
Technical documentation
Eviden provides readily available, easy to use software components, based on next-generation cryptography to secure data and applications in all environments, from the cloud to the edge.
This website provides technical information for technical users, architects to developers.
The documentation is divided by security use cases and then by products.
Security use cases
-
Architecture security of data and applications with a mapping of threats to solutions and a review of common architecture uses cases.
-
Use modern encryption schemes such as:
-
Advanced encryption schemes on client-side encryption (or application level encryption) and server-side encryption:
-
Cosmian Covercrypt: Protect data with the latest post-quantum encryption, access control, and traceable keys.
-
Eviden KMS: Central point of security for managing encryption keys and enabling server-side encryption.
-
-
Alternative encryption schemes
-
Cosmian FPE: Selectively encrypt data while preserving the data format with format-preserving encryption.
-
Anonymizing clear-text data with Cosmian Anonymization
-
-
-
Compute over encrypted data with Eviden's Verifiable Confidential Computing solutions:
-
Solutions based on Confidential Virtual Machine:
-
Solutions based on Intel SGX enclave:
- Eviden Enclave (formerly MSE): protects algorithms and data in the cloud and on 3rd party premises with maximum security.
-
-
Searching encrypted data with Cosmian Findex and Findex server: run encrypted queries on an encrypted index.
Eviden products
- Eviden KMS: A modern, open-source, highly-scalable key management system that is KMIP 1.x/2.x compliant.
- Eviden VM Secure data in any running application in the cloud.
- Eviden AI: Leverage advanced AI models with built-in privacy and security features.
- Eviden Enclave: Protect algorithms and data in the cloud and on third-party premises with maximum security.
- Findex Server: Run encrypted queries on an encrypted index with server-side capabilities.
- KMS Clients: Command-line interface for managing and interacting with Eviden's suite of tools.
If you want to see our technology in action and "play" with it, please visit our Interactive Tutorial
For pricing, check the website
For pricing information, general information on Eviden and its products, please visit our website
All our code is open-sourced on GitHub
All our code is available on GitHub
Chat with us
To chat with our technical team, please join our Discord server
Legal
End User License Agreements
Terms and Conditions
- For Packs
Architecture - Attackers, Threats and Solutions
The first step in understanding how to secure data and applications in a zero-trust environment is to look at potential attackers and their threat model. We assume the application code is safe and that we do not need to protect against the software developer.
| Attacker | Access | Threats |
|---|---|---|
| Passive 3rd party | insider | may get a copy of the disks content |
| Man in the middle | external network | may intercept the data in transit |
| Infrastructure admin. | physical access + network | may externally look at memory, disk contents and network traffic may change hardware or spoof server names, redirect traffic |
| System admin. | OS level access | may access and change memory, disks content and network traffic. may modify the code or run malicious code |
| Application admin. | authorization stack | may escalate privileges to access the data |
Protection against all attackers
Client-side encryption is the only ubiquitous solution that protects against all attackers because data is encrypted by the data owner under its own key before it reaches any of these attackers. Enabling client-side encryption without loss of functionality usually requires a modification to the application and the use of a few Eviden products: Cosmian Covercrypt, Eviden KMS, and possibly Eviden VM and Cosmian Findex.
See the last use case on this page for details.
Protection against a reduced list of attackers
When the threat model is limited to a reduced list of attackers, other solutions may be used. The following table summarizes the solutions that Eviden provides to protect against each attacker.
| Attacker | Solution Name | Eviden Products |
|---|---|---|
| Passive 3rd party | Encryption at rest | Cosmian Covercrypt: post-quantum encryption with access policies Protects against the "Harvest now, decrypt later" risk + limits key leakage |
| Man in the middle | Encryption in transit | TLS |
| Infrastructure admin. | Memory Encryption | Eviden Enclave or Eviden VM: verifiable encrypted memory at runtime |
| System admin. | Sealed Encrypted Memory | Eviden Enclave: verifiable enclaved encrypted memory at runtime that is immutable from the outside (the underlying OS) |
| Application admin. | Covercrypt encryption | Client-side encryption with Cosmian Covercrypt: access policies in user decryption keys prevent the user from decrypting data not authorized by its key |
Use case: move to the cloud
When moving an application for its own users to the cloud, the main threat is the cloud provider itself. It is assumed that the system administrators and the application administrators are trusted.
In that particular case the use of TLS connections to applications running in Eviden VMs with a simple at-rest encryption scheme is sufficient to protect the data and the application from the cloud provider. The Eviden VM integrity is remotely verifiable by the user, preventing the infrastructure administrator from tampering with the VM hardware or software.
Use case: protect code at client's premises (or client's cloud)
When the application code is to be deployed at a client premises (or cloud), and needs to remain secret (such as an AI model), the main threat is the client's system administrator.
Eviden Enclave is the solution that lets the code provider encrypt its code under its own key, deliver it encrypted to the client's system administrator. The encrypted code is then loaded in an enclave with encrypted memory, and before securely provisioning the code encryption key to the enclave, the code provider can then verify that the code is correctly deployed inside the enclave. Check this section for more details.
Use case: a 3rd party SaaS platform running in the cloud
From a user's perspective this is the use case where its data is exposed to all potential attackers: client side encryption will be the answer to protecting its data.
Enabling client-side encryption
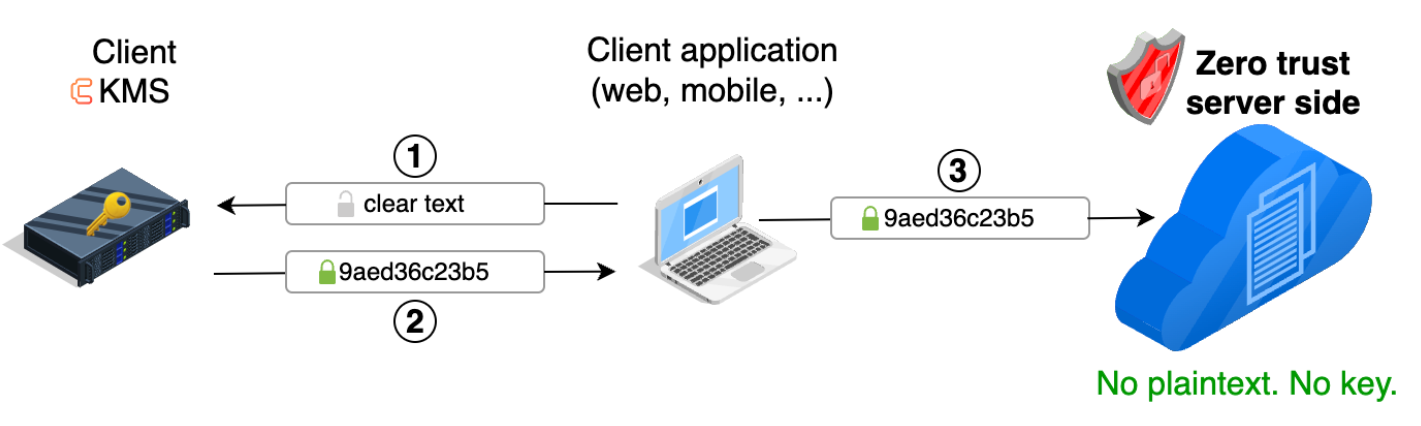
From the SaaS provider perspective, this means making a client-side encryption API available to its users. If the application offers a web interface, the web application will need to be modified to encrypt the data before sending it to the servers. Encryption will require the ability to connect to a KMS from the web application. Performing encryption client-side will require
- either Cosmian javascript (or Dart, or Java, etc.) encryption libraries running client-side with calls to the Eviden KMS server to fetch keys
- or direct encryption/decryption calls to the Eviden KMS which can perform encryption on the fly in a scalable manner.
An example: Google Workspace
Google Workspace is a good example of a SaaS application that offers client-side encryption out of the box. Google made an API available that allows connecting compatible Key Management Systems such as Eviden KMS to encrypting data in the browser.
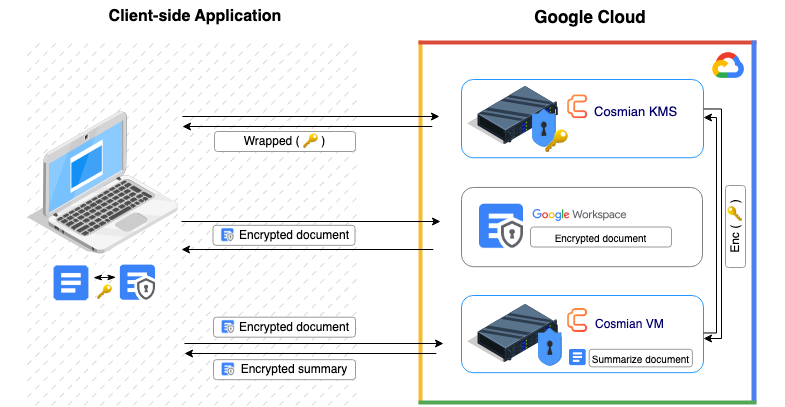
Thanks to Eviden VM, the user does not even have to install its KMS on premise. The KMS can be deployed in an Eviden VM on GCP, which will protect it from Google and its browser can connect to it over a TLS connection.
Likewise, other services, such as document summarization using a language model, can be deployed in an Eviden VM and made available to the user through a web interface. The user's data will be encrypted by the TLS connection to the AI service and will only be available to service in encrypted memory which is protected from Google.
Eviden VM and Eviden KMS are now offered as IaaS services on the marketplaces of all major hyperscalers Azure, AWS and GCP.
- Eviden VM and KMS on AWS Marketplace
- Eviden VM and KMS on Azure Marketplace
- Eviden VM and KMS on GCP Marketplace
SaaS platform: distributing keys between clients
When using client-side encryption in a SaaS platform setting, some users may need to be able to decrypt data from another user that was encrypted with a key that they do not have. This is the case, for example, when a user shares a document with another user. The document is encrypted with the key of the user that created it.
The Eviden KMS offers a key sharing mechanism that allows users to share keys with other users. The key sharing mechanism is based on a standard Public Key Infrastructure (PKI) available in the KMS which offers the ability to wrap a decryption key under the public key of another user. The receiving user can then unwrap the key using its own private key.
The users can safely use the Eviden KMS PKI deployed in the cloud because the KMS does not have access to the private keys of the users.
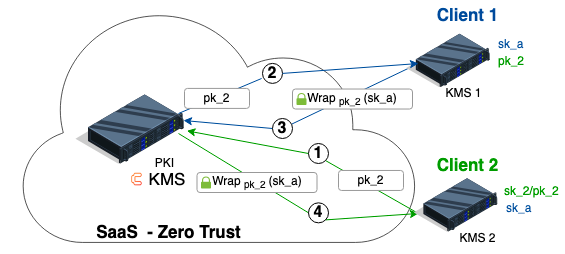
Say Client 1 wants to provide Client 2 with a decryption key sk_a to decrypt data previously encrypted with Covercrypt with Client 1's public key pk_1.
This decryption key is sensitive and should be wrapped under Client 2's public key to be transferred from Client 1's KMS to Client 2's KMS. Since their KMS cannot communicate, the clients are using the Public Key Infrastructure (PKI) built in Eviden KMS to exchange keys.
The typical flow for the distribution of a decryption key is illustrated in the following diagram.
Say Client 1 wants to provide Client 2 with a decryption key sk_a to decrypt data previously encrypted under Client 1's key.
Client 2(the recipient) generates a key pairsk_2/pk_2and publishes its public keypk_2wrapped in a certificate to the SaaS PKI.Client 1recoversClient 2's certificate containingpk_2.Client 1wraps (i.e., encrypts) the decryption keysk_aunder the public keypk_2and publishes the wrapped key in the SaaS PKI.Client 2recovers the wrapped keysk_afrom the SaaS PKI and unwraps it (i.e. decrypts it) using its private keysk_2.
Covercrypt Post-Quantum Encryption with Access Policies
Covercrypt is a post-quantum public key encryption scheme that allows encrypting data for a set of attributes in order to provide fine-grained partitioning.
Covercrypt is being developed in partnership with the ENS cryptographic Lab , has been published at the ESORICS 2023 conference and is being standardized at ETSI. Covercrypt is coded in Rust and the source is available on GitHub.
Unique Decryption Keys with Access Policies
Consider the following 2 policy axes, Department and Country which data are partitioned by the following
attributes:
Department,Finance,Marketing,Human Res.andSalesCountry,France,UK,SpainandGermany
Each pair (Department, Country) constitutes one of the $4^2=16$ data partitions.
When defining the Policy for these partitions, Covercrypt offers the ability to selectively choose which partition is protected by post-quantum cryptography.
With Covercrypt, the encryption key is public. Encrypting systems (A browser, a mobile phone, a Spark process, data engineering applications, ETLs, etc...) do not have to be secured and can directly hold the key, relaxing constraints on the infrastructure. The public key can encrypt for any partition defined by the policy.
Decryption keys can decrypt a subset of the partitions defined by the policy.
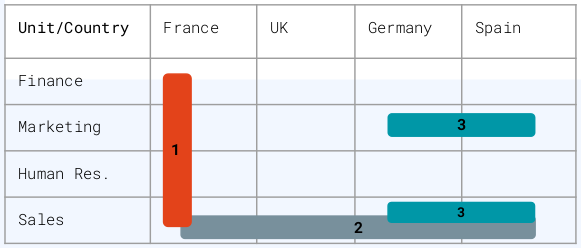
Key 1 can decrypt all the France data with the following access policy:
Country::France
Key 2 can decrypt all the Sales data with the following access policy:
Department::Sales
Key 3 can decrypt the Marketing and Sales data from Spain and Germany with the following access policy:
(Department::Marketing || Department::Sales) && (Country::Spain || Country::Germany )
User keys are truly unique: even though two users have the same access policy, their key fingerprints will be different. This makes it much easier for forensic cyber teams to trace a key leak.
Policy axes can be hierarchical. Suppose three levels on a Confidentiality axis: Medium, Secret,
and Top Secret. This hierarchical axis will let users with a Top Secret attribute in their key access policy
decrypt Medium, Secret, and Top Secret data – whereas users with a Medium attribute will only be able to
decrypt Medium data.
Finally, attributes can be rotated providing forward secrecy on selected partitions only.
The libraries are available in multiple languages to facilitate encryption close to the data source and decryption close to the decryption target, including mobile devices and browsers.
This section describes the Application Level Encryption API, the Encrypted Search API is on this page.
Supported Languages
The application-level encryption scheme is called Covercrypt. It is open-source and written in Rust. For the cryptographic documentation and implementation details, please check its GitHub repository.
Unless low-level programming in Rust, implementers should use Covercrypt through the various cloudproof_xxx user
libraries:
- cloudproof_java: the Cloudproof Java Library,
- cloudproof_js: the Cloudproof Javascript Library,
- cloudproof_python: the Cloudproof Python Library,
- cloudproof_flutter: the Cloudproof Flutter Library.
- cloudproof_spark: the Cloudproof Spark Library.
All these libraries are open-source and available on GitHub
The user libraries all contain extensive tests, and it is highly recommended to start by hacking those tests.
Installing the Libraries
It is possible to create keys using the libraries; however, it is more likely that you will want to store them in a KMS. Please go to the KMS documentation to fetch and run a local KMS.
The library is published on npm: simply install the library in your package.json
npm install cloudproof_js
The library contains web assembly for cryptographic speed
Creating a Policy
A policy defines the space of rights that are used for encryption. It is composed by a set of axes that contain attributes.
For example, the following two axes are divided into four attributes and define a policy:
Department:Finance,Marketing,Human Res.,SalesCountry:France,UK,Spain,Germany
A combination of axis attributes is associated to a partition. For example
Department::Finance && Country France points to a valid partition under the above
policy.
An access policy is defined by a set of partitions. It can be written as a boolean expression of axis attributes:
(Department::Marketing || Department::Sales) && Country::France
In the following demo, we will create a policy that combines two axes, a
security level, and a department. A user will be able to decrypt data only
if it possesses a key with a sufficient security level and the correct
department.
Policy Axes
Security Level Axis:
The first policy axis is the Security Level. It is hierarchical and is
composed of 3 levels: Protected, Confidential, and Top Secret. Since this
axis is hierarchical, when a user is granted access to a given level, it is
granted access to all lower levels. The attributes must be provided in
ascending order.
Department Security Axis:
The second policy axis is the Department axis. It is composed of 3 values:
HR, MKG, and FIN. This axis is not hierarchical: granting access to an
attribute of this axis to a user does not give access to any other attribute.
Hybridization
Covercrypt offers the possibility to hybridize the classic asymmetric scheme with the winner of the NIST post-quantum algorithm selection process: Kyber. Hybridization can be applied with granularity since it is specified at the attribute level. A partition corresponding to a combination of attributes with at least one hybridized attribute is hybridized. Any data encrypted for a hybridized partition will result in a hybridized ciphertext.
Rotations
Rotations allow to refresh the value of a given partition. The maximum number of creations of partition values is set in the policy.
Generating the Master Keys
The master authority possesses the master key pair:
- a master secret key which is used to generate user keys;
- and a public key which is used for encryption. Since it cannot decrypt, the public key can be freely distributed to encrypting systems.
Keys can be generated locally using the WASM code
Encrypting Data
Data is encrypted using the Public Key and an encryption policy that determines the target partitions of the ciphertext.
Anyone who has access to the Public Key can encrypt data, however, only users possessing user keys with the right access policy can decrypt the ciphertext.
A Covercrypt ciphertext is the concatenation of an encrypted header and an encrypted content.
- The encrypted content is a plaintext symmetrically encrypted using an ephemeral secret key (i.e. a random key generated on the fly).
- The header is the encapsulation of the ephemeral key for a given encryption policy, concatenated with some optional metadata. The metadata, if present, is symmetrically encrypted using the same ephemeral key.
Header and encrypted content can be generated separately using the various APIs. Check the inline documentation of the various languages and the test suites for details.
The code below shows the encryption of 3 messages with 3 different encryption policies targeting 3 different partitions.
Encrypting data is done using the encrypt() function which calls the WASM function.
Generating User Decryption Keys
User Decryption Keys are generated from the Master Private Key using access policies.
Let us create 2 users with different access policies to illustrate their effect.
User Decryption Keys can be generated by calling the local WASM
Decrypting Ciphertexts
The confidential marketing user can successfully decrypt a protected marketing message:
.. however, it can neither decrypt a marketing message with higher security:
... nor decrypt a message from another department even with lower security:
As expected, the top-secret marketing financial user can successfully decrypt all messages
Rekeying keys
At any time the Master Authority can generate new keys for any access policy.
When that happens future encryption of data for a given access policy cannot be decrypted with keys that have not been "refreshed".
It is best to perform rekeying using the KMS to automatically refresh each user key if it is active in the KMS (the key has not been revoked).
rekeying all keys having access to "Department::MKG"
This operation will rekey all keys with access to Department::MKG.
It is also possible to rekey all keys with a precise access policy like Department::MKG && Security Level::Protected.
You successfully rekeyed the master keys and all active user keys with access to marketing data.
See more
See more
creating a new confidential marketing message
decrypting the messages with the re-keyed key
The automatically re-keyed confidential marketing user key can still decrypt the "old" protected marketing message, as well as the new confidential marketing message.
Pruning keys
After a rekey operation, the affected keys will store both the old and the newly generated subkeys to be able to decrypt old and new ciphertexts. If you only need access to the new ciphertexts, you can save space by pruning these keys.
By performing the pruning operation using a KMS, the active user keys will be automatically synced with the master keys.
WARNING: This operation will permanently remove access to old ciphertexts for the pruned access policy.
pruning all keys having access to "Department::MKG"
The master and user keys will only keep the latest subkeys associated to the access policy Department::MKG.
Pruned keys will only be able to decrypt ciphertexts generated after the last rekey operation for the corresponding access policy.
Policy editing
The Policy in use by a KMS can be modified on the fly through various operations:
-
Rename attributes: purely visual modification of the Policy.
-
Add new attributes to an existing Policy dimension. ONLY supported by unordered dimension.
-
Disable attributes: soft removal of an attribute, prevents the encryption of new messages for this attribute while keeping the ability to decrypt existing ciphertexts.
-
Remove attributes: will permanently remove the ability to use this attribute in both encryptions and decryptions. ONLY supported by unordered dimension.
The masters keys and users keys will automatically be updated accordingly by the KMS.
Rename attributes
Specify the existing attribute Dimension::Name and the desired name for the attribute NewName.
The resulting attribute will be Dimension::NewName.
rename attribute "MKG" to "Marketing"
The rename operation is purely visual and will not impact the existing user keys and ciphertexts.
From now on, be sure to use the new attribute name when encrypting data or issuing new user keys. New messages can still be decrypted by marketing user keys created before the renaming and vice versa.
Add attributes
Add a new attribute to an unordered dimension, specify the attribute to create with Dimension::Name and whether to use hybridized keys.
add new attribute "Department::R&D"
Create a non-hybridized attribute R&D in the existing dimension Department.
The newly added attribute can be used to encrypt and generate keys as seen previously.
See more
See more
encrypt a message for the newly created attribute
This message will be readable by users with access to the R&D department and the security level protected or above.
generate a user key with access rights for this attribute
This user can decrypt messages from the R&D department OR the financial department, with a security level of confidential or below:
the new user key can decrypt the R&D message
Disable attributes
Remove the ability to encrypt new message for an existing attribute using the KMS. Existing messages associated to the disabled attribute will remain readable.
disable attribute "Department::R&D"
Prevent the generation of new R&D messages while keeping access to existing ones.
Encryption of new R&D messages is no longer possible.
Remove attributes
Completely removes an attribute from the policy and from all associated keys in the KMS.
WARNING: Encryption and decryption for this attribute will no longer be possible after this operation. We strongly recommend to make a local copy of the master secret key beforehand, otherwise messages whose encryption policy does not contain any other attributes belonging to the dimension of the deleted attribute will be lost.
remove "Department::R&D"
All user keys in the KMS associated with this attribute will automatically loose the ability to decrypt for this attribute.
Ciphertexts for which the only Department access was R&D are now unreadable by all KMS keys.
The Whole Code
The code used in this documentation as well as more examples can be found for each library:
If you want to see full code of usage of cloudproof_js, please check the examples directory in Github.
Format Preserving Encryption
Format Preserving Encryption (FPE) is a cryptographic technique standardized in NIST SP 800-38G specification that allows the encryption of data while preserving its original format or structure. Unlike traditional encryption methods that transform data into ciphertext with a different format, FPE ensures that the encrypted output maintains the same format as the original input, such as preserving the length, character set, and other specific formatting requirements.
The purpose of Format Preserving Encryption is to provide confidentiality for sensitive data while minimizing the impact on applications or systems that rely on the original data format. This technique finds applications in scenarios where data format constraints are critical, such as databases, legacy systems, or data interchange processes.
FPE-FF1, the underlying cryptographic primitive, is a normalized algorithm that uses symmetric encryption, but it's not as fast or secure as standardized symmetric (or public key) encryption methods like AES or ChaCha. It should only be used where the format of the ciphertext container is constrained (e.g., a fixed database schema that cannot be changed).
Features
Cosmian FPE implementation supports the encryption of strings, floats and big integers.
In order to keep the format of the input plaintext, the alphabet used for plaintext must be specified.
There are multiple pre-defined alphabets available:
alpha-> abcdefghijklmnopqrstuvwxyzABCDEFGHIJKLMNOPQRSTUVWXYZalpha_lower-> abcdefghijklmnopqrstuvwxyzalpha_upper-> ABCDEFGHIJKLMNOPQRSTUVWXYZnumeric-> 0123456789hexa_decimal-> 0123456789abcdefalpha_numeric-> 0123456789abcdefghijklmnopqrstuvwxyzABCDEFGHIJKLMNOPQRSTUVWXYZchineselatin1suplatin1sup_alphanum
These alphabets can easily be extended with any character.
Implementations and quick start
The FPE techniques are open-source and written in Rust. For the cryptographic documentation and implementation details, please check its GitHub repository.
Unless low-level programming in Rust, implementers should use those techniques through the various Cloudproof user libraries:
- cloudproof_js: the Cloudproof Javascript Library,
- cloudproof_python: the Cloudproof Python Library,
All these libraries are open-source and available on GitHub
The user libraries all contain extensive tests, and it is highly recommended to start by hacking those tests.
Setup
The library is published on npm: simply install the library in your package.json
npm install cloudproof_js
The library contains web assembly for cryptographic speed
Encrypting integers
The most common example when using FPE is the encryption of credit card numbers. Here the alphabet numeric is used (characters of this alphabet being 0123456789) as follows:
When encrypting integers, the important parameters are radix and digits.
radixis the base of the number representation (must be between 2 and 16 inclusive)digitsis the maximum number of digits in the representation. A value of 10 will limit the ciphertext output size to 10.
Also, integers must be passed as string
Here are various examples for integers encryption:
Encrypting chinese plaintexts
Using the chinese alphabet can be done as follows:
Encrypting using a custom alphabet
Data Anonymization
Data anonymization is the process of transforming data in such a way that it can no longer be used to identify individuals without the use of additional information. This is often done to protect the privacy of individuals whose data is being collected or processed.
Anonymization techniques can include removing identifying information such as names and addresses, replacing identifying information with pseudonyms, and aggregating data so that individual data points cannot be distinguished. It's important to note that while anonymization can reduce the risk of re-identification, it is not foolproof and must be used in conjunction with other security measures to fully protect personal data.
Features
Cosmian anonymization provides multiple methods:
-
Hashing: transforms data into a fixed-length representation that is difficult to reverse and provides a high level of anonymity.
-
Noise Addition: adds random noise to data in order to preserve privacy. Support various types of noise distributions to
float,integer, anddate. -
Word Masking: hides sensitive words in a text.
-
Word Pattern Masking: replaces a sensitive pattern in text with specific characters or strings. Supports Regex.
-
Word Tokenization: removes sensitive words from text by replacing them with tokens.
-
Number Aggregation: rounds numbers to a desired power of ten. This method is used to reduce the granularity of data and prevent re-identification of individuals.
-
Date Aggregation: rounds dates based on the specified time unit. This helps to preserve the general time frame of the original data while removing specific details that could potentially identify individuals.
-
Number Scaling: scales numerical data by a specified factor. This can be useful for anonymizing data while preserving its relative proportions.
-
Format preserving encryption: encrypts data preserving its format.
Implementations and quick start
The data anonymization techniques are open-source and written in Rust. For the cryptographic documentation and implementation details, please check its GitHub repository.
Unless low-level programming in Rust, implementers should use those techniques through the various Cloudproof user libraries:
- cloudproof_java: the Cloudproof Java Library,
- cloudproof_js: the Cloudproof Javascript Library,
- cloudproof_python: the Cloudproof Python Library,
- cloudproof_flutter: the Cloudproof Flutter Library.
All these libraries are open-source and available on GitHub
The user libraries all contain extensive tests, and it is highly recommended to start by hacking those tests.
Setup
The library is published on npm: simply install the library in your package.json
npm install cloudproof_js
The library contains web assembly for cryptographic speed
Hashing
The goal of hashing techniques for data anonymization is to transform sensitive or personally identifiable information (PII) into a fixed-length string of characters, called a hash value, while preserving the privacy and confidentiality of the original data. Hashing is a one-way process, meaning that it is computationally infeasible to reverse-engineer the original data from the hash value.
The supported hashing algorithms are SHA2, SHA3 and Argon2:
- SHA-2: SHA-2 consists of multiple hash functions, including SHA-224, SHA-256, SHA-384, SHA-512, SHA-512/224, and SHA-512/256. These functions use the Merkle-Damgård construction and operate on a block size of 512 bits. They employ different combinations of logical functions, such as bitwise logical operations, modular addition, and logical rotation.
- SHA-3: SHA-3 is a cryptographic hash function primarily designed for data integrity, digital signatures, and message authentication codes. It takes an input of any length and produces a fixed-length hash value.
- Argon2: Argon2 is a password hashing function that is specifically designed for secure password storage. It aims to protect against password cracking attacks, such as brute-force and dictionary attacks, by incorporating memory-hardness and resistance to parallel computation.
In JavaScript, the hasher object needs to be instantiated with a specified algorithm and then call the method apply.
Noise addition
The goal of the Noise Addition technique for data anonymization is to introduce random noise or perturbation to sensitive data to preserve privacy while still allowing for meaningful analysis or processing. Noise addition helps protect the confidentiality of individual records by obscuring specific details while preserving the statistical properties and patterns of the dataset.
Three noise distributions are supported:
- Laplace: The Laplace distribution, also known as the double-exponential distribution, is characterized by its peakiness around the mean and its exponential decay in the tails. It is often used to model data with heavy-tailed or skewed distributions.
- Gaussian (Normal): The Gaussian distribution, also known as the normal distribution, is a symmetric bell-shaped distribution. It is one of the most widely used distributions in statistics and probability theory, often employed to model data that is normally distributed or approximately so.
- Uniform: The uniform distribution is a probability distribution where all values within a specified range are equally likely. It forms a rectangle-shaped distribution with a constant probability density function (PDF) over the range.
The noiser object needs to be instantiated with a specified distribution and then call the method apply.
Either mean and standard deviation can be specified:
Or minimum or maximum bounds can be specified:
Noise can be added with correlated information and apply_correlated function as follows:
Word Masking
The purpose of the Word Masking technique in data anonymization is to protect sensitive information by replacing specific words or terms with more generic or generalized placeholders. This technique is commonly applied to text data, such as documents, emails, or chat logs, where preserving privacy is crucial while maintaining the overall meaning and context of the text.
Word Pattern Masking
Word Pattern Masking technique is similar to Word Masking but using a Regular Expression (RegEx).
Word Tokenization
Word tokenization involves splitting a given text or document into its constituent words, and then replace specific sensitive words.
Number Aggregation
The purpose of the Number Aggregation technique in data anonymization is to group or summarize numerical data to protect individual privacy while preserving the overall statistical properties and trends of the dataset. This technique is commonly applied to datasets containing sensitive numerical information, such as income, age, or medical measurements.
Date Aggregation
The purpose of the Date Aggregation technique is similar to the Number Aggregation technique.
Number Scaling
Data Scaling, also known as feature scaling or normalization, is a preprocessing technique used to standardize or transform numerical data to a common scale. The purpose of Data Scaling is not specifically related to data anonymization but rather to ensure that features or variables have similar ranges or distributions, which can benefit various data analysis and machine learning tasks. It aims to address issues that may arise when variables have different scales or units, which can impact the performance and accuracy of algorithms.
Format Preserving Encryption
Format Preserving Encryption (FPE) aims to encrypt plaintext while retaining its format (alphabet). FPE-FF1 is a normalized algorithm that uses symmetric encryption, but it's not as fast or secure as standardized symmetric (or public key) encryption methods like AES or ChaCha. It should only be used where the format of the ciphertext container is constrained (e.g., a fixed database schema that cannot be changed).
FPE can be applied to string, specifying an alphabet. Characters of the plaintext that belong to the alphabet are encrypted while the others are left unchanged at their original location in the ciphertext.
FPE can be applied to int or float, specifying radix and digits parameters:
Anonymization application flow
To facilitate the usage of these anonymization techniques, we offer advanced tools that simplify the process of anonymizing datasets.
Python package
Utilizing the cosmian-anonymization Python package, anonymize a dataframe based on a specified configuration stored in a JSON file. This file defines the techniques to be applied to each column along with specific parameters. The JSON configuration file adheres to a specific format and can be generated through the provided user interface (UI).
The library is available on PyPI:
pip install cosmian-anonymization
UI generating configuration
This user interface (UI) is crafted for constructing JSON configuration files, subsequently parsed by the Python cosmian-anonymization package. Choose the appropriate technique and parameters for each column in a given data sample, and easily download the configured JSON file.
The UI is available on GitHub, and can be run locally.
Verifiable Confidential Computing
Eviden Enclave and Eviden VM are solutions to compute over data
- that keeps data encrypted at all times, even when in use
- and that can be remotely verified at any time, i.e., that a correct non-tampered application is currently running in encrypted memory.
In other words, these solutions ensure that you know what processes your data, and that the data is always encrypted.
Both of these solutions
- have low performance overhead compared to processing in clear text,
- do not require modifications to existing software,
- provide real-time remote verifiability of the hardware environment and the running software
- can run either on the cloud or on-premise.
- are remotely administered and verified using simple CLI tools provided by Eviden
- do not require external key management while in use
Security Models and Use Cases
The two solutions protect applications and data against malicious infrastructure providers (cloud administrators, third-party premises administrators, etc...) that can have physical access to the machine.
- Eviden Enclave is a solution that provides additional protection against the system administrator of the machine, i.e. someone with operating system level access. Eviden Enclave is a sealed secured environment best-suited for scenarios where the provider of the application code - or its parameters such as a neural network - wants to protect its intellectual property from the system administrator. This is typically the case of collaborative confidential computing scenarios where the code provider wants to deploy its code (or its parameters) on a system administered by a third party, such as the data provider.
- Eviden VM provides additional flexibility and performance and is appropriate for scenarios where the running code does not have to be protected against the system administrator. This is typically the migration of an on-premise application to the cloud, or the security upgrade of an on-premise application to allow it to process data with increased confidentiality.
| Solution | Infra. Admins (physical access) | Sys. Admins (OS access) | Use Cases |
|---|---|---|---|
| Eviden Enclave | No access to data or code | No access to data or code | Collaborative confidential computing, code protection |
| Eviden VM | No access to data or code | Access | Move to cloud, security upgrade of on-premise apps |
Note: it is possible to "seal" an Eviden VM by shutting down all operating system level access to the VM (such as the SSH daemon)
Eviden Enclave
Please check the dedicated documentation at Eviden Enclave
Eviden VM
Please check the dedicated documentation at Eviden VM
Summary Comparison of Eviden Enclave and Eviden VM
| Feature | Eviden Enclave | Eviden VM |
|---|---|---|
| Memory encryption | Yes | Yes |
| Remote verifiability | Yes | Yes |
| Remote code deployment | Yes (Python ASGI) | No |
| Offline encrypted code deployment | Yes | No |
| Protection against | Infra. Admins + Sys. Admins | Infra. Admins |
| Required hardware | Intel SGX | Intel TDX or AMD-SEV-SNP |
| Cloud providers availability | Azure, OVH | AWS, Azure, GCP, OVH |
| Applications type | Python, Singularity containers | Any application |
| Code modification | None | None |
| Performance overhead | ~+20% | ~+10% |
| Re-usability of OS images | No | Yes |
| Attack Surface | Small | Large |
These solutions are now available as IaaS on all the major cloud providers.
Search encrypted data
Building an index is required to search an encrypted database without having to decrypt it entirely. However, this index can also contain sensitive data and thus need to be encrypted before it can be outsourced to a Zero-Trust such as a public cloud.
Cosmian Findex is a Searchable Encryption scheme that allows building and securely retrieving information from an encrypted index.

A detailed functional description of Findex is available in its functional documentation.
Implementations
The Findex library provides a Rust implementation of the Findex algorithm. This implementation is storage-technology agnostic. This means that in order for Findex to use a given storage (e.g. a database), all it needs is a Rust implementation of the Findex DB interface on top of this storage.
Two implementations of Findex are available:
- using Cloudproof Rust library which exposes binding for other languages
- using Findex server that provides a HTTP server offering REST API.
The current documentation focuses on the Cloudproof Rust library.
The Cloudproof Rust library provides:
- implementations of the Findex DB interface for some popular databases;
- a wrapper that allows easily instantiating Findex using a selected DB interface;
- bindings to other languages (FFI/WASM/Python).
The other Cloudproof libraries build easy-to-use abstractions on top of these bindings to allow users to use the Findex API and to implement a custom Findex DB interface from languages such as JavaScript, Python or Java. See the section on DB interface implementation to know more about how to code, select and instantiate Findex with a given DB interface.
All those libraries are open-source and contain extensive tests. It is highly recommended to start by hacking some of those tests.
Using Findex using the REST DB interface
The REST DB interface relies on a DB server implementing the Findex REST API.
Setup
The library is published on NPM: simply install the library in your package.json.
npm install cloudproof_js
The library is based on WASM for speed.
Instantiating Findex
Findex relies on the user to provide it with:
- the private key;
- the public label.
These are used to encrypt the index before it is sent to the DB for storage. See the security documentation to know more about the cryptographic algorithms used.
The REST DB interface requires an additional parameter: the server URL. A different server can be used for the two Findex tables. If only one URL is provided, it is used for both tables.
The complete example can be found in the JavaScript tests.
import { Findex, } from "cloudproof_js"

const key = randomBytes(16)
const label = 'hello, world!'
const url = 'http://localhost:8080'

const findex = new Findex(key, label)

// Instantiating an interface is performed in a dedicated step in JS since
// it is an asynchronous one.
await findex.instantiateRestInterface(serverUrl)
Adding and deleting associations to and from the index
Adding associations to the index
Populating the index is done using the add API. It takes as argument a list
of associations that map values to sets of keywords. Each value passed as input
can then be retrieved by searching for any associated keyword.
This API returns the keywords that have been added to the index (meaning that no value where associated to these before).
The following snippet indexes the data 1337 under the keywords "John" and
"Doe".
await findex.add([
  {
    indexedValue: Location.fromNumber(1337),
    keywords: ["John", "Doe"],
  }
])
It is also possible to index keywords under other keywords. Indexing keywords under other keywords can be seen as building a graph where nodes represent keywords and contain the data associated to them and a directed vertex from a node "A" to a node "B" represents "B" being indexed under "A".
In the following example the ID "0xA43C" represents John Doe. It is indexed under both "John" and "Doe" such that a search for either "John" or "Dow" would find the results indexed under this ID.
await findex.add([
  {
    indexedValue: Keyword.fromString("0xA43C"),
    keywords: ["John", "Doe"],
  }
])
Deleting associations from the index
Similarly to the add operation, the delete operation takes associations as
argument. Instead of removing these associations from the index, it adds their
negation. No association added before its negation was indexed can be found
during a search.
The consequence is that the index size increases during this operation. The compact operation collapses negated associations, which allows deflating the index size.
Searching the index
The input of the search API is a set of keywords to search for, and an
optional interrupt function.
It searches the index for all values indexed under the given keywords. If new
keywords are found, the interrupt is called with all found values (both data
and keywords). If it returns true, the search process is interrupted and the
function returns with the data found so far, otherwise the index is searched
for the keywords found in the previous search operation.
The result of the search is a map of the searched keywords to a set containing the data directly associated to them, the data associated to a keyword that is associated to them etc.
In the following example, the index is searched for "Mar". When provided, the
interrupt stops the search after more than 10 results have been found.
// Search without interruption.
const results = await findex.search(["Mar"])

// Search with interruption.
let searchCounter = 0
const filteredResults = await findex.search(
    ["Mar"],
    async (results: IntermediateSearchResults) => {
        searchCounter += results.total()
        return 10 <= searchCounter
    }
)
Compacting the Index
The compact operation allows to:
- collapse negated associations;
- increase the index density;
- remove obsolete data;
- remove keywords not associated to any value (which can happen if all of them where negated values or obsolete data);
- reset any knowledge gained by an attacker watching index requests. This gives a lower bound on the frequency of the compact operation allowing to maintain the safety of index (see the Findex security documentation).
The compact operation takes as argument:
- The new key and a new label used to encrypt the index. At least one of them needs to be different from the old key and old label.
- The compacting rate, which is a float between 0 and 1 and determines how many
compact operations (
1/compacting_rate) would allow to compact the index entirely. - An optional filter that it is called on all the data found during the compact operation and allows to filter out data that does not need to be indexed back (only the data that is returned from the filter is present in the compacted version of the index).
In the following example, the index is entirely compacted in one operation
using the old key and a new label, and the data Location(1337) is removed
from the index.
The JavaScript binding for the compact operation is not available yet.
Using Findex with other DB interfaces
The following figure describes the relationship between the user code, Cloudproof Rust, Findex and the DB interface.
+-----------------------------------------------------------------+
| +-----------------------------------------+                     |
| |  +-------+   +------+         +-----+   | //                  |
| |  | Redis |   | HTTP |   ...   | FFI |   | // DB interfaces    |
| |  +-------+   +------+         +-----+   | //                  |
| +-----------------------------------------+                     |
| |             Findex instance             |                     |
| +-----------------------------------------+                     |
|              ^                ^                                 |
|              |                |                                 |
|      +---------------+      Findex                              |
|      | Configuration |       API                                |
|      +---------------+        |                                 |
|              |                v                                 |
|           ------------------------                              |
|          /           |            \                             |
|     +-----+      +------+     +--------+     //                 |
|     | FFI |      | WASM |     | Python |     // User interface  |
|     +-----+      +------+     +--------+     //                 |
|                                                                 |
+-----------------------------------------------------------------+
|                         Cloudproof Rust                         |
+-----------------------------------------------------------------+
                                 ^
                                 |
                                 v
+-----------------------------------------------------------------+
|           Cloudproof Js/Python/Java/Flutter (optional)          |
+-----------------------------------------------------------------+
                                 ^
                                 |
                                 v
+-----------------------------------------------------------------+
|                            User Code                            |
+-----------------------------------------------------------------+
The user code calls Cloudproof Rust (directly or using a binding from one of the other Cloudproof libraries) to instantiate a Findex. It provides the configuration with the required information (which depends on the targeted DB interface). Cloudproof Rust instantiates the selected DB interface and a Findex object on top of it, which can then be used by the client code through the Findex API.
Available Rust implementations of the Findex DB interface
The following Findex DB interfaces are implemented in Cloudproof Rust:
- REST: interface relying on a server implementing the Findex REST API. It is called by passing the URL of the server to the configuration. It can be identical for the Entry Table and the Chain Table.
- SQLite: called passing a path for the Entry Table and Chain Table. The
path can be identical since a dedicated SQL table (
entry_tableresp.chain_table) is created in the SQLite DB at the given path. - Redis: called passing a Redis URL for the Entry Table and the Chain table in the configuration. The URL can be identical since the tokens are prefixed with an identifier allowing to determine which DB they belong to.
- Custom: each language that exports the Findex API offers the possibility to provide an custom DB interface implementation. It is called by passing the implementation of the Findex DB interface for the Entry Table and for the Chain Table. The following section describes in details how to implement this interface in different languages.
Implementing the Findex DB interface
The DB interface needs to be implemented for:
- the Entry Table;
- the Chain Table.
To understand why two tables are used, see the functional documentation. What is important to know here is that these two tables are simple key/value stores, and that the Entry Table keys and the Chain Table keys are collision free. This means that a single key/value store can be used for both of them, as long as the Entry Table keys can be retrieved for the compact operation.
The following section describes the requirement of each function from the Findex DB interface and the following table describes which function from the Findex DB interface (the columns) needs to be implemented in order to use a function from the Findex API (the rows).
          +-----------+-----------+-----------+-----------+---------------+
          | `fetch`   | `upsert`  | `insert`  | `delete`  | `dump_tokens` |
+---------+-----------+-----------+-----------+-----------+---------------+
| search  |  ET + CT  |           |           |           |               |
+---------+-----------+-----------+-----------+-----------+---------------+
| add     |  ET + CT  |     ET    |    CT     |           |               |
+---------+-----------+-----------+-----------+-----------+---------------+
| delete  |  ET + CT  |     ET    |    CT     |           |               |
+---------+-----------+-----------+-----------+-----------+---------------+
| compact |  ET + CT  |           |  ET + CT  |  ET + CT  |       ET      |
+---------+-----------+-----------+-----------+-----------+---------------+
Fetch
The fetch function takes as argument a list of keys. It returns the list of key/value pairs of each key for which a value was found. The keys that didn't match any value should not be returned.
It is needs to be implemented for the both tables, for each Findex operation.
Implementation of the fetch function for an in-memory DB. The complete implementation can be found in the Cloudproof Js library.
const fetch= async (
  uids: Uint8Array[],
  table: Map<string, Uint8Array>,
): Promise<Index[]> => {
  const results = []
  for (const k of uids) {
    const v = table.get(k.toString())
    if (v !== undefined) {
      results.push(new Index(k, v))
    }
  }
  return results
}
Upsert
This is the most difficult function to implement since it is in charge of ensuring the concurrence safety of the index.
It takes as argument a list of old key/value pairs and a list of new key/value pairs. For each new key, it performs the following operation atomically:
If the current value stored under this key equals the old value given for this key, replace the current value with the new value. Otherwise, if the current value is not defined, return an error. Otherwise stack the current key/value pair for return.
The returned value is therefore the map of current key/value pairs for which the corresponding old key/value pair was different. If no conflict happened nothing should be returned.
It needs to be implemented for the add and delete Findex operations for the
Entry Table only.
Implementation of the upsert function for an in-memory DB. The complete implementation can be found in the Cloudproof Js library.
const upsert = async (
  oldValues: UidsAndValues,
  newValues: UidsAndValues,
  table: Map<string, Uint8Array>,
): Promise<UidsAndValues> => {
  const rejected = [] as UidsAndValues

  // Add old values in a map to efficiently search for matching UIDs.
  const mapOfOldValues = new Map()
  for (const { uid, value } of oldValues) {
    mapOfOldValues.set(uid.toString(), value)
  }

  for (const { uid, value: newValue } of newValues) {
    const currentValue = table.get(uid.toString())

    if (currentValue?.toString() === mapOfOldValues.get(uid.toString())?.toString()) {
      table.set(uid.toString(), newValue)
    } else if (currentValue === undefined) {
      throw new Error(
        "Rust shouldn't send us an oldValue if the table never contained a value… (except if there is a compact between)",
      )
    } else {
      rejected.push({ uid, value: currentValue })
    }
  }
  return rejected
}
Insert
It takes as input a list of key/value pairs. It stores each pair and returns. An error should be returned if there already was a value for any given key.
It needs to be implemented for the add, delete and compact Findex
operations for the Chain Table and for the compact operation only for the
Entry Table.
Implementation of the insert function for an in-memory DB. The complete implementation can be found in the Cloudproof Js library.
const insert = async (
  links: UidsAndValues,
  table: Map<string, Uint8Array>,
): Promise<void> => {
  for (const { uid: newUid, value: newValue } of links) {
    table.set(newUid.toString(), newValue)
  }
}
Delete
It takes as argument a list of keys. It removes all values stored for those keys from the DB.
It needs to be implemented for both tables for the compact Findex operation
only.
The JavaScript binding for the compact operation is not available yet.
Dump tokens
It returns all keys stored in the Entry Table.
The JavaScript binding for the compact operation is not available yet.
Instantiating Findex with a custom DB interface
Given that the required functions have been implemented, Findex can then be instantiated with a custom DB interface.
await loadWasm()

const entryTable: Map<string, Uint8Array> = new Map()
const chainTable: Map<string, Uint8Array> = new Map()

const entryInterface = new DbInterface()
entryInterface.fetch = async (uids: Uint8Array[]) => {
    await fetch(uids, entryTable)
}
entryInterface.upsert = async (oldEntries: UidsAndValues,
                               newEntries: UidsAndValues) => {
    await upsert(oldEntries, newEntries, entryTable)
}

const chainInterface = new DbInterface()
chainInterface.fetch = async (uids: Uint8Array[]) => {
    await fetch(uids, chainTable)
}
chainInterface.insert = async (links: UidsAndValues) => {
    await insert(links, chainTable)
}

const findex = new Findex(key, label)
findex.instantiateCustomInterface(entryInterface, chainInterface)
Eviden KMS
Cosmian has become part of Eviden. The Cosmian KMS is now the Eviden KMS.
The Eviden KMS is a high-performance, source available, FIPS 140-3 compliant server application written in Rust with unique capabilities.
High-scale, secure encryption, anywhere
- High-performance: Delivers encryption and decryption services at up to millions of operations per second, with master keys held in a secure HSM-backed environment.
- Flexible pricing: Per-CPU pricing with no hidden costs, all connectors are included; deploying any number of servers.
- Runs securely in public clouds: or zero-trust environments using Eviden VMs available on Azure, GCP, and AWS marketplaces. See our deployment guide.
Standards' compliance
- FIPS 140-3 mode
- KMIP support (versions 1.0-1.4, 2.0-2.1) in both binary and JSON formats - see KMIP documentation.
- HSM support for Trustway Proteccio & Crypt2Pay, Utimaco general purpose, Nitrokey HSM 2, Smartcard HSMs, etc. with KMS keys wrapped by the HSM.
- Developed in Rust, a memory safe language, with the source code available on GitHub.
- 100% developed in the European Union.
Modern technology
- Source Available server application written in Rust
- Full-featured Web UI with client command line and graphical interface
- Advanced authentication mechanisms
- High-availability mode with simple horizontal scaling
- Multi-language client support: Python, JavaScript, Dart, Rust, C/C++, and Java (see the
cloudprooflibraries on Cosmian GitHub) - Advanced logging with OpenTelemetry
Integrations
- Cloud integrations:
- Azure BYOK
- GCP CSEK and Google CMEK
- AWS BYOK and AWS Fargate
- ...
- Azure BYOK
- GCP CSEK and Google CMEK
- AWS BYOK and AWS Fargate
- ...
- Workplace security:
- Transparent data encryption:
- Disk encryption:
- Storage encryption:
- Big Data:
- Infrastructure as Code:
- Terraform / OpenTofu Provider — manage keys, certificates, and access rights as code (Terraform Registry)
- Other integrations:
- FortiGate / FortiOS
- S/MIME email encryption
- OpenSSH
- GnuPG: OpenPGP keys — OpenPGP (RFC 4880 / RFC 9580 v4) key create, import, export, encrypt, decrypt, sign and verify via KMIP
PGPKeyobjects (non-FIPS builds) — and GnuPG smartcard (gnupg-pkcs11-scd) - SPIRE / SPIFFE (Zero-Trust M2M)
- HSM integrations:
Three-in-one: Key lifecycle management + Encryption oracle + Public key infrastructure
The Eviden KMS combines the functions of a Key Management System, an Encryption Oracle, and a Public Key Infrastructure:
- Key Management System: Manages the full key lifecycle, including on-the-fly generation and revocation, including for connected HSMs.
- Encryption Oracle: Provides high-availability, high-scalability encryption and decryption operations at millions of operations per second with HSM-backed security.
- PKI: Manages root and intermediate certificates, signs and verifies certificates, and uses public keys for encryption/decryption. Certificates can be exported in various formats (including PKCS#12) for applications like S/MIME encrypted emails.
The Eviden KMS supports all standard NIST cryptographic algorithms as well as advanced post-quantum cryptography algorithms like Covercrypt. See the complete supported algorithms list.
Deployment options
The Eviden KMS is available as:
- Linux packages: Debian or RPM
- Windows installer: Windows
- macOS installer: macOS
- Docker: Standard image and FIPS image
User Interface
The Eviden KMS includes an intuitive graphical user interface (GUI) with support for client certificate and OIDC token authentication.
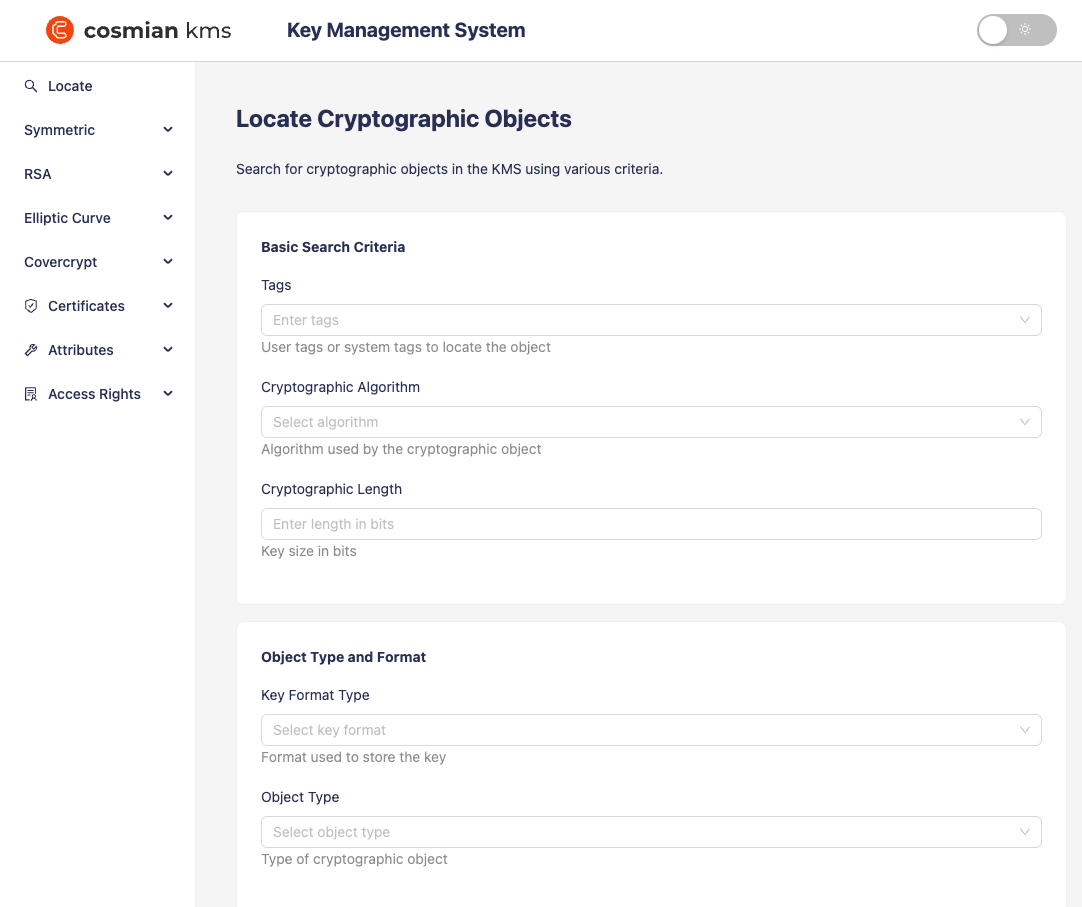
The UI can be fully customized to match your organization's branding.
Client CLI
The KMS CLI provides a powerful command-line interface for managing the server, handling keys, and performing encryption/decryption operations. It features integrated help and is available for multiple operating systems.
The KMS CLI is packaged as:
- Debian or RPM package
- Pre-built binaries for Linux, Windows, and macOS
Quick start
To quick-start an Eviden KMS server on http://localhost:9998 that stores its data
inside the container, run the following command:
docker run -p 9998:9998 --name kms ghcr.io/cosmian/kms:latest
To run a KMS where the database will survive restarts, run:
docker run -p 9998:9998 --name kms --volume cosmian-kms:/cosmian-kms ghcr.io/cosmian/kms:latest
Please note that if you want to use the KMIP wire protocol, you need to configure TLS and the socket server using the server configuration file first.
If you do not have Docker available, install an Eviden KMS server as described in installation guide:
Using the Web UI
Open your web browser and navigate to http://localhost:9998/ui to access the GUI.
Using the CLI
Get the KMS CLI from Cosmian packages. You can then easily manage the server:
-
Create a 256-bit symmetric key
ckms sym keys create --number-of-bits 256 --algorithm aes --tag my-file-key The symmetric key was successfully generated. Unique identifier: 87e9e2a8-4538-4701-aa8c-e3af94e44a9e -
Encrypt the
image.pngfile with AES GCM using the keyckms sym encrypt --tag my-file-key --output-file image.enc image.png The encrypted file is available at "image.enc" -
Decrypt the
image.encfile using the keyckms sym decrypt --tag my-file-key --output-file image2.png image.enc The decrypted file is available at "image2.png"
Encrypting and Decrypting at Scale
The Eviden KMS is architected specifically to deliver high-performance cryptography at scale for enterprise applications.
Scalability Design
The KMS scales efficiently through:
- Vertical scaling: Adding CPUs on the same machine
- Horizontal scaling: Deploying across multiple machines with load balancing
- High availability: Support for high-availability configuration
Performance Considerations
Cryptographic operations themselves are rarely the bottleneck. The key factors affecting overall performance are:
- Network latency: Minimizing the distance between the KMS and client applications
- CPU resources: Allocating sufficient processing power for concurrent operations
- Database performance: Using optimized database configurations
Deployment Architecture
The optimal architecture places KMS instances as close as possible to the applications they serve. Thanks to Eviden KMS's:
- Stateless design
- Per-CPU pricing model
- Containerized an OS packaged deployment option
This makes it practical to deploy KMS instances in multiple locations, including:
- Private data centers
- Edge locations
- Public cloud environments:

Security Considerations
Placing KMS instances closer to applications can introduce security challenges by potentially exposing key material in less trusted environments.
HSM Integration
To maintain strong security while preserving performance, Eviden KMS can be backed by Hardware Security Modules (HSMs):
- HSM integration details are explained in the HSM support section
- HSM master keys wrap all application keys handled by the KMS
- This protects keys at rest while only exposing the cleartext application keys in memory cache; the cache expiration delay is configurable
- Supported HSMs include Trustway Proteccio and Utimaco
For additional security details, see the FIPS 140-3 compliance and zeroization documentation.
Additional Protection in Public Clouds
For deployments in public clouds, consider using the Eviden VM to run the KMS. The Eviden VM provides memory and disk encryption and verifiability of the KMS's integrity.
Pre-packaged KMS in Eviden VMs is available on the Azure, GCP, and AWS marketplaces.
Integration Examples
For practical examples of integrating the KMS for high-volume operations, see:
- Client-side and application-level encryption
- Google Workspace Client-Side Encryption
- Microsoft Double Key Encryption
Client-side and application-level encryption
The Eviden KMS is particularly suited for application-level and client-side encryption scenarios, which may require high-performance encryption and decryption.
The KMS offers two mechanisms for encrypting and decrypting data:
- by calling the
EncryptandDecryptoperations on the KMS KMIP API and benefiting from its parallelization, concurrency, and optimized batching capabilities. - by using the
cosmianCLI client to encrypt and decrypt data locally, including large files.
Calling the KMS API
The KMS provides a high-performance encryption and decryption API for encrypting and decrypting data at scale.
Parallelization, concurrency, and batching
Due to its stateless user session model, the Eviden KMS is designed to use modern multi-core processors and can parallelize encryption and decryption operations across multiple cores. Parallelization can be achieved by scaling vertically (increasing the number of cores on a single machine) or horizontally (increasing the number of machines in a cluster).
The Eviden KMS can also handle multiple concurrent encryption and decryption requests on a single core using (async) concurrency primitives. The asynchronous model optimizes the use of CPU resources by allowing the CPU to perform other tasks while waiting for I/O operations to complete.
Finally, batching can further optimize the performance of encryption and decryption operations. Batching allows multiple encryption or decryption operations to be performed in a single request, reducing the overhead of making multiple requests to the KMS.
Efficient batching
The KMIP way
Batching in KMIP is achieved by sending multiple Operations in a single KMIP RequestMessage operation.
The protocol is highly flexible and allows various operations to be batched together.
The Eviden KMS supports batching using the KMIP protocol.
Optimized batching
However, the overhead of the KMIP protocol can be significant, especially for small data sizes.
Each Operation in a KMIP message carries significant metadata, which can be
prohibitively expensive for small data sizes.
When batching encryption or decryption requests, the metadata is likely identical for each request, and the overhead of unnecessarily sending the metadata multiple times can be significant.
To address this issue, the Eviden KMS provides an optimized batching API that allows multiple encryption or decryption requests to be batched together in a single request, without the overhead of the KMIP protocol. The optimized batching API is designed to be lightweight and efficient, allowing multiple encryption or decryption requests to be batched together with minimal overhead.
The method is to use a single Encrypt or Decrypt operation with multiple data items encoded in
the data field of the request.
Encoding scheme
The encoding scheme is called BulkData and encodes an array of items, each item being an array of
bytes. It works as follows.
- The encoded data starts with the 2-byte fixed sequence
0x87 0x87 - followed by the unsigned leb128 encoded number of items in the array
- followed, for each item, by
- the unsigned leb128 encoded byte length of the item
- the item itself
BulkData = 0x87 0x87 <number of items> <item 1 length> <item 1> ... <item n length> <item n>

number of items = leb128 encoded number of items
item 1 length = leb128 encoded length of item 1
When the server receives an Encrypt or Decrypt operation and detects the header 0x87 0x87, it
attempts to decode the data as a BulkData array. If the decoding is unsuccessful, the server
returns to the standard KMIP protocol (i.e., single item encryption or decryption).
If the decoding is successful, the server processes each item in the array as a separate encryption or decryption request and re-encodes the results.
When processing symmetric encryption results, the server will first, for each encrypted item,
concatenate the IV, the ciphertext, and the MAC, and then encode the result as a single item in the
BulkData array.
For AES-GCM encryption, the concatenation is as follows:
- the IV (12 bytes)
- the ciphertext (same size as the plaintext)
- the MAC (16 bytes)
Performance heuristics
The Eviden KMS uses heuristics to determine the optimal batch size for encryption and decryption requests. The heuristics consider the size of the data, the number of cores available, and the expected latency of the KMS.
Typically, for 64-byte data items, the optimal batch size is around 100,000. With these kinds of batch sizes, each CPU core should be sent an average of five batches to maximize concurrency.
Hence, to encrypt 5 million messages on 10 core machines, 50 requests of 100,000 items each should be sent in parallel. On a standard server CPU, the total processing time should be around 8 seconds, excluding network latency.
Using the KMS CLI client
The KMS CLI client can be used to encrypt and decrypt data locally, including large files.
Encryption can be performed in two modes:
- server side: the file data is sent server-side and encrypted there. This mode is well suited for small or medium files, and where a direct encryption scheme is required.
- client side: the file data is encrypted locally using a hybrid encryption scheme with key wrapping. This mode is well-suited for any type of file, including large ones, requiring high performance.
Server-side encryption and decryption
The file content is sent to the server when using server-side encryption or decryption. To use
This method uses the encrypt or decrypt command of the KMS CLI client WITHOUT
specifying a
--key-encryption-algorithm option.
Say, the KMS holds a 256-bit AES key with the ID 43d28ec7-7438-4d2c-a1a0-00379fa4fe5d, and you want to encrypt a file
image.png with AES 256-bit GCM encryption:
ckms sym encrypt \
--data-encryption-algorithm aes-gcm \
--key-id 43d28ec7-7438-4d2c-a1a0-00379fa4fe5d \
--output-file image.enc \
image.png
To decrypt the file, use the decrypt command:
ckms sym decrypt \
--data-encryption-algorithm aes-gcm \
--key-id 43d28ec7-7438-4d2c-a1a0-00379fa4fe5d \
--output-file decrypted-image.png \
image.enc
Available ciphers
The following ciphers are available for server-side encryption and decryption:
| Cipher | Description | NIST Certified? |
|---|---|---|
| aes-gcm | AES in Galois Counter Mode | yes |
| aes-xts | AES XTS | yes |
| aes-gcm-siv | AES GCM SIV | no |
| chacha20-poly1305 | ChaCha20 Poly1305 | no |
When in doubt, use AES GCM with a 256-bit key. AES GCM is NIST-certified (as NIST SP 800–38D) and well suited for arbitrary data encryption with a length of up to 2^39–256 bits ~ 64 GB.
Please note that for AES XTS, that.
- The key size must be doubled to achieve the same security level: 256 bits for AES 128 and 512 bits for AES 256.
- There is no authentication
Format of the encrypted file
The encrypted file is the concatenation of the IV (or Tweak for XTS), the ciphertext, and the MAC (None for XTS).
IV || Ciphertext || MAC
With these symmetric block ciphers, the size of the ciphertext is equal to the size of the plaintext.
The table below shows the size of the IV (tweak for XTS) and the MAC in bytes.
| Cipher | IV size | MAC size |
|---|---|---|
| aes-gcm | 12 | 16 |
| aes-xts | 16 | 0 |
| aes-gcm-siv | 12 | 16 |
| chacha20-poly1305 | 12 | 16 |
Client-side encryption and decryption
When using client-side encryption or decryption, the file content is encrypted locally using a hybrid encryption scheme with key wrapping:
- A random data encryption key (DEK) is generated. The key size is 256 bits for all schemes except for AES, which is 512 bits to provide 256 bits of classic security, and 128 bits post-quantum security.
- The DEK is used to encrypt the file content using the specified locally
--data-encryption-algorithmfor the data encryption mechanism (DEM). - The DEK is server-side encrypted (i.e., wrapped) using the specified
--key-encryption-algorithmfor the key encryption mechanism (KEM) and the KMS key encryption key (KEK) identified by--key-id.
To use this method, use the encrypt or decrypt command and specify BOTH the
--key-encryption-algorithm and --data-encryption-algorithm.
Say, the KMS holds a 256-bit AES KEK (key encryption key) with the ID
43d28ec7-7438-4d2c-a1a0-00379fa4fe5d and you want to client-side encrypt a file image.png with AES-GCM encryption,
the ephemeral KEK key is wrapped with RFC5649 (a.k.a. NIST key wrap):
ckms sym encrypt \
--data-encryption-algorithm aes-gcm \
--key-encryption-algorithm rfc5649 \
--key-id 43d28ec7-7438-4d2c-a1a0-00379fa4fe5d \
--output-file image.enc \
image.png
To decrypt the file, use the decrypt command:
ckms sym decrypt \
--data-encryption-algorithm aes-gcm \
--key-encryption-algorithm rfc5649 \
--key-id 43d28ec7-7438-4d2c-a1a0-00379fa4fe5d \
--output-file decrypted-image.png \
image.enc
Available ciphers
The following ciphers are available for client-side encryption and decryption:
- Data Encryption
| Cipher | Description | NIST Certified? |
|---|---|---|
| aes-gcm | AES in Galois Counter Mode | yes |
| aes-xts | AES XTS | yes |
| chacha20-poly1305 | ChaCha20 Poly1305 | no |
- Key Wrapping (Encryption)
| Cipher | Description | NIST Certified? |
|---|---|---|
| rfc5649 | NIST Key Wrap | yes |
| aes-gcm | AES in Galois Counter Mode | yes |
| aes-xts | AES XTS | yes |
| aes-gcm-siv | AES GCM SIV | no |
| chacha20-poly1305 | ChaCha20 Poly1305 | no |
When in doubt, use the AES GCM data encryption scheme with the AES GCM key encryption scheme (or RFC5649) with a 256-bit key. These are the most widely used schemes, and they are NIST-certified.
Format of the encrypted file
The encrypted file is the concatenation of
- the length of the key wrapping (a.k.a. encapsulation) in unsigned LEB 128 format
- the key encapsulation
- the data encryption mechanism (DEM) IV (or tweak for XTS)
- the ciphertext (same size as the plaintext)
- the data encryption mechanism (DEM) MAC
encapsulation length || encapsulation || DEM IV || Ciphertext || DEM MAC
The key encapsulation is the concatenation of
- the key encryption mechanism (KEM) IV (or tweak for XTS, none for RFC5649)
- the encrypted DEK (same length as the DEK, +8 bytes for RFC5649)
- the key encryption mechanism (KEM) MAC (none for XTS and RFC5649)
KEM IV || Encrypted DEK || KEM MAC
Using AES GCM as a KEM and a DEM, the details will be as follows:
- 1 unsigned LEB 128 byte holding the length of the encapsulation (60)
- 60 bytes of encapsulation decomposed in :
- 12 byte KEM IV
- 32 bytes encrypted DEK
- 16 byte KEM MAC
- 12 bytes of DEM IV
- x bytes of ciphertext (same size as plaintext)
- 16 bytes of DEM MAC
Anonymization
Eviden KMS exposes a set of data anonymization methods through a dedicated REST endpoint. These methods are stateless, require no cryptographic key, and are available under /tokenize/{method} on any KMS instance built with the non-fips feature.
All endpoints accept a JSON body and return a JSON object with a single result field. Errors come back as HTTP 422 with { "code": 422, "message": "..." }.
The ckms tokenize CLI command wraps each of these endpoints if you prefer working from the command line.
Endpoints
Hash
POST /tokenize/hash
Produces an irreversible, base64-encoded hash of a string. Three algorithms are available: SHA2 (SHA-256), SHA3 (SHA3-256), and Argon2. A salt can be passed as a base64-encoded byte string; for Argon2 it is required.
{
  "data": "test sha2",
  "method": "SHA2"
}
Response:
{ "result": "Px0txVYqBePXWF5K4xFn0Pa2mhnYA/jfsLtpIF70vJ8=" }
Use Argon2 when the input has low entropy (passwords, short identifiers) and you need resistance to brute-force lookup. Use SHA2 or SHA3 for high-entropy values or when throughput matters.
Noise
POST /tokenize/noise
Adds random noise to a numeric or date value. Three distributions are supported: Gaussian, Laplace, and Uniform. You can parameterize the distribution either by mean and standard deviation, or by lower and upper bounds.
The data_type field controls what kind of input to expect: float, integer, or date. Dates must be in RFC 3339 format (2023-04-07T12:34:56Z); the timezone is preserved in the output.
{
  "data": 42000.0,
  "data_type": "float",
  "method": "Laplace",
  "mean": 0.0,
  "std_dev": 500.0
}
{
  "data": "2023-04-07T12:34:56+02:00",
  "data_type": "date",
  "method": "Uniform",
  "min_bound": -3600.0,
  "max_bound": 3600.0
}
Laplace noise is the standard choice for differential privacy budgets. Uniform noise is appropriate when you need a hard bound on the perturbation. Gaussian is a reasonable default for datasets where outliers are acceptable.
Word Mask
POST /tokenize/word-mask
Replaces every occurrence of a listed word with XXXX, case-insensitively, matching only on word boundaries.
{
  "data": "Confidential: contains -secret- documents",
  "words": ["confidential", "secret"]
}
{ "result": "XXXX: contains -XXXX- documents" }
Non-word characters surrounding a target word (dashes, punctuation, spaces) are preserved.
Word Tokenize
POST /tokenize/word-tokenize
Replaces listed words with random 16-byte hex tokens. All occurrences of the same word receive the same token within a single request, so joins across a single document remain consistent. Across separate requests, the tokens are different.
{
  "data": "confidential meeting with confidential sources",
  "words": ["confidential"]
}
The output might be:
{ "result": "3A9F1C8B2E7D4A60 meeting with 3A9F1C8B2E7D4A60 sources" }
Word Pattern Mask
POST /tokenize/word-pattern-mask
Replaces all substrings matching a regular expression with a fixed replacement string. The pattern is limited to 1024 characters.
{
  "data": "Call me at +33 6 12 34 56 78 or +1-555-123-4567",
  "pattern": "\\+[\\d\\s\\-]+",
  "replace": "[PHONE]"
}
{ "result": "Call me at [PHONE] or [PHONE]" }
Aggregate Number
POST /tokenize/aggregate-number
Rounds a number to the nearest power of ten. power_of_ten: 2 rounds to the nearest hundred; power_of_ten: -1 keeps one decimal place.
{
  "data": 1234567,
  "data_type": "integer",
  "power_of_ten": 3
}
{ "result": "1235000" }
data_type is either float or integer.
Aggregate Date
POST /tokenize/aggregate-date
Truncates a date to the specified precision. The time_unit field accepts Second, Minute, Hour, Day, Month, or Year. The timezone offset is preserved.
{
  "data": "2023-04-07T12:34:56+02:00",
  "time_unit": "Month"
}
{ "result": "2023-04-01T00:00:00+02:00" }
Scale Number
POST /tokenize/scale-number
Applies a z-score normalization followed by a linear transformation. Given the mean and standard deviation of the original distribution, each value is standardized to zero mean and unit variance, then multiplied by scale and shifted by translate.
{
  "data": 75.0,
  "data_type": "float",
  "mean": 50.0,
  "std_deviation": 15.0,
  "scale": 10.0,
  "translate": 100.0
}
{ "result": 116.6666666666667 }
data_type is either float or integer. For integers the result is rounded to the nearest integer.
Relation to Format-Preserving Encryption
The methods above are one-way or statistically approximate transformations. They do not require a key and cannot be reversed to recover the original value.
For reversible, key-based field-level encryption that preserves the format of the original value (digit strings stay digit strings, alphanumeric stays alphanumeric), see Format-Preserving Encryption (FPE FF1). FPE is accessed through the KMIP Encrypt and Decrypt operations, not through the /tokenize endpoint.
| Property | Anonymization (/tokenize) | FPE (KMIP) |
|---|---|---|
| Reversible | No | Yes |
| Requires a key | No | Yes (256-bit AES) |
| Format-preserving | Partial (noise, rounding) | Exact |
| FIPS mode | No | No |
| Use case | Analytics, data sharing | Tokenized storage, round-trip |
Public Key Infrastructure (PKI)
The Eviden KMS is a full-featured X.509 certificate authority capable of issuing, storing, validating, and revoking certificates for both classical and post-quantum algorithms.
Supported standards
| Standard | Description | Scope |
|---|---|---|
| RFC 5280 | X.509 PKI Certificate and CRL Profile | All certificate operations |
| RFC 8017 | PKCS #1 v2.2 — RSA Cryptography | RSA key pairs & certificates |
| RFC 5480 | ECC Subject Public Key Information | EC/ECDSA key pairs & certificates |
| RFC 8032 | Edwards-Curve Digital Signature Algorithm (EdDSA) | Ed25519/Ed448 certificates |
| RFC 9881 | ML-DSA in X.509 (FIPS 204) | Post-quantum signing certificates |
| RFC 9909 | SLH-DSA in X.509 (FIPS 205) | Post-quantum signing certificates |
| RFC 9935 | ML-KEM in X.509 (FIPS 203) | Post-quantum KEM certificates |
| RFC 9608 | No Revocation Available extension | All self-signed end-entity certs |
| RFC 6960 | Online Certificate Status Protocol (OCSP) | Real-time certificate status |
| RFC 9654 | OCSP Nonce Extension | OCSP request/response freshness |
Not supported
The following specifications are not currently implemented:
- Merkle Tree Certificates (IETF draft) — transparency-based certificate format.
- Composite Certificates (draft-ietf-lamps-pq-composite-sigs / draft-ietf-lamps-pq-composite-kem) — hybrid classical+PQC keys in a single certificate.
- Delta CRLs (RFC 5280 §5.4) — incremental CRLs containing only certificates revoked since the last full CRL baseline.
Certificate export formats
Certificates and their associated private keys can be exported in:
- PEM (
.pem) — Base64-encoded, human-readable. - DER (
.der) — Binary ASN.1 encoding. - PKCS#12 (
.p12/.pfx) — Bundled certificate + private key, password-protected.
Post-quantum algorithms
PQC algorithms (ML-DSA, SLH-DSA, ML-KEM) are only available in the non-FIPS build
(--features non-fips). The FIPS build restricts algorithms to those approved under
the FIPS 140-3 boundary.
Algorithm identifiers (OIDs)
ML-DSA — signing (RFC 9881, FIPS 204)
| Variant | OID |
|---|---|
| ML-DSA-44 | 2.16.840.1.101.3.4.3.17 |
| ML-DSA-65 | 2.16.840.1.101.3.4.3.18 |
| ML-DSA-87 | 2.16.840.1.101.3.4.3.19 |
SLH-DSA — signing (RFC 9909, FIPS 205)
| Variant | OID |
|---|---|
| SLH-DSA-SHA2-128s | 2.16.840.1.101.3.4.20 |
| SLH-DSA-SHA2-128f | 2.16.840.1.101.3.4.21 |
| SLH-DSA-SHA2-192s | 2.16.840.1.101.3.4.22 |
| SLH-DSA-SHA2-192f | 2.16.840.1.101.3.4.23 |
| SLH-DSA-SHA2-256s | 2.16.840.1.101.3.4.24 |
| SLH-DSA-SHA2-256f | 2.16.840.1.101.3.4.25 |
| SLH-DSA-SHAKE-128s | 2.16.840.1.101.3.4.26 |
| SLH-DSA-SHAKE-128f | 2.16.840.1.101.3.4.27 |
| SLH-DSA-SHAKE-192s | 2.16.840.1.101.3.4.28 |
| SLH-DSA-SHAKE-192f | 2.16.840.1.101.3.4.29 |
| SLH-DSA-SHAKE-256s | 2.16.840.1.101.3.4.30 |
| SLH-DSA-SHAKE-256f | 2.16.840.1.101.3.4.31 |
ML-KEM — key encapsulation (RFC 9935, FIPS 203)
| Variant | OID |
|---|---|
| ML-KEM-512 | 2.16.840.1.101.3.4.4.1 |
| ML-KEM-768 | 2.16.840.1.101.3.4.4.2 |
| ML-KEM-1024 | 2.16.840.1.101.3.4.4.3 |
Key usage requirements
The Eviden KMS automatically adds the correct critical keyUsage extension
to every PQC certificate it generates, per the applicable IETF standard.
ML-DSA and SLH-DSA (signing algorithms)
Per RFC 9881 §5 and RFC 9909 §6:
- The
keyUsageextension MUST be present and MUST be critical. - It MUST include
digitalSignature. - For CA certificates:
keyCertSignandcRLSignare added.
X509v3 Key Usage: critical
    Digital Signature
ML-KEM (key encapsulation algorithm)
Per RFC 9935 §5:
- The
keyUsageextension MUST be present and MUST be critical. - It MUST contain
keyEnciphermentand MUST NOT contain any other bit.
X509v3 Key Usage: critical
    Key Encipherment
ML-KEM is a key encapsulation mechanism (KEM), not a signature scheme.
An ML-KEM key cannot be used to sign its own certificate.
ML-KEM certificates must always be CA-issued: supply
--issuer-private-key-id and --issuer-certificate-id pointing to
a signing key (RSA, EC, ML-DSA, or SLH-DSA).
Generating certificates with the CLI
Self-signed ML-DSA-44 certificate
ckms certificates certify \
  --generate-key-pair \
  --algorithm ml-dsa-44 \
  --subject-name "CN=My ML-DSA CA,O=Acme,C=FR" \
  --days 365
The server will:
- Generate an ML-DSA-44 key pair.
- Issue a self-signed X.509 v3 certificate.
- Automatically add a critical
keyUsageextension withdigitalSignature(per RFC 9881). - Return the certificate identifier.
CA-issued ML-KEM-512 certificate (RFC 9935)
First create an ML-DSA-44 CA:
# Step 1: create the CA certificate (self-signed ML-DSA-44)
CA_CERT_ID=$(ckms certificates certify \
  --generate-key-pair \
  --algorithm ml-dsa-44 \
  --subject-name "CN=PQC Root CA,O=Acme,C=FR" \
  --days 3650 \
  | grep "Certificate ID" | awk '{print $NF}')

# Retrieve the CA private key ID from the certificate attributes
CA_SK_ID=$(ckms certificates export \
  --certificate-id "$CA_CERT_ID" \
  --output-format json-ttlv \
  | python3 -c "import sys,json; d=json.load(sys.stdin); print(next(l['LinkedObjectIdentifier'] for l in d.get('Link',[]) if l['LinkType']=='PrivateKeyLink'))")
Then issue an ML-KEM-512 leaf certificate signed by the CA:
# Step 2: create an ML-KEM-512 leaf certificate signed by the CA
ckms certificates certify \
  --generate-key-pair \
  --algorithm ml-kem-512 \
  --subject-name "CN=ML-KEM-512 Leaf,O=Acme,C=FR" \
  --issuer-private-key-id "$CA_SK_ID" \
  --issuer-certificate-id "$CA_CERT_ID" \
  --days 365
The server will:
- Generate an ML-KEM-512 key pair.
- Issue an X.509 certificate signed by the ML-DSA-44 CA.
- Automatically add a critical
keyUsageextension withkeyEnciphermentonly (per RFC 9935).
SLH-DSA-SHA2-128s self-signed certificate
ckms certificates certify \
  --generate-key-pair \
  --algorithm slh-dsa-sha2-128s \
  --subject-name "CN=SLH-DSA Test,O=Acme,C=FR" \
  --days 365
RSA or EC self-signed certificate
# RSA 4096
ckms certificates certify \
  --generate-key-pair \
  --algorithm rsa4096 \
  --subject-name "CN=RSA CA,O=Acme,C=FR" \
  --days 365

# NIST P-256
ckms certificates certify \
  --generate-key-pair \
  --algorithm nist-p256 \
  --subject-name "CN=EC CA,O=Acme,C=FR" \
  --days 365
Verifying certificates with OpenSSL 3.5+
OpenSSL 3.5+ supports all NIST PQC algorithms. Use the following commands to inspect and verify PQC certificates:
# Inspect the certificate
openssl x509 -text -noout -in ml-dsa-cert.pem

# Verify a leaf certificate against a CA certificate
openssl verify -CAfile ca-cert.pem leaf-cert.pem
Using the Web UI
The Eviden KMS Web UI exposes certificate generation through the
Certificate Issuance and Renewal page at /ui/certificates/certs/certify.
- Select "4. Generate New Keypair".
- Choose an algorithm from the Key Algorithm dropdown
(e.g.
ML-DSA-44 (PQC),ML-KEM-512 (KEM),RSA-4096,NIST-P256). - Enter a subject name.
- Optionally provide issuer key and certificate IDs for CA-signed certificates.
ML-KEM algorithms appear under (KEM) in the dropdown to signal that they require a CA issuer. Attempting to create a self-signed ML-KEM certificate will return an error.
Cross-algorithm PKI
RFC 9881 and RFC 9935 explicitly support cross-algorithm PKI: the CA signing key does not need to match the subject key algorithm.
Examples of supported combinations:
| CA algorithm | Leaf/subject algorithm | Use case |
|---|---|---|
| ML-DSA-44 | ML-KEM-512 | PQC-only PKI (RFC 9935) |
| ML-DSA-44 | ML-DSA-65 | Hierarchical PQC signing chain |
| SLH-DSA-SHA2-128s | ML-DSA-44 | Cross-family PQC PKI |
| ML-DSA-44 | RSA 4096 | PQC CA, classical leaf (transition) |
| RSA 4096 | ML-DSA-44 | Classical CA, PQC leaf (transition) |
Certificate lifecycle
All standard KMIP certificate lifecycle operations work with certificates:
| Operation | Description |
|---|---|
Certify | Generate a new certificate (self-signed or CA-issued) |
Export | Export in PEM, DER, or PKCS#12 format |
Import | Import an externally generated certificate |
Validate | Validate a certificate chain |
Revoke | Revoke a certificate |
Generate-CRL | Generate a signed CRL for an issuer CA |
Destroy | Permanently delete a certificate and its keys |
See Revocation & CRL Distribution for CRL generation,
automatic CDP injection, the public distribution endpoint, and the noRevAvail
extension. See OCSP Responder for real-time, per-certificate
revocation status.
Revocation & CRL Distribution
Certificate revocation in the Eviden KMS follows the two-phase model defined by RFC 5280:
- Revoke a certificate — the KMIP
Revokeoperation marks the certificateDeactivatedorCompromisedin the KMS database. - Publish the revocation — the
Generate-CRLoperation (or automatic post-revocation refresh) signs a fresh CRL that relying parties can fetch.
CRL generation
The KMS generates X.509 v2 Certificate Revocation Lists (CRLs) per RFC 5280 §5.
A CRL lists all certificates issued by a CA that have been revoked. The KMS
automatically collects all revoked certificates — those in Deactivated or
Compromised state with a CertificateLink pointing to the issuer — regardless
of which user owns each certificate record in the KMS database, then signs the
CRL with the CA private key.
CLI usage:
ckms certificates generate-crl \
  --certificate-id <CA_CERT_ID> \
  --validity-days 7 \
  --output-format pem \
  --output-file /tmp/crl.pem
REST endpoint (authenticated):
GET /certificates/{issuer_id}/crl?format=pem&validity_days=7
Returns application/pkix-crl (DER, default) or application/x-pem-file (PEM).
Any authenticated user with Get access to the CA certificate may call
this endpoint — no Crypto Officer role is required. CRL content is public
information (RFC 5280 §3); the authentication check exists to prevent the CA
private key from being used as an unauthenticated signing oracle, not to
restrict access to the revocation list itself.
The generated CRL includes:
- Authority Key Identifier (AKI) — derived from the CA's
subjectKeyIdentifierextension if present, or from a SHA-1 hash of the CA'sSubjectPublicKeyInfoDER. - CRL Number — monotonically increasing integer, seeded at startup from
max(unix_timestamp, db_max_crl_number + 1)to guarantee strict monotonicity across server restarts (RFC 5280 §5.2.3). - Per-entry CRL Reason Code — mapped from the KMIP revocation reason stored at revocation time (RFC 5280 §5.3.1).
- Per-entry Invalidity Date —
GeneralizedTime-encoded date of compromise when available in object attributes (RFC 5280 §5.3.2).
Configuration
# kms.toml
[crl]
crl_default_validity_days = 7   # default CRL validity in days (1–365)
crl_refresh_check_hours   = 1   # background refresh check interval; 0 = disabled
crl_refresh_overlap_hours = 24  # pre-regenerate this many hours before expiry
All three keys may also be set as CLI flags or environment variables:
--crl-default-validity-days 7
--crl-refresh-check-hours   1
--crl-refresh-overlap-hours 24
Automatic CRL regeneration on revocation
When kms_public_url is set in kms.toml, the server automatically regenerates
the issuer's CRL in the background whenever a certificate is revoked via the
Revoke operation. The regeneration is fire-and-forget: it does not block the
Revoke response, and any signing failure is logged at WARN level without
affecting the revocation outcome.
The CRL is signed on behalf of the owner of the CA certificate, so the user who
revokes a leaf certificate does not need access to the CA private key. The same
applies to the scheduled refresh below. A certificate that is revoked and then
destroyed stays on the CRL: Destroy keeps its issuer link and revocation details.
In a multi-node deployment, each node re-reads the stored CRL from the shared database
at most every 60 seconds, so the public endpoint picks up CRLs regenerated by other
nodes.
# kms.toml — enables CDP auto-injection and auto-CRL regeneration
kms_public_url = "https://kms.example.com"
The updated CRL is immediately available at the public CDP endpoint:
GET /public/certificates/{issuer_id}/crl # no authentication required
Scheduled CRL refresh
A background scheduler wakes every crl_refresh_check_hours (default: 1 h) and
regenerates any stored CRL whose nextUpdate timestamp falls within
crl_refresh_overlap_hours (default: 24 h) of the current time. This prevents
relying parties from seeing an expired CRL during the window between the scheduled
expiry and the next revocation-triggered regeneration.
Set crl_refresh_check_hours = 0 to disable the background scheduler entirely
(CRLs will only be refreshed on explicit generate-crl calls or Revoke events).
CRL distribution points
When kms_public_url is configured, the KMS automatically injects a
crlDistributionPoints (CDP) extension into every CA-issued certificate, pointing
to the server's own public CRL endpoint:
https://<kms_public_url>/public/certificates/<issuer_id>/crl
You do not need to supply a CDP extension manually for KMS-issued certificates
when kms_public_url is set.
To override or set a custom CDP manually (e.g. for an external CA), add a
crlDistributionPoints entry in the extension config file passed via
--certificate-extensions:
[ v3_ext ]
crlDistributionPoints=URI:http://ca.example.com/crl.pem
Public (unauthenticated) CRL endpoint
GET /public/certificates/{issuer_id}/crl is intended for CRL Distribution Point
(CDP) URIs embedded in certificates. Any relying party — browser, TLS stack, OCSP
client — can fetch the current CRL without credentials, as required by
RFC 5280 §3.
The response includes:
Content-Type: application/pkix-crlLast-Modified(RFC 7231 IMF-fixdate)Cache-Control: public, max-age=Nwhere N is derived fromnextUpdate − 60 s
The endpoint returns 404 only if the CRL has never been generated and no CRL is stored in the database.
Generated CRLs are persisted in the KMS database (crls table) and reloaded
on server restart, so the public endpoint continues to serve the last signed CRL
without requiring a manual generate-crl call after each restart.
The KMS also includes a built-in OCSP responder (RFC 6960) for real-time, per-certificate revocation status — see OCSP Responder.
No Revocation Available (id-ce-noRevAvail, RFC 9608)
For self-signed certificates (no issuer key provided) that do not carry a CRL
distribution point, the KMS automatically adds the id-ce-noRevAvail extension
(OID 2.5.29.56, RFC 9608 §2). This signals to relying parties that no
revocation information is available for this certificate, and that they MUST NOT
reject it for lack of a CRL or OCSP response.
This behaviour applies to all algorithms (RSA, EC, ML-DSA, SLH-DSA, …).
When validating a chain, the KMS skips CRL fetching for any certificate that carries this extension.
OCSP Responder (RFC 6960)
The KMS includes a built-in OCSP (Online Certificate Status Protocol) responder, compliant with RFC 6960, RFC 9654 (nonce), RFC 5019 (lightweight HTTP profile), and RFC 5280. It complements CRL-based revocation with real-time, per-certificate status queries and does not require an external OCSP service.
Protocol flow
A relying party (a TLS stack, browser, or the openssl ocsp client) sends a request
identifying the certificate by its issuer and serial number; the KMS looks up the
certificate's current lifecycle state and returns a signed status:
sequenceDiagram
    participant RP as Relying Party
    participant KMS as Eviden KMS<br/>(OCSP responder)
    participant DB as Certificate store

    RP->>KMS: OCSP request (issuer hash + serial number)
    KMS->>KMS: Verify issuer matches configured CA
    KMS->>DB: Look up certificate by serial
    DB-->>KMS: Lifecycle state (Active, Compromised, ...)
    KMS->>KMS: Map state to good, revoked or unknown
    KMS->>KMS: Sign BasicResponse (CA or delegated key)
    KMS-->>RP: Signed OCSPResponse
    RP->>RP: Verify signature and check status
Endpoints
| Route | Transport | Notes |
|---|---|---|
GET /ocsp/{base64url-DER} | RFC 6960 Appendix A.1 | For small requests (≤ 255 bytes); the request is base64url-encoded in the path |
POST /ocsp/ | RFC 6960 Appendix A.2 | Body: DER-encoded OCSPRequest, Content-Type: application/ocsp-request |
Both routes are public (no authentication required) — OCSP response content is
public information per RFC 6960, Section 2, "Protocol Overview"; requiring
authentication would break relying-party tooling (openssl ocsp, TLS stacks,
browsers). When ocsp_enabled = false (the default), both routes return 404.
Configuration
# kms.toml
[ocsp]
ocsp_enabled             = true
ocsp_ca_uid              = "ca-certificate-uid"
ocsp_responder_cert_uid  = "delegated-signer-uid"  # optional
ocsp_cache_ttl_secs      = 86400
ocsp_nonce_policy        = "optional"               # optional | required | ignore
ocsp_include_cert_chain  = true
ocsp_archive_cutoff_secs = 0
Equivalent CLI flags: --ocsp-enabled, --ocsp-ca-uid, --ocsp-responder-cert-uid,
--ocsp-cache-ttl-secs, --ocsp-nonce-policy, --ocsp-include-cert-chain,
--ocsp-archive-cutoff-secs.
ocsp_ca_uid— UID of the CA certificate; required whenocsp_enabled = true. Used to verify that incoming requests target this CA (issuer name/key hash) and to look up certificate states for revocation status.ocsp_responder_cert_uid— UID of a delegated OCSP-signing certificate (RFC 6960, Section 4.2.2.2, "Authorized Responders"). When set, responses are signed by this cert/key pair instead of the CA's own key. The referenced certificate must carryextKeyUsage: OCSPSigning(OID1.3.6.1.5.5.7.3.9); addid-pkix-ocsp-nocheck(OID1.3.6.1.5.5.7.48.1.5,noCheckin OpenSSL extension syntax) so relying parties don't attempt to check its own revocation status.ocsp_nonce_policy— nonce handling per RFC 9654, Section 2.1, "Nonce Extension":optional(echo if present),required(reject requests without one), orignore(never echo — enables the in-memory response cache described below).ocsp_archive_cutoff_secs— when non-zero, adds theid-pkix-ocsp-archive-cutoffextension (RFC 6960, Section 4.4.4, "Archive Cutoff").
Delegated responder trust model
Keeping the CA's private key offline (HSM-only, never exposed to a public endpoint) is a common production requirement. Delegating OCSP signing to a dedicated, narrowly-scoped certificate lets the KMS answer high-traffic OCSP queries without ever touching the CA key:
sequenceDiagram
    participant Admin
    participant KMS as Eviden KMS
    participant RP as Relying Party

    Note over Admin,KMS: One-time setup
    Admin->>KMS: Certify delegated signer<br/>(issuer: CA, EKU: OCSPSigning)
    Admin->>KMS: Set ocsp_responder_cert_uid

    Note over RP,KMS: Per request
    RP->>KMS: OCSP request
    KMS->>KMS: Sign response with delegated key<br/>(CA private key never used)
    KMS-->>RP: OCSPResponse + delegated cert chain
    RP->>RP: Verify delegated cert is signed by the CA<br/>and carries the OCSPSigning EKU
    RP->>RP: Verify response signature<br/>using the delegated cert
Status mapping
| KMS certificate state | OCSP status |
|---|---|
Active / PreActive | good |
Compromised / Destroyed_Compromised / Deactivated | revoked |
Destroyed after a Revoke | revoked |
Destroyed without a prior Revoke, or not found under this CA | unknown |
For revoked certificates, revocationTime and the CRLReason are the ones recorded
by the Revoke operation (the same values the CRL lists), so OCSP and CRL always
agree. Destroying a revoked certificate keeps it revoked: its issuer link and
revocation details survive Destroy.
Every CertID in a request must name the configured CA; a request that mixes in
another issuer is answered unauthorized. The in-memory response cache is used only
for single-CertID requests without a nonce, is keyed by the full CertID (hash
algorithm, issuer hashes and serial), never serves a response past its nextUpdate,
and does not store unknown responses.
If the CA itself is revoked with a compromise reason, every certificate it issued
is reported revoked with reason cACompromise, regardless of the leaf certificate's
own state (RFC 6960, Section 2.7, "CA Key Compromise"):
sequenceDiagram
    participant Admin
    participant KMS as Eviden KMS
    participant RP as Relying Party

    Note over RP,KMS: Before CA compromise
    RP->>KMS: OCSP request for leaf certificate
    KMS-->>RP: good

    Admin->>KMS: Revoke CA (reason: CA compromise)

    Note over RP,KMS: After CA compromise
    RP->>KMS: OCSP request for the same leaf certificate
    KMS->>KMS: CA state is Compromised<br/>cascade to every certificate it issued
    KMS-->>RP: revoked (reason: cACompromise)
Manual verification with openssl ocsp
The following walks through the same scenarios validated by mise run test:ocsp
(.mise/tasks/test/ocsp), using only the standard openssl CLI and ckms — the
tools an external customer already has.
-
Issue a CA and a leaf certificate, then enable OCSP for that CA:
cat > ca.ext <<'EOF'
[ v3_ca ]
basicConstraints=critical,CA:TRUE
keyUsage=critical,keyCertSign,crlSign
EOF

ckms certificates certify --certificate-id my-ca --generate-key-pair \
  --algorithm nist-p256 --subject-name "CN=My Test CA" --days 3650 \
  --certificate-extensions ca.ext

ckms certificates certify --certificate-id my-leaf --generate-key-pair \
  --algorithm nist-p256 --subject-name "CN=my-leaf" \
  --issuer-certificate-id my-ca --days 365

ckms certificates export ca.pem   --certificate-id my-ca   --format pem
ckms certificates export leaf.pem --certificate-id my-leaf --format pem
Restart (or configure) the server with:
[ocsp] ocsp_enabled = true ocsp_ca_uid = "my-ca" -
Query status over POST — expect
good, signed by the CA, nonce echoed:openssl ocsp -issuer ca.pem -cert leaf.pem -CAfile ca.pem \ -url http://localhost:9998/ocsp/ -resp_text # leaf.pem: good # Response verify OK -
Query the same certificate over GET (RFC 6960 Appendix A.1):
openssl ocsp -issuer ca.pem -cert leaf.pem -no_nonce -reqout req.der B64URL=$(openssl base64 -in req.der -A | tr '+/' '-_' | tr -d '=') curl -i "http://localhost:9998/ocsp/${B64URL}" # HTTP/1.1 200 OK, Content-Type: application/ocsp-response # Cache-Control / Last-Modified / ETag headers present (RFC 5019) -
Revoke and re-query — expect
revokedwith the mapped reason:ckms certificates revoke "compromised" --certificate-id my-leaf \ --reason-code key-compromise openssl ocsp -issuer ca.pem -cert leaf.pem -CAfile ca.pem \ -url http://localhost:9998/ocsp/ -resp_text # Cert Status: revoked, Reason: keyCompromise, Revocation Time: ... -
Query a serial this CA never issued — expect
unknown:openssl ocsp -issuer ca.pem -serial 0x7F7F7F7F7F7F7F7F \ -CAfile ca.pem -url http://localhost:9998/ocsp/ -resp_text # : unknown
With ocsp_nonce_policy = "required", a request with no nonce (openssl ocsp -no_nonce) receives a malformedRequest OCSP response (RFC 6960, Section 2.3,
"Exception Cases") rather than an HTTP error — this keeps the response parseable
by any standard OCSP client.
Authority Information Access (AIA)
The AIA extension (authorityInfoAccess, OID 1.3.6.1.5.5.7.1.1) can be added
via the extension config file to point relying parties at the KMS's own OCSP
responder, or at an external one, or at the CA issuer certificate:
[ v3_ext ]
authorityInfoAccess=OCSP;URI:http://kms.example.com/ocsp/,caIssuers;URI:http://ca.example.com/ca.crt
Device enrollment: EST and SCEP
This page shows how to let devices (IoT sensors, routers, laptops and phones managed by an MDM) obtain their own X.509 certificate from the KMS, without an administrator issuing each one by hand.
The KMS supports two standard enrollment protocols, each described on its own page:
Both are disabled by default. This page covers what they share: vocabulary, choosing a protocol, creating and delegating the CA, certificate templates and the security model.
| If you want to… | Go to |
|---|---|
| Understand the vocabulary | The ideas in two minutes |
| Pick a protocol | Which protocol should I use? |
| Prepare the CA (both protocols) | Step 1 of every setup |
| Try it end to end, step by step | EST tutorial |
| Serve an MDM or router | How-to: enable SCEP |
| Restrict what devices can ask for | Certificate templates |
| Look up an endpoint or a setting | EST endpoints, SCEP endpoints |
| Understand the security choices | Security model |
| Fix an error | Troubleshooting |
The ideas in two minutes
| Term | Meaning |
|---|---|
| CA (certificate authority) | A certificate plus its private key, stored in the KMS, that signs the certificates handed to devices. The private key never leaves the KMS. |
| CSR (certificate signing request) | A small file a device creates with its own new key pair: "please certify this public key for this name". The device's private key never leaves the device. |
| Enrollment | The device sends its CSR to the KMS and receives a signed certificate back. |
| EST / SCEP | The two network protocols a device can use to do that. |
| Template | A set of rules the KMS applies to every CSR (allowed names, key sizes, certificate lifetime…). A CSR that breaks the rules is refused. |
| Bootstrap credential | A shared secret (EST: user name and password, SCEP: challenge password) that proves a device is allowed to enroll for the first time. |
| Renewal | Before its certificate expires, the device gets a new one by proving it already owns the old one. No shared secret is needed. |
[enrollment-service] | A reserved internal KMS identity that signs on behalf of EST and SCEP. You give it the right to use your CA (nothing else). Nobody can log in as this identity. |
flowchart LR
    D[Device<br/>creates key pair and CSR] -->|EST over HTTPS| K[KMS<br/>checks the template]
    D -->|SCEP over HTTP or HTTPS| K
    K -->|signs with| CA[CA key stored in the KMS]
    CA -->|certificate| D
Which protocol should I use?
| EST | SCEP | |
|---|---|---|
| Age | Modern | Legacy |
| Transport | HTTPS only | HTTP or HTTPS |
| First enrollment is authorized by | A TLS client certificate, or a user name and password | A shared challenge password |
| Renewal is authorized by | The device's current certificate (mutual TLS) | A request signed with the device's current certificate |
| Typical clients | IoT fleets, network gear, services | Apple and Windows MDM, many routers |
| CA key type | RSA or EC | RSA only |
| Documentation | EST | SCEP |
Rule of thumb: use EST whenever your devices support it; use SCEP when your MDM or router only speaks SCEP.
Before you start
You need:
- a running KMS and the
ckmscommand-line tool connected to it as the user who will own the CA (see Quick start); - for EST, the KMS must be served over TLS (HTTPS), because credentials and certificates travel over that channel. See TLS configuration;
opensslto inspect certificates.
Step 1 of every setup: create the CA and delegate it
Do this once, whatever protocol you choose.
Create the CA
The CA is a self-signed certificate created with ckms certificates certify. For SCEP, the CA must
be RSA, because SCEP requests are encrypted to the CA public key. The following works for both
protocols:
cat > ca.ext <<'EOF2'
[ v3_ca ]
basicConstraints=critical,CA:TRUE
keyUsage=critical,keyCertSign,crlSign,digitalSignature,keyEncipherment
EOF2
ckms certificates certify --certificate-id device-ca --generate-key-pair --algorithm rsa2048 \
  --subject-name "CN=Device CA,O=ACME,C=FR" --days 3650 --certificate-extensions ca.ext
device-ca is the unique identifier (UID) of the CA certificate. You will put it in the server
configuration. The CA private key must be in the Active state (it is, right after this command).
Export the CA certificate; devices and tests use it to check what they receive:
ckms certificates export ca.crt --certificate-id device-ca --format pem
Delegate the CA to the enrollment service
EST and SCEP issue certificates as the reserved identity [enrollment-service]. It has no
right on anything until you, the CA owner, give it certify on two objects: the CA
certificate and the CA private key.
First find the UID of the private key linked to the CA:
ckms attributes get -i device-ca -a LinkType -l private-key -o ca-links.json
cat ca-links.json
Copy the value of PrivateKeyLink from the output, then grant:
ckms access-rights grant "[enrollment-service]" -i device-ca certify
ckms access-rights grant "[enrollment-service]" -i <PrivateKeyLink value> certify
Without these two grants, enrollment fails closed (devices receive an error) and the server logs a warning naming the CA and the grants it needs.
Two further cases:
- if
crypto_officer_usersis configured, a Crypto Officer must also grant itcreate(ckms access-rights grant "[enrollment-service]" create); - if the CA private key is wrapped, also grant it
decrypton the wrapping key.
Do not grant it get, export or a Crypto Officer role: issuing certificates needs none of
them. Issued certificates are stored under the CA owner, who can list, revoke and destroy them
like any other certificate (see Revocation & CRL distribution).
default_username and crypto_officer_users must not be set to [enrollment-service]: the server
refuses to start when EST or SCEP is enabled otherwise.
Then enable the protocol: EST or SCEP.
Certificate templates
A template is a set of rules applied to every CSR that arrives through an enrollment endpoint. It is
a TOML section [templates.<name>], selected by est_template or scep_template.
Start from the examples on the EST and SCEP pages, then tighten them: the most useful setting is
subject_cn_regex, which limits the names a device can obtain. Regular expressions are
anchored: they must match the whole value.
[templates.iot_device]
min_rsa_key_bits = 2048
allowed_ec_curves = ["prime256v1"]
allowed_ekus = ["clientAuth"]
max_validity_days = 365
default_validity_days = 90
subject_cn_regex = "[a-z0-9-]+\\.iot\\.example"
san_dns_regex = "[a-z0-9-]+\\.iot\\.example"
san_email_regex = "[a-z0-9.]+@iot\\.example"
san_upn_regex = "[a-z0-9.]+@iot\\.example"
| Key | Default | Meaning |
|---|---|---|
min_rsa_key_bits | 2048 | Smallest accepted RSA key. Values below 2048 stop the server at startup. |
allowed_ec_curves | prime256v1, secp384r1, secp521r1 | Accepted elliptic curves. Must not be empty. |
allowed_ekus | clientAuth | Allowed extended key usages (what the certificate may be used for), as names or dotted OIDs. Added automatically when the CSR asks for none. Must not be empty. |
max_validity_days | 365 | Upper bound on a certificate's lifetime. |
default_validity_days | 90 | Lifetime given to certificates, because neither protocol lets the device request one. |
subject_cn_regex | none | Pattern the subject common name must match. Required unless allow_any_identity = true. |
san_dns_regex | none | Pattern every DNS name in the subject alternative names must match. Without it, a CSR carrying a DNS SAN is refused. |
san_email_regex | none | Same, for e-mail addresses. |
san_upn_regex | none | Same, for Microsoft user principal names. |
allow_any_identity | false | Accept any subject name. Without it the template must set subject_cn_regex, and the serialNumber, UID and emailAddress subject attributes (which other systems may use to identify a person) are refused. When no san_*_regex is set, it also accepts any SAN. |
SANs are refused by default. A CSR may carry a SAN type only when the template has a pattern
for it: a template that sets only subject_cn_regex accepts CSRs without SANs. To let devices
ask for a DNS name, add san_dns_regex (likewise san_email_regex, san_upn_regex). IP address
and URI SANs have no pattern: they are accepted only with allow_any_identity = true and no
san_*_regex, which accepts any SAN. Unknown keys, inconsistent
validity limits and the invalid values above are rejected at startup, so a typo cannot silently
weaken a template.
Every CSR goes through these checks:
- the device proves it owns the private key (proof of possession);
- key type and size, EKUs, subject name and SAN patterns, and validity (clamped to
max_validity_days); - the CSR may not ask for a CA certificate (
basicConstraintsCA:TRUE); - only these extensions are accepted:
keyUsage(withoutkeyCertSignorcRLSign),subjectAltName,extendedKeyUsageandbasicConstraints. Any other extension, a duplicated extension, or extensions sent in a form the KMS cannot verify is refused.
A violation is answered with HTTP 422 (EST) or a badRequest reply (SCEP).
A template is required. est_template / scep_template must name a template that sets
subject_cn_regex (or allow_any_identity = true); the server refuses to start otherwise. The
enrollment secret authenticates a class of devices, not the name a device asks for.
Security model
Protocol-specific notes are on the EST and SCEP pages.
Why the CA is delegated to [enrollment-service]. Devices are not KMS users. A dedicated
identity that nobody can log in as, and that holds only certify on one CA, limits what a bug or a
leaked secret can do.
Enrolled certificates cannot log in to the KMS. A device chooses its own name in its CSR. If
the KMS accepted such a certificate for API access, a device could enroll the name admin and
then act as admin. To prevent this, every certificate issued through EST or SCEP carries a
marker (a certificate policy with the OID 1.3.6.1.4.1.16376.9.2.1), and the KMS refuses to treat
a marked certificate as a user identity on every login path, including the HTTPS and KMIP socket
client-certificate checks. The check covers the whole verified chain, so a certificate signed by an
enrolled one is refused too. Before a certificate is handed to the device the KMS also checks that
it is a plain end-entity certificate (not a CA, no keyCertSign, marker present) and takes it out
of service if it is not. It can still be used for the one thing it is for: renewing itself.
Shared secrets. The EST bootstrap password and the SCEP challenge password are shared by all
devices and do not expire. They must have at least 8 characters, and should be long and random. Keep
them out of version control and prefer the KMS_EST_BOOTSTRAP_PASSWORD /
KMS_SCEP_CHALLENGE_PASSWORD environment variables to the command line, where they show in the
process list (the configuration wizard writes its file readable by its owner only).
Abuse controls. A client address that sends 10 wrong credentials is refused with 429 and a
Retry-After delay that doubles with every further failure (30 seconds up to 1 hour); a correct
EST bootstrap password or SCEP challenge clears the count (a SCEP renewal does not). The EST
lockout only applies to HTTP Basic: a request with a TLS client certificate is not locked out. At
most 16 enrollments run at the same time (503 otherwise) and a request body is limited to
64 KiB. The lockout is per client address (X-Forwarded-For is honoured only from
audit_trusted_proxy_cidrs), so devices behind one NAT share it. These
controls come on top of the optional rate_limit_per_second, which you should set when the
endpoints are reachable from untrusted networks; the server logs a warning when it is not set.
Audit. Every enrollment attempt is logged (info on success, warn on refusal) with the client
address and how it authenticated, and recorded in the tamper-evident audit trail when
auditing is enabled, with the identifier of the
issued certificate. Error replies to devices are plain text (text/plain; charset=utf-8,
X-Content-Type-Options: nosniff). Authentication refusals carry fixed messages, whose reasons
(certificate identifiers, states) are only in the server log; a CSR refused by the certificate
template is answered with the rule it breaks.
Troubleshooting
Protocol-specific errors are listed on the EST and SCEP pages.
| Symptom | Likely cause and fix |
|---|---|
| The server refuses to start, mentioning a template | A template key is unknown, a limit is inconsistent, min_rsa_key_bits is below 2048, a list is empty, it sets neither subject_cn_regex nor allow_any_identity, or est_template / scep_template is missing or names a section that does not exist. |
| The server refuses to start, mentioning a password or challenge | The EST bootstrap password or SCEP challenge is shorter than 8 characters. |
HTTP 429 | Too many wrong credentials from this address; wait for Retry-After. |
HTTP 503 | Too many enrollments in progress; retry after Retry-After. |
The server refuses to start, mentioning [enrollment-service] | default_username or crypto_officer_users uses that reserved name. Rename it. |
| Enrollment fails and the server log names the CA and the grants it needs | The delegation step is missing: grant certify on the CA certificate and on its private key. |
| An enrolled certificate is refused when used against the KMS API | By design: see Security model. |
Device enrollment with EST (RFC 7030)
EST (Enrollment over Secure Transport, RFC 7030) lets a device obtain and renew its X.509 certificate over HTTPS. It is the modern choice for IoT fleets, network equipment and services. EST is disabled by default.
Before you start, complete the steps shared with SCEP on the Device enrollment overview: the prerequisites and creating and delegating the CA.
Architecture
flowchart LR
    D["Device<br/>key pair and CSR"]
    subgraph KMS["Eviden KMS (HTTPS listener)"]
        TLS["TLS layer<br/>client certificate checked against clients_ca_cert_file"]
        CA_EP["GET /.well-known/est/cacerts"]
        ATTR_EP["GET /.well-known/est/csrattrs"]
        ENR_EP["POST /.well-known/est/simpleenroll"]
        REN_EP["POST /.well-known/est/simplereenroll"]
        TPL["Template checks<br/>est_template"]
        SVC["Signs as enrollment-service<br/>certify on the CA only"]
        STORE[("Issued certificates<br/>owned by the CA owner")]
    end
    CAKEY["CA certificate and private key<br/>est_ca_uid"]
    D -- "HTTPS" --> TLS
    TLS --> CA_EP
    TLS --> ATTR_EP
    TLS -- "client certificate or HTTP Basic" --> ENR_EP
    TLS -- "current device certificate (mutual TLS)" --> REN_EP
    CA_EP -. "reads" .-> CAKEY
    ENR_EP --> TPL
    REN_EP --> TPL
    TPL --> SVC
    SVC -- "signs with" --> CAKEY
    SVC --> STORE
Endpoints
All routes answer 404 unless est_enabled = true.
| Route | Authentication | Request | Response | Description |
|---|---|---|---|---|
GET /.well-known/est/cacerts | None | None | application/pkcs7-mime, base64 | The CA chain, as a certs-only PKCS#7. Devices use it to trust the issuing CA. |
GET /.well-known/est/csrattrs | None | None | application/csrattrs, base64 | What the CSR should contain. |
POST /.well-known/est/simpleenroll | TLS client certificate, or HTTP Basic bootstrap credentials when est_require_client_cert = false | PKCS#10 CSR, base64 | application/pkcs7-mime; smime-type=certs-only, base64 | First enrollment: the CSR is checked against the template, then signed by the CA. |
POST /.well-known/est/simplereenroll | The TLS client certificate being renewed | PKCS#10 CSR, base64, same Subject and SubjectAltName | application/pkcs7-mime; smime-type=certs-only, base64 | Renewal or key change. No shared secret is needed. |
Configuration
Each setting is available in the configuration file, as a command-line flag and as an environment
variable; see Server command line for the exact spellings. The
interactive cosmian_kms configure wizard also asks about EST at the last step (it turns EST off
with a warning when no TLS certificate is configured).
Setting ([est]) | Default | Meaning |
|---|---|---|
est_enabled | false | Serve the EST routes. When false, they answer 404. |
est_ca_uid | none | UID of the CA certificate. Required when EST is enabled. |
est_require_client_cert | true | true: first enrollment only over mutual TLS. false: HTTP Basic bootstrap is also accepted. |
est_bootstrap_username, est_bootstrap_password | none | Basic credentials; required when est_require_client_cert = false. The user name must not contain :; the password needs at least 8 characters (environment variable KMS_EST_BOOTSTRAP_PASSWORD). |
est_template | none | Name of the [templates.<name>] section. Required when EST is enabled; see Certificate templates. |
Startup rules: with est_require_client_cert = false the server needs TLS; with
est_require_client_cert = true it needs TLS and clients_ca_cert_file. For renewals the
device certificate must be accepted by the TLS layer, so set clients_ca_cert_file to the CA
certificate used for enrollment.
Tutorial: enroll your first device
In this tutorial a pretend device named device1.iot.example enrolls with a user name and
password, then renews its certificate. It reproduces what the project's automated EST test does
(mise run test:est-interop), so every command is known to work.
You will need, in addition to the prerequisites:
go install github.com/globalsign/est/cmd/estclient@v1.0.7
(The binary is written to $(go env GOPATH)/bin/estclient; add that directory to your PATH.)
1. Give the KMS a TLS certificate
If your KMS already serves HTTPS with a certificate your devices trust, skip this step. For the
tutorial, create a throw-away TLS authority and a server certificate for 127.0.0.1:
openssl req -x509 -newkey rsa:2048 -nodes -days 2 -subj "/CN=EST TLS CA" \
  -keyout tls-ca.key -out tls-ca.crt
openssl req -newkey rsa:2048 -nodes -subj "/CN=127.0.0.1" -keyout tls.key -out tls.csr
printf 'subjectAltName=IP:127.0.0.1,DNS:localhost\n' > tls.ext
openssl x509 -req -in tls.csr -CA tls-ca.crt -CAkey tls-ca.key -CAcreateserial -days 2 \
  -extfile tls.ext -out tls.crt
2. Enable EST in the server configuration
Add the following to your KMS configuration file (see
Server configuration file); keep your existing
[db] and [http] sections. Replace the paths with the absolute paths of the files created above.
[tls]
tls_cert_file = "/path/to/tls.crt"
tls_key_file = "/path/to/tls.key"
# Devices renew by presenting their current certificate over mutual TLS:
# the TLS layer must therefore trust the enrollment CA.
clients_ca_cert_file = "/path/to/ca.crt"

[est]
est_enabled = true
est_ca_uid = "device-ca"
# false = devices may enroll the first time with the user name and password below.
est_require_client_cert = false
est_bootstrap_username = "bootstrap"
est_bootstrap_password = "bootstrap-secret"
est_template = "iot_device"

[templates.iot_device]
name = "iot_device"
min_rsa_key_bits = 2048
allowed_ekus = ["clientAuth"]
max_validity_days = 365
default_validity_days = 90
# Only names such as device1.iot.example are accepted ("\\." is a literal dot in TOML).
subject_cn_regex = "[a-z0-9-]+\\.iot\\.example"
# SANs are refused unless a pattern allows them; uncomment to accept DNS SANs.
# san_dns_regex = "[a-z0-9-]+\\.iot\\.example"
bootstrap-secret is an example. Anyone who knows the bootstrap user name and password can
enroll a device that matches the template.
Restart the KMS. If the configuration is unsafe, the server refuses to start and says why (for instance EST with a password but without TLS).
3. Create the device key and CSR
On the device (here, your terminal):
openssl req -new -newkey rsa:2048 -nodes -subj "/CN=device1.iot.example" \
  -keyout dev1.key -out dev1.csr
dev1.key is the device's private key. It stays on the device.
4. Enroll
Replace PORT with the port of your KMS:
estclient enroll -server 127.0.0.1:PORT -explicit tls-ca.crt \
  -user bootstrap -pass bootstrap-secret \
  -csr dev1.csr -key dev1.key -out dev1.crt
-explicit tls-ca.crt tells the client which authority to trust for the KMS's TLS certificate.
5. Check the result
openssl verify -CAfile ca.crt dev1.crt
openssl x509 -in dev1.crt -noout -ext extendedKeyUsage
The first command confirms the certificate was signed by your CA. The second shows
TLS Web Client Authentication: the template added the clientAuth usage because the CSR did not
ask for any.
6. Renew
Before the certificate expires, the device creates a new key and CSR with the same name and presents its current certificate. No password is involved:
openssl req -new -newkey rsa:2048 -nodes -subj "/CN=device1.iot.example" \
  -keyout dev1-new.key -out dev1-new.csr
estclient reenroll -server 127.0.0.1:PORT -explicit tls-ca.crt \
  -certs dev1.crt -key dev1.key -csr dev1-new.csr -out dev1-renewed.crt
openssl verify -CAfile ca.crt dev1-renewed.crt
dev1-renewed.crt has a new serial number. The new CSR must carry the same Subject and
SubjectAltName as the current certificate, which must have been issued by this CA and still be
Active (not revoked).
7. See the safety rules work
Each of these must fail:
- enrolling with a wrong password: refused;
- enrolling a CSR whose name is outside the template, for example
openssl req -new -newkey rsa:2048 -nodes -subj "/CN=evil.example.com" -keyout evil.key -out evil.csrthenestclient enroll … -csr evil.csr -key evil.key: refused with HTTP422, and a message saying the name does not match; - renewing with a CSR for another name (
device2.iot.example): refused with HTTP400.
You now have a working enrollment service. To bring real devices in, give them the KMS address, the CA certificate (or its fingerprint) and the bootstrap credential, or provision them a client certificate if you use mutual TLS for the first enrollment.
Protocol flow
sequenceDiagram
    participant D as Device
    participant K as KMS EST
    D->>K: GET cacerts
    K-->>D: CA chain
    D->>K: GET csrattrs
    K-->>D: CSR attributes
    D->>K: POST simpleenroll with CSR and TLS client cert or Basic
    K->>K: Template checks then sign with the CA key
    K-->>D: Device certificate
    Note over D,K: Before expiry
    D->>K: POST simplereenroll with new CSR over mutual TLS
    K->>K: Same Subject and SAN, certificate Active
    K-->>D: Renewed certificate
Security notes
The shared security model applies. Specific to EST:
- TLS is mandatory. Bootstrap credentials and certificates travel over the HTTPS channel; the server refuses to start EST without TLS.
- Enrolled certificates only renew themselves. The KMS refuses them as a user identity on every
login path (including a certificate signed by an enrolled one), but accepts them on
simplereenrollfor their own renewal. simpleenrollwith a client certificate. A certificate issued by this CA must be active (not revoked or deactivated) and can only be enrolled again for the same Subject and SubjectAltName. A certificate that carries the enrollment marker but was issued elsewhere (the SCEP CA, an earlier key of this CA) is refused with403. The TLS layer does not check revocation of other client certificates (for example corporate ones accepted throughclients_ca_cert_file).- Do not mix trust roles. Setting
clients_ca_cert_fileto the enrollment CA is needed for renewal, but it also makes the TLS layer accept that CA's certificates for all clients of the listener. Prefer a dedicated listener or trust anchor for KMIP and API users where you can.
Troubleshooting
Errors common to EST and SCEP are listed on the overview.
| Symptom | Likely cause and fix |
|---|---|
404 on /.well-known/est/… | EST is disabled. Set est_enabled = true and restart. |
| The server refuses to start, mentioning TLS | EST with Basic credentials needs TLS; EST with est_require_client_cert = true needs TLS and clients_ca_cert_file. |
HTTP 401 on simpleenroll | Wrong or missing bootstrap credentials, and no accepted client certificate. |
HTTP 422 | The CSR breaks the template: name, SAN, key size, EKU or extension. The reply says which. |
HTTP 400 on simplereenroll | The CSR's Subject or SubjectAltName differs from the current certificate. |
HTTP 403 on simplereenroll or simpleenroll | The client certificate cannot be used for enrollment: not issued by this CA, expired, not Active (for example revoked), or enrolled elsewhere. The reply is a fixed message; the reason is in the server log. |
HTTP 429 / 503 | Too many wrong credentials from this address, or too many enrollments in progress; wait for Retry-After. |
Verifying the setup
mise run test:est-interop runs the globalsign estclient over TLS against a live KMS: cacerts,
csrattrs, enroll, mutual-TLS reenroll, and rejections.
Device enrollment with SCEP (RFC 8894)
SCEP (Simple Certificate Enrollment Protocol, RFC 8894) is what Apple and Windows MDM products and many routers use to obtain and renew a certificate. It works over HTTP or HTTPS and authenticates inside the signed and encrypted SCEP message rather than at the HTTP level. SCEP is disabled by default.
Before you start, complete the steps shared with EST on the Device enrollment overview: the prerequisites and creating and delegating the CA. The CA must be RSA, because SCEP requests are encrypted to the CA public key.
Architecture
flowchart LR
    D["Device or MDM<br/>key pair and CSR"]
    subgraph KMS["Eviden KMS (HTTP or HTTPS listener)"]
        CAPS["GET /scep?operation=GetCACaps"]
        CACERT["GET /scep?operation=GetCACert"]
        PKIOP["POST /scep?operation=PKIOperation<br/>GET /scep?operation=PKIOperation&message=..."]
        DEC["Decrypt the request with the CA key<br/>verify its signature"]
        AUTH["PKCSReq: challenge password<br/>RenewalReq: current certificate"]
        TPL["Template checks<br/>scep_template"]
        SVC["Signs as enrollment-service<br/>certify on the CA only"]
        STORE[("Issued certificates<br/>owned by the CA owner")]
    end
    CAKEY["RSA CA certificate and private key<br/>scep_ca_uid"]
    D --> CAPS
    D --> CACERT
    D -- "pkiMessage (CMS)" --> PKIOP
    CACERT -. "reads" .-> CAKEY
    PKIOP --> DEC
    DEC --> AUTH
    AUTH --> TPL
    TPL --> SVC
    SVC -- "signs with" --> CAKEY
    SVC --> STORE
    SVC -- "CertRep" --> D
Endpoints
A single resource, /scep, dispatches on the operation query parameter. Every route is also
served under /scep/pkiclient.exe, because the Windows MDM (NDES-style) client appends that suffix
to the configured URL. No HTTP-level authentication is applied: it happens inside the SCEP message.
All routes answer 404 unless scep_enabled = true.
| Route | Authentication | Request | Response | Description |
|---|---|---|---|---|
GET /scep?operation=GetCACaps | None | None | text/plain: POSTPKIOperation, SHA-256, AES, and Renewal only when scep_allow_renewal_without_challenge = true | Capabilities the client must negotiate. |
GET /scep?operation=GetCACert | None | None | application/x-x509-ca-cert (single CA) or application/x-x509-ca-ra-cert (chain) | The CA certificate the client encrypts its requests to. |
POST /scep?operation=PKIOperation | Challenge password (PKCSReq), or signature by a current certificate of this CA (RenewalReq) | application/x-pki-message body | application/x-pki-message (CertRep) | Enrollment or renewal. Issuance is synchronous. |
GET /scep?operation=PKIOperation&message=<base64> | Same as POST | Base64 pkiMessage in the query | application/x-pki-message (CertRep) | Same operation, for clients that cannot POST. |
GetCert, GetCRL, CertPoll and GetNextCACert are not implemented, and a PENDING answer is
never returned.
Configuration
Each setting is available in the configuration file, as a command-line flag and as an environment
variable; see Server command line for the exact spellings. The
interactive cosmian_kms configure wizard also asks about SCEP at the last step.
Setting ([scep]) | Default | Meaning |
|---|---|---|
scep_enabled | false | Serve /scep. |
scep_ca_uid | none | UID of the RSA CA certificate. Required when SCEP is enabled. |
scep_challenge_password | none | Shared secret for first enrollment, at least 8 characters (environment variable KMS_SCEP_CHALLENGE_PASSWORD). |
scep_allow_renewal_without_challenge | true | Accept renewals signed by a current certificate without the challenge. |
scep_template | none | Name of the [templates.<name>] section. Required when SCEP is enabled; see Certificate templates. |
How-to: enable SCEP
Add to the server configuration:
[scep]
scep_enabled = true
scep_ca_uid = "device-ca"
scep_challenge_password = "<a long random secret>"
scep_allow_renewal_without_challenge = true
scep_template = "mdm_device"

[templates.mdm_device]
name = "mdm_device"
min_rsa_key_bits = 2048
allowed_ekus = ["clientAuth"]
max_validity_days = 365
default_validity_days = 90
subject_cn_regex = "[a-z0-9.-]+"
# SANs are refused unless a pattern allows them; set one if your MDM profile requests SANs.
# san_dns_regex = "[a-z0-9.-]+"
Restart the KMS, then check that SCEP answers (use https:// if your KMS serves TLS):
curl -fsS "http://<kms-host>:<port>/scep?operation=GetCACaps"
The answer is exactly these lines (Renewal is omitted when
scep_allow_renewal_without_challenge = false):
POSTPKIOperation
SHA-256
AES
Renewal
In your MDM or router, set the SCEP URL to http(s)://<kms-host>:<port>/scep, the challenge
password to the value above, and pin the CA certificate or its fingerprint (see
Security notes).
How SCEP behaves:
- the first request (
PKCSReq) must carry the challenge password; - a renewal (
RenewalReq) is signed with a certificate previously issued by this CA that is still valid andActive; it needs no challenge and must keep the same Subject and SubjectAltName. Setscep_allow_renewal_without_challenge = falseto forbid it (aRenewalReqis then refused with HTTP400and counted as a failed attempt); - the request must be signed with an RSA or EC key, because the certificate is returned encrypted to it;
- the envelope must use AES-CBC (128, 192 or 256) and the signature SHA-256, SHA-384 or SHA-512:
DES,
DES3, RC2,SHA-1and MD5 are refused in every build, so the client must negotiateAESandSHA-256.
Protocol flow
sequenceDiagram
    participant D as Device or MDM
    participant K as KMS SCEP
    D->>K: GetCACaps
    K-->>D: POSTPKIOperation, SHA-256, AES, Renewal
    D->>K: GetCACert
    K-->>D: CA certificate
    D->>K: PKCSReq with CSR and challenge, encrypted to the CA
    K->>K: Decrypt, check challenge and template, sign
    K-->>D: CertRep SUCCESS with the certificate
    Note over D,K: Before expiry
    D->>K: RenewalReq signed with the current certificate
    K-->>D: CertRep SUCCESS with the renewed certificate
The implementation is built for clients that honour GetCACaps. It is verified against the
micromdm scepclient (whose stock build hard-codes single DES and must be built with
AES-128-CBC; see mise run test:scep-interop) and against the native macOS 26.6 SCEP client
(see mise run test:scep-apple). Renewal by the Apple client and Windows clients were not
verified.
Security notes
The shared security model applies. Specific to SCEP:
- Use HTTPS, or pin the CA. SCEP also works over HTTP (the server logs a warning at startup),
but then
GetCACertis not authenticated: a device must pin the CA certificate or its fingerprint out of band (for example in the MDM profile), otherwise an attacker on the network could substitute their own CA, and the AES-CBC envelope has no integrity protection. - The challenge password is shared. It is the same for all devices and does not expire: make it
long and random. Wrong challenges lock the client address out (
429); only a successfulPKCSReqclears the count, a renewal does not. Message types the CA does not process (GetCert,GetCRL,CertPoll, or a disabledRenewalReq) are refused with HTTP400before any CA operation and count as failed attempts. - Replays and error replies. A captured request cannot be replayed: a message that already
authenticated (same signer, transaction ID and nonce, or the same encrypted request re-signed
by another certificate) is refused for an hour. Every failure after the message is parsed is a
badRequest, so the reply does not tell an undecryptable envelope from a wrong challenge. The transaction ID must be at most 128 characters from the ASN.1PrintableStringset (letters, digits, space and'()+,-./:=?). - Enrolled certificates cannot log in to the KMS. They can only sign their own
RenewalReq. - KMIP algorithm policy. When
kmip_policy.policy_idis set, device keys, CSR signatures and the CA key must satisfy the policy (for example RSA 3072 or 4096 bits underDEFAULT); a non-compliant request is refused withbadRequest. The SCEP envelope (AES-CBC, RSA key transport) is protocol transport and is exempt.
Troubleshooting
Errors common to EST and SCEP are listed on the overview.
| Symptom | Likely cause and fix |
|---|---|
404 on /scep | SCEP is disabled. Set scep_enabled = true and restart. |
badRequest reply | The request was refused: the CSR breaks the template (name, SAN, key size, EKU, extension), the challenge is wrong, or the message was replayed. The reply never says which (it would be an oracle); the server log does. |
HTTP 500 "the enrollment CA is not available" | The CA certificate or key cannot be used by the enrollment service (missing certify grant, key not Active); the server log names the object and the reason. |
HTTP 400 on PKIOperation, or a badRequest reply that the server log ties to the envelope algorithm | The client ignores GetCACaps: a SHA-1 or MD5 signature is refused before any processing (400), and a DES, 3DES or RC2 envelope is refused with badRequest (counted as a failed attempt). Use a client that negotiates AES and SHA-256. |
| A renewal or enrollment is refused right after a successful identical one | The message was replayed (same signer, transaction ID and sender nonce, or the same encrypted request): generate a fresh nonce and re-encrypt for every message. |
HTTP 429 / 503 | Too many failed attempts from this address, or too many enrollments in progress; wait for Retry-After. |
Verifying the setup
mise run test:scep-interop: the micromdmscepclient: enrollment, challenge-less renewal and a wrong challenge.mise run test:scep-apple(macOS, interactive): installs acom.apple.security.scepprofile with aCAFingerprintpin; you approve it in System Settings. It checks the Apple request (SHA-256, AES, RSA-2048, challenge) and the issued identity in the keychain, then stores the capture undertest_data/scep/apple/for the CI testapple_scep_fixtures_parse.
HSM Support
The Eviden KMS can be configured to use HSMs to store and manage keys and create KMS keys wrapped by the HSM keys. This provides the best of both worlds: the security of an HSM at rest and the scalability of a KMS at runtime.
The Eviden KMS natively integrates with the Thales Luna Network HSM, the Proteccio, the Utimaco general purpose, the Smartcard HSM, the Kryoptic PKCS#11 v3.0 software token, the AWS CloudHSM, the GCP Cloud HSM, and any HSM that has a standard PKCS#11 interface such as SoftHSMv2.
Integration Workflow

Main use case and benefits
Aside from providing a single interface to manage both KMS and HSM keys, the main use case for HSM support is to host keys in the KMS that are wrapped by keys stored in the HSM.
This combination provides the best of both worlds:
- the scalability and performance of the KMS at runtime to answer a large number of requests concurrently,
- and the hardware security of the HSM at rest, which may be a compliance requirement in some industries.
Typical use cases include:
- securing workplace applications such as MS 365 or Google Workspace, where concurrent requests from potentially a large number of users need to be processed quickly,
- securing big data applications such as Hadoop/Spark, Snowflake, Databricks, where a large number of encryption and decryption requests need to be processed on the fly for each request.
At Rest
KMS keys are stored in the KMS database in a wrapped form, and the wrapping key is stored in the HSM. This provides an additional layer of security for the keys stored in the KMS, since the keys stored in the HSM are protected by the HSM's hardware security mechanisms, and benefit from the HSM certifications.
At Runtime
Encryption and decryption requests from applications are processed by the KMS, which first unwraps the keys stored in the KMS database using the keys stored in the HSM. Contrary to the HSM, the KMS is a highly scalable and performant system that can handle a large number of requests concurrently.
HSM keys & operations
In addition to managing its keys, Eviden KMS can act as a proxy to an HSM, storing and managing keys within the HSM.
See Algorithm support by model for a per-vendor PKCS#11 algorithm and capability comparison.
The HSM's slot-local object-handle and OAEP hash caches are documented in
Cache mechanisms.
The current implementation reads key metadata from PKCS#11 on demand; it has
no KeyMetadataCache.
HSM keys
HSM keys are prefixed keys. They are created with a unique identifier that is prefixed by the hsm keyword and the
slot number in the form:
hsm::<slot_number>::<key_identifier>
For instance, the key hsm::1::mykey is stored in the HSM slot 1 with the identifier mykey. Technically, the identifier
is stored in the LABEL field of the key object in the HSM.
The PKCS#11 standard does not enforce label uniqueness: multiple key objects can share the same LABEL
in the same slot. Eviden KMS however uses the label as the sole key identifier within a slot, so it requires
labels to be unique per slot per key type. If two objects of the same type share a label in the same slot,
Eviden KMS will return an error when that label is referenced. Always verify that no existing object already
uses a label before creating a new key with pkcs11-tool --list-objects.
Eviden KMS sets both CKA_LABEL and CKA_ID (to the same bytes as the label) on every key it creates in
the HSM. This conforms to PKCS#11 v2.40 and prevents spurious warnings from tools such as
pkcs11-tool --list-objects. Keys provisioned externally (via pkcs11-tool or the HSM vendor software)
should also have CKA_ID set to match the label bytes if they are intended to be used with Eviden KMS.
Non-prefixed keys are considered KMS keys and are stored in the KMS database.
HSM admin
The KMS server maintains a list of HSM admin users that are allowed to create and destroy
objects directly in the HSM. This is configured with the hsm_admin key in kms.toml:
# One or more KMS usernames with HSM admin privileges
hsm_admin = ["alice@example.com", "bob@example.com"]

# Wildcard: any authenticated user becomes an HSM admin
hsm_admin = ["*"]
From the command line, pass one --hsm-admin flag per username (or a single comma-separated value):
# Two explicit admins
cosmian_kms --hsm-admin alice@example.com --hsm-admin bob@example.com ...

# Or via environment variable
KMS_HSM_ADMIN=alice@example.com,bob@example.com cosmian_kms ...
HSM key authorization model
HSM keys follow a stricter permission model than regular KMS keys. The key principles are:
- HSM admins are the only users who can create and destroy HSM keys.
- All HSM admins share ownership of all HSM keys (any admin can grant, revoke, or destroy any HSM key).
- Non-admin users can only use HSM keys they have been explicitly granted operations on.
- The
Getpermission does not act as a wildcard for HSM keys — each operation must be granted individually. - Locate only returns HSM keys the user is authorized to see (all keys for admins, granted keys for non-admins).
- The server KEK (Key Encryption Key) is a shared wrapping resource accessible to all users for wrapping/unwrapping, but direct cryptographic operations on the KEK itself require explicit grants.
Operations by role
| Operation | HSM Admin | Non-admin (granted) | Non-admin (no grant) |
|---|---|---|---|
| Create / CreateKeyPair | ✅ | ❌ | ❌ |
| Destroy | ✅ | ❌ (cannot be granted) | ❌ |
| Locate | All HSM keys | Granted keys only | None |
| Grant / Revoke (access rights) | ✅ (any HSM key) | ❌ | ❌ |
| Encrypt | ✅ | ✅ | ❌ |
| Decrypt | ✅ | ✅ | ❌ |
| Sign | ✅ | ✅ | ❌ |
| SignatureVerify | ✅ | ✅ | ❌ |
| MAC | ✅ | ✅ | ❌ |
| Get / Export | ✅ | ✅ (metadata if sensitive) | ❌ |
| GetAttributes | ✅ | ✅ | ❌ |
| SetAttribute / ModifyAttribute / AddAttribute / DeleteAttribute | ✅ | ✅ | ❌ |
| Revoke (lifecycle state) | ❌ (not supported) | ❌ | ❌ |
Grantable operations on HSM keys
| Operation | Can be granted? | Notes |
|---|---|---|
encrypt | ✅ | Symmetric (AES) and asymmetric (RSA) |
decrypt | ✅ | Symmetric (AES) and asymmetric (RSA) |
sign | ✅ | RSA private keys only |
signature_verify | ✅ | RSA public keys only |
mac | ✅ | Compute a Message Authentication Code using the HSM key |
get | ✅ | Retrieve key material or metadata; also implies export |
export | ✅ | Export key; also implies get |
get_attributes | ✅ | Read KMS metadata |
locate | ✅ | Search visibility for this key |
set_attribute | ✅ | Modify KMS metadata — does not access HSM hardware |
modify_attribute | ✅ | Modify KMS metadata — does not access HSM hardware |
add_attribute | ✅ | Modify KMS metadata — does not access HSM hardware |
delete_attribute | ✅ | Modify KMS metadata — does not access HSM hardware |
destroy | ❌ | Admin-only — irreversible hardware operation |
revoke | ❌ | HSM keys do not support KMIP lifecycle state changes |
create | ❌ | Admin-only — not a per-key grant |
Unlike regular KMS keys, granting Get on an HSM key does not implicitly grant all other operations.
Each operation (Encrypt, Decrypt, Sign, etc.) must be granted individually.
Creating a KMS key wrapped by an HSM key
KMS Keys can be created wrapped by an HSM key, either manually or automatically.
Manually using the CLI
To create a KMS key wrapped by an HSM key, the --wrapping-key-id argument must be used to specify the unique
identifier of the HSM key.
The user creating the key must be the HSM admin (see above) or have been granted the Encrypt operation on the HSM key.
When the server is configured with a key_encryption_key (see Automatically using the server configuration),
that KEK is a shared server resource and can be used as a wrapping key by any authenticated user, not just
the HSM admin. This allows non-admin users to create their own KMS keys wrapped by the server KEK.
For instance, the following command creates a 256-bit AES key wrapped by the HSM RSA (public) key
hsm::4::my_rsa_key_pk:
> ckms sym keys create --algorithm aes --number-of-bits 256 --sensitive \
  --wrapping-key-id hsm::4::my_rsa_key_pk my_sym_key
The symmetric key was successfully generated.
      Unique identifier: my_sym_key
The symmetric key is now stored in the database encrypted (wrapped) by the HSM key. The encryption happened in the HSM.
Manually using the Web UI
In the web UI, fill in the Wrapping Key ID field with the unique identifier of the HSM key.
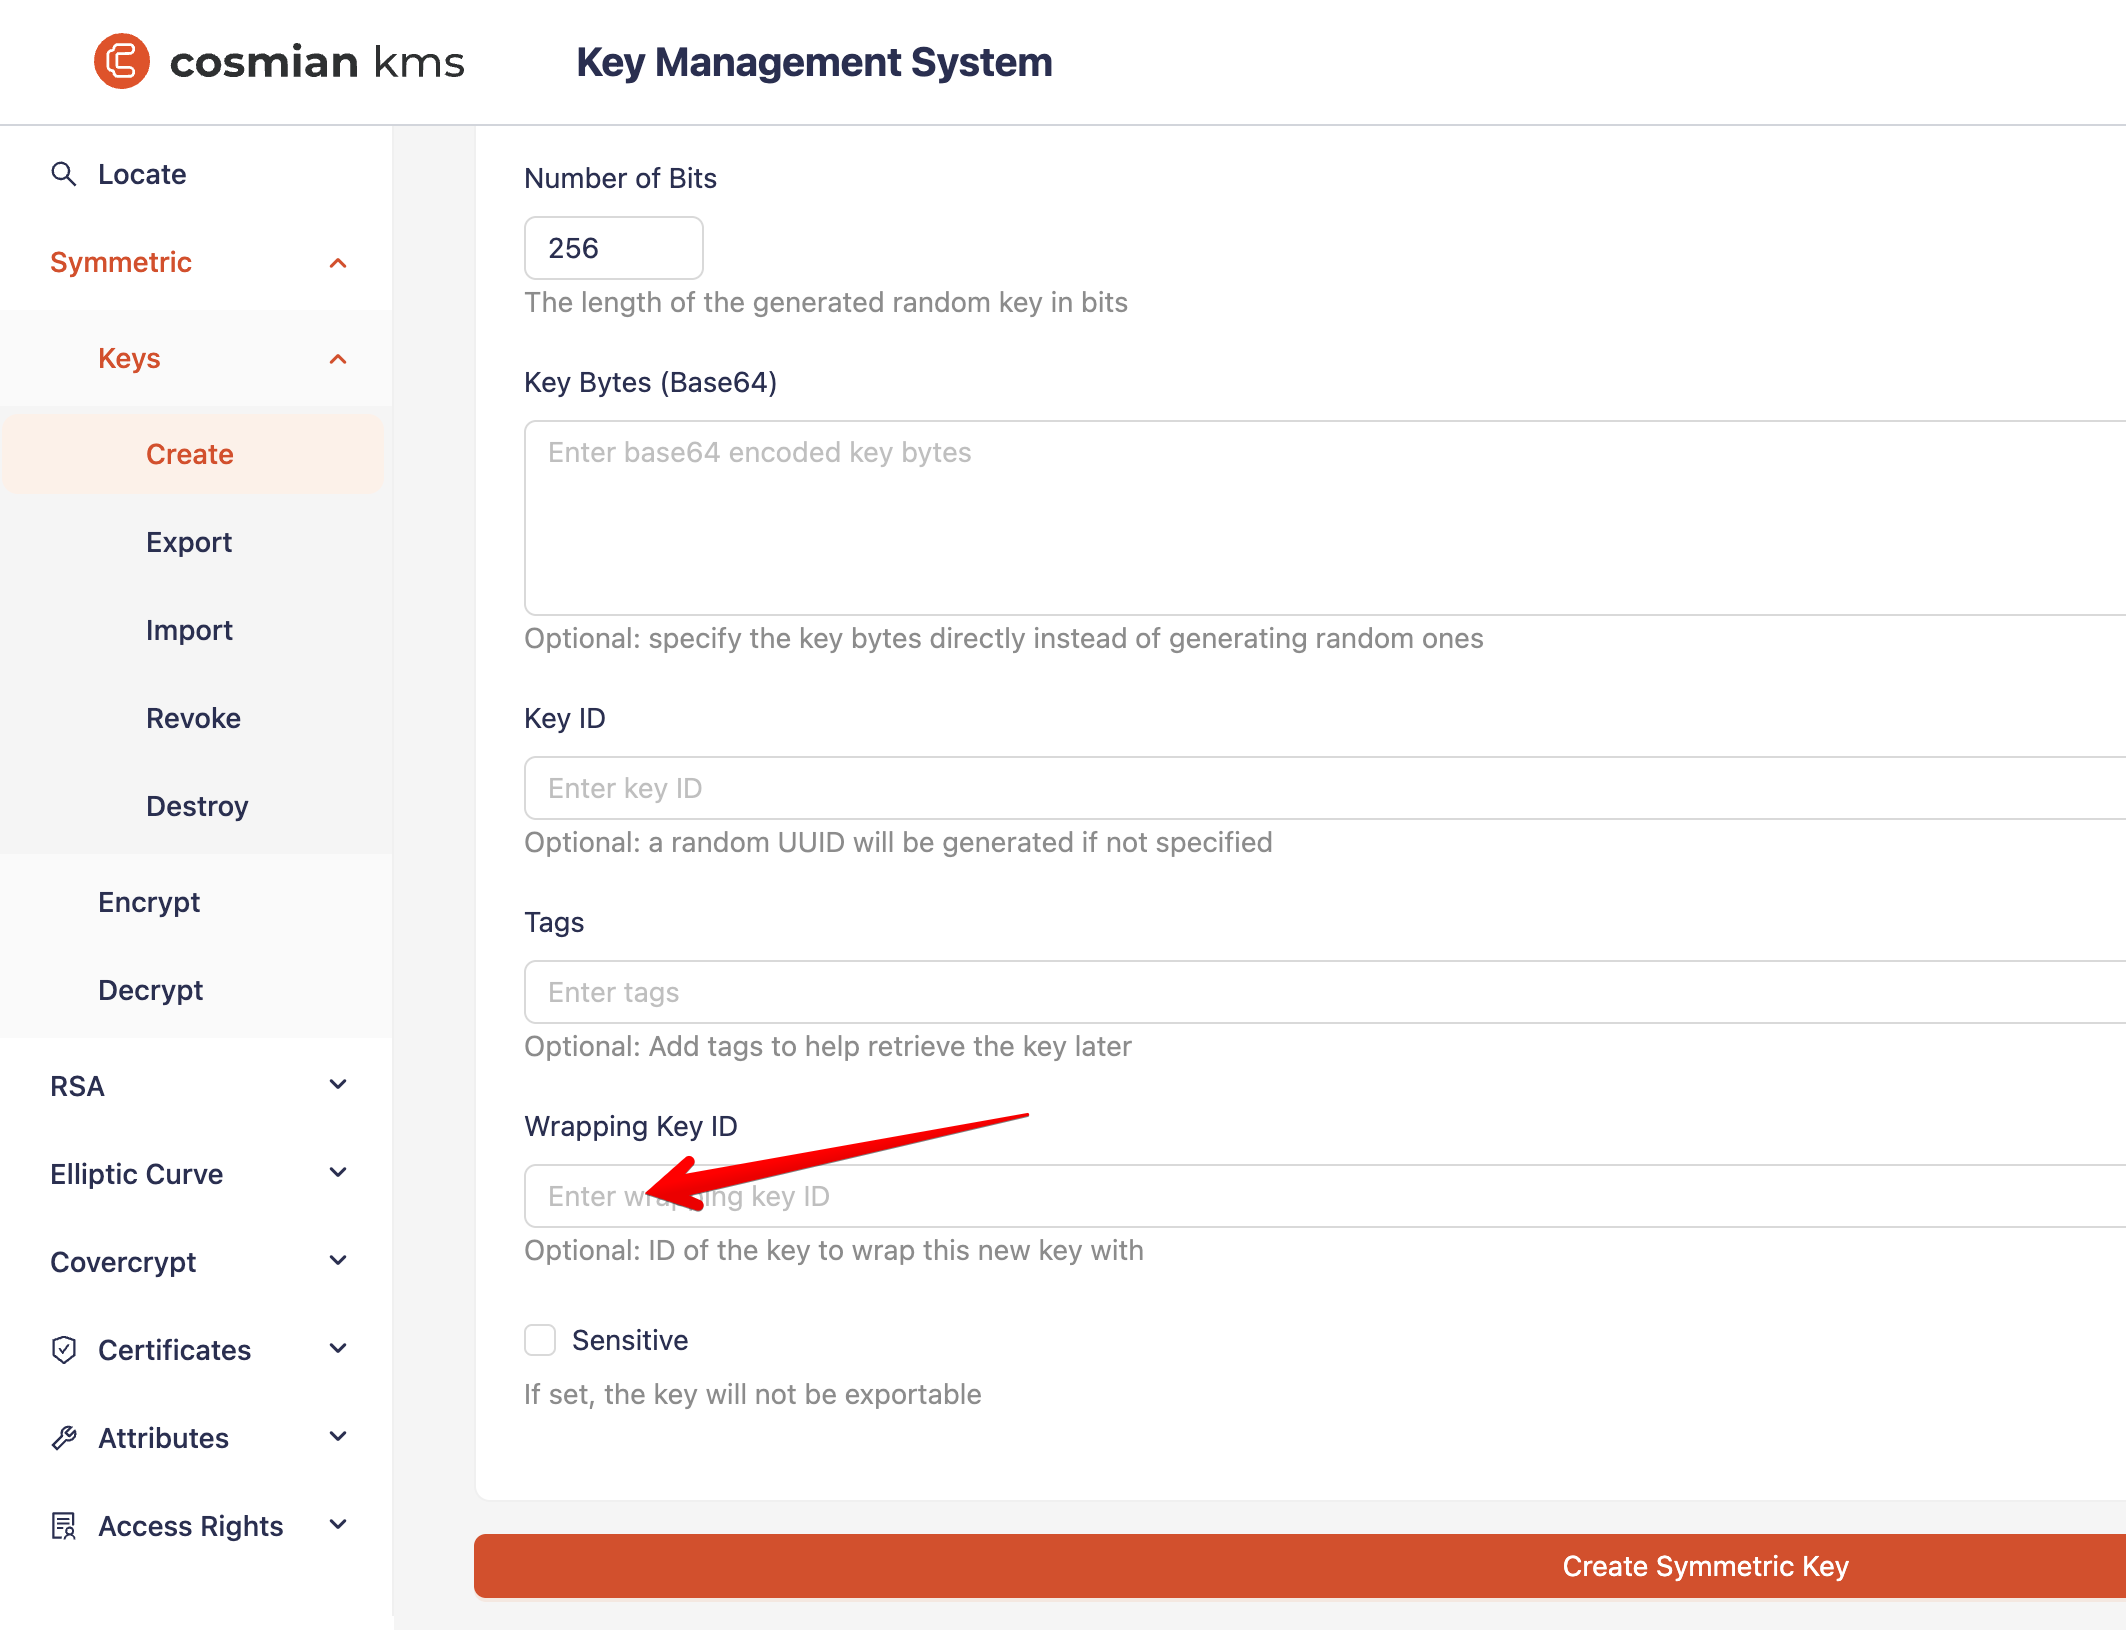
Automatically using the server configuration
The KMS server can automatically wrap all KMS keys with a specific HSM key.
This is done by setting the key_encryption_key property in the TOML server configuration file
or using the corresponding command line switch.
When key_encryption_key is configured, all newly created and imported keys will be automatically wrapped
by the specified Key Encryption Key (KEK), typically an HSM key. Keys are stored wrapped in the KMS database,
ensuring no clear-text key material is persisted.
The server provides selective automatic unwrapping through the default_unwrap_type configuration parameter.
This controls which KMIP object types are automatically unwrapped when retrieved via Get or Export operations:
- Valid values:
["PrivateKey", "PublicKey", "SymmetricKey", "SecretData"] - Default:
[](no automatic unwrapping) - When a
key_encryption_keyis set, it's common to configuredefault_unwrap_type = ["SymmetricKey", "SecretData"]
Example configuration:
# Force all keys to be wrapped by an HSM key
key_encryption_key = "hsm::4::master_kek"

# Automatically unwrap symmetric keys and secret data when retrieved
default_unwrap_type = ["SymmetricKey", "SecretData"]
When an object matching the configured types is retrieved, it is automatically unwrapped and cached in the server's memory cache (see The Unwrapped Objects Cache). This enables transparent encryption/decryption operations without storing clear-text keys in the database while minimizing HSM calls through expiring caching.
Using the wrapped KMS key
The symmetric key created above can now be used to encrypt and decrypt data, and the KMS will transparently unwrap the key using the HSM key.
This unwrapping will happen once, and the unwrapped symmetric key will be cached in memory for later operations; no clear-text symmetric key will be stored in the KMS database.
Small data: encrypting server-side
For example, to encrypt a message with the key my_sym_key server-side, the following command can be used:
> ckms sym encrypt --key-id my_sym_key /tmp/secret.txt
The encrypted file is available at "/tmp/secret.enc"
To decrypt a message with the key my_sym_key, the following command can be used:
> ckms sym decrypt --key-id my_sym_key --output-file /tmp/secret.recovered.txt /tmp/secret.enc
The decrypted file is available at "/tmp/secret.recovered.txt"
Large data: encrypting client side with key wrapping
To encrypt a large file with the key my_sym_key client side, the following command can be used:
>ckms sym encrypt --key-id my_sym_key_2 --data-encryption-algorithm aes-gcm \
--key-encryption-algorithm rfc5649 /tmp/large.bin
The encrypted file is available at "/tmp/large.enc"
In this case, an ephemeral symmetric key (the Data Encryption Key, DEK) is generated and used to encrypt the data.
The DEK is then encrypted/wrapped with RFC4659 (a.k.a NIST AES Key Wrap) with the key my_sym_key,
called the Key Encryption Key, KEK.
The wrapping of the DEK by the KEK is stored at the beginning of the encrypted file.
At rest, in the KMS database, my_sym_key is stored encrypted/wrapped with the HSM key hsm::4::my_rsa_key_pk.
To decrypt a large file with the KEK my_sym_key client side, the following command can be used:
> ckms sym decrypt --key-id my_sym_key_2 --data-encryption-algorithm aes-gcm \
  --key-encryption-algorithm rfc5649 --output-file /tmp/large.recovered.bin /tmp/large.enc
The decrypted file is available at "/tmp/large.recovered.bin"
Unwrapping a KMS-wrapped key from a file
If a KMS key was exported in wrapped KMIP JSON TTLV format (for example, via ckms sym keys export without --unwrap),
it can later be unwrapped using ckms sym keys unwrap.
When the unwrapping key is an HSM key (identified by the hsm:: prefix), the KMS performs the unwrap
server-side using its crypto oracle: the wrapped file is imported to the KMS with key_wrap_type=NotWrapped,
the server decrypts it using the HSM key, and the result is exported back to the output file.
This is transparent to the caller and works even when the HSM key is marked sensitive (non-extractable).
# Export a wrapped DEK to disk
ckms sym keys export --key-id my_sym_key /tmp/my_sym_key_wrapped.json

# Unwrap it using the HSM KEK — the KMS handles the decryption server-side
ckms sym keys unwrap --unwrap-key-id hsm::4::master_kek \
  /tmp/my_sym_key_wrapped.json /tmp/my_sym_key_unwrapped.json
The Unwrapped Objects Cache
The unwrapped cache is a memory cache, and it is not persistent. The unwrapped cache is used to store unwrapped objects that are fetched from the database.
When a wrapped object is fetched from the database, it is unwrapped and stored in the unwrapped cache. Further calls to the same object will use the unwrapped object from the cache until the cache expires.
The time in minutes after an unused object is evicted from the cache is configurable
using the unwrapped_cache_max_age setting. The default is 15 minutes.
When HSM keys wrap objects, a long expiration time reduces the number of calls made to the HSM to unwrap the object. However, increasing the cache time will increase the memory the KMS server uses and expose the key in clear text in the memory for a longer time.
HSM KMIP operations
Some KMIP operations can be performed directly via the KMS server API on the HSM keys.
Create
Create a new key in the HSM. The key unique must be provided on the request and must follow the
hsm::<slot_number>::<key_identifier> format described above.
Only HSM admin users can create keys directly in the HSM (see HSM admin above).
RSA and AES keys are supported.
When creating an RSA key, the key_identifier will be that of the private key. The corresponding public key will be
automatically created and stored in the HSM with the same key_identifier but with the _pk suffix, for example,
the public key of the hsm::1::mykey private key will be created with a unique identifier hsm::1::mykey_pk.
Create an RSA 4096-bit key on the HSM slot 4, with the KMS CLI:
❯ ckms rsa keys create --size_in_bits 4096 hsm::4::my_rsa_key
The RSA key pair has been created.
      Public key unique identifier: hsm::4::my_rsa_key_pk
      Private key unique identifier: hsm::4::my_rsa_key
Create an AES 256-bit key on HSM slot 4, with the KMS CLI:
❯ ckms sym keys create --algorithm aes --number-of-bits 256 hsm::4::my_aes_key
The symmetric key was successfully generated.
   Unique identifier: hsm::4::my_aes_key
Elliptic curve key pairs can also be created directly on the HSM, using the same ec keys create CLI command as for software keys. The FIPS-approved NIST curves supported by the HSM
integration are P-256 (default), P-384, and P-521 — the same curves accepted by
--curve nist-p256/nist-p384/nist-p521. With the non-fips build feature,
Ed25519 and Ed448 (for EdDSA signing) and X25519 (for ECDH key agreement) are also
supported — see HSM-delegated EdDSA signing below. X448 and the non-FIPS NIST
curves (secp256k1, secp224k1) remain unsupported by the HSM delegation and are
software-only.
Create an EC P-384 key pair on HSM slot 4, with the KMS CLI:
❯ ckms ec keys create --curve nist-p384 hsm::4::my_ec_key
The EC key pair has been created.
      Public key unique identifier: hsm::4::my_ec_key_pk
      Private key unique identifier: hsm::4::my_ec_key
HSM keys are always created with CKA_SENSITIVE=true (private/symmetric key material cannot be
exported). Pass --sensitive false explicitly only if you intentionally need an extractable key.
Note: HSM keys do not support object tagging in this release.
Using pkcs11-tool directly
Keys can also be provisioned directly in the HSM with pkcs11-tool (part of OpenSC), bypassing the Eviden KMS
entirely. This is useful for pre-provisioning a master KEK before the KMS server starts, or for HSM models where
the Eviden PKCS#11 integration does not yet support key generation.
The LABEL set with --label becomes the <key_identifier> part of the Eviden KMS unique identifier
hsm::<slot_number>::<label>.
Step 1 — List available slots
pkcs11-tool --module /tw/oemDist/libnethsmpkcs11.so --list-slots
Step 2 — Create an AES key
--key-type AES:<bytes> — size in bytes (16 = 128-bit, 24 = 192-bit, 32 = 256-bit).
# AES-128 key on slot 1, label "master_kek"
pkcs11-tool --module /tw/oemDist/libnethsmpkcs11.so \
  --slot 1 \
  --key-type AES:16 \
  --keygen \
  --label master_kek

# AES-256 key on slot 1, label "data_kek"
pkcs11-tool --module /tw/oemDist/libnethsmpkcs11.so \
  --slot 1 \
  --key-type AES:32 \
  --keygen \
  --label data_kek
If the slot requires a PIN, add --login --pin <PIN> (or --login alone to be prompted interactively):
pkcs11-tool --module /tw/oemDist/libnethsmpkcs11.so \
  --slot 1 \
  --login --pin 1234 \
  --key-type AES:32 \
  --keygen \
  --label data_kek
Step 3 — Create an RSA key pair
# RSA-4096 key pair on slot 4, label "my_rsa_key"
pkcs11-tool --module /tw/oemDist/libnethsmpkcs11.so \
  --slot 4 \
  --login --pin 1234 \
  --key-type RSA:4096 \
  --keypairgen \
  --label my_rsa_key
The private key label becomes hsm::4::my_rsa_key in Eviden KMS. For RSA key pairs, Eviden KMS
appends _pk to the label to build the public key identifier: hsm::4::my_rsa_key_pk.
Step 4 — Verify the objects are visible
Always check for existing objects with the same label before creating a new key — Eviden KMS requires labels to be unique within a slot and key type:
pkcs11-tool --module /tw/oemDist/libnethsmpkcs11.so \
  --slot 1 \
  --list-objects
The AES key created above will then be addressable in Eviden KMS as hsm::1::master_kek
and can immediately be used as a KEK:
# kms.toml
key_encryption_key = "hsm::1::master_kek"
Destroy
Unlike KMS keys, HSM keys must not be revoked before being destroyed. The Destroy operation will remove the
key from the HSM.
Only HSM admin users can destroy keys in the HSM. The Destroy operation cannot be delegated to non-admin users.
To destroy the key hsm::4::my_rsa_key, the following command can be used:
❯ ckms rsa keys destroy --key-id hsm::4::my_rsa_key
Successfully destroyed the key.
      Unique identifier: hsm::4::mykey
To destroy the corresponding public key hsm::4::my_rsa_key_pk, the following command can be used:
❯ ckms rsa keys destroy --key-id hsm::4::my_rsa_key_pk
Successfully destroyed the object.
   Unique identifier: hsm::4::my_rsa_key_pk
Get - Export
The Get and Export operations are used to retrieve the key material from the HSM.
Only HSM admin users, or a user granted the Get operation by an HSM admin, can retrieve keys from the HSM.
Private or symmetric keys marked as sensitive cannot be retrieved from the HSM.
The public key of a key pair can always be retrieved.
To export the public key hsm::4::my_rsa_key_pk in PKCS#8 PEM format, the following command can be used:
❯ ckms rsa keys export --key-id hsm::4::my_rsa_key_pk --key-format pkcs8-pem /tmp/pubkey.pem
The key hsm::4::my_rsa_key_pk of type PublicKey was exported to "/tmp/pubkey.pem"
   Unique identifier: hsm::4::my_rsa_key_pk
To export the private key hsm::4::mykey in PKCS#8 PEM format, the following command can be used:
❯ ckms rsa keys export --key-id hsm::4::my_rsa_key --key-format pkcs8-pem /tmp/privkey.pem
The key hsm::4::my_rsa_key of type PrivateKey was exported to "/tmp/privkey.pem"
   Unique identifier: hsm::4::my_rsa_key
To export the symmetric key hsm::4::my_aes_key in raw format (i.e., raw bytes),
the following command can be used:
❯ ckms sym keys export --key-id hsm::4::my_aes_key --key-format raw /tmp/symkey.raw
The key hsm::4::my_aes_key of type SymmetricKey was exported to "/tmp/symkey.raw"
   Unique identifier: hsm::4::my_aes_key
Encrypt
Symmetric keys and public keys can be used to encrypt data. Only HSM admin users, or a user granted the Encrypt
operation by an HSM admin, can encrypt data with keys stored in the HSM.
For symmetric keys, only AES GCM is supported. CKM_RSA_PKCS_OAEP and the now-deprecated, but still widely used, CKM_RSA_PKCS (v1.5) are supported for RSA keys. The hashing algorithm is fixed to SHA256.
When using RSA, the maximum message size in bytes is:
- PKCS#1 v1.5: (key size in bits / 8) - 11
- OAEP: (key size in bits / 8) - 66
To encrypt a message with the public key hsm::4::my_rsa_key_pk and the CKM RSA PKCS OAEP algorithm, the following
command can be used:
❯ ckms rsa encrypt --key-id hsm::4::my_rsa_key_pk --encryption-algorithm ckm-rsa-pkcs-oaep \
/tmp/secret.txt
The encrypted file is available at "/tmp/secret.enc"
To encrypt a message using AES GCM with the symmetric key hsm::4::my_aes_key, the following command can be used:
❯ ckms sym encrypt --key-id hsm::4::my_aes_key --data-encryption-algorithm aes-gcm /tmp/secret.txt
The encrypted file is available at "/tmp/secret.enc"
Decrypt
Symmetric keys and private keys can be used to decrypt data. Only HSM admin users, or a user granted the Decrypt
operation by an HSM admin, can decrypt data with keys stored in the HSM.
For symmetric keys, only AES GCM is supported. CKM_RSA_PKCS_OAEP and the now-deprecated, but still widely used, CKM_RSA_PKCS (v1.5) are supported for RSA keys. The hashing algorithm is fixed to SHA256.
To decrypt a message with the private key
key hsm::4::hsm::4::my_rsa_key and the CKM RSA PKCS OAEP algorithm, the following command can be used:
❯ ckms rsa decrypt --key-id hsm::4::my_rsa_key --encryption-algorithm ckm-rsa-pkcs-oaep \
  --output-file /tmp/secret.recovered.txt /tmp/secret.enc
The decrypted file is available at "/tmp/secret.plain"
To decrypt a message using AES GCM with the symmetric key hsm::4::my_aes_key, the following command can be used:
> ckms sym decrypt --key-id hsm::4::my_aes_key --data-encryption-algorithm aes-gcm \
  --output-file /tmp/secret.recovered.txt /tmp/secret.enc
The decrypted file is available at "/tmp/secret.recovered.txt"
Sign
RSA and EC private keys can be used to sign data. Only HSM admin users, or a user granted the
Sign operation by an HSM admin, can sign data with keys stored in the HSM.
Two families of RSA signing mechanisms are supported:
- PKCS#1 v1.5 (
CKM_SHA{1,256,384,512}_RSA_PKCS): deterministic, the classic RSA signature scheme. - RSASSA-PSS (
CKM_SHA{256,384,512}_RSA_PKCS_PSS): the probabilistic scheme recommended by current standards (e.g. FIPS 186-5, RFC 8017). The salt length defaults to the digest length in bytes (32 for SHA-256, 48 for SHA-384, 64 for SHA-512) and can be overridden via the KMIPCryptographicParameters.salt_lengthfield;salt_length: 0produces a deterministic PSS signature.
The ckms rsa sign CLI command always uses RSASSA-PSS with SHA-256, matching the KMS software
signing path. To sign a file with the HSM-resident private key hsm::4::my_rsa_key, the following
command can be used:
❯ ckms rsa sign --key-id hsm::4::my_rsa_key -o /tmp/secret.sig /tmp/secret.txt
The signature is available at "/tmp/secret.sig"
RSA-PSS signing over HSM-resident keys is delegated end-to-end to the PKCS#11 device: the
private key never leaves the HSM, and the PSS mechanism parameters (hash algorithm, MGF1
hash algorithm, salt length) are built from the KMIP request and passed directly to
C_Sign via CK_RSA_PKCS_PSS_PARAMS. When the KMIP request carries digested_data, the KMS
uses raw CKM_RSA_PKCS_PSS so the supplied digest is signed directly; otherwise it uses the
matching CKM_SHA{256,384,512}_RSA_PKCS_PSS mechanism. This is purely additive: existing
PKCS#1 v1.5 and OAEP mechanisms, key types, and HSM vendor loaders are unaffected. See
ADR-2026-09-05 for the scope
decision.
ECDSA signing over an HSM-resident EC private key uses the same ec sign CLI command as the
software signing path. The CLI now sends curve-appropriate KMIP CryptographicParameters
automatically (P-256 → ECDSAWithSHA256, P-384 → ECDSAWithSHA384, P-521 → ECDSAWithSHA512),
and the HSM path dispatches them to C_Sign with CKM_ECDSA_SHA{256,384,512}. When --digested
is used, the server switches to raw CKM_ECDSA so the supplied digest is signed directly instead
of being hashed a second time.
To sign a file with the HSM-resident EC private key hsm::4::my_ec_key, the following command
can be used:
❯ ckms ec sign --key-id hsm::4::my_ec_key -o /tmp/secret.sig /tmp/secret.txt
The signature is available at "/tmp/secret.sig"
ECDSA signing over HSM-resident EC keys is delegated end-to-end to the PKCS#11 device: the
private key never leaves the HSM. PKCS#11 ECDSA signatures are the raw, fixed-length r‖s
concatenation; the KMS converts this to the DER SEQUENCE { r, s } encoding expected
elsewhere in the codebase before returning the signature. Depending on the HSM and mechanism
implementation, ECDSA signatures may be randomized or deterministic (for example RFC 6979);
both behaviors are valid as long as the returned signature verifies. This is purely additive:
existing RSA signing mechanisms, key types, and HSM vendor loaders are unaffected. See
ADR-2026-09-06 for
implementation details and the PBKDF2 deferral rationale (SoftHSM2, the only backend
available for end-to-end validation in this environment, does not implement
CKM_PKCS5_PBKD2).
EdDSA signing (Ed25519/Ed448) over an HSM-resident Edwards-curve private key is available with
the non-fips build feature, using the same ec sign CLI command as ECDSA above. Unlike ECDSA,
EdDSA is a pure, un-hashed signature scheme (RFC 8032): the raw message is passed directly to
C_Sign with CKM_EDDSA, with no digest step and no DER re-encoding.
❯ ckms ec keys create --curve ed25519 hsm::4::my_ed25519_key
The EC key pair has been created.
      Public key unique identifier: hsm::4::my_ed25519_key_pk
      Private key unique identifier: hsm::4::my_ed25519_key

❯ ckms ec sign --key-id hsm::4::my_ed25519_key -o /tmp/secret.sig /tmp/secret.txt
The signature is available at "/tmp/secret.sig"
EdDSA signing over HSM-resident Ed25519/Ed448 keys is delegated end-to-end to the PKCS#11
device via CKM_EC_EDWARDS_KEY_PAIR_GEN (key generation) and CKM_EDDSA (signing). Unlike
ECDSA, EdDSA is deterministic: signing the same data twice with the same key always
produces the same signature. Gated behind the non-fips build feature, mirroring the
existing software EdDSA gating in crate::crypto::elliptic_curves::sign — HKDF and SP
800-108 KDF are NIST-approved and not affected by this flag. Validated live against a
SoftHSM2 2.6.1 token. HSM-delegated X25519 key generation
(CKM_EC_MONTGOMERY_KEY_PAIR_GEN) is also implemented, but X25519 ECDH key agreement
(DeriveKey), HKDF/SP 800-108 key derivation, and message-based AEAD are not yet
implemented — no PKCS#11 backend available in this environment (SoftHSM2, the Utimaco
CryptoServer simulator) exposes the required mechanisms for end-to-end validation. This
remains open, tracked on
issue #1157.
PKCS#11 protocol version compatibility
Eviden KMS talks to HSMs over Cryptoki (PKCS#11) v2.40 on the consumer side (crate/hsm/base_hsm
and its vendor loaders: SoftHSM2, Utimaco, Proteccio, Crypt2Pay, SmartCard HSM, AWS CloudHSM). Every Cryptoki
function (C_Initialize, C_GetInfo, C_Encrypt, ...) is resolved by its stable C symbol name,
never through the PKCS#11 v3.0 "interfaces" discovery mechanism
(C_GetInterfaceList/C_GetInterface). This means any v2.40-compliant HSM library works out of
the box, and this behavior is unaffected regardless of whether the library also happens to support
v3.0.
Eviden KMS uses the canonical v3 bindings supplied by pkcs11-sys to optionally detect
whether the loaded PKCS#11 library exposes the v3
interfaces discovery entry point (C_GetInterfaceList), without changing how any function is
resolved or called. This is a read-only capability probe for diagnostics — a v2.40-only
library simply does not export C_GetInterfaceList, so the probe reports "not
supported" and nothing else changes; a v3-capable library additionally reports the list of
interfaces it exposes (e.g. "PKCS 11"). See
ADR-2026-09-03 for the full
scope decision and rationale.
Supported operations and mechanisms
The tables below enumerate every mechanism/operation category defined by the OASIS PKCS#11
v2.40 and v3.0 specifications (Cryptoki mechanisms table, PKCS11-Curr-v2.40 §12 and
PKCS11-Curr-v3.0 §2/§6), and mark, per the actual source code, which are supported by:
- KMS server — Eviden KMS acting as a PKCS#11 consumer/client of a vendor HSM
(
crate/hsm/base_hsm), delegating KMIP operations toC_*calls against the loaded vendor library. cosmian_pkcs11— thelibcosmian_pkcs11provider DLL (documented in full on the PKCS#11 provider module page), which exposes KMS-managed keys as a Cryptoki token to third-party applications — the opposite PKCS#11 role.
✅ supported · ⚠️ partially supported (see Notes) · ❌ not supported · ➖ not applicable to this role
Random number generation
| Function | Ver. | KMS server | cosmian_pkcs11 | Notes |
|---|---|---|---|---|
C_GenerateRandom | v2.40 | ✅ delegated to the HSM's own RNG | ✅ system CSPRNG (rand::rng()), not HSM-backed | — |
C_SeedRandom | v2.40 | ➖ (HSM's own RNG is not re-seedable through base_hsm) | ❌ always returns CKR_RANDOM_NO_RNG | the provider's OS-backed CSPRNG does not accept caller seed material |
Object management — symmetric key generation (§6.31 v2.40, §2.3 v3.0)
| Mechanism | Ver. | KMS server: parameters | cosmian_pkcs11 | Notes |
|---|---|---|---|---|
CKM_AES_KEY_GEN | v2.40 | ✅ AES-128 or AES-256 (CKA_VALUE_LEN 16/32 bytes) | ❌ | provider: C_GenerateKeyPair/C_GenerateKey for secret keys stubbed except the CKM_AES_KEY_GEN mapping used internally by C_GenerateKey's KeyAlgorithm conversion (keys are still created via KMIP Create, not through this provider's PKCS#11 surface) |
CKM_GENERIC_SECRET_KEY_GEN | v3.0 | ✅ CKK_GENERIC_SECRET, arbitrary length (HKDF IKM) | ❌ | FIPS-eligible (not gated) |
CKM_DES_KEY_GENCKM_DES2_KEY_GENCKM_DES3_KEY_GEN | v2.40 | ❌ | ❌ | not implemented (deprecated algorithm) |
CKM_RC2_KEY_GENCKM_RC4_KEY_GENCKM_RC5_KEY_GENCKM_CAST_KEY_GENCKM_CAST3_KEY_GENCKM_CAST128_KEY_GENCKM_IDEA_KEY_GENCKM_CDMF_KEY_GENCKM_BLOWFISH_KEY_GENCKM_CAMELLIA_KEY_GENCKM_SEED_KEY_GEN | v2.40 | ❌ | ❌ | legacy/vendor ciphers, not implemented |
CKM_GOST28147_KEY_GEN | v2.40 | ❌ | ❌ | not implemented (Russian GOST cryptosystem) |
Object management — asymmetric key-pair generation (§6.31 v2.40, §2.3 v3.0)
| Mechanism | Ver. | KMS server: parameters | cosmian_pkcs11 | Notes |
|---|---|---|---|---|
CKM_RSA_PKCS_KEY_PAIR_GEN | v2.40 | ✅ CKA_MODULUS_BITS ∈ {1024, 2048, 3072, 4096}, CKA_PUBLIC_EXPONENT fixed 0x010001 (65537) | ❌ | keys created via the KMIP CreateKeyPair API, then discovered by the provider |
CKM_RSA_X9_31_KEY_PAIR_GEN | v2.40 | ❌ | ❌ | not implemented |
CKM_EC_KEY_PAIR_GEN (NIST prime curves) | v2.40 | ✅ P-224/P-256/P-384/P-521, CKA_EC_PARAMS = DER OBJECT IDENTIFIER | ❌ (recognized for sign/verify only, see below) | secp256k1/secp224k1 (SECG Koblitz) explicitly rejected on the KMS side (curve_from_der_oid, issue #1157) |
CKM_DSA_KEY_PAIR_GENCKM_DSA_PARAMETER_GEN | v2.40 | ❌ | ❌ | not implemented (deprecated algorithm) |
CKM_DH_PKCS_KEY_PAIR_GENCKM_DH_PKCS_PARAMETER_GEN | v2.40 | ❌ | ❌ | not implemented (classic Diffie-Hellman) |
CKM_X9_42_DH_KEY_PAIR_GENCKM_X9_42_DH_PARAMETER_GEN | v2.40 | ❌ | ❌ | not implemented |
CKM_GOST3410_KEY_PAIR_GEN | v2.40 | ❌ | ❌ | not implemented (Russian GOST cryptosystem) |
CKM_EC_EDWARDS_KEY_PAIR_GEN | v3.0 | ✅ Ed25519 (non-fips)/Ed448 (non-fips); CKA_EC_PARAMS encoded as a PrintableString curve name (empirically required by SoftHSM2 2.6.1, not the OID form) | ❌ | capability-gated: attempted best-effort, degrades gracefully if the loaded library lacks the mechanism |
CKM_EC_MONTGOMERY_KEY_PAIR_GEN | v3.0 | ✅ X25519 (non-fips), CKA_DERIVE set instead of CKA_SIGN/CKA_VERIFY | ❌ | keygen only — C_DeriveKey/ECDH not yet wired (#1157) |
Symmetric encryption and decryption (§6.3 v2.40, §5.20-5.21 v3.0)
| Mechanism | Ver. | KMS server: parameters | cosmian_pkcs11: parameters | Notes |
|---|---|---|---|---|
CKM_AES_GCM | v2.40 | ✅ random 96-bit IV per call; no AAD (ulAADLen always 0); fixed 128-bit tag, ciphertext‖tag layout | ✅ caller-supplied IV 1–128 bytes; caller-supplied AAD 0–1 MiB; tag must be exactly 128 bits (rejected otherwise); ciphertext‖tag layout; single-shot only (C_EncryptUpdate/C_EncryptFinal multi-part stubbed) | provider AES-GCM is implemented in the KMS crypto backend, not delegated to a vendor HSM |
CKM_AES_CBC | v2.40 | ✅ random 16-byte IV; software PKCS#7 padding applied before C_Encrypt; multi-round chaining above max_cbc_data_size | ✅ caller-supplied 16-byte IV, unpadded | — |
CKM_AES_CBC_PAD | v2.40 | ❌ (padding done in software, see above) | ✅ caller-supplied 16-byte IV, native PKCS#7 padding | — |
CKM_AES_ECBCKM_AES_CTRCKM_AES_CFB{8,64,128}CKM_AES_OFBCKM_AES_CCMCKM_AES_CTS | v2.40 | ❌ | ❌ | not implemented |
CKM_DES_ECBCKM_DES_CBCCKM_DES_CBC_PADCKM_DES3_ECBCKM_DES3_CBCCKM_DES3_CBC_PADCKM_DES_CFB{8,64}CKM_DES_OFB64 | v2.40 | ❌ | ❌ | not implemented (deprecated algorithm) |
CKM_RC2_*CKM_RC4CKM_RC5_*CKM_CAST_*CKM_CAST3_*CKM_CAST128_*CKM_IDEA_*CKM_CDMF_*CKM_BLOWFISH_CBCCKM_CAMELLIA_*CKM_SEED_*CKM_GOST28147_ECBCKM_GOST28147 | v2.40 | ❌ | ❌ | legacy/vendor ciphers, not implemented |
Asymmetric encryption and decryption (§6.4 v2.40)
| Mechanism | Ver. | KMS server: parameters | cosmian_pkcs11 | Notes |
|---|---|---|---|---|
CKM_RSA_PKCS | v2.40 | ✅ RSA PKCS#1 v1.5 encrypt/decrypt, no parameters | ❌ (sign/verify only, see below) | — |
CKM_RSA_PKCS_OAEP | v2.40 | ✅ SHA-1/MGF1-SHA1 or SHA-256/MGF1-SHA256 (CK_RSA_PKCS_OAEP_PARAMS, empty source data); also used via C_WrapKey/C_UnwrapKey to wrap AES KEKs | ❌ | not implemented on the provider side |
CKM_RSA_X_509 (raw RSA) | v2.40 | ❌ | ❌ | not implemented |
Signatures and MACs (§6.4-6.5 v2.40, §2.3.9 v3.0)
| Mechanism | Ver. | KMS server: algorithm & parameters | cosmian_pkcs11: algorithm & parameters | Notes |
|---|---|---|---|---|
CKM_RSA_PKCS (raw) | v2.40 | ✅ RSA PKCS#1 v1.5 over a caller-supplied DigestInfo (SHA-1/256/384/512 OID prefix) | ✅ raw PKCS#1 v1.5 | — |
CKM_SHA{1,256,384,512}_RSA_PKCS | v2.40 | ✅ RSA PKCS#1 v1.5, hash computed by the HSM | ✅ same 4 hashes | CKM_SHA224_RSA_PKCS/CKM_MD5_RSA_PKCS not implemented on either side |
CKM_RSA_PKCS_PSS | v2.40 | ✅ hash ∈ {SHA-256, SHA-384, SHA-512}, independent MGF1 hash, explicit salt length (CK_RSA_PKCS_PSS_PARAMS) | ✅ hash & MGF1 ∈ {SHA-1, SHA-224, SHA-256, SHA-384, SHA-512} (any combination), explicit salt length; operates on a pre-hashed digest per §6.4.7 | — |
CKM_SHA{256,384,512}_RSA_PKCS_PSS | v2.40 | ✅ combined hash-then-PSS-sign in one call | ➖ (provider always uses the pre-hashed CKM_RSA_PKCS_PSS form) | — |
CKM_RSA_X_509 (raw sign/verify) / CKM_RSA_9796 | v2.40 | ❌ | ❌ | not implemented |
CKM_ECDSA (raw digest) | v2.40 | ✅ NIST P-256/P-384/P-521, raw r‖s re-encoded to DER ECDSA-Sig-Value | ✅ NIST P-256/P-384/P-521 + secp256k1 (non-FIPS) | KMS: secp256k1 explicitly rejected; provider: usable for sign/verify against KMS-generated secp256k1 keys |
CKM_ECDSA_SHA{1,224,256,384,512} | v2.40 | ✅ (SHA-256/384/512 only) hash-then-sign in one call | ❌ (provider hashes client-side, then uses raw CKM_ECDSA) | — |
CKM_DSACKM_DSA_SHA{1,224,256,384,512} | v2.40 | ❌ | ❌ | not implemented (deprecated algorithm) |
CKM_MD2_HMACCKM_MD5_HMACCKM_SHA_1_HMACCKM_SHA224_HMACCKM_SHA256_HMACCKM_SHA384_HMACCKM_SHA512_HMAC | v2.40 | ❌ | ❌ | not implemented |
CKM_AES_CMACCKM_AES_CMAC_GENERALCKM_DES3_CMACCKM_DES3_CMAC_GENERAL | v2.40 | ❌ | ❌ | not implemented |
CKM_GOST3410_WITH_GOSTR3411 | v2.40 | ❌ | ❌ | not implemented (Russian GOST cryptosystem) |
CKM_EDDSA | v3.0 | ✅ Ed25519/Ed448 (non-fips), pure un-hashed signing (RFC 8032); pParameter omitted (NULL) to select plain Ed25519, not Ed25519ctx | ✅ Ed25519/Ed448, same pure un-hashed convention | capability-gated on the KMS side |
C_MessageSignInitC_SignMessageC_MessageSignFinal | v3.0 | ➖ | ✅ EdDSA (Ed25519/Ed448) only | provider-only concept (message-based split flow); not applicable to the KMS-as-consumer role |
C_MessageVerifyInitC_VerifyMessageC_MessageVerifyFinal | v3.0 | ➖ | ❌ | present in the v3.0 function list but stubbed on the provider side |
Message digesting (§6.2 v2.40, §2.1 v3.0)
| Mechanism | Ver. | KMS server | cosmian_pkcs11 | Notes |
|---|---|---|---|---|
C_Digest with CKM_MD2CKM_MD5CKM_SHA_1CKM_SHA224CKM_SHA256CKM_SHA384CKM_SHA512CKM_SHA512_224CKM_SHA512_256CKM_RIPEMD128CKM_RIPEMD160 (standalone) | v2.40 | ❌ | ❌ stubbed (C_Digest family) | hash mechanisms are used internally only, as parameters to RSA-OAEP/PSS and "hash-and-sign" mechanisms; no standalone digest operation is exposed on either side |
CKM_SHA3_224CKM_SHA3_256CKM_SHA3_384CKM_SHA3_512CKM_SHAKE_128CKM_SHAKE_256 | v3.0 | ❌ | ❌ | not implemented |
CKM_GOSTR3411 | v2.40 | ❌ | ❌ | not implemented (Russian GOST hash) |
Key derivation (§6.30 v2.40, §2.5 v3.0)
| Mechanism | Ver. | KMS server: parameters | cosmian_pkcs11 | Notes |
|---|---|---|---|---|
CKM_HKDF_DERIVECKM_HKDF_DATA | v3.0 | ⚠️ HKDF-Extract-and-Expand, PRF hash ∈ {SHA-256, SHA-384, SHA-512}, optional salt (CK_HKDF_PARAMS), base key must be CKK_GENERIC_SECRET — implemented in base_hsm (derive_hkdf_key), not yet KMIP-reachable (#1182) | ❌ | provider: C_DeriveKey stubbed |
CKM_ECDH1_DERIVECKM_ECDH1_COFACTOR_DERIVECKM_ECMQV_DERIVE | v2.40/v3.0 | ❌ (X25519 keygen exists but ECDH derive is not wired) | ❌ | not implemented on either side |
CKM_DH_PKCS_DERIVECKM_X9_42_DH_DERIVECKM_X9_42_DH_HYBRID_DERIVECKM_X9_42_MQV_DERIVE | v2.40 | ❌ | ❌ | not implemented |
CKM_SSL3_MASTER_KEY_DERIVECKM_SSL3_KEY_AND_MAC_DERIVECKM_TLS_MASTER_KEY_DERIVECKM_TLS_KEY_AND_MAC_DERIVECKM_TLS12_MASTER_KEY_DERIVECKM_TLS12_KEY_AND_MAC_DERIVECKM_TLS_KDF | v2.40 | ❌ | ❌ | not implemented (TLS/SSL session-key derivation) |
CKM_CONCATENATE_BASE_AND_KEYCKM_CONCATENATE_BASE_AND_DATACKM_CONCATENATE_DATA_AND_BASECKM_XOR_BASE_AND_DATACKM_EXTRACT_KEY_FROM_KEYCKM_AES_CBC_ENCRYPT_DATACKM_DES3_CBC_ENCRYPT_DATA | v2.40 | ❌ | ❌ | key-derivation utility mechanisms, not implemented |
CKM_PKCS5_PBKD2 | v2.40 | ❌ | ❌ | not implemented (password-based key derivation) |
CKM_SP800_108_COUNTER_KDF_FEEDBACK_KDF_DOUBLE_PIPELINE_KDF | v3.0 | ❌ | ❌ | not implemented |
Key wrapping and unwrapping (§6.31 v2.40)
| Function | Ver. | KMS server: parameters | cosmian_pkcs11 | Notes |
|---|---|---|---|---|
C_WrapKeyC_UnwrapKey with CKM_RSA_PKCS_OAEP | v2.40 | ✅ RSA-OAEP wraps/unwraps an AES KEK (wrap_aes_key_with_rsa_oaep/unwrap_aes_key_with_rsa_oaep), SHA-1 or SHA-256 | ❌ stubbed | — |
C_WrapKeyC_UnwrapKey with CKM_RSA_PKCSCKM_RSA_X_509 | v2.40 | ❌ | ❌ stubbed | not implemented |
C_WrapKeyC_UnwrapKey with CKM_AES_KEY_WRAPCKM_AES_KEY_WRAP_PADCKM_AES_KEY_WRAP_KWP | v2.40/v3.0 | ❌ | ❌ stubbed | not implemented |
C_WrapKeyC_UnwrapKey with CKM_DES3_ECBCKM_DES3_CBC/CMS wrap variants | v2.40 | ❌ | ❌ stubbed | not implemented |
Message-based dual-function encryption/decryption (§5.20-5.21 v3.0, additive to signatures table above)
| Function | Ver. | KMS server: parameters | cosmian_pkcs11 | Notes |
|---|---|---|---|---|
C_MessageEncryptInitC_EncryptMessageC_MessageEncryptFinal | v3.0 | ⚠️ AES-GCM, random 96-bit IV, caller-supplied AAD supported (unlike classic CKM_AES_GCM above), fixed 128-bit tag — implemented in base_hsm, not yet KMIP-reachable (#1182) | ❌ | provider: C_Message* family present in the v3.0 function list but stubbed |
C_MessageDecryptInitC_DecryptMessageC_MessageDecryptFinal | v3.0 | ⚠️ same as above | ❌ | same as above |
Session, object and interface management (v3.0 additions)
| Function | Ver. | KMS server | cosmian_pkcs11 | Notes |
|---|---|---|---|---|
C_GetInterfaceListC_GetInterface | v3.0 | ➖ | ✅ | KMS: read-only capability probe only (see below), does not change how any function is resolved |
C_LoginUser | v3.0 | ➖ | ✅ | real implementation on the provider side (not a stub) |
C_SessionCancel | v3.0 | ➖ | ❌ | present in the v3.0 function list but stubbed |
C_FindObjects on CKO_PROFILE | v3.0 | ➖ | ✅ | self-declares CKP_BASELINE_PROVIDER/CKP_EXTENDED_PROVIDER/CKP_AUTHENTICATION_TOKEN/CKP_PUBLIC_CERTIFICATES_TOKEN |
C_LoginC_LogoutC_FindObjects*C_CreateObjectC_DestroyObjectC_GetAttributeValueC_SetAttributeValue | v2.40 | ➖ | ✅ | baseline session/object management |
C_CopyObject, C_GetObjectSize, C_GetOperationState, C_SetOperationState | v2.40 | ➖ | ❌ | stubbed on the provider side |
PKCS#11 v3.0 mechanisms (conditional, capability-gated)
Beyond the discovery probe above, crate/hsm/base_hsm also implements a set of PKCS#11
v3.0-only mechanisms, always attempted best-effort and never assumed present:
- EdDSA sign/verify (
CKM_EDDSA, OASIS Cryptoki v3.0 §2.3.9) — pure Ed25519 (RFC 8032), requested withpParameter = NULL/ulParameterLen = 0(omittingCK_EDDSA_PARAMSentirely selects the plain Ed25519 variant; an explicit, even empty-context, params struct instead selects the distinctEd25519ctxvariant, which not every conformant library implements). - HKDF key derivation (
CKM_HKDF_DERIVE, OASIS Cryptoki v3.0 §2.5) — input key material must be aCKK_GENERIC_SECRET/CKK_HKDFsecret key withCKA_DERIVE=true(produced viaSession::generate_generic_secret_key); the derived key is likewise typedCKK_GENERIC_SECRET. - Message-based AEAD (
C_MessageEncryptInit/C_EncryptMessage/...) for AES-GCM.
Every one of these calls degrades gracefully: if the loaded library reports
CKR_MECHANISM_INVALID or CKR_MECHANISM_PARAM_INVALID, the KMS treats the mechanism as
simply unavailable on that library rather than surfacing a hard error, mirroring the
additive philosophy of the capability probe. KMIP reachability is currently limited to
RSA SignatureVerify — EdDSA/HKDF/message-AEAD are implemented and unit-tested at the
base_hsm layer but not yet exposed through a KMIP operation end-to-end, since that
requires expanding the KeyType/HsmKeypairAlgorithm enums (today limited to
AES/RSA) — tracked as a dedicated follow-up (#1182).
Validating v3.0 mechanisms: the Kryoptic test token
No vendor HSM currently supported by Eviden KMS (SoftHSM2, Utimaco, Proteccio, Crypt2Pay, SmartCard HSM, AWS CloudHSM) implements PKCS#11 v3.0, so none of them can exercise the mechanisms above — SoftHSM2's own v3 probe test only confirms the "not supported" degrade path.
The v3.0 code paths are validated against
kryoptic — a Rust PKCS#11 v3.0 software token
maintained by Red Hat's identity team (latchset) — through the crate/hsm/kryoptic loader
crate (HSM_MODEL=kryoptic). kryoptic is fetched and built out-of-tree from its published
crates.io release, in its own isolated build/lockfile — it is never added to this workspace's
dependency graph (its rusqlite pin conflicts with crate/server_database's; see the header of
.mise/lib/kryoptic.sh). The fetch/build step is owned entirely by
.mise/lib/kryoptic.sh::kryoptic_build_cdylib (mirroring how .mise/lib/softhsm2.sh builds
and locates the SoftHSM2 library). The mise task exports the resulting cdylib path as
KRYOPTIC_PKCS11_LIB, which the tests read from the environment, exactly like
SOFTHSM2_PKCS11_LIB.
kryoptic's own standard feature (EdDSA, HKDF, etc.) requires OpenSSL >= 3.2.0, which is
newer than the system OpenSSL on some CI runners/dev machines (e.g. Ubuntu 22.04/24.04 ship
3.0.x). Rather than depend on whatever OpenSSL happens to be installed, kryoptic_build_cdylib
first builds this workspace's own OpenSSL 3.6.2 (crate/crypto/build.rs, if not already built)
and points kryoptic's pkg-config-based OpenSSL discovery at it via PKG_CONFIG_PATH — so the
token always builds against the exact same, known-good OpenSSL version this workspace already
uses, on every machine.
Run it locally with:
mise run test:hsm-kryoptic --variant fips
crate/hsm/kryoptic/src/tests.rs::test_hsm_kryoptic_all provisions a fresh Kryoptic token
(C_InitToken/C_InitPIN) and runs the shared HSM test suite
(crate/hsm/base_hsm/src/tests_shared.rs) against it, including the v3.0 checks: a populated
C_GetInterfaceList result, an EdDSA sign/verify round trip, an HKDF key derivation, and a
message-based AES-GCM round trip. The task then runs the KMS server HSM tests against the same
token. It runs in CI as the kryoptic entry of the hsm job's matrix in
.github/workflows/test_all.yml, for both the fips and non-fips variants.
Craton HSM (craton-co/craton-hsm-core) was also evaluated as a candidate v3.0 conformance
oracle: it is a pure-Rust PKCS#11 v3.0 library with post-quantum algorithm support, but as of
this writing it is ~5 months old, has a single/small maintainer group, and has not undergone
independent security review — not yet a suitable trust anchor for protocol-conformance testing
in a FIPS-140-3-oriented KMS. It may be reconsidered once it matures.
HSM key labeling & tag-based location
Eviden KMS supports storing, discovering, and managing keys directly on Hardware Security Modules (HSMs) via PKCS#11.
To enable key organization, lifecycle management, and discovery across hardware tokens without relying on external databases,
Eviden KMS implements an inline tag-based labeling mechanism inside the PKCS#11 CKA_LABEL attribute.
This page explains how HSM keys encode application and system tags, how tag-based discovery works via KMIP Locate,
and how Eviden KMS maintains backward compatibility with plain PKCS#11 labels.
Overview
Unlike database-backed keys where metadata and tags are stored in dedicated tables, HSM keys reside entirely on hardware tokens.
PKCS#11 tokens natively expose a single CKA_LABEL string per object, but do not provide a native metadata dictionary or tag query API.
Eviden KMS solves this by serializing both the logical identifier and user/system tags into an envelope stored directly in CKA_LABEL.
When clients execute operations such as Locate, Get Attributes, or Export, the KMS inspects token objects,
decodes the tagged label, and evaluates tag-based filters.
flowchart TD
    subgraph Client["KMS Client / ckms"]
        direction TB
        req["KMIP Locate<br/>tag: [bench, disk]"]
    end

    subgraph KMS["Eviden KMS Server"]
        direction TB
        store["HsmStore"]
        filter["Tag Filter<br/>tags.is_subset(key_tags)"]
        decode["deserialize_tagged_label()"]
    end

    subgraph HSM["PKCS#11 HSM Token"]
        direction TB
        slot["Slot Objects"]
        k1["Object 1<br/>CKA_LABEL: [cosmian-kms-tags-v1, [bench, disk], key-1]"]
        k2["Object 2<br/>CKA_LABEL: [cosmian-kms-tags-v1, [bench], key-2]"]
        k3["Object 3 (Legacy)<br/>CKA_LABEL: legacy-key-3"]
    end

    req -->|"POST /kmip/2_1"| store
    store -->|"C_FindObjects"| slot
    slot -->|"Raw CKA_LABEL bytes"| decode
    decode -->|"id: key-1, tags: {bench, disk}"| filter
    decode -->|"id: key-2, tags: {bench}"| filter
    decode -->|"id: legacy-key-3, tags: {}"| filter
    filter -->|"Match: hsm::0::key-1"| store
    store -->|"UniqueIdentifier: hsm::0::key-1"| req
Tagged label format
When an HSM key is created or imported with tags, Eviden KMS formats the CKA_LABEL attribute as a serialized JSON envelope:
["cosmian-kms-tags-v1", ["tag1", "tag2"], "key_identifier"]
The three components of the envelope are:
- Version marker:
cosmian-kms-tags-v1identifies the label as an Eviden KMS tagged structure. - Tag array: a set of string tags associated with the object.
- Key identifier: the byte string representing the key's logical identifier within the slot.
Backward compatibility
Eviden KMS maintains strict backward compatibility with existing or externally-provisioned PKCS#11 objects:
- Tagged labels: If
CKA_LABELdeserializes as a JSON tuple matchingcosmian-kms-tags-v1, the inner identifier is extracted as the key ID, and the tag set is populated from the array. - Legacy plain labels: If
CKA_LABELdoes not match the marker or is not valid JSON, the KMS treats the entire raw byte sequence as a plain UTF-8 string identifier with an empty tag set (HashSet::new()). - Empty tags optimization: When a key is created without tags, Eviden KMS stores the raw identifier directly without JSON overhead.
System tags on HSM objects
When keypairs or symmetric keys are created on the HSM, Eviden KMS automatically attaches system tags to distinguish key types:
| System tag | Purpose | Description |
|---|---|---|
_kk | Symmetric key | Automatically attached to AES keys |
_sk | Private key | Automatically attached to asymmetric private keys (RSA, EC, Ed25519) |
_pk | Public key | Automatically attached to asymmetric public keys |
Tag-based location (Locate)
The KMIP Locate operation queries objects based on search criteria.
For HSM stores, Locate inspects objects across all configured HSM slots:
- Slot enumeration: The KMS retrieves the list of active slots (
get_available_slot_list). - Object enumeration: For each slot, it lists candidate objects (
find(slot_id, HsmObjectFilter::Any)). - Metadata decoding: It reads
CKA_LABELand decodes the tag set viadeserialize_tagged_label. - Subset matching: A candidate matches if and only if all requested query tags are present in the object's tag set:
$$\text{requested_tags} \subseteq \text{object_tags}$$
If an object matches, its full KMS identifier is returned in the form:
hsm::<slot_id>::<key_identifier>
KMIP Locate example
To locate all HSM keys containing both the bench and disk tags:
{
  "tag": "Locate",
  "type": "Structure",
  "value": [
    {
      "tag": "Attributes",
      "type": "Structure",
      "value": [
        {
          "tag": "Attribute",
          "type": "Structure",
          "value": [
            {
              "tag": "VendorIdentification",
              "type": "TextString",
              "value": "cosmian"
            },
            {
              "tag": "AttributeName",
              "type": "TextString",
              "value": "tag"
            },
            {
              "tag": "AttributeValue",
              "type": "TextString",
              "value": "[\"bench\",\"disk\"]"
            }
          ]
        }
      ]
    }
  ]
}
CLI usage (ckms)
The ckms command-line client transparently sets and queries tags on HSM objects using the --tag flag.
Creating an HSM key with tags
# Create an AES-256 key in HSM slot 0 with tags 'bench' and 'disk'
ckms --url "http://127.0.0.1:9998" sym keys create \
    --algorithm aes \
    --number-of-bits 256 \
    --tag bench \
    --tag disk \
    hsm::0::my-tagged-key
Locating keys by tag
# Locate all keys tagged with 'bench'
ckms --url "http://127.0.0.1:9998" locate --tag bench
Security considerations
- Tag confidentiality: Tags are stored in plaintext within the HSM token's
CKA_LABEL. Do not include sensitive information (passwords, PII, secret parameters) in tag values. - Label size limits: PKCS#11 tokens and HSM firmwares impose maximum byte lengths on
CKA_LABEL(typically between 32 and 255 bytes). Keep tag names concise to avoid exceeding token label capacity. - Authorization: Tag discovery respects KMS authorization. Non-admin users only receive identifiers for keys on which they have been explicitly granted permissions.
Multi-HSM Support
Eviden KMS can connect to multiple Hardware Security Modules simultaneously. Each HSM instance is independently initialised via PKCS#11 and exposed to the rest of the server through a unique routing prefix derived from its model name.
Routing prefix scheme
Every KMS object stored inside an HSM has a UID of the form:
hsm::<model>::<slot_id>::<key_id>
The model name embedded in the prefix allows the server to route any KMIP operation to the correct HSM without additional configuration.
| Configuration | Prefix | Example UID |
|---|---|---|
Single softhsm2 instance | hsm::softhsm2 | hsm::softhsm2::0::my-aes-key |
Single utimaco instance | hsm::utimaco | hsm::utimaco::0::another-key |
First of two softhsm2 instances | hsm::softhsm2 | hsm::softhsm2::0::key-a |
Second of two softhsm2 instances | hsm::softhsm2_1 | hsm::softhsm2_1::1::key-b |
Third of two softhsm2 instances | hsm::softhsm2_2 | hsm::softhsm2_2::2::key-c |
When the same model appears more than once, the second instance gets the suffix
_1, the third _2, and so on (e.g. hsm::softhsm2, hsm::softhsm2_1,
hsm::softhsm2_2).
Configuration
Option A — flat single-HSM CLI flags (backward compatible)
The existing --hsm-model, --hsm-admin, --hsm-slot, and --hsm-password
flags continue to work exactly as before. They configure one HSM instance
whose prefix is "hsm::<model>".
Option B — TOML [[hsm_instances]] array (multi-HSM)
Add one [[hsm_instances]] section per HSM in kms.toml. When this section is
present it takes precedence over the flat CLI flags.
# First HSM — prefix "hsm::softhsm2"
[[hsm_instances]]
hsm_model    = "softhsm2"
hsm_admin    = ["tech@example.com"]
hsm_slot     = [0]
hsm_password = ["changeme"]

# Second HSM — prefix "hsm::utimaco"
[[hsm_instances]]
hsm_model    = "utimaco"
hsm_admin    = ["tech@example.com"]
hsm_slot     = [0, 1]
hsm_password = ["slot0pass", "slot1pass"]

# Third HSM — same model as first, disambiguated as "hsm::softhsm2_1"
[[hsm_instances]]
hsm_model    = "softhsm2"
hsm_admin    = ["tech@example.com"]
hsm_slot     = [2]
hsm_password = ["anotherpass"]
| Field | Description |
|---|---|
hsm_model | HSM model: luna, softhsm2, utimaco, proteccio, crypt2pay, smartcardhsm, aws_cloudhsm, kryoptic, other |
hsm_admin | List of KMS user identities that have admin rights on this HSM |
hsm_slot | PKCS#11 slot indices to open |
hsm_password | Login passwords for the corresponding slots (same order as hsm_slot) |
Checking HSM status at runtime
The GET /hsm/status endpoint returns a JSON array of all configured HSM
instances. Authentication is required (pass the usual credentials):
curl http://localhost:9998/hsm/status
Example response:
[
  {
    "prefix": "hsm::softhsm2",
    "model": "softhsm2",
    "slots": [
      { "slot_id": 0, "accessible": true }
    ]
  },
  {
    "prefix": "hsm::utimaco",
    "model": "utimaco",
    "slots": [
      { "slot_id": 0, "accessible": true },
      { "slot_id": 1, "accessible": false }
    ]
  }
]
The same information is available in the HSM Status page of the Web UI
(Objects → HSM Status).
Supported platforms
HSM support is available on:
- Linux x86_64 — all models (
luna,softhsm2,utimaco,proteccio,crypt2pay,smartcardhsm,aws_cloudhsm,kryoptic,other) - Linux arm64 —
softhsm2,smartcardhsm,aws_cloudhsm,other - macOS (arm64 / x86_64) —
softhsm2,smartcardhsm, andkryoptic
See also
- Thales Luna setup
- SoftHSM2 setup
- Kryoptic setup
- Utimaco setup
- Proteccio setup
- AWS CloudHSM setup
- HSM operations
- Algorithm support by model
HSM algorithm support by model
This page compares PKCS#11 algorithm and capability coverage across the HSM models natively
integrated by Eviden KMS: SoftHSM2, Kryoptic, Proteccio, Crypt2Pay, Utimaco,
AWS CloudHSM, GCP Cloud HSM, SmartCard HSM, and Thales Luna. All models share the
same BaseHsm implementation (crate/hsm/base_hsm); per-model differences come from (a) real
PKCS#11 mechanism availability on the device/library, and (b) a small set of vendor-specific
behavioral quirks captured in each model's HsmCapabilities (crate/hsm/<model>/src/lib.rs).
Legend:
- ✅ Proven — exercised by the shared cross-backend test suite
(
crate/hsm/base_hsm/src/tests_shared.rs), run per model incrate/hsm/<model>/src/tests.rs'stest_hsm_<model>_all(and individually-runnable sibling tests). - 📄 Documented — confirmed supported by the vendor's PKCS#11 documentation, not yet exercised by this repository's test suite for that model.
- ❌ Not supported — confirmed absent, either by vendor documentation or by a
HsmCapabilitiesflag. - ⚠️ Known issue — vendor-documented as supported, but currently blocked in this environment; see the note under the table.
- — Not tested — not exercised by this model's test suite, and no vendor documentation was checked for it.
Key generation
| Algorithm / curve | SoftHSM2 | Kryoptic | Proteccio | Crypt2Pay | Utimaco | AWS CloudHSM | GCP Cloud HSM | SmartCard HSM | Thales Luna |
|---|---|---|---|---|---|---|---|---|---|
| AES-128/192/256 | ✅ | ✅ | ✅ | ✅ | ✅ | ✅ | ✅ | ✅ | ✅ |
| RSA-2048 | ✅ | ✅ | ✅ | ✅ | ✅ | ✅ | — | ✅ | ✅ |
| EC P-224 | ✅ | ❌ | 📄 | ⚠️ | 📄 | ✅ | — | 📄 | ✅ |
| EC P-256 | ✅ | ✅ | 📄 | ⚠️ | 📄 | ✅ | — | 📄 | ✅ |
| EC P-384 | ✅ | ✅ | 📄 | ⚠️ | 📄 | ✅ | — | 📄 | ✅ |
| EC P-521 | ✅ | ✅ | 📄 | ⚠️ | 📄 | ✅ | — | 📄 | ✅ |
| EC secp256k1 (non-fips) | ✅ | 📄 | 📄 | 📄 | 📄 | 📄 | — | 📄 | — |
| EC secp192k1 (non-fips) | ✅ | 📄 | 📄 | 📄 | 📄 | 📄 | — | 📄 | — |
| EC Brainpool / FRP256v1 | ❌ | ❌ | 📄 | 📄 | ❌ | ❌ | — | ❌ | — |
| Ed25519 (non-fips) | ✅ | ✅ | ❌ | 📄 | 📄 | ✅ | — | 📄 | ✅ |
| Ed448 (non-fips) | ✅ | ❌ | ❌ | 📄 | 📄 | ✅ | — | 📄 | ✅ |
Encryption mechanisms
| Mechanism | SoftHSM2 | Kryoptic | Proteccio | Crypt2Pay | Utimaco | AWS CloudHSM | GCP Cloud HSM | SmartCard HSM | Thales Luna |
|---|---|---|---|---|---|---|---|---|---|
| AES-GCM | ✅ | ✅ | ✅ | ✅ | ✅ | ✅ | ✅ | 📄 | ✅ |
| AES-CBC (+ multi-round) | ✅ | ✅ | 📄 | 📄 | 📄 | ✅ | ✅ (single-round) | ✅ | ✅ |
| RSA PKCS#1 v1.5 | ✅ | ✅ | ✅ | ✅ | ✅ | 📄 | — | ✅ | ✅ |
RSA-OAEP (SHA-256), direct Encrypt/Decrypt | ❌ | ✅ | ✅ | ✅ | ✅ | ✅ | — | ✅ | ✅ |
RSA-OAEP key wrap (C_WrapKey/C_UnwrapKey) | ❌ | 📄 | ✅ | ✅ | ✅ | ✅ | ❌ | ❌ | ✅ |
Signing mechanisms
| Mechanism | SoftHSM2 | Kryoptic | Proteccio | Crypt2Pay | Utimaco | AWS CloudHSM | GCP Cloud HSM | SmartCard HSM | Thales Luna |
|---|---|---|---|---|---|---|---|---|---|
| RSA PKCS#1 v1.5 (SHA-1/256/384/512) | ✅ | ✅ | ✅ | ✅ | ✅ | ✅ | — | ✅ | ✅ |
| RSA-PSS (SHA-256/384/512) | ✅ | ✅ | 📄 | 📄 | 📄 | 📄 | — | 📄 | ✅ |
ECDSA (raw CKM_ECDSA and/or combined CKM_ECDSA_SHA*) | ✅ | ✅ | 📄 | ⚠️ | 📄 | ✅ | — | 📄 | ✅ |
| ECDSA secp256k1 (non-fips) | ✅ | 📄 | 📄 | 📄 | 📄 | 📄 | — | 📄 | — |
| ECDSA secp192k1 (non-fips) | ✅ | 📄 | 📄 | 📄 | 📄 | 📄 | — | 📄 | — |
| EdDSA Ed25519 (non-fips) | ✅ | ✅ | ❌ | 📄 | 📄 | ✅ | — | 📄 | ✅ |
| EdDSA Ed448 (non-fips) | ✅ | ❌ | ❌ | 📄 | 📄 | ✅ | — | 📄 | ✅ |
Crypt2Pay's own PKCS#11 API User Guide documents CKM_RSA_PKCS_KEY_PAIR_GEN and
CKM_ECDSA_KEY_PAIR_GEN (plus an extensive curve list: NIST P-192/224/256/384/521,
secp256k1, Brainpool P192–P512, FRP256v1, Ed25519/Ed448) as supported mechanisms. On the
unit tested against in this repository, C_GenerateKeyPair for both mechanisms returns
CKR_MECHANISM_INVALID (raw PKCS#11 probe, confirmed outside the KMS). The vendor guide
notes some features require activation of a PKCS11/ENCRYPT license option — this is believed
to be an un-activated option or device-specific configuration on that unit, not a KMS defect.
Crypt2Pay's shared RSA/AES/encrypt/sign test coverage above does not depend on live key
generation succeeding for those two mechanisms and continues to pass.
SoftHSM2 2.6.1 rejects CKM_RSA_PKCS_OAEP with explicit mechanism parameters
(CKR_ARGUMENTS_BAD / "Return code: 7") for both SHA-256 and SHA-1 regardless of the
fix to the OAEP empty-label source pointer described in the quirks table below — confirmed
by an explicit code comment in crate/hsm/softhsm2/src/tests.rs's test_hsm_softhsm2_all,
which skips rsa_oaep_encrypt/multi_threaded_rsa entirely for this reason, and by the
KMIP-level test vectors test_data/vectors/hsm/resident_rsa2048_encrypt_oaep_sha{256,1}.
RSA-OAEP key wrap (C_WrapKey/C_UnwrapKey, a separate mechanism/code path) is
unaffected by this and genuinely does not support it either
(supports_rsa_oaep_key_wrap: false, already reflected in the quirks table).
Live-verified against Kryoptic 1.5.2 (cargo build --features standard, this repository's
pinned build): C_GenerateKeyPair(CKM_EC_KEY_PAIR_GEN) for curve P-224 fails with
CKR_DEVICE_ERROR ("Return code: 5"), while P-256/P-384/P-521 succeed without issue —
isolated by testing each curve individually. Similarly, C_Sign(CKM_EDDSA) on an Ed448 key
fails with CKR_MECHANISM_PARAM_INVALID ("Return code: 113") while Ed25519 signs
successfully with the same mechanism. base_hsm's shared generate_ec_keypair,
ecdsa_sign_all_curves_and_hashes, and eddsa_sign_all_curves test functions
capability-probe per curve (skip-and-warn on failure) rather than hard-failing the whole
test, so a per-curve gap on one backend does not block the rest of the suite.
Luna rejects an explicit CKA_SENSITIVE=false with CKR_ATTRIBUTE_VALUE_INVALID, so the KMS
omits CKA_SENSITIVE on Luna and controls exportability with CKA_EXTRACTABLE only. The Luna
Client exports the PKCS#11 3.0 message-based encryption functions, but C_MessageEncryptInit
fails for AES-GCM (CKR_FUNCTION_NOT_SUPPORTED); the KMS uses classic C_EncryptInit
AES-GCM instead. In FIPS mode, Luna generates the AES-GCM IV itself and appends it to the
output; the KMS uses that IV with firmware 7.9.3 or later (96-bit IV) and rejects the 16-byte
IV of older firmware. This FIPS behavior follows the Thales documentation and has not been
exercised on a FIPS-mode partition.
Vendor-specific quirks
These are objective, code-level behavioral differences captured in each model's
HsmCapabilities (crate/hsm/<model>/src/lib.rs), not algorithm availability — BaseHsm already
branches on them so KMS operations behave correctly regardless of HSM model.
| Capability | SoftHSM2 | Kryoptic | Proteccio | Crypt2Pay | Utimaco | AWS CloudHSM | GCP Cloud HSM | SmartCard HSM | Thales Luna |
|---|---|---|---|---|---|---|---|---|---|
| PKCS#11 v3.0 message-based AES-GCM | ❌ | ✅ (default) | ✅ | ❌ | ✅ | ✅ | ❌ | ✅ | ❌ |
| Caller-supplied AES-GCM IV | ✅ | ✅ (default) | ✅ | ✅ | ✅ | ❌ | ❌ | ✅ | ✅ |
| RSA-OAEP empty-label source pointer | non-null required | NULL (default) | NULL | NULL | NULL | NULL required | NULL | NULL | NULL |
CKA_START_DATE/CKA_END_DATE (HSM key auto-rotation) | ❌ | ✅ (default) | ✅ | ❌ | ✅ | ❌ | ❌ | ✅ | ✅ |
Explicit CKA_SENSITIVE on key generation | ✅ | ✅ (default) | ✅ | ✅ | ✅ | ❌ | ❌ | ✅ | ❌ |
| Enforces ECDSA digest ≥ curve strength | ❌ | ❌ (default) | ❌ | ❌ | ❌ | ✅ | ❌ | ❌ | ❌ |
FindObjects page size | 32 | 10 (default) | 64 | 64 | 64 | 64 | 64 | 16 | 256 |
CKA_LABEL length limit | none | none (default) | 128 bytes | none | none | none | none | none | none |
Methodology
- ✅ rows are grounded in the shared test functions each model's
test_hsm_<model>_allactually calls (crate/hsm/<model>/src/tests.rs), e.g.generate_ec_keypair,ecdsa_sign_all_curves_and_hashes,rsa_pss_sign_all_algorithms,eddsa_sign_all_curves,aes_cbc_encrypt. These functions capability-probe per curve/operation (skip-and-warn on failure) rather than hard-failing the whole test, so a passing test does not by itself prove every curve row: per-curve skips show up as warnings in the test log (e.g. Kryoptic's P-224/Ed448). - CI runs SoftHSM2, Kryoptic, and the Utimaco simulator on every build, and Proteccio and
Crypt2Pay on upstream builds (
.github/workflows/test_all.yml). The AWS CloudHSM and GCP Cloud HSM jobs are disabled. GCP Cloud HSM's suite covers AES only (generate_aes_key,aes_gcm_encrypt,aes_cbc_encrypt); its other algorithm rows are — (not tested). - Proteccio, Crypt2Pay, and Utimaco call the same shared EC/ECDSA/RSA-PSS functions, but their EC, ECDSA, and RSA-PSS rows stay 📄 (vendor-documented) until a run's log confirms each curve and digest.
- Thales Luna rows come from the Luna suite (
crate/hsm/luna/src/tests.rs, also run bymise run test:hsm:luna) against a Luna Network HSM 7 partition (firmware 7.9.1, Luna Client 10.9.3, not in FIPS mode), with every curve and digest confirmed in the run log. Luna sits on a private network and is not part of CI. - EC secp256k1/secp192k1 share one generic, curve-agnostic code path in
base_hsm(no vendor-specific branching) and are not part of the shared test suite. SoftHSM2's rows are ✅ from an end-to-end create/sign/verify run against it; the other models' rows are 📄 or —, even where the same model's NIST P-curve rows are ✅. - Quirks table values come directly from each model's
HsmCapabilitiesstruct fields (rsa_oaep_requires_source_data_ptr,supports_aes_gcm_message,supports_key_dates,enforces_ecdsa_digest_strength,max_label_len,find_max_object_count, etc.). - 📄 rows are sourced from vendor PKCS#11 documentation (Proteccio Developer's Guide; Crypt2Pay PKCS#11 API User Guide) for mechanisms not yet exercised by this repository's tests.
- ChaCha20/ChaCha20-Poly1305, documented by Crypt2Pay as a vendor extension, is not implemented
anywhere in
crate/hsm/base_hsmand is therefore out of scope for this table (a KMS-side gap, not an HSM limitation). - If you spot a mismatch, or extend test coverage for a 📄 or — row, please open an issue or PR updating this page.
See also
- HSM keys & operations — KMIP-operation-level mechanism documentation (message sizes, CLI examples, delegation details).
- Multi-HSM support — platform support matrix and multi-instance configuration.
- SoftHSM2 setup · Kryoptic setup · Proteccio setup · Crypt2Pay setup · Utimaco setup · AWS CloudHSM setup · GCP Cloud HSM setup · SmartCard HSM setup · Thales Luna setup
Thales Luna HSM
The Thales Luna SA HSM client (v10.9.3) is supported on Linux (x86_64, Debian/Ubuntu).
This guide covers installation, configuration, and verification of PKCS#11 communication with Thales Luna SA appliances.
System Requirements
Hardware
- Architecture: x86_64 (64-bit Linux)
- Network: TCP connectivity to Luna SA servers (port 5656)
Operating System
- Linux: Debian 13 (trixie) or Ubuntu 22.04 LTS or later
- Kernel: 6.0+
Installation
.github/reusable_scripts/prepare_luna.sh performs the installation, certificate and configuration
steps below in one run, on a host or in a container image. See the
Luna quick reference. The steps below are the manual equivalent.
Step 1: Install Debian Dependencies
Luna requires several system libraries for USB, SSL, and PKSC#11 support:
sudo apt-get update
sudo apt-get install -y \
  libusb-1.0-0 libusb-1.0-0-dev \
  libssl-dev libssl3 \
  openssl \
  libpcsclite1 libpcsclite-dev \
  libmotif-common libxt6 libice6 libsm6 \
  alien rpm build-essential
The alien tool converts Luna RPMs to Debian packages.
Step 2: Prepare Luna Client Packages
Luna client RPMs should be located in a directory (e.g., /home/user/LunaClient_10.9.3-43_Linux/64/).
List available packages:
ls -lah /path/to/LunaClient_*/64/*.rpm | grep -E "libcryptoki|lunacm|lunacmu|vtl|libshim|softtoken"
Expected core packages:
libcryptoki-10.9.3-43.x86_64.rpm— PKCS#11 cryptographic librarylunacm-10.9.3-43.x86_64.rpm— Luna Client Managerlunacmu-10.9.3-43.x86_64.rpm— Luna CMU utilityvtl-10.9.3-43.x86_64.rpm— Verify Tool (diagnostics)libshim-10.9.3-43.x86_64.rpm— Luna shim librarysafenet-softtoken_client-10.9.3-43.x86_64.rpm— Soft token support
Step 3: Install Luna Packages via Alien
Convert and install each core package:
cd /path/to/LunaClient_*/64/

# Core PKCS#11 library
sudo alien -i libcryptoki-10.9.3-43.x86_64.rpm

# Management utilities
sudo alien -i lunacm-10.9.3-43.x86_64.rpm
sudo alien -i lunacmu-10.9.3-43.x86_64.rpm

# Verification tool
sudo alien -i vtl-10.9.3-43.x86_64.rpm

# Shim and soft token support
sudo alien -i libshim-10.9.3-43.x86_64.rpm
sudo alien -i safenet-softtoken_client-10.9.3-43.x86_64.rpm
Verify installation:
dpkg -l | grep -E "libcryptoki|lunacm|lunacmu|vtl|libshim|safenet-softtoken"
Expected output (all should show ii status):
ii  libcryptoki                     10.9.3-44  amd64  Luna PKCS#11 library
ii  lunacm                          10.9.3-44  amd64  Luna Client Manager
ii  lunacmu                         10.9.3-44  amd64  Luna CMU utility
ii  vtl                             10.9.3-44  amd64  Luna Verify Tool
ii  libshim                         10.9.3-44  amd64  Luna shim library
ii  safenet-softtoken-client        10.9.3-44  amd64  Luna soft token
Configuration
Step 1: Set Up HSM User and Group
Luna requires a dedicated user group:
sudo groupadd -f hsmusers
sudo usermod -a -G hsmusers $USER
Refresh group membership:
newgrp hsmusers
Step 2: Deploy Configuration Files
Luna configuration files are typically pre-configured by the HSM administrator. Copy them to the system configuration directory:
# Assume pre-configured files are in:
# /home/user/Config_Lunaclient/

sudo mkdir -p /etc/luna/conf
sudo cp -r /home/user/Config_Lunaclient_*/* /etc/luna/conf/
sudo chown -R root:hsmusers /etc/luna/conf
sudo chmod 755 /etc/luna/conf
Create a system-wide symlink for Chrystoki.conf (Luna's standard location):
sudo ln -sf /etc/luna/conf/Chrystoki.conf /etc/Chrystoki.conf
Step 3: Create Compatibility Symlink
Luna libraries are installed in /usr/safenet/, but configuration expects /opt/safenet/:
sudo mkdir -p /opt/safenet
sudo ln -sf /usr/safenet/lunaclient /opt/safenet/lunaclient
Step 4: Set Up PKCS#11 Library Symlink
Luna installs the 64-bit PKCS#11 library as libCryptoki2_64.so. Create a compatibility symlink:
cd /usr/safenet/lunaclient/lib
sudo ln -sf libCryptoki2_64.so libCryptoki2.so
Step 5: Fix Directory Permissions
Ensure the HSM user can access Luna directories:
sudo chown -R $USER:hsmusers /opt/safenet/lunaclient
sudo chmod -R 755 /opt/safenet/lunaclient/
sudo chmod 750 /opt/safenet/lunaclient/cert/client  # Private key storage
Network Configuration
Step 1: Verify HSM Server Reachability
Test connectivity to the Luna SA servers (default port 5656):
nc -zv <luna-1-ip> 5656
nc -zv <luna-2-ip> 5656
Expected output:
Connection to <luna-1-ip> 5656 port [tcp/*] succeeded!
Connection to <luna-2-ip> 5656 port [tcp/*] succeeded!
Step 2: Review Chrystoki.conf Network Settings
Check the configured HSM servers:
grep -A 20 "LunaSA Client" /etc/luna/conf/Chrystoki.conf | grep -E "ServerName|ServerPort"
Expected output (or similar):
   ServerName00 = <luna-1-ip>;
   ServerPort00 = 5656;
   ServerName01 = <luna-2-ip>;
   ServerPort01 = 5656;
Certificate Setup
Step 1: Deploy Server Certificates
Server certificates authenticate the HSM appliances. Copy them from the pre-configured directory:
mkdir -p /opt/safenet/lunaclient/cert/server
cp /etc/luna/conf/cert/server/*.pem /opt/safenet/lunaclient/cert/server/
sudo chown -R $USER:hsmusers /opt/safenet/lunaclient/cert/server
Verify:
ls -lah /opt/safenet/lunaclient/cert/server/
Expected files:
CAFile.pem— Root CA certificate<luna-1-ip>.pem,<luna-1-ip>Cert.pem— Primary HSM certificates<luna-2-ip>.pem,<luna-2-ip>Cert.pem— Secondary HSM certificates
Step 2: Generate Client Certificates
Luna uses NTLS (NetLuna TLS) for mutual authentication. Generate client certificates using the VTL tool:
export LUNA_HOME=/etc/luna/conf
export LD_LIBRARY_PATH=/usr/safenet/lunaclient/lib

mkdir -p /opt/safenet/lunaclient/cert/client

# Generate client certificate (replace '<client-name>' with your hostname/client name)
/usr/safenet/lunaclient/bin/vtl createCert -n <client-name>
Expected output:
Private Key created and written to: /opt/safenet/lunaclient/cert/client/<client-name>Key.pem
Certificate created and written to: /opt/safenet/lunaclient/cert/client/<client-name>.pem
Step 3: Create Configuration Symlinks
Chrystoki.conf expects files named ClientNameCert.pem and ClientNameKey.pem:
cd /opt/safenet/lunaclient/cert/client
ln -sf <client-name>.pem ClientNameCert.pem
ln -sf <client-name>Key.pem ClientNameKey.pem

# Restrict private key access
chmod 600 <client-name>Key.pem ClientNameKey.pem

ls -lah
Step 4: Deploy Partition Identities
The HSM administrator provides partition identity files (.pid) that establish trust. Copy them:
cp -r /etc/luna/conf/data/* /opt/safenet/lunaclient/data/
cp -r /etc/luna/conf/configData/* /opt/safenet/lunaclient/configData/

sudo chown -R $USER:hsmusers /opt/safenet/lunaclient/data /opt/safenet/lunaclient/configData
chmod -R 755 /opt/safenet/lunaclient/data
chmod -R 755 /opt/safenet/lunaclient/configData
Environment
No environment variable is required: the Luna tools (vtl, lunacm) and libCryptoki2_64.so read
/etc/Chrystoki.conf, or the Chrystoki.conf of the directory set in ChrystokiConfigurationPath.
Verification
Step 1: Verify PKCS#11 Library
Check that the library loads successfully:
ldd /usr/safenet/lunaclient/lib/libCryptoki2_64.so | grep -E "not found|error"
Expected output: No missing dependencies.
Step 2: List HSM Slots
Use the VTL verify command to enumerate available partitions:
/usr/safenet/lunaclient/bin/vtl verify
Expected output (example):
The following Luna SA Slots/Partitions were found:

Slot Serial #         Label
==== ================ =====
   0    <partition-serial>  Sandbox
   1    <partition-serial>  QA
   2    <partition-serial>  Other
Step 3: Detailed Slot Information
Get full hardware details:
echo "slot list" | /usr/safenet/lunaclient/bin/lunacm
Expected output (partial):
Available HSMs:
Slot Id ->              0
Label ->                Sandbox
Serial Number ->        <partition-serial>
Model ->                LunaSA
Firmware Version ->     7.9.1
Bootloader Version ->   1.1.5
Configuration ->        Luna User Partition With SO (PED) Key Export With Cloning Mode
Step 4: Run Diagnostics
Collect full diagnostic information:
/usr/safenet/lunaclient/bin/vtl supportInfo

# Read the generated report
cat c_supportInfo.txt | grep -E "CLIENT FILE CHECKS|Certificate|SSL|PING"
Check that all certificate paths resolve and network connectivity is confirmed.
Step 5: Check Partition Activation (No Login)
A KMS needs an activated partition. Check it without logging in, to avoid consuming failed-login attempts:
printf 'slot set -slot 0\npartition showinfo\nrole show -name co\nexit\n' \
  | /usr/safenet/lunaclient/bin/lunacm | grep -E "Partition Label|Object Count|Activated"
The Crypto Officer role must report Activated..
KMS Configuration
The KMS loads the Luna PKCS#11 library natively with hsm_model = "luna".
Refer to HSM Operations for detailed KMS HSM integration steps.
Configuration via TOML File
hsm_model    = "luna"
hsm_admin    = ["admin"]                 # KMS users with admin rights on the HSM
hsm_slot     = [0]                       # Slot index from `vtl verify`
hsm_password = ["<partition-password>"]  # Crypto Officer password of the partition
Configuration via Command Line
# KMS_HSM_PASSWORD keeps the password out of `ps` output
KMS_HSM_PASSWORD='<partition-password>' ./cosmian_kms \
  --hsm-model luna \
  --hsm-admin admin \
  --hsm-slot 0
Luna-specific behavior
- Library:
/usr/safenet/lunaclient/lib/libCryptoki2_64.soby default; override it with theLUNA_PKCS11_LIBenvironment variable. Luna is supported on Linux x86_64 only. - Several Luna appliances: keep one
Chrystoki.confper appliance and point the KMS process to the directory of the one to use withChrystokiConfigurationPath=<directory>. - Sensitive keys: Luna rejects an explicit
CKA_SENSITIVE=falsewithCKR_ATTRIBUTE_VALUE_INVALID. The KMS therefore omitsCKA_SENSITIVEon Luna and sets onlyCKA_EXTRACTABLE: a key created without--sensitivegetsCKA_EXTRACTABLE=true(it can be wrapped) and Luna's defaultCKA_SENSITIVEvalue. - AES-GCM: the KMS uses classic
C_EncryptInitAES-GCM (the PKCS#11 3.0 message API fails on Luna). In FIPS mode Luna generates the IV and appends it to the output; the KMS uses that IV with firmware 7.9.3 or later (96-bit IV) and rejects the 16-byte IV of older firmware. - Login lockout: the partition locks after Max failed user logins allowed (10 by default) wrong passwords. Check the password before starting the KMS repeatedly.
- Verified on: Luna Network HSM 7, firmware 7.8.5 and 7.9.1, Luna Client 10.9.3.
Kubernetes (Helm chart)
Recommended setup: the official KMS image, unmodified, with the Thales Luna Client runtime
copied by an init container from a small client image, and the Luna configuration and credentials
mounted from Kubernetes Secrets. The KMS image is upgraded by changing its tag, the Luna Client is
versioned independently, no image holds a secret, and the chart's default hardening (UID 1000,
read-only root filesystem) is kept. The KMS image ships the C++ runtime required by
libCryptoki2_64.so (/usr/local/cosmian/lib/hsm, on LD_LIBRARY_PATH).
hsm_model = "luna" and the C++ runtime in the image are available in KMS releases after
5.28.0. KMS 5.28.0 and earlier images reject luna and cannot load libCryptoki2_64.so.
To log the Luna PKCS#11 calls in Kubernetes, mount a writable emptyDir for the log files and
follow Logging and Diagnostics; the root filesystem is read-only.
1. Luna Client image
The Thales Luna Client is proprietary and is not part of the KMS image: build this image once per
Luna Client version, from the Thales tarball (LunaClient.tar) and
.github/reusable_scripts/prepare_luna.sh (without LUNA_CONFIG, it installs the client runtime only).
FROM debian:bookworm-slim AS build
RUN apt-get update && apt-get install -y --no-install-recommends rpm2cpio cpio \
    && rm -rf /var/lib/apt/lists/*
COPY LunaClient.tar prepare_luna.sh /tmp/
RUN LUNA_CLIENT_TAR=/tmp/LunaClient.tar bash /tmp/prepare_luna.sh

FROM debian:bookworm-slim
COPY --from=build /usr/safenet/lunaclient/lib /usr/safenet/lunaclient/lib
COPY --from=build /usr/safenet/lunaclient/bin /usr/safenet/lunaclient/bin
2. Luna configuration in Secrets
Chrystoki.conf, mounted with the other files under /etc/luna:
Chrystoki2 = {
   LibUNIX64 = /usr/safenet/lunaclient/lib/libCryptoki2_64.so;
}

LunaSA Client = {
   SSLConfigFile = /usr/safenet/lunaclient/bin/openssl.cnf;
   ServerCAFile = /etc/luna/cert/server.pem;
   ClientCertFile = /etc/luna/cert/client.pem;
   ClientPrivKeyFile = /etc/luna/cert/client-key.pem;
   NetClient = 1;
   ServerName00 = <luna-ip>;
   ServerPort00 = 5656;
}

Secure Trusted Channel = {
   ClientTokenLib = /usr/safenet/lunaclient/lib/libSoftToken.so;
   SoftTokenDir = /etc/luna/token;
   ClientIdentitiesDir = /etc/luna/client_identities;
   PartitionIdentitiesDir = /etc/luna/partition_identities;
}
kubectl -n kms create secret generic luna-files \
  --from-file=Chrystoki.conf \
  --from-file=server.pem=cert/server/<luna-ip>.pem \
  --from-file=client.pem=<client-name>.pem \
  --from-file=client-key.pem=<client-name>Key.pem \
  --from-file=token_v2.db=configData/token/001/token_v2.db \
  --from-file=clientRD=data/client_identities/clientRD \
  --from-file=data/partition_identities/   # one key per <partition-serial>.pid
kubectl -n kms create secret generic luna-password --from-literal=password='<partition-password>'
3. Helm values
image:
  repository: ghcr.io/cosmian/kms
  tag: <version>
extraArgs: [--hsm-model, luna, --hsm-slot, "0", --hsm-admin, admin]
extraEnv:
  - name: ChrystokiConfigurationPath
    value: /etc/luna
  - name: KMS_HSM_PASSWORD
    valueFrom:
      secretKeyRef: {name: luna-password, key: password}
initContainers:
  - name: luna-client
    image: <registry>/luna-client:<luna-client-version>
    command: [cp, -r, /usr/safenet/lunaclient/lib, /usr/safenet/lunaclient/bin, /luna-client/]
    securityContext:
      runAsNonRoot: true
      runAsUser: 1000
      readOnlyRootFilesystem: true
      allowPrivilegeEscalation: false
    volumeMounts:
      - {name: luna-client, mountPath: /luna-client}
extraVolumes:
  - name: luna-client
    emptyDir: {}
  - name: luna
    secret:
      secretName: luna-files
      defaultMode: 0440
      items:
        - {key: Chrystoki.conf, path: Chrystoki.conf}
        - {key: server.pem, path: cert/server.pem}
        - {key: client.pem, path: cert/client.pem}
        - {key: client-key.pem, path: cert/client-key.pem}
        - {key: token_v2.db, path: token/001/token_v2.db}
        - {key: clientRD, path: client_identities/clientRD}
        - {key: <partition-serial>.pid, path: partition_identities/<partition-serial>.pid}
extraVolumeMounts:
  - name: luna-client
    mountPath: /usr/safenet/lunaclient
    readOnly: true
  - name: luna
    mountPath: /etc/luna
    readOnly: true
Add one items entry per partition identity file. On minikube with a Luna Network HSM 7 (firmware
7.9.1) and the chart's default security context, HSM key creation, AES-GCM encryption/decryption and
ECDSA signature were validated through the KMS pod with the Luna Client runtime inside the image; with
this init-container setup, the official image loading and initializing the Luna library was validated.
Logging and Diagnostics
Thales cklog logs every PKCS#11 call. Install libcklog2.so from the cklog RPM of the Luna
Client tarball (prepare_luna.sh does not install it), then point the KMS to it and CkLog2 to the
real library. The KMS loads LUNA_PKCS11_LIB directly and does not use Chrystoki2.LibUNIX64:
LUNA_PKCS11_LIB=/usr/safenet/lunaclient/lib/libcklog2.so
Add to Chrystoki.conf (the log directory must be writable by the KMS user):
CkLog2 = {
   LibUNIX64 = /usr/safenet/lunaclient/lib/libCryptoki2_64.so;
   Enabled = 1;
   File = /var/log/luna/cklog.txt;
   Error = /var/log/luna/error.txt;
   NewFormat = 1;
   LoggingMask = ALL_FUNC;
}
Each call is logged with its return code and duration, e.g.
STRTGetFunctionList {} then FINIGetFunctionList CKR_OK(83ms) {}. Every call is written to the
log file: enable it for diagnostics only.
References
Luna Network HSM Deployment (Complete Example)
This section documents a complete, end-to-end deployment of Cosmian KMS with Thales Luna Network HSM 7 (v7.8.5).
Scenario
- KMS Server:
<kms-host> - Luna HSM:
<luna-ip>(Luna Network HSM 7, v7.8.5) - Luna Client: v10.9.3
- HSM Partition: slot 0
- HSM Password:
<partition-password>(from the HSM administrator)
Deployment Steps
1. Pre-configuration Files
The Luna administrator provides pre-configured files, here in /path/to/luna_config/:
/path/to/luna_config/
├── Chrystoki.conf
├── cert/server/
│   ├── <luna-ip>.pem            # Server certificate
│   ├── <luna-ip>Cert.pem
│   └── CAFile.pem
├── configData/token/001/
│   └── token_v2.db              # STC soft token database
└── data/
    ├── client_identities/
    │   └── clientLuna7RD        # Luna Network HSM specific identity
    └── partition_identities/
        └── *.pid                # Partition identities
2. Deploy to /usr/safenet/lunaclient/
Important: Luna Network HSM uses /usr/safenet/lunaclient/ (NOT /opt/safenet/).
# Create directory structure
sudo mkdir -p /usr/safenet/lunaclient/{cert/server,data/{client_identities,partition_identities},configData/token/001}

# Copy server certificate (rename to lunasa7rd.pem for Luna Network HSM)
sudo cp /path/to/luna_config/cert/server/<luna-ip>.pem \
  /usr/safenet/lunaclient/cert/server/lunasa7rd.pem

# Copy STC token database (rename with .LUNA7 suffix)
sudo cp /path/to/luna_config/configData/token/001/token_v2.db \
  /usr/safenet/lunaclient/configData/token/001/token_v2.db.LUNA7

# Copy Luna Network HSM specific client identity
sudo cp /path/to/luna_config/data/client_identities/clientLuna7RD \
  /usr/safenet/lunaclient/data/client_identities/

# Copy all partition identities
sudo cp /path/to/luna_config/data/partition_identities/*.pid \
  /usr/safenet/lunaclient/data/partition_identities/
3. Set Correct Permissions
# All files owned by hsmusers group
sudo chown -R :hsmusers /usr/safenet/lunaclient

# File permissions (rw-r--r--)
sudo chmod 644 /usr/safenet/lunaclient/cert/server/lunasa7rd.pem
sudo chmod 644 /usr/safenet/lunaclient/configData/token/001/token_v2.db*
sudo chmod 644 /usr/safenet/lunaclient/data/client_identities/clientLuna7RD
sudo chmod 644 /usr/safenet/lunaclient/data/partition_identities/*.pid

# Directory permissions
sudo chmod -R 755 /usr/safenet/lunaclient
4. Configure Chrystoki.conf for Luna Network HSM
Key differences for Luna Network HSM:
ServerCAFile: Uselunasa7rd.pem(not individual IP-based certs)- Remove
ClientCertFileandClientPrivKeyFileentries - Use
/usr/safenet/paths (not/opt/safenet/) - Include
ClientTokenLibfor STC soft tokens
cat | sudo tee /etc/Chrystoki.conf << 'EOF'
Chrystoki2 = {
   LibUNIX64 = /usr/safenet/lunaclient/lib/libCryptoki2_64.so;
}

Luna = {
  DefaultTimeOut = 500000;
  PEDTimeout1 = 100000;
  PEDTimeout2 = 200000;
  PEDTimeout3 = 20000;
  KeypairGenTimeOut = 2700000;
  CloningCommandTimeOut = 300000;
  CommandTimeOutPedSet = 720000;
}

LunaSA Client = {
   ReceiveTimeout = 20000;
   SSLConfigFile = /usr/safenet/lunaclient/bin/openssl.cnf;
   ServerCAFile = /usr/safenet/lunaclient/cert/server/lunasa7rd.pem;
   NetClient = 1;
   TCPKeepAlive = 1;
   ServerName00 = <luna-ip>;
   ServerPort00 = 5656;
}

Secure Trusted Channel = {
   ClientTokenLib = /usr/safenet/lunaclient/lib/libSoftToken.so;
   SoftTokenDir = /usr/safenet/lunaclient/configData/token;
   ClientIdentitiesDir = /usr/safenet/lunaclient/data/client_identities;
   PartitionIdentitiesDir = /usr/safenet/lunaclient/data/partition_identities;
}
EOF
5. Configure KMS with HSM Backend
In /etc/cosmian_kms/config.toml:
hsm_model    = "luna"
hsm_admin    = ["*"]
hsm_slot     = [0]
hsm_password = ["<partition-password>"]
6. Verify Installation
export LUNA_HOME=/usr/safenet/lunaclient
export PATH=/usr/safenet/lunaclient/bin:${PATH}

# Should show all partitions of the appliance (slot 0 included)
/usr/safenet/lunaclient/bin/vtl verify
Troubleshooting
Issue: vtl verify shows no partitions
Solution: Check that partition identities are in the correct location:
ls -la /usr/safenet/lunaclient/data/partition_identities/
# Should show one <partition-serial>.pid file per partition
Issue: PKCS#11 login hangs
Solution: HSM administrator must enable partition challenge authentication:
# On Luna appliance (admin user)
lunash:> partition activateChallenge -partition <partition-label> -challenge <partition-password>
After activation, restart KMS and key creation will succeed.
Symlink Note
If your system has /opt/safenet/lunaclient as a symlink to /usr/safenet/lunaclient, both paths work interchangeably. Ensure Chrystoki.conf uses /usr/safenet/ paths explicitly.
Trustway Crypt2pay
The Crypt2pay HSM integration is supported on Linux (x86_64). It has been tested with the following devices: BULL PKCS11 C2P 5.0.7 (Release) Unix64
How the KMS connects to the HSM
The KMS talks to the HSM exclusively through the vendor PKCS#11 library /lib/libpkcs11c2p.so.
Everything below the PKCS#11 API (the network channel to the HSM, TLS, the vendor key files)
is handled by that library, driven by the c2p.xml file that C2P_CONF points to
(default location when C2P_CONF is not set: /c2p/c2p.xml).
| Concern | Handled by | Configured in |
|---|---|---|
| Loading the library | KMS (/lib/libpkcs11c2p.so) | fixed path, see Copy the library |
| Slot login (PIN/password) | KMS, via PKCS#11 C_Login | hsm_slot / hsm_password (KMS config) |
.kdk and .ksk key files | Crypt2pay library, not the KMS | c2p.xml (KDKfile, KSKfile) |
| HSM certificate validation | Crypt2pay library, not the KMS | c2p.xml (SSLDefinition/authorities) |
| KMS certificate to the HSM (mTLS) | Crypt2pay library, not the KMS | c2p.xml (SSLDefinition/certificate, privateKey), see mTLS |
The .kdk and .ksk files
Per the Crypt2pay PKCS#11 API User Guide (§5), the PKCS#11 library protects the keys it stores with technical keys that are created on the Crypt2pay Key Management Centre (KMC) and distributed as files:
- KDK (key storage key): encrypts the RSA, ECDSA and (HSM firmware 8.05 and later) secret keys generated through
PKCS#11. It is distributed in a
.kdkfile (one per HSM), or on a smart card. - KSK (the
.kskfile carries the KMS storage key): only needed for secret keys generated with an HSM firmware older than 8.05. Optional on newer firmware.
At session opening the Crypt2pay library loads the KDK tokens from the .kdk file into the HSM (and the KMS key from the
.ksk file, if configured). With KDKintroduction set to start or login, it additionally asks for the KDK to be
inserted from a smart card through a PIN pad connected to the HSM, at C_OpenSession or C_Login time.
Smart-card insertion is meant for manually operated platforms and is not suitable for automated load-balanced setups.
The diagram below shows who owns what. The KMS process never touches the key files: the Crypt2pay PKCS#11 library, loaded in the KMS process, reads them from the KMS host filesystem and pushes them to the HSM.
flowchart LR
    KMC["Crypt2pay KMC<br/>(HSM administrators)"]

    subgraph HOST["KMS host"]
        subgraph FS["Host filesystem (C2P_DIR)"]
            XML["c2p.xml"]
            KDK[".kdk file<br/>KDK key storage key"]
            KSK[".ksk file (optional)<br/>KMS key, firmware below 8.05"]
            SSL["ssl/ trusted CAs<br/>client cert and key (mTLS)"]
            OBJ["token_objects/<br/>wrapped key store"]
        end
        subgraph PROC["KMS process"]
            KMS["Eviden KMS<br/>slot, password only"]
            LIB["libpkcs11c2p.so<br/>Crypt2pay PKCS#11 library"]
        end
    end

    subgraph HSM["Crypt2pay HSM"]
        MK["KM2bntx master key<br/>(never leaves the HSM)"]
        KEYS["KDK and KMS keys loaded<br/>application keys in use"]
    end

    KMC -- "① generates and distributes" --> KDK
    KMC -- "① generates and distributes" --> KSK
    KMS -- "② PKCS#11 calls, C_Login" --> LIB
    LIB -- "③ reads at session opening" --> XML
    LIB -- "③ reads at session opening" --> KDK
    LIB -- "③ reads at session opening" --> KSK
    LIB -- "③ reads" --> SSL
    LIB <-->|"stores and loads"| OBJ
    LIB == "④ TLS, KDK and KMS tokens loaded<br/>then crypto operations" ==> KEYS
    MK -. "decrypts the KDK tokens" .-> KEYS
Steps ① to ④: the administrators create the key files on the KMC and copy them to the host; the KMS only issues PKCS#11 calls; the library reads its configuration and key files when a session is opened; the library then opens the (optionally mutually authenticated) TLS connection, loads the KDK tokens into the HSM, and relays the crypto operations.
Consequences for the KMS:
- The files are generated by the HSM administrators on the KMC and copied to
[C2P_DIR]on the KMS host. The KMS never reads, loads, or transmits them to the HSM, and it has no configuration option for them. - The load therefore goes from the KMS host to the HSM, performed by the Crypt2pay PKCS#11 library, not by the KMS.
- The KMS performs no certificate handling for the HSM link. The KMS server's own TLS and client-certificate settings are unrelated to this link.
- The KMS opens the PKCS#11 session and logs in lazily, when the first session on a slot is opened.
With the special password
<NO_LOGIN>no login is performed. - If
c2p.xmlsetslogin User="<CommonName>",hsm_passwordmust be the user PIN; withUser="@"it must be of the formcommonname@PIN(PKCS#11 API User Guide, §4.2.2.4).
HSM files installation
Copy the Crypt2pay PKCS#11 library to /lib
Copy libpkcs11c2p.so to /lib.
Make sure it is readable by the user running the KMS.
Create the c2p directory
Create a c2p directory in, say, /etc/c2p (hereafter called [C2P_DIR])
In this directory copy the following files:
c2padmin<- The Crypt2pay admin toolc2p.xml<- The Crypt2pay configuration fileca.der<- The CA certificateinstallca<- The Crypt2pay CA installation toolp11tool<- The PKCS#11 tool used to test the connection- The files with extensions
.kdk(one per HSM) and.ksk(optional) <- The Crypt2pay key distribution files generated on the Crypt2pay KMC. They are only referenced fromc2p.xml; see The.kdkand.kskfiles
Install the CA certificate
This certificate is the one that signed the HSM certificate and will be used to authenticate the HSM.
In the [C2P_DIR], run the installca tool:
./installca -i ./ca.der ssl
This will create an ssl directory in the [C2P_DIR] and copy the CA certificate there.
To check that the CA certificate is installed correctly, run:
./installca -l ./ssl/
Edit the c2p.xml file and insert the full path to the CA certificate ssl directory in C2PConfig/SSLDefinition/authorities:
<C2PConfig>
  ...
  <SSLDefinition>
    <authorities>[C2P_DIR]/ssl</authorities>
  </SSLDefinition>
  ...
</C2PConfig>
replace [C2P_DIR] with the actual path.
Set logging and Verify the c2p.xml file
In the c2p.xml file, set the logging to
<C2Pconfig>
  <TraceLevel>debug functions parameters pkcs hsm</TraceLevel>
  <TraceFile>+logs\c2p.trc</TraceFile>
  ...
</C2Pconfig>
Check the Crypt2pay manual (PKCS#11 API User Guide, §4.2.2) to make sure that other elements of the c2p.xml are correct, in particular:
C2PConfig/LocalKeyOwner(mandatory) andC2PConfig/LocalKeyIndex(optional, default00): identify the KDK used by the PKCS#11 library- the name of the
.kdkfile inC2PConfig/C2PSlot/KDKfile(can be overridden per HSM inC2PBox/KDKfile) - the name of the
.kskfile inC2PConfig/KSKfile: optional, only needed for secret keys generated with an HSM firmware older than 8.05 - the IP address of the HSM in
C2PConfig/C2PSlot/C2PBox/IP, andssl="on"on theC2PBoxelement to use TLS (port3001for TLS connections,2001for clear connections)
.. and recover the configured Slot ID(s) in the Id attribute of C2PConfig/C2PSlot.
Mutual authentication (mTLS)
The configuration above authenticates the HSM to the KMS host only. To also authenticate the KMS host to the HSM,
add the client certificate, its private key and its chain to the SSLDefinition section of c2p.xml
(PKCS#11 API User Guide, §4.2.2.3):
<SSLDefinition>
  <authorities>[C2P_DIR]/ssl</authorities>
  <certificate>[C2P_DIR]/ssl/client.pem</certificate>
  <privateKey password="<KEY_PASSWORD>">[C2P_DIR]/ssl/client-key.pem</privateKey>
  <certificateChain format="pkcs7">[C2P_DIR]/ssl/chain.der</certificateChain>
</SSLDefinition>
authoritiesis mandatory for both HSM authentication and mutual authentication.certificateandcertificateChainare only required for mutual authentication. DefiningprivateKeyis what turns mutual authentication on. PKCS#12 is also supported (format="pkcs12").- A password-protected private key must be in PEM format. The
passwordattribute can be plain text or encrypted in the file ({++AES}...,{AES256}...); see the manual for thecipherModeoptions. SSLDefinitioncan be set globally, perC2PSlot, or perC2PBox, the most specific one taking precedence.- The HSM must in turn trust the CA that signed this client certificate, and the client certificate's common name must be an authorized crypto user on the HSM. This is prepared on the HSM side with the Crypt2pay KMC and administration interface; see the User Handbook: Securing network communication with TLS protocol (§2.1 to §2.3).
The KMS is not involved in any of this: it is entirely configured in c2p.xml and handled by libpkcs11c2p.so.
Set the C2P_CONF environment variable to [C2P_DIR]/c2p.xml
export C2P_CONF=[C2P_DIR]/c2p.xml
replace [C2P_DIR] with the actual path.
Test the configuration
Run the p11tool tool to create a new 256-bit AES key:
./p11tool -genkey -keyalg aes -keysize 256 -shared /lib/libpkcs11c2p.so -slot 1 -verbose
The creation should be successful and print the key alias and ID:
use slot #1
Alias 'mykey' selected
Secret key #1000004 created
The logs are available in [C2P_DIR]/logs/c2p.trc.
KMS Configuration
When using the TOML configuration file, enable HSM support by setting these parameters:
hsm_model = "crypt2pay"
hsm_admin = "<HSM_ADMIN_USERNAME>" # defaults to "admin"
hsm_slot = [0, 0, ] # example [0,4] for slots 0 and 4
hsm_password = ["<password>", "<password>", ] # example ["648219", "648219"] for slots 0 and 4
NOTE:
hsm_slotandhsm_passwordmust always be arrays, even if only one slot is used.The order of the passwords must match the order of the slots in the
hsm_slotarray.If you want to login with an empty (null) password, use an empty string.
If you do not want to login, use the special password value
<NO_LOGIN>
Configuration via command-line
HSM support can also be enabled with command-line arguments:
--hsm-model "crypt2pay" \
--hsm-admin "<HSM_ADMIN_USERNAME>"  \
--hsm-slot <number_of_1st_slot> --hsm-password <password_of_1st_slot> \
--hsm-slot <number_of_2and_slot> --hsm-password <password_of_2and_slot>
The hsm-model parameter is the HSM model. Use crypt2pay.
The hsm-admin parameter is the username of the HSM administrator.
The HSM administrator is the only user who can create objects on the HSM via the KMIP Create operation
and delegate other operations to other users.
The hsm-slot and hsm-password parameters are the slot number and user password (PIN) of the HSM slots used by the KMS.
These options can be repeated to configure multiple slots.
NOTE: To list available slots and keys run from the
[C2P_DIR]directory:./p11tool -list -shared /lib/libpkcs11c2p.so -verbose
Kubernetes (Helm chart)
Use an official KMS image unmodified (ghcr.io/cosmian/kms below, or ghcr.io/cosmian/kms-fips).
An init container copies libpkcs11c2p.so from a small client image and unpacks the [C2P_DIR]
configuration from a Kubernetes Secret. See the
Helm chart HSM overview.
Unlike other HSM libraries, the Crypt2pay library writes inside [C2P_DIR] at runtime: logs/ and
the objects directory (<ObjectsDirectory> in c2p.xml, for example QuickStart_<date>_p11/),
which stores the keys generated through PKCS#11, wrapped by the KDK. [C2P_DIR] is therefore a
PersistentVolumeClaim mounted read-write at /etc/c2p, and the KMS runs as a single replica
(replicaCount: 1, autoscaling disabled). Otherwise each pod would keep its own objects directory.
Validated on minikube against a live Crypt2pay with the values below, with the non-FIPS and FIPS images: HSM key creation, AES-GCM encryption and decryption through the KMS pod, and decryption with the same HSM key after the pod was deleted and recreated.
1. Crypt2pay client image
Build it once per library version. libpkcs11c2p.so links only against glibc (check yours with
ldd libpkcs11c2p.so). If yours lists other libraries, copy them into /opt/c2p/lib too and set
LD_LIBRARY_PATH to /usr/local/cosmian/lib/hsm:/opt/c2p/lib in extraEnv:
FROM debian:bookworm-slim
COPY libpkcs11c2p.so /opt/c2p/lib/libpkcs11c2p.so
2. Crypt2pay configuration in a Secret
Prepare and test [C2P_DIR] on a workstation as described above, with [C2P_DIR] = /etc/c2p.
Absolute paths under /etc/c2p are recommended in c2p.xml (Authorities, mTLS files,
TraceFile), e.g. <TraceFile>+/etc/c2p/logs/c2p.trc</TraceFile>; relative KSKfile and
ObjectsDirectory entries resolve under /etc/c2p. Lower TraceLevel (for example error):
debug traces grow by gigabytes and share the volume with the objects directory. Pack the
configuration, the installed CA tree and the key files into one archive (add <name>.ksk and the
mTLS client key file referenced by <privateKey>, if used):
cd /etc/c2p
tar -cf c2p-config.tar c2p.xml ssl <name>.kdk
kubectl -n kms create secret generic c2p-files --from-file=c2p-config.tar
kubectl -n kms create secret generic c2p-password --from-literal=password='<PIN>'
PersistentVolumeClaim for [C2P_DIR]:
apiVersion: v1
kind: PersistentVolumeClaim
metadata:
  name: c2p-data
  namespace: kms
spec:
  accessModes: [ReadWriteOnce]
  resources:
    requests:
      storage: 1Gi
3. Helm values
At each pod start, the init container refreshes the configuration on the volume and leaves the objects directory intact:
image:
  repository: ghcr.io/cosmian/kms
  tag: <version>
nodeSelector: {kubernetes.io/arch: amd64} # the crypt2pay model is Linux x86_64 only
replicaCount: 1
extraArgs: [--hsm-model, crypt2pay, --hsm-slot, "<slot>", --hsm-admin, admin]
extraEnv:
  - name: CRYPT2PAY_PKCS11_LIB
    value: /opt/c2p/lib/libpkcs11c2p.so
  - name: C2P_CONF
    value: /etc/c2p/c2p.xml
  - name: KMS_HSM_PASSWORD
    valueFrom:
      secretKeyRef: {name: c2p-password, key: password}
initContainers:
  - name: c2p-client
    image: <registry>/c2p-client:<library-version>
    command: [sh, -c, 'cp /opt/c2p/lib/* /c2p-lib/ && tar -xf /c2p-secret/c2p-config.tar -C /etc/c2p && mkdir -p /etc/c2p/logs']
    securityContext:
      runAsNonRoot: true
      runAsUser: 1000
      readOnlyRootFilesystem: true
      allowPrivilegeEscalation: false
    volumeMounts:
      - {name: c2p-lib, mountPath: /c2p-lib}
      - {name: c2p-secret, mountPath: /c2p-secret, readOnly: true}
      - {name: c2p, mountPath: /etc/c2p}
extraVolumes:
  - name: c2p-lib
    emptyDir: {}
  - name: c2p-secret
    secret:
      secretName: c2p-files
      defaultMode: 0440
  - name: c2p
    persistentVolumeClaim:
      claimName: c2p-data
extraVolumeMounts:
  - name: c2p-lib
    mountPath: /opt/c2p/lib
    readOnly: true
  - name: c2p
    mountPath: /etc/c2p
The pod must reach the HSM on TCP port 3001 (TLS).
Trustway Proteccio
Eviden KMS natively integrates with the Trustway Proteccio HSM.
Proteccio library setup
This solution works on Linux (x86_64) and has been validated against the Proteccio nethsm library version 3.17.
The KMS expects:
- the Proteccio
nethsmlibrary to be installed in/lib/libnethsm.so - and the Proteccio configuration files in
/etc/proteccio.
/etc/proteccio configuration files
The Proteccio client library reads its configuration from /etc/proteccio. The directory must contain the
following files:
| File | Description |
|---|---|
proteccio.rc or proteccio.ini | Main INI configuration file (see below) |
proteccio.crt | Server TLS certificate (PEM) used to authenticate the HSM appliance |
proteccio_client.key | Client TLS private key (PEM) for mutual TLS authentication |
proteccio_client.crt | Client TLS certificate (PEM) for mutual TLS authentication |
secchannel_hsm.pem | HSM secure-channel public key (EC, PEM) — only if the secure channel is enabled |
secchl_clt_privkey.pem | Client secure-channel private key (PEM) — only if the secure channel is enabled |
secchl_clt_pubkey.pem | Client secure-channel public key (PEM) — only if the secure channel is enabled |
The proteccio.rc / proteccio.ini file contains two sections:
[PROTECCIO]
IPaddr=<HSM_IP_ADDRESS>   ; IP address of the Proteccio appliance
SSL=1                     ; Enable TLS (1) or plain TCP (0)
SrvCert=proteccio.crt     ; Server certificate filename (relative to /etc/proteccio)
SEC_CHANNEL=1             ; Enable encrypted secure channel (1) or not (0)
SecChlSrvKey=secchannel_hsm.pem  ; HSM secure-channel public key filename

[CLIENT]
Mode=0                    ; 0 = synchronous
LoggingLevel=7            ; Verbosity (0–7, 7 = most verbose)
LogFile=proteccio_log_file.log   ; Path to the library log file
ClntKey=proteccio_client.key     ; Client TLS private key filename
ClntCert=proteccio_client.crt    ; Client TLS certificate filename
SecChlClntPrivKey=secchl_clt_privkey.pem  ; Client secure-channel private key
SecChlClntPubKey=secchl_clt_pubkey.pem    ; Client secure-channel public key
All filenames in the configuration file are relative to /etc/proteccio unless an
absolute path is given.
A secondary status log (HSM_Status.log) is written to /etc/proteccio by the nethsmstatus
monitoring daemon and records HSM availability events. It is not read by the KMS.
Please run the nethsmstatus tool to check the status of the HSM before proceeding with the
rest of the installation.
Installing the client on Debian (x86_64)
The Proteccio client package ships an interactive Linux/install.sh (root, language prompt). The same result
can be obtained non-interactively with the steps below, which were validated on Debian 13 against a
Proteccio running firmware 194 (client library nethsm 4.5, PKCS#11 token flags login required).
-
Unpack the package delivered by Eviden and locate the 64-bit client files in
Client_Software/linux64(libnethsm.so,nethsmstatus,nethsmtool). Keep the client certificate pair and the HSM server certificate provided with your HSM (proteccio_client.crt,proteccio_client.key, server.crt). -
Install the library and tools:
sudo cp Client_Software/linux64/libnethsm.so /lib/libnethsm.so sudo ln -sf /lib/libnethsm.so /usr/lib/libnethsm.so sudo install -m 755 Client_Software/linux64/nethsmstatus /usr/local/bin/nethsmstatus sudo install -m 755 Client_Software/linux64/nethsmtool /usr/local/bin/nethsmtoolnethsmstatusis linked againstlibnethsm.so; it fails withlibnethsm.so => not founduntil the library is installed in a standard library path. -
Install the certificates in
/etc/proteccio. The HSM server certificate must be renamedproteccio.crtto matchSrvCert:sudo mkdir -p /etc/proteccio sudo cp <server_cert>.crt /etc/proteccio/proteccio.crt sudo cp proteccio_client.crt /etc/proteccio/proteccio_client.crt sudo cp proteccio_client.key /etc/proteccio/proteccio_client.key sudo chmod 644 /etc/proteccio/proteccio.crt /etc/proteccio/proteccio_client.crt sudo chmod 600 /etc/proteccio/proteccio_client.key -
Create
/etc/proteccio/proteccio.iniand copy it toproteccio.rc(the library readsproteccio.rc, as printed bynethsmstatus). The package default points at192.168.0.1withSSL=0: replace the address and enable TLS.[PROTECCIO] IPaddr=<HSM_IP_ADDRESS> SSL=1 SrvCert=proteccio.crt [CLIENT] Mode=0 LoggingLevel=0 LogFile=/dev/null StatusFile=/dev/null ClntKey=proteccio_client.key ClntCert=proteccio_client.crtsudo cp /etc/proteccio/proteccio.ini /etc/proteccio/proteccio.rc
The Proteccio manual states that enabling traces has a direct impact on performance
(LoggingLevel ranges from 0, no trace, to 7). Use a non-zero level only while debugging.
-
Check connectivity and the virtual HSMs (slots):
nethsmstatusThe command must print
TLS is enabled,Token state: 0X40 OPERATIONALand oneToken (Slot N)block per virtual HSM, with its label. TheNshown is the slot number to configure inhsm_slot. -
Optionally verify the PKCS#11 login of one slot with
pkcs11-tool(packageopensc). Run it once: repeated failed logins can lock the virtual HSM.pkcs11-tool --module /lib/libnethsm.so --list-slots pkcs11-tool --module /lib/libnethsm.so --slot <0xN> --login --pin <password> --list-objectspkcs11-tool --slotexpects the PKCS#11 slot ID (hexadecimal): Proteccio slot4is0x4, whereas--slot-indexis zero-based (slot4is index3).
Troubleshooting
| Symptom | Cause / fix |
|---|---|
libnethsm.so => not found when running nethsmstatus | Library not in /lib or /usr/lib; redo step 2 |
| Client cannot reach the HSM | Check IPaddr, TCP port 5552 (TLS) or 5551 (plain) through firewalls |
| TLS handshake fails | Server certificate not named proteccio.crt, or the client certificate is not imported on the HSM |
| Very low signature throughput | LoggingLevel is not 0; see step 4 |
KMS configuration
At least one slot and its corresponding password must be configured. Any slot and any number of slots may be used.
When using the TOML configuration file, the HSM support is enabled by configuring these 4 parameters:
hsm_model = "proteccio"
hsm_admin = "<HSM_ADMIN_USERNAME>" # defaults to "admin"
hsm_slot = [0, 0, ] # example [1,4] for slots 1 and 4
hsm_password = ["<password>", "<password>", ] # example ["pass1", "pass4"] for slots 1 and 4
hsm_slot and hsm_password must always be arrays, even if only one slot is used.
The order of the passwords must match the order of the slots in the hsm_slot array.
If you want to login with an empty (null) password, use an empty string.
If you do not want to login, use the special password value
<NO_LOGIN>
When the KMS is started from the command line, the HSM support can be enabled by using the following arguments:
--hsm-model "proteccio" \
--hsm-admin "<HSM_ADMIN_USERNAME>" \
--hsm-slot <number_of_1st_slot> --hsm-password <password_of_1st_slot> \
--hsm-slot <number_of_2and_slot> --hsm-password <password_of_2and_slot>
The hsm-model parameter is the HSM model to be used; use proteccio
The hsm-admin parameter is the username of the HSM administrator. The HSM administrator is the only user that can create objects on the HSM via the KMIP Create operation the delegate other operations to other users. (see below)
The hsm-slot and hsm-password parameters are the slot number and password of the HSM slots to be used by the KMS. These arguments can be repeated multiple times to specify multiple slots.
Kubernetes (Helm chart)
Use an official KMS image unmodified (ghcr.io/cosmian/kms-fips below, or ghcr.io/cosmian/kms).
An init container copies libnethsm.so from a small client image, and /etc/proteccio is mounted
from a Kubernetes Secret. See the Helm chart HSM overview.
The nethsm client library links only against glibc (libc.so.6, libdl.so.2; check yours with
readelf -d libnethsm.so), so no extra runtime library is needed.
libnethsm.so embeds its own OpenSSL, which reads the OPENSSL_CONF environment variable. The
FIPS image sets it to the KMS FIPS configuration, which the embedded OpenSSL cannot load:
C_Initialize fails with CKR_FUNCTION_FAILED and the pod restarts in a loop. The values below
therefore start the KMS with command: [env, -u, OPENSSL_CONF, cosmian_kms]: the KMS then
reads the same FIPS configuration from its built-in default path, and libnethsm.so uses its
own defaults. The chart command value is available in chart releases after 5.28.0. The
non-FIPS image (ghcr.io/cosmian/kms) does not need command.
Validated on minikube against a live Proteccio (secure channel enabled) with the values below,
with the FIPS image (with command) and the non-FIPS image (without): HSM key creation, AES-GCM
encryption and decryption through the KMS pod.
1. Proteccio client image
Build it once per nethsm version, from Client_Software/linux64/libnethsm.so of the Proteccio
package:
FROM debian:bookworm-slim
COPY libnethsm.so /opt/proteccio/lib/libnethsm.so
2. Proteccio configuration in Secrets
The Secret is mounted read-only, so the library must not write logs into /etc/proteccio. Keep
LogFile and StatusFile on /dev/null. proteccio.rc:
[PROTECCIO]
IPaddr=<HSM_IP_ADDRESS>
SSL=1
SrvCert=proteccio.crt

[CLIENT]
Mode=0
LoggingLevel=0
LogFile=/dev/null
StatusFile=/dev/null
ClntKey=proteccio_client.key
ClntCert=proteccio_client.crt
kubectl -n kms create secret generic proteccio-files \
  --from-file=proteccio.rc \
  --from-file=proteccio.crt=<server_cert>.crt \
  --from-file=proteccio_client.crt \
  --from-file=proteccio_client.key
kubectl -n kms create secret generic proteccio-password --from-literal=password='<password>'
With the secure channel enabled (SEC_CHANNEL=1), also add secchannel_hsm.pem,
secchl_clt_privkey.pem and secchl_clt_pubkey.pem to the Secret and their keys to proteccio.rc
(see /etc/proteccio configuration files).
3. Helm values
image:
  repository: ghcr.io/cosmian/kms-fips
  tag: <version>
nodeSelector: {kubernetes.io/arch: amd64} # the proteccio model is Linux x86_64 only
command: [env, -u, OPENSSL_CONF, cosmian_kms] # FIPS image only, see above
extraArgs: [--hsm-model, proteccio, --hsm-slot, "<slot>", --hsm-admin, admin]
extraEnv:
  - name: PROTECCIO_PKCS11_LIB
    value: /opt/proteccio/lib/libnethsm.so
  - name: KMS_HSM_PASSWORD
    valueFrom:
      secretKeyRef: {name: proteccio-password, key: password}
initContainers:
  - name: proteccio-client
    image: <registry>/proteccio-client:<nethsm-version>
    command: [cp, /opt/proteccio/lib/libnethsm.so, /proteccio-client/]
    securityContext:
      runAsNonRoot: true
      runAsUser: 1000
      readOnlyRootFilesystem: true
      allowPrivilegeEscalation: false
    volumeMounts:
      - {name: proteccio-client, mountPath: /proteccio-client}
extraVolumes:
  - name: proteccio-client
    emptyDir: {}
  - name: proteccio
    secret:
      secretName: proteccio-files
      defaultMode: 0440
extraVolumeMounts:
  - name: proteccio-client
    mountPath: /opt/proteccio/lib
    readOnly: true
  - name: proteccio
    mountPath: /etc/proteccio
    readOnly: true
The pod must reach the HSM on TCP port 5552 (TLS).
Utimaco General Purpose
This solution works on Linux (x86_64) and has been validated against the Utimaco client library version 6.0.
Utimaco library setup
This solution works on Linux (x64_86) and has been validated against the Utimaco libcs_pkcs11_R3.so library version 6.0.
The KMS expects:
- the Utimaco
cs_pkcs11_R3library to be installed in/lib/libcs_pkcs11_R3.so - the Utimaco configuration file
cs_pkcs11_R3.cfgto be in/etc/utimacoand - and the environment variable
CS_PKCS11_R3_CFto point to it, i.e.,
export CS_PKCS11_R3_CFG=/etc/utimaco/cs_pkcs11_R3.cfg
Please make sure the cs_pkcs11_R3.cfg is set with the correct parameter, and validate your
installation with the p11tool2 utility, by running, for instance,
./p11tool2 Slot=0 GetSlotInfo
KMS configuration
At least one slot and its corresponding password must be configured. Any slot and any number of slots may be used.
When using the TOML configuration file, the HSM support is enabled by configuring these 4 parameters:
hsm_model = "utimaco"
hsm_admin = "<HSM_ADMIN_USERNAME>" # defaults to "admin"
hsm_slot = [0, 0, ] # example [0,4] for slots 0 and 4
hsm_password = ["<password>", "<password>", ] # example ["pass0", "pass4"] for slots 0 and 4
NOTE:
hsm_slotandhsm_passwordmust always be arrays, even if only one slot is used.The order of the passwords must match the order of the slots in the
hsm_slotarray.If you want to login with an empty (null) password, use an empty string.
If you do not want to login, use the special password value
<NO_LOGIN>
When the KMS is started from the command line, the HSM support can be enabled by using the following arguments:
--hsm-model "utimaco" \
--hsm-admin "<HSM_ADMIN_USERNAME>"  \
--hsm-slot <number_of_1st_slot> --hsm-password <password_of_1st_slot> \
--hsm-slot <number_of_2and_slot> --hsm-password <password_of_2and_slot>
The hsm-model parameter is the HSM model; use utimaco.
The hsm-admin parameter is the username of the HSM administrator.
The HSM administrator is the only user who can create objects on the HSM via the KMIP Create operation
and delegate other operations to other users.
(see below)
The hsm-slot and hsm-password parameters are the slot number and user password of the HSM slots used by the KMS.
These arguments can be repeated multiple times to specify various slots.
Using the simulator
Utimaco provides a simulator that can be used instead of a physical HSM to test your installation. The simulator is a 32-bit Linux i386 library (it also exists as a Windows binary).
Follow these general steps to install the simulator on a Debian-based (e.g., Ubuntu) Linux amd64/x86_64.
-
Enable 32-bit support
sudo dpkg --add-architecture i386Then
sudo apt-get update sudo apt-get install libc6:i386 libncurses5:i386 libstdc++6:i386 -
Start the simulator
In
<eval-bundle-6.0.0>\Software\Windows\Simulator\sim5_windows\bin, run.\bl_sim5.exe -h -o -d ..\devices\ -
Make sure the Device in
cs_pkcs11_R3.cfgpoints to the simulator. -
Initialize a slot and create the Security Officer and User pins.
Due to a bug (?) in the simulator, the Security Officer PIN must be set then changed before the User PIN can be set, and then changed as well.
# Set the SO PIN to 11223344
./p11tool2 Slot=0 login=ADMIN,./key/ADMIN_SIM.key  InitToken=11223344
# Change the SO PIN to 12345678
./p11tool2 Slot=0 LoginSO=11223344 SetPin=11223344,12345678
Failing to change the SO PIN before setting the User PIN will result in the following error:
Error 0x000001B8 ( CKR_PIN_TOO_WEAK)# Set the User PIN to 11223344 ./p11tool2 Slot=0 LoginSO=12345678 InitPin=11223344 # Change the User PIN to 12345678 ./p11tool2 Slot=0 LoginUser=11223344 SetPin=11223344,12345678Now, both the SO and User PINs have been set to 12345678.
To list objects on Slot 0, use:
./p11tool2 Slot=0 LoginUser=12345678 ListObjects
Smart card HSM / Nitrokey HSM 2
The Smartcard HSM integration is supported on Linux (x86_64). It has been tested with the following devices:
- SC HSM 4k (Smartcard and USB variants)
- Nitrokey HSM 2
Smartcard HSM library setup
To use a Smartcard HSM with the KMS, the sc-hsm-embedded PKCS#11 library must be installed.
The integration has been validated with version 2.12.
The KMS expects the library to be installed at /usr/local/lib/libsc-hsm-pkcs11.so.
To build and install the library, follow the instructions in the sc-hsm-embedded GitHub repository.
Smartcard HSM initialisation
⚠️ Warning:
- Initialization is destructive. It will erase all existing keys and objects on the HSM.
- Losing the Security Officer (SO) PIN will prevent future resets of the HSM. This can make the device permanently unusable. Keep it secure.
NOTE: The default PINs shown below are recommended by the manufacturer for development purposes. Always change them in production.
Before use, the HSM must be initialized. There are two ways to accomplish this:
Graphical Initialization (SmartCard-HSM Key Manager)
- Download and install Smart Card Shell.
- Launch Smart Card Shell and insert the HSM.
- From the File menu (or with
CTRL+M), open the SmartCard-HSM Key Manager. - Right-click on the HSM entry and select Initialize Device.
- Follow the on-screen guide.
Using sc-hsm-tool
-
Install the OpenSC for your distribution.
-
Initialize the card with a Security Officer and a User PIN.
sc-hsm-tool --initialize --so-pin 3537363231383830 --pin 648219 --label "SC HSM test"Additional initialisation options are documented in the sc-hsm-tool man page.
KMS configuration
At least one slot and its corresponding PIN must be configured. Multiple slots can be used simultaneously, with each represented by a separate slot.
Configuration via config file
When using the TOML configuration file, enable HSM support by setting these parameters:
hsm_model = "smartcardhsm"
hsm_admin = "<HSM_ADMIN_USERNAME>" # defaults to "admin"
hsm_slot = [0, 0, ] # example [0,4] for slots 0 and 4
hsm_password = ["<password>", "<password>", ] # example ["648219", "648219"] for slots 0 and 4
NOTE:
hsm_slotandhsm_passwordmust always be arrays, even if only one slot is used.The order of the passwords must match the order of the slots in the
hsm_slotarray.If you want to login with an empty (null) password, use an empty string.
If you do not want to login, use the special password value
<NO_LOGIN>
Configuration via command-line
HSM support can also be enabled with command-line arguments:
--hsm-model "smartcardhsm" \
--hsm-admin "<HSM_ADMIN_USERNAME>"  \
--hsm-slot <number_of_1st_slot> --hsm-password <password_of_1st_slot> \
--hsm-slot <number_of_2and_slot> --hsm-password <password_of_2and_slot>
The hsm-model parameter is the HSM model. Use smartcardhsm.
The hsm-admin parameter is the username of the HSM administrator.
The HSM administrator is the only user who can create objects on the HSM via the KMIP Create operation
and delegate other operations to other users.
The hsm-slot and hsm-password parameters are the slot number and user password (PIN) of the HSM slots used by the KMS.
These options can be repeated to configure multiple slots.
NOTE: To list available slots, run:
pkcs11-tool --module /usr/local/lib/libsc-hsm-pkcs11.so --list-slots
AWS CloudHSM
AWS CloudHSM is Amazon's dedicated, single-tenant HSM cluster service. It ships its own
PKCS#11 v2.40-compliant library (libcloudhsm_pkcs11.so), supporting AES, RSA, ECDSA, HMAC,
SHA and EdDSA(Ed25519) mechanisms.
The integration is supported on Linux (x86_64 and arm64) — AWS CloudHSM's PKCS#11 client does not support macOS.
This is a different feature from AWS XKS: XKS is AWS KMS calling into Cosmian as an external key store (reverse direction); this integration is Cosmian consuming AWS's own HSM hardware as one of its backend HSM vendors — the same direction as the Utimaco, Proteccio, Crypt2Pay, and SmartCard HSM integrations.
AWS CloudHSM client setup
To use AWS CloudHSM with the KMS, install the AWS CloudHSM Client SDK 5 PKCS#11 library following the AWS documentation.
The KMS expects the library to be installed at /opt/cloudhsm/lib/libcloudhsm_pkcs11.so
(the default installation path). Override it with the AWS_CLOUDHSM_PKCS11_LIB environment
variable if your installation differs.
Register your cluster with the client using configure-pkcs11:
sudo /opt/cloudhsm/bin/configure-pkcs11 add-cluster \
  --cluster-id <cluster-id> \
  --hsm-ca-cert customerCA.crt
Authentication
The PKCS#11 login PIN expected by AWS CloudHSM for a Crypto User (CU) is the string
"<cu_username>:<cu_password>" (see the
AWS documentation).
Pass this combined string directly as the KMS hsm_password value — no other configuration
is required.
KMS configuration
At least one slot and its corresponding PIN must be configured.
Configuration via config file
When using the TOML configuration file, enable HSM support by setting these parameters:
hsm_model = "aws_cloudhsm"
hsm_admin = "<HSM_ADMIN_USERNAME>" # defaults to "admin"
hsm_slot = [0]
hsm_password = ["<cu_username>:<cu_password>"]
NOTE:
hsm_slotandhsm_passwordmust always be arrays, even if only one slot is used.The order of the passwords must match the order of the slots in the
hsm_slotarray.
Configuration via command-line
HSM support can also be enabled with command-line arguments:
--hsm-model "aws_cloudhsm" \
--hsm-admin "<HSM_ADMIN_USERNAME>" \
--hsm-slot 0 --hsm-password "<cu_username>:<cu_password>"
The hsm-model parameter is the HSM model. Use aws_cloudhsm.
The hsm-admin parameter is the username of the HSM administrator.
The HSM administrator is the only user who can create objects on the HSM via the KMIP Create operation
and delegate other operations to other users.
The hsm-slot and hsm-password parameters are the slot number and CU login PIN of the HSM
slots used by the KMS. These options can be repeated to configure multiple slots.
NOTE: To list available slots, run:
pkcs11-tool --module /opt/cloudhsm/lib/libcloudhsm_pkcs11.so --list-slots
Development and CI validation
There is no free/local AWS CloudHSM simulator equivalent to SoftHSM2. See
crate/hsm/aws_cloudhsm/README.md
for:
- the one-time runbook to provision a persistent AWS CloudHSM cluster for CI,
- the
mise run test:hsm-aws-cloudhsmcommand used by the CIhsmjob matrix, and - a fully manual validation procedure for anyone without access to the CI cluster.
GCP Cloud HSM
GCP Cloud HSM exposes Google Cloud KMS through Google's own PKCS#11 v2.40-compliant
compatibility library (libkmsp11.so), which is wired into the KMS's generic PKCS#11
implementation.
The integration is supported on Linux (x86_64).
Google client setup
Download and install Google's PKCS#11 library from the
kms-integrations releases page
(asset libkmsp11-<version>-linux-amd64.tar.gz).
The KMS expects the library to be installed at
/usr/lib/x86_64-linux-gnu/libkmsp11.so (the default installation path). Override it with the
GCP_CLOUD_HSM_PKCS11_LIB environment variable if your installation differs.
The library itself requires a YAML configuration file describing which Cloud KMS key ring(s) to
expose, set via the KMS_PKCS11_CONFIG environment variable:
tokens:
  - key_ring: "projects/<project>/locations/<location>/keyRings/<key-ring>"
    label: "my key ring"
Authentication to GCP uses standard
Application Default Credentials
— point GOOGLE_APPLICATION_CREDENTIALS at a service account key JSON file granted the
cloudkms.cryptoKeys.* / cloudkms.cryptoKeyVersions.* permissions listed in Google's
PKCS #11 library user guide.
Authentication
Google's library ignores the PKCS#11 login PIN value entirely (C_Login is a no-op per the
user guide above) — access is controlled solely by the service account credentials described
above. The KMS still requires a non-empty hsm_password value to open a PKCS#11 session; any
placeholder string works.
KMS configuration
At least one slot and its corresponding (placeholder) PIN must be configured.
Configuration via config file
When using the TOML configuration file, enable HSM support by setting these parameters:
hsm_model = "gcp_cloud_hsm"
hsm_slot = [0]
hsm_password = ["<placeholder-pin>"]
NOTE:
hsm_slotandhsm_passwordmust always be arrays, even if only one slot is used.
Configuration via command-line
HSM support can also be enabled with command-line arguments:
--hsm-model "gcp_cloud_hsm" \
--hsm-slot 0 --hsm-password "<placeholder-pin>"
The hsm-model parameter is the HSM model. Use gcp_cloud_hsm.
The hsm-slot and hsm-password parameters are the slot number and placeholder PIN of the HSM
slots used by the KMS. These options can be repeated to configure multiple slots (one per
configured token in the KMS_PKCS11_CONFIG YAML).
Development and CI validation
See crate/hsm/gcp_cloud_hsm/README.md
for the live test invocation. The CI hsm-upstream job matrix runs mise run test:hsm-gcp-cloud-hsm
against a persistent Cloud KMS HSM-tier key ring, downloading libkmsp11.so and provisioning the
service account credentials and PKCS#11 config file at runtime.
SoftHSMv2
The SoftHSMv2 integration is supported on Linux (x86_64).
SoftHSMv2 library setup
To use SoftHSMv2 with the KMS, the library must first be installed.
The KMS expects the library to be installed at /usr/lib/softhsm/libsofthsm2.so.
Install the library using your distributions package manager, or build it by following the instructions in the SoftHSMv2 GitHub repository.
SoftHSMv2 initialisation
Before use, SoftHSMv2 requires initialization:
softhsm2-util --init-token --slot 0 --so-pin 000000 --pin 000000 --label "SoftHSM"
NOTE: The slot number will be reassigned randomly. Use the new slot number in your KMS configuration.
KMS configuration
At least one slot and its corresponding PIN must be configured. Multiple slots can be used at the same time.
Configuration via config file
When using the TOML configuration file, enable HSM support by setting these parameters:
hsm_model = "softhsm2"
hsm_admin = "<HSM_ADMIN_USERNAME>" # defaults to "admin"
hsm_slot = [0, 0, ] # example [0,4] for slots 0 and 4
hsm_password = ["<password>", "<password>", ] # example ["000000", "444444"] for slots 0 and 4
NOTE:
hsm_slotandhsm_passwordmust always be arrays, even if only one slot is used.The order of the passwords must match the order of the slots in the
hsm_slotarray.If you want to login with an empty (null) password, use an empty string.
If you do not want to login, use the special password value
<NO_LOGIN>
Configuration via command-line
HSM support can also be enabled with command-line arguments:
--hsm-model "softhsm2" \
--hsm-admin "<HSM_ADMIN_USERNAME>" \
--hsm-slot <number_of_1st_slot> --hsm-password <password_of_1st_slot> \
--hsm-slot <number_of_2and_slot> --hsm-password <password_of_2and_slot>
The hsm-model parameter is the HSM model. Use softhsm2.
The hsm-admin parameter is the username of the HSM administrator.
The HSM administrator is the only user who can create objects on the HSM via the KMIP Create operation
and delegate other operations to other users.
The hsm-slot and hsm-password parameters are the slot number and user password (PIN) of the HSM slots used by the KMS.
These options can be repeated to configure multiple slots.
NOTE: To list available slots, run:
softhsm2-util --show-slots
Kryoptic
The Kryoptic integration is supported on Linux (x86_64, aarch64) and macOS.
Kryoptic is a modern PKCS#11 v3.0 software token implementation from Red Hat's latchset project, providing support for OASIS Cryptoki v3.0 features including EdDSA, HKDF key derivation, and message-based authenticated encryption (AEAD).
Runtime setup
To use Kryoptic with the KMS, the PKCS#11 shared library and a token configuration file must be provided.
- Set the library path via the
KRYOPTIC_PKCS11_LIBenvironment variable (defaults tolibkryoptic_pkcs11.soon Linux orlibkryoptic_pkcs11.dylibon macOS). - Set
KRYOPTIC_CONFto point to a Kryoptic TOML configuration file defining the token slot and SQLite storage:
[[slots]]
slot = 1
dbtype = "sqlite"
dbargs = "/var/lib/kryoptic/token.sql"
Testing and Out-of-tree Build
Kryoptic 1.5.2 pins rusqlite = 0.38.0, which conflicts with the workspace's libsqlite3-sys dependency graph. Therefore, the library is built out-of-tree for testing and verification.
To run the complete Kryoptic test suite:
mise run test:hsm:kryoptic
KMS configuration
At least one slot and its corresponding PIN must be configured.
Configuration via config file
When using the TOML configuration file, enable Kryoptic HSM support by setting:
hsm_model = "kryoptic"
hsm_admin = ["admin"]
hsm_slot = [1]
hsm_password = ["12345678"]
Configuration via command-line
--hsm-model "kryoptic" \
--hsm-admin "admin" \
--hsm-slot 1 --hsm-password "12345678"
Other HSMs
Integration of other HSMs is supported on Linux (x86_64).
Even if your HSM is not explicitly listed in this documentation, there is a great chance that it will work, in particular its PKCS#11 driver API is compatible with that of SofHsmV2.
Library setup
The KMS expects the HSM linux PKCS#11 library to be installed at /lib/libkmshsm.so.
Rename your HSM library to libkmshsm.so if necessary.
HSM initialization
Before using the HSM with the KMS, follow your documentation to initialize a slot and a user pin/password for that slot.
KMS configuration
At least one slot and its corresponding PIN must be configured. Multiple slots can be used at the same time.
Configuration via config file
When using the TOML configuration file, enable HSM support by setting these parameters:
hsm_model = "other"
hsm_admin = "<HSM_ADMIN_USERNAME>" # defaults to "admin"
hsm_slot = [0, 0, ] # example [0,4] for slots 0 and 4
hsm_password = ["<password>", "<password>", ] # example ["000000", "444444"] for slots 0 and 4
NOTE:
hsm_slotandhsm_passwordmust always be arrays, even if only one slot is used.The order of the passwords must match the order of the slots in the
hsm_slotarray.If you want to login with an empty (null) password, use an empty string.
If you do not want to login, use the special password value
<NO_LOGIN>
Configuration via command-line
HSM support can also be enabled with command-line arguments:
--hsm-model "other" \
--hsm-admin "<HSM_ADMIN_USERNAME>" \
--hsm-slot <number_of_1st_slot> --hsm-password <password_of_1st_slot> \
--hsm-slot <number_of_2and_slot> --hsm-password <password_of_2and_slot>
The hsm-model parameter is the HSM model. Use other.
The hsm-admin parameter is the username of the HSM administrator.
The HSM administrator is the only user who can create objects on the HSM via the KMIP Create operation
and delegate other operations to other users.
The hsm-slot and hsm-password parameters are the slot number and user password (PIN) of the HSM slots used by the
KMS.
These options can be repeated to configure multiple slots.
KMIP Support
The Eviden KMS server implements both KMIP 1.x and 2.x interfaces. KMIP (Key Management Interoperability Protocol) is an OASIS standard designed to standardize communication between key management systems and encryption clients.
Connection Options
-
Binary Protocol: Available on port 5696
- TLS secured
- Client certificate required for authentication
-
JSON Protocol: Available on port 9998 via REST POST
- Optional TLS security
- Multiple authentication mechanisms supported
- Endpoints:
/kmip: Handles KMIP 1.x and 2.xRequestMessage/kmip/2_1: Specifically for KMIP 2.1RequestMessageor operations likeCreate,Encrypt,Decrypt, etc.
Implementation Details
Internally, all KMIP messages are translated to KMIP 2.1 specifications and converted back to KMIP 1.x when necessary. The Eviden KMS server implements a targeted subset of the KMIP 2.1 protocol.
Purpose of KMIP
The OASIS KMIP standard aims to:
- Define a comprehensive protocol for communication between encryption systems and enterprise applications
- Support diverse applications including email, databases, and storage devices
- Eliminate redundant and incompatible key management processes
- Enhance data security while reducing costs associated with multiple products
Scope of Implementation
KMIP is an extensive specification. While the Eviden KMS server does not implement the entire standard, it supports the features necessary for advanced cryptographic use cases. The implementation continues to evolve to meet customer requirements, though like most KMS servers, it doesn't support all possible cryptographic objects and operations.
The following pages document the supported features of the KMIP 2.1 specification and Cosmian-specific extensions.
KMIP support by Eviden KMS
This page summarizes the KMIP coverage in Eviden KMS. The support status is
derived from the actual implementation in crate/server/src/core/operations.
Eviden KMS Server supports KMIP versions: 2.1, 2.0, 1.4, 1.3, 1.2, 1.1, 1.0
Legend:
- ✅ Fully supported
- ❌ Not implemented
- 🚫 Deprecated
- N/A Not applicable (operation/attribute not defined in that KMIP version)
KMIP Baseline Profile Compliance
Baseline Server: ✅ Compliant (all 9 required + 18/18 optional)
The Baseline Server profile (defined in KMIP Profiles v2.1 Section 4.1) requires:
- Required operations: Discover Versions, Query, Create, Register, Get, Destroy, Locate, Activate, Revoke
- Optional operations: Many additional operations for extended functionality
KMIP Coverage
Messages
| Message | Support |
|---|---|
| Request Message | ✅ |
| Response Message | ✅ |
Operations by KMIP Version
The following table shows operation support across all KMIP versions.
| Operation | 1.0 | 1.1 | 1.2 | 1.3 | 1.4 | 2.0 | 2.1 |
|---|---|---|---|---|---|---|---|
| Activate | ✅ | ✅ | ✅ | ✅ | ✅ | ✅ | ✅ |
| Add Attribute | N/A | ✅ | ✅ | ✅ | ✅ | ✅ | ✅ |
| Archive | ❌ | ❌ | ❌ | ❌ | ❌ | ❌ | ❌ |
| Cancel | ❌ | ❌ | ❌ | ❌ | ❌ | ❌ | ❌ |
| Certify | ✅ | ✅ | ✅ | ✅ | ✅ | ✅ | ✅ |
| Check | ✅ | ✅ | ✅ | ✅ | ✅ | ✅ | ✅ |
| Create | ✅ | ✅ | ✅ | ✅ | ✅ | ✅ | ✅ |
| Create Key Pair | ✅ | ✅ | ✅ | ✅ | ✅ | ✅ | ✅ |
| Create Split Key | N/A | N/A | ✅ | ✅ | ✅ | ✅ | ✅ |
| Decrypt | N/A | N/A | ✅ | ✅ | ✅ | ✅ | ✅ |
| Delete Attribute | N/A | ✅ | ✅ | ✅ | ✅ | ✅ | ✅ |
| DeriveKey | ✅ | ✅ | ✅ | ✅ | ✅ | ✅ | ✅ |
| Destroy | ✅ | ✅ | ✅ | ✅ | ✅ | ✅ | ✅ |
| Discover Versions | N/A | ✅ | ✅ | ✅ | ✅ | ✅ | ✅ |
| Encrypt | N/A | N/A | ✅ | ✅ | ✅ | ✅ | ✅ |
| Export | N/A | N/A | N/A | N/A | ✅ | ✅ | ✅ |
| Get | ✅ | ✅ | ✅ | ✅ | ✅ | ✅ | ✅ |
| Get Attribute List | N/A | ✅ | ✅ | ✅ | ✅ | ✅ | ✅ |
| Get Attributes | N/A | ✅ | ✅ | ✅ | ✅ | ✅ | ✅ |
| Get Usage Allocation | ❌ | ❌ | ❌ | ❌ | ❌ | ❌ | ❌ |
| Hash | N/A | N/A | ✅ | ✅ | ✅ | ✅ | ✅ |
| Import | N/A | N/A | N/A | N/A | ✅ | ✅ | ✅ |
| Join Split Key | N/A | N/A | ✅ | ✅ | ✅ | ✅ | ✅ |
| Locate | ✅ | ✅ | ✅ | ✅ | ✅ | ✅ | ✅ |
| MAC | N/A | N/A | ✅ | ✅ | ✅ | ✅ | ✅ |
| MAC Verify | N/A | N/A | ✅ | ✅ | ✅ | ✅ | ✅ |
| Notify | N/A | N/A | N/A | N/A | N/A | ❌ | ❌ |
| Obtain Lease | ❌ | ❌ | ❌ | ❌ | ❌ | ❌ | ❌ |
| Poll | ❌ | ❌ | ❌ | ❌ | ❌ | ❌ | ❌ |
| Put | N/A | N/A | N/A | N/A | N/A | ❌ | ❌ |
| Query | ✅ | ✅ | ✅ | ✅ | ✅ | ✅ | ✅ |
| RNG Retrieve | N/A | N/A | ✅ | ✅ | ✅ | ✅ | ✅ |
| RNG Seed | N/A | N/A | ✅ | ✅ | ✅ | ✅ | ✅ |
| Re-certify | ❌ | ❌ | ❌ | ❌ | ❌ | ❌ | ❌ |
| Re-key | ✅ | ✅ | ✅ | ✅ | ✅ | ✅ | ✅ |
| Re-key Key Pair | N/A | ✅ | ✅ | ✅ | ✅ | ✅ | ✅ |
| Recover | ❌ | ❌ | ❌ | ❌ | ❌ | ❌ | ❌ |
| Register | ✅ | ✅ | ✅ | ✅ | ✅ | ✅ | ✅ |
| Revoke | ✅ | ✅ | ✅ | ✅ | ✅ | ✅ | ✅ |
| Set Attribute (Modify) | N/A | N/A | N/A | N/A | N/A | ✅ | ✅ |
| Sign | N/A | N/A | ✅ | ✅ | ✅ | ✅ | ✅ |
| Signature Verify | N/A | N/A | ✅ | ✅ | ✅ | ✅ | ✅ |
| Validate | ✅ | ✅ | ✅ | ✅ | ✅ | ✅ | ✅ |
Methodology
- Operations marked ✅ are backed by a Rust implementation file under
crate/server/src/core/operations. - Operations marked ❌ are defined in the KMIP specification but not implemented in Eviden KMS.
- Operations marked N/A do not exist in that particular KMIP version.
- This documentation is auto-generated by analyzing source code and KMIP specifications.
If you spot a mismatch or want to extend coverage, please open an issue or PR.
Managed Objects
The following table shows managed object support across all KMIP versions.
| Managed Object | 1.0 | 1.1 | 1.2 | 1.3 | 1.4 | 2.0 | 2.1 |
|---|---|---|---|---|---|---|---|
| Certificate | ✅ | ✅ | ✅ | ✅ | ✅ | ✅ | ✅ |
| Symmetric Key | ✅ | ✅ | ✅ | ✅ | ✅ | ✅ | ✅ |
| Public Key | ✅ | ✅ | ✅ | ✅ | ✅ | ✅ | ✅ |
| Private Key | ✅ | ✅ | ✅ | ✅ | ✅ | ✅ | ✅ |
| Split Key | ✅ | ✅ | ✅ | ✅ | ✅ | ✅ | ✅ |
| Template | 🚫 | 🚫 | 🚫 | 🚫 | 🚫 | N/A | N/A |
| Secret Data | ✅ | ✅ | ✅ | ✅ | ✅ | ✅ | ✅ |
| Opaque Data | ✅ | ✅ | ✅ | ✅ | ✅ | ✅ | ✅ |
| PGP Key | ✅ | ✅ | ✅ | ✅ | ✅ | ✅ | ✅ |
Notes:
- Opaque Object import support is present (see
import.rs). - PGP Key objects are supported (Create, Import, Export, Encrypt, Decrypt, Sign, SignatureVerify) in non-FIPS mode.
- Template objects are deprecated in newer KMIP versions.
Base Objects
The following table shows base object support across all KMIP versions.
| Base Object | 1.0 | 1.1 | 1.2 | 1.3 | 1.4 | 2.0 | 2.1 |
|---|---|---|---|---|---|---|---|
| Attribute | ❌ | ❌ | ❌ | ❌ | ❌ | ❌ | ❌ |
| Credential | ❌ | ❌ | ❌ | ❌ | ❌ | ❌ | ❌ |
| Key Block | ✅ | ✅ | ✅ | ✅ | ✅ | ✅ | ✅ |
| Key Value | ❌ | ❌ | ❌ | ❌ | ❌ | ❌ | ❌ |
| Key Wrapping Data | ✅ | ✅ | ✅ | ✅ | ✅ | ✅ | ✅ |
| Key Wrapping Specification | ✅ | ✅ | ✅ | ✅ | ✅ | ✅ | ✅ |
| Transparent Key Structures | ✅ | ✅ | ✅ | ✅ | ✅ | N/A | N/A |
| Template-Attribute Structures | N/A | ✅ | ✅ | ✅ | ✅ | N/A | N/A |
| Server Information | ✅ | ✅ | ✅ | ✅ | ✅ | ✅ | ✅ |
| Extension Information | N/A | ❌ | ❌ | ❌ | ❌ | ❌ | ❌ |
| Data | ✅ | ✅ | ✅ | ✅ | ✅ | ✅ | ✅ |
| Data Length | N/A | N/A | ✅ | ✅ | ✅ | ✅ | ✅ |
| Signature Data | N/A | N/A | ✅ | ✅ | ✅ | ✅ | ✅ |
| MAC Data | N/A | N/A | ✅ | ✅ | ✅ | ✅ | ✅ |
| Nonce | ✅ | ✅ | ✅ | ✅ | ✅ | ✅ | ✅ |
| Correlation Value | ✅ | ✅ | ✅ | ✅ | ✅ | ✅ | ✅ |
| Init Indicator | N/A | N/A | N/A | ✅ | ✅ | ✅ | ✅ |
| Final Indicator | N/A | N/A | N/A | ✅ | ✅ | ✅ | ✅ |
| RNG Parameters | N/A | N/A | N/A | ✅ | ✅ | ✅ | ✅ |
| Profile Information | N/A | N/A | N/A | ❌ | ❌ | ❌ | ❌ |
| Validation Information | N/A | N/A | N/A | ❌ | ❌ | ❌ | ❌ |
| Capability Information | N/A | N/A | N/A | ❌ | ❌ | ❌ | ❌ |
| Authenticated Encryption Additional Data | N/A | N/A | N/A | N/A | ✅ | ✅ | ✅ |
| Authenticated Encryption Tag | N/A | N/A | N/A | N/A | ✅ | ✅ | ✅ |
Notes:
- AEAD Additional Data and Tag are supported in encrypt/decrypt APIs.
- Nonce and RNG Parameter are used by symmetric encryption paths.
- Base objects are fundamental structures present across all KMIP versions.
Transparent Key Structures
The following table shows transparent key structure support across all KMIP versions.
| Structure | 1.0 | 1.1 | 1.2 | 1.3 | 1.4 | 2.0 | 2.1 |
|---|---|---|---|---|---|---|---|
| Symmetric Key | ✅ | ✅ | ✅ | ✅ | ✅ | ✅ | ✅ |
| DSA Private Key | ✅ | ✅ | ✅ | ✅ | ✅ | ✅ | ✅ |
| DSA Public Key | ❌ | ❌ | ❌ | ❌ | ❌ | ❌ | ❌ |
| RSA Private Key | ✅ | ✅ | ✅ | ✅ | ✅ | ✅ | ✅ |
| RSA Public Key | ✅ | ✅ | ✅ | ✅ | ✅ | ✅ | ✅ |
| DH Private Key | ❌ | ❌ | ❌ | ❌ | ❌ | ❌ | ❌ |
| DH Public Key | ❌ | ❌ | ❌ | ❌ | ❌ | ❌ | ❌ |
| EC Private Key | N/A | N/A | N/A | ✅ | ✅ | ✅ | ✅ |
| EC Public Key | ✅ | ✅ | ✅ | ✅ | ✅ | ✅ | ✅ |
| ECDSA Private Key | ✅ | ✅ | ✅ | ✅ | ✅ | N/A | N/A |
| ECDSA Public Key | ✅ | ✅ | ✅ | ✅ | ✅ | N/A | N/A |
| ECDH Private Key | ✅ | ✅ | ✅ | ✅ | ✅ | N/A | N/A |
| ECDH Public Key | ✅ | ✅ | ✅ | ✅ | ✅ | N/A | N/A |
| ECMQV Private Key | ❌ | ❌ | ❌ | ❌ | ❌ | N/A | N/A |
| ECMQV Public Key | ❌ | ❌ | ❌ | ❌ | ❌ | N/A | N/A |
Note: EC/ECDSA/ECDH support is present; DH/DSA/ECMQV are not implemented.
Attributes
| Attribute | 1.0 | 1.1 | 1.2 | 1.3 | 1.4 | 2.0 | 2.1 |
|---|---|---|---|---|---|---|---|
| Activation Date | ✅ | ✅ | ✅ | ✅ | ✅ | ✅ | ✅ |
| Alternative Name | N/A | N/A | ✅ | ✅ | ✅ | ✅ | ✅ |
| Always Sensitive | N/A | N/A | N/A | N/A | ✅ | ✅ | ✅ |
| Application Specific Information | ✅ | ✅ | ✅ | ✅ | ✅ | ✅ | ✅ |
| Archive Date | ✅ | ✅ | ✅ | ✅ | ✅ | ✅ | ✅ |
| Attribute Index | 🔧 | 🔧 | 🔧 | 🔧 | 🔧 | 🔧 | 🔧 |
| Certificate Attributes | N/A | N/A | N/A | N/A | N/A | ✅ | ✅ |
| Certificate Length | N/A | ✅ | ✅ | ✅ | ✅ | ✅ | ✅ |
| Certificate Type | ✅ | ✅ | ✅ | ✅ | ✅ | ✅ | ✅ |
| Comment | N/A | N/A | N/A | N/A | ✅ | ✅ | ✅ |
| Compromise Date | ✅ | ✅ | ✅ | ✅ | ✅ | ✅ | ✅ |
| Compromise Occurrence Date | ✅ | ✅ | ✅ | ✅ | ✅ | ✅ | ✅ |
| Contact Information | ✅ | ✅ | ✅ | ✅ | ✅ | ✅ | ✅ |
| Critical | 🔧 | 🔧 | 🔧 | 🔧 | 🔧 | 🔧 | 🔧 |
| Cryptographic Algorithm | ✅ | ✅ | ✅ | ✅ | ✅ | ✅ | ✅ |
| Cryptographic Domain Parameters | ✅ | ✅ | ✅ | ✅ | ✅ | ✅ | ✅ |
| Cryptographic Length | ✅ | ✅ | ✅ | ✅ | ✅ | ✅ | ✅ |
| Cryptographic Parameters | ✅ | ✅ | ✅ | ✅ | ✅ | ✅ | ✅ |
| Cryptographic Usage Mask | ✅ | ✅ | ✅ | ✅ | ✅ | ✅ | ✅ |
| Deactivation Date | ✅ | ✅ | ✅ | ✅ | ✅ | ✅ | ✅ |
| Description | N/A | N/A | N/A | N/A | ✅ | ✅ | ✅ |
| Destroy Date | ✅ | ✅ | ✅ | ✅ | ✅ | ✅ | ✅ |
| Digest | ✅ | ✅ | ✅ | ✅ | ✅ | ✅ | ✅ |
| Digital Signature Algorithm | N/A | ✅ | ✅ | ✅ | ✅ | ✅ | ✅ |
| Extractable | N/A | N/A | N/A | N/A | ✅ | ✅ | ✅ |
| Fresh | N/A | ✅ | ✅ | ✅ | ✅ | ✅ | ✅ |
| Initial Date | ✅ | ✅ | ✅ | ✅ | ✅ | ✅ | ✅ |
| Key Format Type | N/A | N/A | N/A | N/A | N/A | ✅ | ✅ |
| Key Value Location | N/A | N/A | ✅ | ✅ | ✅ | ✅ | ✅ |
| Key Value Present | N/A | N/A | ✅ | ✅ | ✅ | ✅ | ✅ |
| Last Change Date | ✅ | ✅ | ✅ | ✅ | ✅ | ✅ | ✅ |
| Lease Time | ✅ | ✅ | ✅ | ✅ | ✅ | ✅ | ✅ |
| Link | ✅ | ✅ | ✅ | ✅ | ✅ | ✅ | ✅ |
| Name | ✅ | ✅ | ✅ | ✅ | ✅ | ✅ | ✅ |
| Never Extractable | N/A | N/A | N/A | N/A | ✅ | ✅ | ✅ |
| Nist Key Type | N/A | N/A | N/A | N/A | N/A | ✅ | ✅ |
| Object Group | ✅ | ✅ | ✅ | ✅ | ✅ | ✅ | ✅ |
| Object Group Member | 🔧 | 🔧 | 🔧 | 🔧 | 🔧 | 🔧 | 🔧 |
| Object Type | ✅ | ✅ | ✅ | ✅ | ✅ | ✅ | ✅ |
| Opaque Data Type | N/A | N/A | N/A | N/A | N/A | ✅ | ✅ |
| Original Creation Date | N/A | N/A | ✅ | ✅ | ✅ | ✅ | ✅ |
| PKCS#12 Friendly Name | N/A | N/A | N/A | N/A | ✅ | ✅ | ✅ |
| Process Start Date | ✅ | ✅ | ✅ | ✅ | ✅ | ✅ | ✅ |
| Protect Stop Date | ✅ | ✅ | ✅ | ✅ | ✅ | ✅ | ✅ |
| Protection Level | N/A | N/A | N/A | N/A | N/A | ✅ | ✅ |
| Protection Period | N/A | N/A | N/A | N/A | N/A | ✅ | ✅ |
| Protection Storage Masks | N/A | N/A | N/A | N/A | N/A | ✅ | ✅ |
| Quantum Safe | N/A | N/A | N/A | N/A | N/A | ✅ | ✅ |
| Random Number Generator | N/A | N/A | N/A | ✅ | ✅ | ✅ | ✅ |
| Revocation Reason | ✅ | ✅ | ✅ | ✅ | ✅ | ✅ | ✅ |
| Rotate Automatic | N/A | N/A | N/A | N/A | N/A | N/A | ✅ |
| Rotate Date | N/A | N/A | N/A | N/A | N/A | N/A | ✅ |
| Rotate Generation | N/A | N/A | N/A | N/A | N/A | N/A | ✅ |
| Rotate Interval | N/A | N/A | N/A | N/A | N/A | N/A | ✅ |
| Rotate Latest | N/A | N/A | N/A | N/A | N/A | N/A | ✅ |
| Rotate Name | N/A | N/A | N/A | N/A | N/A | N/A | ✅ |
| Rotate Offset | N/A | N/A | N/A | N/A | N/A | N/A | ✅ |
| Sensitive | N/A | N/A | N/A | N/A | ✅ | ✅ | ✅ |
| Short Unique Identifier | N/A | N/A | N/A | N/A | N/A | ✅ | ✅ |
| State | ✅ | ✅ | ✅ | ✅ | ✅ | ✅ | ✅ |
| Unique Identifier | ✅ | ✅ | ✅ | ✅ | ✅ | ✅ | ✅ |
| Usage Limits | ✅ | ✅ | ✅ | ✅ | ✅ | ✅ | ✅ |
| Vendor Attribute | N/A | N/A | N/A | N/A | N/A | ✅ | ✅ |
| X.509 Certificate Identifier | N/A | ✅ | ✅ | ✅ | ✅ | ✅ | ✅ |
| X.509 Certificate Issuer | N/A | ✅ | ✅ | ✅ | ✅ | ✅ | ✅ |
| X.509 Certificate Subject | N/A | ✅ | ✅ | ✅ | ✅ | ✅ | ✅ |
Notes:
- ✅ = attribute defined in that KMIP version and implemented by this server.
- ❌ = attribute defined in that KMIP version but not yet implemented.
- N/A = attribute was not defined in that KMIP version (protocol gap, not a server limitation).
- 🔧 = Cosmian-specific extension — attribute is absent from all standard KMIP versions.
- GetAttributes returns a union of metadata attributes and those embedded in KeyBlock structures.
- "Vendor Attributes" are available via the Cosmian vendor namespace and are accessible via GetAttributes.
AlwaysSensitive,NeverExtractable,Extractable, andSensitivewere introduced in KMIP 1.4 and must not appear in responses to KMIP 1.0–1.3 clients (the server enforces this automatically).Rotate*attributes were introduced in KMIP 2.1.
Supported Objects
The KMIP 2.1 specification pre-defines a set of 9 cryptographic objects. Eviden supports the following objects:
| Objects | Cryptographic primitives |
|---|---|
| Certificate | X509 |
| Certificate Request | - |
| Opaque Object | - |
| PGP Key | RSA, Ed25519 (non-FIPS) |
| Private Key | Covercrypt, X25519, Ed25519, X448, Ed448, NIST EC, RSA |
| Public Key | Covercrypt, X25519, Ed25519, X448, Ed448, NIST EC, RSA |
| Secret Data | - |
| Split Key | - |
| Symmetric key | SSE, AES, FPE, Salsa20, XChacha20, Findex |
Notes:
- Certificates can be
- imported using the
Importoperation as X509 (PEM, DER) or PKCS12 (PFX) files. - created using the
Certifyoperation from a PKCS#10 Certificate Request or from an existing public key.
- imported using the
- PGP Keys can be created (RFC 9580 v4 secret key), imported, exported (secret or public armor), and used for KMIP
Encrypt,Decrypt,Sign, andSignatureVerifyin non-FIPS mode. - For the supported algorithms for key wrapping, encryption and decryption, see the supported algorithms page.
- For the supported formats, see the supported formats page.
Supported Formats
KMIP Objects may be manipulated in various standardized formats.
Import - Export
The KMIP 2.1 specification states that keys have a default Key Format Type that SHALL be produced by KMIP servers. When requesting the export of an Object without specifying the Key Format Type, a default Key Format Type by object (and algorithm) should be used as listed in the following table:
| Type | Default Key Format Type | Available Key Format Types Import/Export |
|---|---|---|
| Certificate | X.509 | X.509 |
| Certificate Request | PKCS#10 | PKCS#10 |
| Opaque Object | Opaque | |
| PGP Key | Raw | Raw, OpenPgpSecretKey, OpenPgpPublicKey |
| Secret Data | Raw | |
| Symmetric Key | Raw | Raw |
| Split Key | Raw | |
| RSA Private Key | PKCS#1 | PKCS#1, PKCS#8, Transparent RSA Private Key |
| RSA Public Key | PKCS#1 | PKCS#1, PKCS#8 (SPKI), Transparent RSA Public Key |
| EC Private Key | Transparent EC Private Key | Transparent EC Private Key, PKCS#8, EC Private Key (SEC1) |
| EC Public Key | Transparent EC Public Key | Transparent EC Public Key, PKCS#8 (SPKI) |
| DSA Private Key | Transparent DSA Private Key | |
| DSA Public Key | Transparent DSA Public Key |
- All ASN.1 based formats are available as
PEMorDERencoded SPKIis denotedPKCS8for public keys in KMIPSEC1(calledECPrivateKeyin KMIP) is only available for NIST curves (i.e. not for curve 25519 and curve 448) private keys.- The
Dfield of theTransparent EC Private Keyis:- the (absolute) value of the Big Integer of the scalar for NIST curves
- the Big Integer value of the private key raw bytes (as big endian) for Curve 25519 and Curve 448
- The
Q Stringfield of theTransparent EC Public Keyis:- the uncompressed point octet form as defined in RFC5480 and used in certificates and TLS records for NIST curves.
- the raw bytes of the public key for Curve 25519 and Curve 448
CLI Key Formats
The ckms command-line tool supports the following format flags for OpenPGP:
- Export:
--key-format pgp-secret(exports ASCII-armored secret key block) and--key-format pgp-public(exports ASCII-armored public key block). - Import:
--key-format pgp(imports binary or ASCII-armored OpenPGP key material, secret or public).
Internal storage
The IETF now recommends using PKCS#8 and Subject Public Key Info (SPKI) as default formats for inter-operability. This server enforces the KMIP 2.1 default export formats above but the storage formats used in the database are:
PKCS#8 DERfor RSA and EC private Keys (RFC 5208 and 5958).SPKI DER(RFC 5480) for RSA and EC public keys, using the Key Format Type PKCS#8, since SPKI is not listed.X509 DERfor certificates (RFC 5280).PKCS#10 DERfor certificate requests (RFC 2986).TransparentSymmetricKeyfor symmetric keysRawfor opaque objects and Secret DataOpenPgpSecretKey/OpenPgpPublicKey(ASCII-armored UTF-8 bytes) for PGP keys
Users requesting keys are therefore encouraged to request them in these storage formats to avoid conversions and match recent RFCs.
Objects Tagging
The Eviden KMS server supports the tagging of objects. Tags are arbitrary strings that can be attached to objects. Tags can be used to group objects together, and to find objects for most operations, such as export, import, encrypt, decrypt, etc.
In addition, the KMS server will automatically add a system tag to objects based on the object type:
_sk: for a private key_pk: for a public key_kk: for a symmetric key_uk: for a Covercrypt user decryption key_cert: for a X509 certificate_sd: for a secret data_oo: for an opaque object_pgp: for an OpenPGP key
Since there is no provision in the KMIP 2.1 specification for tagging. The Eviden KMS server implements tagging using the following KMIP 2.1 extensions:
-
When
Attributesare passed as part of the KMIP operation, such as in theCreate,Create Key Pair,Locate,CertifyandImportoperations, the tags are passed asVendorAttributeswith the server's configured vendor identification (default:cosmian, configurable via--vendor-identification/KMS_VENDOR_IDENTIFICATION) and attribute nametag. The value is the serialization of the tags as a JSON array of strings. -
When unique identifiers are passed as part of the KMIP operation, such as in the
Certify,Encrypt,Export,Decrypt,Get,Get Attributes,Revoke, andDestroyoperations, the tags are in the unique identifier itself as a serialized JSON array e.g.[ "tag1", "tag2" ].
Example
Export the Symmetric key (tag _kk) with user tag myTag:
{
"tag": "Export",
"type": "Structure",
"value": [
{
"tag": "UniqueIdentifier",
"type": "TextString",
"value": "[\"_kk\",\"myTag\"]"
},
{
"tag": "KeyFormatType",
"type": "Enumeration",
"value": "AsRegistered"
}
]
}
Attributes Extensions
In chapter 4, the KMIP 2.1 specification specifies a list of 63 Attributes, mostly made of enumerations and data structures, often nested in each other. Despite this impressive list, and as expected in such a large specification, KMIP allows for extensions to support new cryptographic schemes such as the ones enabled by Eviden.
Extensions in KMIP consist mostly in augmenting enumerations with new values and attributing a specific prefix values, usually 0x8880 to the new variants.
To support Covercrypt, Cosmian is using a few extensions listed below.
Key Format Type
The Key Format Type attribute is a required attribute of a Cryptographic Object.
It is set by the server, but a particular Key Format Type MAY be requested by the client if the cryptographic material is produced by the server (i.e., Create, Create Key Pair, Create Split Key, Re-key, Re-key Key Pair, Derive Key) on the client's behalf. The server SHALL comply with the client's requested format or SHALL fail the request. When the server calculates a Digest for the object, it SHALL compute the digest on the data in the assigned Key Format Type, as well as a digest in the default KMIP Key Format Type for that type of key and the algorithm requested (if a non-default value is specified).
Extensions
CoverCryptSecretKey = 0x8880_000C,
CoverCryptPublicKey = 0x8880_000D,
Cryptographic Algorithm
The Cryptographic Parameters attribute is a structure that contains a set of OPTIONAL fields that describe certain cryptographic parameters to be used when performing cryptographic operations using the object. Specific fields MAY pertain only to certain types of Managed Objects. The Cryptographic Parameters attribute of a Certificate object identifies the cryptographic parameters of the public key contained within the Certificate.
The Cryptographic Algorithm is also used to specify the parameters for cryptographic operations. For operations involving digital signatures, either the Digital Signature Algorithm can be specified or the Cryptographic Algorithm and Hashing Algorithm combination can be specified.
Random IV can be used to request that the KMIP server generate an appropriate IV for a cryptographic operation that uses an IV. The generated Random IV is returned in the response to the cryptographic operation.
IV Length is the length of the Initialization Vector in bits. This parameter SHALL be provided when the specified Block Cipher Mode supports variable IV lengths such as CTR or GCM.
Tag Length is the length of the authenticator tag in bytes. This parameter SHALL be provided when the Block Cipher Mode is GCM.
The IV used with counter modes of operation (e.g., CTR and GCM) cannot repeat for a given cryptographic key. To prevent an IV/key reuse, the IV is often constructed of three parts: a fixed field, an invocation field, and a counter as described in [SP800-38A] and [SP800-38D]. The Fixed Field Length is the length of the fixed field portion of the IV in bits. The Invocation Field Length is the length of the invocation field portion of the IV in bits. The Counter Length is the length of the counter portion of the IV in bits.
Initial Counter Value is the starting counter value for CTR mode (for [RFC3686] it is 1).
Extensions
CoverCrypt = 0x8880_0004,
Vendor Attributes
All keys managed by the Eviden KMS server are primarily a KeyMaterial made of bytes. Some keys, typically those of ABE, also carry information regarding the underlying access policies. This information is carried together with the keys using VendorAttributes
Typically a vendor attribute is made of 3 values: a Vendor Identification - set to the server's configured vendor ID (default: cosmian, configurable via --vendor-identification / KMS_VENDOR_IDENTIFICATION) - and a tuple Attribute Name, Attribute Value.
Covercrypt uses a few vendor attributes which names can be seen in the code attributes.rs file.
The attributes names and corresponding values used for a given KeyFormatType are as follows:
-
VENDOR_ATTR_COVER_CRYPT_POLICY = "cover_crypt_policy": the JSONified Policy found in the master keys. -
VENDOR_ATTR_COVER_CRYPT_ACCESS_POLICY = "cover_crypt_access_policy": the JSONified boolean Access Policy found in a user key
In addition, the VENDOR_ATTR_COVER_CRYPT_ATTR = "cover_crypt_attributes" name is used in Locate requests to identify User Decryption Keys holding certain Policy Attributes.
The JSON TTLV KMIP API
The easiest way to call the KMIP API is to use the cosmian Command Line Interface
or one of the Eviden cloudproof libraries which provide wrapper calls
in the corresponding language.
Without the use of a library, the client must build the JSON TTLV messages from
an Operation
as described in the KMIP 2.1 specification, and issue an HTTP POST call to the /kmip/2_1 endpoint
of the server.
Multiple operations can be sent in a single call using the Messages API .
Building JSON TTLV messages is a complex task and the easiest way to get started is to use
the KMS CLI in JSON mode mode to print the corresponding request and response messages.
The JSON mode is activated by passing the --kms-print-json flag to the cosmian command.
See the JSON mode example below.
To send multiple requests in a single call, se the Messages API .
Sample JSON TTLV messages
Please refer to the various operations pages for sample JSON TTLV messages.
JSON mode example
This creates a (default AES 256) symmetric key which will be tagged with the string myKey.
ckms --kms-print-json sym keys create --tag myKey
The CLI will then show the JSON TTLV requests and response:
2024-09-13T13:39:20.001395Z INFO ThreadId(01) cosmian_kms_client::kms_rest_client: ==>
{
"tag": "Create",
"type": "Structure",
"value": [
{
"tag": "ObjectType",
"type": "Enumeration",
"value": "SymmetricKey"
},
{
"tag": "Attributes",
"type": "Structure",
"value": [
{
"tag": "CryptographicAlgorithm",
"type": "Enumeration",
"value": "AES"
},
{
"tag": "CryptographicLength",
"type": "Integer",
"value": 256
},
{
"tag": "CryptographicUsageMask",
"type": "Integer",
"value": 2108
},
{
"tag": "KeyFormatType",
"type": "Enumeration",
"value": "TransparentSymmetricKey"
},
{
"tag": "ObjectType",
"type": "Enumeration",
"value": "SymmetricKey"
},
{
"tag": "VendorAttributes",
"type": "Structure",
"value": [
{
"tag": "VendorAttributes",
"type": "Structure",
"value": [
{
"tag": "VendorIdentification",
"type": "TextString",
"value": "cosmian"
},
{
"tag": "AttributeName",
"type": "TextString",
"value": "tag"
},
{
"tag": "AttributeValue",
"type": "ByteString",
"value": "5B226D794B6579225D"
}
]
}
]
}
]
}
]
}
2024-09-13T13:39:20.018203Z INFO ThreadId(01) cosmian_kms_client::kms_rest_client <==
{
"tag": "CreateResponse",
"type": "Structure",
"value": [
{
"tag": "ObjectType",
"type": "Enumeration",
"value": "SymmetricKey"
},
{
"tag": "UniqueIdentifier",
"type": "TextString",
"value": "925f2175-0676-4785-b9d9-61fff30771f3"
}
]
}
The symmetric key was successfully generated.
Unique identifier: 925f2175-0676-4785-b9d9-61fff30771f3
Tags:
- myKey
Bulk mode with Messages
Chapter 8 of the KMIP 2.1
specification defines the Messages functionality, which enables sending/receiving multiple requests/responses at
once (also known as bulk mode).
This is the standard way to communicate with the KMIP server using the Binary protocol on port 5696 or the JSON protocol
on port 9998 and endpoint /kmip.
The /kmip/2_1 endpoint is a Eviden extension allowing the posting of Operations directly to the server without
the need for a RequestMessage wrapper.
This is particularly useful for operations like Encrypt and Decrypt.
Multiple operations can be included in a single RequestMessage query.
The server processes these operations sequentially, though they appear to execute simultaneously.
Each batch item contains an independent request.
For every request message sent, the server returns a response message containing the result status of the requested operation, along with any relevant result data or error messages.
Request and response example
Below are canonical KMIP 2.1 message examples, following the mandatory XML schema AKLC-M-1-21.xml. Each request and response is shown in JSON TTLV format.
1. CreateKeyPair
{
"tag": "RequestMessage",
"type": "Structure",
"value": [
{
"tag": "RequestHeader",
"type": "Structure",
"value": [
{ "tag": "ProtocolVersion", "type": "Structure", "value": [
{ "tag": "ProtocolVersionMajor", "type": "Integer", "value": 2 },
{ "tag": "ProtocolVersionMinor", "type": "Integer", "value": 1 }
] },
{ "tag": "ClientCorrelationValue", "type": "TextString", "value": "AKLC-M-1-21 step=0" },
{ "tag": "BatchCount", "type": "Integer", "value": 1 }
]
},
{
"tag": "BatchItem",
"type": "Structure",
"value": [
{ "tag": "Operation", "type": "Enumeration", "value": "CreateKeyPair" },
{ "tag": "RequestPayload", "type": "Structure", "value": [
{ "tag": "CommonAttributes", "type": "Structure", "value": [
{ "tag": "CryptographicAlgorithm", "type": "Enumeration", "value": "RSA" },
{ "tag": "CryptographicLength", "type": "Integer", "value": 2048 }
] },
{ "tag": "PrivateKeyAttributes", "type": "Structure", "value": [
{ "tag": "Name", "type": "Structure", "value": [
{ "tag": "NameValue", "type": "TextString", "value": "AKLC-M-1-21-private" },
{ "tag": "NameType", "type": "Enumeration", "value": "UninterpretedTextString" }
] },
{ "tag": "CryptographicUsageMask", "type": "Integer", "value": "Sign" }
] },
{ "tag": "PublicKeyAttributes", "type": "Structure", "value": [
{ "tag": "Name", "type": "Structure", "value": [
{ "tag": "NameValue", "type": "TextString", "value": "AKLC-M-1-21-public" },
{ "tag": "NameType", "type": "Enumeration", "value": "UninterpretedTextString" }
] },
{ "tag": "CryptographicUsageMask", "type": "Integer", "value": "Verify" }
] }
] }
]
}
]
}
2. GetAttributes (Private Key)
{
"tag": "RequestMessage",
"type": "Structure",
"value": [
{
"tag": "RequestHeader",
"type": "Structure",
"value": [
{ "tag": "ProtocolVersion", "type": "Structure", "value": [
{ "tag": "ProtocolVersionMajor", "type": "Integer", "value": 2 },
{ "tag": "ProtocolVersionMinor", "type": "Integer", "value": 1 }
] },
{ "tag": "ClientCorrelationValue", "type": "TextString", "value": "AKLC-M-1-21 step=1" },
{ "tag": "BatchCount", "type": "Integer", "value": 1 }
]
},
{
"tag": "BatchItem",
"type": "Structure",
"value": [
{ "tag": "Operation", "type": "Enumeration", "value": "GetAttributes" },
{ "tag": "RequestPayload", "type": "Structure", "value": [
{ "tag": "UniqueIdentifier", "type": "TextString", "value": "$UNIQUE_IDENTIFIER_0" },
{ "tag": "AttributeReference", "type": "Enumeration", "value": "State" },
{ "tag": "AttributeReference", "type": "Enumeration", "value": "CryptographicUsageMask" },
{ "tag": "AttributeReference", "type": "Enumeration", "value": "UniqueIdentifier" },
{ "tag": "AttributeReference", "type": "Enumeration", "value": "ObjectType" },
{ "tag": "AttributeReference", "type": "Enumeration", "value": "CryptographicAlgorithm" },
{ "tag": "AttributeReference", "type": "Enumeration", "value": "CryptographicLength" },
{ "tag": "AttributeReference", "type": "Enumeration", "value": "Digest" },
{ "tag": "AttributeReference", "type": "Enumeration", "value": "InitialDate" },
{ "tag": "AttributeReference", "type": "Enumeration", "value": "LastChangeDate" },
{ "tag": "AttributeReference", "type": "Enumeration", "value": "ActivationDate" },
{ "tag": "AttributeReference", "type": "Enumeration", "value": "OriginalCreationDate" },
{ "tag": "AttributeReference", "type": "Enumeration", "value": "RandomNumberGenerator" },
{ "tag": "AttributeReference", "type": "Enumeration", "value": "KeyFormatType" }
] }
]
}
]
}
3. Destroy (Private Key)
{
"tag": "RequestMessage",
"type": "Structure",
"value": [
{
"tag": "RequestHeader",
"type": "Structure",
"value": [
{ "tag": "ProtocolVersion", "type": "Structure", "value": [
{ "tag": "ProtocolVersionMajor", "type": "Integer", "value": 2 },
{ "tag": "ProtocolVersionMinor", "type": "Integer", "value": 1 }
] },
{ "tag": "ClientCorrelationValue", "type": "TextString", "value": "AKLC-M-1-21 step=3" },
{ "tag": "BatchCount", "type": "Integer", "value": 1 }
]
},
{
"tag": "BatchItem",
"type": "Structure",
"value": [
{ "tag": "Operation", "type": "Enumeration", "value": "Destroy" },
{ "tag": "RequestPayload", "type": "Structure", "value": [
{ "tag": "UniqueIdentifier", "type": "TextString", "value": "$UNIQUE_IDENTIFIER_0" }
] }
]
}
]
}
Operations
In chapter 6, the KMIP 2.1 specifications describe 57 potential operations that can be performed on a KMS.
Supported Operations
Out of this list, the Eviden KMS server only requires 12 operations to provide all required functionalities to support the cryptographic schemes available on the server.
The list of supported Operations is that of the menu entries below this one.
Messages and Bulk Operations
A KMIP request may be made by POSTing a single Operation serialized as JSON TTLV, or by combining multiple operations
in a Message request. See the bulk mode page for more details.
No support for "ID Placeholders"
KMIP states that a number of the operations are affected by a mechanism referred to as the ID Placeholder. It is a variable stored inside the server that is preserved during the execution of a batch of operations.
Maintaining this value requires maintaining a state during a batch session across multiple requests and potentially multiple servers. The performance gain of using placeholder IDs is not obvious, and the added complexity of maintaining sessions across multiple servers when scaling horizontally is not worth in the Eviden view for the type of operations conducted on the server.
The Eviden KMS servers are kept stateless to simplify horizontal scaling and therefore do not support placeholder IDs for now.
Get
Specification
This operation requests one or more attributes associated with a Managed Object. The object is specified by its Unique Identifier, and the attributes are specified by their name in the request. If a specified attribute has multiple instances, then all instances are returned. If a specified attribute does not exist (i.e., has no value), then it SHALL NOT be present in the returned response. If none of the requested attributes exist, then the response SHALL consist only of the Unique Identifier. The same Attribute Reference SHALL NOT be present more than once in a request.
If no Attribute Reference is provided, the server SHALL return all attributes.
Implementation
This operation can be applied to all supported objects.
Example - A symmetric key
Get the attributes of a symmetric key by its unique identifier 027cced1-ff2b-4bd3-a200-db1041583bdc.
Corresponding KMS CLI command:
ckms attributes get -i 027cced1-ff2b-4bd3-a200-db1041583bdc
The request has an empty AttributeReference structure, which means that all
attributes are requested.
The response contains all the system and user tags associated with the key. This is the hex encoded value of a JSON array with value
["MySymmetricKey", "_kk"]
The VendorIdentification field in the response reflects the server's configured vendor ID
(default: cosmian, configurable via --vendor-identification / KMS_VENDOR_IDENTIFICATION).
{
"tag": "GetAttributes",
"type": "Structure",
"value": [
{
"tag": "UniqueIdentifier",
"type": "TextString",
"value": "027cced1-ff2b-4bd3-a200-db1041583bdc"
},
{
"tag": "AttributeReference",
"type": "Structure",
"value": []
}
]
}
Example - A NIST P-256 private key
Get the attributes of a NIST P-256 private key.
Corresponding KMS CLI command:
ckms attributes get -i 927adccb-f59a-4cc9-a9e3-1eeb958c601f
The request has an empty AttributeReference structure, which means that
all attributes are requested.
In the response, please note:
- the
RecommendedCurveisP256, the KMIP name for NIST P-256 - the
tagis the hex encoded value of a JSON array with value["_sk"], the system tag for a private key
{
"tag": "GetAttributes",
"type": "Structure",
"value": [
{
"tag": "UniqueIdentifier",
"type": "TextString",
"value": "927adccb-f59a-4cc9-a9e3-1eeb958c601f"
},
{
"tag": "AttributeReference",
"type": "Structure",
"value": []
}
]
}
Example - A certificate imported as part of a PKCS#12 container
Get the attributes of the certificate imported as part of a PKCS#12 container (see Import for reference to the imported PKCS#12 container). The certificate is linked to a private key was signed by an intermediate certificate imported as part of the same container.
Corresponding KMS CLI command:
ckms attributes get -i d2f4e937-dda9-4a86-bbe8-c866646a612f
The request has an empty AttributeReference structure, which means that all attributes are requested.
Please note in the response:
- the
Linkto the private key - the
Linkto the intermediate certificate - the presence of all the system and user tags associated with the certificate. This is the hex encoded value of a JSON array with value
{
"tag": "GetAttributes",
"type": "Structure",
"value": [
{
"tag": "UniqueIdentifier",
"type": "TextString",
"value": "d2f4e937-dda9-4a86-bbe8-c866646a612f"
},
{
"tag": "AttributeReference",
"type": "Structure",
"value": []
}
]
}
Set
Specification
This operation requests the server to either add or modify an attribute. The request contains the Unique Identifier of the Managed Object to which the attribute pertains, along with the attribute and value. If the object did not have any instances of the attribute, one is created. If the object had exactly one instance, then it is modified. If it has more than one instance an error is raised. Read-Only attributes SHALL NOT be added or modified using this operation.
Implementation
This operation can be applied to all supported objects. One or more attributes can be set at once. The operation is idempotent, meaning that if the attribute is already set, the operation will not fail.
Read-only attributes
The following attributes are read-only for SetAttribute. Any attempt returns an Attribute_Read_Only error before
the object is touched:
UniqueIdentifier,ObjectType,CryptographicLength,CertificateLength,DigestInitialDate,LastChangeDate,OriginalCreationDate,FreshState(use Revoke and Destroy to change it)AlwaysSensitive,NeverExtractableRotateGeneration,RotateDate,RotateLatest
Sensitive and Extractable can be set only by the object owner or by a user holding an explicit SetAttribute
grant.
Example - A symmetric key
Set an attribute of a symmetric key by its unique identifier 027cced1-ff2b-4bd3-a200-db1041583bdc.
Corresponding KMS CLI command:
First, create a symmetric key:
ckms sym keys create my_symmetric_key
ckms attributes set -i my_symmetric_key --activation-date 1726211157791
The request sets the activation date of a symmetric key.
The response contains all the system and user tags associated with the key. This is the hex encoded value of a JSON array with value
Attribute set successfully
Unique identifier: 6209aa2a-900f-4a1c-b2ca-9b4af1bbd1d1
{
"tag": "SetAttribute",
"type": "Structure",
"value": [
{
"tag": "UniqueIdentifier",
"type": "TextString",
"value": "my_symmetric_key"
},
{
"tag": "NewAttribute",
"type": "Structure",
"value": [
{
"tag": "Link",
"type": "Structure",
"value": [
{
"tag": "LinkType",
"type": "Enumeration",
"value": "CertificateLink"
},
{
"tag": "LinkedObjectIdentifier",
"type": "TextString",
"value": "certificate_id"
}
]
}
]
}
]
}
Example - Set links on Certificate
Set the links on a certificate object. It will set 2 KMIP attributes.
Corresponding KMS CLI command:
ckms attributes set -i 03948573-9348-aaaa-aaaa-93857383 --public-key-id xxxxxxxx-yyyy-yyyy-yyyy-zzzzzzzzzzzz --private-key-id xxxxxxxx-yyyy-yyyy-yyyy-zzzzzzzzzzzz
The request set the KMIP links of the public key and the private key of the underlying certificate.
The SetAttribute operation being unitary, 2 requests are sent to the server, one for each link.
Output is:
Attribute set successfully
Unique identifier: 6209aa2a-900f-4a1c-b2ca-9b4af1bbd1d1
[
{
"LinkType": "PublicKeyLink",
"LinkedObjectIdentifier": "xxxxxxxx-yyyy-yyyy-yyyy-zzzzzzzzzzzz"
}
]
Attribute set successfully
Unique identifier: 6209aa2a-900f-4a1c-b2ca-9b4af1bbd1d1
[
{
"LinkType": "PrivateKeyLink",
"LinkedObjectIdentifier": "xxxxxxxx-yyyy-yyyy-yyyy-zzzzzzzzzzzz"
}
]
{
"tag": "SetAttribute",
"type": "Structure",
"value": [
{
"tag": "UniqueIdentifier",
"type": "TextString",
"value": "my_symmetric_key"
},
{
"tag": "NewAttribute",
"type": "Structure",
"value": [
{
"tag": "Link",
"type": "Structure",
"value": [
{
"tag": "LinkType",
"type": "Enumeration",
"value": "PublicKeyLink"
},
{
"tag": "LinkedObjectIdentifier",
"type": "TextString",
"value": "xxxxxxxx-yyyy-yyyy-yyyy-zzzzzzzzzzzz"
}
]
}
]
}
]
}
Modify
Specification
This operation requests the server to modify an attribute value associated with a Managed Object. The request contains
the Unique Identifier of the Managed Object whose attribute is to be modified, along with the attribute and its new
value. Unlike SetAttribute, ModifyAttribute is intended to replace the value of an existing attribute — it does
not create the attribute if it is absent.
Read-Only attributes SHALL NOT be modified using this operation.
Implementation
This operation can be applied to all supported objects.
Supported attributes
The following KMIP attributes can be modified:
| Attribute | Notes |
|---|---|
ActivationDate | Pre-Active objects only. If the new date ≤ now the object automatically transitions to Active (KMIP spec §3.22). |
CryptographicAlgorithm | Replaces the algorithm of the managed object. |
CryptographicParameters | Replaces the cryptographic parameters structure. |
CryptographicDomainParameters | Replaces the domain parameters structure. |
CryptographicUsageMask | Replaces the bitmask of allowed cryptographic usages. |
DeactivationDate | Sets or replaces the deactivation date. |
Link | Replaces the linked object identifier for the given link type. |
Name | Replaces the first Name entry if one exists, otherwise adds it. |
ObjectGroup | Replaces the object group string. |
VendorAttribute | Replaces a vendor attribute value identified by vendor ID + attribute name. |
Read-only attributes
The following attributes are read-only for ModifyAttribute and SHALL NOT be modified. Any attempt returns an
Attribute_Read_Only error before the object is touched:
UniqueIdentifier,ObjectType,CryptographicLength,CertificateLength,DigestInitialDate,LastChangeDate,OriginalCreationDate,FreshState(use Revoke and Destroy to change it)AlwaysSensitive,NeverExtractableRotateGeneration,RotateDate,RotateLatest
Sensitive and Extractable can be modified only by the object owner or by a user holding an explicit
ModifyAttribute grant.
Example - Modify the cryptographic algorithm
ckms attributes modify -i my_symmetric_key --cryptographic-algorithm chacha20
{
"tag": "ModifyAttribute",
"type": "Structure",
"value": [
{
"tag": "UniqueIdentifier",
"type": "TextString",
"value": "my_symmetric_key"
},
{
"tag": "NewAttribute",
"type": "Structure",
"value": [
{
"tag": "CryptographicAlgorithm",
"type": "Enumeration",
"value": "ChaCha20"
}
]
}
]
}
Example - Modify the activation date on a Pre-Active key
ActivationDate can only be modified on Pre-Active objects. Setting a date that is in the past or equal to the
current time will automatically transition the object to the Active state.
ckms attributes modify -i my_preactive_key --activation-date 1773571883
{
"tag": "ModifyAttribute",
"type": "Structure",
"value": [
{
"tag": "UniqueIdentifier",
"type": "TextString",
"value": "my_preactive_key"
},
{
"tag": "NewAttribute",
"type": "Structure",
"value": [
{
"tag": "ActivationDate",
"type": "DateTime",
"value": "2026-03-15T10:11:23+00:00"
}
]
}
]
}
Example - Read-only attribute rejection
Attempting to modify a read-only attribute such as State will return an Attribute_Read_Only error:
{
"tag": "ModifyAttribute",
"type": "Structure",
"value": [
{
"tag": "UniqueIdentifier",
"type": "TextString",
"value": "my_symmetric_key"
},
{
"tag": "NewAttribute",
"type": "Structure",
"value": [
{
"tag": "State",
"type": "Enumeration",
"value": "Active"
}
]
}
]
}
Delete
Specification
This operation requests the server to delete an attribute associated with a Managed Object. The request contains the Unique Identifier of the Managed Object whose attribute is to be deleted, the Current Attribute of the attribute. Attributes that are always REQUIRED to have a value SHALL never be deleted by this operation. Attempting to delete a non-existent attribute or specifying an Current Attribute for which there exists no attribute value SHALL result in an error. If no Current Attribute is specified in the request, and an Attribute Reference is specified, then all instances of the specified attribute SHALL be deleted.
Implementation
This operation can be applied to all supported objects. One or more attributes can be set at once.
Read-only attributes
The following attributes are read-only for DeleteAttribute. Any attempt returns an Attribute_Read_Only error
before the object is touched:
UniqueIdentifier,ObjectType,CryptographicLength,CertificateLength,DigestInitialDate,LastChangeDate,OriginalCreationDate,FreshStateSensitive,Extractable,AlwaysSensitive,NeverExtractableRotateAutomatic,RotateGeneration,RotateDate,RotateLatest
Example - Delete links on Certificate
First, for the demo purpose create a certificate:
ckms certificates certify --generate-key-pair --subject-name C=yo --algorithm rsa2048 -c my_certificate
Delete the links on a certificate object.
Corresponding KMS CLI command:
ckms attributes delete -i my_certificate --public-key-id xxxxxxxx-yyyy-yyyy-yyyy-zzzzzzzzzzzz --private-key-id xxxxxxxx-yyyy-yyyy-yyyy-zzzzzzzzzzzz --certificate-id xxxxxxxx-yyyy-yyyy-yyyy-zzzzzzzzzzzz
The request deletes the KMIP links of the public key and the private key of the underlying certificate.
The DeleteAttribute operation being unitary, 3 requests are sent to the server, one for each link.
Output is:
Attribute deleted successfully
Unique identifier: my_certificate
[
{
"LinkType": "PublicKeyLink",
"LinkedObjectIdentifier": "xxxxxxxx-yyyy-yyyy-yyyy-zzzzzzzzzzzz"
}
]
Attribute deleted successfully
Unique identifier: my_certificate
[
{
"LinkType": "PrivateKeyLink",
"LinkedObjectIdentifier": "xxxxxxxx-yyyy-yyyy-yyyy-zzzzzzzzzzzz"
}
]
Attribute deleted successfully
Unique identifier: my_certificate
[
{
"LinkType": "CertificateLink",
"LinkedObjectIdentifier": "xxxxxxxx-yyyy-yyyy-yyyy-zzzzzzzzzzzz"
}
]
{
"tag": "DeleteAttribute",
"type": "Structure",
"value": [
{
"tag": "UniqueIdentifier",
"type": "TextString",
"value": "my_certificate"
},
{
"tag": "CurrentAttribute",
"type": "Structure",
"value": [
{
"tag": "Link",
"type": "Structure",
"value": [
{
"tag": "LinkType",
"type": "Enumeration",
"value": "PublicKeyLink"
},
{
"tag": "LinkedObjectIdentifier",
"type": "TextString",
"value": "xxxxxxxx-yyyy-yyyy-yyyy-zzzzzzzzzzzz"
}
]
}
]
}
]
}
Certify
Specifications
This request is used to generate a Certificate object for a public key. This request supports the certification of a new public key, as well as the certification of a public key that has already been certified (i.e., certificate update). Only a single certificate SHALL be requested at a time.
The Certificate Request object MAY be omitted, in which case the public key for which a Certificate object is generated SHALL be specified by its Unique Identifier only. If the Certificate Request Type and the Certificate Request objects are omitted from the request, then the Certificate Type SHALL be specified using the Attributes object.
The Certificate Request is passed as a Byte String, which allows multiple certificate request types for X.509 certificates (e.g., PKCS#10, PEM, etc.) to be submitted to the server.
The generated Certificate object whose Unique Identifier is returned MAY be obtained by the client via a Get operation in the same batch, using the ID Placeholder mechanism.
For the public key, the server SHALL create a Link attribute of Link Type Certificate pointing to the generated certificate. For the generated certificate, the server SHALL create a Link attribute of Link Type Public Key pointing to the Public Key.
The server SHALL copy the Unique Identifier of the generated certificate returned by this operation into the ID Placeholder variable.
If the information in the Certificate Request conflicts with the attributes specified in the Attributes, then the information in the Certificate Request takes precedence.
Implementation
The KMIP implementation does not:
- specify how the signer is selected and whether self-signing is allowed
- specify how the certificate extensions are provided
- and only supports Certificate Signing Request (CSR) and certifying public keys
Eviden has extended the specifications and offers 4 possibilities to generate a certificate
- Providing a Certificate Signing Request (CSR)
- Providing a public key id to certify as well as a subject name
- Providing an existing certificate id to re-certify
- Generating a keypair then signing the public key to generate a certificate specifying a subject name and an algorithm
The signer is specified by providing an issuer private key id and/or an issuer certificate via the Links in the attributes of the request. If only one of this parameter is specified, the other one will be inferred from the links of the cryptographic object behind the provided parameter.
If no signer is provided, the certificate will be self-signed. It is not possible to self-sign a CSR.
When re-certifying a certificate, if no certificate unique identifier is provided, the original certificate id will be used and the original certificate will be replaced by the new one. In all other cases, a random certificate id will be generated.
Post-quantum (PQC) certificates
The Eviden KMS generates fully standards-compliant X.509 v3 certificates for all NIST-standardized post-quantum algorithms:
- ML-DSA (CRYSTALS-Dilithium) — RFC 9881:
self-signed or CA-signed; the KMS automatically adds a critical
keyUsageextension withdigitalSignature. - SLH-DSA (SPHINCS+) — draft-ietf-lamps-x509-slh-dsa:
self-signed or CA-signed; same
digitalSignaturekey usage. - ML-KEM (CRYSTALS-Kyber) — RFC 9935:
always CA-issued (ML-KEM cannot self-sign); the KMS automatically adds a critical
keyUsageextension withkeyEnciphermentonly.
See Post-Quantum X.509 Certificates for detailed usage instructions, OID tables, CLI examples, and cross-algorithm PKI guidance.
Supply X509 extensions (optional)
Specify X509 extensions for a Certify operation is possible using the KMS CLI.
The --certificate-extensions arg (short version -e) expects a path to a configuration file
written in ini format (roughly the same format
as OpenSSL X509 v3 cert extension cnf format).
The extensions may be part of a paragraph called v3_ca.
Example of a configuration file containing v3_ca parag describing extensions to add:
[v3_ca]
basicConstraints=critical,CA:FALSE,pathlen:0
keyUsage=keyCertSign,digitalSignature
extendedKeyUsage=emailProtection
crlDistributionPoints=URI:http://cse.example.com/crl.pem
These extensions are embedded in the Certify request within the vendor attributes.
Example of the corresponding KMS CLI command:
ckms certificates certify \
-r my_cert.csr -k 854d7914-3b1d-461a-a2dd-7aad27043b56 -d 365 -t "MyCert" \
-e /some/path/to/ext.cnf
Example - PKCS#10 Certificate Signing Request
Certify a PKCS#10 Certificate Signing Request (CSR) with the issuer private key unique identifier
854d7914-3b1d-461a-a2dd-7aad27043b56, and set the certificate requested validity to 365 days and
the tag to MyCert.
The corresponding KMS CLI command is:
ckms certificates certify -r my_cert.csr -k 854d7914-3b1d-461a-a2dd-7aad27043b56 -d 365 -t "MyCert"
Note: the KMS CLIent converts the CSR from PEM TO DER before creating the JSON TTLV and sending it to the server.
{
"tag": "Certify",
"type": "Structure",
"value": [
{
"tag": "CertificateRequestType",
"type": "Enumeration",
"value": "PEM"
},
{
"tag": "CertificateRequestValue",
"type": "ByteString",
"value": "2D2D2D2D2D424547494E20434552544946494341544520524551554553542D2D2D2D2D0A4D494944704443434167774341514177587A454C4D416B474131554542684D43526C49784444414B42674E564241674D41306C6B526A454F4D417747413155450A427777465547467961584D784544414F42674E5642416F4D42304E7663323170595734784444414B42674E564241734D4131496D524445534D424147413155450A4177774A5647567A6443424D5A57466D4D4949426F6A414E42676B71686B6947397730424151454641414F43415938414D49494269674B4341594541773045470A575355754F4E59526C5A3077506139524A7057416C577351515A5050675350786E354D5777464E4F383671676856666378314C387169515079315147687172320A764F766D577A366D752F59772F5663366E44644744694B54555564537341305167566474643770366B71317341393071364C30416E63384D384D46392F6F536F0A7145642F6C4F436774744F6D55667842566C314B6D7146434146464854786E4B5737387954332F3438386B57373952516B6D41367733416246377361787639500A706843365A634F76514F6836644D42326E4E6C574C67537670312B3948674455635956394D53575A6D2B376C524F5468552B41676433363364355A57574F41470A495659544E5A2F6E746B69705270717251352B7356694863752F4E4F544D757733524C632F575347736D6A594E57616465304C6D2F58685032684D67416D6F350A306474792B36307970437342573269504A6652755152743342644249632B3971637946326176786C457431414446556A49726B305353516F39774A45313953440A68534A414A33782B4D31466C6D4C2B34464832726E69777555615A6F6844506938567542367A634430747732524F664471586A2F5A4B356C7A4A6D745A6B53790A5636704B54485035737558372B6A3848324A35554A496F46487A44484764674E315A724C3570773563305A6D65634B516D5756796F394854614B364641674D420A414147674144414E42676B71686B6947397730424151734641414F4341594541594236615738625549306361466443356939334F376542345530535A414745740A612F546B5133486C764456364F2B327A64735042304F4672385262355171784134776A3843536579466C7A775666497172756A48457831557150706E2B7932720A4C6C397236754C7257725A753568664C767749752B774C6A617644425662354E2B7159536548357643334A582B4652385A64787A6B5754776465464C6F4273340A434749456D46494D2F2B666E79676E6B4C455254566B6738337339534B44736838316772755438302F6135365649636D656E373470584830514641615368766F0A7A52486F7670766A5631735A416265595365796B69564E53497179734166594A33327168744173366E5367796751637A546773756A4F746C63776653432B71550A497A4D623932325A654B5445427A7A3859326351394D6245714850787276664B5A675A4A43306B57342F482B736F2B5659776A684956337048705842527944640A6359637275732B434D335A416A456439585A6C39466D37454555736E346D7459486F497541394167756949425152596B473469726863524E5449377A36755A2B0A77544E724D792B47646B436B5271424256714146374E3473696931356E334E716A3535637257452F642F38316B574E36495943504448586C4F38756B4A6E4B750A30524E6A4B52656551624377596B72464C7A4F5A677342674E6C626E364263470A2D2D2D2D2D454E4420434552544946494341544520524551554553542D2D2D2D2D0A"
},
{
"tag": "Attributes",
"type": "Structure",
"value": [
{
"tag": "Link",
"type": "Structure",
"value": [
{
"tag": "Link",
"type": "Structure",
"value": [
{
"tag": "LinkType",
"type": "Enumeration",
"value": "PrivateKeyLink"
},
{
"tag": "LinkedObjectIdentifier",
"type": "TextString",
"value": "854d7914-3b1d-461a-a2dd-7aad27043b56"
}
]
}
]
},
{
"tag": "ObjectType",
"type": "Enumeration",
"value": "Certificate"
},
{
"tag": "VendorAttributes",
"type": "Structure",
"value": [
{
"tag": "VendorAttributes",
"type": "Structure",
"value": [
{
"tag": "VendorIdentification",
"type": "TextString",
"value": "cosmian"
},
{
"tag": "AttributeName",
"type": "TextString",
"value": "requested_validity_days"
},
{
"tag": "AttributeValue",
"type": "ByteString",
"value": "333635"
}
]
},
{
"tag": "VendorAttributes",
"type": "Structure",
"value": [
{
"tag": "VendorIdentification",
"type": "TextString",
"value": "cosmian"
},
{
"tag": "AttributeName",
"type": "TextString",
"value": "tag"
},
{
"tag": "AttributeValue",
"type": "ByteString",
"value": "5B224D7943657274225D"
}
]
}
]
}
]
}
]
}
Example - Public key
Certify a public key with unique id 45e56e67-d813-468f-9116-4d1e611a1828 using the issuer private
key
45e56e67-d813-468f-9116-4d1e611a1828.
Set the Subject Name of the certificate to C=FR, ST=IdF, L=Paris, O=AcmeTest, CN=bob@acme.com, the
tag to Bob and
the certificate requested validity to 365 days.
The corresponding KMS CLI command is
ckms certificates certify -p 45e56e67-d813-468f-9116-4d1e611a1828 -k 854d7914-3b1d-461a-a2dd-7aad27043b56 \
-d 365 -t "Bob" --subject-name "C=FR, ST=IdF, L=Paris, O=AcmeTest, CN=bob@acme.com"
Please note the following in the JSON TTLV of the request:
- the various Subject Name fields that are set for the certificate
- the Subject Name issuer fields are ignored: they will be copied from the certificate linked to the issuer private key
{
"tag": "Certify",
"type": "Structure",
"value": [
{
"tag": "UniqueIdentifier",
"type": "TextString",
"value": "45e56e67-d813-468f-9116-4d1e611a1828"
},
{
"tag": "Attributes",
"type": "Structure",
"value": [
{
"tag": "CertificateAttributes",
"type": "Structure",
"value": [
{
"tag": "CertificateSubjectCn",
"type": "TextString",
"value": "bob@acme.com"
},
{
"tag": "CertificateSubjectO",
"type": "TextString",
"value": "AcmeTest"
},
{
"tag": "CertificateSubjectOu",
"type": "TextString",
"value": ""
},
{
"tag": "CertificateSubjectEmail",
"type": "TextString",
"value": ""
},
{
"tag": "CertificateSubjectC",
"type": "TextString",
"value": "FR"
},
{
"tag": "CertificateSubjectSt",
"type": "TextString",
"value": "IdF"
},
{
"tag": "CertificateSubjectL",
"type": "TextString",
"value": "Paris"
},
{
"tag": "CertificateSubjectUid",
"type": "TextString",
"value": ""
},
{
"tag": "CertificateSubjectSerialNumber",
"type": "TextString",
"value": ""
},
{
"tag": "CertificateSubjectTitle",
"type": "TextString",
"value": ""
},
{
"tag": "CertificateSubjectDc",
"type": "TextString",
"value": ""
},
{
"tag": "CertificateSubjectDnQualifier",
"type": "TextString",
"value": ""
},
{
"tag": "CertificateIssuerCn",
"type": "TextString",
"value": ""
},
{
"tag": "CertificateIssuerO",
"type": "TextString",
"value": ""
},
{
"tag": "CertificateIssuerOu",
"type": "TextString",
"value": ""
},
{
"tag": "CertificateIssuerEmail",
"type": "TextString",
"value": ""
},
{
"tag": "CertificateIssuerC",
"type": "TextString",
"value": ""
},
{
"tag": "CertificateIssuerSt",
"type": "TextString",
"value": ""
},
{
"tag": "CertificateIssuerL",
"type": "TextString",
"value": ""
},
{
"tag": "CertificateIssuerUid",
"type": "TextString",
"value": ""
},
{
"tag": "CertificateIssuerSerialNumber",
"type": "TextString",
"value": ""
},
{
"tag": "CertificateIssuerTitle",
"type": "TextString",
"value": ""
},
{
"tag": "CertificateIssuerDc",
"type": "TextString",
"value": ""
},
{
"tag": "CertificateIssuerDnQualifier",
"type": "TextString",
"value": ""
}
]
},
{
"tag": "Link",
"type": "Structure",
"value": [
{
"tag": "Link",
"type": "Structure",
"value": [
{
"tag": "LinkType",
"type": "Enumeration",
"value": "PrivateKeyLink"
},
{
"tag": "LinkedObjectIdentifier",
"type": "TextString",
"value": "854d7914-3b1d-461a-a2dd-7aad27043b56"
}
]
}
]
},
{
"tag": "ObjectType",
"type": "Enumeration",
"value": "Certificate"
},
{
"tag": "VendorAttributes",
"type": "Structure",
"value": [
{
"tag": "VendorAttributes",
"type": "Structure",
"value": [
{
"tag": "VendorIdentification",
"type": "TextString",
"value": "cosmian"
},
{
"tag": "AttributeName",
"type": "TextString",
"value": "requested_validity_days"
},
{
"tag": "AttributeValue",
"type": "ByteString",
"value": "333635"
}
]
},
{
"tag": "VendorAttributes",
"type": "Structure",
"value": [
{
"tag": "VendorIdentification",
"type": "TextString",
"value": "cosmian"
},
{
"tag": "AttributeName",
"type": "TextString",
"value": "tag"
},
{
"tag": "AttributeValue",
"type": "ByteString",
"value": "5B22426F62225D"
}
]
}
]
}
]
}
]
}
Create
Specification
This operation requests the server to generate a new symmetric key or generate Secret Data as a Managed Cryptographic Object.
The request contains information about the type of object being created, and some of the attributes to be assigned to the object (e.g., Cryptographic Algorithm, Cryptographic Length, etc.).
The response contains the Unique Identifier of the created object. The server SHALL copy the Unique Identifier returned in this operation into the ID Placeholder variable.
Implementation
This operation can be used to create a new symmetric key, a new Covercrypt user decryption key, or an OpenPGP key (PGPKey, non-FIPS mode).
Example - Symmetric Key
Creating a 256 bit AES Symmetric Key with the tag MySymmetricKey.
The tags are assembled in a JSON array and encoded in hex.
The CryptographicUsageMask is optional.
Corresponding KMS CLI command:
ckms sym keys create --tag MySymmetricKey
{
"tag": "Create",
"type": "Structure",
"value": [
{
"tag": "ObjectType",
"type": "Enumeration",
"value": "SymmetricKey"
},
{
"tag": "Attributes",
"type": "Structure",
"value": [
{
"tag": "CryptographicAlgorithm",
"type": "Enumeration",
"value": "AES"
},
{
"tag": "CryptographicLength",
"type": "Integer",
"value": 256
},
{
"tag": "CryptographicUsageMask",
"type": "Integer",
"value": 2108
},
{
"tag": "KeyFormatType",
"type": "Enumeration",
"value": "TransparentSymmetricKey"
},
{
"tag": "ObjectType",
"type": "Enumeration",
"value": "SymmetricKey"
},
{
"tag": "Attribute",
"type": "Structure",
"value": [
{
"tag": "VendorIdentification",
"type": "TextString",
"value": "cosmian"
},
{
"tag": "AttributeName",
"type": "TextString",
"value": "tag"
},
{
"tag": "AttributeValue",
"type": "TextString",
"value": "[\"MySymmetricKey\"]"
}
]
}
]
}
]
}
Example - Covercrypt User Decryption Key
Creating a Covercrypt User Decryption Key with the tag MyUserKey and the access policy Security Level::Confidential && (Department::FIN || Department::HR)
(see Create Key Pair for the corresponding master key access structure).
Corresponding KMS CLI command:
ckms cc keys create-user-key -t "MyUserKey"\
b652a48a-a48c-4dc1-bd7e-cf0e5126b7b9 \
"Security Level::Confidential && (Department::FIN || Department::HR)"
Please note:
- The tag(s) is (are) assembled in a JSON array and encoded in hex.
- The access policy is encoded in hex.
{
"tag": "Create",
"type": "Structure",
"value": [
{
"tag": "ObjectType",
"type": "Enumeration",
"value": "PrivateKey"
},
{
"tag": "Attributes",
"type": "Structure",
"value": [
{
"tag": "CryptographicAlgorithm",
"type": "Enumeration",
"value": "CoverCrypt"
},
{
"tag": "KeyFormatType",
"type": "Enumeration",
"value": "CoverCryptSecretKey"
},
{
"tag": "Link",
"type": "Structure",
"value": [
{
"tag": "Link",
"type": "Structure",
"value": [
{
"tag": "LinkType",
"type": "Enumeration",
"value": "ParentLink"
},
{
"tag": "LinkedObjectIdentifier",
"type": "TextString",
"value": "b652a48a-a48c-4dc1-bd7e-cf0e5126b7b9"
}
]
}
]
},
{
"tag": "ObjectType",
"type": "Enumeration",
"value": "PrivateKey"
},
{
"tag": "VendorAttributes",
"type": "Structure",
"value": [
{
"tag": "VendorAttributes",
"type": "Structure",
"value": [
{
"tag": "VendorIdentification",
"type": "TextString",
"value": "cosmian"
},
{
"tag": "AttributeName",
"type": "TextString",
"value": "cover_crypt_access_policy"
},
{
"tag": "AttributeValue",
"type": "ByteString",
"value": "5365637572697479204C6576656C3A3A436F6E666964656E7469616C20262620284465706172746D656E743A3A46494E207C7C204465706172746D656E743A3A485229"
}
]
},
{
"tag": "VendorAttributes",
"type": "Structure",
"value": [
{
"tag": "VendorIdentification",
"type": "TextString",
"value": "cosmian"
},
{
"tag": "AttributeName",
"type": "TextString",
"value": "tag"
},
{
"tag": "AttributeValue",
"type": "ByteString",
"value": "5B224D79557365724B6579225D"
}
]
}
]
}
]
}
]
}
Create Key Pair
Specification
This operation requests the server to generate a new public/private key pair and register the two corresponding new Managed Cryptographic Objects.
The request contains attributes to be assigned to the objects (e.g., Cryptographic Algorithm, Cryptographic Length, etc.). Attributes MAY be specified for both keys at the same time by specifying a Common Attributes object in the request.
Attributes not common to both keys (e.g., Name, Cryptographic Usage Mask) MAY be specified using the Private Key Attributes and Public Key Attributes objects in the request, which take precedence over the Common Attributes object.
For the Private Key, the server SHALL create a Link attribute of Link Type Public Key pointing to the Public Key. For the Public Key, the server SHALL create a Link attribute of Link Type Private Key pointing to the Private Key. The response contains the Unique Identifiers of both created objects. The ID Placeholder value SHALL be set to the Unique Identifier of the Private Key.
Implementation
Please see the supported objects for the list of key pairs that can be created with this operation.
Example - X25519 Key Pair
Creating an X25519 key pair with the tag MyECKeyPair.
Please note:
- The tag is set in a JSON array and is hex-encoded before being added to the KMIP request.
- The
KeyFormatTypeis set toECPrivateKey. - The
ObjectTypeis set toPrivateKey. - The
CryptographicAlgorithmis set toECDH. - The
RecommendedCurveis set toCURVE25519.
Corresponding KMS CLI command:
ckms ec keys create
{
"tag": "CreateKeyPair",
"type": "Structure",
"value": [
{
"tag": "CommonAttributes",
"type": "Structure",
"value": [
{
"tag": "CryptographicAlgorithm",
"type": "Enumeration",
"value": "ECDH"
},
{
"tag": "CryptographicLength",
"type": "Integer",
"value": 253
},
{
"tag": "CryptographicDomainParameters",
"type": "Structure",
"value": [
{
"tag": "QLength",
"type": "Integer",
"value": 253
},
{
"tag": "RecommendedCurve",
"type": "Enumeration",
"value": "CURVE25519"
}
]
},
{
"tag": "CryptographicUsageMask",
"type": "Integer",
"value": 2108
},
{
"tag": "KeyFormatType",
"type": "Enumeration",
"value": "ECPrivateKey"
},
{
"tag": "ObjectType",
"type": "Enumeration",
"value": "PrivateKey"
},
{
"tag": "VendorAttributes",
"type": "Structure",
"value": [
{
"tag": "VendorAttributes",
"type": "Structure",
"value": [
{
"tag": "VendorIdentification",
"type": "TextString",
"value": "cosmian"
},
{
"tag": "AttributeName",
"type": "TextString",
"value": "tag"
},
{
"tag": "AttributeValue",
"type": "ByteString",
"value": "5B224D7945434B657950616972225D"
}
]
}
]
}
]
}
]
}
Example -Covercrypt Master Key Pair
Creating a Covercrypt master key pair with the following access structure specifications which is hex-encoded before being added to the KMIP request.
Note: it is much easier to use the KMS CLI to create Covercrypt master keys where a simple specification file can be used. Use the debug mode to get the hex-encoded access structure from the specifications.
For a specification file
{
"Security Level::<": [
"Protected",
"Confidential",
"Top Secret::+"
],
"Department": [
"RnD",
"HR",
"MKG",
"FIN"
]
}
The access structure to hex-encode to the call will be:
{
"version": "V2",
"last_attribute_value": 7,
"dimensions": {
"Security Level": {
"order": [
"Protected",
"Confidential",
"Top Secret"
],
"attributes": {
"Confidential": {
"rotation_values": [
6
],
"encryption_hint": "Classic",
"write_status": "EncryptDecrypt"
},
"Top Secret": {
"rotation_values": [
7
],
"encryption_hint": "Hybridized",
"write_status": "EncryptDecrypt"
},
"Protected": {
"rotation_values": [
5
],
"encryption_hint": "Classic",
"write_status": "EncryptDecrypt"
}
}
},
"Department": {
"order": null,
"attributes": {
"MKG": {
"rotation_values": [
3
],
"encryption_hint": "Classic",
"write_status": "EncryptDecrypt"
},
"FIN": {
"rotation_values": [
4
],
"encryption_hint": "Classic",
"write_status": "EncryptDecrypt"
},
"RnD": {
"rotation_values": [
1
],
"encryption_hint": "Classic",
"write_status": "EncryptDecrypt"
},
"HR": {
"rotation_values": [
2
],
"encryption_hint": "Classic",
"write_status": "EncryptDecrypt"
}
}
}
}
}
Corresponding KMS CLI command:
ckms cc keys create-master-key-pair -s access_structure_specifications.json
{
"tag": "CreateKeyPair",
"type": "Structure",
"value": [
{
"tag": "CommonAttributes",
"type": "Structure",
"value": [
{
"tag": "CryptographicAlgorithm",
"type": "Enumeration",
"value": "CoverCrypt"
},
{
"tag": "KeyFormatType",
"type": "Enumeration",
"value": "CoverCryptSecretKey"
},
{
"tag": "ObjectType",
"type": "Enumeration",
"value": "PrivateKey"
},
{
"tag": "VendorAttributes",
"type": "Structure",
"value": [
{
"tag": "VendorAttributes",
"type": "Structure",
"value": [
{
"tag": "VendorIdentification",
"type": "TextString",
"value": "cosmian"
},
{
"tag": "AttributeName",
"type": "TextString",
"value": "cover_crypt_policy"
},
{
"tag": "AttributeValue",
"type": "ByteString",
"value": "7B2276657273696F6E223A225632222C226C6173745F6174747269627574655F76616C7565223A372C2264696D656E73696F6E73223A7B225365637572697479204C6576656C223A7B226F72646572223A5B2250726F746563746564222C22436F6E666964656E7469616C222C22546F7020536563726574225D2C2261747472696275746573223A7B22436F6E666964656E7469616C223A7B22726F746174696F6E5F76616C756573223A5B365D2C22656E6372797074696F6E5F68696E74223A22436C6173736963222C2277726974655F737461747573223A22456E637279707444656372797074227D2C22546F7020536563726574223A7B22726F746174696F6E5F76616C756573223A5B375D2C22656E6372797074696F6E5F68696E74223A22487962726964697A6564222C2277726974655F737461747573223A22456E637279707444656372797074227D2C2250726F746563746564223A7B22726F746174696F6E5F76616C756573223A5B355D2C22656E6372797074696F6E5F68696E74223A22436C6173736963222C2277726974655F737461747573223A22456E637279707444656372797074227D7D7D2C224465706172746D656E74223A7B226F72646572223A6E756C6C2C2261747472696275746573223A7B224D4B47223A7B22726F746174696F6E5F76616C756573223A5B335D2C22656E6372797074696F6E5F68696E74223A22436C6173736963222C2277726974655F737461747573223A22456E637279707444656372797074227D2C2246494E223A7B22726F746174696F6E5F76616C756573223A5B345D2C22656E6372797074696F6E5F68696E74223A22436C6173736963222C2277726974655F737461747573223A22456E637279707444656372797074227D2C22522644223A7B22726F746174696F6E5F76616C756573223A5B315D2C22656E6372797074696F6E5F68696E74223A22436C6173736963222C2277726974655F737461747573223A22456E637279707444656372797074227D2C224852223A7B22726F746174696F6E5F76616C756573223A5B325D2C22656E6372797074696F6E5F68696E74223A22436C6173736963222C2277726974655F737461747573223A22456E637279707444656372797074227D7D7D7D7D"
}
]
},
{
"tag": "VendorAttributes",
"type": "Structure",
"value": [
{
"tag": "VendorIdentification",
"type": "TextString",
"value": "cosmian"
},
{
"tag": "AttributeName",
"type": "TextString",
"value": "tag"
},
{
"tag": "AttributeValue",
"type": "ByteString",
"value": "5B5D"
}
]
}
]
}
]
}
]
}
Decrypt
Specification
This operation requests the server to perform a decryption operation on the provided data using a Managed Cryptographic Object as the key for the decryption operation.
The request contains information about the cryptographic parameters (mode and padding method), the data to be decrypted, and the IV/Counter/Nonce to use. The cryptographic parameters MAY be omitted from the request as they can be specified as associated attributes of the Managed Cryptographic Object. The initialization vector/counter/nonce MAY also be omitted from the request if the algorithm does not use an IV/Counter/Nonce.
The response contains the Unique Identifier of the Managed Cryptographic Object used as the key and the result of the decryption operation.
The success or failure of the operation is indicated by the Result Status (and if failure, the Result Reason) in the response header.
Implementation
Decryption is supported for symmetric keys, private keys, and OpenPGP secret keys (PGPKey, non-FIPS mode). To see the list of supported cryptographic algorithms, please refer to Supported Algorithms.
Example - AES GCM decryption
Decrypting the text Hello, world! with symmetric key 027cced1-ff2b-4bd3-a200-db1041583bd (go to Create to see how to create the symmetric key).
Instead of using the UID of the key, we can use the unique tag of the key MySymmetricKey. The key must be uniquely
identified. It is possible to use multiple tags to identify a key; for instance symmetric keys automatically get a
system tag _kk. See tagging for more information on tags.
Corresponding KMS CLI command:
ckms sym decrypt /tmp/encrypted.bin -t "MySymmetricKey"
where /tmp/encrypted.bin contains the a concatenation of the the nonce, the encrypted and the authentication tag
in that order.
The JSON TTLV request the same information as in the Encrypt Response:
- the encrypted data
- the nonce: 12 bytes
- the authentication tag: 16 bytes
{
"tag": "Decrypt",
"type": "Structure",
"value": [
{
"tag": "UniqueIdentifier",
"type": "TextString",
"value": "[\"MySymmetricKey\"]"
},
{
"tag": "Data",
"type": "ByteString",
"value": "40D59A0735811135749A507FDEB3"
},
{
"tag": "IVCounterNonce",
"type": "ByteString",
"value": "DBDD622A64F7D65E75894B1B"
},
{
"tag": "AuthenticatedEncryptionTag",
"type": "ByteString",
"value": "50FCE680540BD3E96EFA9218A2F1009D"
}
]
}
Example - Covercrypt
Decrypting the text Hello, world! with Covercrypt user decryption key df871e79-0923-47cd-9078-bbec83287c85 (go
to Create to see how to create the Covercrypt user decryption key).
Instead of using the UID of the key, we can use the unique tag of the key MyUserKey. The key must be uniquely
identified. It is possible to use multiple tags to identify a key; for instance Covercrypt user decryption keys
automatically get a system tag _uk. See tagging for more information on tags.
Corresponding KMS CLI command:
ckms cc decrypt /tmp/encrypted.bin -t "MyUserKey"
{
"tag": "Decrypt",
"type": "Structure",
"value": [
{
"tag": "UniqueIdentifier",
"type": "TextString",
"value": "[\"MyUserKey\"]"
},
{
"tag": "CryptographicParameters",
"type": "Structure",
"value": [
{
"tag": "CryptographicAlgorithm",
"type": "Enumeration",
"value": "CoverCrypt"
}
]
},
{
"tag": "Data",
"type": "ByteString",
"value": "AEA6CF824612448B8445CAF46F9D987161706DAD6E43DFD1A57DD0F39869DC39A68096657A3EDC03CBC619D563744D2CC9819B6A9AB9A3893FD27F452F49A244A8CAA42279C4705D4D3A9E04D2B7887F0100D947F27D27BBD1D06F5A65087F73B8AAB617568761273282D4C14770FFCBA47200D02DDB4C48E1028DC5C50DE860A10A26E35AC405EFE6405486B56E9968594471075687D7BF6935BD003D"
}
]
}
Destroy
Specification
This operation is used to indicate to the server that the key material for the specified Managed Object SHALL be destroyed or rendered inaccessible. The meta-data for the key material SHALL be retained by the server. Objects SHALL only be destroyed if they are in either Pre-Active or Deactivated state.
Implementation
To destroy a key, it must be revoked using the Revoke operation first, unless it belongs to an external store,
such as an HSM.
Eviden has added an option Remove flag to the Destroy operation. If the Remove flag is set to true, the key
is completely removed from the database. This does not follow the KMIP 2.1 specification, but is useful in scenarios
where the key was incorrectly created and the ID must ne re-used or for GDPR compliance, when the key is associated
with personal data.
HSM keys are systematically removed when calling the destroy operation.
Unless, they are removed, destroyed keys are set in the state destroyed on the Eviden KMS Server. They can only be
retrieved using theExport operation. The Get operation will return an error. No key material will be returned by the
Export operation, only metadata.
Example - Symmetric key
Destroying key f54f14a3-5639-4054-8c23-54af891669db:
Corresponding cosmian command:
ckms sym keys destroy -k f54f14a3-5639-4054-8c23-54af891669db --remove
{
"tag": "Destroy",
"type": "Structure",
"value": [
{
"tag": "UniqueIdentifier",
"type": "TextString",
"value": "f54f14a3-5639-4054-8c23-54af891669db"
},
{
"tag": "Remove",
"type": "Boolean",
"value": true
}
]
}
Encrypt
Specification
This operation requests the server to perform an encryption operation on the provided data using a Managed Cryptographic Object as the key for the encryption operation.
The request contains information about the cryptographic parameters (mode and padding method), the data to be encrypted, and the IV/Counter/Nonce to use. The cryptographic parameters MAY be omitted from the request as they can be specified as associated attributes of the Managed Cryptographic Object. The IV/Counter/Nonce MAY also be omitted from the request if the cryptographic parameters indicate that the server shall generate a Random IV on behalf of the client or the encryption algorithm does not need an IV/Counter/Nonce. The server does not store or otherwise manage the IV/Counter/Nonce.
If the Managed Cryptographic Object referenced has a Usage Limits attribute, then the server SHALL obtain an allocation from the current Usage Limits value prior to performing the encryption operation. If the allocation is unable to be obtained, the operation SHALL return with a result status of Operation Failed and result reason of Permission Denied.
The response contains the Unique Identifier of the Managed Cryptographic Object used as the key and the result of the encryption operation.
The success or failure of the operation is indicated by the Result Status (and, if failure, the Result Reason) in the response header.
Implementation
Encryption is supported for symmetric keys, public keys, certificates, and OpenPGP keys (PGPKey, non-FIPS mode). To see the list of supported cryptographic algorithms, please refer to Supported Algorithms.
Example - AES GCM encryption
Encrypting the text Hello, world! with symmetric key 027cced1-ff2b-4bd3-a200-db1041583bd (go to Create
to see how to create the symmetric key).
Corresponding KMS CLI command:
ckms sym encrypt -t "MySymmetricKey" /tmp/hello_world.txt
Note: the file /tmp/hello_world.txt contains the text Hello, world!.
Please note that the response contains:
- the encrypted data
- the nonce: 12 bytes
- the authentication tag: 16 bytes
{
"tag": "Encrypt",
"type": "Structure",
"value": [
{
"tag": "UniqueIdentifier",
"type": "TextString",
"value": "[\"MySymmetricKey\"]"
},
{
"tag": "CryptographicParameters",
"type": "Structure",
"value": [
{
"tag": "BlockCipherMode",
"type": "Enumeration",
"value": "GCM"
},
{
"tag": "CryptographicAlgorithm",
"type": "Enumeration",
"value": "AES"
}
]
},
{
"tag": "Data",
"type": "ByteString",
"value": "48656C6C6F2C20776F726C64210A"
}
]
}
Example - Covercrypt
Encrypting the text Hello, world! with the Covercrypt master public key 0fd1f684-156c-4ca6-adc2-0a6f4b620463
(go to Create Key Pair to see how to create the mater key pair) and attributes Security Level::Confidential && Department::FIN.
Corresponding KMS CLI command:
ckms cc encrypt -k 0fd1f684-156c-4ca6-adc2-0a6f4b620463 \
/tmp/hello_world.txt "Security Level::Confidential && Department::FIN"
Note: the file /tmp/hello_world.txt contains the text Hello, world!.
In the request, please note that the Data parameter contains:
- the length of the bytes of the attributes:
47 = 2Fin hexadecimal - the attributes as bytes:
Security Level::Confidential && Department::FIN - the bytes to encrypt:
Hello, world!as UTF-8 bytes
{
"tag": "Encrypt",
"type": "Structure",
"value": [
{
"tag": "UniqueIdentifier",
"type": "TextString",
"value": "0fd1f684-156c-4ca6-adc2-0a6f4b620463"
},
{
"tag": "CryptographicParameters",
"type": "Structure",
"value": [
{
"tag": "CryptographicAlgorithm",
"type": "Enumeration",
"value": "CoverCrypt"
}
]
},
{
"tag": "Data",
"type": "ByteString",
"value": "2F5365637572697479204C6576656C3A3A436F6E666964656E7469616C202626204465706172746D656E743A3A46494E0048656C6C6F2C20776F726C64210A"
}
]
}
Export
Specification
This operation requests that the server returns a Managed Object specified by its Unique Identifier, together with its attributes.
The Key Format Type, Key Wrap Type, Key Compression Type and Key Wrapping Specification SHALL have the same semantics as for the Get operation. If the Managed Object has been Destroyed then the key material for the specified managed object SHALL not be returned in the response.
The server SHALL copy the Unique Identifier returned by this operations into the ID Placeholder variable.
Implementation
The Export operation - contrarily to the Getoperation - allows exporting objects which have been revoked or
destroyed.
When an object is destroyed, the key material cannot be exported anymore; only the attributes are returned.
To be able to export an Object the user must have the export permission on the object or be the object owner.
Key wrapping and unwrapping on export is supported for all keys, except OpenPGP (PGPKey) keys, which can be exported wrapped but not unwrapped on export. Please check the
algorithms page
for more details, including how to invoke
CKM_RSA_AES_KEY_WRAP
using CryptographicAlgorithm::RSA + PaddingMethod::None.
For the list of supported key formats, please check the formats page. OpenPGP keys (PGPKey) can be exported in their stored format (secret key armor) or projected to public key armor using KeyFormatType::OpenPgpPublicKey.
Examples - Check Get
An export example is provided below but it is in every point similar to the Get operation save for the
name of the operation. To run Export instead of Get with he KMS CLI, pass the --allow-revoked flag on the
command line.
Please check the Get page for more examples.
Example - Symmetric Key
Exporting a symmetric key 027cced1-ff2b-4bd3-a200-db1041583bdc (go to Create to see how to create the
symmetric key).
Instead of using the UID of the key, we can use the unique tag of the key MySymmetricKey. The key must be uniquely
identified. It is possible to use multiple tags to identify a key; for instance symmetric keys automatically get a
system tag _kk. See tagging for more information on tags.
The response is in Rawformat, the default format for symmetric keys specified by KMIP 2.1; see the formats page for details.
Corresponding KMS CLI command:
ckms sym keys export -t "MySymmetricKey" /tmp/sym_key.json --allow-revoked
{
"tag": "Export",
"type": "Structure",
"value": [
{
"tag": "UniqueIdentifier",
"type": "TextString",
"value": "[\"MySymmetricKey\"]"
},
{
"tag": "KeyWrapType",
"type": "Enumeration",
"value": "AsRegistered"
}
]
}
Get
Specification
This operation requests that the server returns the Managed Object specified by its Unique Identifier. Only a single object is returned.
The response contains the Unique Identifier of the object, along with the object itself, which MAY be wrapped using a wrapping key as specified in the request. The following key format capabilities SHALL be assumed by the client; restrictions apply when the client requests the server to return an object in a particular format:
-
If a client registers a key in a given format, the server SHALL be able to return the key during the Get operation in the same format that was used when the key was registered.
-
Any other format conversion MAY be supported by the server.
If Key Format Type is specified to be PKCS#12 then the response payload shall be a PKCS#12 container as specified by [RFC7292].
The Unique Identifier shall be either that of a private key or certificate to be included in the response.
The container shall be protected using the Secret Data object specified via the private key or certificate's PKCS#12 Password Link. The current certificate chain shall also be included as determined by using the private key's Public Key link to get the corresponding public key (where relevant) and then using that public key's PKCS#12 Certificate Link to get the base certificate, and then using each certificate's Certificate Link to build the certificate chain. It is an error if there is more than one valid certificate chain.
Implementation
The Get operation allows exporting Active objects only.
When an object is Destroyed or Deactivated, the Export operation must be used instead.
Key wrapping and unwrapping on export is supported for all keys. Please check the algorithms page for more details.
For the list of supported key formats, please check the formats page.
Example - A symmetric key
Exporting a symmetric key 027cced1-ff2b-4bd3-a200-db1041583bdc (go to Create to see how to create the
symmetric key).
Instead of using the UID of the key, we can use the unique tag of the key my_symmetric_key. The key must be uniquely
identified. It is possible to use multiple tags to identify a key; for instance symmetric keys automatically get a
system tag _kk. See tagging for more information on tags.
The response is in Rawformat, the default format for symmetric keys specified by KMIP 2.1; see the formats page for details.
Corresponding KMS CLI command:
ckms sym keys create my_symmetric_key
ckms sym keys export -t my_symmetric_key /tmp/sym_key.json
{
"tag": "Get",
"type": "Structure",
"value": [
{
"tag": "UniqueIdentifier",
"type": "TextString",
"value": "[my_symmetric_key]"
},
{
"tag": "KeyWrapType",
"type": "Enumeration",
"value": "AsRegistered"
}
]
}
Example - A wrapped Covercrypt user key
Exporting a wrapped Covercrypt user key df871e79-0923-47cd-9078-bbec83287c85 (go to Create to
see how to create the Covercrypt user key) after wrapping it with symmetric key
027cced1-ff2b-4bd3-a200-db1041583bdc using RFC 5649.
Corresponding KMS CLI command:
ckms cc keys export -k df871e79-0923-47cd-9078-bbec83287c85 /tmp/sym_key.json -w 027cced1-ff2b-4bd3-a200-db1041583bdc
Please note the presence of the KeyWrappingSpecification structure in the request with the unique identifier of
the symmetric key.
The response contains a KeyWrappingData structure with a reference to the symmetric key used for wrapping.
The encoding option is TTLVEncoding as specified ion the request, which indicates that the ciphertext
contains a JSON TTLV structure with the Key Material and its Attributes. Please refer to the KMIP specification for
more details.
{
"tag": "Get",
"type": "Structure",
"value": [
{
"tag": "UniqueIdentifier",
"type": "TextString",
"value": "df871e79-0923-47cd-9078-bbec83287c85"
},
{
"tag": "KeyWrappingSpecification",
"type": "Structure",
"value": [
{
"tag": "WrappingMethod",
"type": "Enumeration",
"value": "Encrypt"
},
{
"tag": "EncryptionKeyInformation",
"type": "Structure",
"value": [
{
"tag": "UniqueIdentifier",
"type": "TextString",
"value": "027cced1-ff2b-4bd3-a200-db1041583bdc"
}
]
},
{
"tag": "EncodingOption",
"type": "Enumeration",
"value": "TTLVEncoding"
}
]
}
]
}
Example - An EC private key in PKCS#8, linked to a certificate
Exporting in PKCS#8 an EC private key bf614d45-5a3e-49b9-95c0-5586d3c0d17b which was imported as part of a PKCS#12
container.
Corresponding KMS CLI command:
ckms ec keys export /tmp/pkey.pem -f pkcs8-pem -k bf614d45-5a3e-49b9-95c0-5586d3c0d17b
Please note:
- the presence of the
KeyFormatTypein the request set toPKCS8 - the presence of a
Linkstructure in the response, which links the private key to the certificate
{
"tag": "Get",
"type": "Structure",
"value": [
{
"tag": "UniqueIdentifier",
"type": "TextString",
"value": "bf614d45-5a3e-49b9-95c0-5586d3c0d17b"
},
{
"tag": "KeyFormatType",
"type": "Enumeration",
"value": "PKCS8"
},
{
"tag": "KeyWrapType",
"type": "Enumeration",
"value": "AsRegistered"
}
]
}
Example - A certificate in X509
Exporting in X509 a certificate d2f4e937-dda9-4a86-bbe8-c866646a612f which was imported as part of a PKCS#12.
Corresponding KMS CLI command:
ckms certificates export /tmp/cert.x509 -f pem -c d2f4e937-dda9-4a86-bbe8-c866646a612f
The conversion from DER to PEM is done by the CLI.
Please note:
- the presence of the
KeyFormatTypein the request set toX509 - the presence of a
Linkstructure in the response, which links the certificate to the private key - the presence of a
CertificateValuestructure in the response, which contains the X509 DER encoding of the certificate
{
"tag": "Get",
"type": "Structure",
"value": [
{
"tag": "UniqueIdentifier",
"type": "TextString",
"value": "d2f4e937-dda9-4a86-bbe8-c866646a612f"
},
{
"tag": "KeyFormatType",
"type": "Enumeration",
"value": "X509"
},
{
"tag": "KeyWrapType",
"type": "Enumeration",
"value": "AsRegistered"
}
]
}
Example - A PKCS#12 container
Export a PKCS#12 container using the unique identifier of the private key. The Private Key must have a link to:
- either a certificate with a link of type
PKCS12CertificateLinkorCertificateLink - or a link to a public key with a link of type
PublicKeyLink, the public key having a link to a certificate with a link of typeCertificateLink. - for intermediate certificates to be included, the certificate must have a link to a certificate with a link of type
CertificateLinkto its issuer.
Corresponding KMS CLI command:
ckms certificates export /tmp/exported.p12 -c bf614d45-5a3e-49b9-95c0-5586d3c0d17b -f pkcs12 -p secret
Please note:
- the presence of the
KeyFormatTypein the request set toPKCS12. - the presence of a
KeyWrappingSpecificationstructure in the request with the the secret used to seal the PKCS#12 container. - the
EncodingOptionis ignored in this case.
{
"tag": "Get",
"type": "Structure",
"value": [
{
"tag": "UniqueIdentifier",
"type": "TextString",
"value": "bf614d45-5a3e-49b9-95c0-5586d3c0d17b"
},
{
"tag": "KeyFormatType",
"type": "Enumeration",
"value": "PKCS12"
},
{
"tag": "KeyWrappingSpecification",
"type": "Structure",
"value": [
{
"tag": "WrappingMethod",
"type": "Enumeration",
"value": "Encrypt"
},
{
"tag": "EncryptionKeyInformation",
"type": "Structure",
"value": [
{
"tag": "UniqueIdentifier",
"type": "TextString",
"value": "secret"
}
]
},
{
"tag": "EncodingOption",
"type": "Enumeration",
"value": "TTLVEncoding"
}
]
}
]
}
Hash
Specification
This operation requests the server to perform a hash operation on provided data, using a specified Hashing Algorithm. The operation can be performed in a single request or as a series of requests for long data streams or by-parts cryptographic operations.
The response contains the hashed data.
When a stream or by-parts operation is requested:
- The server SHALL create a unique identifier, called correlation value if Init Indicator is True.
- The server SHALL expect one or more requests with the same correlation value if Init Indicator is True.
- The server SHALL return the Correlation Value in the response if Init Indicator is True.
- The server SHALL use the Correlation Value for subsequent Hash requests.
- The server SHALL close the stream or by-parts operation when Final Indicator is True.
Implementation
The Eviden KMS server supports the following hashing algorithms:
- SHA256
- SHA384
- SHA512
For the complete list of supported hashing algorithms, please check the algorithms page.
Example - Simple hash
Hashing data with SHA256.
Corresponding KMS CLI command:
ckms hash --algorithm sha3-512 --data 0011223344556677889900
{
"tag": "Hash",
"type": "Structure",
"value": [
{
"tag": "CryptographicParameters",
"type": "Structure",
"value": [
{
"tag": "HashingAlgorithm",
"type": "Enumeration",
"value": "SHA3512"
}
]
},
{
"tag": "Data",
"type": "ByteString",
"value": "0011223344556677889900"
},
{
"tag": "InitIndicator",
"type": "Boolean",
"value": false
},
{
"tag": "FinalIndicator",
"type": "Boolean",
"value": false
}
]
}
Example - Stream hash
Hashing a large file in multiple parts using SHA256.
Corresponding KMS CLI command:
# First part with init indicator
ckms hash --algorithm sha3-512 --data 0011223344556677889900 -i
# Middle part using correlation value
ckms hash --algorithm sha3-512 --correlation-value F91DDB96D12CF8FAB0AA72224836D3F5F659A6634E3508A7C31DBC3727D2030254C57AD90AA5FB7F27FB3AAFABEAEB1204E4AF62BA2DE44E33E761B2C39DBACA --data 0011223344556677889900
# Final part with final indicator
ckms hash --algorithm sha3-512 --correlation-value 51A2F7FCA8DECFC106031BE935F28F6EEE7E3850BCDB9D9B41B0F623146D7F51E399FC8F76A8B14EB71463DB0F6D421EF431E33F8CE1897FF988237C890C808F -f --data 0011223344556677889900
{
"tag": "Hash",
"type": "Structure",
"value": [
{
"tag": "CryptographicParameters",
"type": "Structure",
"value": [
{
"tag": "HashingAlgorithm",
"type": "Enumeration",
"value": "SHA3512"
}
]
},
{
"tag": "Data",
"type": "ByteString",
"value": "0011223344556677889900"
},
{
"tag": "InitIndicator",
"type": "Boolean",
"value": true
},
{
"tag": "FinalIndicator",
"type": "Boolean",
"value": false
}
]
}
Import
Specification
This operation requests the server to Import a Managed Object specified by its Unique Identifier. The request specifies the object being imported and all the attributes to be assigned to the object.
The attribute rules for each attribute for "Initially set by" and "When implicitly set" SHALL NOT be enforced as all attributes MUST be set to the supplied values rather than any server-generated values.
The response contains the Unique Identifier provided in the request or assigned by the server. The server SHALL copy the Unique Identifier returned by this operation into the ID Placeholder variable.
Implementation
Key unwrapping on import is supported for all keys. Please check the algorithms page for more details.
For the list of supported key formats, please check the formats page. OpenPGP keys (PGPKey) can be imported as transferable secret or public keys (ASCII armored or binary bytes) in non-FIPS mode.
Example - A NIST P-256 EC private key in SEC1 format
Importing a NIST P-256 EC Private Key in SEC1 format.
Corresponding KMS CLI command:
ckms ec keys import cra../kms_clients/test_data/certificates/openssl/prime256v1-private-key.pem --key-format pem
The conversion from PEM to DER is done by the KMS CLI.
In the JSON TTLV requests, please note:
- the empty
UniqueIdentifierwhich requests the server to generate a newUniqueIdentifierfor the imported key. - the empty tags
[]in hex - the
KeyFormatTypeset toECPrivateKeywhich indicates to the server that the key is in SEC1 format.
{
"tag": "Import",
"type": "Structure",
"value": [
{
"tag": "UniqueIdentifier",
"type": "TextString",
"value": ""
},
{
"tag": "ObjectType",
"type": "Enumeration",
"value": "PrivateKey"
},
{
"tag": "ReplaceExisting",
"type": "Boolean",
"value": false
},
{
"tag": "Attributes",
"type": "Structure",
"value": [
{
"tag": "VendorAttributes",
"type": "Structure",
"value": [
{
"tag": "VendorAttributes",
"type": "Structure",
"value": [
{
"tag": "VendorIdentification",
"type": "TextString",
"value": "cosmian"
},
{
"tag": "AttributeName",
"type": "TextString",
"value": "tag"
},
{
"tag": "AttributeValue",
"type": "ByteString",
"value": "5B5D"
}
]
}
]
}
]
},
{
"tag": "Object",
"type": "Structure",
"value": [
{
"tag": "KeyBlock",
"type": "Structure",
"value": [
{
"tag": "KeyFormatType",
"type": "Enumeration",
"value": "ECPrivateKey"
},
{
"tag": "KeyValue",
"type": "Structure",
"value": [
{
"tag": "KeyMaterial",
"type": "ByteString",
"value": "307702010104204CC0D4B807CED6BB2CCFE44D467D6A2A5D706B0E11E9352CF5CA8D3998790B83A00A06082A8648CE3D030107A14403420004A8D465338FB81879378BC9730A07A2BA455009E1B4606A58136C4A73C40B4BE7DDFE9D7959BC16E6BF8D6F2EF4BA4DB43A3DA29FA1A9D2ECA5AD30F129A0A5A4"
}
]
}
]
}
]
}
]
}
Example - A RSA 2048 private key in PKCS#8 format
Importing a RSA 2048 key in PKCS#8 format with tags MyRSAKeyand 2048.
Corresponding KMS CLI command:
ckms ec keys import cra../kms_clients/test_data/certificates/openssl/rsa-2048-private-key.pem --key-format pem --tag "MyRSAKey" --tag "2048"
The conversion from PEM to DER is done by the KMS CLI.
In the JSON TTLV Request, please note:
- the empty
UniqueIdentifierwhich requests the server to generate a newUniqueIdentifierfor the imported key. - the tags
["MyRSAKey","2048"]in hex - the
KeyFormatTypeset toPKCS8which indicates to the server that the key is in PKCS#8 format. - the
KeyMaterialwhich are the hex-encoded DER bytes of the PKCS#8 structure.
{
"tag": "Import",
"type": "Structure",
"value": [
{
"tag": "UniqueIdentifier",
"type": "TextString",
"value": ""
},
{
"tag": "ObjectType",
"type": "Enumeration",
"value": "PrivateKey"
},
{
"tag": "ReplaceExisting",
"type": "Boolean",
"value": false
},
{
"tag": "Attributes",
"type": "Structure",
"value": [
{
"tag": "VendorAttributes",
"type": "Structure",
"value": [
{
"tag": "VendorAttributes",
"type": "Structure",
"value": [
{
"tag": "VendorIdentification",
"type": "TextString",
"value": "cosmian"
},
{
"tag": "AttributeName",
"type": "TextString",
"value": "tag"
},
{
"tag": "AttributeValue",
"type": "ByteString",
"value": "5B224D795253414B6579222C2232303438225D"
}
]
}
]
}
]
},
{
"tag": "Object",
"type": "Structure",
"value": [
{
"tag": "KeyBlock",
"type": "Structure",
"value": [
{
"tag": "KeyFormatType",
"type": "Enumeration",
"value": "PKCS8"
},
{
"tag": "KeyValue",
"type": "Structure",
"value": [
{
"tag": "KeyMaterial",
"type": "ByteString",
"value": "308204BD020100300D06092A864886F70D0101010500048204A7308204A30201000282010100B466EEF95ECB9CEC2F9AFA71F280C3F7671BD18C21819E08521D890CADF4D52EB02B33D2CEC25B45124F4977FC5EB43918FD0717697EBF09B0AD3143915DD233A248DBA42550ECE7530AA98C318F425915E1300600B873B24EB33715A93A96F7AC4198C1EFBD111B7D0D7100FCEB90A3B2549F4D9CDF1C08E0E14098ED07F5442FFFA9775F488778CE967AFB662FBC8FE9E353E778AA49E1976F818CC8C597D9DBFAAD219DA1B5B36037B3146DBB031AA43552B18D1B03AD789BE60B19FCD685ED774BC11E9E2C8D076CEBAB5BD21FB1EB80EDCCE55C47A8BB607A6B3311E9CFBC76E162C4F98FD30E87D39ED0A8BC07CA46C2653A2B04DD47998CDDD2744E5302030100010282010018572D163B6A98952B852B1675C456EC8A1E70430A804D1CCD4B8BE2C893D8B1B0765BCB2D377F0E0E3EE1684D864FA5C68FD94598E7CF89D4AB4192DEC9BC635819A17CFFC5EFF8F434E39475596177D8A26612E14501E344881CBE10F3C54BCC939B334B90047F637B8D4C3753E75396EBA104DD4E231FB58BDEE5E351680F9D5E8F0F555BDF09CECA4E83AE6CCDC0F6E8E07AA0A2EC96ABA1B57F53667B05957B0BE4CB9564CFEC672981CB1BB57BF4785563B87A6AC3354C68B83CD73C4896DB526A5D037224EBEAECDF01EC6F94B637FA2F3128EB1588294942601ECE5B0AEE98E222BD8779ED931734FE27F0C4ADACB586CCFE649FAA0273F333CC43CD02818100EF9732DA98D3AB9F561B602F74AAEFFEBAA4F5D8A3AC93BF560DC097AC853FCD246433D30FC294D81F6FF05B2DFD286155DAF4CFB3666DDA580A992DAE649DAA6B407FD240F07E87AF6DEEA93525EED90799888B488980470F70F749AC8C440B776D0CAF327706638AD46923D14FD5E5D25CDA0DE14FA9E5869F71104D6B9E7502818100C0C1F7B91012BB6794FE901039F0B93C08DFA0D1AB6308A444B34304EBAD516EB76CBE976551F38DA4B78CF67675882A4293765BDAA824CF7DF9912BB77D9CC986A5692CF06A520C0F00148110692EF25814420FB496C8FD60C1402D487980D457FB9B54004D58F19ACDA3317734EA39CFB07DE3446200E283AB6F68B82230A702818020E24CBD8A0A4B5CF4318FB313BD3E7164E6AD438DBB6B0FF0DCB4595CF970F7540E58BA984829ABBC2CDDFD75C3705E63AD48BA9531F2D3EC0F90549FC1F98DE16899E29EBD2370B6184D9075D5FE0155B4B1F40401B3548D7F00C1E0E7E392FB5241526E87BD9DBDF94770FE128A1620185469614A50D44AF4E94CC68385DD028181008129B8A06697D6C21B01D5713A12075DA6288BAFD3A361E8092D01ECAB2C11541A4F210B7BD645589596753BB5B71E0E0B5C9AC4042A05B890168A637BEA0D04B157E7B938445644444CEE706999C1DE9C8CBE939D94288C38A86623B1DBD12AF8E5DD7895573F116E84FB24AB5766D8644644A4E46EB35F1591EBEE84EC4C2302818042F72AC26114C103F011407A8189128E3C2A2CC59CEB559DF3DA198EA1D6A0023E98B7FDCBFEF61D82AC6176981CBD4B4B239DF39189DC15B246DE13B879AC82490C065BA3A007E5413F27CD998546BE17F30AD6A40E4A891CA84CD9D006239BB47E06024DA1DE35B791A79A57CBC5C501B16B1511138DCEB97F111E548F076D"
}
]
}
]
}
]
}
]
}
Example - Covercrypt user key with unwrapping on import
Importing a wrapped Covercrypt user key after unwrapping it with symmetric key
027cced1-ff2b-4bd3-a200-db1041583bdc using RFC 5649.
Corresponding KMS CLI command:
ckms cc keys import /tmp/sym_key.json -u
Note: the -u flag is used to indicate that the key should be unwrapped on import; the JSON file (obtained using the
export command) contains the wrapped key details.
In the JSON TTLV request, please note:
- the
KeyWrapTypeset toNotWrappedwhich indicates to the server that it should look into theKeyWrappingDatastructure to see how to unwrap the key. - the empty
UniqueIdentifierwhich requests the server to generate a newUniqueIdentifierfor the imported key.
{
"tag": "Import",
"type": "Structure",
"value": [
{
"tag": "UniqueIdentifier",
"type": "TextString",
"value": ""
},
{
"tag": "ObjectType",
"type": "Enumeration",
"value": "PrivateKey"
},
{
"tag": "ReplaceExisting",
"type": "Boolean",
"value": false
},
{
"tag": "KeyWrapType",
"type": "Enumeration",
"value": "NotWrapped"
},
{
"tag": "Attributes",
"type": "Structure",
"value": [
{
"tag": "CryptographicAlgorithm",
"type": "Enumeration",
"value": "CoverCrypt"
},
{
"tag": "KeyFormatType",
"type": "Enumeration",
"value": "CoverCryptSecretKey"
},
{
"tag": "Link",
"type": "Structure",
"value": [
{
"tag": "Link",
"type": "Structure",
"value": [
{
"tag": "LinkType",
"type": "Enumeration",
"value": "ParentLink"
},
{
"tag": "LinkedObjectIdentifier",
"type": "TextString",
"value": "b652a48a-a48c-4dc1-bd7e-cf0e5126b7b9"
}
]
}
]
},
{
"tag": "ObjectType",
"type": "Enumeration",
"value": "PrivateKey"
},
{
"tag": "VendorAttributes",
"type": "Structure",
"value": [
{
"tag": "VendorAttributes",
"type": "Structure",
"value": [
{
"tag": "VendorIdentification",
"type": "TextString",
"value": "cosmian"
},
{
"tag": "AttributeName",
"type": "TextString",
"value": "tag"
},
{
"tag": "AttributeValue",
"type": "ByteString",
"value": "5B5D"
}
]
},
{
"tag": "VendorAttributes",
"type": "Structure",
"value": [
{
"tag": "VendorIdentification",
"type": "TextString",
"value": "cosmian"
},
{
"tag": "AttributeName",
"type": "TextString",
"value": "cover_crypt_access_policy"
},
{
"tag": "AttributeValue",
"type": "ByteString",
"value": "5365637572697479204C6576656C3A3A436F6E666964656E7469616C20262620284465706172746D656E743A3A46494E207C7C204465706172746D656E743A3A485229"
}
]
}
]
}
]
},
{
"tag": "Object",
"type": "Structure",
"value": [
{
"tag": "KeyBlock",
"type": "Structure",
"value": [
{
"tag": "KeyFormatType",
"type": "Enumeration",
"value": "CoverCryptSecretKey"
},
{
"tag": "KeyValue",
"type": "Structure",
"value": [
{
"tag": "KeyMaterial",
"type": "ByteString",
"value": "2DCB9F6F18570EE9400372953342590B13CDAE02DC92ABDE50A873239F4EDFC64081B861B9CAC050D6AEE890CF7167AD44739974507A6D2DAB532B886B369EB00794F2ED4D80BD510556C92FF022F20D1E2E810D1466AF9B526319F8529BA9AFA34964C37BC6070BA5489970C9565785FFF29C1669251DDB6C7A189BA8D9238B2B6D717F5A4680E5458931A994DC4698D1C6E1B1D4B296CFFFA7402911933092B428F8AA9669185ACFC1ADDC7CC8026F96BFA240283F9667D03C2BC597DB1677CFBFA7CB8B88E5AC9456722477845BA6AB075F30C1DAE9BB9D95E4DA67C7E1D69E7394DC8CF6F54040B279D50C6E5C6B1FB92AAB17FD7E766C3E826603EBA9FE357199CF937AAA844B37BC8DA7C7D28E18D9C8D2A44F473D39B377BB04FD0178CE5E78385D31D19420270F7A121AEF4844977E14A5B387EB5032ABA81BFC9BEF2343C58AA1F468E4007AAAA3E7725754B1127A2F89D15DBE4F8237008B68D00F4C00862560A4A5FCB9E47C9E802A70C3AEEEAED6DE4136FFBCF31F50B5745C1975A08CC818C81655F6C5E9DAE96E7E76F5D58EB0A1FC1D9A10839E8ACB7F0327544481CEB60CACFC299C18E40D453DF9466CC9B524CDC31ABADAB2EF78E617E6571D6BE2B4F78F057F68CCB4FD732F39CC1CD6F1AFF80804CF27765A777832E614FC01D6E9967328CA7938D9BE8560B19C1A85C3C99DA43AEE7850FEC158541C968E8287142C306F9E18DD46AF5C8774E91C1786208A595DDDEBA26B28F5F06FE6AD0F2773E65082FA354A293C4924508DD0CBD469711E71F455A83929E0BD5C4A6461CB5F2ED57B7A55E3EA74E99525917FF76488CD7B1CF24515FE77FBAB4D4C0F686A921D50D643C0E7058357B2313DF8D2B376B261DE966E33BF436AAF7EEB200E1E577E0C0B3D6C3C9B3F7199202AC9D7160B15D3DFEC1F395DCCA876AD50201CC85CB07B28160D60DFB6EAF8EC9F591642B946BBD3D9FBBD41565A42383848EE0D2C47AA2715C1AE1E937795098DBF9A161A25DD2705F84261041F4395B93BA49916B6F7A1D386FF0B1C31AF06A15B96D4E43E60510C1E6D9C613E2DDC7E9B0821E99AC1FC82235AFC472FBB4B49923D139F7801DAAA73022B6BF53E0E067A7F6BDB128BB3DF47B9DFC72B1DDE87A0D67EE446FD248BBD4E9CF9983CD0E38D1430672145EF2B84F8CA1C3B04E4CD3C0405BD82523F23057F89BBDBAA04F2241AF87A0CFA76917D34F69B021BEE26BE5DD4F31D446684948A366C23696E64A3B56A9B67541AE575BF4C18933EEB3EAC634590BE9E0995E355FFB66ED1C3D284F20D0246EFD286D98EC337DA91AB9BF62FDAFC80F76D94D9F132CDF75A70F39DE697B1619011E9C7DD5BE305CA699480B276C8B62356626196F00EDBE250512A39E3750DDA8B62B329F20B339630F5BAD63A5B9203CC05170A7BD2F40929886DDEB14EF55C3ED2D7228034F8A632B1E7A7D44272A87E131AF2FE09640496A6D74E88F3D67AA17732884F3EED6C9DF4EC4D41A81F47B0124DA017D4D7AF079F79A1795541A49FB3D8A7F17CA1167FF7B4467813F02A7C97E53BAFDA269EB6D85F6086C17B60763DBD753E1FCC642CCEE072C9AB41FC433CBBEA9E3B97389DD205E05A2BA5DF147032B8C721119A831A29F474F7D9D6CF14F887CC43F5343F94CEBEDA7228BB3A6F7429A58FFF595CA055522B18C32DCB7377E953B2099116517FD32DDD1566C8C0B759C7CEBEE1B8CC3C21B7A8735D791D1F964F8C41A3B02EB9BA47537D03B6226003CDB05C0315B8B9B5D36C44F7FFC242B8783D27D6F2C014396CC88B0AA6B03C798199B1D309A1130A1DFEE0862F8619C127FA922EC83816E0A1FDF24EF7F27EEF5D92E5035D4E5A1BD9F656D1A3F384E617DA90677FFDE819CD618B9A13DA1E4FBD6AE8B61AC1CEE8A5C7D93C4BB4BB97325E75E5264CFD22B0A58BA7D55CB84DD5DADDFBEEDAC39A96D7498017DF1564BC853643764D73EFB370B6E3CB6A876678657A1499B7AFE47F92AD3B946099F7A86E2EDB731CFC7E0560A618EE56944A90BCE1E5928A3B506AD02A197EA71FCF3E290FF2DDFBECC6F79CA8405D87F65D73F3F6E39AFD8BFEA8AA35F246CE8BC85226BF3D7FD70D8C56589A48D38AF721B97FC58B0D"
},
{
"tag": "Attributes",
"type": "Structure",
"value": [
{
"tag": "CryptographicAlgorithm",
"type": "Enumeration",
"value": "CoverCrypt"
},
{
"tag": "KeyFormatType",
"type": "Enumeration",
"value": "CoverCryptSecretKey"
},
{
"tag": "Link",
"type": "Structure",
"value": [
{
"tag": "Link",
"type": "Structure",
"value": [
{
"tag": "LinkType",
"type": "Enumeration",
"value": "ParentLink"
},
{
"tag": "LinkedObjectIdentifier",
"type": "TextString",
"value": "b652a48a-a48c-4dc1-bd7e-cf0e5126b7b9"
}
]
}
]
},
{
"tag": "ObjectType",
"type": "Enumeration",
"value": "PrivateKey"
},
{
"tag": "VendorAttributes",
"type": "Structure",
"value": [
{
"tag": "VendorAttributes",
"type": "Structure",
"value": [
{
"tag": "VendorIdentification",
"type": "TextString",
"value": "cosmian"
},
{
"tag": "AttributeName",
"type": "TextString",
"value": "tag"
},
{
"tag": "AttributeValue",
"type": "ByteString",
"value": "5B224D79557365724B6579225D"
}
]
},
{
"tag": "VendorAttributes",
"type": "Structure",
"value": [
{
"tag": "VendorIdentification",
"type": "TextString",
"value": "cosmian"
},
{
"tag": "AttributeName",
"type": "TextString",
"value": "cover_crypt_access_policy"
},
{
"tag": "AttributeValue",
"type": "ByteString",
"value": "5365637572697479204C6576656C3A3A436F6E666964656E7469616C20262620284465706172746D656E743A3A46494E207C7C204465706172746D656E743A3A485229"
}
]
}
]
}
]
}
]
},
{
"tag": "CryptographicAlgorithm",
"type": "Enumeration",
"value": "CoverCrypt"
},
{
"tag": "CryptographicLength",
"type": "Integer",
"value": 1832
},
{
"tag": "KeyWrappingData",
"type": "Structure",
"value": [
{
"tag": "WrappingMethod",
"type": "Enumeration",
"value": "Encrypt"
},
{
"tag": "EncryptionKeyInformation",
"type": "Structure",
"value": [
{
"tag": "UniqueIdentifier",
"type": "TextString",
"value": "027cced1-ff2b-4bd3-a200-db1041583bdc"
}
]
},
{
"tag": "EncodingOption",
"type": "Enumeration",
"value": "TTLVEncoding"
}
]
}
]
}
]
}
]
}
Example - A PKCS#12 container
Importing a PKCS#12 container containing an EC private key, a certificate and an intermediate certificate.
Corresponding KMS CLI command:
ckms certificates import cra../kms_clients/test_data/certificates/p12/output.p12 --tag "MyPKCS12" -f pkcs12 -p secret
In the request, please note:
- the empty
UniqueIdentifierwhich requests the server to generate a newUniqueIdentifierfor the imported private key. The server will also generate unique identifiers for the certificate and the intermediate certificate but the latter are not returned in the response. To recover these identifiers, use theGet Attributesoperation on the private key and then on the certificate. - the tag
["MyPKCS12"]in hex. - the
KeyFormatTypeset toPKCS12which indicates to the server that the key is in PKCS#12 format. - the
KeyMaterialwhich are the hex-encoded DER bytes of the PKCS#12 structure. - the
LinkTypeset toPKCS12PasswordLinkwhich indicates to the server that the password is in theLinkedObjectIdentifierfield.
{
"tag": "Import",
"type": "Structure",
"value": [
{
"tag": "UniqueIdentifier",
"type": "TextString",
"value": ""
},
{
"tag": "ObjectType",
"type": "Enumeration",
"value": "PrivateKey"
},
{
"tag": "ReplaceExisting",
"type": "Boolean",
"value": false
},
{
"tag": "Attributes",
"type": "Structure",
"value": [
{
"tag": "Link",
"type": "Structure",
"value": [
{
"tag": "Link",
"type": "Structure",
"value": [
{
"tag": "LinkType",
"type": "Enumeration",
"value": "PKCS12PasswordLink"
},
{
"tag": "LinkedObjectIdentifier",
"type": "TextString",
"value": "secret"
}
]
}
]
},
{
"tag": "VendorAttributes",
"type": "Structure",
"value": [
{
"tag": "VendorAttributes",
"type": "Structure",
"value": [
{
"tag": "VendorIdentification",
"type": "TextString",
"value": "cosmian"
},
{
"tag": "AttributeName",
"type": "TextString",
"value": "tag"
},
{
"tag": "AttributeValue",
"type": "ByteString",
"value": "5B224D79504B43533132225D"
}
]
}
]
}
]
},
{
"tag": "Object",
"type": "Structure",
"value": [
{
"tag": "KeyBlock",
"type": "Structure",
"value": [
{
"tag": "KeyFormatType",
"type": "Enumeration",
"value": "PKCS12"
},
{
"tag": "KeyValue",
"type": "Structure",
"value": [
{
"tag": "KeyMaterial",
"type": "ByteString",
"value": "308204660201033082042C06092A864886F70D010701A082041D04820419308204153082036706092A864886F70D010706A0820358308203540201003082034D06092A864886F70D010701301C060A2A864886F70D010C0106300E04082A727ACADC7F30FE0202080080820320C807EF330DE2F0D9B5E4B47E457DBCAE52DB41BB85E627645E9C60B51FB4FD148D2DC1C262F64212DFFB07ED5D741E8CD4AED9F684AA20A1AA8CBA372437A5183967E0EA69F7417AE5AF6B18D45864A6508B95DA6302F3892A4FB68BB29580DCC70EE91AB124D029E029E60C04CA8E1037D741E865C7968AD77BB350CE5D91F7482410E8AB3579E3C3D12530B4F402A010BB10E4C33D50ADA3FE2D8105AF8B489D5F446C976F913C48F7232A3448D79B8E6BCE2B2AE72369713017077F6732CCE794A1EFD46F59C3CB5F03978B7DF613FA2B7E9C872967C92F059A857BA935C8A235235A29E65789ADB84B7F907F2B01B11E1EEF69967A187831C6DCA81C3B4140BC20421BCAA0114FD6F2692FDDBD8569D1DE14B6D1A58C85D15F2C9FF7C1A00FE77B10D1278ED6E9AF358E7D169724A0420D4D93ACBB531AD58EA95E65A31F95063BB1C6ED080D16EA85F0E041215BF5FC3FA7C301C8CFCC73BADF46DE1E7AD7AA599ECFCE60D12474A93CBB8E869A65822466DBA2E892617C7D1626EEEED90586B70C9354DF4F5451E4E14BE38D4E7893D7F118255E9F9CBDCF290E6AEA97EBA4599587FC9BD652F346E47A697FD7F497ABB7EE1B1D53A5A10ADD99AC3F635CBE440B8D34C20FF6CEB7D8F1FF4FF4A8F0BF3158B901A42631BFC8C11E0E607344BEE46BAAFAB049FA9AD3F8752AFF90ED26102DE1D905FD389E530F34534FD206B691A82C4E1B6BD180F2F2AE0C0FF7FC943B608A247EC5C49FAB7419222C17638AEA5B5DC225CD898CC6EDD7B98E6FF73CFE9C94795B7BAE7F53DE1BC0FA2C875F75D056B01A341358283294FBE6F5E76B0E03BDC7E497F69E31FC91895940CB654E5A0F669F58C820A2486BC35FA0BC17AF93959E9CD4CAAA0E1141E7E7A12B80F409D2B8B2E36B0E6637189A4180CE6E135702C4C6AB16FB96228FFE58AC92842845FA8A73B48571FFCCC3F7C513B94B72E69C115AC22D7891EE1A5518032C4661654486DC0F2808CEC195E80A0BA6501F0C6E1A454C5A6CD17137F10226EEB9182D7B848AAE0C5FF19FC5ED8EF1E19B45ECA1CAA45BDC7B913BEBB38D4F3B35BE8F5A70A9F58DFEEEBB68BDF83844DE4FE00CDA4745EF2194FF417D943081A706092A864886F70D010701A08199048196308193308190060B2A864886F70D010C0A0102A05A3058301C060A2A864886F70D010C0103300E04086CA064C6D55C2211020208000438FF5E786E0DB3C6D85C358321EF8E5BB0E8A057ACFC33E52281897F152239736B1F2DB061D712E8A83747A767C168737A515EFE1BE7EDAE3E3125302306092A864886F70D0109153116041460854FAEF5E61527293E6551F170EF7145957FC430313021300906052B0E03021A050004149CF1C7AF502B81AB981D5786E4800099B9D37D960408B970C0A9A2BDB46102020800"
}
]
}
]
}
]
}
]
}
Example - A X509 Certificate
Importing a X509 certificate. The certificate must be imported an X509, DER encoded.
Corresponding KMS CLI command:
ckms certificates import --tag "MyImportedCert" cra../kms_clients/test_data/certificates/ca.crt -f pem
The conversion from PEM to DER is done by the CLI.
In the JSON TTLV request, please note:
- the empty
UniqueIdentifierwhich requests the server to generate a newUniqueIdentifierfor the imported certificate. - the tag
["MyImportedCert"]in hex. - the
ObjectTypeset toCertificatewhich indicates to the server that the key is in X509 format.
{
"tag": "Import",
"type": "Structure",
"value": [
{
"tag": "UniqueIdentifier",
"type": "TextString",
"value": ""
},
{
"tag": "ObjectType",
"type": "Enumeration",
"value": "Certificate"
},
{
"tag": "ReplaceExisting",
"type": "Boolean",
"value": false
},
{
"tag": "Attributes",
"type": "Structure",
"value": [
{
"tag": "VendorAttributes",
"type": "Structure",
"value": [
{
"tag": "VendorAttributes",
"type": "Structure",
"value": [
{
"tag": "VendorIdentification",
"type": "TextString",
"value": "cosmian"
},
{
"tag": "AttributeName",
"type": "TextString",
"value": "tag"
},
{
"tag": "AttributeValue",
"type": "ByteString",
"value": "5B224D79496D706F7274656443657274225D"
}
]
}
]
}
]
},
{
"tag": "Object",
"type": "Structure",
"value": [
{
"tag": "CertificateType",
"type": "Enumeration",
"value": "X509"
},
{
"tag": "CertificateValue",
"type": "ByteString",
"value": "3082033030820218020900C03CBFDC0BD87789300D06092A864886F70D01010B0500305A310B3009060355040613024652310C300A06035504080C03496446310E300C06035504070C0550617269733111300F060355040A0C0841636D6554657374311A301806035504030C1141636D65205465737420526F6F74204341301E170D3233303531393135323934355A170D3333303531363135323934355A305A310B3009060355040613024652310C300A06035504080C03496446310E300C06035504070C0550617269733111300F060355040A0C0841636D6554657374311A301806035504030C1141636D65205465737420526F6F7420434130820122300D06092A864886F70D01010105000382010F003082010A0282010100D61FF874D90172D96968F8DEA453A9D2ACD29886EAC934A18ED1172136FFE284EA702B14FA3BD2900782BCE489A6CF2FC8063F1C8BC13C52F92A3B72B44A343786B1A1DC7A3C49CA1EB24AAFF809F5AE3BB64120553B9B40E2E104966C9C8C0CF2DEBDA167FA804BDB1FBC66CDA82052F9918771FDE318D74E4894D51B808A06A10330C3E985EC2B0067C60F955AD74D64FD4667ABA76D9DC17F681B36391698BF2A3303665C19E2C20A9CADD174A49FD236E89E7541F3AACDC8453ECE094D1C886761A39CBBF809F5F27396E1C9CF431280C07670E87A3BCC9ED6C38037F53E5E006FE2D952D48D9B57D765061A5F8C2CA30CCE394DD2ED88EB6856623239190203010001300D06092A864886F70D01010B05000382010100C48C6AC67FD80062816E065637B64B17D8821299A8718CF04E7D3998C761E72C3030F27DD3C955754BFE25F3D750D15C6ABFFC887FD63B27A1C345B8F9C78BA886196866C49180C3BA37BF20D918B0EAD6051C1AEAB3C98798C43580AA10E7909F7F7F122E9349CC74FE6EFCF947C761945C3BABF68973773CC7B36FBF346D4D4286BB88BB45FA5388870F58BD192F6ED6B8541C269C7F4D77D62DE860E981CDB6D5E99579164C048C80898BF6B53E731AB97997FF48DA5FC8BB6357574CDB58BE6922ECA9CD644E7442177B66032665D186A9F6027ECF6295235922EF045285D9118182E12D608EAA21E5879B08B3BCA894D10E947625058B90796FC7FCDD57"
}
]
}
]
}
Locate
Specification
This operation requests that the server search for one or more Managed Objects, depending on the attributes specified in the request. All attributes are allowed to be used. The request MAY contain a Maximum Items field, which specifies the maximum number of objects to be returned. If the Maximum Items field is omitted, then the server MAY return all objects matched or MAY impose an internal maximum limit due to resource limitations.
The request MAY contain an Offset Items field, which specifies the number of objects to skip that satisfy the identification criteria specified in the request. An Offset Items field of 0 is the same as omitting the Offset Items field. If both Offset Items and Maximum Items are specified in the request, the server skips Offset Items objects and returns up to Maximum Items objects.
If more than one object satisfies the identification criteria specified in the request, then the response MAY contain Unique Identifiers for multiple Managed Objects. Responses containing Unique Identifiers for multiple objects SHALL be returned in descending order of object creation (most recently created object first). Returned objects SHALL match all of the attributes in the request. If no objects match, then an empty response payload is returned. If no attribute is specified in the request, any object SHALL be deemed to match the Locate request. The response MAY include Located Items which is the count of all objects that satisfy the identification criteria.
The server returns a list of Unique Identifiers of the found objects, which then MAY be retrieved using the Get operation. If the objects are archived, then the Recover and Get operations are REQUIRED to be used to obtain those objects. If a single Unique Identifier is returned to the client, then the server SHALL copy the Unique Identifier returned by this operation into the ID Placeholder variable. If the Locate operation matches more than one object, and the Maximum Items value is omitted in the request, or is set to a value larger than one, then the server SHALL empty the ID Placeholder, causing any subsequent operations that are batched with the Locate, and which do not specify a Unique Identifier explicitly, to fail. This ensures that these batched operations SHALL proceed only if a single object is returned by Locate.
The Date attributes in the Locate request (e.g., Initial Date, Activation Date, etc.) are used to specify a time or a time range for the search. If a single instance of a given Date attribute is used in the request (e.g., the Activation Date), then objects with the same Date attribute are considered to be matching candidate objects. If two instances of the same Date attribute are used (i.e., with two different values specifying a range), then objects for which the Date attribute is inside or at a limit of the range are considered to be matching candidate objects. If a Date attribute is set to its largest possible value, then it is equivalent to an undefined attribute.
When the Cryptographic Usage Mask attribute is specified in the request, candidate objects are compared against this field via an operation that consists of a logical AND of the requested mask with the mask in the candidate object, and then a comparison of the resulting value with the requested mask. For example, if the request contains a mask value of 10001100010000, and a candidate object mask contains 10000100010000, then the logical AND of the two masks is 10000100010000, which is compared against the mask value in the request (10001100010000) and the match fails. This means that a matching candidate object has all of the bits set in its mask that are set in the requested mask, but MAY have additional bits set.
When the Usage Limits attribute is specified in the request, matching candidate objects SHALL have a Usage Limits Count and Usage Limits Total equal to or larger than the values specified in the request.
When an attribute that is defined as a structure is specified, all of the structure fields are not REQUIRED to be specified. For instance, for the Link attribute, if the Linked Object Identifier value is specified without the Link Type value, then matching candidate objects have the Linked Object Identifier as specified, irrespective of their Link Type.
When the Object Group attribute and the Object Group Member flag are specified in the request, and the value specified
for Object Group Member is Group Member Fresh, matching candidate objects SHALL be fresh objects from the object
group. If there are no more fresh objects in the group, the server MAY choose to generate a new object on-the-fly, based
on server policy. If the value specified for Object Group Member is Group Member Default, the server locates the
default object as defined by server policy.
The Storage Status Mask field is used to indicate whether on-line objects (not archived or destroyed), archived objects, destroyed objects or any combination of the above are to be searched.The server SHALL NOT return unique identifiers for objects that are destroyed unless the Storage Status Mask field includes the Destroyed Storage indicator. The server SHALL NOT return unique identifiers for objects that are archived unless the Storage Status Mask field includes the Archived Storage indicator.
Implementation
Locate allows finding objects:
- by their tags (see tagging)
- by their
Cryptographic Algorithm. Some supported values are:AES,RSA,ECDSA,ECDH,EC,ChaCha20,Poly1305,ChaCha20Poly1305,Ed25519,Ed448,CoverCrypt - by their
Key Format Type. Some supported values are:Raw,Opaque,PKCS1,PKCS8,X509,ECPrivateKey,TransparentSymmetricKey,TransparentRSAPrivateKey,TransparentRSAPublicKey,TransparentECPrivateKey,TransparentECPublicKey,PKCS12,CoverCryptSecretKey,CoverCryptPublicKey - by their links to other objects:
- a public key (
Public Key Link) - a private key (
Private Key Link) - a certificate (
Certificate Link)
- a public key (
- for certificates:
- by subject common name
- by certificate spki
Example - Symmetric Keys using the _kk tag
All symmetric keys are tagged with the system tag _kk.
Multiple tags can be used locate objects; a JSON array of tags is used to specify multiple tags which is then
serialized to hex.
{
"tag": "Locate",
"type": "Structure",
"value": [
{
"tag": "Attributes",
"type": "Structure",
"value": [
{
"tag": "Attribute",
"type": "Structure",
"value": [
{
"tag": "VendorIdentification",
"type": "TextString",
"value": "cosmian"
},
{
"tag": "AttributeName",
"type": "TextString",
"value": "tag"
},
{
"tag": "AttributeValue",
"type": "TextString",
"value": "[\"_kk\"]"
}
]
}
]
}
]
}
Mac
Specification
This operation requests the server to perform a Message Authentication Code (MAC) operation on provided data using a specified MAC key and algorithm. The operation can be performed in a single request or as a series of requests for long data streams or by-parts cryptographic operations.
The response contains the MAC value or correlation value for streamed operations.
When a stream or by-parts operation is requested:
- The server SHALL create a unique identifier, called correlation value if Init Indicator is True.
- The server SHALL expect one or more requests with the same correlation value if Init Indicator is True.
- The server SHALL return the Correlation Value in the response if Init Indicator is True.
- The server SHALL use the Correlation Value for subsequent MAC requests.
- The server SHALL close the stream or by-parts operation when Final Indicator is True.
Implementation
The Eviden KMS server supports the following MAC algorithms:
- HMAC-SHA-1 (NIST SP 800-131A Rev. 2 — Acceptable)
- HMAC-SHA-224 (NIST SP 800-131A Rev. 2 — Acceptable)
- HMAC-SHA-256
- HMAC-SHA-384
- HMAC-SHA-512
For the complete list of supported MAC algorithms, please check the algorithms page.
Example - Simple MAC
Computing MAC with SHA3-512 using a MAC key.
Corresponding KMS CLI command:
ckms mac --mac-key-id 027cced1-ff2b-4bd3-a200-db1041583bdc --algorithm sha3-512 --data 0011223344556677889900
{
"tag": "Mac",
"type": "Structure",
"value": [
{
"tag": "UniqueIdentifier",
"type": "TextString",
"value": "027cced1-ff2b-4bd3-a200-db1041583bdc"
},
{
"tag": "CryptographicParameters",
"type": "Structure",
"value": [
{
"tag": "HashingAlgorithm",
"type": "Enumeration",
"value": "SHA3512"
}
]
},
{
"tag": "Data",
"type": "ByteString",
"value": "0011223344556677889900"
}
]
}
Example - Stream MAC
Computing MAC for a large file in multiple parts using SHA3-512.
Corresponding KMS CLI commands:
# First part with init indicator
ckms mac --mac-key-id 027cced1-ff2b-4bd3-a200-db1041583bdc --algorithm sha3-512 --data 0011223344556677889900 -i
# Middle part using correlation value
ckms mac --mac-key-id 027cced1-ff2b-4bd3-a200-db1041583bdc --algorithm sha3-512 --correlation-value F91DDB96D12CF8FAB0AA72224836D3F5F659A6634E3508A7C31DBC3727D2030254C57AD90AA5FB7F27FB3AAFABEAEB1204E4AF62BA2DE44E33E761B2C39DBACA --data 0011223344556677889900
# Final part with final indicator
ckms mac --mac-key-id 027cced1-ff2b-4bd3-a200-db1041583bdc --algorithm sha3-512 --correlation-value 51A2F7FCA8DECFC106031BE935F28F6EEE7E3850BCDB9D9B41B0F623146D7F51E399FC8F76A8B14EB71463DB0F6D421EF431E33F8CE1897FF988237C890C808F -f --data 0011223344556677889900
{
"tag": "Mac",
"type": "Structure",
"value": [
{
"tag": "UniqueIdentifier",
"type": "TextString",
"value": "027cced1-ff2b-4bd3-a200-db1041583bdc"
},
{
"tag": "CryptographicParameters",
"type": "Structure",
"value": [
{
"tag": "HashingAlgorithm",
"type": "Enumeration",
"value": "SHA3512"
}
]
},
{
"tag": "Data",
"type": "ByteString",
"value": "0011223344556677889900"
},
{
"tag": "InitIndicator",
"type": "Boolean",
"value": true
}
]
}
Re-Key
Specification
This request is used to generate a replacement key for an existing symmetric key. It is analogous to the Create operation, except that attributes of the replacement key are copied from the existing key, with the exception of the attributes listed in Re-key Attribute Requirements.
As the replacement key takes over the name attribute of the existing key, Re-key SHOULD only be performed once on a given key.
The server SHALL copy the Unique Identifier of the replacement key returned by this operation into the ID Placeholder variable.
For the existing key, the server SHALL create a Link attribute of Link Type Replacement Object pointing to the replacement key. For the replacement key, the server SHALL create a Link attribute of Link Type Replaced Key pointing to the existing key.
An Offset MAY be used to indicate the difference between the Initial Date and the Activation Date of the replacement key. If no Offset is specified, the Activation Date, Process Start Date, Protect Stop Date and Deactivation Date values are copied from the existing key. If Offset is set and dates exist for the existing key, then the dates of the replacement key SHALL be set based on the dates of the existing key as follows.
Implementation
The Re-Key Operation refreshes Symmetric keys.
Example - Refresh a Symmetric Key
Corresponding KMS CLI command:
ckms sym keys re-key -k 64c60363-6660-4fd4-9f30-c965a0f72fc3
{
"tag": "ReKey",
"type": "Structure",
"value": [
{
"tag": "UniqueIdentifier",
"type": "TextString",
"value": "64c60363-6660-4fd4-9f30-c965a0f72fc3"
}
]
}
Re-Key Key Pair
Specification
This request is used to generate a replacement key pair for an existing public/private key pair. It is analogous to the Create Key Pair operation, except that attributes of the replacement key pair are copied from the existing key pair, with the exception of the attributes listed in Re-key Key Pair Attribute Requirements tor.
As the replacement of the key pair takes over the name attribute for the existing public/private key pair, Re-key Key Pair SHOULD only be performed once on a given key pair.
For both the existing public key and private key, the server SHALL create a Link attribute of Link Type Replacement Key pointing to the replacement public and private key, respectively. For both the replacement public and private key, the server SHALL create a Link attribute of Link Type Replaced Key pointing to the existing public and private key, respectively.
The server SHALL copy the Private Key Unique Identifier of the replacement private key returned by this operation into the ID Placeholder variable.
An Offset MAY be used to indicate the difference between the Initial Date and the Activation Date of the replacement key pair. If no Offset is specified, the Activation Date and Deactivation Date values are copied from the existing key pair. If Offset is set and dates exist for the existing key pair, then the dates of the replacement key pair SHALL be set based on the dates of the existing key pair as follows
Implementation
The Re-Key Key Pair Operation is the main mechanism to rotate Covercrypt attributes on the Eviden KMS Server. By
updating, through this operation, the Policy held by a master secret key in it Vendor Attributes, the Eviden KMS Server
will automatically
- update the Policy held by the Master Public Key
- and re-key all non revoked User Decryption Keys holding the rotated policy attributes in a way that they will now be able to decrypt cipher texts encrypted with attributes before and after the rotation.
The operation has currently no other usages on the Eviden server.
Example - Rotate the Security Level::Confidential attribute
Corresponding KMS CLI command:
ckms cc keys rekey -k b652a48a-a48c-4dc1-bd7e-cf0e5126b7b9 "Security Level::Confidential"
Using a JSON TTLV request to rotate the Security Level::Confidential attribute on a master secret key, construct a JSON object containing
an array of the attributes that must be rotated:
{
"RotateAttributes":
[
"Security Level::Confidential"
]
}
Then hex encode the JSON and add it as a VendorAttribute with name cover_crypt_policy_edit_action to the Re-Key Key Pair request.
The Private Key Unique Identifier of the Master Secret Key must be passed in the request.
{
"tag": "ReKeyKeyPair",
"type": "Structure",
"value": [
{
"tag": "PrivateKeyUniqueIdentifier",
"type": "TextString",
"value": "b652a48a-a48c-4dc1-bd7e-cf0e5126b7b9"
},
{
"tag": "PrivateKeyAttributes",
"type": "Structure",
"value": [
{
"tag": "CryptographicAlgorithm",
"type": "Enumeration",
"value": "CoverCrypt"
},
{
"tag": "KeyFormatType",
"type": "Enumeration",
"value": "CoverCryptSecretKey"
},
{
"tag": "ObjectType",
"type": "Enumeration",
"value": "PrivateKey"
},
{
"tag": "VendorAttributes",
"type": "Structure",
"value": [
{
"tag": "VendorAttributes",
"type": "Structure",
"value": [
{
"tag": "VendorIdentification",
"type": "TextString",
"value": "cosmian"
},
{
"tag": "AttributeName",
"type": "TextString",
"value": "cover_crypt_policy_edit_action"
},
{
"tag": "AttributeValue",
"type": "ByteString",
"value": "7B22526F7461746541747472696275746573223A5B225365637572697479204C6576656C3A3A436F6E666964656E7469616C225D7D"
}
]
}
]
}
]
}
]
}
Re-Certify
Specification
This request is used to generate a replacement certificate for an existing X.509 certificate. It is analogous to the Certify operation, except that the source is an already-issued certificate rather than a public key or CSR.
The server creates a new certificate with a fresh Unique Identifier, copies the subject public key and the requested validity period from the existing certificate, and re-signs it using the specified (or inherited) issuer key.
[KMIP 2.1], §6.1.6, "Certify" — "This request supports the certification of a new public key, as well as the certification of a public key that has already been certified (i.e., certificate update)."
The dedicated
ReCertifyoperation tag (distinct fromCertify) creates the replacement certificate as a new managed object with a new UID, and wires bidirectionalReplacementObjectLink/ReplacedObjectLinkattributes between old and new certificates.
Server behaviour:
- A new Certificate object is created with a fresh Unique Identifier.
- The new certificate is issued with the requested
Offset(activation delay) andNumberOfDaysvalidity, or the issuer's defaults if omitted. ReplacementObjectLinkis added to the old certificate pointing to the new UID.ReplacedObjectLinkis added to the new certificate pointing back to the old UID.- The new certificate enters Active state (or Pre-Active if
Offset > 0). - The old certificate is not automatically deactivated — its state remains
unchanged. Call
Revokeexplicitly to deactivate it when ready.
Request Payload
| Item | Required | Description |
|---|---|---|
UniqueIdentifier | No | UID of the existing certificate to re-certify. Defaults to the ID Placeholder if omitted. |
CertificateRequestType | No | Type of an optional accompanying certificate request (e.g., PKCS10). |
CertificateRequestValue | No | Raw certificate request bytes (PEM or DER). Overrides the subject information from the old cert. |
Offset | No | Seconds between Initial Date and the new certificate's Activation Date. 0 → Active immediately; > 0 → Pre-Active. |
Attributes | No | Desired attributes for the new certificate (e.g., issuer private key ID, issuer certificate ID, number of days). |
ProtectionStorageMasks | No | Permissible protection storage mask selections for the new object. |
Response Payload
| Item | Description |
|---|---|
UniqueIdentifier | The Unique Identifier of the newly created replacement certificate. |
Implementation
The ReCertify operation rotates an X.509 certificate. It is the certificate
equivalent of Re-Key for symmetric keys and Re-Key Key Pair for asymmetric
key pairs.
Key differences vs. Certify with certificate-id-to-re-certify:
| Aspect | ReCertify operation | Certify with existing cert UID |
|---|---|---|
| New UID | Always fresh | Optionally same as old |
| Object links | Bidirectional (old ↔ new) | Not set automatically |
| Old cert deactivation | Manual (call Revoke) | Manual (call Revoke) |
| KMIP operation tag | ReCertify | Certify |
CLI command:
ckms certificates certify \
--certificate-id-to-re-certify <OLD_CERT_UID> \
--issuer-private-key-id <ISSUER_SK_UID> \
--issuer-certificate-id <ISSUER_CERT_UID> \
--number-of-days 365
Example — Re-certify a self-signed certificate
{
"tag": "ReCertify",
"value": [
{
"tag": "UniqueIdentifier",
"type": "TextString",
"value": "c3d4e5f6-0000-0000-0000-aabbccddeeff"
}
]
}
Example — Re-certify with a future activation date (Offset)
An Offset of 86400 (24 h) produces a Pre-Active certificate whose
Activation Date is set to Initial Date + 86400 s, allowing a zero-downtime
switchover by pre-staging the replacement before the old one expires.
{
"tag": "ReCertify",
"value": [
{
"tag": "UniqueIdentifier",
"type": "TextString",
"value": "c3d4e5f6-0000-0000-0000-aabbccddeeff"
},
{
"tag": "Offset",
"type": "Interval",
"value": 86400
}
]
}
KMIP link chain after re-certification
flowchart LR
C0["Cert₀ (old)<br/>Active"] -->|ReplacementObjectLink| C1["Cert₁ (new)<br/>Active"]
C1 -->|ReplacedObjectLink| C0
The old certificate remains Active until explicitly revoked. To complete the
rotation:
# Revoke the old certificate when no longer needed
ckms certificates revoke --certificate-id <OLD_CERT_UID> \
--revocation-reason "Superseded"
Key Rotation
Eviden KMS supports manual key rotation for all key types through the standard KMIP operations:
| KMIP operation | Applies to | CLI command |
|---|---|---|
Re-Key | Symmetric keys, secret data | ckms sym keys rekey |
Re-Key Key Pair | Asymmetric key pairs (RSA, EC, PQC, …) | ckms {rsa,ec,pqc} keys rekey |
ReCertify | X.509 certificates | ckms certificates certify --certificate-id-to-re-certify |
On every rotation the server:
- Generates a new cryptographic object (or new certificate) under a fresh UID.
- Sets a
ReplacementObjectLinkon the old object pointing to the new UID. - Sets a
ReplacedObjectLinkon the new object pointing back to the old UID. - Transitions the old key to Deactivated (KMIP §4.57, transition 6 — see below).
- Increments
x-rotate-generationand recordsx-rotate-dateon the new object.
Auto-rotation (scheduler-driven, policy-based) is covered separately in Auto-Rotation Policy. HSM key rotation is covered in HSM Key Rotation.
State restrictions
Only objects in the following states can be the source of a rotation:
| State | Rotation allowed? | Rationale |
|---|---|---|
| Active | ✅ | Primary valid source state. |
| Deactivated | ✅ | KMIP §6.1.46 permits it; a replacement key should still be issued. |
| Compromised | ✅ | Rotating a compromised key is the recommended incident response. |
| Pre-Active | ❌ | Key material was never activated — rotating unused material is premature. |
| Destroyed | ❌ | Object no longer exists. |
| Destroyed_Compromised | ❌ | Object no longer exists. |
This restriction applies to the source key only. The output of a rotation can enter
Pre-Activeif the request includes anOffset > 0(the new key's Activation Date is set toInitial Date + Offset).
Old key Deactivated after rotation
Why deactivation is enforced
A key in the Deactivated state SHALL NOT be used for applying cryptographic protection (encryption, signing, wrapping, MACing, deriving). It MAY still be used to process already-protected data (decryption, signature verification, unwrapping). This asymmetry is the key principle behind post-rotation key handling:
- Limit blast radius. If the old key material is compromised after rotation, no new data was ever encrypted with it — the damage is bounded.
- Enforce the cryptoperiod. NIST SP800-57-1 defines a cryptoperiod as the span during which a key is authorised to protect data. Key rotation ends that period; the Deactivated state makes the boundary enforceable by the server.
- Preserve backward compatibility. Consumers holding ciphertexts produced before rotation must still be able to decrypt. Deactivated keeps the key accessible for decryption without allowing it to encrypt new data.
How KMIP §4.57 mandates it
KMIP §4.57 defines the State attribute and lists the only legal state
transitions. Transition 6 governs Active → Deactivated and states that it
SHALL occur in one of three ways:
- The object's Deactivation Date is reached.
- A client issues a Revoke operation with a non-Compromised reason.
- A client Modify Attribute sets the Deactivation Date to now or the past.
Re-Key / Re-Key Key Pair are not listed as a direct cause of transition 6.
The spec mandates deactivation indirectly through path 1: the KMIP §4.33
Deactivation Date attribute rules list Re-key and Re-key Key Pair under
"When implicitly set", meaning the server MUST set the Deactivation Date on
the old key as part of the rotation operation. Because that date is set to
now (or already passed), the condition "Deactivation Date is reached"
immediately triggers transition 6.
In short: the spec does not have a direct Re-Key → Deactivated transition, but
it mandates deactivation by requiring the server to set the Deactivation Date
during Re-Key, which then fires transition 6 automatically.
Consequences
- The old key can no longer be used for Encrypt or Sign operations
(those require
Activestate). - The old key remains available for Decrypt and Verify (processing
operations accept
Active,Deactivated, andCompromisedstates per KMIP §3.31), so in-flight ciphertexts continue to decrypt. - You can call
Revokeon an already-Deactivated key; the call succeeds as a no-op (the state is already revoked). - You can call
Destroyon a Deactivated key directly — no priorRevokeis required.
Keysets
A keyset is a named group of related key generations. Each generation is
a distinct cryptographic key (different material, different UID) produced by
successive Re-Key operations.
Creating a SQL key in a keyset
For SQL-backed keys the key's UID must equal the keyset name from the
start. Supply both UniqueIdentifier and x-rotate-name in the same Create
request:
# Create a key whose UID is the keyset name
ckms sym keys create --key-id my-keyset --algorithm aes --length 256
ckms sym keys set-rotation-policy --key-id my-keyset --name my-keyset
Attempting set-rotation-policy --name X on a SQL key whose UID is not X
is rejected:
Invalid Request: SetAttribute: rotate_name ('X') must equal the key's UID — create the key with the keyset name as its ID
SQL keyset UID scheme
UIDs are assigned deterministically at each generation:
my-keyset ← gen 0 (UID equals the keyset name)
my-keyset@1 ← gen 1 (after first Re-Key)
my-keyset@2 ← gen 2 (after second Re-Key)
The Re-Key response always returns the new key's real UID (e.g. my-keyset@1).
Addressing syntax
A keyset can be referenced by name wherever a UniqueIdentifier is accepted
(Encrypt, Decrypt, Get, Re-Key, …):
| Syntax | Resolves to |
|---|---|
my-keyset | Latest generation (bare name = @latest) |
my-keyset@latest | Latest generation (explicit alias) |
my-keyset@first | Generation 0 |
my-keyset@0 | Generation 0 (numeric alias for @first) |
my-keyset@N | Generation N |
Encrypt / Sign always resolves to the latest generation.
Decrypt / Verify walks the chain newest-to-oldest until one generation succeeds, allowing ciphertexts encrypted with an older (now Deactivated) key to continue to decrypt after rotation.
@latestis a virtual alias. It is never stored in the database and is never returned in a response.my-keyset(bare name) also resolves to the latest generation even thoughmy-keysetis the literal UID of gen-0. To access gen-0 explicitly, usemy-keyset@0ormy-keyset@first.
Non-latest guard
Only the latest generation of a keyset can be rotated via Re-Key.
Attempting to rotate a retired member is rejected:
Invalid Request: ReKey: key '<uid>' is not the latest in its keyset —
only the latest generation can be rotated
Use my-keyset@0 (explicit generation) rather than my-keyset (bare name)
to target an older generation — and expect that call to fail.
Keyset internals (SQL)
Keyset state is stored as KMIP vendor attributes in the database:
| Attribute | Type | Meaning |
|---|---|---|
x-rotate-name | string | Keyset name; equals the key UID for gen-0. |
x-rotate-generation | i32 | 0 for gen-0, incremented on each Re-Key. |
x-rotate-latest | bool | true on the current key; false on older keys. |
KMIP link attributes mirror the chain for protocol compliance:
ReplacementObjectLink (old → new) and ReplacedObjectLink (new → old).
Keyset chain traversal for Decrypt / Verify uses
x-rotate-generation (sorted descending), not the link back-pointers.
Rotation flows by key type
1. Plain symmetric key
A plain symmetric key carries only its own policy.
What happens:
- Fresh key material is generated (same algorithm and length).
- The new key gets a new UID (
my-keyset@Nfor keyset keys, fresh UUID otherwise). ReplacedObjectLinkon the new key → old key.ReplacementObjectLinkon the old key → new key.- Old key → Deactivated.
KMIP link chain after two rotations:
flowchart LR
K0["Key₀ (gen 0)<br/>Deactivated"] -->|ReplacementObjectLink| K1["Key₁ (gen 1)<br/>Deactivated"]
K1 -->|ReplacementObjectLink| K2["Key₂ (gen 2)<br/>Active"]
K2 -->|ReplacedObjectLink| K1
K1 -->|ReplacedObjectLink| K0
CLI:
# Manual rotation of a SQL keyset key
ckms sym keys rekey --key-id my-keyset
# Response: new UID = my-keyset@1
# Manual rotation of a plain UUID key
ckms sym keys rekey --key-id <KEY_UID>
2. Wrapping key
A wrapping key is referenced by one or more wrapped keys via a
WrappingKeyLink attribute. Rotating a wrapping key re-wraps all its
dependants atomically.
What happens:
- A new wrapping key is created and committed to the database (Phase 1).
- Every key owned by the same user whose
WrappingKeyLinkpoints to the old wrapping key is fetched — regardless of its state (Active, Deactivated, Pre-Active, Compromised, …) — unwrapped in memory (plaintext never stored), and re-wrapped with the new wrapping key (Phase 2). - Each wrapped key's
WrappingKeyLinkis updated to the new wrapping key UID. - Standard rotation metadata is applied; old wrapping key → Deactivated.
No state filter on dependants. The server queries all keys with a
wrapping_key_idmatching the rotated key, with no restriction on their lifecycle state. Only the owner check applies: dependants owned by a different user are skipped (with a warning logged).
sequenceDiagram
participant Client
participant KMS
participant DB
Client->>KMS: Re-Key(wrapping_key_uid)
KMS->>DB: Phase 1 — create new wrapping key (committed)
loop For each wrapped dependant
KMS->>DB: retrieve wrapped key
KMS->>KMS: unwrap with old wrapping key
KMS->>KMS: re-wrap with new wrapping key
KMS->>DB: update WrappingKeyLink → new wrapping key UID
end
KMS->>DB: Phase 2 — retire old wrapping key (Deactivated, links set)
KMS-->>Client: Re-KeyResponse(new_wrapping_key_uid)
3. Wrapped key
A wrapped key stores its key material encrypted under a wrapping key.
What happens:
- The wrapped key is exported and unwrapped in memory using the current wrapping key (plaintext never stored).
- Fresh plaintext key material is generated from the unwrapped attributes.
- The new material is re-wrapped with the same wrapping key.
- The new ciphertext is stored under a new UID with an active
WrappingKeyLink. - Standard rotation metadata is applied; old wrapped key → Deactivated.
sequenceDiagram
participant Client
participant KMS
participant DB
Client->>KMS: Re-Key(wrapped_key_uid)
KMS->>DB: retrieve wrapped key + wrapping key
Note over KMS: unwrap in-memory (plaintext never stored)
KMS->>KMS: generate new key material
KMS->>KMS: re-wrap with same wrapping key
KMS->>DB: store new wrapped key (new UID, same WrappingKeyLink)
KMS->>DB: retire old key (Deactivated, ReplacementObjectLink → new key)
KMS-->>Client: Re-KeyResponse(new_key_uid)
4. Asymmetric key pair
Re-Key Key Pair targets the private key UID. The server resolves the
associated public key via the PublicKeyLink attribute.
What happens:
- A new private key + public key pair is generated (same algorithm).
- Both receive new UIDs; the new private key carries a
PublicKeyLinkto the new public key. - Standard
ReplacementObjectLink/ReplacedObjectLinklinks are set on both pairs. - Old private key and old public key → Deactivated.
sequenceDiagram
participant Client
participant KMS
participant DB
Client->>KMS: Re-Key Key Pair(private_key_uid)
KMS->>DB: retrieve private key
KMS->>DB: retrieve linked public key (PublicKeyLink)
KMS->>KMS: generate new key pair (same algorithm)
KMS->>DB: Phase 1 — store new private key + new public key
KMS->>DB: Phase 2 — retire old private key + public key (Deactivated, links)
KMS-->>Client: Re-Key Key PairResponse(new_sk_uid, new_pk_uid)
CLI:
# EC key pair
ckms ec keys rekey --key-id <PRIVATE_KEY_UID>
# RSA key pair
ckms rsa keys rekey --key-id <PRIVATE_KEY_UID>
# Post-quantum (ML-KEM, ML-DSA, SLH-DSA)
ckms pqc keys rekey --key-id <PRIVATE_KEY_UID>
5. Wrapped private key (Covercrypt)
A Covercrypt master private key follows the same Re-Key Key Pair flow. The
wrapped key is unwrapped in memory, the Covercrypt partition attributes are
re-keyed, and the new wrapped private key is stored under a fresh UID.
Setting a rotation policy on a wrapped private key always works: the
x-rotate-*attributes are stored in the metadata column (not inside the ciphertext block) and do not require the key to be unwrapped first.
6. Certificate renewal (ReCertify)
Certificate renewal creates a new certificate for the same key pair — no new key material is generated.
What happens:
- The existing certificate is retrieved and its issuer / subject are resolved.
- A new certificate is built and signed (same key pair, same issuer).
- The new certificate receives a fresh UID.
ReplacedObjectLinkon the new cert → old cert.ReplacementObjectLinkon the old cert → new cert.- All keys linked to the old certificate have their
CertificateLinkupdated. x-rotate-generationandx-rotate-dateare updated.
sequenceDiagram
participant Client
participant KMS
participant DB
Client->>KMS: ReCertify(old_cert_uid)
KMS->>DB: retrieve old certificate
KMS->>KMS: resolve issuer + subject from old cert
KMS->>KMS: build & sign new certificate (same key pair)
KMS->>DB: Phase 1 — store new cert (fresh UID)
KMS->>DB: Phase 2 — update old cert (ReplacementObjectLink)
KMS->>DB: Phase 2 — relink keys (CertificateLink → new cert)
KMS-->>Client: ReCertifyResponse(new_cert_uid)
Attribute changes (KMIP 2.1 §6.1.45):
| Attribute | New certificate | Old certificate |
|---|---|---|
Unique Identifier | Fresh UUID | Unchanged |
Initial Date | Now | Unchanged |
Link[ReplacedObjectLink] | → old cert UID | — |
Link[ReplacementObjectLink] | — | → new cert UID |
Link[PublicKeyLink] | Copied from old | Unchanged |
Link[PrivateKeyLink] | Copied from old | Unchanged |
Name | Inherited from old | Removed (per KMIP spec) |
State | Active | Active (not Deactivated — certificates are exempt from §4.57) |
x-rotate-generation | old + 1 | Unchanged |
x-rotate-date | Now | Unchanged |
CLI:
# Renew a CA-signed certificate (same key pair, new validity period)
ckms certificates certify \
--certificate-id-to-re-certify <OLD_CERT_UID> \
--issuer-private-key-id <ISSUER_SK_UID> \
--days 365
# Self-signed certificate renewal
ckms certificates certify \
--certificate-id-to-re-certify <OLD_CERT_UID> \
--days 3650
Standards:
| Standard | Relevance |
|---|---|
| KMIP 2.1 §6.1.45 | Normative definition of ReCertify |
| RFC 4210 §5.3.5–5.3.6 | CMP Key Update Request / Response (kur/kup) — the wire-protocol equivalent |
| RFC 5280 | X.509v3 certificate structure and validity periods |
7. KEK-protected key (server-wide key-encryption key)
When the KMS server is started with --key-encryption-key <KEK_UID>, every
object stored in the database is transparently wrapped by the KEK. Rotation
works identically to the wrapped-key flow above — the server unwraps in memory,
generates fresh material, re-wraps, and stores the result.
# Example server startup with SoftHSM2 KEK
cosmian_kms \
--database-type sqlite \
--hsm-model softhsm2 \
--hsm-slot 0 \
--hsm-password 12345678 \
--key-encryption-key "hsm::softhsm2::0::my-kek"
No special handling is required for rotation policy — SetAttribute on a
KEK-wrapped key writes the x-rotate-* attributes to the metadata column, not
into the ciphertext, so no unwrap is needed.
Rotation dispatch overview
flowchart TD
subgraph "Re-Key dispatch"
REQ["Re-Key / Re-Key Key Pair / ReCertify"] --> DISPATCH{"Object type?"}
DISPATCH -->|SymmetricKey, no dependants| PLAIN["Plain rekey<br/>(new material, new UID)"]
DISPATCH -->|SymmetricKey, has WrappingKeyLink dependants| WRAP_K["Wrapping-key rotation<br/>(Phase 1 commit → Phase 2 re-wrap)"]
DISPATCH -->|SymmetricKey, is wrapped| WRAP_D["Wrapped-key rotation<br/>(unwrap → new material → re-wrap)"]
DISPATCH -->|PrivateKey| ASYM["Re-Key Key Pair"]
DISPATCH -->|Certificate| CERT["ReCertify<br/>(same key pair, new cert UID)"]
PLAIN & WRAP_K & WRAP_D & ASYM & CERT --> META["Update metadata<br/>(generation++, date, links,<br/>old key → Deactivated)"]
end
KMIP attribute changes on manual rotation
When the user explicitly calls Re-Key (e.g. ckms sym keys rekey), the
following attributes are set on the old and new key:
| Attribute | Old key | New key |
|---|---|---|
Unique Identifier | unchanged | fresh UUID (or name@N for keyset keys) |
State | Deactivated (§4.57) | Active |
Link[ReplacementObjectLink] | → new key UID | — |
Link[ReplacedObjectLink] | — | → old key UID |
Link[WrappingKeyLink] | unchanged | copied from old key |
x-rotate-generation | unchanged | old value + 1 |
x-rotate-date | unchanged | timestamp of rotation |
x-rotate-interval | set to 0 (disabled) | 0 — must be re-armed explicitly on the new key |
x-rotate-name | unchanged | inherited from old key |
x-rotate-offset | unchanged | None (not inherited for manual rekey) |
Name | removed | inherited from old key |
Manual vs auto-rotation difference:
x-rotate-intervalis intentionally set to0(not inherited) on the new key after a manual rotation. This forces the operator to re-evaluate the rotation policy for the new key rather than blindly continuing the old schedule.# After a manual rekey, re-arm the rotation policy on the new key: ckms sym keys set-rotation-policy \ --key-id <NEW_KEY_UID> \ --interval 3600 \ --name "my-keyset"
Revoking superseded keys
After rotation the old key is Deactivated (not Destroyed). Its material persists so that in-flight Decrypt / Verify operations against old ciphertexts continue to work. Once all consumers have migrated, destroy the old key:
# Find the old key UID from the new key's ReplacedObjectLink attribute
ckms objects get-attributes --key-id <NEW_KEY_UID>
# Destroy the old key directly (Deactivated keys do not need a prior Revoke)
ckms sym keys destroy --key-id <OLD_KEY_UID>
If you need to place the old key into Compromised state (e.g. for audit
records), call Revoke first with a compromise reason:
# Symmetric key
ckms sym keys revoke -k <OLD_KEY_UID> "Superseded"
# Asymmetric key pair (revokes both private and linked public key)
ckms ec keys revoke -k <OLD_KEY_UID> "Superseded"
# Certificate
ckms certificates revoke -c <OLD_CERT_UID> "Superseded"
HSM Key Rotation
Eviden KMS supports manual Re-Key for keys that reside on a
PKCS#11-capable Hardware Security Module (SoftHSM2, Utimaco, Proteccio, …).
The flow mirrors SQL-backed rotation but all keyset metadata lives in PKCS#11
attributes rather than the KMS database.
Capabilities
| Capability | Supported | Notes |
|---|---|---|
Manual Re-Key via KMIP | ✅ | Calls C_GenerateKey on the same HSM slot. |
Keyset membership (x-rotate-name) | ✅ | Stored in CKA_LABEL; keyset name must be the full base UID (hsm::model::slot::key_id). Supports @latest, @first, @N generation addressing. |
x-rotate-interval attribute | ✅ | Writes CKA_START_DATE / CKA_END_DATE for validity tracking. Rejected with an error on HSMs that cannot store these dates on keys (SoftHSM2, Crypt2pay, AWS CloudHSM). |
| Auto-rotation scheduler | ❌ | find_due_for_rotation never returns HSM UIDs; scheduler skips them. |
x-rotate-offset | ❌ | Not applicable to PKCS#11 scheduling; rejected with NotSupported. |
Why label HSM keys?
A PKCS#11 object exposes only a small, fixed set of attributes
(CKA_CLASS, CKA_KEY_TYPE, CKA_ID, CKA_LABEL, CKA_START_DATE,
CKA_END_DATE, …). None of them can hold free-form metadata, so an HSM key
cannot store KMIP concepts such as "which keyset do I belong to" or "which
generation am I" in a dedicated field.
CKA_LABEL is the only freely-writable text attribute, subject to a
token-specific maximum length (e.g. 128 bytes on Proteccio). The KMS therefore
encodes everything it needs to know about an HSM key into that single field:
- tags, so clients can discover keys with
Locate— see HSM key labeling & tagging; - keyset membership and generation, so a bare key can be rotated and its generations ordered — the subject of this page.
Without a label an HSM key is an opaque blob: the KMS cannot tell its logical
name, which keyset (if any) it belongs to, or which generation is current.
Encoding that metadata in CKA_LABEL keeps it self-contained on the token,
with no SQL shadow rows and no external registry.
CKA_LABEL convention
HSM keyset metadata is stored entirely in the PKCS#11 CKA_LABEL attribute —
no SQL shadow rows are written.
CKA_LABEL value | Meaning |
|---|---|
{key_id} (plain, before enrollment) | Initial state after Create — key has not yet been added to a keyset |
{base_uid}::0::{key_id}@latest | Gen-0 key immediately after SetAttribute enrollment |
{base_uid}::{gen}::{base_id}@latest | Current latest key after any Re-Key |
{base_uid}::{gen}::{base_id} | Retired key (any generation that is no longer the latest) |
| (anything else) | Key does not belong to a keyset |
Where:
base_uid— the full base UID of the gen-0 key:hsm::<model>::<slot_id>::<key_id>. Because it embeds the slot ID, the keyset name is unique across all HSM slots. A key on slot 0 and a key on slot 1 with the same local name will have different keyset names (hsm::softhsm2::0::my-keyvshsm::softhsm2::1::my-key).gen— integer starting at0, incremented on everyRe-Key.base_id/key_id— the PKCS#11CKA_IDof the gen-0 key.
The label format is {rotate_name}::{gen}::{key_id}. For HSM keys,
rotate_name is the full base UID (hsm::softhsm2::0::my-hsm-key), which
already embeds the local key name. The same name then appears again as the
separate key_id field required by parse_label_metadata to reconstruct the
per-key PKCS#11 CKA_ID.
hsm::softhsm2::0::my-hsm-key :: 0 :: my-hsm-key@latest
├─ rotate_name (full base UID) gen key_id
This duplication is intentional and handled by the right-split parser.
Because rotate_name itself contains ::, the label is parsed from the right
(rsplitn(3, "::")):
hsm::softhsm2::0::my-key::1::my-key@latest
├─ rotate_name = "hsm::softhsm2::0::my-key" (everything left of the last two ::)
├─ generation = 1
└─ key_id = "my-key@latest"
This is backward-compatible: labels written before the full-UID convention
(e.g. "my-keyset::0::my-key@latest") still parse correctly.
UID scheme
hsm::<model>::<slot_id>::<base_key_id> ← gen 0 (original key)
hsm::<model>::<slot_id>::<base_key_id>@1 ← gen 1 (after first Re-Key)
hsm::<model>::<slot_id>::<base_key_id>@2 ← gen 2 (after second Re-Key)
Where <model> is the HSM model name (e.g. softhsm2, utimaco, proteccio).
The @N generation suffix is appended to the original base_key_id, using the
same convention as SQL keyset keys (my-key@1, my-key@2). Unlike
SQL keys, the base portion of the UID never changes, so the full chain can be
discovered by scanning CKA_LABEL on the HSM slot.
The older format hsm::<slot_id>::<key_id> (without model segment) is still
accepted for backward compatibility with keys created before the model segment
was introduced.
Keyset name constraint
For HSM keys the keyset name (x-rotate-name) must be the key's full base UID
(hsm::<model>::<slot>::<key_id> without any @N suffix).
| Value | Accepted? | Reason |
|---|---|---|
hsm::softhsm2::0::my-hsm-key | ✅ | Full base UID — unique across slots. |
my-hsm-keyset | ❌ | Bare name rejected — no slot disambiguation. |
hsm::softhsm2::0::my-hsm-key@1 | ❌ | Generation suffix rejected — base UID only. |
Invalid Request: SetAttribute: for HSM keys, rotate_name must be the key's base UID
('hsm::softhsm2::0::my-hsm-key'), not 'my-hsm-keyset'
Why this constraint? A bare name like
"my-hsm-key"is ambiguous when multiple HSM slots are in use — two keys on different slots could have the same local name. Embedding the slot ID in the keyset name prevents cross-slot collisions without requiring a central name registry.
Keyset resolution
When a base UID (e.g. hsm::softhsm2::0::my-hsm-key) or generation-scoped syntax
(hsm::softhsm2::0::my-hsm-key@latest, hsm::softhsm2::0::my-hsm-key@0,
hsm::softhsm2::0::my-hsm-key@N) is used, the server calls find_by_rotate_name,
which scans PKCS#11 objects in the HSM slot and parses CKA_LABEL to extract
the rotate_name and rotate_generation. Results are sorted by generation
descending:
- Encrypt / Sign → uses the key with the highest
rotate_generation(current latest). The@latestsuffix inCKA_LABELis not used for this determination — generation sorting is the authoritative source. - Decrypt / Verify → tries each generation newest-to-oldest until one succeeds, allowing old ciphertexts to continue to decrypt after rotation.
Using a direct generation UID with an explicit @N suffix
(e.g. hsm::softhsm2::0::my-hsm-key@0) bypasses keyset resolution entirely:
only that specific generation is used, with no chain walk.
Using the base UID without @N (e.g. hsm::softhsm2::0::my-hsm-key)
always resolves to the latest generation (see Second rotation and non-latest guard
below for the Re-Key-specific stable-handle behaviour).
HSM keysets do not use ReplacedObjectLink / ReplacementObjectLink
back-pointers; all state lives in PKCS#11 attributes.
Full rotation workflow
Setup
# 1. Start the KMS server with HSM backend
cosmian_kms \
--database-type sqlite \
--hsm-model softhsm2 \
--hsm-slot 0 \
--hsm-password 12345678
Create and enrol
# 2. Create an AES-256 key directly on the HSM
ckms sym keys create \
--key-id "hsm::softhsm2::0::my-hsm-key" \
--algorithm aes --length 256
# 3. Enrol the key in a keyset.
# The keyset name MUST equal the key's full base UID.
# Before: CKA_LABEL = "my-hsm-key" (plain key_id set at creation)
# After: CKA_LABEL = "hsm::softhsm2::0::my-hsm-key::0::my-hsm-key@latest"
# └─ rotate_name ──────────────────────┘ gen └─ key_id ──┘
ckms sym keys set-rotation-policy \
--key-id "hsm::softhsm2::0::my-hsm-key" \
--name "hsm::softhsm2::0::my-hsm-key"
Encrypt using the base UID as the keyset address
# 4. Encrypt — base UID resolves to the latest key (gen-0 initially)
ckms sym encrypt --key-id "hsm::softhsm2::0::my-hsm-key" plaintext.bin -o ciphertext.enc
First rotation
# 5. Rotate using the base UID as a stable keyset handle.
# No @N suffix → server redirects to the latest generation (gen-0 here).
ckms sym keys rekey --key-id "hsm::softhsm2::0::my-hsm-key"
# Response: new UID = hsm::softhsm2::0::my-hsm-key@1
#
# CKA_LABEL (gen-0): "hsm::softhsm2::0::my-hsm-key::0::my-hsm-key" (retired)
# CKA_LABEL (gen-1): "hsm::softhsm2::0::my-hsm-key::1::my-hsm-key@latest" (current)
sequenceDiagram
participant Client
participant KMS
participant HSM
Client->>KMS: Re-Key("hsm::softhsm2::0::my-hsm-key")
KMS->>HSM: C_FindObjects (CKA_ID = "my-hsm-key")
HSM-->>KMS: {gen-0 object handle}
KMS->>KMS: build new key attributes<br/>(algorithm, length, gen=1)
KMS->>HSM: C_GenerateKey → gen-1 object
KMS->>HSM: C_SetAttributeValue gen-0<br/>CKA_LABEL = "hsm::softhsm2::0::my-hsm-key::0::my-hsm-key"
KMS->>HSM: C_SetAttributeValue gen-1<br/>CKA_LABEL = "hsm::softhsm2::0::my-hsm-key::1::my-hsm-key@latest"
KMS-->>Client: Re-KeyResponse("hsm::softhsm2::0::my-hsm-key@1")
Decrypt old ciphertext after rotation
# 6. Decrypt using the base UID — server tries gen-1 then gen-0
ckms sym decrypt --key-id "hsm::softhsm2::0::my-hsm-key" ciphertext.enc -o plaintext.bin
sequenceDiagram
participant Client
participant KMS
participant HSM
Client->>KMS: Decrypt("hsm::softhsm2::0::my-hsm-key", ciphertext)
KMS->>HSM: find_by_rotate_name("hsm::softhsm2::0::my-hsm-key")<br/>scan CKA_LABEL right-split, sort by gen desc
HSM-->>KMS: [gen-1, gen-0]
KMS->>HSM: C_DecryptInit / C_Decrypt with gen-1
HSM-->>KMS: DecryptFailed (wrong key material)
KMS->>HSM: C_DecryptInit / C_Decrypt with gen-0
HSM-->>KMS: plaintext
KMS-->>Client: DecryptResponse(plaintext)
Second rotation and non-latest guard
The Re-Key operation distinguishes two addressing styles for HSM keys:
| Addressing style | Example | Behaviour when not latest |
|---|---|---|
Stable handle (base UID, no @N) | hsm::softhsm2::0::my-hsm-key | Silently redirects to the latest generation |
Explicit generation (@N) | hsm::softhsm2::0::my-hsm-key@0 | Returns an error |
# 7. Second rotation using the stable handle (always rotates the latest)
ckms sym keys rekey --key-id "hsm::softhsm2::0::my-hsm-key"
# → redirected to gen-1 (current latest)
# Response: new UID = hsm::softhsm2::0::my-hsm-key@2
# Attempting to re-key an explicit retired generation is rejected:
ckms sym keys rekey --key-id "hsm::softhsm2::0::my-hsm-key@0" # explicit @0 — REJECTED
# Error: ReKey: HSM key 'hsm::softhsm2::0::my-hsm-key@0' is not the latest in its keyset
# — only the latest generation can be rotated.
# Use 'hsm::softhsm2::0::my-hsm-key' to always rotate the current head.
Differences from SQL rotation
| Aspect | SQL-backed keys | HSM-resident keys |
|---|---|---|
| Keyset metadata storage | KMIP vendor attributes (x-rotate-*) in SQL DB | CKA_LABEL on PKCS#11 objects |
| UID scheme | Plain identifier (keyset name is a rotate_name attribute, not in the UID) | hsm::<model>::<slot>::<base_key_id>[@N] (generation suffix appended) |
| Auto-rotation scheduler | ✅ Supported | ❌ Not supported |
x-rotate-offset | ✅ Supported | ❌ Not supported |
| KMIP link back-pointers | ✅ ReplacedObjectLink / ReplacementObjectLink | ❌ Not used; chain lives in CKA_LABEL |
| Chain discovery | SQL query on x-rotate-name + x-rotate-generation | PKCS#11 C_FindObjects on CKA_LABEL prefix |
| Old key state after rotation | Deactivated (§4.57) | Retired label set in CKA_LABEL (no KMIP state) |
Auto-Rotation Policy
Eviden KMS supports scheduled, policy-driven key rotation for SQL-backed symmetric keys and asymmetric key pairs. A per-key rotation policy is attached to a key object; a background scheduler then rotates any key whose interval has elapsed — without any operator action.
HSM keys support manual rotation only; the auto-rotation scheduler never picks up HSM UIDs. See HSM Key Rotation.
For the rotation flows and sequence diagrams for each key type, see Key Rotation.
Rotation policy attributes
All rotation-policy state is stored as vendor-extension KMIP attributes on the key object itself:
| Attribute | Type | Mutable | Description |
|---|---|---|---|
x-rotate-interval | i64 (seconds) | ✅ | How often to rotate. 0 disables auto-rotation. |
x-rotate-name | string | ✅ | Keyset name this key belongs to (see Key Rotation — Keysets). |
x-rotate-offset | i64 (seconds) | ✅ | Shift the first rotation trigger by this many seconds after Initial Date. |
x-rotate-generation | i32 | ❌ | Incremented on every rotation; 0 for never-rotated keys. Server-managed. |
x-rotate-date | datetime | ❌ | Timestamp of the last rotation. Server-managed. |
x-rotate-latest | bool | ❌ | true on the most-recent keyset member; false on all older keys. Server-managed. |
Read-only attributes
x-rotate-generation, x-rotate-date, and x-rotate-latest are set
exclusively by the server during the Re-Key operation. Any attempt to
modify them via AddAttribute, SetAttribute, ModifyAttribute, or
DeleteAttribute is rejected with Attribute_Read_Only.
These restrictions maintain two invariants relied on by the scheduler and the keyset resolution logic:
- Monotonic generation counter —
x-rotate-generationstarts at0and increments by exactly1per rotation. Within a keyset the generation is unique and strictly increasing, which lets the scheduler and client tooling identify the current key without inspecting every member. - Authoritative rotation timestamp —
x-rotate-dateis the only reliable source for "when was this key last rotated". The scheduler computes the next trigger asx-rotate-date + x-rotate-interval(previously rotated) orinitial_date + x-rotate-offset + x-rotate-interval(never rotated). External modifications tox-rotate-datewould cause missed or premature rotations.
Assigning a rotation policy
Use ckms sym keys set-rotation-policy (or SetAttribute for key pairs) to
configure the mutable attributes on an existing key:
# Rotate every hour; first rotation is 60 seconds after Initial Date
ckms sym keys set-rotation-policy \
--key-id my-keyset \
--interval 3600 \
--offset 60 \
--name my-keyset
SetAttribute initialises x-rotate-generation = 0 and
x-rotate-latest = true on the key. Every subsequent Re-Key increments
the generation, marks the new key as latest, and marks the old key as
non-latest.
For asymmetric key pairs, use SetAttribute directly:
ckms objects set-attribute \
--id <PRIVATE_KEY_UID> \
x-rotate-interval 86400
Server configuration
Enable the scheduler
The background scheduler is disabled by default. Enable it in kms.toml
or via the command-line flag:
# kms.toml
auto_rotation_check_interval_secs = 300 # check every 5 minutes
# Command-line equivalent
cosmian_kms --auto-rotation-check-interval-secs 300
Set the interval to a value smaller than the shortest x-rotate-interval
on any key — otherwise some rotations will be delayed by up to one scheduler
period.
HSM backend + KEK
The scheduler works with any database backend. If the server is started with
a --key-encryption-key, KEK-wrapped keys are rotated the same as plain keys
(the server unwraps in memory, generates fresh material, re-wraps):
cosmian_kms \
--database-type sqlite \
--hsm-model softhsm2 \
--hsm-slot 0 \
--hsm-password 12345678 \
--key-encryption-key "hsm::softhsm2::0::my-kek" \
--auto-rotation-check-interval-secs 300
How the scheduler works
On each tick, the scheduler:
- Queries all Active symmetric keys and private keys whose
x-rotate-interval > 0. - For each candidate, computes the next rotation deadline:
- Previously rotated key:
x-rotate-date + x-rotate-interval - Never-rotated key with Initial Date:
initial_date + x-rotate-offset + x-rotate-interval
- Previously rotated key:
- Rotates every key whose deadline is in the past.
- Emits an OpenTelemetry counter
kms.key.auto_rotationlabelled withuidandalgorithmfor each successful rotation.
The scheduler never returns HSM UIDs — auto-rotation is SQL-only.
Attribute changes on auto-rotation
| Attribute | Old key | New key |
|---|---|---|
Unique Identifier | unchanged | fresh UUID (or name@N for keysets) |
State | Deactivated (§4.57) | Active |
Link[ReplacementObjectLink] | → new key UID | — |
Link[ReplacedObjectLink] | — | → old key UID |
x-rotate-generation | unchanged | old value + 1 |
x-rotate-date | unchanged | timestamp of rotation |
x-rotate-interval | set to 0 (cron skips old key) | inherited from old key |
x-rotate-name | unchanged | inherited from old key |
x-rotate-offset | unchanged | inherited from old key |
x-initial-date | cleared | set to now (resets next deadline) |
Cryptographic Algorithm | unchanged | copied from old key |
Cryptographic Length | unchanged | copied from old key |
Note:
x-rotate-intervalis inherited on auto-rotation (policy continues on the new key automatically). On manualRe-Keyit is set to0on the new key — the operator must re-arm the policy explicitly.
End-to-end setup
Step 1 — Create a key in a keyset
# SQL key: UID must equal the keyset name
ckms sym keys create --key-id my-keyset --algorithm aes --length 256
Step 2 — Attach a rotation policy
ckms sym keys set-rotation-policy \
--key-id my-keyset \
--name my-keyset \
--interval 3600 \
--offset 60
Step 3 — Enable the server scheduler
In kms.toml:
auto_rotation_check_interval_secs = 300
The scheduler will rotate my-keyset for the first time roughly 60 + 3600
seconds after its Initial Date, and every 3600 seconds thereafter.
Disabling auto-rotation on a key
Set x-rotate-interval to 0:
ckms sym keys set-rotation-policy --key-id my-keyset --interval 0
This prevents the scheduler from selecting the key without removing any other keyset metadata.
Keyset chain depth warning
When a Decrypt or Verify call resolves a keyset name (e.g. my-keyset)
rather than an explicit key UID, the server walks the generation chain
newest-to-oldest until one generation succeeds. A very deep chain indicates
that many ciphertexts are still bound to old key generations — a signal that
client-side re-encryption may be overdue.
To surface this, configure keyset_warn_depth in kms.toml:
# Emit a server warning when decryption succeeds at chain depth >= this value.
# Default: 5. 0 disables the warning.
keyset_warn_depth = 5
Or via the CLI flag:
cosmian_kms --keyset-warn-depth 5
When the threshold is reached, the server emits a WARN log line:
Decrypt: keyset chain depth 5 >= warn threshold 5 for uid my-keyset@0;
consider re-encrypting with the latest key
The chain walk has no hard limit. All key generations remain reachable
(subject to KMIP state rules). keyset_warn_depth is purely a
monitoring hint — it never prevents a decryption from succeeding.
Observability
The server increments the OpenTelemetry counter kms.key.auto_rotation with
labels uid and algorithm on every successful auto-rotation. Use your
OTel-compatible backend (Prometheus + Grafana, Datadog, …) to:
- Alert on unexpected gaps in rotation activity.
- Audit which keys were rotated and when.
- Track rotation throughput across the fleet.
See Monitoring for the full OTel setup guide.
Revoke
Specification
This operation requests the server to revoke a Managed Cryptographic Object or an Opaque Object.
The request contains a reason for the revocation (e.g., "key compromise", "cessation of operation", etc.).
The operation has one of two effects. If the revocation reason is "key compromise" or "CA compromise", then the object is placed into the "compromised" state; the Date is set to the current date and time; and the Compromise Occurrence Date is set to the value (if provided) in the Revoke request and if a value is not provided in the Revoke request then Compromise Occurrence Date SHOULD be set to the Initial Date for the object. If the revocation reason is neither "key compromise" nor "CA compromise", the object is placed into the "deactivated" state, and the Deactivation Date is set to the current date and time.
Implementation
The state of the object is kept as specified. The revocation reason is also persisted
in the object's attributes (both internal and external), as required by RFC 5280 §5.3.1
to populate the CRLReason extension in generated CRLs.
Once an Object is revoked, it can only be retrieved using the Export operation. The Get operation will return an
error.
A Revoked object can be destroyed using the Destroy operation.
Example - Symmetric key
Revoking key f54f14a3-5639-4054-8c23-54af891669db with reason key was compromised.
Corresponding KMS CLI command:
ckms sym keys revoke -k f54f14a3-5639-4054-8c23-54af891669db "key was compromised"
{
"tag": "Revoke",
"type": "Structure",
"value": [
{
"tag": "UniqueIdentifier",
"type": "TextString",
"value": "f54f14a3-5639-4054-8c23-54af891669db"
},
{
"tag": "RevocationReason",
"type": "TextString",
"value": "key was compromised"
}
]
}
Sign
Specification
The Sign operation requests the server to generate a digital signature for the provided data using a specified Managed Object.
The request contains the unique identifier of the signing key, data to be signed (or already digested data), and cryptographic parameters. The signature is computed using the specified signing key and cryptographic parameters.
The SignatureVerify operation validates a digital signature against provided data using a specified verification key.
Implementation
The Eviden KMS server supports signing with RSA and EC private keys, as well as OpenPGP keys (PGPKey, non-FIPS mode). The signature algorithms supported include:
- RSA-PKCS#1 v1.5 with SHA-256, SHA-384, SHA-512
- RSA-PSS with SHA-256, SHA-384, SHA-512
- ECDSA with SHA-256, SHA-384, SHA-512
- Ed25519 (signature verification only for imported keys)
- OpenPGP detached signatures (SHA-256, RSA or Ed25519)
Example - Sign with RSA Private Key
Sign data using an RSA private key with SHA-256.
Note: Sign and SignatureVerify operations are available through the KMIP JSON API endpoint but not directly exposed through CLI subcommands. Use direct HTTP requests to the /kmip/2_1 endpoint.
{
"tag": "Sign",
"type": "Structure",
"value": [
{
"tag": "UniqueIdentifier",
"type": "TextString",
"value": "9382bfec-bd6c-46ed-8f00-90b467f77a15"
},
{
"tag": "CryptographicParameters",
"type": "Structure",
"value": [
{
"tag": "DigitalSignatureAlgorithm",
"type": "Enumeration",
"value": "SHA256WithRSAEncryption"
}
]
},
{
"tag": "Data",
"type": "ByteString",
"value": "48656C6C6F2C207369676E61747572652074657374"
},
{
"tag": "InitIndicator",
"type": "Boolean",
"value": true
},
{
"tag": "FinalIndicator",
"type": "Boolean",
"value": true
}
]
}
Example - Signature Verification
Verify a signature using the corresponding public key.
{
"tag": "SignatureVerify",
"type": "Structure",
"value": [
{
"tag": "UniqueIdentifier",
"type": "TextString",
"value": "9382bfec-bd6c-46ed-8f00-90b467f77a15_pk"
},
{
"tag": "CryptographicParameters",
"type": "Structure",
"value": [
{
"tag": "DigitalSignatureAlgorithm",
"type": "Enumeration",
"value": "SHA256WithRSAEncryption"
}
]
},
{
"tag": "Data",
"type": "ByteString",
"value": "48656C6C6F2C207369676E61747572652074657374"
},
{
"tag": "SignatureData",
"type": "ByteString",
"value": "3A4B5C6D7E8F901234567890ABCDEF1234567890ABCDEF1234567890ABCDEF12"
},
{
"tag": "InitIndicator",
"type": "Boolean",
"value": true
},
{
"tag": "FinalIndicator",
"type": "Boolean",
"value": true
}
]
}
Usage via HTTP API
To use Sign and SignatureVerify operations, send HTTP POST requests to the /kmip/2_1 endpoint:
# Sign operation example
curl -X POST -H "Content-Type: application/json" \
-d '{
"tag": "RequestMessage",
"value": [
{
"tag": "RequestHeader",
"value": [
{
"tag": "ProtocolVersion",
"value": [
{"tag": "ProtocolVersionMajor", "type": "Integer", "value": 2},
{"tag": "ProtocolVersionMinor", "type": "Integer", "value": 1}
]
},
{"tag": "BatchCount", "type": "Integer", "value": 1}
]
},
{
"tag": "BatchItem",
"value": [
{"tag": "Operation", "type": "Enumeration", "value": "Sign"},
{
"tag": "RequestPayload",
"value": [
{"tag": "UniqueIdentifier", "type": "TextString", "value": "your-key-id"},
{"tag": "Data", "type": "ByteString", "value": "48656C6C6F"}
]
}
]
}
]
}' \
http://localhost:9998/kmip/2_1
Streaming Support
Both Sign and SignatureVerify operations support streaming for large data:
- Set
InitIndicator: trueto start streaming - Use
CorrelationValueto continue streaming sessions - Set
FinalIndicator: trueto complete the operation
Streaming is not supported for OpenPGP (PGPKey) keys: supplying InitIndicator or CorrelationValue returns an error, as does DigestedData.
API Overview & Security
The Eviden KMS server exposes multiple API interfaces over HTTP/TLS and TCP, including standard KMIP protocols, a native REST cryptographic API, access control endpoints, and enterprise cloud provider integrations.
This page provides an architectural overview of all available API endpoints, the request processing pipeline, and the server-side API security measures enforced across all routes.
API Endpoints
The KMS server exposes endpoints grouped by function:
| Interface | Base Path | Protocol / Format | Purpose |
|---|---|---|---|
| KMIP 2.1 JSON TTLV | POST /kmip/2_1 | KMIP 2.1 over JSON TTLV | Primary standard KMIP management & cryptographic operations |
| KMIP 1.4 JSON TTLV | POST /kmip/1_4 | KMIP 1.4 over JSON TTLV | Legacy KMIP 1.4 client compatibility |
| KMIP Binary Socket | Port 5696 | KMIP TTLV over TLS TCP | Binary wire-format KMIP protocol (TLS + mTLS required) |
| REST Native Crypto | /v1/crypto/* | REST / JSON (JOSE-aligned) | Key generation, encryption, decryption, sign, verify, and MAC |
| Access Control | /access/* | REST / JSON | Object ownership queries, grant/revoke permissions, Crypto Officer ceremony |
| System & Diagnostics | /health, /version (public); /server-info (auth required) | REST / JSON | Service health checks, version information, and server capabilities |
| JWKS Public Keys | GET /.well-known/jwks.json | JSON Web Key Set | Public key distribution for active keys tagged with jwks (unauthenticated) |
| PKI & Revocation | GET /public/certificates/{issuer_id}/crl, GET /ocsp/{request} | RFC 5280 CRL / RFC 6960 OCSP | Public certificate revocation list distribution and OCSP responder |
| OpenAPI / Swagger | GET /openapi.yaml, GET /swagger | OpenAPI 3.1 & Swagger UI | Interactive documentation and API schema download (publicly served) |
| Cloud Integrations | /aws, /google_cse, /ms_dke, /azureekm | Vendor-specific REST protocols | External Key Store integrations (AWS XKS, Google CSE, MS DKE, Azure EKM) |
See KMIP Support for KMIP protocol details and Ownership and access rights for access control endpoints.
Calling the KMIP API
This API is documented in the KMIP section of this manual.
Calling the authorization API
This API is documented in the authorization section of this manual.
Authentication
The Eviden server supports various authentication mechanisms: see the authentication section of this manual for details.
When authenticating using JWT, an HTTP Authorization header must be passed with the JWT token as a bearer token:
Authorization: Bearer <JWT_TOKEN>
Security Architecture & Middleware Pipeline
All HTTP requests pass through an Actix-web middleware pipeline executing in LIFO order (the last middleware added via .wrap() runs first on incoming requests). The pipeline enforces defense-in-depth across two distinct tiers:
- Application Level: Applied globally across the entire HTTP server (all scopes and routes).
- Scope Level: Applied to specific service scopes (such as the default KMIP and REST scope, or dedicated cloud provider scopes).
flowchart TD
Client["Client Request"] --> TLS["TLS 1.2 / 1.3 & mTLS"]
subgraph AppLevel ["Application Stack (LIFO)"]
TLS --> Session["Session cookie"]
Session --> Identity["Identity middleware"]
Identity --> SecHeaders["Security headers<br/>CSP & X-Frame-Options"]
SecHeaders --> RateLimiter["Rate limiter<br/>Keyed by peer IP"]
RateLimiter --> OTel["OTel metrics"]
end
subgraph DefaultScope ["Default KMIP & REST Scope (LIFO)"]
OTel --> CORS["CORS filter<br/>Same-origin / allowed origins"]
CORS --> Audit["Audit middleware<br/>Log request & outcome"]
Audit --> SpireAuth["SPIRE / Vault token"]
SpireAuth --> CertAuth["Client certificate<br/>tls_auth"]
CertAuth --> JwtAuth["JWT / OIDC token"]
JwtAuth --> AuthVerifier["Auth verifier token"]
AuthVerifier --> ApiTokenAuth["API bearer token"]
ApiTokenAuth --> SessionAuth["Session auth"]
SessionAuth --> EnsureAuth{"EnsureAuth<br/>Identity resolved?"}
end
EnsureAuth -- No --> Deny["401 Unauthorized"]
EnsureAuth -- Yes --> ACL["Object ownership<br/>& access rights"]
ACL --> Operation["Cryptographic engine<br/>KMIP / HSM"]
Security Measures
1. Transport Security (TLS & mTLS)
All communication with the KMS server is encrypted using TLS:
- Protocol Versions: Supports TLS 1.2 and TLS 1.3.
- Cipher Profiles: Uses Mozilla Intermediate v5 cipher suites by default. The cipher list can be customized using
--tls-cipher-suitesor thetls_cipher_suiteskey inkms.toml. - Mutual TLS (mTLS): Configured with
clients_ca_cert_file. Client certificates presented during TLS negotiation are validated against the specified CA. The client certificate's Subject Common Name (CN) is extracted as the authenticated user identity. - KMIP Binary Socket Listener: The binary KMIP socket on port 5696 requires both TLS and a
clients_ca_cert_fileconfigured to start. The server refuses to listen without them.
For configuration details, see Enabling TLS and Obtaining TLS Certificates.
2. Rate Limiting (DoS & Brute-Force Mitigation)
The KMS server includes a built-in token bucket rate limiter keyed by client peer IP address, backed by the governor crate.
- Sustained Limit & Burst: Configured via
rate_limit_per_second(CLI:--rate-limit-per-second, env:KMS_RATE_LIMIT_PER_SECOND). When set, the burst capacity is automatically scaled to 3x the sustained rate. - HTTP 429 Responses: Requests exceeding the quota receive
HTTP 429 Too Many Requests, returningRetry-AfterandX-RateLimit-Afterheaders indicating the wait time in seconds. - Global Coverage: Wrapped at the application level, protecting all endpoints including unauthenticated routes and authentication proxies.
- Startup Protection Warnings: The server warns at startup if rate limiting is omitted while high-cost endpoints are active (e.g., the unauthenticated
/v1/auth/*proxy or the Crypto Officer ceremony endpoint).
The rate limiter keys strictly on the TCP connection's peer IP address, not on the X-Forwarded-For header. When deployed behind a reverse proxy or load balancer, all client requests arrive from the proxy's IP address and will share a single rate-limiting bucket. In such deployments, configure rate limiting at the reverse proxy/ingress layer, or size rate_limit_per_second accordingly.
For configuration syntax, see Server configuration file.
3. Authentication Pipeline
The HTTP server validates client identities through a cascading middleware chain. When an authenticator succeeds, it populates an AuthenticatedUser extension on the request.
Supported authentication methods include:
- TLS Client Certificates (
tls_auth): Authenticates via X.509 client certificateCNpresented over mTLS. - JWT / OIDC Bearer Tokens (
jwt_auth): Validates OpenID Connect JWT tokens (including JWT-SVID for SPIFFE workloads) from configured identity providers against remote or local JWKS keys. Sent viaAuthorization: Bearer <TOKEN>. - Cosmian Auth Verifier (
AuthVerifier): Validates Bearer tokens against JWKS keys when tokens do not include akidheader. - API Tokens (
api_token): Validates static pre-shared bearer tokens corresponding to symmetric key objects stored in the KMS database. - SPIRE App-Tokens (
spire_token): ValidatesX-Vault-Tokenheaders for HashiCorp Vault-compatible Zero-Trust integrations. - AWS SigV4 (
Sigv4MWare): Authenticates AWS KMS requests on the/awsscope using AWS Signature Version 4 HMAC signatures. - Web UI Sessions (
SessionAuth): Uses an encrypted,HttpOnly,SameSite=Laxcookie (auth_session) with a 24-hour lifetime.
Fail-Closed Enforcement (EnsureAuth)
The EnsureAuth middleware runs after all credential extractors:
- If authentication is enabled and all extractors fail, the request is rejected with
401 Unauthorized. - If no authentication methods are configured, the request falls back to the configured
default_username(defaultadmin), unless--force-default-usernameis specified.
See Authenticating users to the server and PKCE Authentication.
4. Object Authorization & Access Rights
Once authenticated, the server evaluates access control rules per cryptographic object:
- Ownership: Every key or secret object has an assigned creator/owner established at creation (
Create,CreateKeyPair,Import). - Granular Permissions: Object owners or administrators can grant or revoke granular rights (
Read,Modify,Destroy,UseKey,Authorize, etc.) via/access/grantand/access/revoke. - Role Management (
[roles] crypto_officer_users): Restricts critical administrative privileges and key lifecycle management to designated Crypto Officer identities. - Crypto Officer Ceremony: Optional quorum-based dual control requiring multi-party authorization for high-security key operations.
See Ownership and access rights and Role Management and Key Ceremony.
5. HTTP Protocol & Boundary Hardening
- Security Headers: All HTTP responses include
X-Frame-Options: DENYandContent-Security-Policy: frame-ancestors 'none'to block clickjacking and prevent framing in unauthorized web contexts. - Payload Size Limits: Strict 64 MB deserialization ceiling prevents memory exhaustion and DoS from maliciously oversized KMIP or JSON bodies.
- CORS Scope Isolation: The default KMIP and REST scope (
/kmip,/v1/crypto,/access) defaults to same-origin. Cross-origin access requires explicit approval incors_allowed_origins. Cloud provider scopes (/aws,/google_cse,/ms_dke) enable permissive CORS as required by their protocol specifications.
6. Audit Logging & Non-Repudiation
When enabled, the audit logging middleware records every KMIP and crypto operation into a tamper-evident, cryptographically chained JSONL log:
- Pre-Authentication Recording: In the default scope, the audit middleware wraps outside the authentication layers, capturing both successful operations and failed attempts (
401 Unauthorized,403 Forbidden). - Trusted Proxy CIDRs: Client IP addresses are extracted from
X-Forwarded-Foronly when the immediate peer IP matches configured CIDR ranges inaudit_trusted_proxy_cidrs. - Failure Modes: Configurable via
audit_failure_modeto eithercontinue(log failure and proceed) orreject(fail closed and return HTTP 503 if an event cannot be audited).
See Audit logs and SIEM integration.
REST Native Crypto API
In addition to the KMIP protocol, the server exposes a lightweight JOSE-compatible REST API under /v1/crypto for encrypt, decrypt, sign, verify, and MAC operations. See the REST Native Crypto API page for full documentation.
OpenAPI Specification and Swagger UI
The KMS server exposes its complete API as an OpenAPI 3.1 specification and serves an interactive Swagger UI browser directly from the server binary. Both are publicly accessible at /openapi.yaml and /swagger.
See OpenAPI Specification and Swagger UI for full details on the interactive documentation, downloading the spec, and using external tools.
OpenAPI Specification and Swagger UI
The Eviden KMS server publishes its complete API as an OpenAPI 3.1 specification and serves an interactive Swagger UI browser directly from the server binary.
Endpoints
| Endpoint | Method | Description |
|---|---|---|
/openapi.yaml | GET | Full OpenAPI 3.1 schema in YAML format |
/swagger | GET | Interactive Swagger UI (HTML page, locally served) |
No authentication is required to access either endpoint; the UI itself uses the configured authentication mechanism to authorize API calls made through the browser.
Using the Swagger UI
Navigate to <server_url>/swagger in a browser.
https://<your-kms-host>:9998/swagger
The page displays all documented operations grouped by tag:
| Tag | Operations |
|---|---|
| KMIP | TTLV-over-HTTP via POST /kmip/2_1 and POST /kmip/1_4 |
| REST Crypto API | Encrypt, decrypt, sign, verify, and MAC under /v1/crypto |
| Server | Health, version, and server-info endpoints |
| Access control | Grant, revoke, list, and check object permissions |
| HSM | HSM status and diagnostics |
| Download | CLI binary download endpoint |
Authentication in the UI
When the KMS is configured with JWT bearer authentication, click the Authorize button
in the Swagger UI and enter your token. The UI will send it as an Authorization: Bearer <token>
header on every subsequent request.
Downloading the spec
curl -O https://<your-kms-host>:9998/openapi.yaml
The downloaded YAML can be imported into any OpenAPI-compatible tooling:
-
Postman —
Import > OpenAPIto generate a full collection with example requests. -
Insomnia —
Import > OpenAPI 3.0. -
openapi-generator — generate a typed client in any language:
openapi-generator-cli generate \ -i openapi.yaml \ -g python \ -o ./kms-client-python -
swagger-codegen — similar code-generation approach.
Security
All assets (JavaScript bundle and stylesheet) are served directly from the KMS binary — there is no external CDN dependency. The server is therefore fully usable in air-gapped environments.
The Swagger UI page is protected by the following HTTP response headers:
| Header | Value |
|---|---|
Content-Security-Policy | default-src 'none'; script-src 'self' 'unsafe-inline'; style-src 'self' 'unsafe-inline'; img-src 'self' data:; connect-src 'self'; frame-ancestors 'none' |
The frame-ancestors 'none' directive prevents the page from being embedded in an <iframe>, protecting against clickjacking.
Relationship to the JSON TTLV API
The OpenAPI spec documents the HTTP transport layer of the KMS API. The KMIP operations
themselves are sent as JSON TTLV payloads in the body of POST /kmip/2_1 or POST /kmip/1_4.
See The JSON TTLV KMIP API for the full description of the KMIP message format.
Spec version and server URL
The version field in the OpenAPI YAML is injected dynamically to match the running KMS
binary version. When the kms_public_url configuration option is set, the servers[].url
field is replaced with the configured public URL, making the downloaded spec self-contained
for use in external tooling.
See Configuration file for the
kms_public_url option.
PKCS#11 provider module
The Eviden KMS ships a PKCS#11 v3.0 provider library, libcosmian_pkcs11 (.so on Linux, .dylib
on macOS, .dll on Windows), which exposes KMS-managed keys as a Cryptoki token to any PKCS#11-aware
application.
This page documents capabilities of the provider library itself. It is shared by every integration that loads the library, including Veracrypt, LUKS, Cryhod, Oracle Database TDE, OpenSSH, and GnuPG smartcard (gnupg-pkcs11-scd). See those pages for integration-specific setup steps.
Cryptoki version and interfaces discovery
The library implements the Cryptoki v2.40 function list (C_GetFunctionList) and additionally
implements the Cryptoki v3.0 "interfaces" discovery entry points, C_GetInterfaceList and
C_GetInterface (CK_INFO.cryptokiVersion is reported as 3.1).
This is purely additive: every consumer that only knows about C_GetFunctionList (Cryptoki
v2.40 style, the previous behavior of this library) keeps working unchanged. A v3.0-aware consumer
may instead discover the library's single "PKCS 11" interface via C_GetInterfaceList/
C_GetInterface and obtain the exact same v2.x function pointers plus a small set of v3.0-only
entry points.
C_GetInterfaceList(NULL, &count)reportscount = 1(the library exposes a single interface).C_GetInterface(NULL, NULL, &pInterface, 0)returns that interface unconditionally; a caller may instead pass the explicit name"PKCS 11"and/or an explicit major version (only major version 3 is matched) — any other name, an unsupported major version, or non-zeroflagsis rejected withCKR_ARGUMENTS_BAD.- v3.0-only functions that this library does not natively implement (
C_LoginUser,C_SessionCancel, and the message-based bulk encrypt/decrypt/sign/verify family —C_Message*Init/C_*MessageBegin/C_*MessageNext/C_Message*Final) are present in the v3.0 function list as required by the specification (a v3.0 function list must not contain null pointers), but returnCKR_FUNCTION_NOT_SUPPORTEDwhen called. Applications that need those specific operations should continue to use the equivalent v2.x calls (C_Encrypt/C_Decrypt/C_Sign/C_Verify), which are fully implemented.
Supported operations and mechanisms
For the exhaustive PKCS#11 v2.40/v3.0 operation matrix — every mechanism/operation category
defined by the two OASIS specifications (key generation, encryption, signatures, digest, key
derivation, key wrapping, random generation, session/object/interface management, ...) — see the
single, authoritative comparison table on the HSM keys & operations page:
Supported operations and mechanisms.
That table contrasts, side by side, what this provider DLL (cosmian_pkcs11, acting as an HSM
provider) supports against what the Eviden KMS server itself supports as an HSM-delegation
client (crate/hsm/base_hsm) — keeping a single source of truth for both roles.
CKM_AES_GCM
CKM_AES_GCM performs AES-GCM authenticated encryption/decryption through the KMS, using the
CK_GCM_PARAMS structure to carry the initialization vector (IV), optional additional
authenticated data (AAD), and tag length:
pIv/ulIvLen: IV, 1 to 128 bytes (a 12-byte/96-bit IV is the recommended default).pAAD/ulAADLen: optional AAD, 0 to 1 MiB (pAADmay beNULLwhenulAADLenis 0).ulTagBits: must be exactly128— the KMS's AES-GCM backend always produces/verifies a 128-bit (16-byte) authentication tag; any other value is rejected withCKR_MECHANISM_INVALID.
C_Encrypt returns ciphertext || tag (the 16-byte tag appended after the ciphertext), and
C_Decrypt expects that same ciphertext || tag layout as input — this matches the convention
used by OpenSSL's and most other PKCS#11 AES-GCM implementations.
CK_BYTE iv[12] = { /* random IV */ };
CK_BYTE aad[] = "context-binding-data";
CK_GCM_PARAMS gcm_params = {
.pIv = iv, .ulIvLen = sizeof(iv), .ulIvBits = 0,
.pAAD = aad, .ulAADLen = sizeof(aad) - 1,
.ulTagBits = 128,
};
CK_MECHANISM mechanism = { CKM_AES_GCM, &gcm_params, sizeof(gcm_params) };
C_EncryptInit(session, &mechanism, key_handle);
/* ciphertext buffer must be at least plaintext_len + 16 bytes (for the appended tag) */
C_Encrypt(session, plaintext, plaintext_len, ciphertext, &ciphertext_len);
Backward compatibility
No configuration change and no code change are required to keep using the PKCS#11 provider library
as before: existing v2.40-only consumers keep calling C_GetFunctionList exactly as they always
have, and every previously-supported mechanism (CKM_AES_CBC, CKM_RSA_PKCS, CKM_ECDSA,
CKM_EDDSA, etc.) is unchanged. CKM_AES_GCM and the v3.0 interfaces discovery entry points are
new, optional capabilities.
Logging
By default the PKCS#11 module logs to cosmian-pkcs11.log in ~/.cosmian/, except on Windows
where it logs next to the loaded DLL instead (the Oracle Database TDE external-table service
account, for instance, has no writable home directory). On Linux, if the
COSMIAN_PKCS11_LOGGING_FOLDER environment variable is set, its value is used as the log
directory instead of ~/.cosmian/. The COSMIAN_PKCS11_LOGGING_LEVEL environment variable
controls the logging level (trace, debug, info, warn, or error; defaults to info).
REST Native Crypto API (/v1/crypto)
The Eviden KMS exposes a lightweight REST Native Crypto API under the /v1/crypto path.
This API follows the JOSE (JSON Object Signing and Encryption) conventions from
RFC 7516 (JWE),
RFC 7515 (JWS), and
RFC 7518 (JWA).
Key material never leaves the KMS. Only ciphertext, signatures, and MACs travel over the network.
Table of Contents
- Authentication
- Endpoints
- Key tag management
- Error responses
- Known limitations
- Algorithm support matrix
Authentication
The /v1/crypto endpoints share the same authentication as the rest of the KMS API.
Pass a JWT bearer token, a TLS client certificate, or an API token, depending on your
server configuration. See Authentication.
Endpoints
POST /v1/crypto/keys
Generate or import a cryptographic key (or key pair) in the KMS. The request follows JWK
conventions — specify kty (key type) and alg (algorithm) at minimum.
- Generate: omit key material fields to create a new random key.
- Import: include key material (
kfor symmetric,dfor asymmetric) to import an existing key.
Request body
{
"kty": "oct",
"alg": "A256GCM"
}
| Field | Required | Description |
|---|---|---|
kty | ✓ | Key type: oct (symmetric), RSA, EC, OKP (non-FIPS) |
alg | ✓ | JOSE algorithm identifier (determines key size and usage) |
crv | EC/OKP | Curve name: P-256, P-384, P-521, Ed25519 (non-FIPS) |
k | import oct | Base64url-encoded symmetric key material |
d | import EC/RSA/OKP | Base64url-encoded private key scalar (EC/OKP) or private exponent (RSA) |
n | import RSA | Base64url-encoded RSA modulus |
e | import RSA | Base64url-encoded RSA public exponent |
p | import RSA | Base64url-encoded first prime factor |
q | import RSA | Base64url-encoded second prime factor |
dp | import RSA | Base64url-encoded d mod (p-1) |
dq | import RSA | Base64url-encoded d mod (q-1) |
qi | import RSA | Base64url-encoded CRT coefficient (q^-1 mod p) |
Response body
{
"kid": "<key-uuid>",
"kid_public": "<public-key-uuid>" // only for generated asymmetric key pairs
}
Note: Imported asymmetric keys return
kid_public: nullbecause only the private key is stored. The KMS derives the public key internally when needed for verification or encryption.
Examples
Symmetric key generation (AES-256-GCM):
{ "kty": "oct", "alg": "A256GCM" }
Symmetric key import (HMAC-SHA256):
{ "kty": "oct", "alg": "HS256", "k": "<base64url-encoded-32-byte-key>" }
RSA key pair generation (PS256):
{ "kty": "RSA", "alg": "PS256" }
EC key import (P-256):
{ "kty": "EC", "crv": "P-256", "alg": "ES256", "d": "<base64url-encoded-scalar>" }
RSA key import:
{
"kty": "RSA", "alg": "RS256",
"n": "<modulus>", "e": "AQAB", "d": "<private-exponent>",
"p": "<prime1>", "q": "<prime2>",
"dp": "<exponent1>", "dq": "<exponent2>", "qi": "<coefficient>"
}
DELETE /v1/crypto/keys/{kid}
Destroy (permanently delete) a key from the KMS. The key is first revoked (deactivated) then removed from the database, including any linked public/private key in the pair.
Path parameters
| Parameter | Description |
|---|---|
kid | The UUID of the key to destroy |
Response
- 204 No Content on success (empty body).
POST /v1/crypto/keys/unwrap
Unwrap (decrypt) a JWE encrypted_key using an RSA private key and import the
resulting symmetric CEK into the KMS as a managed key. The raw key material is
never returned to the caller — only a kid identifier is provided.
This endpoint is designed for the JWE decryption use case where the same CEK is
reused across multiple messages: unwrap once, then decrypt subsequent ciphertexts
using POST /v1/crypto/decrypt with alg=dir.
Supported alg values: RSA-OAEP, RSA-OAEP-256.
Supported enc values: A128GCM, A192GCM, A256GCM.
Flow — Unwrap CEK then decrypt
sequenceDiagram
participant Client
participant KMS
Note over Client,KMS: Prerequisite: RSA key pair exists in KMS
Client->>KMS: POST /v1/crypto/keys/unwrap<br/>{protected: {alg,enc,kid}, encrypted_key}
Note over KMS: RSA-OAEP decrypt → CEK<br/>Import CEK as Active symmetric key
KMS-->>Client: {"kid":"<cek-uuid>","kty":"oct","alg":"A256GCM","key_ops":[...]}
Client->>KMS: POST /v1/crypto/decrypt<br/>{protected: {alg:"dir",enc,kid:"<cek-uuid>"},<br/>iv, ciphertext, tag}
Note over KMS: AES-GCM decrypt with persisted CEK
KMS-->>Client: {"kid":"<cek-uuid>","data":"..."}
Request body
{
"protected": "<base64url JWE Protected Header>",
"encrypted_key": "<base64url wrapped CEK>"
}
| Field | Required | Description |
|---|---|---|
protected | ✓ | Base64url-encoded JWE Protected Header (must contain alg, enc, kid) |
encrypted_key | ✓ | Base64url-encoded RSA-OAEP-wrapped CEK (must be non-empty) |
The protected header must decode to a JSON object containing:
| Header field | Required | Description |
|---|---|---|
kid | ✓ | UUID of the RSA private key (or its linked public key) |
alg | ✓ | RSA-OAEP or RSA-OAEP-256 |
enc | ✓ | A128GCM, A192GCM, or A256GCM (determines expected CEK size) |
Response body
{
"kid": "<cek-uuid>",
"kty": "oct",
"alg": "A256GCM",
"key_ops": ["encrypt", "decrypt"]
}
| Field | Description |
|---|---|
kid | UUID of the imported symmetric key in the KMS |
kty | Always oct (symmetric key) |
alg | The enc algorithm from the protected header |
key_ops | Allowed operations: ["encrypt", "decrypt"] |
Error conditions
| Condition | Status | Error code |
|---|---|---|
Invalid base64url in protected or encrypted_key | 400 | bad_request |
Missing kid, alg, or enc in protected header | 400 | bad_request |
Empty encrypted_key | 400 | bad_request |
Unsupported algorithm (e.g., dir, A128KW) | 422 | unsupported_algorithm |
| Private key not found | 404 | not_found |
| Decryption failure (wrong key, corrupted data) | 422 | decryption_failed |
CEK size does not match enc algorithm | 422 | crypto_failure |
Example (curl)
# Assume $PROTECTED and $ENCRYPTED_KEY come from a JWE token
# The protected header contains {"alg":"RSA-OAEP-256","enc":"A256GCM","kid":"<priv-uuid>"}
# 1. Unwrap the CEK
UNWRAP_RESP=$(curl -s -X POST https://kms.example.com/v1/crypto/keys/unwrap \
-H 'Content-Type: application/json' \
-d "{\"protected\":\"$PROTECTED\",\"encrypted_key\":\"$ENCRYPTED_KEY\"}")
CEK_KID=$(echo "$UNWRAP_RESP" | jq -r '.kid')
# 2. Decrypt subsequent ciphertexts using the persisted CEK
# Build a protected header for direct decryption:
DIR_HEADER=$(printf '{"alg":"dir","enc":"A256GCM","kid":"%s"}' "$CEK_KID" \
| base64 | tr '+/' '-_' | tr -d '=')
curl -s -X POST https://kms.example.com/v1/crypto/decrypt \
-H 'Content-Type: application/json' \
-d "{\"protected\":\"$DIR_HEADER\",\"iv\":\"$IV\",\"ciphertext\":\"$CT\",\"tag\":\"$TAG\"}" \
| jq -r '.data | @base64d'
# 3. Clean up
curl -s -X DELETE https://kms.example.com/v1/crypto/keys/$CEK_KID
POST /v1/crypto/encrypt
Encrypt plaintext using either:
- Direct encryption (
alg=dir): uses a symmetric key directly as the content encryption key (CEK). - RSA-OAEP key wrapping (
alg=RSA-OAEPoralg=RSA-OAEP-256): generates an ephemeral CEK, wraps it with the RSA public key, and encrypts data with AES-GCM.
Supported alg values: dir, RSA-OAEP, RSA-OAEP-256.
Supported enc values: A128GCM, A192GCM, A256GCM.
Flow — Direct (dir)
sequenceDiagram
participant Client
participant KMS
Client->>KMS: POST /v1/crypto/keys {"kty":"oct","alg":"A256GCM"}
KMS-->>Client: {"kid":"<uuid>"}
Client->>KMS: POST /v1/crypto/encrypt {"kid":"<uuid>","alg":"dir","enc":"A256GCM","data":"..."}
Note over KMS: AES-GCM encrypt with symmetric key
KMS-->>Client: {"protected":"...","encrypted_key":"","iv":"...","ciphertext":"...","tag":"..."}
Client->>KMS: POST /v1/crypto/decrypt {"protected":"...","iv":"...","ciphertext":"...","tag":"..."}
Note over KMS: AES-GCM decrypt with symmetric key
KMS-->>Client: {"kid":"<uuid>","data":"..."}
Client->>KMS: DELETE /v1/crypto/keys/<uuid>
KMS-->>Client: 204 No Content
Flow — RSA-OAEP
sequenceDiagram
participant Client
participant KMS
Client->>KMS: POST /v1/crypto/keys {"kty":"RSA","bits":2048}
KMS-->>Client: {"kid":"<priv-uuid>","kid_public":"<pub-uuid>"}
Client->>KMS: POST /v1/crypto/encrypt {"kid":"<pub-uuid>","alg":"RSA-OAEP-256","enc":"A256GCM","data":"..."}
Note over KMS: Generate ephemeral CEK<br/>Wrap CEK with RSA-OAEP-256<br/>AES-GCM encrypt data<br/>Wipe CEK from memory
KMS-->>Client: {"protected":"...","encrypted_key":"<wrapped-CEK>","iv":"...","ciphertext":"...","tag":"..."}
Client->>KMS: POST /v1/crypto/decrypt {"protected":"...","encrypted_key":"<wrapped-CEK>","iv":"...","ciphertext":"...","tag":"..."}
Note over KMS: RSA-OAEP unwrap → CEK<br/>AES-GCM decrypt<br/>(implicit rejection on OAEP failure)
KMS-->>Client: {"kid":"<priv-uuid>","data":"..."}
Client->>KMS: DELETE /v1/crypto/keys/<priv-uuid>
KMS-->>Client: 204 No Content (cascades to public key)
Request body
{
"kid": "<key-uuid>",
"alg": "RSA-OAEP",
"enc": "A256GCM",
"data": "<base64url-encoded plaintext>",
"aad": "<base64url-encoded AAD>" // optional
}
| Field | Required | Description |
|---|---|---|
kid | ✓ | Key UUID (symmetric key for dir; RSA private or public key for RSA-OAEP/RSA-OAEP-256) |
alg | ✓ | Key management algorithm: dir, RSA-OAEP, or RSA-OAEP-256 |
enc | ✓ | Content encryption algorithm: A128GCM, A192GCM, A256GCM |
data | ✓ | Base64url-encoded plaintext |
aad | Optional additional authenticated data (base64url) |
Response body (Flattened JWE)
{
"protected": "<base64url JWE Protected Header>",
"encrypted_key": "<base64url wrapped CEK>",
"iv": "<base64url IV>",
"ciphertext": "<base64url ciphertext>",
"tag": "<base64url GCM authentication tag>",
"aad": "<base64url AAD>" // omitted when not supplied
}
For alg=dir, the encrypted_key field is an empty string. For RSA-OAEP, it contains
the RSA-OAEP-wrapped CEK.
Example — Direct encryption (curl)
# 1. Create a 256-bit AES key
KID=$(curl -s -X POST https://kms.example.com/v1/crypto/keys \
-H 'Content-Type: application/json' \
-d '{"kty":"oct","alg":"A256GCM"}' | jq -r '.kid')
# 2. Encrypt
DATA_B64=$(printf 'Hello KMS!' | base64 | tr '+/' '-_' | tr -d '=')
JWE=$(curl -s -X POST https://kms.example.com/v1/crypto/encrypt \
-H 'Content-Type: application/json' \
-d "{\"kid\":\"$KID\",\"alg\":\"dir\",\"enc\":\"A256GCM\",\"data\":\"$DATA_B64\"}")
# 3. Decrypt
curl -s -X POST https://kms.example.com/v1/crypto/decrypt \
-H 'Content-Type: application/json' \
-d "$JWE" | jq -r '.data | @base64d'
# 4. Clean up
curl -s -X DELETE https://kms.example.com/v1/crypto/keys/$KID
Example — RSA-OAEP (curl)
# 1. Create an RSA-2048 key pair
KEYS=$(curl -s -X POST https://kms.example.com/v1/crypto/keys \
-H 'Content-Type: application/json' \
-d '{"kty":"RSA","bits":2048}')
KID=$(echo "$KEYS" | jq -r '.kid')
KID_PUB=$(echo "$KEYS" | jq -r '.kid_public')
# 2. Encrypt with RSA-OAEP-256 using the public key
DATA_B64=$(printf 'Secret message' | base64 | tr '+/' '-_' | tr -d '=')
JWE=$(curl -s -X POST https://kms.example.com/v1/crypto/encrypt \
-H 'Content-Type: application/json' \
-d "{\"kid\":\"$KID_PUB\",\"alg\":\"RSA-OAEP-256\",\"enc\":\"A256GCM\",\"data\":\"$DATA_B64\"}")
# 3. Decrypt (kid in protected header resolves to private key automatically)
curl -s -X POST https://kms.example.com/v1/crypto/decrypt \
-H 'Content-Type: application/json' \
-d "$JWE" | jq -r '.data | @base64d'
# 4. Clean up (cascades to the linked public key)
curl -s -X DELETE https://kms.example.com/v1/crypto/keys/$KID
POST /v1/crypto/decrypt
Decrypt a Flattened JWE token.
Supports both alg=dir (direct AES-GCM) and alg=RSA-OAEP/RSA-OAEP-256
(RSA-OAEP key unwrapping + AES-GCM content decryption).
The kid in the JWE protected header identifies the decryption key. For RSA-OAEP,
this can be either the private key or the public key UUID (the server resolves to
the private key automatically).
The decrypt endpoint has no standalone flow diagram — it is the second half of the encrypt/decrypt flows shown in the encrypt section above.
Request body
{
"protected": "<base64url JWE Protected Header>",
"encrypted_key": "<base64url wrapped CEK>",
"iv": "<base64url IV>",
"ciphertext": "<base64url ciphertext>",
"tag": "<base64url GCM authentication tag>",
"aad": "<base64url AAD>" // optional; must match the value used during encryption
}
| Field | Required | Description |
|---|---|---|
protected | ✓ | Base64url-encoded JWE Protected Header (must contain alg, enc, kid) |
encrypted_key | For RSA-OAEP | The RSA-OAEP-wrapped CEK (empty or absent for dir) |
iv | ✓ | 12-byte initialization vector (base64url) |
ciphertext | ✓ | Encrypted data (base64url) |
tag | ✓ | 16-byte GCM authentication tag (base64url) |
aad | Additional authenticated data (base64url) |
Response body
{
"kid": "<key-uuid>",
"data": "<base64url plaintext>"
}
Security: implicit rejection
For RSA-OAEP decryption, the server implements implicit rejection as recommended
by RFC 7516 §11.5. If the
RSA-OAEP unwrap fails (indicating a tampered or invalid encrypted_key), the server
substitutes a random CEK and proceeds with AES-GCM decryption — which will fail
with the same generic "Decryption failed" error. This prevents padding oracle attacks.
Example (curl)
# JWE is the JSON response from POST /v1/crypto/encrypt
PLAINTEXT=$(curl -s -X POST https://kms.example.com/v1/crypto/decrypt \
-H 'Content-Type: application/json' \
-d "$JWE" | jq -r '.data | @base64d')
echo "$PLAINTEXT"
POST /v1/crypto/sign
Sign data using an asymmetric private key. Returns a detached JWS (payload not included in the response).
Supported algorithms: RS256, RS384, RS512, PS256, PS384, PS512,
ES256, ES384, ES512; EdDSA and MLDSA44 (non-FIPS builds only).
Flow — Sign and verify
sequenceDiagram
participant Client
participant KMS
Client->>KMS: POST /v1/crypto/keys {"kty":"RSA","alg":"PS256"}
KMS-->>Client: {"kid":"<priv-uuid>","kid_public":"<pub-uuid>"}
Client->>KMS: POST /v1/crypto/sign {"kid":"<priv-uuid>","alg":"PS256","data":"<b64>"}
Note over KMS: RSA-PSS sign with private key
KMS-->>Client: {"protected":"<b64-header>","signature":"<b64>"}
Client->>KMS: POST /v1/crypto/verify {"protected":"<b64-header>","data":"<b64>","signature":"<b64>"}
Note over KMS: Decode protected header → kid<br/>Fetch public key<br/>RSA-PSS verify
KMS-->>Client: {"kid":"<pub-uuid>","valid":true}
Client->>KMS: DELETE /v1/crypto/keys/<priv-uuid>
KMS-->>Client: 204 No Content (cascades to public key)
Request body
{
"kid": "<private-key-uuid>",
"alg": "RS256",
"data": "<base64url payload>"
}
Response body
{
"protected": "<base64url JWS Protected Header>",
"signature": "<base64url signature>"
}
Example (curl)
# 1. Create an RSA-2048 key pair
KEYS=$(curl -s -X POST https://kms.example.com/v1/crypto/keys \
-H 'Content-Type: application/json' \
-d '{"kty":"RSA","alg":"RS256"}')
KID=$(echo "$KEYS" | jq -r '.kid')
# 2. Sign
DATA_B64=$(printf 'data to sign' | base64 | tr '+/' '-_' | tr -d '=')
SIGN_RESP=$(curl -s -X POST https://kms.example.com/v1/crypto/sign \
-H 'Content-Type: application/json' \
-d "{\"kid\":\"$KID\",\"alg\":\"RS256\",\"data\":\"$DATA_B64\"}")
# 3. Verify
curl -s -X POST https://kms.example.com/v1/crypto/verify \
-H 'Content-Type: application/json' \
-d "$(jq -n --argjson s "$SIGN_RESP" --arg d "$DATA_B64" \
'{protected:$s.protected,data:$d,signature:$s.signature}')"
# 4. Clean up
curl -s -X DELETE https://kms.example.com/v1/crypto/keys/$KID
POST /v1/crypto/verify
Verify a detached JWS signature. The KMS looks up the public key from the protected header.
Required: the JWS protected header decoded from
protectedmust contain akidfield set to the KMS public key UUID. Requests withoutkidare rejected with400. This field is set automatically byPOST /v1/crypto/sign.The verify endpoint is the second half of the sign/verify flow shown in the sign section above.
Request body
{
"protected": "<base64url JWS Protected Header (contains kid + alg)>",
"data": "<base64url payload>",
"signature": "<base64url signature>"
}
Response body
{
"kid": "<public-key-uuid>",
"valid": true // false when the signature does not match
}
POST /v1/crypto/mac
Compute or verify a MAC (Message Authentication Code).
- Compute: omit the
macfield → the KMS returns the computed MAC value. - Verify: include the
macfield → the KMS returnsvalid: true/false.
Supported algorithms: HS256, HS384, HS512.
Flow — MAC compute and verify
sequenceDiagram
participant Client
participant KMS
Client->>KMS: POST /v1/crypto/keys {"kty":"oct","alg":"HS256"}
KMS-->>Client: {"kid":"<uuid>"}
Client->>KMS: POST /v1/crypto/mac {"kid":"<uuid>","alg":"HS256","data":"<b64>"}
Note over KMS: HMAC-SHA256 compute
KMS-->>Client: {"kid":"<uuid>","mac":"<b64>"}
Client->>KMS: POST /v1/crypto/mac {"kid":"<uuid>","alg":"HS256","data":"<b64>","mac":"<b64>"}
Note over KMS: HMAC-SHA256 verify
KMS-->>Client: {"kid":"<uuid>","valid":true}
Client->>KMS: DELETE /v1/crypto/keys/<uuid>
KMS-->>Client: 204 No Content
Request body
{
"kid": "<key-uuid>",
"alg": "HS256",
"data": "<base64url data>",
"mac": "<base64url MAC to verify>" // omit to compute
}
Response body — compute
{
"kid": "<key-uuid>",
"mac": "<base64url MAC>"
}
Response body — verify
{
"kid": "<key-uuid>",
"valid": true // false when the MAC does not match
}
RFC 7515 §A.1 known-answer vector
The MAC value below is pinned by an integration test (test_rfc7515_a1_hs256_known_answer).
It reproduces the exact HS256 result from RFC 7515 §Appendix A.1.
| Field | Value |
|---|---|
| Key (base64url) | AyM1SysPpbyDfgZld3umj1qzKObwVMkoqQ-EstJQLr_T-1qS0gZH75aKtMN3Yj0iPS4hcgUuTwjAzZr1Z9CAow |
| Data | JWS Signing Input from RFC 7515 §A.1 |
alg | HS256 |
Expected mac | dBjftJeZ4CVP-mB92K27uhbUJU1p1r_wW1gFWFOEjXk |
Example (curl)
# 1. Create an HMAC-SHA256 key
KID=$(curl -s -X POST https://kms.example.com/v1/crypto/keys \
-H 'Content-Type: application/json' \
-d '{"kty":"oct","alg":"HS256"}' | jq -r '.kid')
# 2. Compute MAC
DATA_B64=$(printf 'message' | base64 | tr '+/' '-_' | tr -d '=')
MAC_RESP=$(curl -s -X POST https://kms.example.com/v1/crypto/mac \
-H 'Content-Type: application/json' \
-d "{\"kid\":\"$KID\",\"alg\":\"HS256\",\"data\":\"$DATA_B64\"}")
MAC_VALUE=$(echo "$MAC_RESP" | jq -r '.mac')
# 3. Verify MAC
curl -s -X POST https://kms.example.com/v1/crypto/mac \
-H 'Content-Type: application/json' \
-d "{\"kid\":\"$KID\",\"alg\":\"HS256\",\"data\":\"$DATA_B64\",\"mac\":\"$MAC_VALUE\"}"
# 4. Clean up
curl -s -X DELETE https://kms.example.com/v1/crypto/keys/$KID
Key tag management
User-defined string tags can be attached to any key stored in the KMS. Tags
enable key discovery (for example the JWKS endpoint returns only keys tagged
"jwks") and custom key grouping.
Rules:
- Tags are arbitrary, non-empty strings.
- Tags starting with
_are system tags (_kk,_sk,_pk,_cert, …) and cannot be created or deleted through these endpoints. - All write operations are idempotent: adding an existing tag or removing a missing tag has no effect.
POST /v1/crypto/keys/{kid}/tags
Add one or more user tags to a key. Existing tags are preserved.
Requires the add_attribute access right on the key (or ownership / get), the
same as the KMIP AddAttribute operation.
Request body
{ "tags": ["jwks", "prod"] }
| Field | Required | Description |
|---|---|---|
tags | ✓ | Array of non-empty tag strings (must not start with _) |
Response body
{ "kid": "<key-uuid>", "tags": ["jwks", "prod"] }
The tags array reflects the complete current set of user tags after the
operation (sorted, system tags excluded).
Status codes
| Status | Meaning |
|---|---|
200 | Tags updated successfully |
400 | Empty tag string or _-prefixed (system) tag supplied |
403 | Key access denied |
404 | Key not found |
curl example
curl -s -X POST "https://kms.example.com/v1/crypto/keys/${KID}/tags" \
-H "Authorization: Bearer ${TOKEN}" \
-H "Content-Type: application/json" \
-d '{"tags": ["jwks", "prod"]}'
DELETE /v1/crypto/keys/{kid}/tags
Remove one or more user tags from a key. Tags not present on the key are silently ignored.
Requires the delete_attribute access right on the key (or ownership / get), the
same as the KMIP DeleteAttribute operation.
Request body
{ "tags": ["prod"] }
| Field | Required | Description |
|---|---|---|
tags | ✓ | Array of tag strings to remove (must not start with _) |
Response body
{ "kid": "<key-uuid>", "tags": ["jwks"] }
The tags array reflects the remaining user tags after removal.
Status codes
| Status | Meaning |
|---|---|
200 | Tags updated successfully |
400 | Empty tag string or _-prefixed (system) tag supplied |
403 | Key access denied |
404 | Key not found |
curl example
curl -s -X DELETE "https://kms.example.com/v1/crypto/keys/${KID}/tags" \
-H "Authorization: Bearer ${TOKEN}" \
-H "Content-Type: application/json" \
-d '{"tags": ["prod"]}'
GET /v1/crypto/keys/{kid}/tags
List the current user tags on a key. No body required.
Response body
{ "kid": "<key-uuid>", "tags": ["jwks"] }
System tags are never included.
Status codes
| Status | Meaning |
|---|---|
200 | OK |
403 | Key access denied |
404 | Key not found |
curl example
curl -s "https://kms.example.com/v1/crypto/keys/${KID}/tags" \
-H "Authorization: Bearer ${TOKEN}"
Error responses
All endpoints return a JSON body { "error": "<type>", "description": "<detail>" } with
an appropriate HTTP status code:
| Status | Meaning |
|---|---|
400 | Bad request (malformed base64, missing field, etc.) |
403 | Forbidden (key access denied) |
404 | Key not found |
422 | Unsupported or unknown algorithm |
500 | Internal server error / cryptographic failure |
Known limitations
The following JOSE features are not yet implemented in this API.
| Missing feature | Blocked by |
|---|---|
JWE alg=RSA-PKCS1-v1_5 + enc=A128CBC-HS256 (RFC 7516 §A.2) | RSA-PKCS1v1.5 + AES-CBC not implemented |
JWE alg=A128KW + enc=A128CBC-HS256 (RFC 7516 §A.3) | AES key-wrap + AES-CBC not implemented |
JWE alg=dir + enc=A128CBC-HS256 (RFC 7516 §A.5) | AES-CBC enc not implemented |
JWE alg=ECDH-ES (RFC 7518 §C) | ECDH-ES key agreement not implemented |
JWS verify without kid in protected header | kid-less verify not yet supported |
Full RFC 7515 §A.2/A.3/A.4 known-answer tests are deferred until kid-less verification is supported (current tests do round-trips with freshly generated keys).
Algorithm support matrix
Key management algorithms (alg)
| Algorithm | FIPS | Operation | Notes |
|---|---|---|---|
dir | ✓ | encrypt / decrypt | Direct use of symmetric key as CEK |
RSA-OAEP | ✓ | encrypt / decrypt / unwrap | RSA-OAEP with SHA-1 (RFC 7518 §4.3) |
RSA-OAEP-256 | ✓ | encrypt / decrypt / unwrap | RSA-OAEP with SHA-256 (RFC 7518 §4.3) |
Content encryption algorithms (enc)
| Algorithm | FIPS | Key size | Notes |
|---|---|---|---|
A128GCM | ✓ | 128 bits | AES-GCM with 96-bit IV, 128-bit tag |
A192GCM | ✓ | 192 bits | AES-GCM with 96-bit IV, 128-bit tag |
A256GCM | ✓ | 256 bits | AES-GCM with 96-bit IV, 128-bit tag |
Signature algorithms
| Algorithm | FIPS | Operation |
|---|---|---|
RS256/384/512 | ✓ | sign / verify |
PS256/384/512 | ✓ | sign / verify |
ES256/384/512 | ✓ | sign / verify |
EdDSA | ✗ | sign / verify (non-FIPS) |
MLDSA44 | ✗ | sign / verify (non-FIPS) |
MAC algorithms
| Algorithm | FIPS | Operation |
|---|---|---|
HS256/384/512 | ✓ | mac compute / verify |
JWE Decryption — Unwrap without Key Exposure
This use case describes how to decrypt JWE (JSON Web Encryption) tokens using the Eviden KMS without ever exposing the symmetric content encryption key (CEK) to the calling application.
Problem Statement
You receive JWE tokens with the structure: Kpub(Ksym) . Ksym(value)
Ksym(value): the payloadvalueis encrypted with a symmetric AES keyKsym(the CEK)Kpub(Ksym): the CEK is wrapped (encrypted) with an RSA public keyKpub- The
kid(Key ID) of the RSA key pair is known
Security constraint: the calling application must never have access to Ksym.
Solution: One-Shot JWE Decrypt (No Key Persistence)
If the full JWE is available at each decryption call (including the encrypted_key
field), the REST crypto endpoint performs all operations server-side in a single request.
Ksym is used ephemerally in memory and immediately zeroized.
No additional development required.
Flow
sequenceDiagram
participant App as Application
participant KMS as KMS Server
participant HSM as HSM (optional)
App->>KMS: POST /v1/crypto/decrypt<br/>{protected, encrypted_key=Kpub(Ksym),<br/>iv, ciphertext=Ksym(value), tag}
alt Kpriv in HSM
KMS->>HSM: C_Decrypt(handle_kpriv, Kpub(Ksym))
HSM-->>KMS: Ksym (stays in server RAM only)
else Kpriv in database
KMS->>KMS: RSA-OAEP decrypt(Kpriv, Kpub(Ksym)) → Ksym
end
KMS->>KMS: AES-GCM decrypt(Ksym, iv, ciphertext, tag) → value
KMS->>KMS: Zeroize(Ksym)
KMS-->>App: {"kid":"<kid>", "data":"<base64url(value)>"}
Request
curl -s -X POST https://kms.example.com/v1/crypto/decrypt \
-H 'Content-Type: application/json' \
-d '{
"protected": "<base64url JWE header: {\"alg\":\"RSA-OAEP-256\",\"enc\":\"A256GCM\",\"kid\":\"<kid>\"}>",
"encrypted_key": "<base64url of Kpub(Ksym)>",
"iv": "<base64url of 12-byte IV>",
"ciphertext": "<base64url of Ksym(value)>",
"tag": "<base64url of 16-byte GCM tag>"
}'
Response
{ "kid": "<kid>", "data": "<base64url of decrypted value>" }
The application receives value — never Ksym.
Server Configuration (TOML)
Minimal configuration with HSM holding the RSA private key:
[[hsm_instances]]
hsm_model = "softhsm2" # or: utimaco, proteccio, crypt2pay, smartcardhsm
hsm_admin = ["admin"]
hsm_slot = [0]
hsm_password = ["changeme"]
[http]
port = 9998
hostname = "0.0.0.0"
[db]
database_type = "sqlite"
sqlite_path = "data/kms-objects"
If Kpriv is stored in the HSM with UID hsm::softhsm2::0::my_rsa_key, set the
kid in the JWE protected header to this UID. The KMS automatically routes the
RSA-OAEP decrypt to the HSM via the crypto oracle.
Re-encryption
After decryption, re-encrypt value with a new key in the same call flow:
curl -s -X POST https://kms.example.com/v1/crypto/encrypt \
-H 'Content-Type: application/json' \
-d '{
"kid": "<kid_new_key>",
"alg": "RSA-OAEP-256",
"enc": "A256GCM",
"data": "<base64url of value>"
}'
Advanced: Persisting Ksym in the KMS (Key Unwrap Endpoint)
If the application receives subsequent ciphertexts Ksym(value) without the
Kpub(Ksym) wrapper (i.e., the same CEK is reused across multiple messages), then
Ksym must be persisted for later reuse. The POST /v1/crypto/keys/unwrap endpoint
unwraps the CEK using RSA-OAEP and imports it as a managed symmetric key — without
ever exposing the raw key material to the calling application.
Flow
sequenceDiagram
participant App as Application
participant KMS as KMS Server
participant HSM as HSM (optional)
Note over App,KMS: Step 1 — Unwrap and persist Ksym (once)
App->>KMS: POST /v1/crypto/keys/unwrap<br/>{protected: {alg:"RSA-OAEP-256",<br/>enc:"A256GCM", kid:"<kpriv_uid>"},<br/>encrypted_key: Kpub(Ksym)}
alt Kpriv in HSM
KMS->>HSM: C_Decrypt(handle_kpriv, Kpub(Ksym))
HSM-->>KMS: Ksym
else Kpriv in database
KMS->>KMS: RSA-OAEP decrypt(Kpriv, Kpub(Ksym)) → Ksym
end
KMS->>KMS: Import Ksym as Active symmetric key
KMS-->>App: {"kid":"<ksym_uid>", "kty":"oct",<br/>"alg":"A256GCM", "key_ops":["encrypt","decrypt"]}
Note over App,KMS: Step 2 — Decrypt with persisted Ksym (subsequent calls)
App->>KMS: POST /v1/crypto/decrypt<br/>{protected: {alg:"dir", enc:"A256GCM",<br/>kid:"<ksym_uid>"},<br/>iv, ciphertext, tag}
KMS->>KMS: AES-GCM decrypt(Ksym, iv, ciphertext, tag) → value
KMS-->>App: {"kid":"<ksym_uid>", "data":"<base64url(value)>"}
Step 1: Unwrap the CEK
curl -s -X POST https://kms.example.com/v1/crypto/keys/unwrap \
-H 'Content-Type: application/json' \
-d '{
"protected": "<base64url of {\"alg\":\"RSA-OAEP-256\",\"enc\":\"A256GCM\",\"kid\":\"<kpriv_uid>\"}>",
"encrypted_key": "<base64url of Kpub(Ksym)>"
}'
Response
{
"kid": "<ksym_uid>",
"kty": "oct",
"alg": "A256GCM",
"key_ops": ["encrypt", "decrypt"]
}
The symmetric key is now stored in the KMS. The application receives only the kid
identifier — never the raw key bytes.
Step 2: Decrypt with the Persisted Key
curl -s -X POST https://kms.example.com/v1/crypto/decrypt \
-H 'Content-Type: application/json' \
-d '{
"protected": "<base64url of {\"alg\":\"dir\",\"enc\":\"A256GCM\",\"kid\":\"<ksym_uid>\"}>",
"iv": "<base64url of 12-byte IV>",
"ciphertext": "<base64url of Ksym(value)>",
"tag": "<base64url of 16-byte GCM tag>"
}'
Response
{ "kid": "<ksym_uid>", "data": "<base64url of decrypted value>" }
Supported Algorithms
alg (key wrapping) | enc (content encryption) |
|---|---|
RSA-OAEP | A128GCM, A192GCM, A256GCM |
RSA-OAEP-256 | A128GCM, A192GCM, A256GCM |
Error Conditions
| Condition | HTTP Status | Error Code |
|---|---|---|
Invalid base64url in protected or encrypted_key | 400 | bad_request |
Missing kid, alg, or enc in protected header | 400 | bad_request |
Empty encrypted_key | 400 | bad_request |
Unsupported algorithm (e.g., dir, A128KW) | 422 | unsupported_algorithm |
| Private key not found | 404 | not_found |
| Decryption failure (wrong key, corrupted data) | 422 | decryption_failed |
CEK size mismatch with enc algorithm | 422 | crypto_failure |
Advanced: Persisting Ksym in the HSM (Requires Development)
If the application requires that Ksym never leaves the HSM boundary (even transiently
in KMS server memory), the PKCS#11 C_UnwrapKey operation can be used to import the
key directly into the HSM hardware.
The PKCS#11 C_UnwrapKey operation is implemented in the HSM driver code but is
not yet exposed by any production KMS endpoint. Integrating it into a server
endpoint requires additional development.
Target Flow (After Development)
sequenceDiagram
participant App as Application
participant KMS as KMS Server
participant HSM as HSM
Note over App,HSM: Step 1 — Unwrap and persist Ksym (once)
App->>KMS: KMIP Import {wrapped_key=Kpub(Ksym),<br/>wrapping_key="hsm::softhsm2::0::kpriv",<br/>store_in_hsm=true}
KMS->>HSM: C_UnwrapKey(CKM_RSA_PKCS_OAEP, handle_kpriv, Kpub(Ksym))
HSM->>HSM: Decrypt + store AES key<br/>CKA_SENSITIVE=TRUE, CKA_EXTRACTABLE=FALSE
HSM-->>KMS: handle_ksym (opaque)
KMS-->>App: {"UniqueIdentifier": "hsm::softhsm2::0::ksym_123"}
Note over App,HSM: Step 2 — Decrypt with persisted Ksym (subsequent calls)
App->>KMS: POST /v1/crypto/decrypt<br/>{protected: {alg:"dir", enc:"A256GCM",<br/>kid:"hsm::softhsm2::0::ksym_123"},<br/>iv, ciphertext, tag}
KMS->>HSM: C_Decrypt(handle_ksym, iv||ciphertext||tag)
HSM-->>KMS: value
KMS-->>App: {"kid":"hsm::softhsm2::0::ksym_123", "data":"<base64url(value)>"}
The POST /v1/crypto/decrypt endpoint with alg=dir and a kid referencing an
HSM key (hsm::...) already routes to C_Decrypt on the HSM. Only Step 1
(C_UnwrapKey integration) requires development.
What Needs to be Developed
| Component | Current State | Required Change |
|---|---|---|
PKCS#11 C_UnwrapKey wrapper | ✅ Implemented (test-only) | Wire into production endpoint |
HsmStore::atomic() | Only RSA keypairs | Support symmetric key import |
| UID routing for unwrapped keys | N/A | Assign hsm::model::slot::label UID |
| KMIP Import with HSM target | Not supported | Add store_in_hsm flag or detect HSM wrapping key |
Summary
| Approach | Ksym exposed? | Ksym persisted? | Dev required? | Conformant? |
|---|---|---|---|---|
POST /v1/crypto/decrypt (RSA-OAEP, full JWE) | ❌ No | ❌ No | ❌ No | ✅ If full JWE always available |
POST /v1/crypto/keys/unwrap + alg=dir decrypt | ❌ No | ✅ Yes (KMS DB) | ❌ No | ✅ Yes |
| KMIP Decrypt + Import | ✅ Yes | ✅ Yes | ❌ No | ❌ No (violates constraint) |
HSM C_UnwrapKey + alg=dir | ❌ No | ✅ Yes (HSM) | ⚠️ Yes | ✅ Yes |
JWKS endpoint
The KMS exposes a standard RFC 7517 JWKS endpoint at:
GET /.well-known/jwks.json
By default, every public key pair created through the REST API is automatically tagged
jwks and immediately advertised in the JWKS document. No extra step is
needed for the common case.
To exclude a specific public key from the JWKS remove its jwks tag via the tag management
endpoint.
Only keys owned by the server's default_username are published. A jwks-tagged key
owned by another user is never advertised, even if it is shared with default_username
or with everyone (*): otherwise any user could place a key they control in the
server's trusted key set.
How it works
sequenceDiagram
participant Client
participant KMS
Client->>KMS: POST /v1/crypto/keys {kty, alg}
KMS-->>Client: {kid, kid_public}
Note over Client,KMS: kid_public is auto-tagged "jwks" — no extra step
Client->>KMS: GET /.well-known/jwks.json
KMS-->>Client: {keys: [{kid, kty, alg, use, n, e, ...}]}
Quickstart
# EC P-256 key for JWS (ES256)
curl -s -X POST "https://kms.example.com/v1/crypto/keys" \
-H "Authorization: Bearer ${TOKEN}" \
-H "Content-Type: application/json" \
-d '{"kty":"EC","alg":"ES256"}'
The response contains the KMS identifier for both the private key (kid) and
the public key (kid_public):
{
"kid": "<private-key-uuid>",
"kid_public": "<public-key-uuid>",
"kty": "EC",
"alg": "ES256",
"crv": "P-256",
"key_ops": ["sign", "verify"]
}
Verify the key is advertised
curl -s "https://kms.example.com/.well-known/jwks.json" | jq .
Expected output (abbreviated):
{
"keys": [
{
"kty": "EC",
"use": "sig",
"alg": "ES256",
"kid": "<public-key-uuid>",
"crv": "P-256",
"x": "...",
"y": "..."
}
]
}
Opt a key out of JWKS
Remove the jwks tag from the public key to stop advertising it. The key
material is not deleted.
curl -s -X DELETE "https://kms.example.com/v1/crypto/keys/${KID_PUBLIC}/tags" \
-H "Authorization: Bearer ${TOKEN}" \
-H "Content-Type: application/json" \
-d '{"tags": ["jwks"]}'
The response confirms the updated tag set (the jwks tag is absent):
{ "kid": "<public-key-uuid>", "tags": [] }
If you later want to re-advertise a key that was previously opted out, add thejwks tag back via https://kms.example.com/v1/crypto/keys/${KID_PUBLIC}/tags
Key rotation
During rotation, both the retiring key and the new key are present in the JWKS document for a brief overlap period, allowing relying parties to verify tokens signed by either key.
# 1. Create the new key pair — automatically tagged "jwks".
NEW_KID_PUBLIC=$(curl -s -X POST "https://kms.example.com/v1/crypto/keys" \
-H "Authorization: Bearer ${TOKEN}" \
-H "Content-Type: application/json" \
-d '{"kty":"EC","alg":"ES256"}' | jq -r .kid_public)
# 2. (overlap window) Both old and new keys appear in JWKS.
# 3. Opt the old key out of JWKS once all outstanding tokens have expired.
curl -s -X DELETE "https://kms.example.com/v1/crypto/keys/${OLD_KID_PUBLIC}/tags" \
-H "Authorization: Bearer ${TOKEN}" \
-H "Content-Type: application/json" \
-d '{"tags": ["jwks"]}'
Keys created outside the REST API
Keys created directly through the KMIP protocol (e.g. via ckms or a KMIP
client library) are not auto-tagged. To include such a key in the JWKS
document, explicitly add the jwks tag:
curl -s -X POST "https://kms.example.com/v1/crypto/keys/${KID_PUBLIC}/tags" \
-H "Authorization: Bearer ${TOKEN}" \
-H "Content-Type: application/json" \
-d '{"tags": ["jwks"]}'
Disable auto-tagging globally
By default the KMS tags every REST-created key pair for JWKS inclusion. If you prefer a fully manual opt-in model, disable auto-tagging in the server configuration:
| Method | Value |
|---|---|
| CLI flag | --jwks-endpoint-auto-tag=false |
| Environment variable | KMS_JWKS_ENDPOINT_AUTO_TAG=false |
| TOML config | jwks_endpoint_auto_tag = false |
When auto-tagging is disabled, newly created key pairs do not receive the
jwks tag. To publish a key you must tag it explicitly:
curl -s -X POST "https://kms.example.com/v1/crypto/keys/${KID_PUBLIC}/tags" \
-H "Authorization: Bearer ${TOKEN}" \
-H "Content-Type: application/json" \
-d '{"tags": ["jwks"]}'
Existing keys are not affected when you change this setting.
See also
- JOSE API — full endpoint reference
- JWE Decryption — using the KMS as a JWE decryption oracle
Eviden KMS on AWS ECS
Deploy Eviden KMS on AWS ECS (Fargate) using either a production-ready setup with an Application Load Balancer (ALB) or a fast, fully managed Express Mode deployment.
Overview
This repository documents two supported ways to run Eviden KMS on AWS ECS.
| Mode | Use case |
|---|---|
| Fargate + ALB | Production, custom networking, HTTPS, persistence |
| Express Mode | PoC, demos, quick testing |
Prerequisites
- AWS account with access to:
- ECS
- EC2 (Security Groups)
- Elastic Load Balancing
- A VPC with at least two subnets
- Docker image:
ghcr.io/cosmian/kms:latest - KMS CLI installed
Standard Deployment (Fargate + ALB)
1. Architecture
Traffic flows from the client to the ALB on the public HTTP port, which then routes requests to the private Fargate container on the application port.
flowchart LR
client["Client Station<br/>(KMS CLI)"]
subgraph aws["AWS Cloud"]
alb["ALB<br/>(Public Subnet)<br/>Listener Port 80"]
subgraph ecs["ECS Fargate (Private/Public)"]
container["Container<br/>Port 9998"]
end
sg_alb["Security Group<br/>(SG-ALB)"]
sg_ecs["Security Group<br/>(SG-ECS)"]
end
client -- "HTTP :80" --> alb
alb --> container
sg_alb -. controls .-> alb
sg_ecs -. controls .-> container
2. Deployment Steps
Networking
- ALB runs in public subnets
- ECS tasks can run in public or private subnets
- NAT Gateway is required if tasks run in private subnets
Security Groups
ALB Security Group
- Inbound: 80/TCP (and 443/TCP if HTTPS is enabled)
- Outbound: all traffic
ECS Task Security Group
- Inbound: 9998/TCP
- Source: ALB security group only
- Outbound: as required (database, external services)
Application Load Balancer
- Type: Internet-facing ALB
- Listener: HTTP on port 80
Target Group
- Target type: IP
- Protocol and port: HTTP / 9998
Health Check
- Path: /ui
- Success codes: 200
- Interval: 30 seconds
- Timeout: 10 seconds
ECS Task Definition
- Image: ghcr.io/cosmian/kms:latest
- Container port: 9998
- Environment variables:
- KMS configuration
- Database connection (if persistence is enabled)
ECS Service
- Attach the target group to container port 9998
- Health check grace period: minimum 60–120 seconds
3. Client Setup (KMS CLI)
Run: ckms configure
KMS URL example:
http(s)://<ALB-DNS-NAME>
4. Validation & Testing
Connectivity Test Verify that the ALB is correctly routing traffic to a healthy container.
curl http(s)://<YOUR-ALB-DNS-NAME>/ui
# Expected response: 200 OK with a JSON payload containing the version.
Create a symmetric key:
ckms sym keys create --tag test --algorithm aes --number-of-bits 256
# Expected response:
The symmetric key was successfully generated.
Unique identifier: xxxxxxx_xxxxxxx
Tags:
- test
5. Troubleshooting
503 Service Unavailable usually means:
- No running ECS tasks
- No healthy targets in the target group
- Health checks failing
Actions:
- Check ECS Service events
- Verify target group target health
- Increase health check grace period
Unhealthy targets:
- Ensure port 9998 is exposed
- Ensure ECS SG allows traffic from ALB SG
- Confirm /ui endpoint is reachable
6. Production Recommendations
- Enable HTTPS using ACM certificates
- Redirect HTTP to HTTPS
- Use an external database (e.g. RDS PostgreSQL) for persistence
- Configure Route53 DNS pointing to the ALB
Express Mode Deployment
Express Mode Architecture
flowchart LR
client["Client (CLI)"]
alb["Express ALB"]
task["Fargate Task (KMS:9998)"]
container["Container"]
client -->|HTTPS| alb
alb -->|HTTP| task
task --> container
Express Mode Deployment Steps
AWS Console → ECS → Express Mode
- Image: ghcr.io/cosmian/kms:latest
- Service name: kms-express
- Container port: 9998
- Desired tasks: 1
- healthcheck path : /ui
Wait until service status is Active.
Express Mode Client Setup
Run:
ckms configure
KMS URL example:
https://ex-xxxxxxxx.ecs.<region>.on.aws
Express Mode Validation
Connectivity test:
curl https://ex-xxxxxxxx.ecs.<region>.on.aws/ui
# Expected response: 200 OK with a JSON payload containing the version.
Create a symmetric key:
ckms sym keys create --tag test-express --algorithm aes --number-of-bits 256
# Expected response:
The symmetric key was successfully generated.
Unique identifier: xxxxxxx_xxxxxxx
Tags:
- test-express
Production Notes
- Express Mode is suitable for development, demos, and PoCs
- HTTPS is included by default
- Storage is ephemeral
- Use an external database for persistence
- Deleting the service removes all associated resources
License
Refer to Eviden documentation for licensing and support details.
Integration to AWS External Key Service (XKS)
Background
AWS XKS (External Key Store) is a feature of AWS Key Management Service (AWS KMS) that allows you to use cryptographic keys stored in an external key management system with AWS KMS. It enables you to maintain control over your keys while leveraging AWS services that integrate with AWS KMS.
Source: AWS KMS XKS Proxy API Specification - Background
Architecture
The Eviden KMS integrates to AWS XKS and proposes a novel architecture (dubbed xksv2) that solves the traditional XKS performance issues without compromising on security.

The Eviden XKSv2 architecture is composed of the following components:
Eviden Confidential KMS
This is the Confidential Key Management System, deployed as IaaS, in the customer AWS tenant. It is responsible for managing the Key Encryption Keys (KEKs) wrapping the XKS keys in AWS KMS and for answering encryption and decryption requests from the AWS KMS.
To protect the KEKs, the Eviden KMS runs inside an Eviden VM on top of confidential computing machines. Eviden VM provides strong security and verifiability guarantees.
The Eviden KMS is deployed in AWS infrastructure, solving the XKS scaling problem, as it benefits from a stable high bandwidth network and can easily scale to reliably support large amount of transactions from the AWS KMS.
The Confidential KMS is available as a ready-to-deploy product from the AWS Marketplace.
HSM
The HSM is responsible for storing the Master keys and securing the Eviden KMS keys. It is deployed in the customer premises or offered as a managed service by Atos. See the HSM integration documentation for more details.
Deployment
-
Deploy an Eviden KMS in your AWS tenant. You can find the product on the AWS Marketplace and follow the deployment instructions in the product documentation.
-
Configure the KMS for use with AWS XKS by filling up the
aws_xks_configsection of the configuration file with the following values:[aws_xks_config] # set this to true aws_xks_enable = true # this is the region you Eviden KMS is deployed in aws_xks_region = "us-east-1" # keep this to this value aws_xks_service = "kms-xks-proxy" # used for sigv4. The values set here must match the values configured # when setting up the KMS as an external keystore for AWS KMS (see next step) aws_xks_sigv4_access_key_id = "AKIAIOSFODNN7EXAMPLE" aws_xks_sigv4_secret_access_key = "wJalrXUtnFEMI/K7MDENG/bPxRfiCYEXAMPLEKEY" -
Configure the KMS to act as an External Key Store for AWS KMS. Follow the instructions in the AWS documentation to create an External Key Store.
-
Create an external key in AWS KMS and specify the key store created in the previous step as the key store for the key.
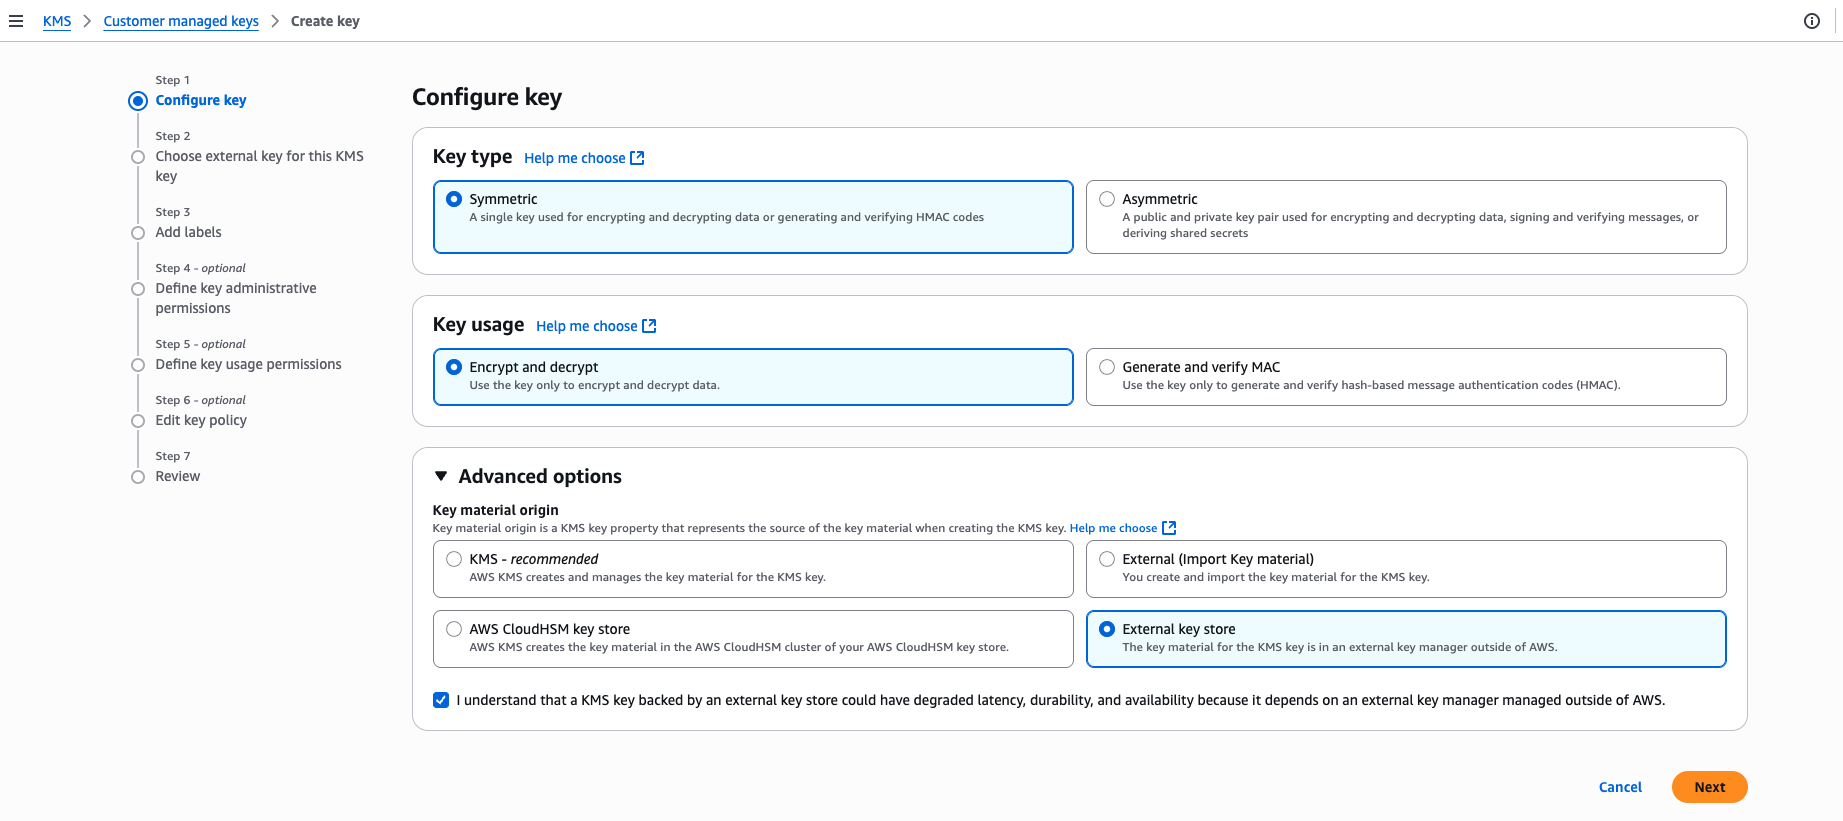
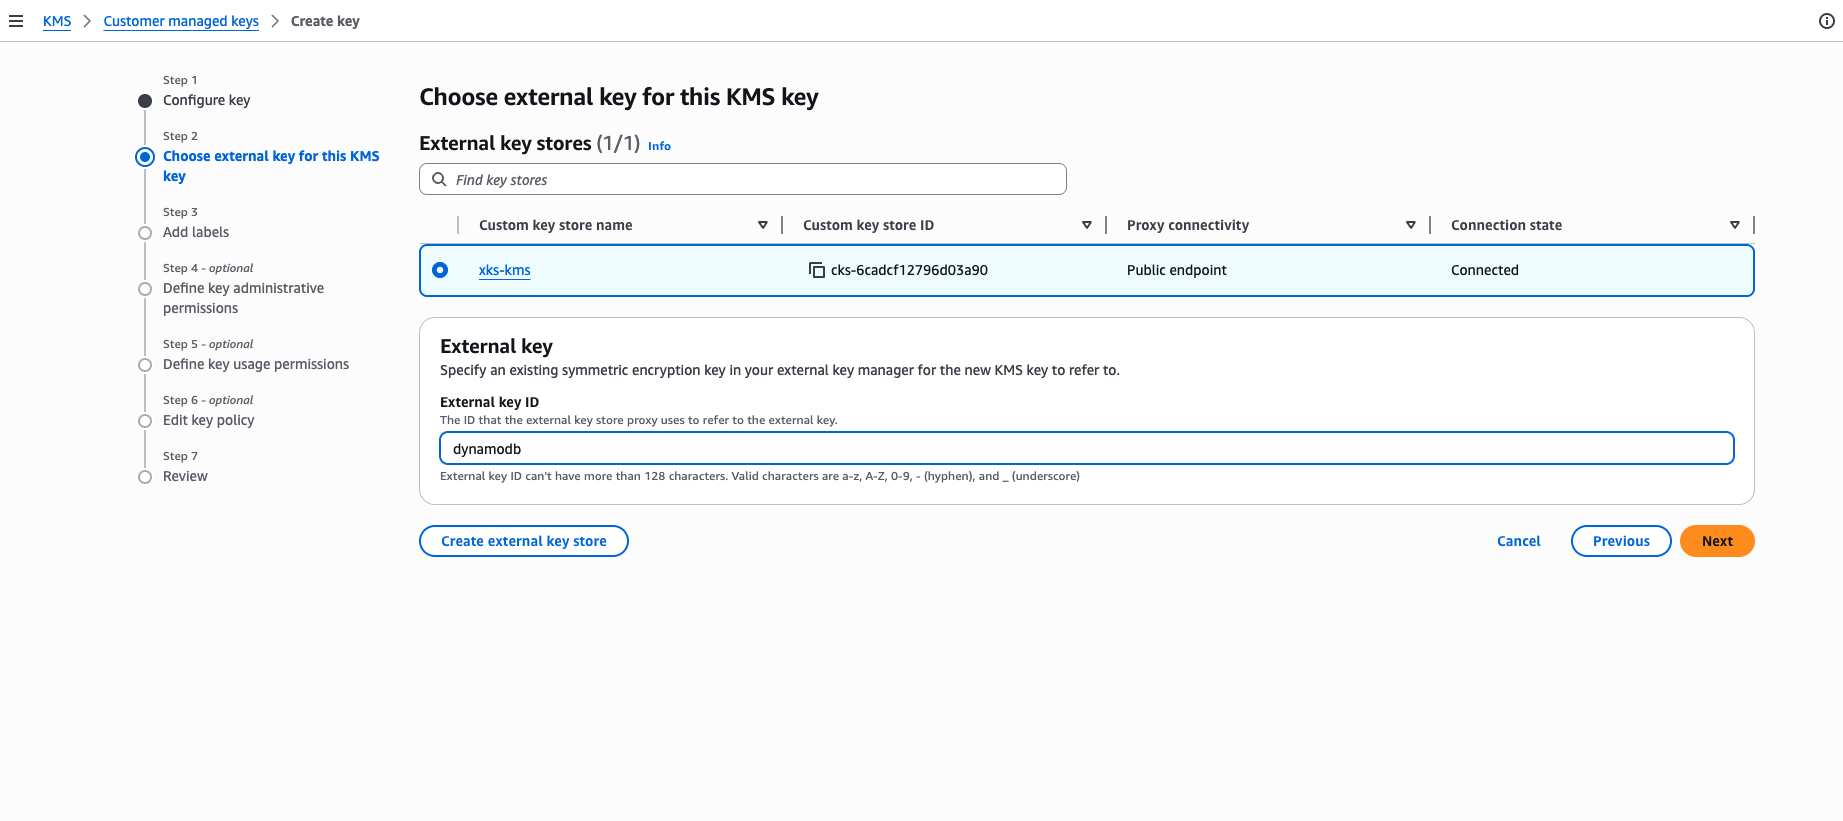
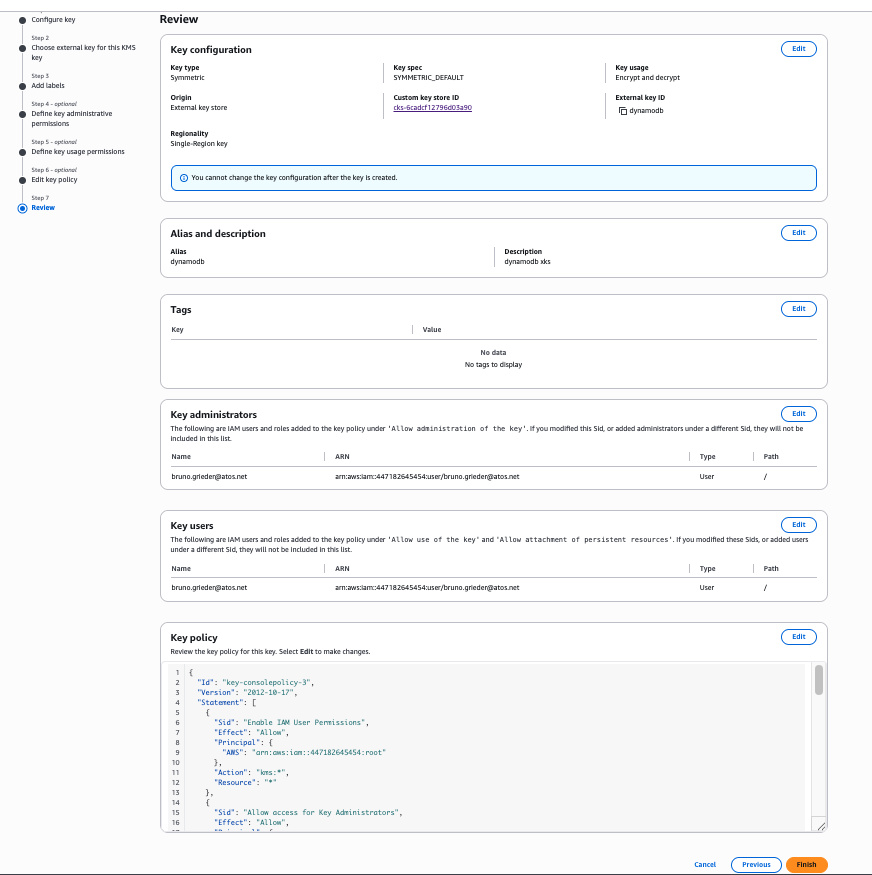
-
Authorize AWS principals to use the key.
The KMS authenticates every XKS request from AWS KMS using the shared SigV4 credentials configured above (
aws_xks_sigv4_access_key_id/aws_xks_sigv4_secret_access_key). This signature is the trust boundary, in line with AWS's model where the AWS key policy and IAM are the source of truth for which principals may use the key.XKS keys are used internally through a dedicated, reserved KMS service identity, so any AWS principal whose request is correctly signed can use the key. You do not need to create or maintain a per-principal (per-ARN) permission entry on the KMS for each IAM role, and the numerous or dynamic roles common with AWS SSO or Control Tower work without additional configuration.
The keys remain owned by the KMS
default_username, so you keep full administrative control over them (listing, revocation, destruction and export) from the CLI and the Web UI. The XKS service identity itself is granted onlyEncrypt,DecryptandGetAttributes, so the XKS endpoints can never revoke, destroy or export key material.The
awsPrincipalArnsent by AWS KMS is recorded in the KMS logs for auditing only and is never used as an authorization gate.Keys created by an earlier KMS version are updated automatically when the server starts, so no manual action is required when upgrading.
Monitoring and lifecycle management
AWS never calls back into the XKS proxy to list, monitor, rotate, revoke, or destroy key
material — the XKS proxy API
spec
only defines GetKeyMetadata, Encrypt, Decrypt, and GetHealthStatus. Scheduling
deletion or on-demand rotation of a CMK from the AWS console only changes state on AWS's
side; it never reaches this KMS. Lifecycle management of the external key material is
therefore entirely your operational responsibility.
A Crypto Officer must be designated to handle this. Configure a real, credentialed
identity (a TLS certificate CN or OIDC subject matching default_username) as a Crypto
Officer (crypto_officer.users / privileged_users) so that a human operator can, through
the normal ckms CLI or Web UI:
- List/monitor XKS keys —
Locateby theaws-xkstag,GetAttributes. - Revoke or destroy XKS keys that are no longer needed.
XKS keys cannot be rotated in place. The KMS ReKey operation always assigns a new
internal unique identifier, but AWS KMS always calls the XKS proxy back with the original
external key id configured when the CMK was created — it has no mechanism to learn about a
new one. Attempting ReKey (manually or via the auto-rotation scheduler) on an aws-xks
key is therefore rejected with an explicit error. To rotate the cryptographic material
behind an external key, create a new external key (new CMK with a new external key id)
in AWS KMS, migrate consumers to it, and destroy the old one through this Crypto Officer
identity once it is no longer in use.
Do this deliberately: an installation with an empty crypto_officer.users list has no one
who can reach these keys this way, and the server logs a startup warning in that case. Never
attempt to authenticate as the reserved AWS XKS service identity itself — it is intentionally
unreachable through any normal authentication path (TLS, OIDC, SPIRE, UI session) and is only
ever used internally to answer SigV4-signed requests from AWS KMS. Granting it a real
credential would let anyone holding it bypass AWS's SigV4 trust boundary entirely. See
crate/server/src/routes/aws_xks/README.md for the underlying authorization model.
Migrating an AWS External Key Store to a New Eviden KMS Instance
This guide describes how to migrate an AWS External Key Store (XKS) from one Eviden KMS instance (Server A, the source) to another (Server B, the target). This is typically required when moving to a new server, a new region, or upgrading infrastructure.
The migration must be performed with minimal downtime. During the transition window, AWS KMS marks
the key store as DISCONNECTED, meaning any AWS service that attempts to use an XKS key will
receive a KMSInvalidStateException until the connection is restored on Server B.
Prerequisites
- Server B must be deployed and configured with AWS XKS enabled (see the XKS deployment guide).
- You must know the AWS principal ARN that was granted permissions on each key (e.g.
dynamodb.amazonaws.com,arn:aws:iam::123456789012:user/Alice). - The SigV4 credentials configured on Server B must match (or be updated in) the AWS XKS key store settings.
Step 1 — Export all XKS keys from Server A
On Server A, export every key used by the XKS integration in json-ttlv format (the default).
This format preserves all KMIP metadata and can be re-imported identically on Server B.
For each key (replace <KEY_ID> with the actual unique identifier or tag):
# Export a single key to a local file
ckms -c /path/to/server_a.toml \
sym keys export \
--key-id <KEY_ID> \
keys/<KEY_ID>.json
Security note: The exported file contains the raw key material in KMIP JSON TTLV format. Store these files securely (encrypted storage, restricted filesystem permissions) and delete them once the import on Server B is complete.
Step 2 — Disconnect the XKS key store in AWS KMS
Before switching the endpoint, disconnect the external key store in the AWS Management Console or via the AWS CLI. This prevents AWS from sending requests to Server A while the endpoint is being updated.
Using the AWS CLI:
aws kms disconnect-custom-key-store \
--custom-key-store-id <CUSTOM_KEY_STORE_ID>
Confirm that the key store status is DISCONNECTED:
aws kms describe-custom-key-stores \
--custom-key-store-id <CUSTOM_KEY_STORE_ID> \
--query 'CustomKeyStores[0].ConnectionState'
Expected output:
"DISCONNECTED"
Alternatively, from the AWS Management Console, open the key store and click Key store actions → Disconnect:
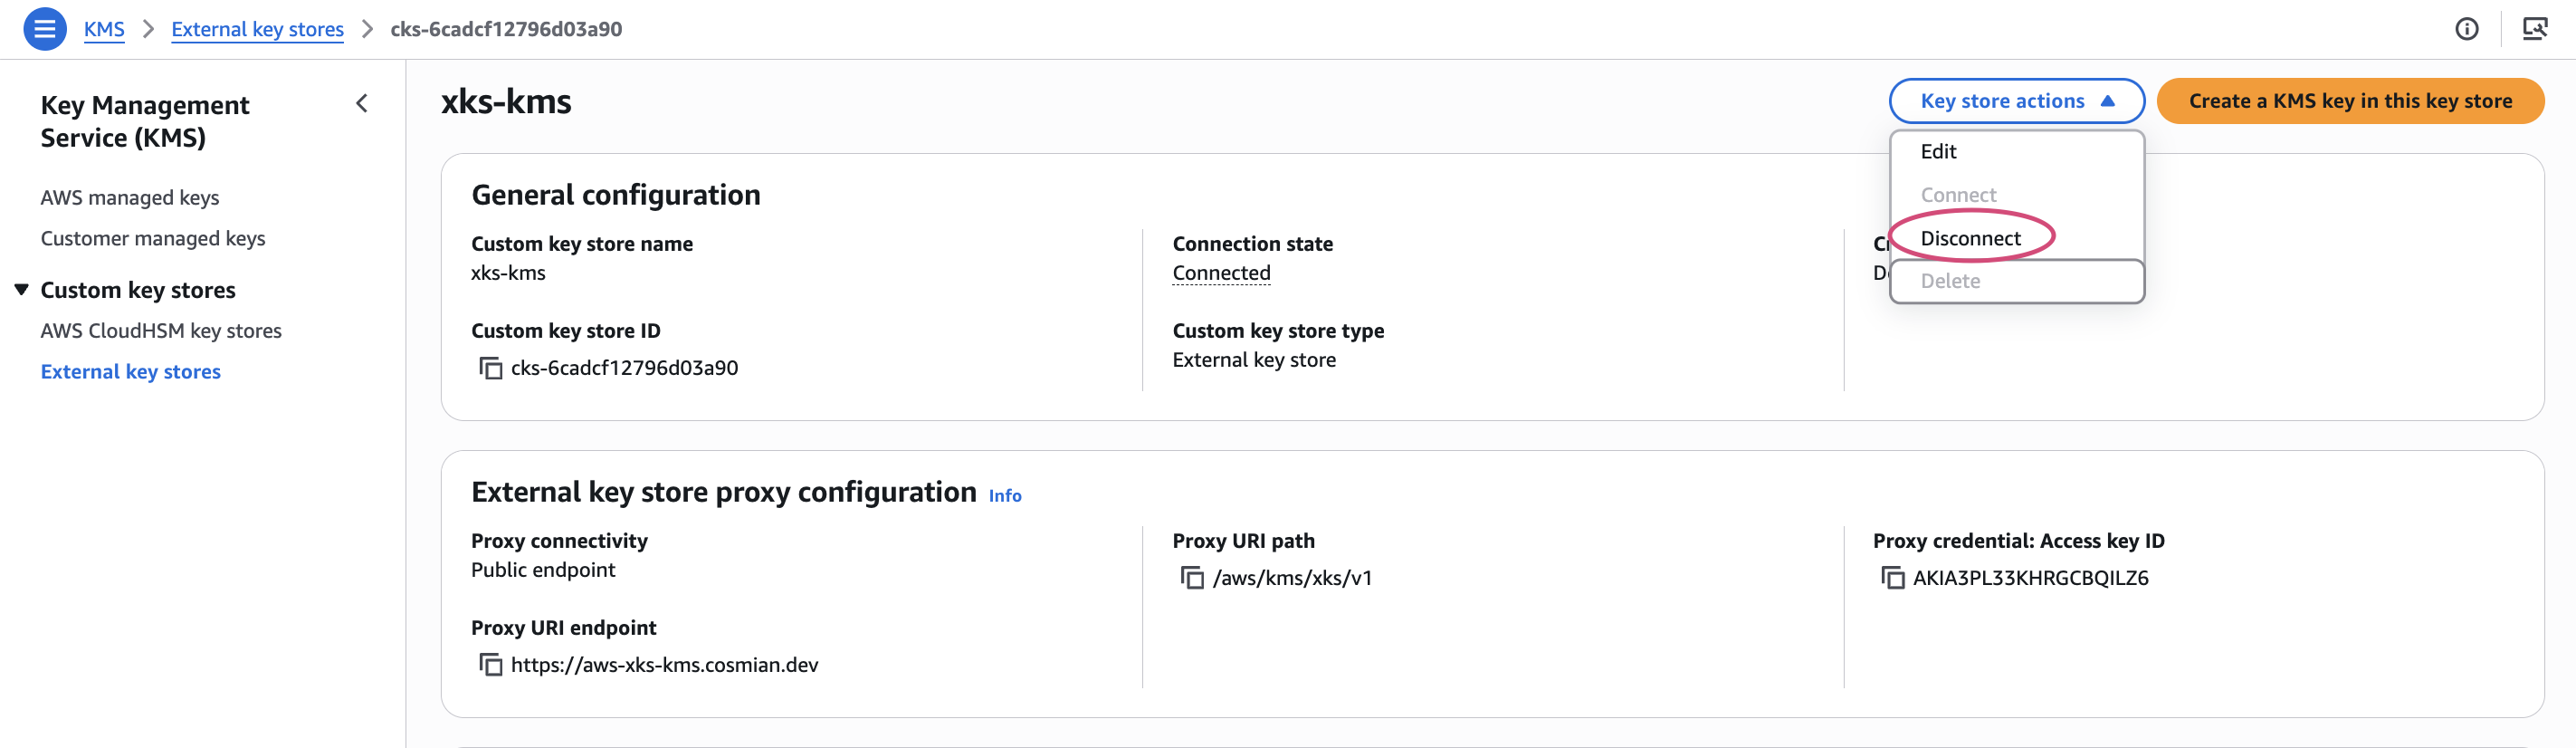
Type disconnect in the confirmation dialog and click Disconnect key store:
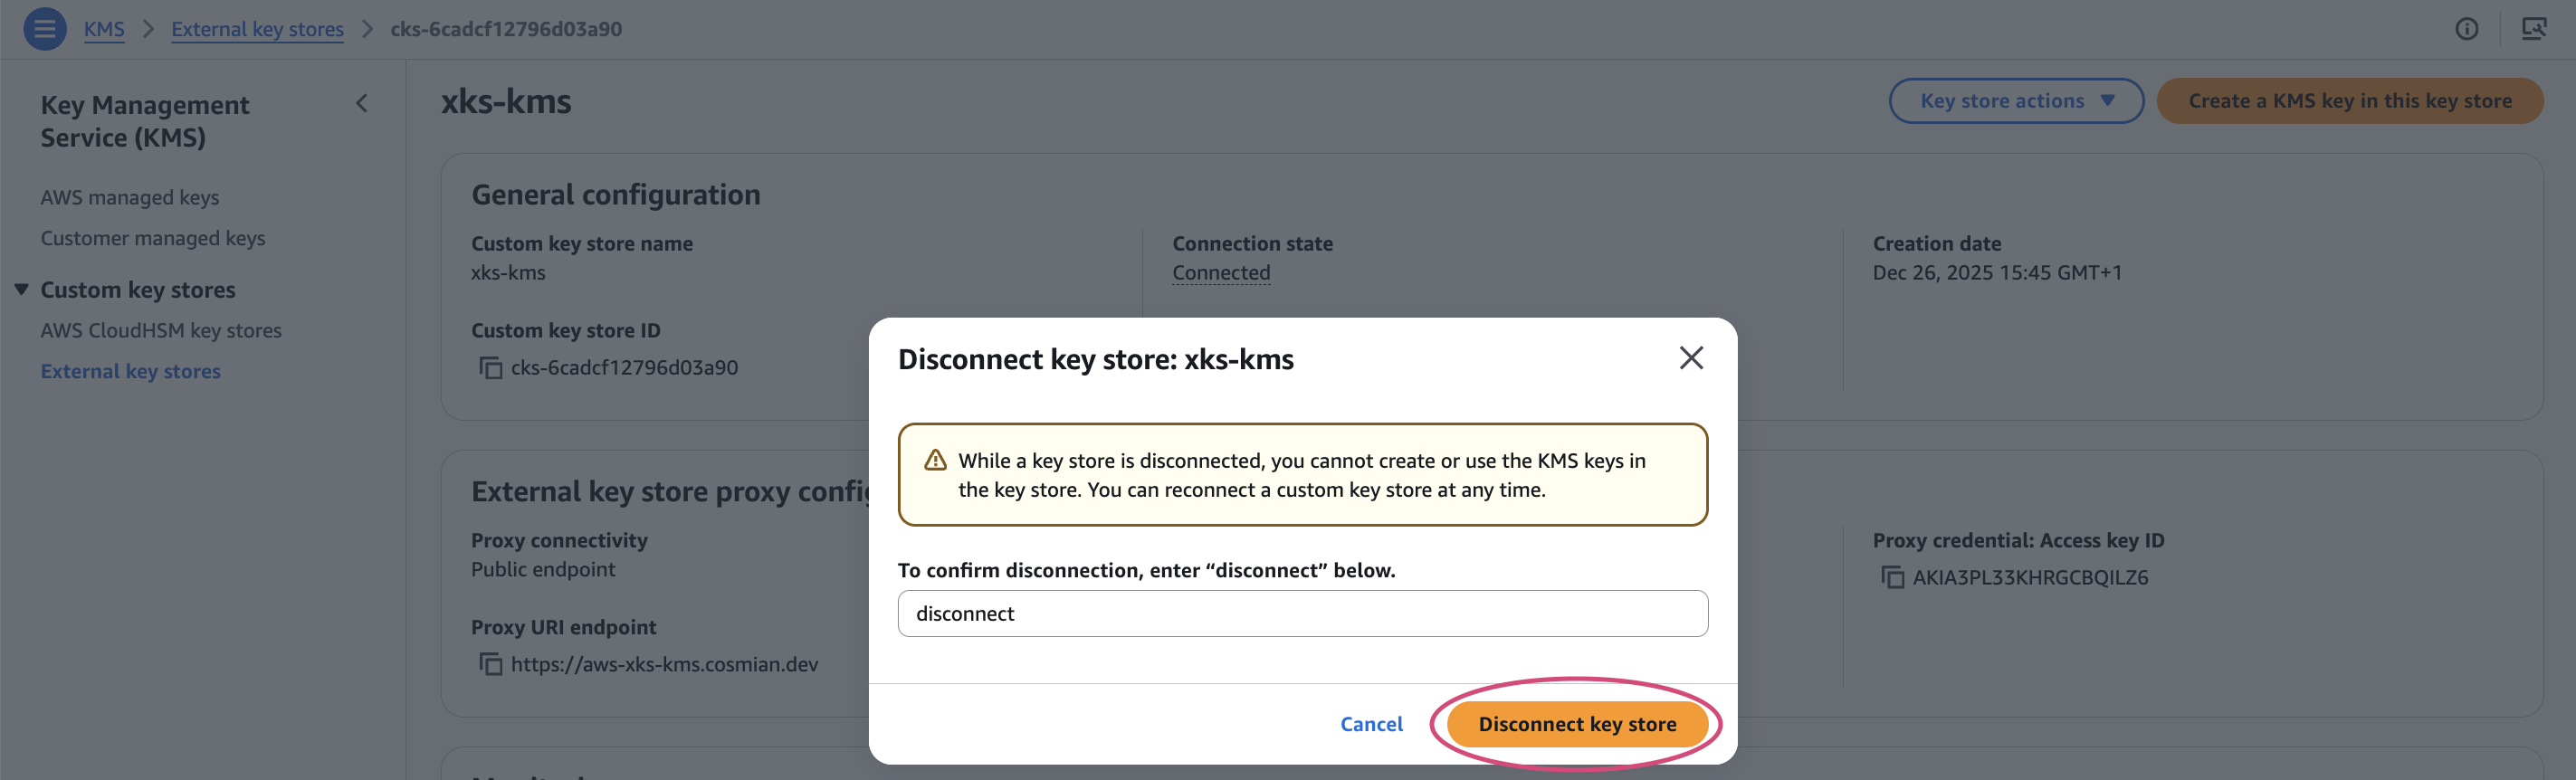
A success banner confirms the key store is now disconnected:

Step 3 — Configure Server B
Ensure Server B's configuration file contains the correct AWS XKS parameters. The SigV4 credentials must match the values registered in the AWS key store configuration. If you are rotating the credentials, update both the KMS config and the AWS key store settings in the same operation (step 4).
[aws_xks_config]
aws_xks_enable = true
aws_xks_region = "eu-west-1" # region where your new KMS is deployed
aws_xks_service = "kms-xks-proxy"
aws_xks_sigv4_access_key_id = "YOUR_AWS_KEYID"
aws_xks_sigv4_secret_access_key = "YOUR_AWS_SECRETKEY"
aws_xks_kek_user = "admin"
Start (or restart) Server B after updating the configuration.
Step 4 — Update the XKS proxy URI in AWS KMS
Update the external key store to point to Server B's public endpoint. This can be done via the AWS Management Console (KMS → Custom key stores → Edit) or with the AWS CLI:
aws kms update-custom-key-store \
--custom-key-store-id <CUSTOM_KEY_STORE_ID> \
--xks-proxy-uri-endpoint "https://<SERVER_B_PUBLIC_HOSTNAME>" \
--xks-proxy-authentication-credential \
"AccessKeyId=YOUR_AWS_KEYID,RawSecretAccessKey=YOUR_AWS_SECRETKEY"
If you are keeping the same SigV4 credentials, the
--xks-proxy-authentication-credentialargument can be omitted.
Alternatively, from the AWS Management Console, click Key store actions → Edit:
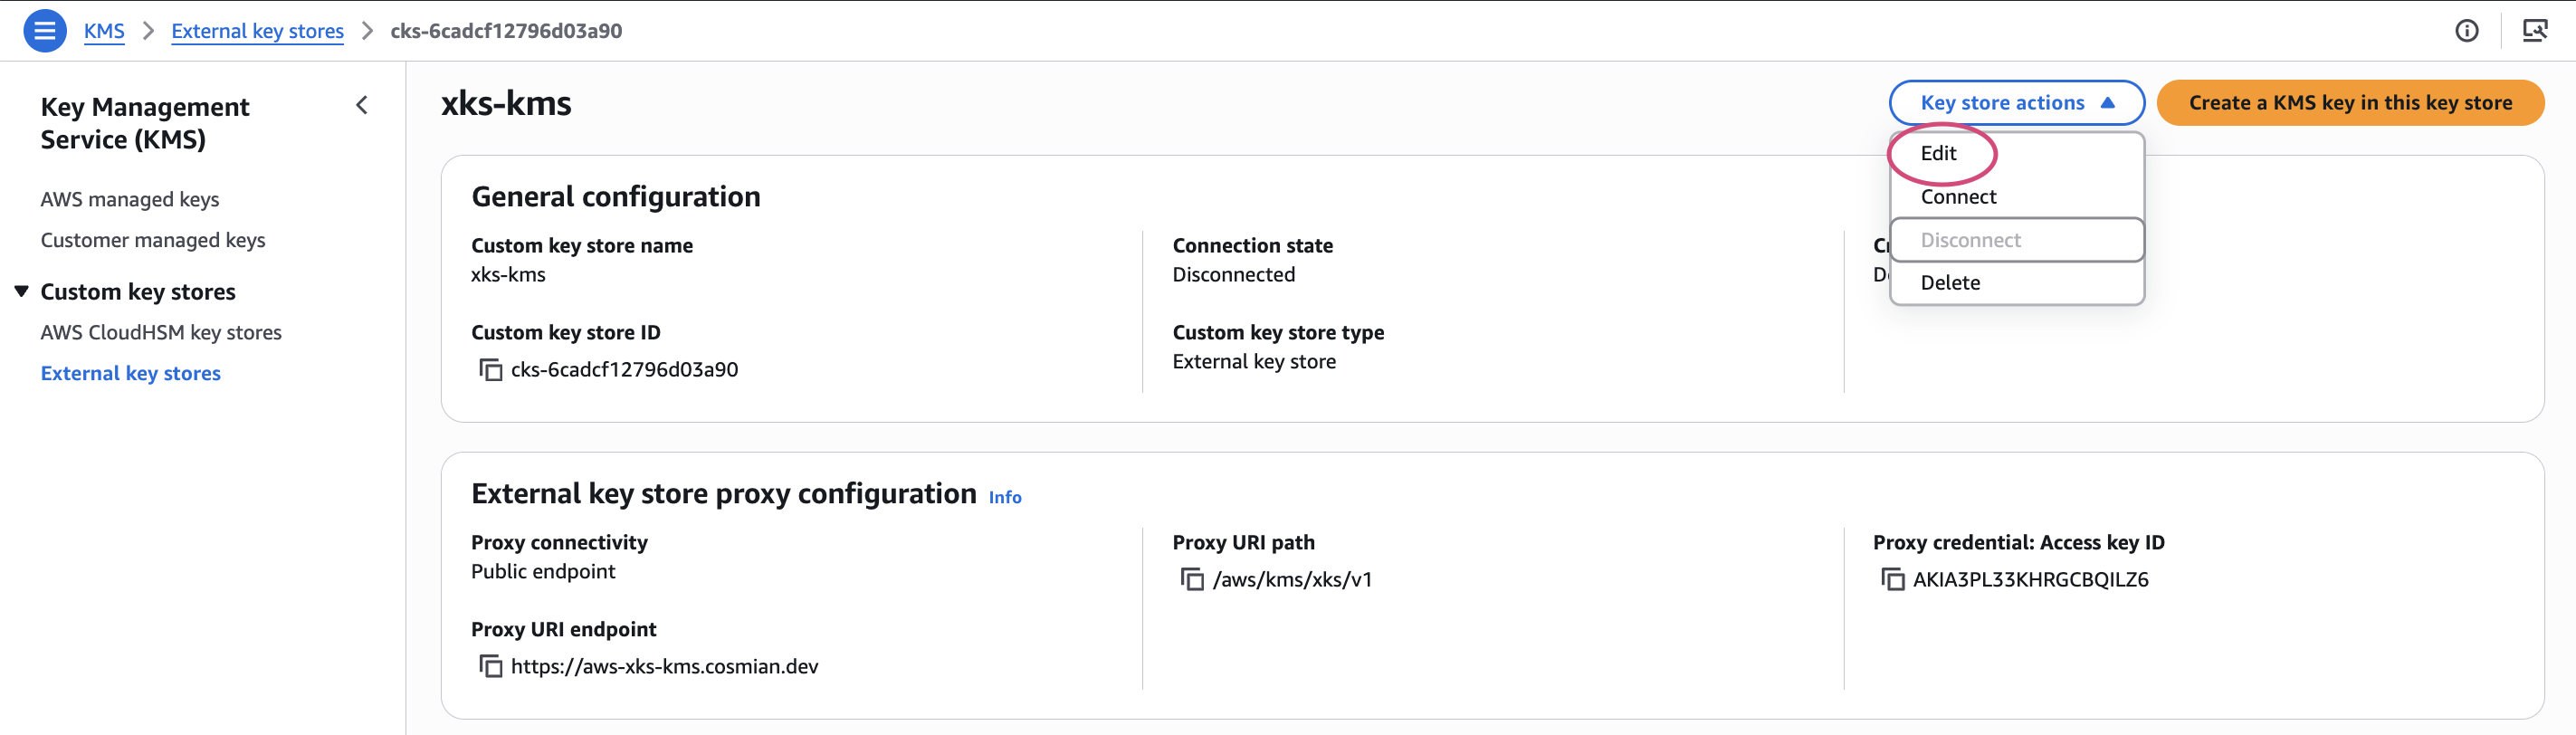
Update the Proxy URI endpoint field with Server B's hostname, then click Update external key store:
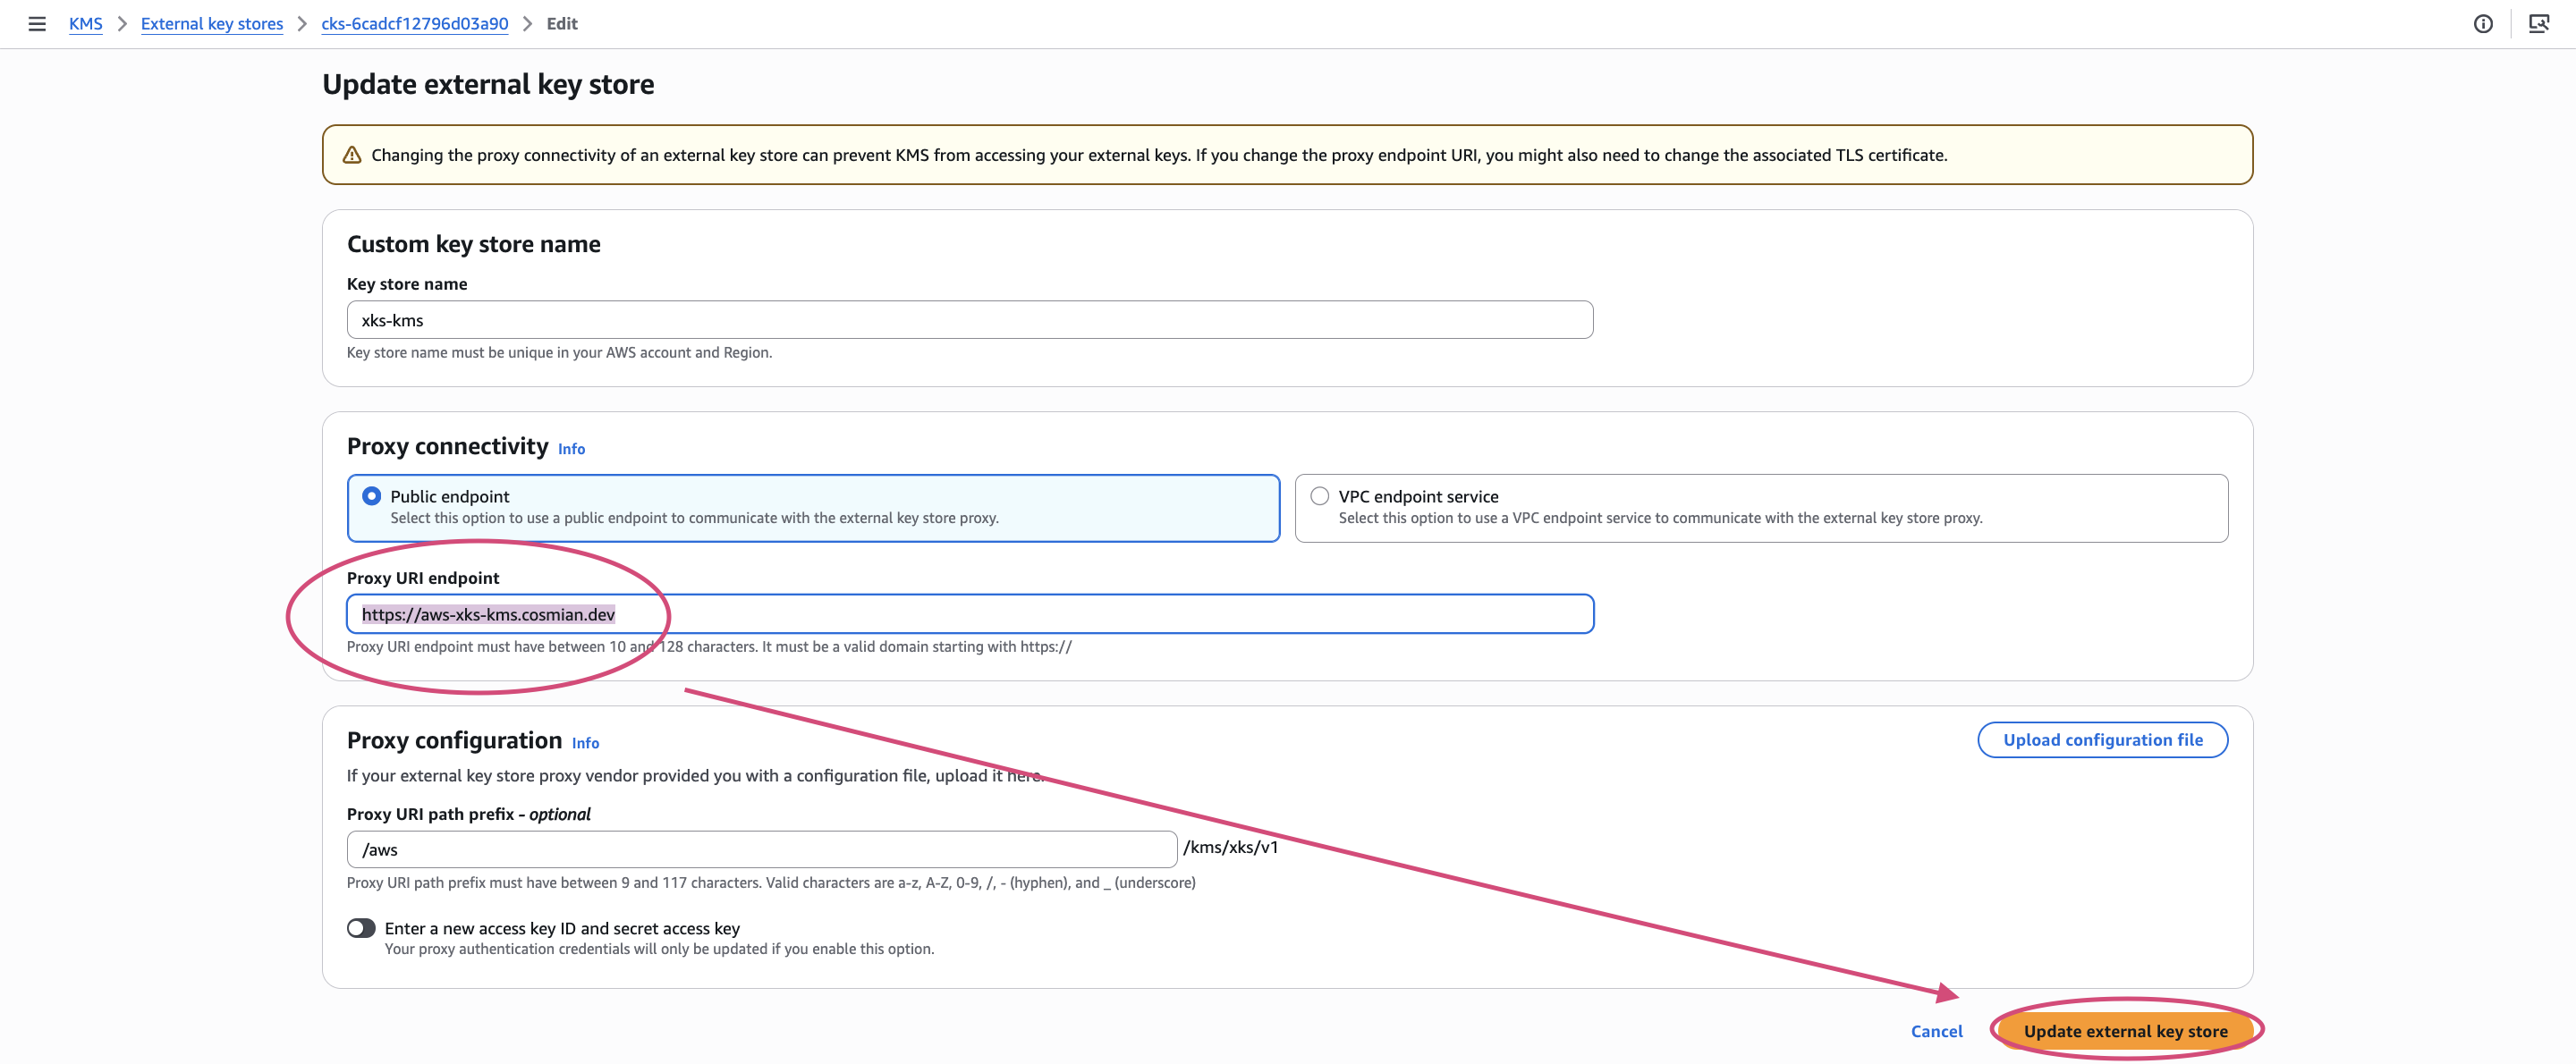
Check the acknowledgement checkbox and confirm:
A success banner confirms the endpoint has been updated:

Step 5 — Import keys on Server B
On Server B, import each key exported in step 1. The --key-id parameter must preserve the
exact same unique identifier that was used on Server A, because AWS KMS references keys by their
ID in the XKS metadata endpoint path (/kms/xks/v1/keys/{key_id}/metadata).
ckms -c /path/to/server_b.toml \
sym keys import \
--key-id <KEY_ID> \
keys/<KEY_ID>.json
Repeat for every XKS key.
Step 6 — Re-grant access rights on Server B
The Eviden KMS access control is per-instance: permissions granted on Server A are not transferred
automatically. For each imported key, re-grant the operations required by AWS KMS
(get_attributes, encrypt, decrypt).
# Grant the required permissions to the AWS principal ARN
ckms -c /path/to/server_b.toml \
access-rights grant \
--id <KEY_ID> \
<AWS_PRINCIPAL_ARN> \
get_attributes encrypt decrypt
Step 7 — Reconnect the XKS key store
Once Server B is ready and all keys are imported with the correct permissions, reconnect the AWS external key store:
aws kms connect-custom-key-store \
--custom-key-store-id <CUSTOM_KEY_STORE_ID>
Poll until the status returns CONNECTED:
aws kms describe-custom-key-stores \
--custom-key-store-id <CUSTOM_KEY_STORE_ID> \
--query 'CustomKeyStores[0].ConnectionState'
Expected output:
"CONNECTED"
If the connection fails, check Server B's logs for SigV4 authentication errors or TLS issues. Verify the
aws_xks_sigv4_access_key_idandaws_xks_sigv4_secret_access_keyvalues match exactly what was provided toupdate-custom-key-store.
Step 8 — Verify the migration
Test an encrypt/decrypt round-trip through AWS KMS using one of the migrated keys to confirm end-to-end connectivity:
# Encrypt a small test payload
aws kms encrypt \
--key-id <AWS_KMS_KEY_ARN> \
--plaintext "SGVsbG8gV29ybGQ=" \
--output text \
--query CiphertextBlob \
> /tmp/ciphertext.b64
# Decrypt it back
aws kms decrypt \
--key-id <AWS_KMS_KEY_ARN> \
--ciphertext-blob fileb://<(base64 -d /tmp/ciphertext.b64) \
--output text \
--query Plaintext | base64 -d
Expected output: Hello World
Post-migration cleanup
Once the migration is validated:
-
Delete the exported key files from your local filesystem:
rm keys/*.json -
Shut down Server A (or reconfigure it to no longer serve the XKS endpoints).
-
If applicable, revoke access rights on Server A to prevent any residual use:
ckms -c /path/to/server_a.toml \ access-rights revoke \ --id <KEY_ID> \ <AWS_PRINCIPAL_ARN> \ get_attributes encrypt decrypt
AWS KMS - Bring Your Own Key (BYOK)
Eviden KMS provides an aws byok command in its CLI (also available in the ui) to facilitate the import of an AWS wrapping key (KEK) in Eviden KMS, and the export of the wrapped keys for direct import in AWS KMS. To use the AWS KMS terminology, the key that will be created in the Eviden KMS will be called the external key material as stated in the AWS KMS docs.
The key material refers to the actual cryptographic key bytes that form the basis of a KMS key. While AWS KMS keys include additional metadata, policies, and access controls, the BYOK process allows Eviden KMS users to maintain full control over key generation while leveraging AWS KMS's infrastructure for other usages.
Overview
Since AWS KMS is a managed service where private key material never leaves AWS HSMs, the key import process requires:
- Creating a KMS key with
EXTERNALorigin (no key material) - Download the wrapping public key and import token from AWS
- Wrap your key material using Eviden KMS
- Import the wrapped key material into AWS KMS
Supported wrapping algorithms:
| Wrapping Algorithm | Description | Supported Key Material Types |
|---|---|---|
| RSAES_OAEP_SHA_256 RSAES_OAEP_SHA_1 | The RSA encryption algorithm with Optimal Asymmetric Encryption Padding (OAEP) with SHA-256 or SHA-1 hash function. | • 256-bit AES Symmetric keys • HMAC keys • Asymmetric ECC private keys* |
| RSA_AES_KEY_WRAP_SHA_256 RSA_AES_KEY_WRAP_SHA_1 | Hybrid wrapping (RSA + AES Key Wrap) with SHA-256 or SHA-1 hash function. | • Asymmetric RSA private keys • Asymmetric ECC private keys |
Wrapping Key Specs:
- RSA_2048 (Note: cannot be used to wrap ECC_NIST_P521 keys with RSAES_OAEP_SHA*_)
- RSA_3072
- RSA_4096
⚠️ WARNING: Invalid combinations of wrapping algorithms, key material types may lead to errors. Ensure that your selected key material type is supported by the chosen wrapping algorithm and that the wrapping key spec is compatible with both.
Prerequisites
- An active AWS account
- Either: AWS CLI installed and configured on your machine (recommended) or an access to AWS Management Console and open the AWS Key Management Service (AWS KMS) console at
https://console.aws.amazon.com/kms. - A running Eviden KMS instance.
- Either: Eviden KMS CLI installed and configured on your machine or an access to the Eviden KMS UI of your deployed KMS instance.
- Any tool to convert base64 values to their binary counterparts (e.g. openssl, python, etc).
Creating an AES key and importing it using the AWS CLI and the Eviden CLI
1. Create a KMS key with EXTERNAL origin
To use the AWS KMS API to create a symmetric encryption KMS key with no key material, send a CreateKey request with the Origin parameter set to EXTERNAL :
aws kms create-key --origin EXTERNAL
If successful, the output should look like :
{
"KeyMetadata": {
"AWSAccountId": "447182645454",
"KeyId": "350e35ef-ac51-4dbb-82a4-9bc50b0ea42b",
"Arn": "arn:aws:kms:eu-west-3:447182645454:key/350e35ef-ac51-4dbb-82a4-9bc50b0ea42b",
"CreationDate": "2026-02-18T15:05:59.358000+01:00",
"Enabled": false,
"Description": "",
"KeyUsage": "ENCRYPT_DECRYPT",
"KeyState": "PendingImport",
"Origin": "EXTERNAL",
"KeyManager": "CUSTOMER",
"CustomerMasterKeySpec": "SYMMETRIC_DEFAULT",
"KeySpec": "SYMMETRIC_DEFAULT",
"EncryptionAlgorithms": [
"SYMMETRIC_DEFAULT"
],
"MultiRegion": false
}
}
Copy the key ARN, you will need it in the next step. In this example, the key ARN is
arn:aws:kms:eu-west-3:447182645454:key/350e35ef-ac51-4dbb-82a4-9bc50b0ea42b.
Note: If no key spec is specified, a symmetric key is created by default. To create a different key, pass the key-spec argument like below for an ECC_NIST_P384 key :
aws kms create-key \
--origin EXTERNAL \
--key-spec ECC_NIST_P384 \
--description "External NIST-P384 key for signing"
2. Create a symmetric key in Eviden KMS
ckms sym keys create symmetric_key_test1
Response:
The symmetric key was successfully generated.
Unique identifier: symmetric_key_test1
3. Download wrapping public key and import token from AWS
After you create a AWS KMS key with no key material, download a wrapping public key and an import token for that KMS key by using the AWS KMS console or the GetParametersForImport API. The wrapping public key and import token are an indivisible set that must be used together.
A very detailed example on how to do this is detailed on this page, please refer to it for more info.
The command you should use is the following :
aws kms get-parameters-for-import \
--key-id arn:aws:kms:eu-west-3:447182645454:key/350e35ef-ac51-4dbb-82a4-9bc50b0ea42b \
--wrapping-algorithm RSAES_OAEP_SHA_256 \
--wrapping-key-spec RSA_4096
Response:
{
"KeyId": "arn:aws:kms:eu-west-3:447182645454:key/350e35ef-ac51-4dbb-82a4-9bc50b0ea42b",
"ImportToken": "<YourBase64EncodedToken>",
"PublicKey": "<YourBase64EncodedPublicKey>",
"ParametersValidTo": "2026-02-19T15:07:13.227000+01:00"
}
As mentioned in the AWS documentation for importing key material, you will have to convert the base64 values to their binary counterparts before importing them. This can be done with the method of your choice, the most straightforward method (If you have openssl on your cli), would be to copy the token and paste it with the following command to get the file token.bin :
echo -n "<YourBase64EncodedToken>" | openssl enc -d -base64 -A -out token.bin
In a similar manner, you can use the command if you want to keep your public key as a binary blob :
echo -n "<YourBase64EncodedPublicKey>" | openssl enc -d -base64 -A -out kek.bin
4. Import the AWS KEK into Eviden KMS
ckms aws byok import \
--kek-base64 "<YourBase64EncodedPublicKey>" \
--wrapping-algorithm RSAES_OAEP_SHA_256 \
--key-arn "<YourKeyArn>" \
--key-id aws_kek_1
Feel free to change the key id to whatever you want, we will call the kek aws_kek_1 in this example.
Alternative : importing the kek as file
ckms aws byok import \
--kek-file kek.bin \
--wrapping-algorithm RSAES_OAEP_SHA_256 \
--key-arn arn:aws:kms:eu-west-3:447182645454:key/350e35ef-ac51-4dbb-82a4-9bc50b0ea42b \
--key-id aws_kek_1
Response:
The PublicKey in file /tmp/ca9f45ad-8596-45a6-bc57-5591e662cb61 was successfully imported with id: aws_kek_1.
Unique identifier: aws_kek_1
Tags:
- aws
- wrapping_algorithm:RsaesOaepSha256
- key_arn:arn:aws:kms:eu-west-3:447182645454:key/350e35ef-ac51-4dbb-82a4-9bc50b0ea42b
5. Export the wrapped key material from Eviden KMS
# Provide token file simply to display the correct AWS CLI command for import
# If the output file is not specified, the CLI returns base64 encoded encrypted key material
ckms aws byok export \
symmetric_key_test1 \
kek_test1 \
token.bin \
EncryptedKeyMaterial.bin
Response:
The encrypted key material was successfully written to 512 for key symmetric_key_test1.
To import into AWS KMS using the API, run:
aws kms import-key-material \
--key-id arn:aws:kms:eu-west-3:447182645454:key/350e35ef-ac51-4dbb-82a4-9bc50b0ea42b \
--encrypted-key-material fileb://EncryptedKeyMaterial.bin \
--import-token fileb://token.bin \
--expiration-model KEY_MATERIAL_DOES_NOT_EXPIRE
6. Import the wrapped key material into AWS KMS
If you have filled all the fields on the previous step, you can directly use the command that the Eviden CLI automatically generated for you:
aws kms import-key-material \
--key-id arn:aws:kms:eu-west-3:447182645454:key/350e35ef-ac51-4dbb-82a4-9bc50b0ea42b \
--encrypted-key-material fileb://EncryptedKeyMaterial.bin \
--import-token fileb://token.bin \
--expiration-model KEY_MATERIAL_DOES_NOT_EXPIRE
Response:
{
"KeyId": "arn:aws:kms:eu-west-3:447182645454:key/350e35ef-ac51-4dbb-82a4-9bc50b0ea42b",
"KeyMaterialId": "60a5374a2457941eaf5c26b75fea0236bcdc5ddbe70c4aa15046e6fdda49e334"
}
Receiving this response means that the key material has been successfully imported into AWS KMS.
Creating an RSA key and importing it using the AWS CLI and the Eviden CLI
For this example, we will create an 2048 bits RSA key material, wrapped using a 4096 kek with RSAES_OAEP_SHA_256.
First, Sign in to the AWS Management Console and open the AWS Key Management Service (AWS KMS) console at https://console.aws.amazon.com/kms and complete the necessary steps to create a KMS key with external key material. Be mindful to provide the correct key spec - otherwise the console will expect a symmetric key by default. For this example, we will use RSA_2048.
The next step is to download the wrapping public key and import token. Be mindful that an RSA_AES_KEY_WRAP_SHA wrapping algorithm is required for wrapping RSA private key material (except in China Regions). Choosing RSAES_OAEP_SHA_256 will work for this example.
Once this is done, create your key on the Eviden KMS like follow, we call it rsa_key_material :
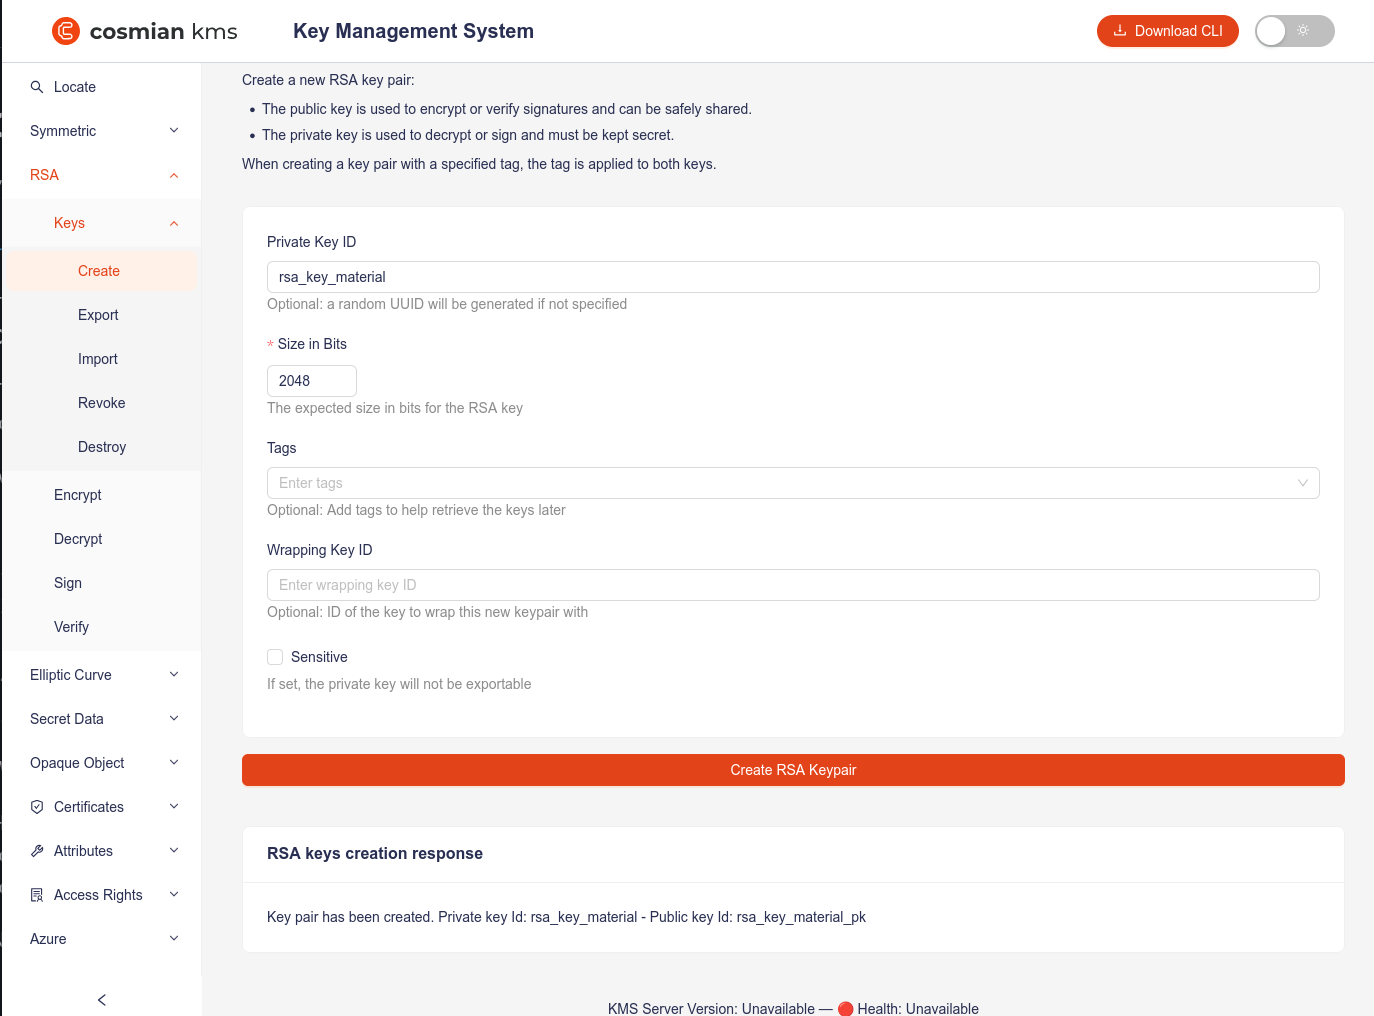
Then, navigate to the AWS - Import Kek section and fill with the adequate data. In this example, we paste the kek in the base64 format for convenience, and call it aws_kek_2.
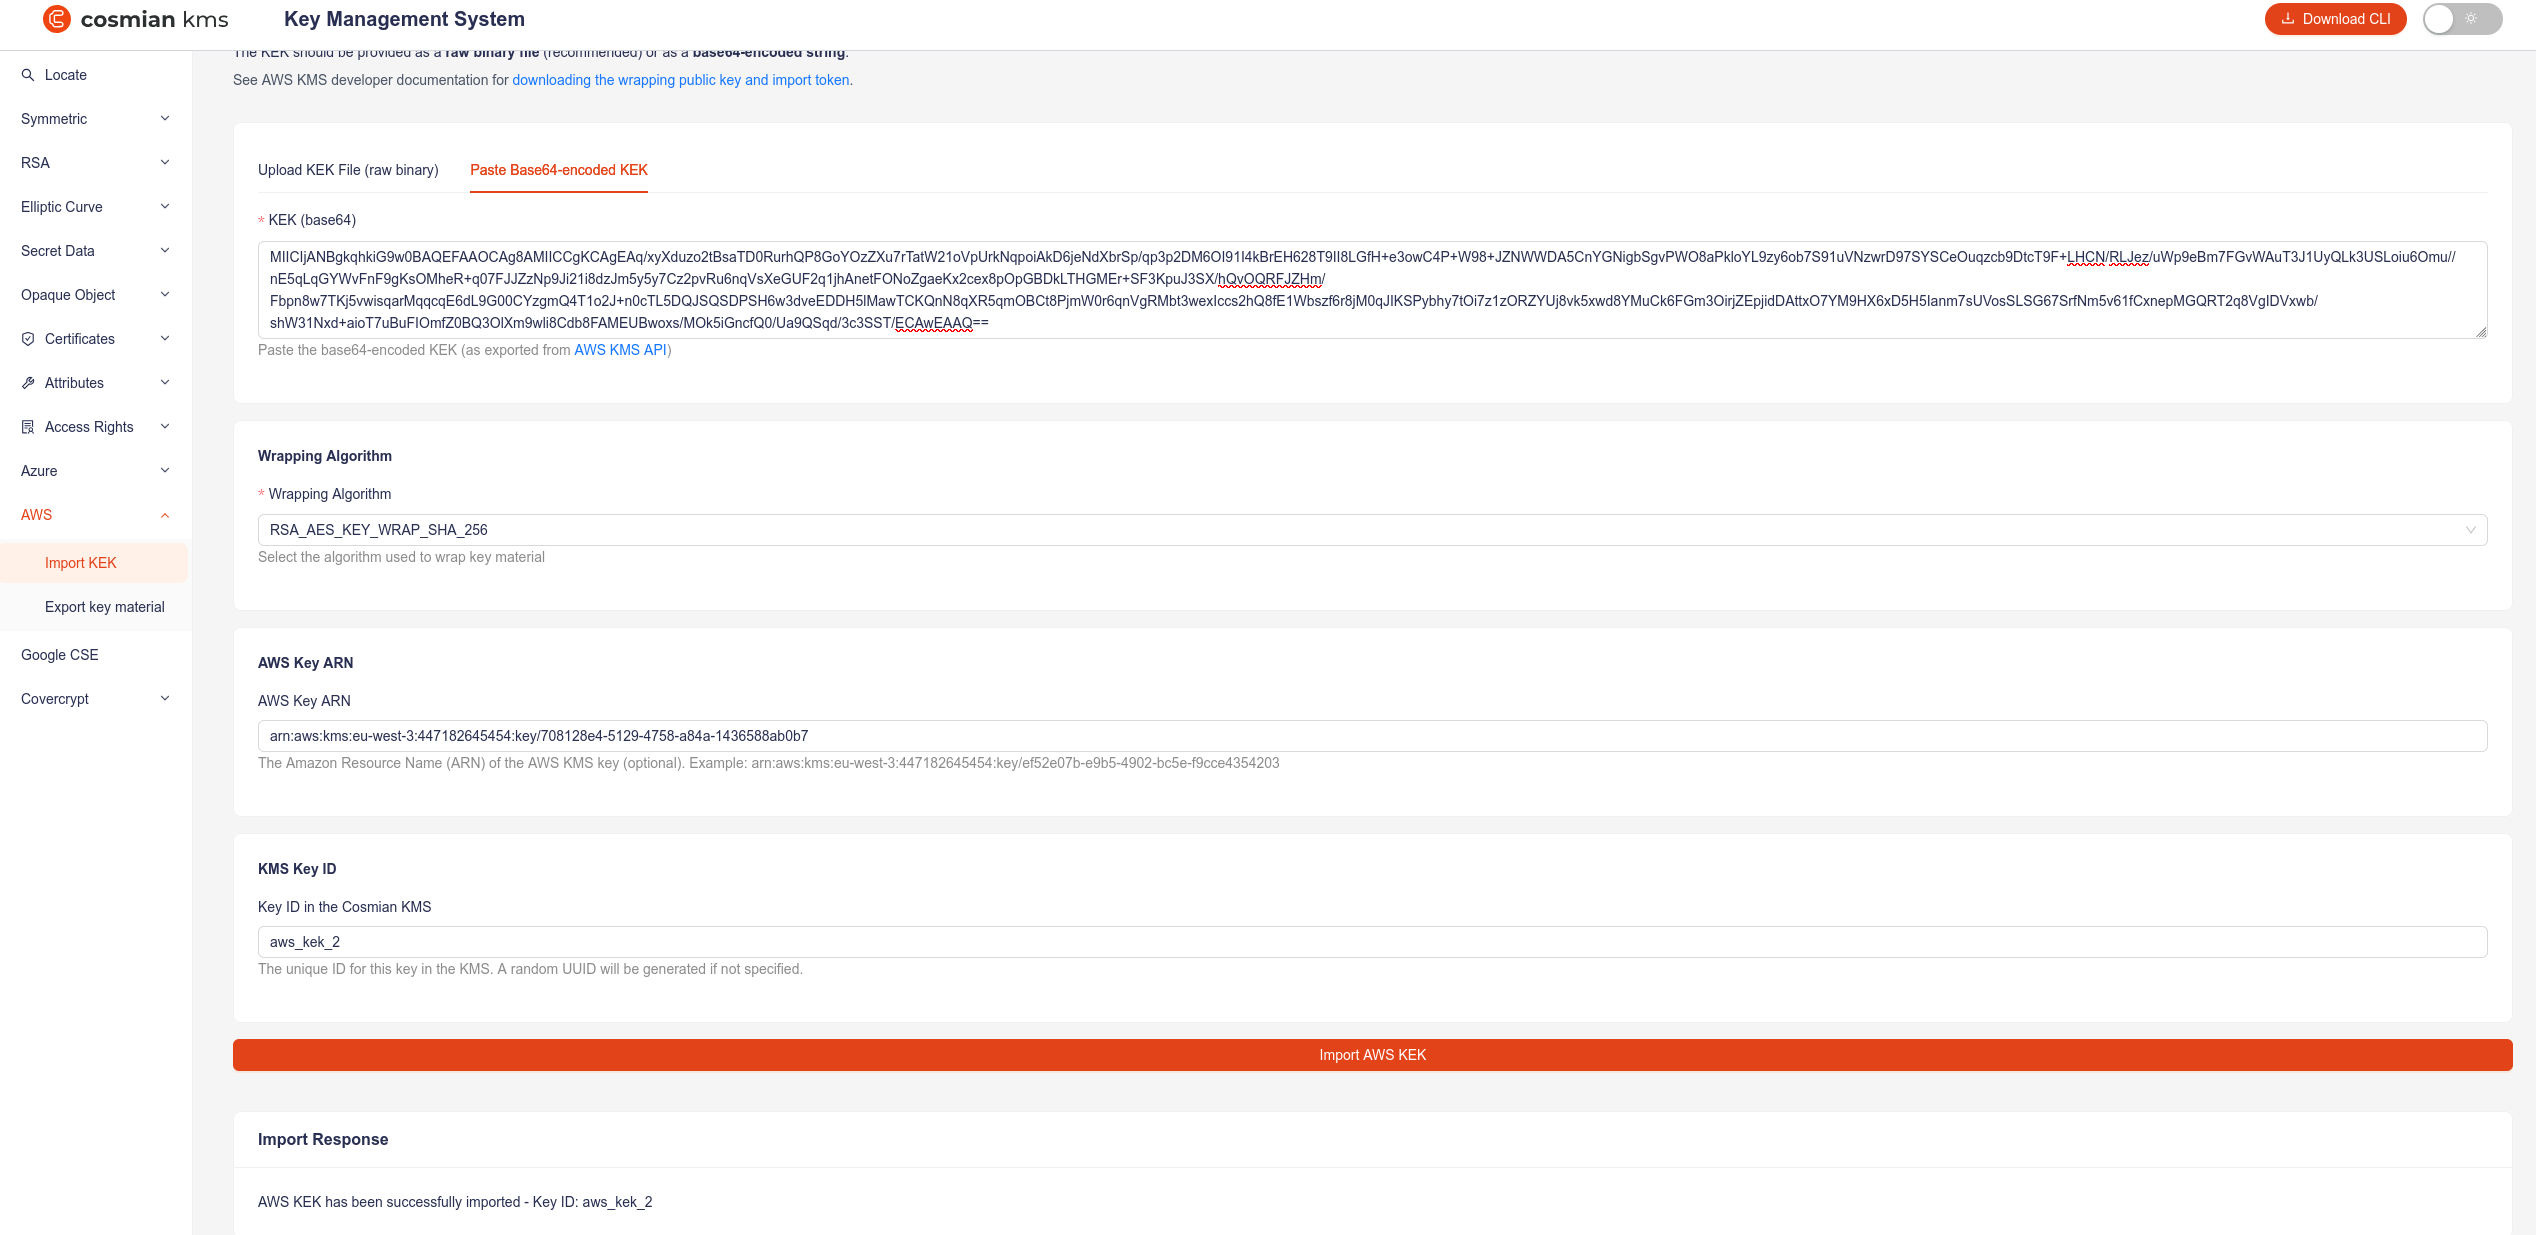
Finally, export the wrapped key material from Eviden KMS to import it into AWS KMS.
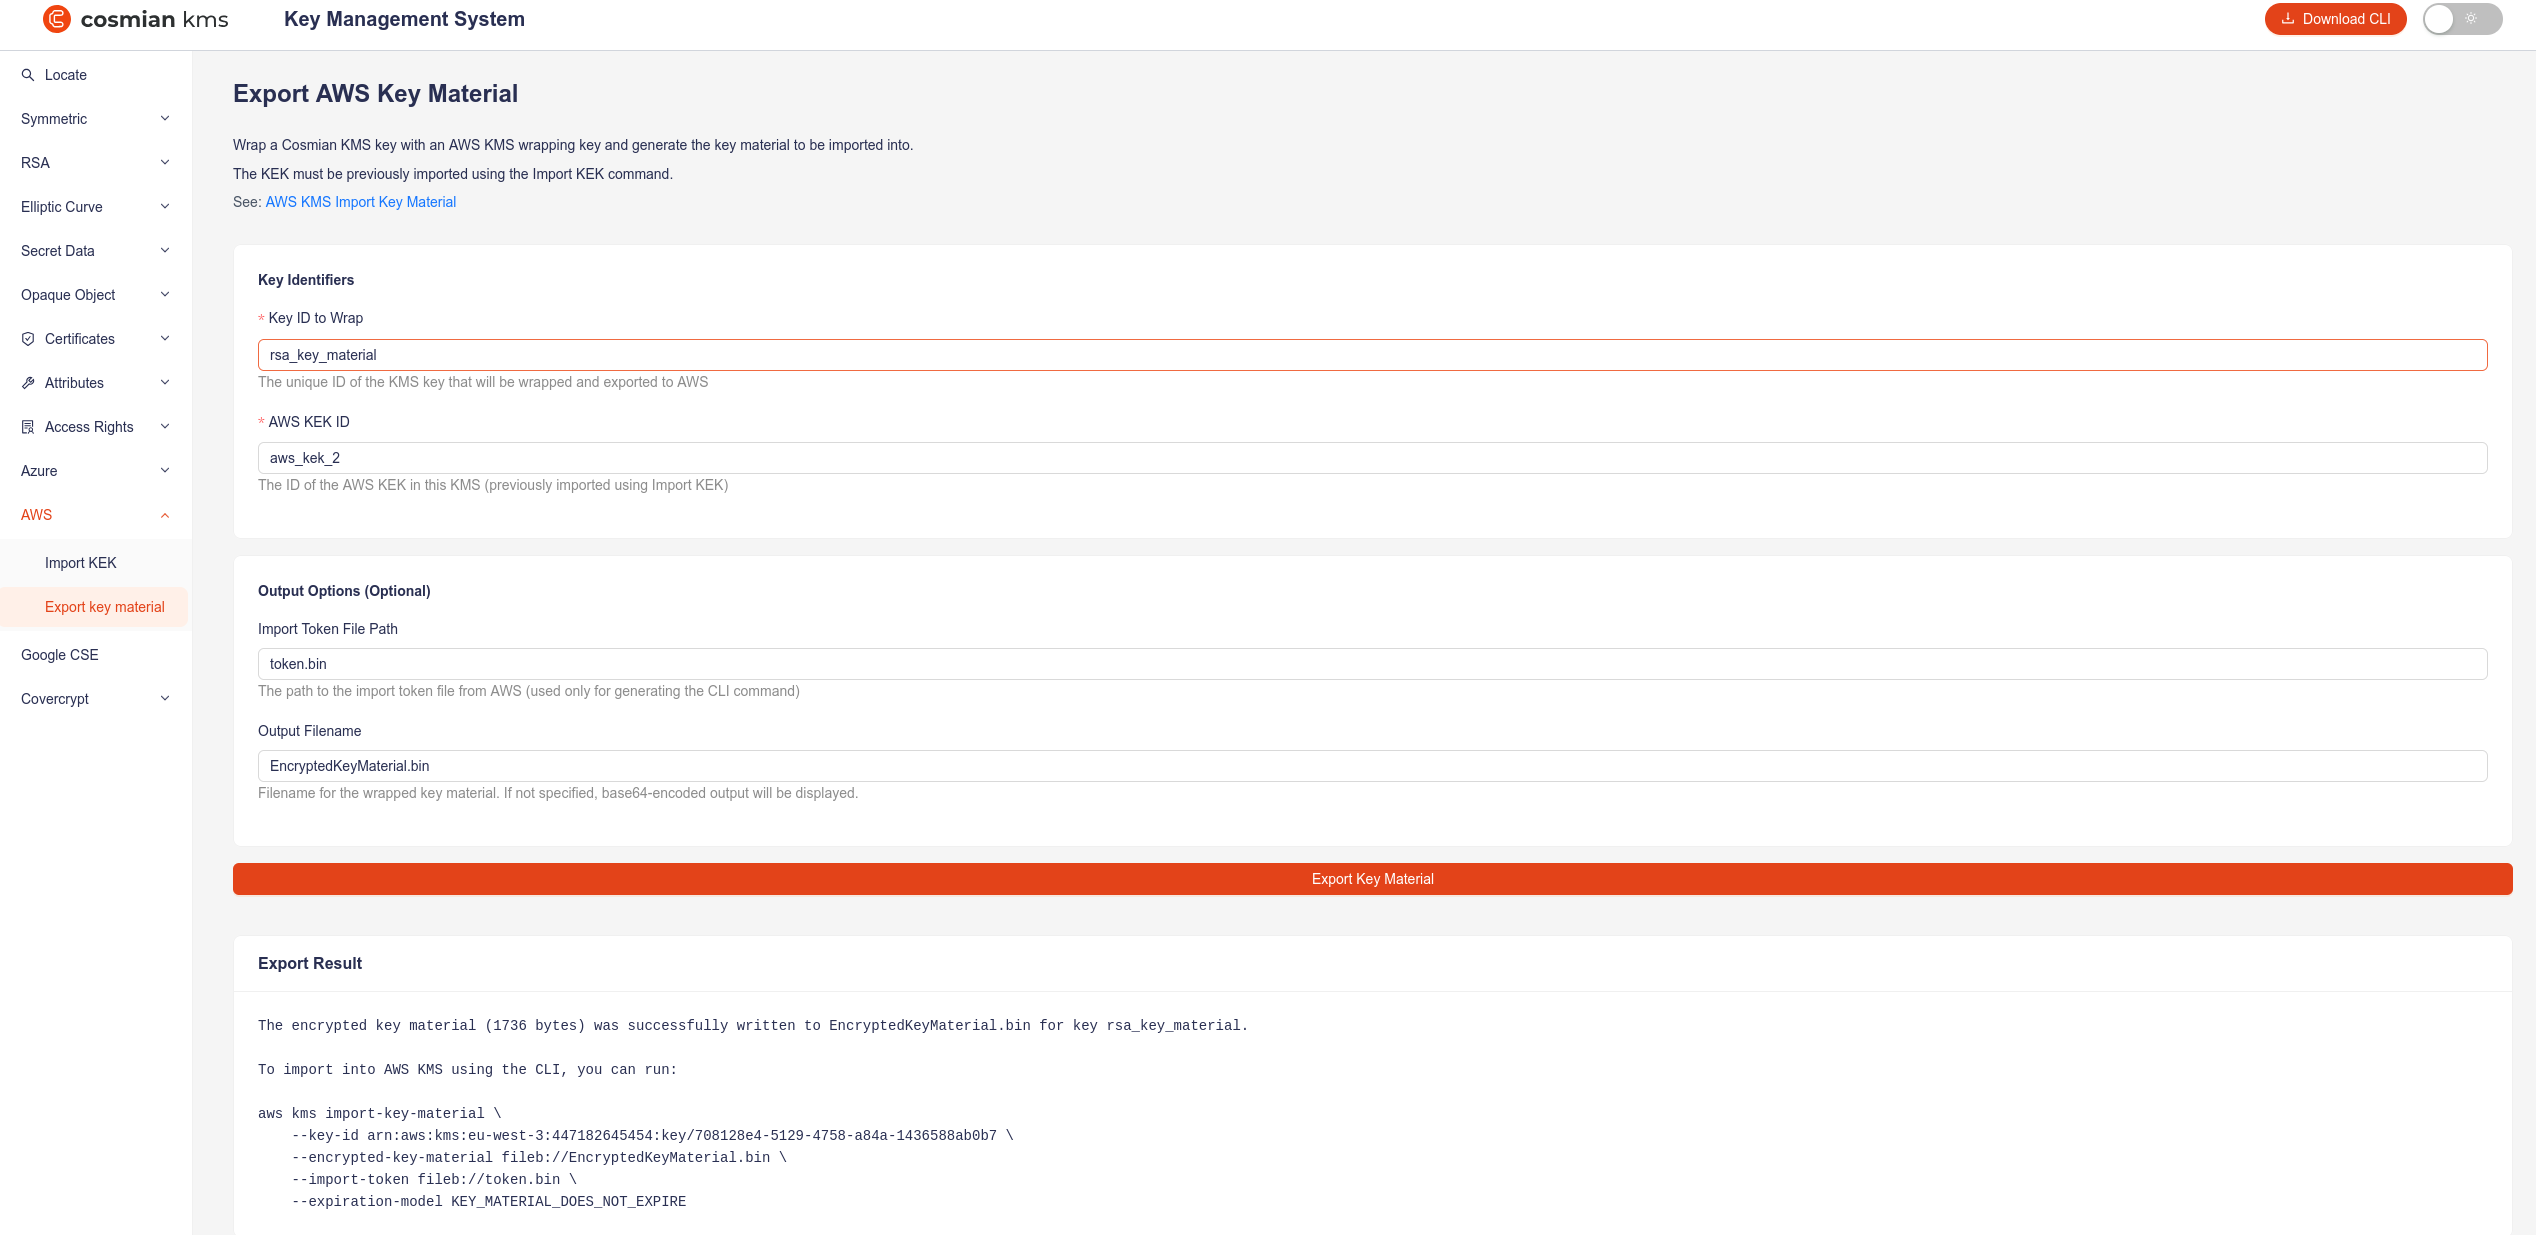
We named the file to export EncryptedKeyMaterial.bin. You can import the wrapped key material using the AWS CLI or the AWS Management Console.
An in depth explanation of the import process can be found in the AWS documentation to Import key material (console).
Automated BYOK Scripts
To facilitate testing and automating the BYOK flow, we provide ready-to-use Bash scripts that demonstrate the end-to-end process of creating an AWS KMS key, generating the corresponding key material using the Eviden CLI, and performing the import/export procedures.
The following scripts are available for download:
-
RSA BYOK Script: Automates the import of RSA private key material. Supports RSA key sizes:
2048,3072, and4096. Findrun_rsa_byok.shon repository -
ECC BYOK Script: Automates the import of Elliptic Curve private key material. Supports NIST curves:
p256,p384, andp521. Findrun_ecc_byok.shon repository -
AES BYOK Script: Automates the import of 256-bit AES symmetric key material. Find
run_aes_byok.shon repository
Usage
Each script requires the cosmian CLI to be available either in your PATH, the current directory, or specified via the COSMIAN_KMS_CLI environment variable. Also, ensure the aws CLI is available in your PATH, authenticated, and configured.
Example usage:
# Make the script executable
chmod +x run_rsa_byok.sh
# Run the script with the desired key size and an optional description
./run_rsa_byok.sh 2048 "My RSA External Key"
BYOK (Bring Your Own Key)
Eviden KMS provides a azure byok command in its CLI to facilitate the import of an Azure wrapping key (KEK) in
Eviden KMS, and the export of the wrapped keys in the .byok format for easy import in Azure Key Vault.
Follow this Azure documentation, for a description of Bring Your Own Key (BYOK) in Azure Key Vault,
The vault must be a premium Azure Key Vault, and the user performing the operations
must have the role of Crypto Officer.
Create two test keys in the Eviden KMS
These keys will later be exported wrapped by the Azure (KEK) key, and imported into Azure Key Vault.
Create an RSA Key
The key will be a 4096-bit key.
ckms rsa keys create --size_in_bits 4096 TestRSAKey
Public key unique identifier: TestRSAKey_pk
Private key unique identifier: TestRSAKey
Create an Elliptic Curve Key
The key will be created on the NIST P-256 curve.
ckms ec keys create --curve nist-p256 TestECKey
Public key unique identifier: TestECKey_pk
Private key unique identifier: TestECKey
Create an Azure Key Encryption Key (KEK)
This key will be used to wrap the KMS RSA and EC private keys on export.
Using the Azure console:
Navigate to the Key Vault (say MyPremiumKeyVault) and create a 4096-bit RSA key.
Make sure to select Generate Key Encryption Key for importing HSM-protected Keys.
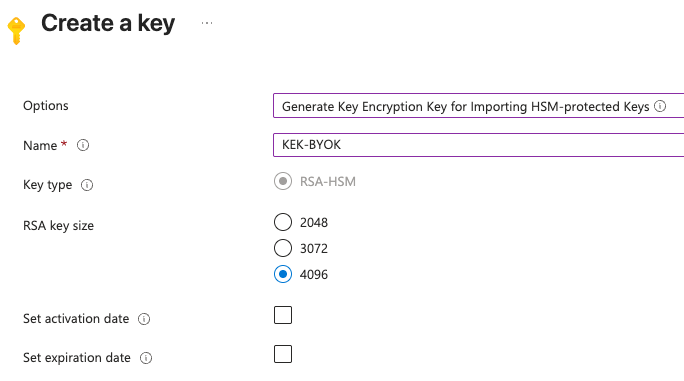
Using the az CLI:
The supported operations must be restricted to import.
az keyvault key create --kty RSA-HSM --size 4096 --name KEK-BYOK --ops import --vault-name MyPremiumKeyVault
In the azoutput, the key identifier (kid) will be something like:
https://mypremiumkeyvault.vault.azure.net/keys/KEK-BYOK/664f5aa2797a4075b8e36ca4500636d8
Please take note of the kid for next steps.
Export the Key Encryption (Public) Key
The KEK public key must be exported, then imported into the KMS.
Using the Azure console:
Edit the KEK by double-clicking on it.
Please take note of the key identifier (kid), which will be required later.
Download the public key and rename the file KEK-BYOK.public.pem.
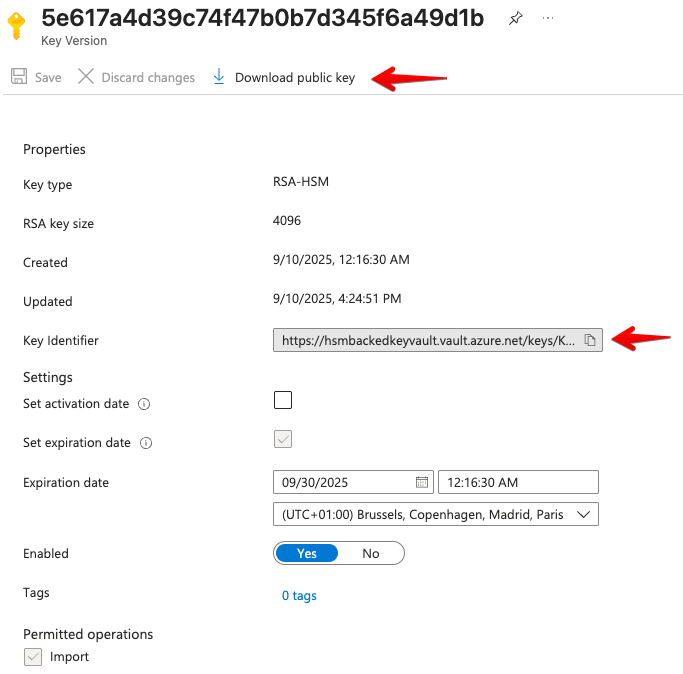
Using the az CLI:
az keyvault key download --name KEK-BYOK --vault-name MyPremiumKeyVault --file KEK-BYOK.public.pem
Import the key encryption key in Eviden KMS
The KMS CLI provides an azure byok command to facilitate both the import of the key encryption key in Eviden KMS,
and the export of the wrapped keys in the .byok format for easy import in Azure Key Vault.
ckms azure byok import KEK-BYOK.public.pem \
https://hsmbackedkeyvault.vault.azure.net/keys/BYOK_KEK/5e617a4d39c74f47b0b7d345f6a49d1b \
BYOK_KEK
The PublicKey in file KEK-BYOK.public.pem was imported with id: BYOK_KEK
Unique identifier: BYOK_KEK
Tags:
- azure
- kid:https://hsmbackedkeyvault.vault.azure.net/keys/BYOK_KEK/5e617a4d39c74f47b0b7d345f6a49d1b
Please note the presence of the azure and kid: tags on the key.
These identify the key as an Azure Key Encryption Key (KEK) in the Eviden KMS.
Export the wrapped keys from the Eviden KMS
The KMS CLI azure byok export command will generate a .byok file
containing the wrapped private key, which can be directly imported into Azure Key Vault.
Export the RSA key
ckms azure byok export TestRSAKey BYOK_KEK
The byok file was written to "TestRSAKey.byok" for key TestRSAKey
Export the EC key
ckms azure byok export TestECKey BYOK_KEK
The byok file was written to "TestECKey.byok" for key TestECKey
Upload the byok transfer blob in Azure Key Vault
Wrapped private RSA keys can be imported using either the console or the az LI.
Elliptic curve keys can only be imported using the az CLI.
For an RSA Private Key
Using the Azure console:
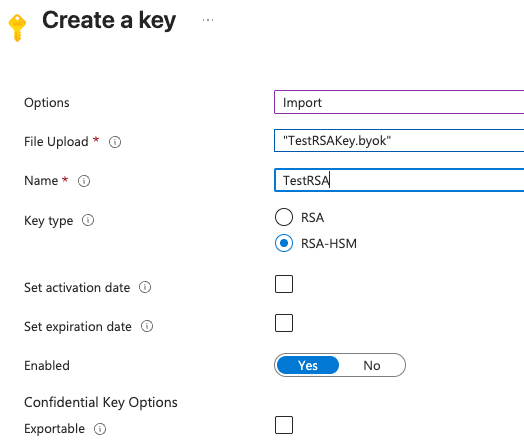
Using the az CLI:
az keyvault key import --vault-name MyPremiumKeyVault --name TestRSAKey --byok-file TestRSAKey.byok \
--ops sign verify
For an EC Private Key
The key type and curve must be specified on import for elliptic curve keys.
az keyvault key import --vault-name MyPremiumKeyVault --name TestECKey --byok-file TestECKey.byok \
--kty EC --curve P-256 --ops sign verify
EKM (External Key Management)
Eviden KMS implements the Azure External Key Manager (EKM) Proxy API, enabling it to serve as an external key management service for an Azure Managed HSM.
This integration allows organizations to maintain complete physical control over their encryption keys outside of Azure infrastructure while seamlessly integrating with Azure services that support Customer Managed Keys (CMK).
The Eviden KMS implementation follows and implements the Microsoft EKM Proxy API Specification for v0.1-preview.
High level architecture
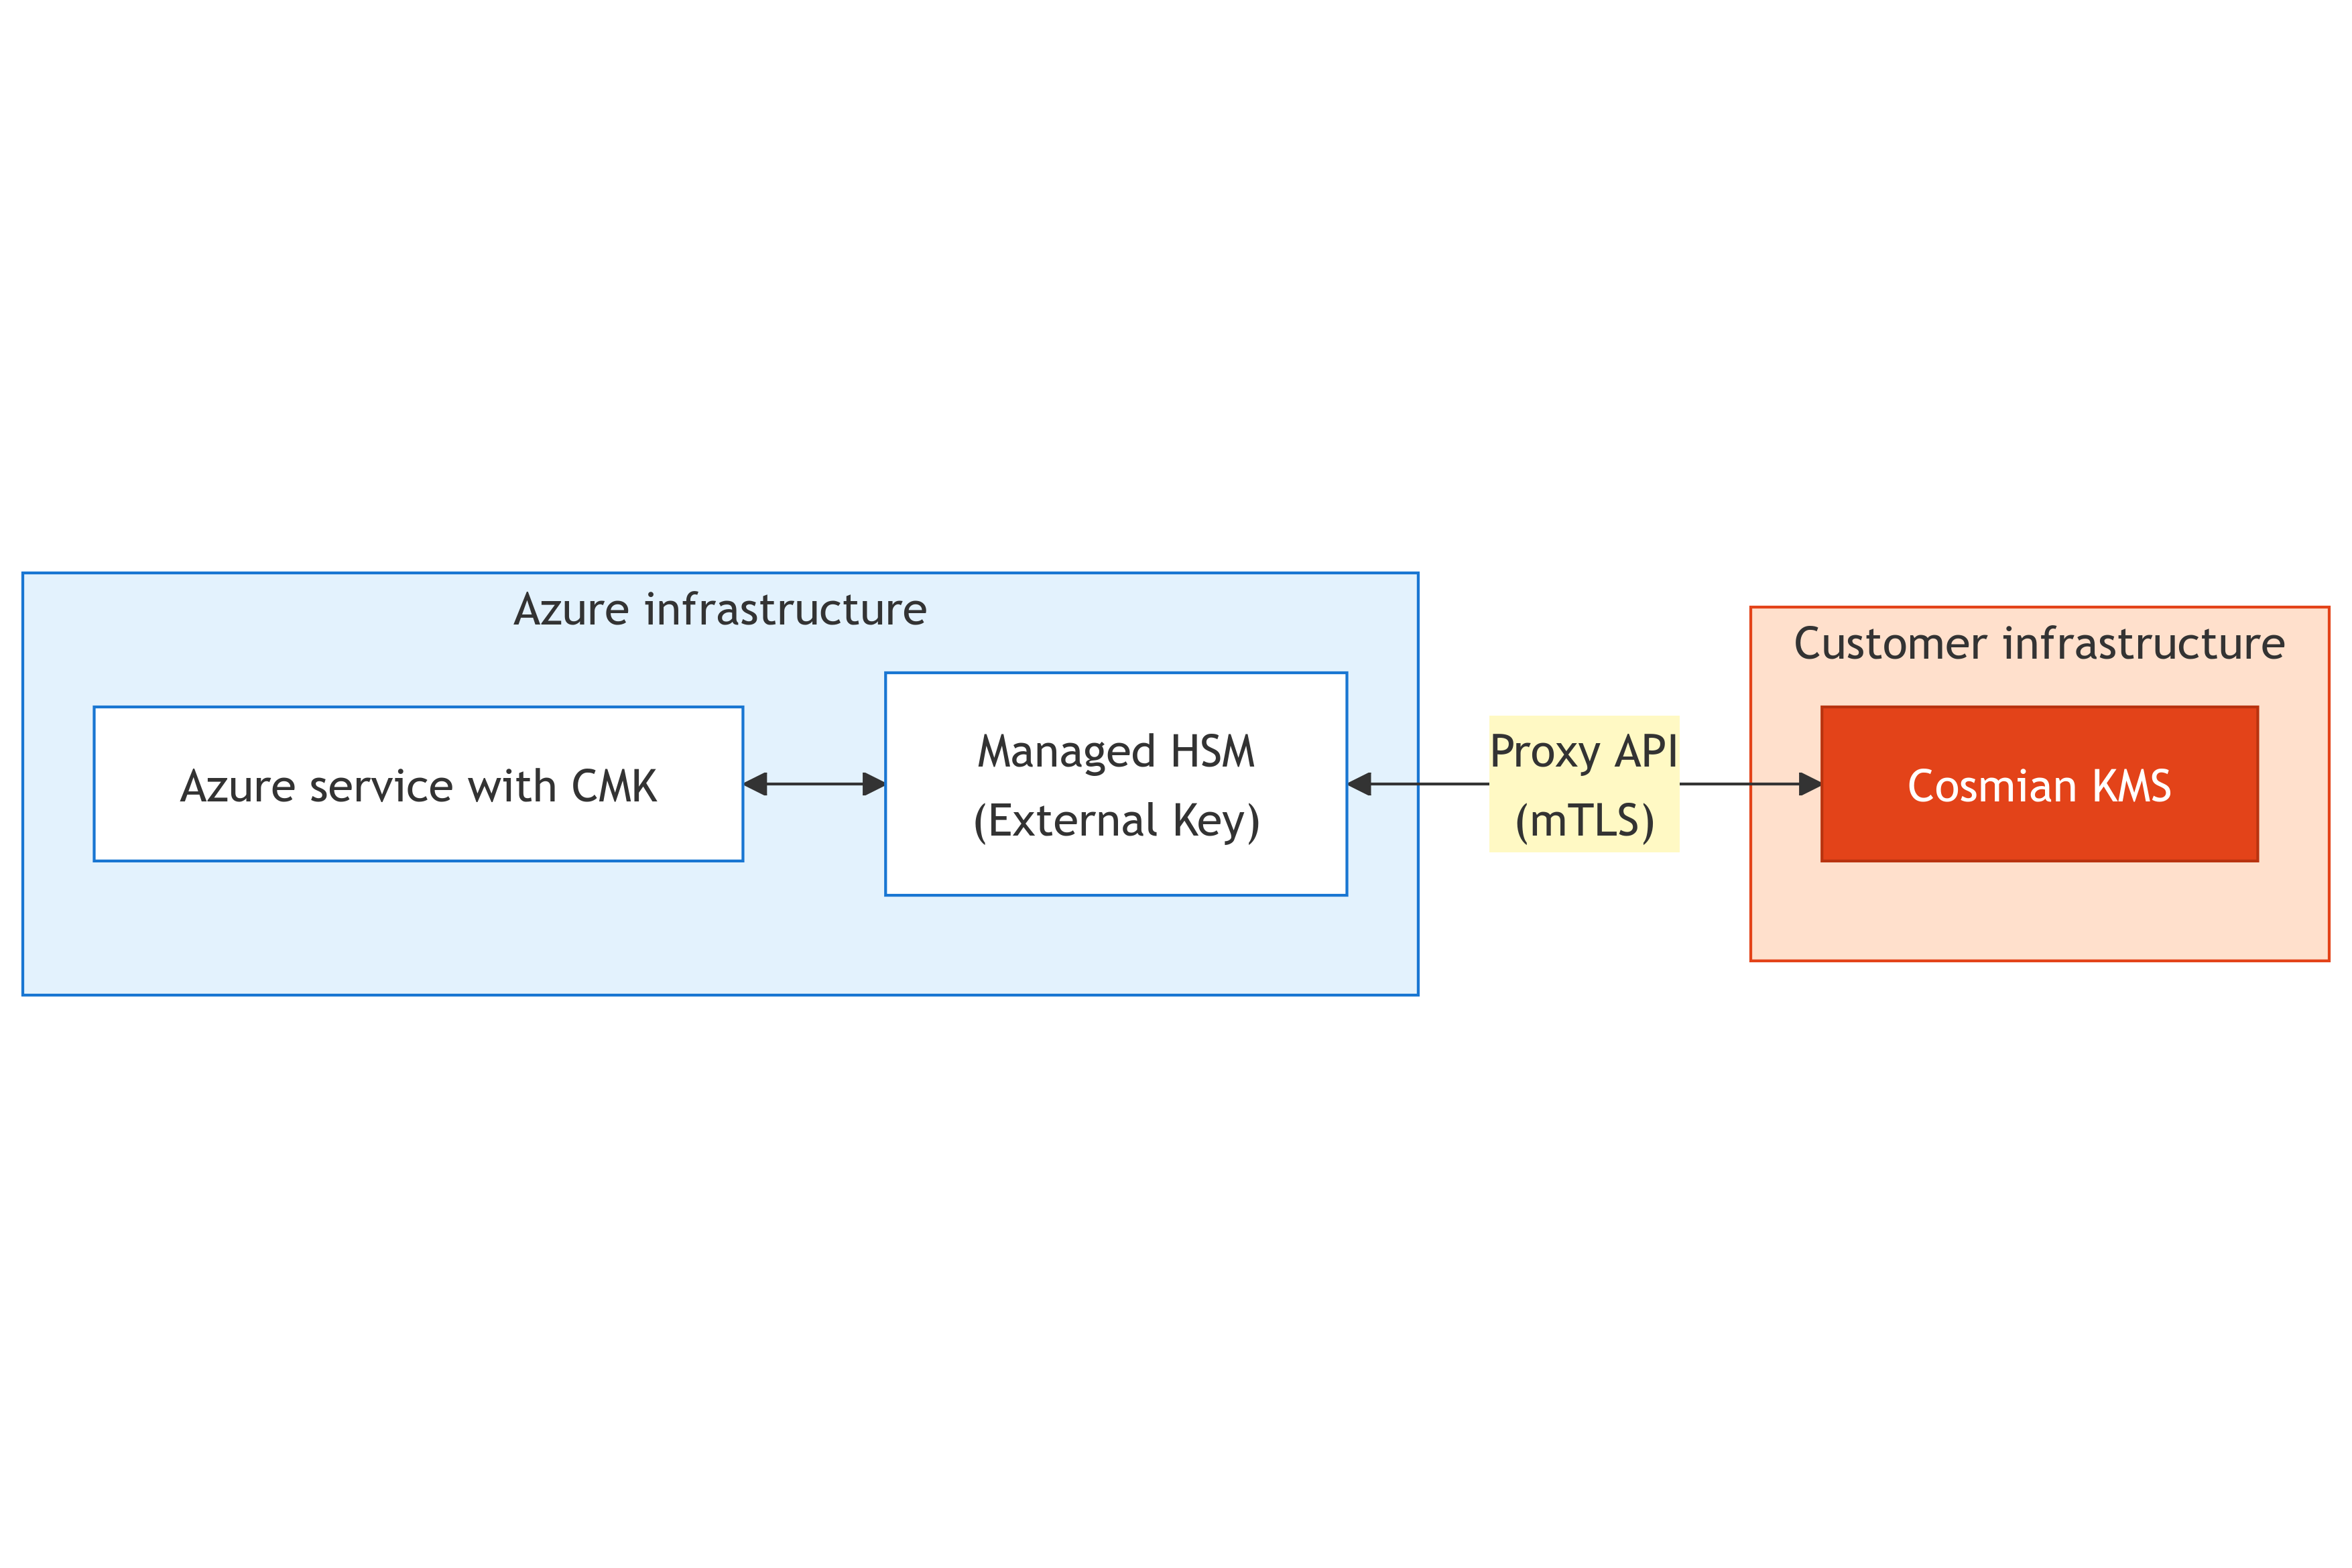
The customer's Azure services (configured with Customer Managed Keys) communicate with Azure Managed HSM to perform encryption/decryption operations. A full list of Azure services that support CMK can be consulted on this page.
With this integration, your protected secrets remain under your complete control while maintaining compatibility with Azure's managed services.
The following diagram illustrates a possible use case where Eviden KMS acts as the EKM Proxy :

Api specification
URL format
All requests and responses for Azure EKM APIs are sent as JSON objects over HTTPS. Each request includes context information to associate Azure Managed HSM logs and audits with Eviden KMS logs.
The URI format for EKM Proxy API calls is:
https://{public-KMS-URI}/azureekm/\[path-prefix]/{api-specific-paths}?api-version={client-api-version}
The parameters between brackets {} can be edited on the KMS configuration and must follow the following constraints :
Path Prefix:
- Maximum 64 characters
- Allowed characters: letters (a-z, A-Z), numbers (0-9), slashes (/), and dashes (-)
External Key ID:
- Referenced as
{key-name}in the endpoints below - Maximum 64 characters
- Allowed characters: letters (a-z, A-Z), numbers (0-9), and dashes (-)
Endpoints
| Endpoint | Method | Path | Description |
|---|---|---|---|
| Get Proxy Info | POST | /azureekm/[path-prefix]/info | Health check and proxy details |
| Get Key Metadata | POST | /azureekm/[path-prefix]/{key-name}/metadata | Retrieve key type, size, and supported operations |
| Wrap Key | POST | /azureekm/[path-prefix]/{key-name}/wrapkey | Wrap (encrypt) a DEK with a KEK |
| Unwrap Key | POST | /azureekm/[path-prefix]/{key-name}/unwrapkey | Unwrap (decrypt) a previously wrapped DEK |
Supported algorithms
| Algorithm | Key Type | Description |
|---|---|---|
| A256KW | AES-256 | AES Key Wrap (RFC 3394) |
| A256KWP | AES-256 | AES Key Wrap with Padding (RFC 5649) |
| RSA-OAEP-256 | RSA | RSA-OAEP using SHA-256 and MGF1 |
| RSA-OAEP | RSA | RSA-OAEP using SHA-1 and MGF1 |
⚠️ Notice: For RSA operations, always use the private key reference as
{key-name}in all endpoints, including wrap operations. The KMS will automatically derive and use the associated public key for encryption (wrap) operations. Passing the public key ID might lead to errors.
Getting started
Azure Managed HSM Setup
You must have an Azure Managed HSM Pool already created and activated in your Azure subscription. Refer to the Azure Managed HSM documentation for setup instructions.
Once the configuration is done, you will need the root CA certificate that the Azure Managed HSM uses for client authentication. This certificate will be configured in Eviden KMS to validate incoming mTLS connections.
Let's save the root CA as mhsm-root-ca.pem - We will need it in the next step.
Eviden KMS setup
Follow the Eviden KMS installation guide to install the KMS server on your infrastructure. The KMS server typically uses the configuration file located at /etc/cosmian/kms.toml when installed manually with default parameters.
Alternatively, you can deploy a pre-configured Eviden Confidential VM like explained in this guide.. For confidential VMs, the KMS configuration file is located in the encrypted LUKS container at /var/lib/cosmian_vm/data/app.conf.
Environment variables can also be used for all the configurations below.
The following guide will consider running Eviden KMS on confidential VM in non-FIPS mode.
mTLS Configuration
Configure mutual TLS authentication to accept connections from Azure Managed HSM by adding of editing to following lines in your configuration file: For detailed information about TLS client certificate authentication, see the TLS Client Certificate configuration guide.
[tls]
# Your server certificate and private key (PKCS#12 format)
tls_p12_file = "/etc/cosmian/server-cert.p12"
tls_p12_password = "your-secure-password"
# The certificate downloaded in the previous section
# This validates the client certificate presented by Azure MHSM
clients_ca_cert_file = "/etc/cosmian/mhsm-root-ca.pem"
Note : If you have a server's key and certificate files, you can convert them to PKCS#12 format using openssl:
openssl pkcs12 -export \
-in server.crt \
-inkey server.key \
-out server-cert.p12 \
-name "cosmian-kms-server" \
-passout pass:your-secure-password
Azure EKM Configuration
[azure_ekm_config]
# Enable Azure EKM endpoints
azure_ekm_enable = true
# Optional: Path prefix for multi-tenant isolation (max 64 chars: a-z, A-Z, 0-9, /, -)
azure_ekm_path_prefix = "cosmian0"
# The fields below will be reported in the /info endpoint, edit according to your needs
azure_ekm_proxy_vendor = "Eviden"
azure_ekm_proxy_name = "EKM Proxy Service v0.1-preview"
azure_ekm_ekm_vendor = "Eviden"
azure_ekm_ekm_product = "Eviden KMS"
# WARNING: Only set to true for testing! Never in production.
azure_ekm_disable_client_auth = false
Configuration Parameters:
| Parameter | Type | Default | Description |
|---|---|---|---|
azure_ekm_enable | boolean | false | Enable/disable Azure EKM API endpoints. |
azure_ekm_path_prefix | string | none | Optional path prefix for routing and multi-tenant isolation. Max 64 chars: a-z, A-Z, 0-9, /, -. Example: "cosmian0", "customer-a/prod" |
azure_ekm_proxy_vendor | string | "Eviden" | Proxy vendor name reported in /info endpoint. |
azure_ekm_proxy_name | string | "EKM Proxy Service" | Proxy name and version reported in /info endpoint. Auto-inserts the KMS package version by default. |
azure_ekm_ekm_vendor | string | "Eviden" | EKMS vendor name reported in /info endpoint. |
azure_ekm_ekm_product | string | "Eviden KMS v{CARGO_PKG_VERSION}" | EKMS product name and version reported in /info endpoint. |
azure_ekm_disable_client_auth | boolean | false | ⚠️ Bypasses mTLS authentication. Only use for testing. |
Grant the Managed HSM identity access rights on the KMS
When Azure Managed HSM connects to the EKM proxy over mTLS, Eviden KMS authenticates it as a regular KMIP user, using the Subject CN of the client certificate as the username (see TLS Client Certificate configuration and the Authentication guide). This identity is generally of the form <hsm-name>.managedhsmclient.azure.net — check your own Managed HSM client certificate to confirm its exact Subject CN.
Because the external key is owned by whichever KMS user created it, you must explicitly grant this Managed HSM identity the rights to read and use that key, using ckms access-rights grant:
ckms access-rights grant <hsm-name>.managedhsmclient.azure.net -i <kms-key-uid> get get_attributes encrypt decrypt
Without this step, Azure's key registration call (see below) fails with a KeyNotFound-type error, because the KMS rejects the Managed HSM identity's request for an object it does not own and has not been granted access to.
Connect Azure Managed HSM to the EKM proxy
The following az keyvault ekm-connection commands configure the Managed HSM side of the connection to your Eviden KMS.
First, create the EKM connection on the Managed HSM, pointing it at your Eviden KMS:
az keyvault ekm-connection create \
--hsm-name <hsm-name> \
--host <kms-fqdn>:443 \
--path-prefix /azureekm/<azure_ekm_path_prefix> \
--server-ca-certificate <path-to-kms-tls-ca-or-server-cert.pem>
⚠️ Port 443 is required. The
--hostargument's own help text states: "EKM proxy host (FQDN or FQDN:port). If port is omitted, 443 is assumed." In practice, the Managed HSM EKM proxy calls have been observed to require port 443 — make sure your Eviden KMS is reachable on port 443 (in addition to any other port you use for KMIP/administrative access), even if[http] portin your KMS configuration is set to a different value.
--path-prefixmust matchazure_ekm_path_prefix. If you configuredazure_ekm_path_prefix = "cosmian0"on the KMS side, the Azure-side--path-prefixmust be the corresponding path (e.g./azureekm/cosmian0). A mismatch here causes requests to fail to route, without necessarily producing an obvious error on the Azure side.
Verify the connection:
az keyvault ekm-connection check --hsm-name <hsm-name>
A successful check returns the /info payload reported by the KMS (apiVersion, proxyVendor, proxyName, ekmVendor, ekmProduct).
Register the external key and grant Azure RBAC
Register the KMS key as an external Managed HSM key, referencing its KMS UID:
az keyvault key create \
--hsm-name <hsm-name> \
--name <azure-key-name> \
--external-key-id <kms-key-uid>
The consuming Azure service (for example, a Storage account's managed identity) then needs the Managed HSM Crypto Service Encryption User role (built-in Managed HSM local RBAC role, which grants the keys/wrap, keys/unwrap, and keys/read data actions) on that key:
az keyvault role assignment create \
--hsm-name <hsm-name> \
--role "Managed HSM Crypto Service Encryption User" \
--assignee <consuming-service-principal-id> \
--scope /keys/<azure-key-name>
Testing the integration
For testing purposes or for debugging, you can temporarily disable client authentication by commenting out the following configuration fields:
[tls]
# Comment this field to disable client auth and allow incoming requests from anyone
# clients_ca_cert_file = "/etc/cosmian/mhsm-root-ca.pem"
[azure_ekm_config]
# Set to true to bypass mTLS for local testing only — NEVER use in production
azure_ekm_disable_client_auth = true
Restart the KMS server:
sudo systemctl restart cosmian-kms
Test the /info endpoint:
curl -X POST "https://ekm.yourdomain.com/azureekm/cosmian0/info?api-version=0.1-preview" \
-H "Content-Type: application/json" \
-d '{
"request_context": {
"request_id": "test-request-123",
"correlation_id": "test-correlation-456",
"pool_name": "test-pool"
}
}'
Expected response (if you used the config above):
{
"api_version": "0.1-preview",
"proxy_vendor": "Eviden",
"proxy_name": "EKM Proxy Service v=0.1-preview",
"ekm_vendor": "Eviden",
"ekm_product": "Eviden KMS v5.15.0"
}
Troubleshooting
| Symptom | Likely cause | Fix |
|---|---|---|
az keyvault ekm-connection create succeeds, but Azure later fails to reach the proxy | KMS not reachable on port 443 | Expose the KMS on port 443, in addition to any other configured port — see the port 443 note above. |
| Requests never reach the KMS logs, or Azure reports a connectivity/routing error | --path-prefix used in az keyvault ekm-connection create does not match azure_ekm_path_prefix in the KMS configuration | Make both values match exactly, including the /azureekm/ prefix. |
az keyvault key create --external-key-id ... fails with a KeyNotFound-type error | The Managed HSM's mTLS identity has not been granted access rights on the KMS key | Grant get, get_attributes, encrypt, decrypt to the Managed HSM identity with ckms access-rights grant — see above. |
| Wrap/unwrap fails during a CMK-enabling operation (for example Azure Storage CMK) with a generic error on the Azure side | The client sent a wrapping algorithm not currently listed under Supported algorithms | Check the KMS server logs for the exact alg value received, and confirm it is one of the algorithms in the table above. |
Microsoft Double Key Encryption (DKE)
Microsoft Double Key Encryption (DKE) is a feature of Microsoft 365 that allows you to protect your most sensitive data by encrypting data on the client computer before sending it to Microsoft servers. One of the keys used to encrypt remains under your control and makes the data unreadable by Microsoft. This key is kept inside your instance of Eviden KMS which exposes the required API to integrate with Microsoft DKE.
See How it works for details on the cryptographic process.
Microsoft Prerequisites
The DKE feature is currently only available for the Office Windows clients. In addition, to use Microsoft Double Key Encryption (DKE) you must have a Microsoft 365 Business Premium license and must have access to the Microsoft Purview compliance portal.
How it works
Once DKE is configured, the whole process consists in assigning a specific sensitivity label to a document. The label will indicate that the document is encrypted and that the key to decrypt it is stored in your Eviden KMS.
Please check the dedicated Microsoft documentation for a complete overview of the feature.
From a cryptographic standpoint, the feature works as follows:
Before saving an encrypted document, the Office client will:
- Generate an ephemeral 128-bit AES key and use it to encrypt the document
- Call the Eviden KMS to get your 2048-bit RSA public key (the Office client will cache the key for 24 hours)
- Use that key to wrap the AES key using the PKCS#11 CKM_RSA_PKCS_OAEP (NIST 800 56B Rev2) algorithm; the hashing algorithm is set to SHA-256 (see the list of supported algorithms for details)
- Send the wrapped AES key and the encrypted document to Microsoft servers, where Azure RMS will also wrap the wrapped AES key with their own key (hence the "double key" acronym)
Retrieving an encrypted document works as follows, the Office client will:
- Request Azure RMS to perform the first unwrapping using their key, to recover the wrapped AES key
- Download the encrypted document and the wrapped AES key
- Call your Eviden KMS to unwrap the AES key using your private RSA key. Please note that the private RSA key never leaves the Eviden KMS.
- Decrypt the document using the recovered AES key and display it.
Note: The Eviden KMS implementation of the PKCS#11 CKM_RSA_PKCS_OAEP algorithm is FIPS compliant. The DKE API is therefore available on the Eviden server running in FIPS mode.
Configuring the Eviden KMS server
The Eviden KMS server needs to be started with the --ms-dke-service-url <MS_DKE_SERVICE_URL> option.
The <MS_DKE_SERVICE_URL>should contain the external URL of this server as configured in Azure App Registrations
for the DKE Service
The URL should be something like https://kms.my_domain.com/ms_dke
Alternatively, you can set the KMS_MS_DKE_SERVICE_URL environment variable to the same value, or set the
corresponding entry in the server TOML configuration file.
The Office client does not send any authentication information when calling the Eviden KMS. Firewalling the Eviden KMS server to only accept requests from valid Office clients is critical.
It is possible to confidentially run the Eviden KMS server in the cloud inside an Eviden VM. However, due to the lack of authentication, and thus the need to firewall the server, one should make sure to use OS-level firewalling and not rely on the cloud provider's firewalling capabilities, particularly if running on Azure.
Create an RSA key with tag dke_key
Using the KMS CLI, create a 2048-bit RSA key with the tag dke_key:
ckms rsa keys create --tag dke_key --size_in_bits 2048
The tag can be changed to any value, but it must be used in the URL of the sensitivity label in the Microsoft Purview compliance portal. See Create a sensitivity label for encryption for details.
Rotate the DKE key
If later on you need to rotate the DKE key, you can use the KMS CLI to create a new key with a new tag. You must then create a new sensitivity label where the Double Key Encryption URL ends with the new tag value. See Create a sensitivity label for encryption for details.
Users should now select the new label when creating new documents. As long as the old key is available in the Eviden KMS, users will still be able to open documents encrypted with the old key.
Configuring Microsoft DKE in Purview
Please follow the main documentation provided by Microsoft. The following paragraphs add details and tips to the process.
Activating the protection service from Azure Information Protection
The protection service must be activated in order to use DKE. If not activated, "Group and Sites" will not be available in the scopes of the sensitivity label.
Run PowerShell as Admin
Install-Module -Name AIPService
In case of troubles with the execution policy, try
powershell -ExecutionPolicy ByPass
Get the status of the AIP service
Import-Module AIPService
Get-AIPService
You may have to connect to it first
Connect-AipService
If it is disabled, enable it
Enable-AipService
More options for phased deployments here.
Microsoft Entra configuration for encrypted content
Check if there is anything to configure.
Activate sensitivity labels for MS 365 groups
Sensitivity labels must be activated for MS 365 groups which are also called unified groups. The main documentation on configuring sensitivity labels is available here.
The objective is to set the EnableMIPLabels parameter to True at the Entra ID Directory level (which is set
to False by default), using Group.Unified template.
The
EnableMIPLabelsflag indicates whether sensitivity labels published in Microsoft Purview compliance portal can be applied to Microsoft 365 groups. For more information, see Assign Sensitivity Labels for Microsoft 365 groups.
To verify the current value of the EnableMIPLabels parameter, run the following command:
$Setting = Get-AzureADDirectorySetting | ? { $_.DisplayName -eq "Group.Unified"}
&Setting.Values
See this doc and Enable sensitivity label support in PowerShell which will probably require configuring groups first.
De-activate co-authoring in Microsoft Purview
Do NOT click the box on this page, doing so will prevent the use of DKE in Sensitivity Labels.
If you need to deactivate co-authoring, you can do so by running the following commands:
Install-Module -Name PSWSMan # if not already installed
Install-WSMan
Install-Module -Name ExchangeOnlineManagement
Import-Module ExchangeOnlineManagement
Connect-IPPSSession -UserPrincipalName you_admin_user@your_domain.com
Set-PolicyConfig -EnableLabelCoauth:$false
Create a sensitivity label for encryption
Navigate to Purview then Solutions > Information protection > Labels
Follow these instructions
to create the label.
Select Use Double Key Encryption on the encryption configuration screen and make sure
you do not activate co-authoring.
The URL must be set to a form similar to https://dke.acme.com/ms_dke/dke_key where
dke.acme.comis the address of the Eviden KMS server. A valid certificate must be installed on the server.ms_dkeis the root of REST path for the DKE services.dke_keyis the tag set for the RSA key pair to use for this label.
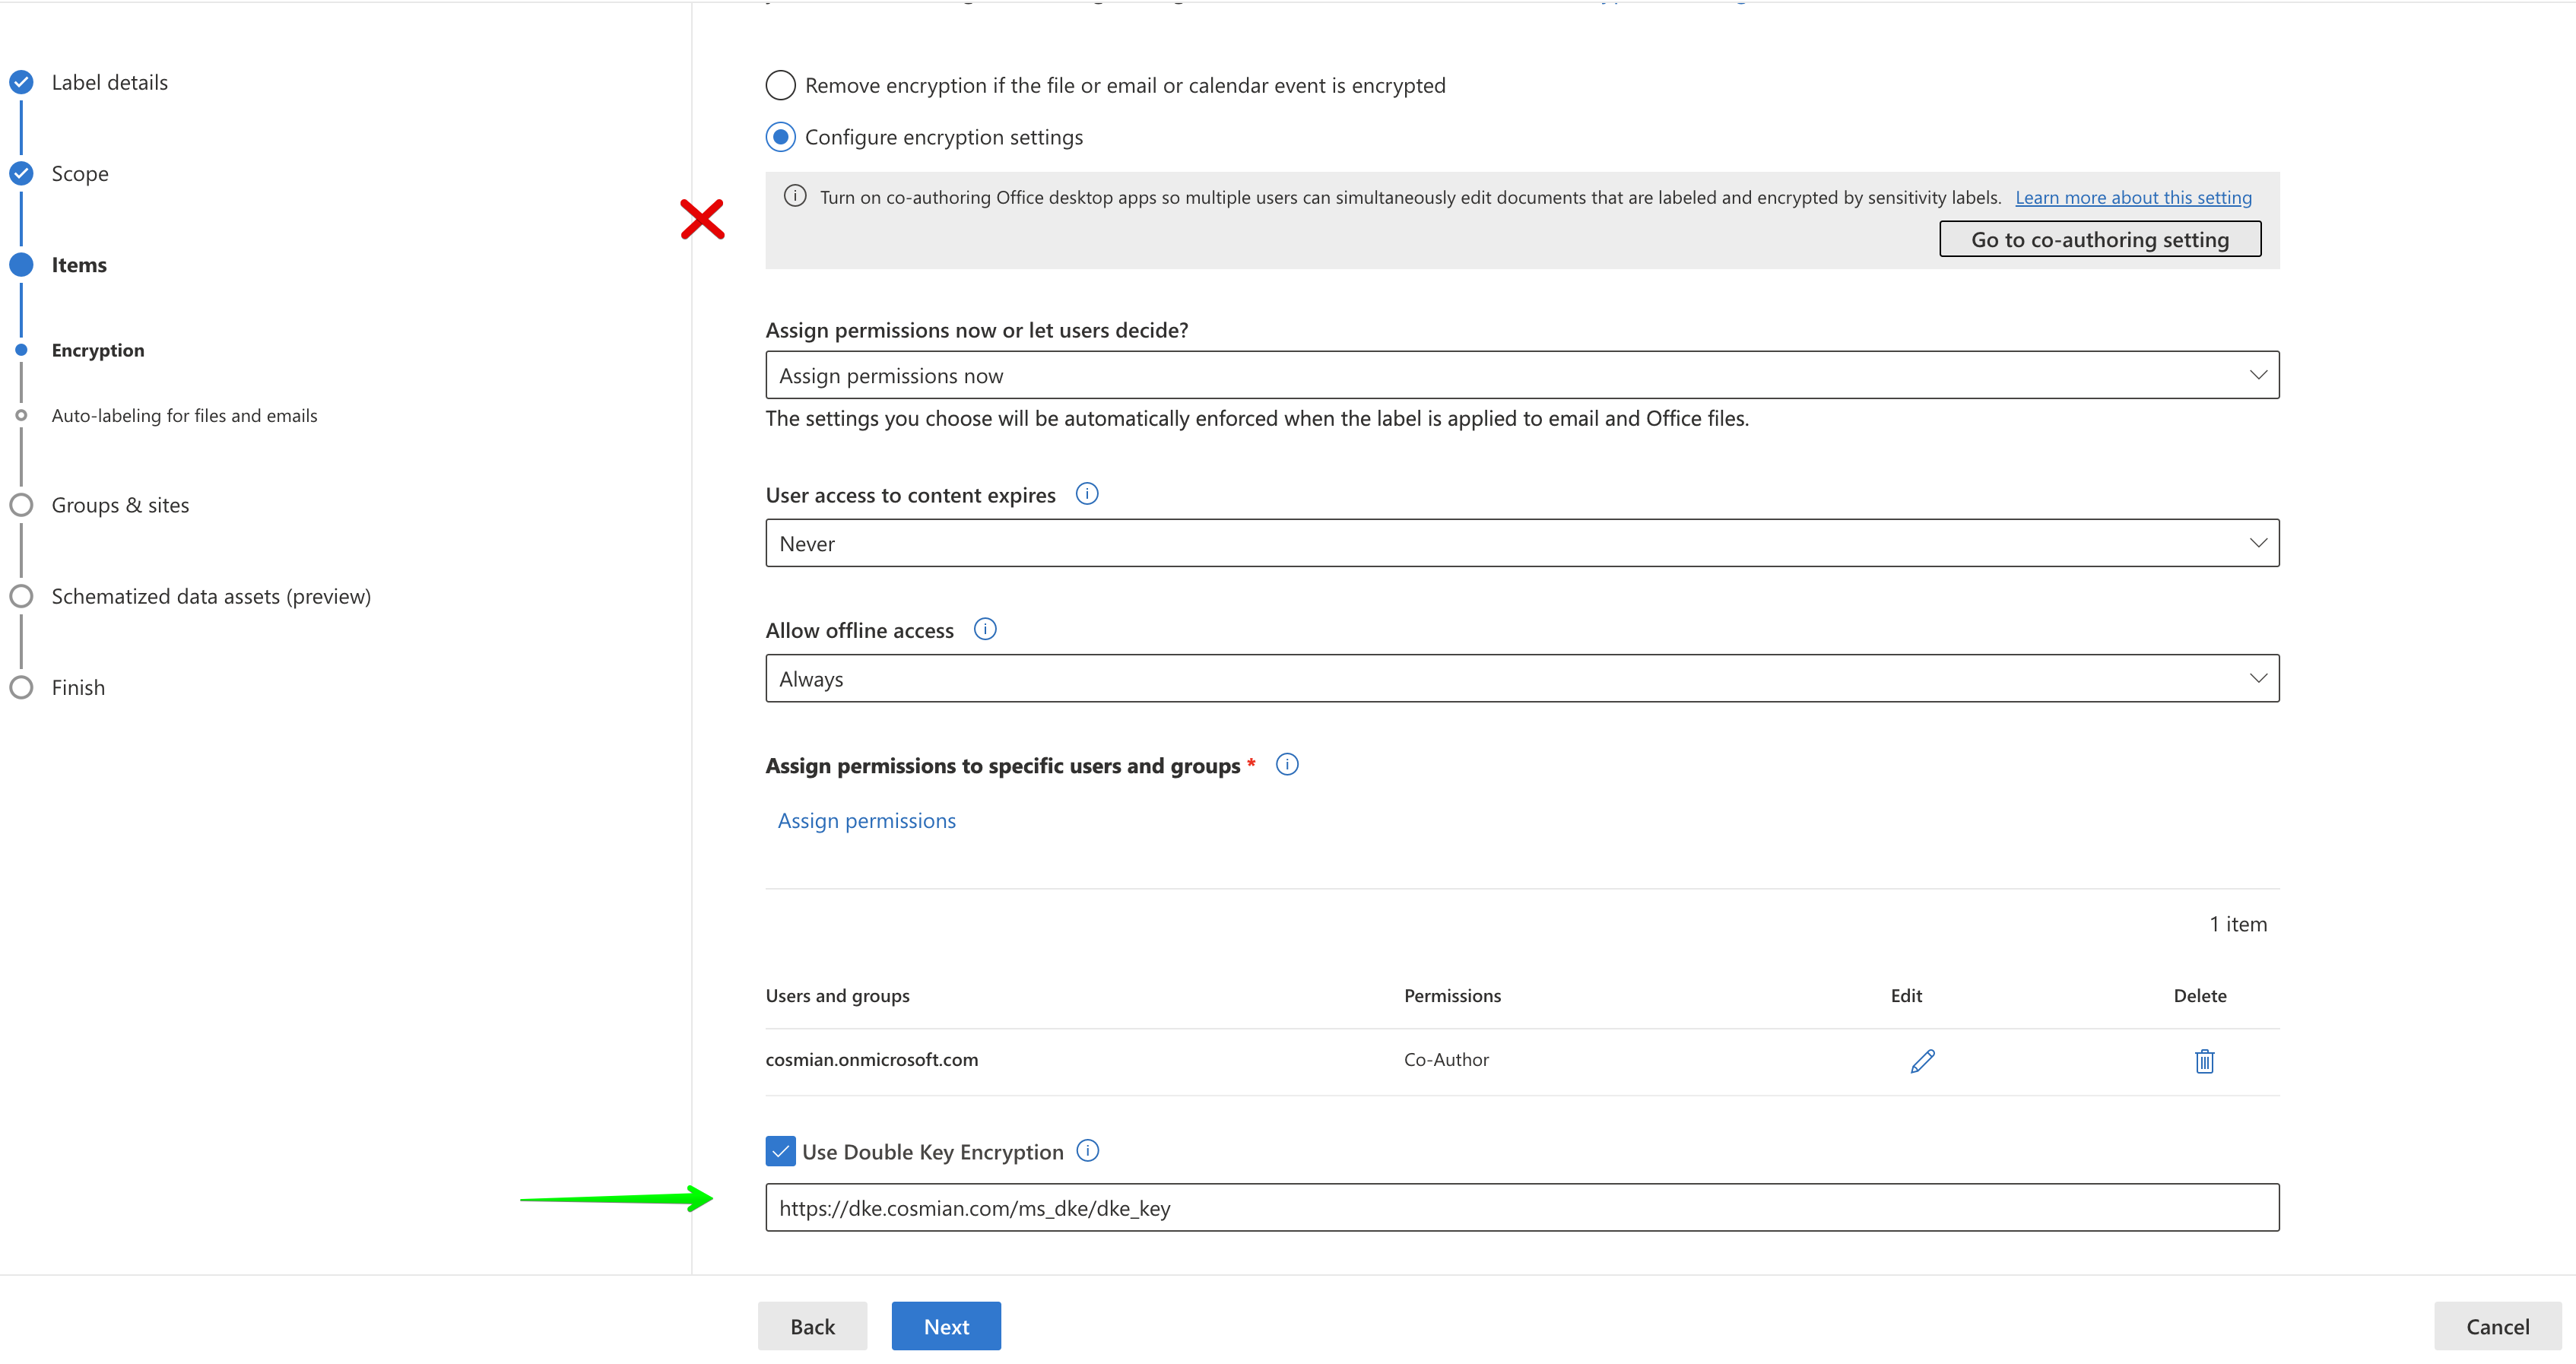
Activating the label (scope) for meetings does not seem to work.
Windows CNG Key Storage Provider (KSP)
Microsoft Intune integration — The Eviden KMS CNG KSP integrates natively with Microsoft Intune SCEP and PKCS certificate profiles. When Intune provisions a device certificate, the private key is created and permanently stored in Eviden KMS — never on the endpoint. See the Intune integration section for setup details.
Intune + CNG KSP architecture
sequenceDiagram
participant Admin as IT Administrator
participant Intune as Microsoft Intune<br/>(Cloud UEM)
participant Endpoint as Windows Endpoint<br/>(Intune-managed)
participant KSP as cosmian_cng.dll<br/>(CNG KSP)
participant KMS as Eviden KMS<br/>(KMIP 2.1)
participant SCEP as SCEP / PKCS<br/>Certificate Authority
Admin->>Intune: 1. Create SCEP certificate profile<br/>KSP = "Eviden KMS Key Storage Provider"
Intune->>Endpoint: 2. Push certificate profile
Endpoint->>KSP: 3. NCryptCreatePersistedKey()
KSP->>KMS: 4. KMIP CreateKeyPair<br/>(private key stays in KMS)
KMS-->>KSP: 5. Public key + key UUID
KSP-->>Endpoint: 6. Key handle (public key blob)
Endpoint->>SCEP: 7. Submit CSR<br/>(public key only)
SCEP-->>Endpoint: 8. Signed certificate
Note over Endpoint,KMS: All subsequent Sign / Decrypt operations<br/>are forwarded to Eviden KMS via the KSP
Endpoint->>KSP: 9. NCryptSignHash() (e.g. TLS handshake)
KSP->>KMS: 10. KMIP Sign
KMS-->>KSP: 11. Signature
KSP-->>Endpoint: 12. Signature bytes
What is it?
Eviden KMS provides a Windows CNG Key Storage Provider (KSP) DLL —
cosmian_cng.dll — that stores private keys inside Eviden KMS rather
than the local Windows machine store.
A Key Storage Provider is a pluggable module defined by the Windows
Cryptography API: Next Generation (CNG) framework (introduced in Windows
Vista / Server 2008). CNG replaces the older CAPI (CryptoAPI). Any application
that calls the standard NCrypt* family of functions — including the Windows
certificate enrollment engine, Schannel (TLS), and Code Signing — automatically
uses whichever KSP is associated with a given key, with no application changes
required. By deploying cosmian_cng.dll, all private key material is
kept inside Eviden KMS: it never exists on the device disk.
Why use it?
| Need | How the KSP addresses it |
|---|---|
| Private-key protection | Keys are generated and stored exclusively inside Eviden KMS — never on the endpoint disk or in the Windows registry. |
| FIPS 140-3 compliance | Eviden KMS is FIPS 140-3 validated. All cryptographic operations (sign, decrypt, key generation) are executed by the KMS, not by Windows. |
| Centralised audit trail | Every sign / decrypt operation is logged in the KMS with user identity, timestamp, and key identifier. |
| Key revocation | Revoking a key in the KMS immediately blocks all devices using it, without requiring an MDM policy push. |
| Zero-touch provisioning | Works natively with Microsoft Intune SCEP and PKCS certificate profiles — no custom enrollment agent is needed. |
| Export prevention | Export policy is disabled by default (NCRYPT_ALLOW_PLAINTEXT_EXPORT_FLAG is off), so private keys cannot be extracted from the device. |
Who should use it?
- Enterprise IT / Security teams deploying Microsoft Intune device certificates where device private keys must be hardware-protected or centrally managed.
- PKI administrators who need a hardware-security-module (HSM)-equivalent experience without deploying a physical HSM on every endpoint.
- Compliance officers who need full audit logs of every private key usage on corporate endpoints.
- Windows developers integrating with any NCrypt-based API (Schannel, Code Signing, S/MIME, BitLocker recovery) who want keys protected by a remote KMS.
When to use it?
Use the CNG KSP when:
- You are enrolling device certificates through Microsoft Intune SCEP or PKCS profiles and you want the private key to remain inside Eviden KMS rather than in the Windows software KSP or TPM.
- You need to remotely wipe a key (e.g. lost device): destroy the key in the KMS and all signing / decryption operations on that device fail immediately.
- Your organisation is subject to regulations (FIPS 140-3, Common Criteria, eIDAS, NIS2) that mandate private key custody inside a certified key store.
- You want a single, centralised, KMIP 2.1-compliant inventory of all device keys with metadata and access-control policies.
Do not use the CNG KSP for keys that must be available offline (e.g. full-disk encryption unlock keys), because operations require a live HTTPS connection to the KMS.
How it works
CNG plug-in mechanism
Windows CNG defines the NCRYPT_KEY_STORAGE_FUNCTION_TABLE interface: a struct
of 30 function pointers that Windows calls for every key operation. A KSP DLL
exports a single entry point:
SECURITY_STATUS GetKeyStorageInterface(
LPCWSTR pszProviderName,
NCRYPT_KEY_STORAGE_FUNCTION_TABLE **ppFunctionTable,
DWORD dwFlags
);
cosmian_cng.dll implements this interface entirely in Rust. When
Windows loads the DLL, it calls GetKeyStorageInterface to obtain the function
table, and from that point on every NCrypt* call is handled by the
corresponding Rust function.
Request flow
sequenceDiagram
participant App as Windows Application<br/>(Intune SCEP, MMC, certutil)
participant DLL as cosmian_cng.dll
participant KMS as Eviden KMS<br/>(HTTPS / KMIP 2.1)
App->>DLL: NCrypt* call<br/>(OpenStorageProvider, SignHash, …)
Note over DLL: 1. Validate handle (magic check)<br/>2. Translate NCrypt params → KMIP request<br/>3. Block on shared Tokio runtime
DLL->>KMS: KMIP operation<br/>(CreateKeyPair, Sign, Decrypt, …)
KMS-->>DLL: KMIP response
Note over DLL: 4. Translate KMS response → NCrypt buffer<br/>5. Return SECURITY_STATUS
DLL-->>App: SECURITY_STATUS + output buffer
Private keys never leave the KMS: only the public key blob
(BCRYPT_RSAKEY_BLOB or BCRYPT_ECCKEY_BLOB) is serialised and returned to
Windows for certificate construction.
Provider and key context objects
| Windows concept | Rust type | What it holds |
|---|---|---|
NCRYPT_PROV_HANDLE | CngProviderCtx (heap box → raw usize) | Shared Arc<KmsClient>, provider config path |
NCRYPT_KEY_HANDLE | CngKeyCtx (heap box → raw usize) | Key state (Persisted or Pending), Arc<KmsClient> |
Both types carry a magic number (0xC05_1A_AC) that is validated on every
handle dereference — a stale or forged handle returns NTE_INVALID_HANDLE
instead of causing undefined behaviour.
Key lifecycle
flowchart LR
subgraph Key Creation
A[CreatePersistedKey] -->|allocates PendingCreation context| B[SetKeyProperty]
B --> C[FinalizeKey]
C -->|calls KMS CreateKeyPair,<br/>tags key with cng-ksp::name| D["Key exists in KMS<br/>(Persisted state)"]
end
flowchart LR
subgraph Key Lookup
E[OpenKey] -->|look up KMS UUID<br/>by tag cng-ksp::name| F[allocate CngKeyCtx]
end
flowchart LR
subgraph Key Operations
G[SignHash] -->|digested_data = pre-hashed input| H[KMS Sign]
I[Decrypt] --> J[KMS Decrypt]
K[ExportKey] -->|SPKI DER → BCRYPT blob| L[KMS export public key only]
M[DeleteKey] -->|revoke + destroy both key UUIDs| N[KMS Destroy]
end
Key naming and tagging
Each key is tagged in the KMS with two vendor tags (namespace Cosmian):
| Tag | Purpose |
|---|---|
cng-ksp | Marks the object as managed by this KSP |
cng-ksp::<name> | Allows lookup by the CNG key name string |
Authentication
The DLL reads ckms.toml using the same search order as the ckms CLI:
- Path in the
CKMS_CONFenvironment variable. ckms.tomlin the same directory ascosmian_cng.dll.%APPDATA%\.cosmian\ckms.toml.
The configuration file supports bearer-token OAuth 2.0, mTLS (PKCS#12 client certificate), or unauthenticated (for local dev/test only).
SECURITY_STATUS error mapping
| KSP error | SECURITY_STATUS returned |
|---|---|
| Handle invalid / null | NTE_INVALID_HANDLE (0x80090026) |
| Key not found in KMS | NTE_BAD_KEYSET (0x80090016) |
| Algorithm not in supported list | NTE_BAD_ALGID (0x80090008) |
| Export requested on non-exportable key | NTE_PERM (0x80090010) |
| Output buffer too small | NTE_BUFFER_TOO_SMALL (0x80090028) |
| Any KMS REST error | NTE_FAIL (0x8009002A) |
Architecture
flowchart LR
App["Windows Application<br/>(Intune SCEP, MMC, certutil)"] -->|NCrypt API calls| DLL["cosmian_cng.dll<br/><br/>NCRYPT_KEY_STORAGE_FUNCTION_TABLE<br/>GetKeyStorageInterface()"]
DLL -->|"CreateKeyPair / Sign / Decrypt<br/>Locate / Destroy"| KMS["Eviden KMS<br/>(REST / KMIP 2.1)"]
style DLL fill:#f5f5f5,stroke:#333
style KMS fill:#e8f4e8,stroke:#2d7d2d
Private keys never touch the local machine. Only public key blobs are returned to Windows.
Supported algorithms
| Algorithm | Key sizes / curves | Operations |
|---|---|---|
| RSA | 2048, 3072, 4096 bits | Sign, Decrypt |
| ECDSA P-256 | NIST P-256 | Sign |
| ECDSA P-384 | NIST P-384 | Sign |
| ECDSA P-521 | NIST P-521 | Sign |
| ECDH P-256/384/521 | NIST curves | Key Agreement |
Installation
1. Install the Eviden KMS CLI
The cosmian_cng.dll is bundled inside the Eviden KMS CLI installer
alongside ckms.exe. Download and run the installer for your platform:
# Download the CLI installer (adjust the version number as needed)
Invoke-WebRequest `
-Uri "https://package.cosmian.com/kms/5.28.0/windows/x86_64/non-fips/static-openssl/cosmian-kms-cli-non-fips-static-openssl_5.28.0_x86_64.exe" `
-OutFile "$env:TEMP\cosmian-kms-cli.exe"
# Run the installer (accepts the default installation directory)
Start-Process -FilePath "$env:TEMP\cosmian-kms-cli.exe" -ArgumentList "/S" -Wait
The installer places both files in the default installation directory:
C:\Users\<username>\AppData\Local\Eviden KMS CLI\ckms.exe
C:\Users\<username>\AppData\Local\Eviden KMS CLI\cosmian_cng.dll
Ensure the installation directory is on your PATH (the installer does
this automatically):
$env:PATH += ";$env:LOCALAPPDATA\Eviden KMS CLI"
2. Configure the KMS connection
Run the interactive configuration wizard to create ckms.toml:
ckms configure
The wizard prompts for the KMS server URL and authentication method (none,
bearer token, PEM client certificate, or PKCS#12 client certificate). It writes
the configuration to %APPDATA%\.cosmian\ckms.toml.
3. Verify the DLL
Before registering the KSP, confirm that the DLL loads correctly and can reach the KMS server:
ckms cng verify --dll "$env:LOCALAPPDATA\Eviden KMS CLI\cosmian_cng.dll"
Expected output (with a running KMS):
=== Cosmian CNG KSP Verification ===
Loading DLL: C:\Users\<user>\AppData\Local\Eviden KMS CLI\cosmian_cng.dll
[OK] OpenProvider
── RSA key pair + sign + export + lookup ──
[OK] RSA key pair + sign + export + lookup
...
─────────────────────────────────────────
All 15 verification step(s) PASSED.
If any step shows [FAIL] with NTE_FAIL (0x8009002A), the DLL cannot reach
the KMS server — check ckms.toml and network connectivity before proceeding.
4. Register the KSP (requires Administrator)
# From an elevated PowerShell prompt:
ckms cng register --dll "$env:LOCALAPPDATA\Eviden KMS CLI\cosmian_cng.dll"
This performs the following steps:
-
Copies
cosmian_cng.dllto%SystemRoot%\System32(CNG resolves provider DLLs from that directory) -
Calls
BCryptRegisterProviderto create the proper registry structure:HKLM\SYSTEM\CurrentControlSet\Control\Cryptography\Providers\ Eviden KMS Key Storage Provider\ UM\ Image REG_SZ "cosmian_cng.dll" 00010001\ (Default) REG_SZ "CRYPT_KEY_STORAGE_INTERFACE" Functions REG_MULTI_SZ "KEY_STORAGE" -
Calls
BCryptAddContextFunctionProviderto make the provider discoverable byNCryptOpenStorageProviderandcertutil -csplist
5. Verify registration
ckms cng status
# Expected: Eviden KMS CNG KSP: REGISTERED
# Also verify Windows sees the provider:
certutil -csplist | Select-String "Cosmian"
# Expected output includes: "Eviden KMS Key Storage Provider"
Using the KSP
Create a key pair via NCrypt API
The KSP is automatically available to any Windows application that calls
NCryptOpenStorageProvider with the provider name
"Eviden KMS Key Storage Provider".
NCRYPT_PROV_HANDLE hProv;
NCryptOpenStorageProvider(
&hProv,
L"Eviden KMS Key Storage Provider",
0
);
NCRYPT_KEY_HANDLE hKey;
NCryptCreatePersistedKey(hProv, &hKey, BCRYPT_RSA_ALGORITHM, L"my-key", 0, 0);
NCryptSetProperty(hKey, NCRYPT_LENGTH_PROPERTY, (PBYTE)&keyLength, sizeof(DWORD), 0);
NCryptFinalizeKey(hKey, 0);
// The private key is now stored in Eviden KMS
// FinalizeKey returns only after the KMS confirms creation
Intune SCEP device certificate
Microsoft Intune uses the Windows CNG CSR pipeline. Once the KSP is registered, configure the Intune SCEP profile to use the Eviden KMS Key Storage Provider as the key storage location. The private key backing the device certificate will be created and permanently stored in Eviden KMS.
List all CNG KSP keys in the KMS
ckms cng list-keys
Unregister the KSP
# Elevated PowerShell:
ckms cng unregister
Logging
Log output is written to cosmian_cng.log in the same directory as the
DLL by default — no additional configuration is required. If the DLL directory
is not writable, the log file is created in %APPDATA%\.cosmian\cosmian_cng.log
instead. Logging to a file always happens without any configuration.
Set the COSMIAN_CNG_KSP_LOGGING_LEVEL environment variable to control
verbosity: trace, debug, info (default), warn, or error.
Key naming and tag convention
Each key created through the KSP is tagged in the KMS with:
cng-ksp— identifies all KSP-managed keys.cng-ksp::<key_name>— identifies the key by its CNG name (the string passed toNCryptCreatePersistedKey/NCryptOpenKey).
Use ckms cng list-keys or the standard ckms locate command to find keys:
ckms locate --tag "cng-ksp::my-key"
Security considerations
- Private keys are never stored locally; they exist only in Eviden KMS.
- All key operations require an authenticated connection to the KMS.
- The
NCRYPT_ALLOW_PLAINTEXT_EXPORT_FLAGis off by default; private keys cannot be exported in plaintext. - Use mTLS or bearer-token authentication in
ckms.tomlfor production deployments. - Run
ckms cng registeras Administrator. The DLL path stored in the registry is read by the Windows LSASS process — only trusted, signed DLLs should be registered. - Consider restricting read access to
ckms.tomlso that unprivileged users cannot extract the KMS server URL or client certificate.
Microsoft Intune integration
Microsoft Intune is Microsoft's cloud-based Unified Endpoint Management (UEM) service. It lets IT administrators manage devices (Windows, macOS, iOS, Android) and enforce security policies — including deploying certificates — without on-premises infrastructure. When Intune provisions a certificate on a Windows endpoint, the private key is generated locally via a Key Storage Provider. By default Windows uses its built-in software KSP, which stores keys in the registry.
With the Eviden KMS CNG KSP registered on the device, Intune can be configured to use it instead: the private key is created and permanently stored in Cosmian KMS rather than on the device. This gives the organisation centralised custody, FIPS 140-3 compliance, real-time revocation, and a full audit trail — all without any change to the Intune enrollment workflow itself.
SCEP certificate profile
-
In the Microsoft Intune admin center, create a SCEP certificate profile for Windows 10/11.
-
Set Key storage provider (KSP) to "Enroll to Custom KSP, otherwise fail" and enter the provider name exactly as:
Eviden KMS Key Storage Provider -
Ensure the
ckms.tomlconfiguration file and the DLL are deployed to managed endpoints via an Intune Win32 app or PowerShell script before the certificate profile is applied. -
The Intune SCEP agent will call
NCryptCreatePersistedKeyon the Cosmian KSP, then send the resulting CSR (public key only) to the SCEP server. The private key never leaves Eviden KMS.
PKCS certificate profile
Set Key storage provider (KSP) to "Enroll to Custom KSP, otherwise fail" and enter the same provider name. The Intune PKCS connector will use the Cosmian KSP to generate the key pair on the device.
Imported PFX certificate (PFXImport PowerShell module)
For importing existing PFX certificates via the IntunePfxImport PowerShell module, follow these steps on the Certificate Connector server:
-
Ensure the KMS server is running and reachable (e.g.
http://localhost:9998). -
Register the KSP (see Installation above):
ckms cng register --dll "$env:LOCALAPPDATA\Eviden KMS CLI\cosmian_cng.dll" -
Verify Windows discovers the provider:
certutil -csplist | Select-String "Cosmian" # Expected: "Eviden KMS Key Storage Provider" -
Import the IntunePfxImport module (from the IntunePfxImportUtilities release folder):
Import-Module .\IntunePfxImport.psd1 -
Create the encryption key pair in Eviden KMS:
Add-IntuneKspKey ` -ProviderName "Eviden KMS Key Storage Provider" ` -KeyName "PFXEncryptionKey" ` -MakeExportableThis calls
NCryptCreatePersistedKey→NCryptSetProperty(Export Policy)→NCryptFinalizeKeyon the Cosmian KSP. The RSA key pair is created and stored exclusively in Eviden KMS. The-MakeExportableflag sets theNCRYPT_ALLOW_EXPORT_FLAGso the public key can be exported for use on other connector servers. -
Export the public key (if multiple connector servers share the key):
Export-IntunePublicKey ` -ProviderName "Eviden KMS Key Storage Provider" ` -KeyName "PFXEncryptionKey" ` -FilePath "C:\temp\PFXEncryptionKey.pfx" -
Import PFX certificates to Intune using the key:
$userPFXObject = New-IntuneUserPfxCertificate ` -PathToPfxFile "C:\temp\userA.pfx" ` $SecureFilePassword ` "userA@contoso.com" ` "Eviden KMS Key Storage Provider" ` "PFXEncryptionKey" ` "smimeEncryption" Import-IntuneUserPfxCertificate -CertificateList $userPFXObject
Remote key revocation for lost devices
When a device is lost or decommissioned:
# From the KMS administrator workstation:
ckms locate --tag "cng-ksp::intune-device-<serial>"
ckms revoke --id <uuid> "Device decommissioned"
ckms destroy --id <uuid>
Once the key is destroyed in the KMS, any subsequent sign or decrypt attempt
from the device returns NTE_FAIL, effectively revoking the private key without
requiring a certificate revocation list (CRL) propagation delay.
Integration testing
The CNG KSP is tested at three levels — all runnable without Azure credentials or an Intune tenant.
Prerequisites
| Requirement | Why |
|---|---|
| Windows 10/11 or Server 2019+ | The DLL uses the Windows CNG API (NCrypt*), which is Windows-only. |
| Rust toolchain (MSVC target) | cargo build produces the DLL, server binary, and verification tool. |
| Administrator privileges | Required to write the KSP registry key under HKLM. |
vcpkg with openssl_x64-windows-static | Set OPENSSL_DIR or VCPKG_INSTALLATION_ROOT. |
No Azure account, Intune license, or SCEP infrastructure is needed — all tests run against a local Eviden KMS server with a SQLite backend.
Test layers
| Layer | What it tests | Runner | Location |
|---|---|---|---|
| Rust lib tests | Backend functions (backend::create_rsa_key_pair, sign_hash, list_cng_keys, …) via an in-process KMS | cargo test --lib -p cosmian_cng | crate/clients/cng/src/tests.rs |
| DLL surface tests | Loads cosmian_cng.dll at runtime, calls GetKeyStorageInterface, exercises every NCrypt* function pointer against a live KMS | ckms cng verify --dll <path> | crate/clients/clap/src/actions/cng_verify.rs |
| CLI commands | ckms cng register, status, list-keys, unregister | PowerShell assertions | .mise/scripts/windows/test_cng_ksp.ps1 |
| Intune PFX Import | Add-IntuneKspKey + Export-IntunePublicKey via the IntunePfxImportUtilities module against the registered KSP | PowerShell (requires Admin + module) | .mise/scripts/windows/test_cng_ksp.ps1 |
Running the full test suite
From an elevated PowerShell prompt at the repository root:
.\.github\scripts\windows\test_cng_ksp.ps1
The script performs the following steps:
sequenceDiagram
participant PS as PowerShell script
participant Build as Cargo build
participant KMS as Local KMS server
participant Reg as Windows Registry
participant Verify as cng_verify.exe
participant Tests as cargo test
participant Intune as IntunePfxImport module
PS->>Build: 1. Build KMS server, cosmian_cng.dll, cng_verify, ckms
Build-->>PS: Binaries ready
PS->>KMS: 2. Start KMS (SQLite, port 9998)
PS->>PS: 3. Write ckms.toml (server_url = localhost:9998)
PS->>KMS: 4. GET /version (smoke-test)
KMS-->>PS: 200 OK
PS->>Reg: 5. ckms cng register (write HKLM KSP key)
Reg-->>PS: Registry key created
PS->>Verify: 6. Run cng_verify.exe (NCrypt surface tests)
Verify->>KMS: NCrypt* calls via cosmian_cng.dll
KMS-->>Verify: Key operations
Verify-->>PS: All tests passed
PS->>Tests: 7. cargo test --lib (in-process backend tests)
Tests->>KMS: KMIP operations
Tests-->>PS: Tests passed
PS->>KMS: 8. ckms cng list-keys / ckms cng status
KMS-->>PS: Key list and status
PS->>Intune: 8b. Add-IntuneKspKey + Export-IntunePublicKey
Intune->>KMS: NCryptCreatePersistedKey → NCryptFinalizeKey → NCryptExportKey
KMS-->>Intune: Key created + public blob exported
Intune-->>PS: Intune PFX workflow passed
PS->>PS: 9. Parse KMS logs for ERROR / PANIC
PS->>Reg: 10. ckms cng unregister (remove HKLM KSP key)
PS->>KMS: Stop KMS server
Test coverage
The cng_verify tool exercises the following NCrypt operations against a live KMS:
| Test | Operations exercised |
|---|---|
| RSA key pair + sign + export + lookup | CreatePersistedKey → SetKeyProperty → FinalizeKey → ExportKey → OpenKey → SignHash (PKCS1v15) → DeleteKey |
| RSA encrypt / decrypt (OAEP) | Encrypt → Decrypt (round-trip validation) |
| RSA-PSS sign | SignHash with PSS padding + salt |
| RSA signature verify | SignHash → VerifySignature (valid + invalid hash) |
| EC P-256 key pair + sign + export | CreatePersistedKey → FinalizeKey → ExportKey → SignHash (ECDSA) → DeleteKey |
| ECDSA signature verify (P-256) | SignHash → VerifySignature |
| EC P-384 key pair + sign | CreatePersistedKey → FinalizeKey → ExportKey → SignHash (SHA-384) |
| EC P-521 key pair + export | CreatePersistedKey → FinalizeKey → ExportKey |
| DeleteKey + verify gone | DeleteKey → OpenKey (expect NTE_BAD_KEYSET) |
Environment variables
| Variable | Default | Purpose |
|---|---|---|
CKMS_CONF | <target_dir>/ckms.toml | Path to the KMS client configuration file |
OPENSSL_DIR | Auto-detected from vcpkg | OpenSSL static library directory |
VCPKG_INSTALLATION_ROOT | — | Fallback for OPENSSL_DIR |
CNG_TEST_RELEASE | 0 | Set to 1 to build and test in release mode |
RUST_LOG | cosmian_kms_server=info,cosmian_cng=debug | Log verbosity for KMS server and DLL |
COSMIAN_CNG_KSP_LOGGING_LEVEL | info | DLL-specific logging (trace/debug/info/warn/error) |
INTUNE_PFX_MODULE_PATH | — | Path to IntunePfxImport.psd1; enables the Intune PFX Import test step |
Testing the Intune enrollment flow
The automated tests above validate the CNG KSP DLL itself — the same code
path that Intune SCEP uses when it calls NCryptCreatePersistedKey and
NCryptSignHash. To test the full Intune → endpoint → KMS flow you need:
| Requirement | Purpose |
|---|---|
| Microsoft Intune tenant (Azure AD / Entra ID) | Manages the SCEP certificate profile |
| SCEP server (NDES or third-party) | Signs the CSR generated by the endpoint |
| Intune-enrolled Windows device | Receives the SCEP profile and triggers key creation |
| Eviden KMS instance reachable from the device | Stores the private key |
This is typically validated manually or in a dedicated staging environment, not in CI.
Troubleshooting
| Problem | Likely cause | Solution |
|---|---|---|
NTE_FAIL on OpenKey or CreatePersistedKey | ckms.toml missing or KMS unreachable | Verify ckms.toml is present and server_url is reachable (curl https://<kms>/kmip/2_1). |
NTE_BAD_KEYSET on OpenKey | Key name not found in the KMS | Run ckms cng list-keys; verify the name and that the cng-ksp::<name> tag exists. |
NTE_PERM on ExportKey | Export policy disabled (by design) | Private key export is intentionally blocked. Use ExportKey only for public key blobs. |
NTE_BAD_ALGID | Algorithm string not recognised | Use RSA, ECDSA_P256, ECDSA_P384, ECDSA_P521, ECDH_P256, ECDH_P384, or ECDH_P521. |
RegCreateKeyExW returns 0x80070005 (Access Denied) | Not running as Administrator | Run ckms cng register from an elevated PowerShell prompt. |
KSP not listed in certutil -csplist | Registry key missing or CryptSvc cached old list | Re-run ckms cng register and restart the CryptSvc service (Restart-Service CryptSvc). |
NTE_INVALID_HANDLE | Stale handle or DLL unloaded mid-operation | Ensure the DLL is not forcibly unloaded during an active key operation. |
| Intune SCEP enrollment fails with "Custom KSP not found" | DLL not deployed before profile applies | Deploy the Win32 app containing the DLL and ckms.toml before the certificate profile, using an Intune assignment filter or dependency. |
| Log file not created | DLL directory not writable | Set COSMIAN_CNG_KSP_LOGGING_LEVEL and check stderr, or grant write access to the DLL directory. |
Glossary
| Term | Full name | Definition |
|---|---|---|
| BCRYPT | Base Cryptography API: Next Generation | The symmetric/hash/key-derivation half of the Windows CNG API (BCrypt* functions), as opposed to the asymmetric/key-storage half (NCrypt*). |
| BYOK | Bring Your Own Key | A cloud-provider feature that lets customers supply (and control) the encryption key used by a cloud service, rather than having the provider generate it. |
| CA | Certificate Authority | A trusted entity that issues and signs digital certificates, binding a public key to an identity. |
| CAPI | Cryptography API | The original Windows cryptographic subsystem (pre-Vista), replaced by CNG. Also written CryptoAPI. |
| CNG | Cryptography API: Next Generation | The Windows cryptographic framework introduced in Vista / Server 2008. It defines pluggable Key Storage Providers and Algorithm Providers via well-known function tables, replacing the older CAPI/CryptoAPI. |
| CRL | Certificate Revocation List | A signed list published by a CA of certificates that have been revoked before their expiry date. |
| CSR | Certificate Signing Request | A PKCS#10 message containing a public key and subject information, sent to a CA to obtain a signed certificate. |
| DLL | Dynamic-Link Library | A Windows shared library loaded at runtime, providing functions and data to calling processes without static linking. |
| ECDH | Elliptic-Curve Diffie–Hellman | A key-agreement protocol that allows two parties to establish a shared secret over an insecure channel using elliptic-curve arithmetic. |
| ECDSA | Elliptic Curve Digital Signature Algorithm | A digital signature scheme based on elliptic-curve cryptography, offering equivalent security to RSA with significantly smaller key sizes. |
| eIDAS | Electronic Identification, Authentication and Trust Services | EU regulation establishing a legal framework for electronic signatures, seals, timestamps, and authentication across EU member states. |
| FIPS 140-3 | Federal Information Processing Standard Publication 140-3 | A US government standard (NIST) specifying security requirements for cryptographic modules. Level 1–4 define increasing physical and logical security. |
| HKLM | HKEY_LOCAL_MACHINE | The Windows registry hive containing system-wide configuration settings that apply to all users on the machine. |
| HSM | Hardware Security Module | A tamper-resistant physical device that generates, stores, and protects cryptographic keys and performs cryptographic operations. |
| HTTPS | Hypertext Transfer Protocol Secure | HTTP layered over TLS, providing encrypted and authenticated communication between client and server. |
| KMS | Key Management System / Key Management Service | A centralised service that manages cryptographic keys throughout their lifecycle (creation, distribution, rotation, revocation, destruction). In this document, refers to Eviden KMS. |
| KMIP | Key Management Interoperability Protocol | An OASIS standard (current version 2.1) defining a protocol for communication between clients and key management servers. |
| KSP | Key Storage Provider | A pluggable Windows CNG component (a DLL implementing NCRYPT_KEY_STORAGE_FUNCTION_TABLE) that stores private keys and performs asymmetric key operations on behalf of Windows and applications. |
| LSASS | Local Security Authority Subsystem Service | The Windows process responsible for enforcing security policy, handling authentication, and loading CNG/CAPI providers. |
| MDM | Mobile Device Management | A class of software and protocols that allow organisations to remotely configure, monitor, and enforce policies on employee devices. |
| MMC | Microsoft Management Console | A Windows host application for administrative snap-in tools, including the Certificates snap-in (certmgr.msc). |
| MSVC | Microsoft Visual C++ | Microsoft's C/C++ compiler and runtime toolchain, required to build Windows native binaries and DLLs (including Rust code targeting x86_64-pc-windows-msvc). |
| mTLS | Mutual TLS | A variant of TLS in which both the client and the server present X.509 certificates to authenticate each other. |
| NCrypt | N-Crypt (CNG asymmetric API) | The asymmetric-key and key-storage half of the Windows CNG API. NCrypt* functions delegate to the registered KSP DLL for private key operations. |
| NDES | Network Device Enrollment Service | A Microsoft Windows Server role that implements the SCEP protocol, acting as a proxy between Intune/MDM and an enterprise CA. |
| NIS2 | Network and Information Systems Directive 2 | EU cybersecurity directive (2022/2555) that expands the scope of the original NIS directive, imposing stricter security requirements and incident reporting obligations. |
| NIST | National Institute of Standards and Technology | US federal agency that publishes cryptographic standards (AES, SHA, ECDSA, FIPS 140, etc.). |
| OAEP | Optimal Asymmetric Encryption Padding | A padding scheme (RFC 8017) used with RSA encryption that provides semantic security and resistance to chosen-ciphertext attacks. |
| OAuth 2.0 | Open Authorization 2.0 | An open standard for token-based delegated authorisation, widely used for API access. Bearer tokens issued by an identity provider are used to authenticate calls to the KMS. |
| PKCS | Public Key Cryptography Standards | A family of cryptographic standards published by RSA Security / IETF. Commonly referenced standards include PKCS#1 (RSA), PKCS#7/CMS (signed data), PKCS#10 (CSR), PKCS#11 (token interface), and PKCS#12 (PFX key store). |
| PKCS#12 | Public Key Cryptography Standard #12 | A binary format (.pfx / .p12) for storing a private key together with its certificate chain, protected by a password. |
| PKI | Public Key Infrastructure | The set of roles, policies, hardware, software, and procedures needed to create, manage, distribute, use, store, and revoke digital certificates. |
| PSS | Probabilistic Signature Scheme | A padding scheme (RFC 8017 / RSASSA-PSS) for RSA digital signatures that adds randomness, providing provable security without requiring a full-domain hash. |
| RSA | Rivest–Shamir–Adleman | A widely used public-key cryptosystem based on the difficulty of factoring large integers, supporting both encryption and digital signatures. |
| SCEP | Simple Certificate Enrollment Protocol | An IETF protocol (RFC 8894) that automates the issuance of X.509 certificates, typically used by MDM systems like Microsoft Intune to enroll device certificates. |
| S/MIME | Secure/Multipurpose Internet Mail Extensions | A standard for public-key encryption and digital signing of email messages, using X.509 certificates. |
| SPKI | Subject Public Key Info | The ASN.1 structure (from X.509 / RFC 5480) that encodes a public key together with its algorithm identifier, used in CSRs and DER-format public key exports. |
| TLS | Transport Layer Security | The cryptographic protocol that secures communications over networks, successor to SSL. Used for all HTTPS connections between the KSP DLL and the KMS server. |
| TPM | Trusted Platform Module | A hardware chip embedded in many PCs that provides secure key generation and storage tied to the physical machine. The CNG KSP is an alternative to TPM-backed key storage, offering remote management capabilities. |
| UEM | Unified Endpoint Management | A category of IT management solutions that provide a single platform for managing all endpoint types (PCs, mobiles, IoT). Microsoft Intune is a UEM service. |
| UUID | Universally Unique Identifier | A 128-bit identifier (RFC 4122) used by Eviden KMS to uniquely identify every managed key object. |
| vcpkg | Visual C++ Package Manager | Microsoft's open-source C/C++ package manager, used in this project to obtain pre-built OpenSSL static libraries for Windows builds. |
CMEK (Customer Managed Encryption Keys)
To import a Customer Managed Encryption Key in the Google KMS, follow the instructions on Google documentation related to importing a manually wrapped key.
Prepare the symmetric key and wrapping key in Google Cloud KMS
Using the Google Console, first create a key in an existing Cloud KMS key ring.
Click Continue and select Imported Key
Then click Create
In the Select Import Job dropdown, select Create Import Job
Select 4096 bit RSA -OAEP Padding - SHA256 digest + 256 bit AES-KWP as import method
then click Create
Then click Download wrapping key
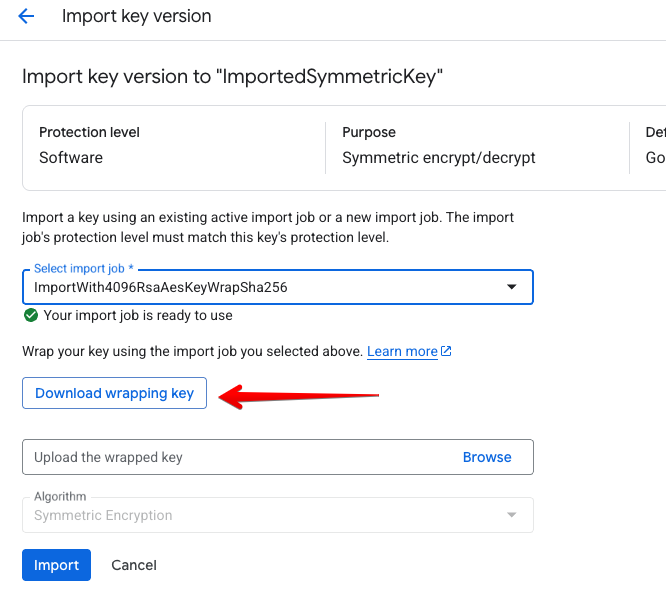
The key will be downloaded as a PKCS#8 PEM named ImportWith4096RsaAesKeyWrapSha256.pem
Create a symmetric key in Eviden KMS
This is the symmetric key that will be wrapped by the Google wrapping key and imported in the Google KMS.
ckms sym keys create --number-of-bits 256 CMEK_Sym_Key
The symmetric key was successfully generated.
Unique identifier: CMEK_Sym_Key
Import the wrapping key in Eviden KMS
ckms rsa keys import --key-format pem --key-usage encrypt --key-usage wrap-key \
ImportWith4096RsaAesKeyWrapSha256.pem CMEK_Wrapping_Key
The PublicKey in file ImportWith4096RsaAesKeyWrapSha256.pem was imported with id: CMEK_Wrapping_Key
Unique identifier: CMEK_Wrapping_Key
Export the symmetric key wrapped by the wrapping key from Eviden KMS
ckms sym keys export --key-id CMEK_Sym_Key --wrap-key-id CMEK_Wrapping_Key \
--key-format raw --wrapping-algorithm rsa-aes-key-wrap wrapped_key.bin
The key CMEK_Sym_Key of type SymmetricKey was exported to "wrapped_key.bin"
Unique identifier: CMEK_Sym_Key
Note 1: The rsa-aes-key-wrap wrapping algorithm uses the SHA256 digest.
Note 2: the wrapped key should be 552 bytes (4416 bits) long:
- 4096 bits (RSA key length) +
- 256 bits (Symmetric key length) +
- 64 bits of AES KWP overhead.
Import the wrapped key in Google Cloud KMS
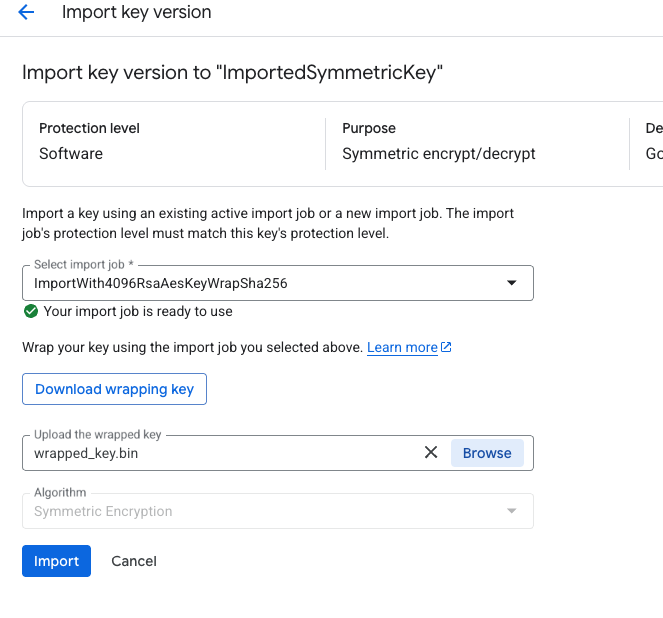
The key should now be available in the Google Cloud KMS.
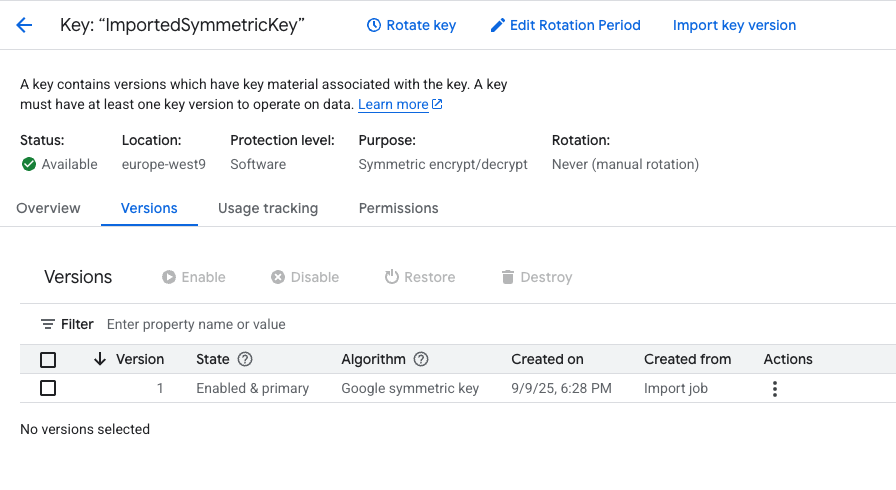
Automated testing
The entire Eviden KMS side of this workflow (steps 2–4) is covered by the
script .mise/scripts/test_gcp_cmek.sh. It uses the test wrapping key at
test_data/google_cmek/Import_RSA_AES_WRAP.pem and can be executed via:
mise run test:gcp_cmek --variant non-fips
CSEK (Customer Supplied Encryption Keys)
To use Customer Supplied Encryption Keys, follow the general instructions on using RSA wrapping keys.
Generate a symmetric key in Eviden KMS
This is the symmetric key that will be used as the CSEK.
ckms sym keys create --number-of-bits 256 CSEK_Sym_Key
The symmetric key was successfully generated.
Unique identifier: CSEK_Sym_Key
Download the Google CSEK Certificate and extract the RSA wrapping key
Download the certificate
curl https://cloud-certs.storage.googleapis.com/google-cloud-csek-ingress.pem > test_data/cse/google-cloud-csek-ingress.pem
Import the certificates in Eviden KMS
Name it google_csek on import.
ckms certificates import --format pem test_data/cse/google-cloud-csek-ingress.pem google_csek
The certificate in the PEM file was successfully imported!
Unique identifier: google_csek
Export the wrapped CSEK Symmetric Key
The key must be wrapped using CKM_RSA_PKCS_OAEP with a SHA1 digest.
The export function will automatically recover the wrapping public key from the certificate and perform the key wrapping.
ckms rsa keys export --key-id CSEK_Sym_Key --wrap-key-id google_csek \
--wrapping-algorithm rsa-oaep-sha1 --key-format raw wrapped_key.bin
The key CSEK_Sym_Key of type SymmetricKey was exported to "wrapped_key.bin"
Unique identifier: CSEK_Sym_Key
Note 1: Make sure you use rsa-oaep-sha1 to force the SHA1 digest.
Note 2: The wrapped key should be 2048 bits (256 bytes) long.
Convert the wrapped CSEK Symmetric Key to base64
cat wrapped_key.bin | base64
BtE+r06qy4isyfMR29n5uGSPj1qbOQTA42nxVJ...Hw==
Getting started
The Eviden Key Management Server is compatible with Google Workspace client-side encryption. Using this feature, your users can encrypt files and documents, in their browsers, before sending them to Google servers. The ephemeral encryption keys are protected by "key wrapping keys", stored in the KMS and unavailable to Google. Only users that have the right to unwrap the ephemeral encryption keys inside the KMS, can decrypt the files. An overview is provided in Google's About client-side encryption page.
To enable client-side encryption (CSE) in Google Workspace, connect as an admin to the admin console and go to the Google Workspace client-side encryption page.
Google has extensive documentation on how to enable CSE in Google Workspace. The Use client-side encryption for users' data page is a good starting point. It may be slightly overwhelming, and this documentation adds some details to help you get started.
Architecture
The diagram below summarizes the components described in this documentation and in Google's CSE API reference: the Eviden KMS plays the role of the Key Access Control List Service (KACLS) that Google calls the "external key service".
flowchart LR
subgraph Users["Users"]
App["Workspace apps<br/>Drive, Docs, Meet, Calendar, Gmail<br/>(browser, desktop, mobile)"]
end
subgraph Google["Google"]
Admin["Admin console<br/>External key service<br/>Identity provider<br/>S/MIME root CA chain"]
Issuer["Token issuer<br/>gsuitecse-tokenissuer-APP<br/>authorization JWT"]
GmailAPI["Gmail API<br/>CSE key pairs and identities"]
end
subgraph IdPBox["Identity provider"]
IdP["Google Identity or other OIDC IdP<br/>authentication JWT"]
end
subgraph Customer["Customer infrastructure"]
Nginx["Nginx<br/>TLS termination<br/>serves the .well-known file"]
subgraph KMS["Eviden KMS - KACLS at kms_public_url/google_cse"]
Endpoints["CSE endpoints<br/>status, certs, wrap, unwrap, digest<br/>privatekeysign, privatekeydecrypt<br/>privilegedwrap, privilegedunwrap<br/>privilegedprivatekeydecrypt, rewrap"]
Keys["Keys<br/>google_cse AES wrapping key<br/>google_cse_rsa and google_cse_rsa_pk"]
end
CA["Certificate authority<br/>issues the users S/MIME certificates"]
CLI["ckms CLI<br/>sym keys, access-rights<br/>google key-pairs and identities"]
end
OldKACLS["Previous KACLS<br/>(migration only)"]
Admin -- "① configures KACLS URL and IdP" --> Nginx
App -- "② signs in" --> IdP
App -- "③ requests authorization JWT" --> Issuer
App -- "④ wrap, unwrap, privatekey calls<br/>authentication + authorization JWT" --> Nginx
Nginx --> Endpoints
Endpoints -- "⑤ fetches the JWKS to validate the JWTs" --> IdP
Endpoints --> Keys
CA -- "certificates" --> CLI
CLI -- "create google_cse key<br/>wrap user private keys" --> Endpoints
CLI -- "⑥ service account: key pairs, identities" --> GmailAPI
GmailAPI -- "S/MIME key material" --> App
Endpoints -- "⑦ migration: privilegedunwrap with JWT, audience kacls-migration" --> OldKACLS
OldKACLS -- "fetches certs to verify the migration JWT" --> Endpoints
Prerequisites
You will need:
- A Google Workspace account
- A Certificate Authority (CA) compliant with Gmail to generate the certificates for the users
- An Identity Provider (IdP) (in this tutorial the Google Identity Provider)
- The Eviden Key Management Server behind a
Nginxserver:- exposing a valid TLS certificate
- and serving the
.well-knownfile used by the Identity Provider
- The KMS CLI
- to generate the Google CSE key in the Eviden KMS with correct access rights
- to generate the Gmail users keys
Choosing the Certificate Authority
First you need an intermediate CA (Certificate Authority) that is trusted by Google and compliant with Gmail X509 expectations (read the expected X509 extensions).
This CA will issue your users certificates:
- either your CA is one of the Google recommended CA, follow this page to make sure it is (note that Actalis can provide CA certificates for free). In that case, your users S/MIME certificates will be issued directly from your CA and you will need to import them one by one using KMS CLI
- either this is a custom CA:
- that you already have (remember that this custom CA must have the expected Google X509 extensions). You will have to upload the full CA chain in admin.google.com->Apps/Google Workspace/Settings for Gmail/User Settings/S/MIME (and wait for provisioning to be fully done, few hours expected).
- that you do not have, in that case read this page to generate your own CA and upload the full CA chain in admin.google.com.
Actalis CA
In order to import the Actalis CA in admin.google.com->Apps/Google Workspace/Settings for Gmail/User Settings/S/MIME, you have to build the full chain of certificates from an existing PKCS#12 certificate.
openssl pkcs12 -in certificate_s_mime.p12 -cacerts -nokeys -out ca.pem -passin pass:'YOUR_PASSWORD'
openssl pkcs12 -in certificate_s_mime.p12 -clcerts -nokeys -out certificate.pem -passin pass:'YOUR_PASSWORD'
cp certificate.pem fullchain.pem
cat ca.pem >> fullchain.pem
cat fullchain.pem
Choosing and configuring the Identity Provider
The first thing that will need to be done is to configure the Identity Provider. This is the service that the Eviden Key Management Server will use to authenticate users before they can encrypt files or access encrypted files.
The Identity Provider (IdP) is either a third party IdP or Google identity.
Using Google Identity is not recommended since Google as the authority could issue tokens to impersonate users and recover their keys. However, since configuring an Identity Provider is hard and Google Identity is the easiest to configure, we will use it in this tutorial.
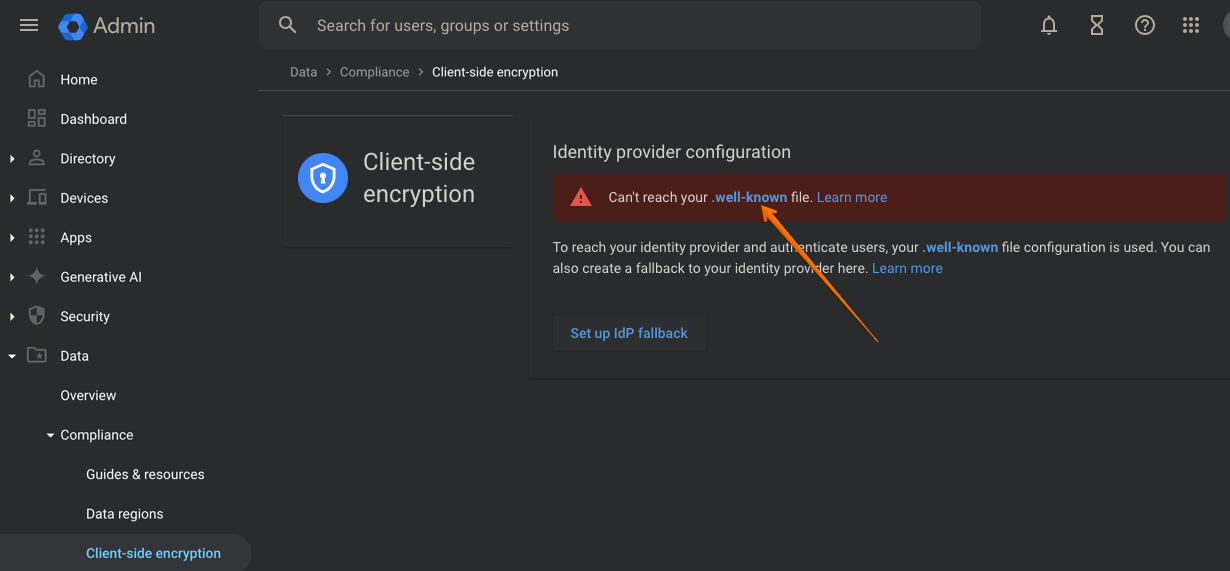
The initial page should look like this. What matters here is the link shown at the tip of the red-arrow.
This is the URL at which Google client-side encryption expects the .well-known file to be served.
Assuming your domain is example.com, the URL will likely be https://cse.example.com/.well-known/cse-configuration.
To configure a .well-known file, you need to:
-
Create the
.well-knownfile with the proper content -
Set up a server that serves the file at the URL shown in the image above
Instructions are provided in the Configuring the .well-known file section
Once this is complete, the screen on refresh should turn to this:
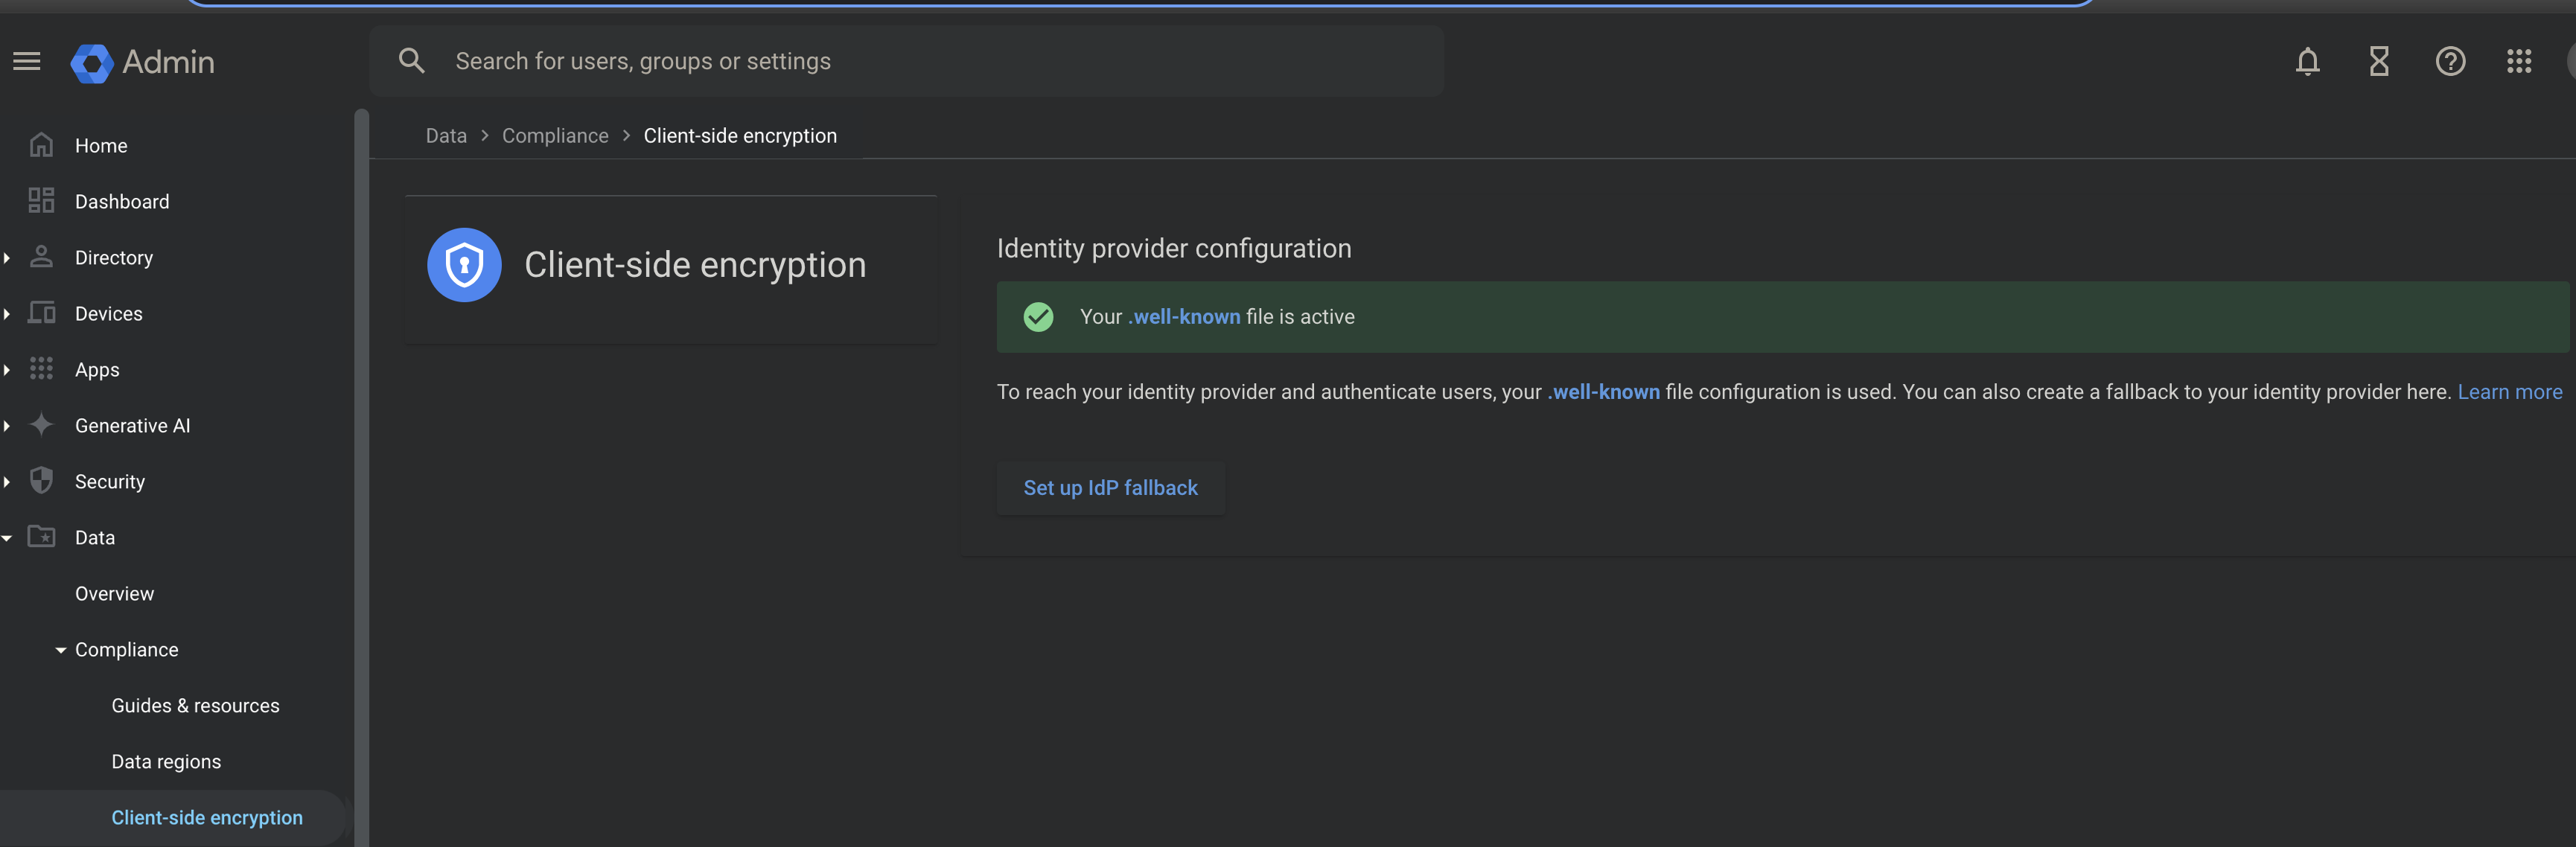
Configuring the Key Management Server
The KMS must be behind a valid TLS certificate when started.
Assuming it is running at https://cse.example.com (kms-public-url parameter from server configuration), you should add the External Key Service with KACLS URL https://cse.example.com/google_cse in the Client-Side Encryption page of the Google Workspace admin console.
To enable Client Side Encryption on the Eviden KMS server, it must be started with the --kms-public-url option, and the --google-cse-enable option.
This URL option is at which the KMS will serve the Key Access Control Lists (KACLs) for the Google CSE service.
The KACLs are used by the Google CSE service to determine which users have access to which keys.
The KACLs are served by the KMS at the URL https://cse.example.com/google_cse in the example above.
The Key Management Server must be configured to use the same Identity Provider as the one configured in the previous step. When using Google Identity, the server should be configured with the following options set in the corresponding Google documentation.
Assuming Google is the Identity Provider, the KMS should be started with the following options:
--jwt-issuer-uri=https://accounts.google.com
--jwks-uri=https://www.googleapis.com/oauth2/v3/certs
--kms-public-url=https://cse.example.com
--google-cse-enable
For example, if you are using the docker image, you can run the following command:
docker run -p 9998:9998 --name kms ghcr.io/cosmian/kms:latest \
--jwt-issuer-uri=https://accounts.google.com \
--jwks-uri=https://www.googleapis.com/oauth2/v3/certs \
--kms-public-url=https://cse.example.com \
--google-cse-enable
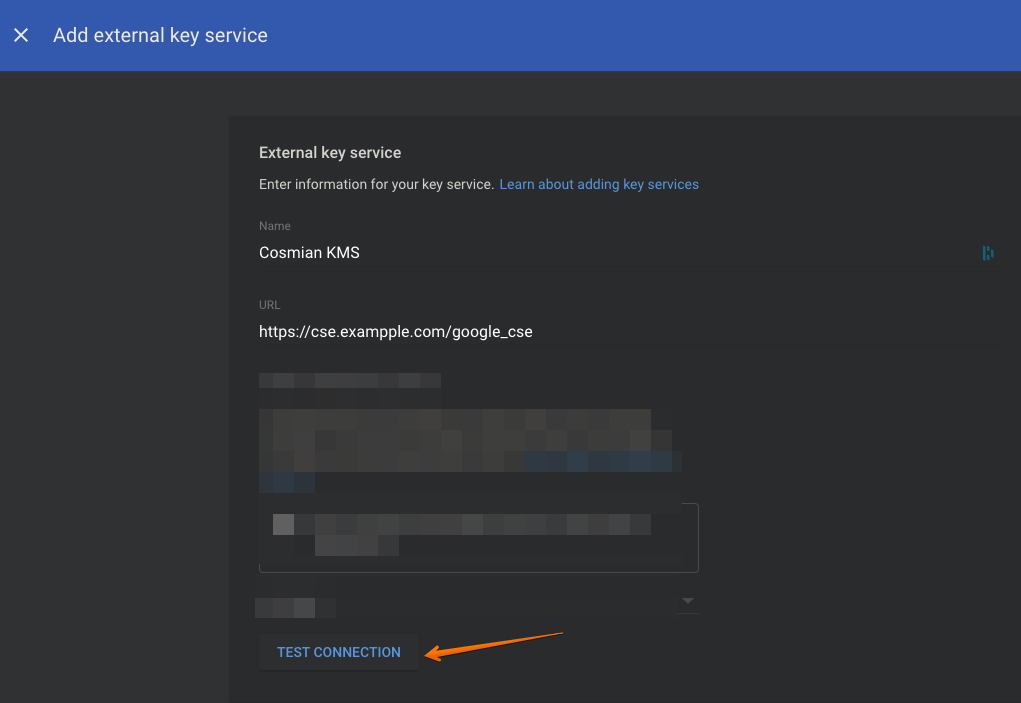
Then test the connection; it should show:
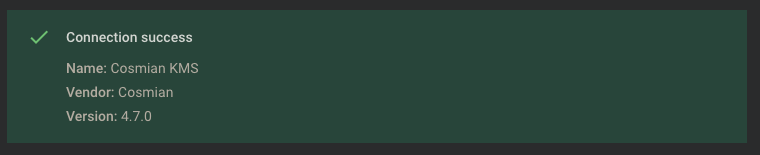
Finalize the configuration. The Client Side Encryption page should now show the service to be active and you will now have to decide whether to assign this service to all users or to a subset of users.
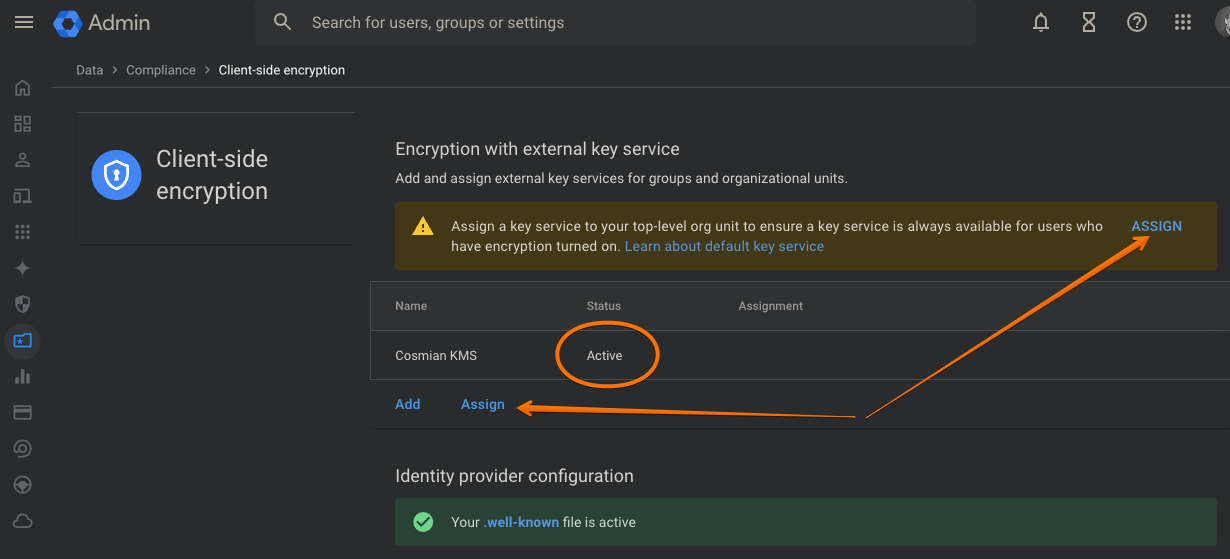
Creating google_cse key
Once your CSE Eviden KMS is up and running, you need to import the AES wrapping key, which will be responsible for wrapping the keys managed by Google.
This key MUST be created under the google_cse ID.
Using the KMS CLI, ensure that it is properly configured and that authentication is handled correctly.
Concerning the KMS CLI, you will have to log in the first time you use it.
This is done by running ckms login.
# create it
ckms sym keys create -t google_cse google_cse
# or import an existing key
ckms sym keys import -t google_cse PATH_TO_YOUR_KEY google_cse
Next, you'll need to assign access rights to each user who requires CSE functionality, whether they are part of your organization or a guest. You can also grant wildcard access ('*') to allow all users to use this key in CSE endpoints.
ckms access-rights grant USER_ID google_cse get encrypt decrypt
# or give access to everyone
ckms access-rights grant '*' google_cse get encrypt decrypt
Handling Guest identity providers
As an administrator, you can allow external users to access your encrypted content via Google Workspace Client-Side Encryption (CSE), including sharing encrypted documents or hosting encrypted Google Meet sessions.
For more information on this configuration, refer to Google documentation.
Eviden KMS supports this feature, and to enable it:
- Add the identity provider's information in the server-side Eviden KMS configuration
- Ensure that external users can access the Google CSE symmetric key
User experience
Learn more details about CSE user experience over all supported applications.
Configuring the .well-known file
General configuration instructions for Google client-side encryption is available at this url in paragraph (Option 1) To connect to your IdP using a .well-known file
Using Google as an Identity Provider
To use Google as an Identity Provider, you first need to create a dedicated client ID in the Google Cloud Console. Detailed instructions are available on the page referenced above in the section entitled Create-a-client-id-for-google-identity.
The general idea is to create a project, then in APIs & Services > Credentials, create a client ID for a web application.
This Client ID will be used in the .well-known file.
Once created the Client ID should look like this
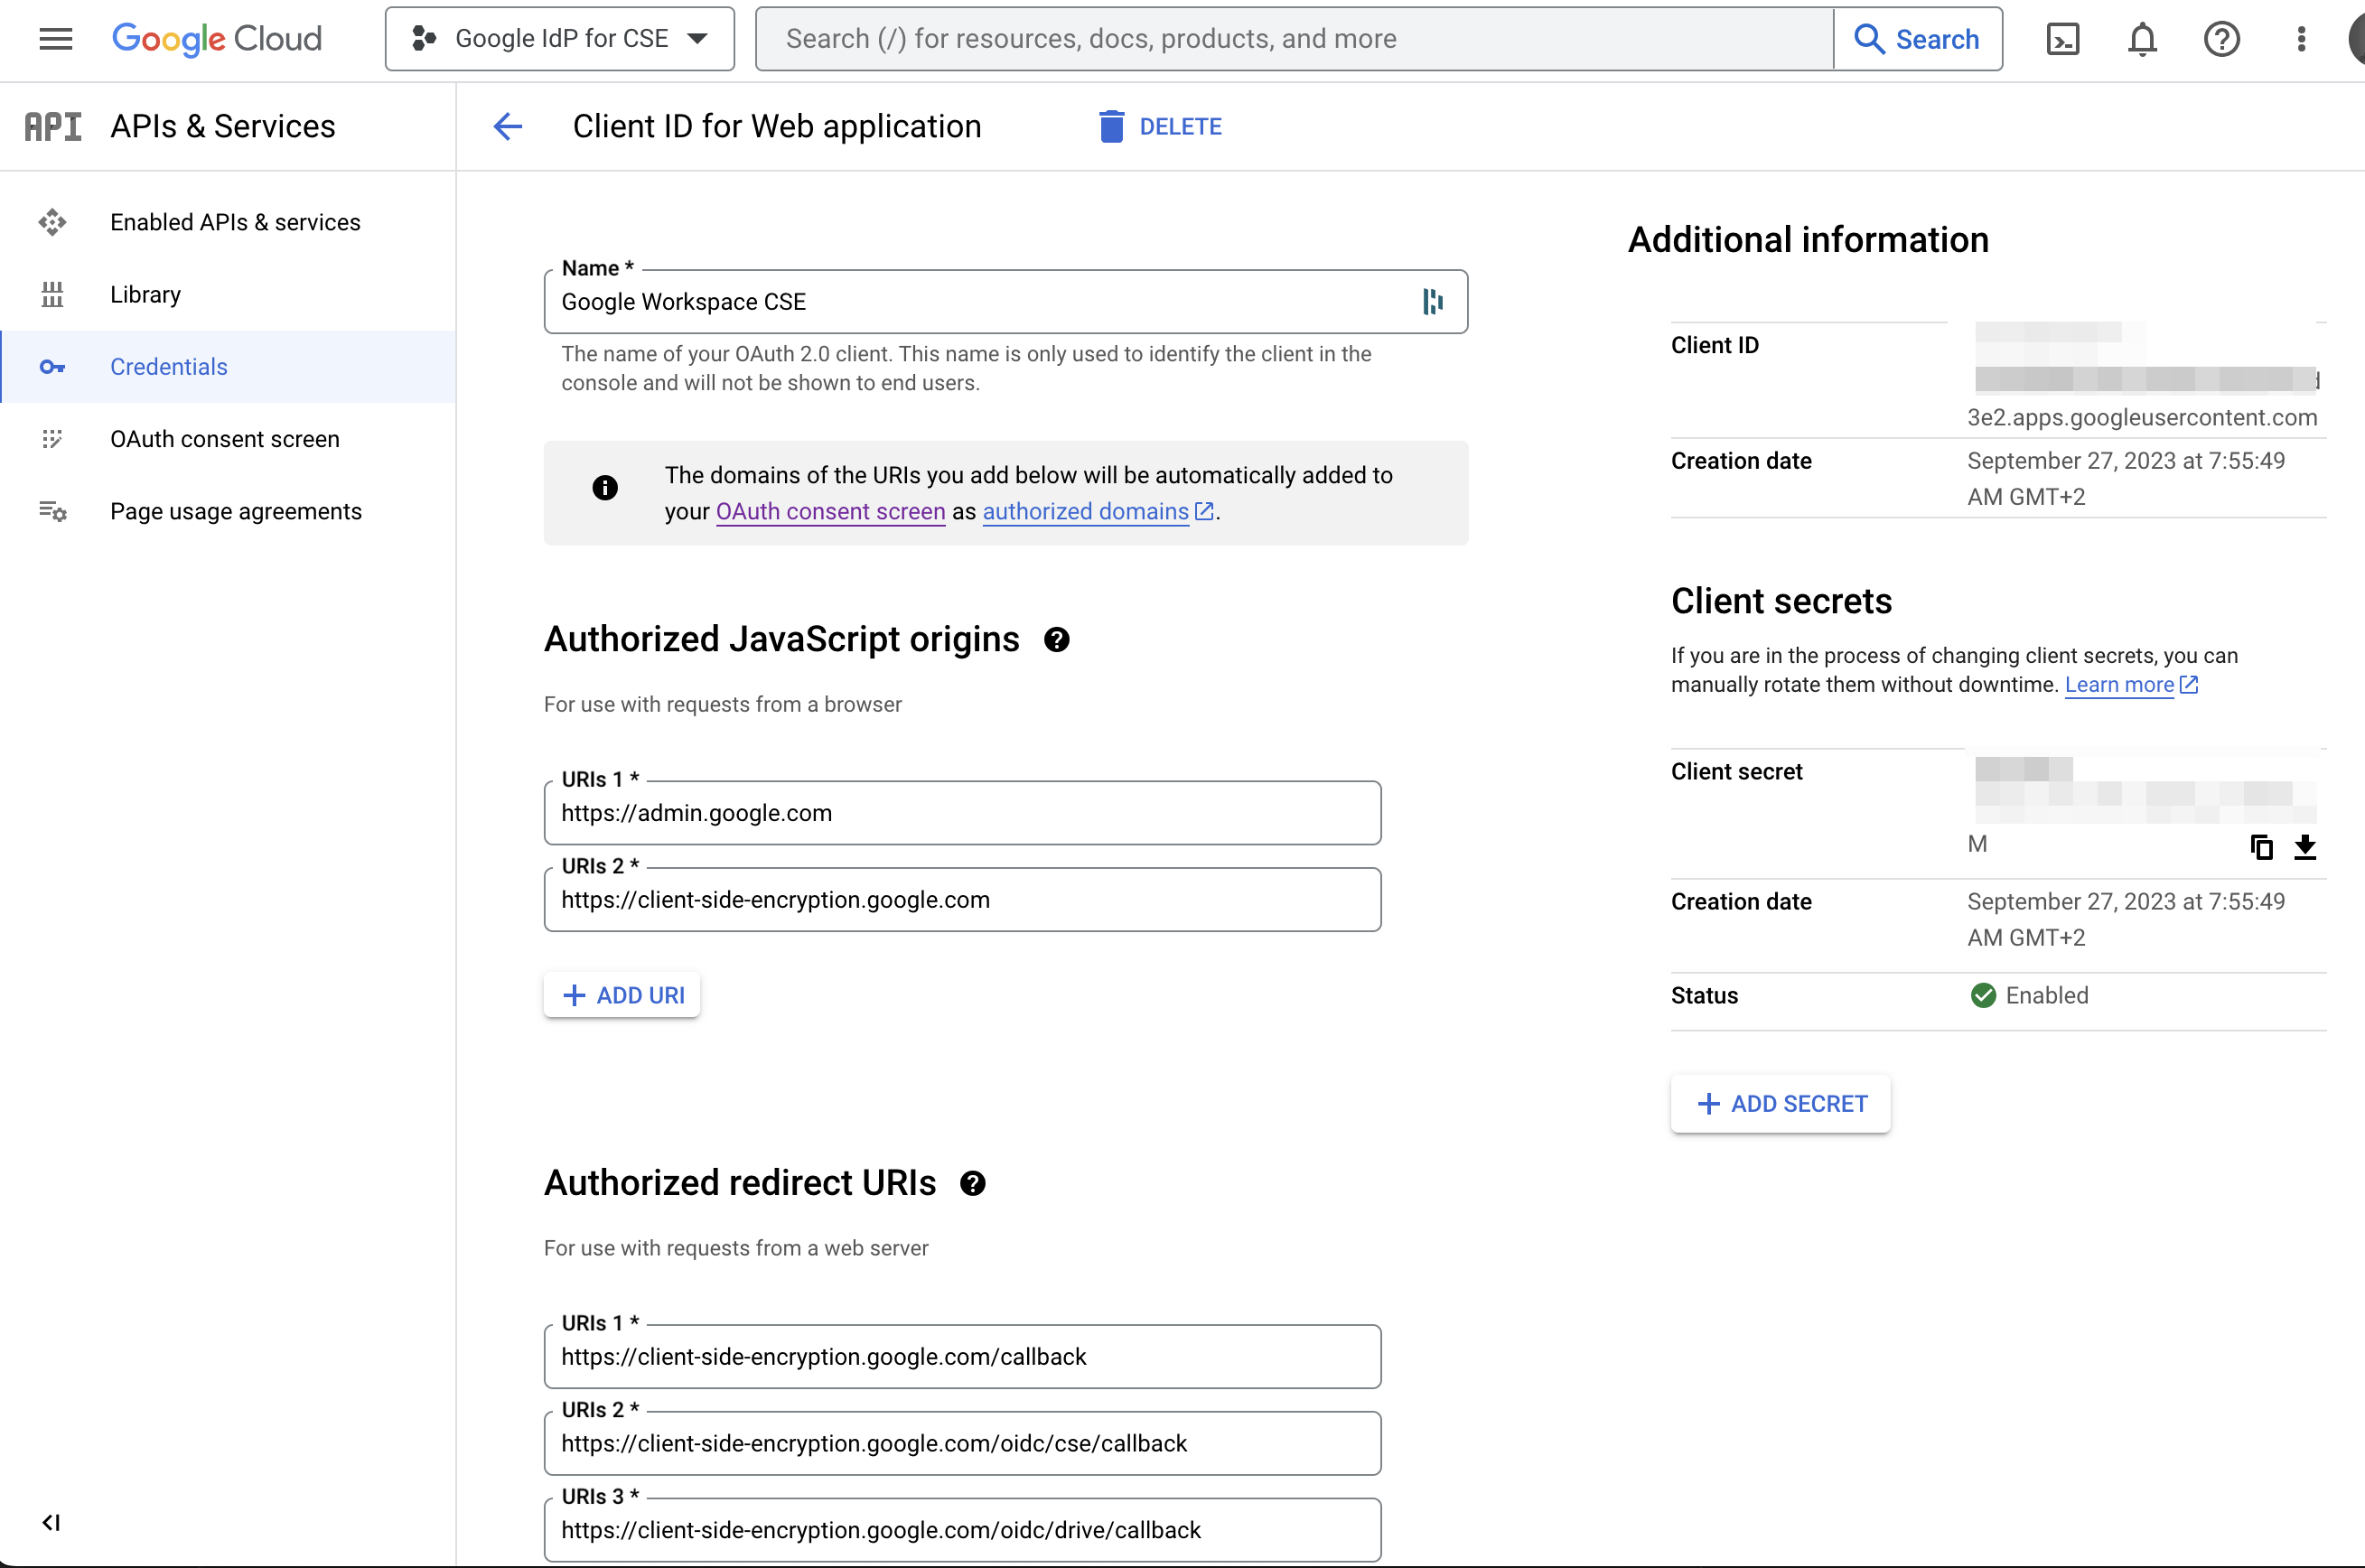
Do not forget to add http://localhost:17899/authorization in the Authorized redirect URIs list.
It will allow the KMS CLI to authenticate with Google.
The list of URLs for Authorized origins and Authorized redirect are available in the Google documentation above, in paragraph Create a client ID for Google identity.
Generating the .well-known file
The format of the .well-known file is specified by RFC 8259
{
"name": "Google identity for workspace client-side encryption",
"client_id": "996739510374-au9fdbgp72dacrsag267ckg32jf3d3e2.apps.googleusercontent.com",
"discovery_uri": "https://accounts.google.com/.well-known/openid-configuration",
"grant_type": "implicit",
"applications": {
"drivefs": {
"client_id": "947318989803-k88lapdik9bledfml8rr69ic6d3rdv57.apps.googleusercontent.com"
},
"drive-android": {
"client_id": "313892590415-6lbccuf47cou4q45vanraqp3fv5jt9do.apps.googleusercontent.com"
},
"drive-ios": {
"client_id": "313892590415-d3h1l7kl4htab916r6jevqdtu8bfmh9m.apps.googleusercontent.com"
},
"calendar-android": {
"client_id": "313892590415-q84luo8fon5on5vl8a6rppo1qvcd3qvn.apps.googleusercontent.com"
},
"calendar-ios": {
"client_id": "313892590415-283b3nilr8561tedgu1n4dcm9hd6g3hr.apps.googleusercontent.com"
},
"gmail-android": {
"client_id": "313892590415-samhd32i4piankgs42o9sit5e9dug452.apps.googleusercontent.com"
},
"gmail-ios": {
"client_id": "313892590415-ijvjpbnsh0gauuunjgsdn64ngg37k6rc.apps.googleusercontent.com"
},
"meet-android": {
"client_id": "313892590415-i06v47su4k03ns7ot38akv7s9ari5oa5.apps.googleusercontent.com"
},
"meet-ios": {
"client_id": "313892590415-32ha2bvs0tr1b12s089i33o58hjvqt55.apps.googleusercontent.com"
}
}
}
client_id is the OAuth 2.0 client ID of the Google Workspace domain that is created using the Google Cloud Console
Configuring a static web server to serve the .well-known file
The URL at which Google client-side encryption expects the .well-known file is on the link pointed by the red arrow below.
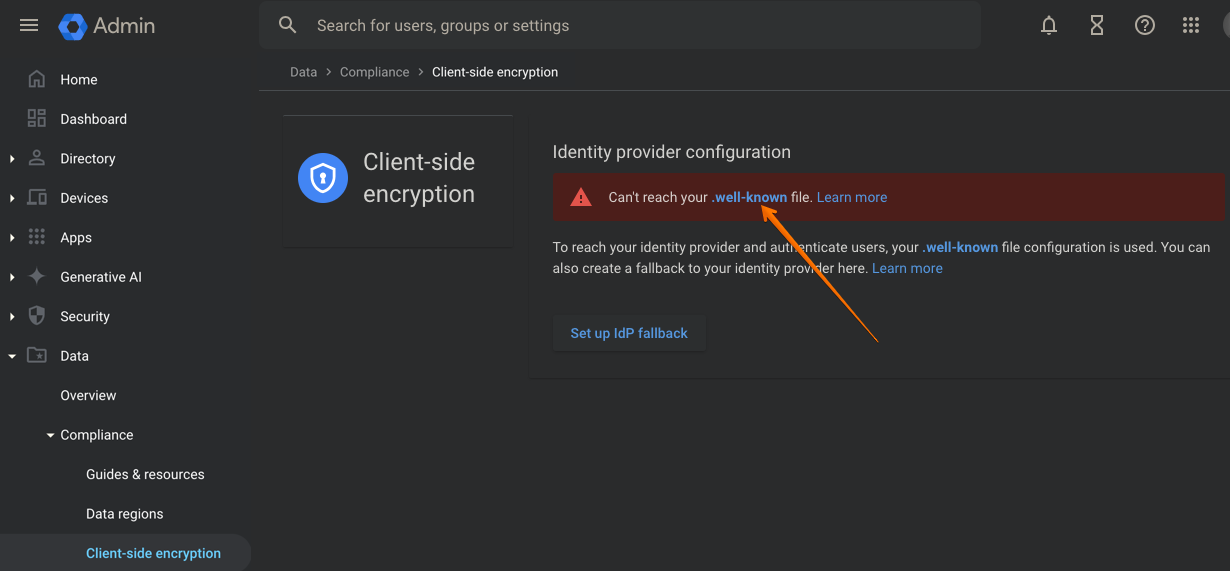
Assuming your organization is on the domain acme.com (which should match that of your email address domain), the URL would be: https://cse.acme.com/.well-known/cse-configuration
1. Configure a server running Ubuntu 23.04
The server should be reachable using an external IP; configure your DNS so that a A record with value cse.acme.com points to that external IP address of the server.
Make sure ports 80 and 443 are open to external traffic on this machine. Access to port 80 can be closed at the end of this procedure.
2. Install nginx on the server
sudo apt update
sudo apt install nginx
3. Transfer your .well-known file
sudo mkdir /var/www/html/.well-known
sudo touch /var/www/html/.well-known/cse-configuration
sudo scp 'path_to_your_well_known_file' user@IP:/var/www/html/.well-known/cse-configuration"
The file will put your created .well-known file to you web server in order to expose it.
4. Configure nginx to serve the .well-known file
Since, the .well-known file is served from a different domain than the one used by Google client-side encryption,
CORS calls need to be enabled on NGINX to allow the browser to fetch the .well-known file.
Edit the file /etc/nginx/sites-available/default and add the following location:
location /.well-known/ {
root /var/www/html;
# Allow CORS calls: see https://support.google.com/a/answer/10743588?hl=en
add_header 'Access-Control-Allow-Origin' '*';
}
Then restart the nginx service
sudo systemctl restart nginx
Finally, verify that nginx is correctly serving the file by running
➜ curl http://localhost/.well-known/cse-configuration
5. Enable HTTPS with certbot and Lets's Encrypt
Install certbot on the machine using snap (the snap daemon should already be installed and activated on Ubuntu 23.04)
sudo snap install --classic certbot
sudo ln -s /snap/bin/certbot /usr/bin/certbot
General instructions on installing certbot are available at this URL.
Get a certificate and configure nginx
sudo certbot --nginx
The command will ask you to provide an email address and a domain name. The domain name should be cse.acme.com (or whatever domain you chose in step 1).
That's it, the empty .well-known file should now be served using HTTPS. From another machine, verify that it is now available on the public address
➜ curl https://cse.acme.com/.well-known/cse-configuration
{}
Port 80 can now be closed on the machine (or nginx configuration can be updated to redirect HTTP requests to HTTPS)
6. Enable CORS calls
The .well-known file is served from a different domain than the one used by Google client-side encryption. CORS calls need to be enabled on the server to allow the browser to fetch the .well-known file.
Edit the file /etc/nginx/sites-available/default and add the following at the top of the file (before the server block):
# Allow CORS calls: see https://apps.google.com/supportwidget/articlehome?hl=en&article_url=https%3A%2F%2Fsupport.google.com%2Fa%2Fanswer%2F10743588%3Fhl%3Den&assistant_id=generic-unu&product_context=10743588&product_name=UnuFlow&trigger_context=a
add_header 'Access-Control-Allow-Origin' '*';
Then restart the nginx service
sudo systemctl restart nginx
7. Optional: download the .well-known file as a proper JSON
The Client-side encryption service does not require this setting to work properly. However, it is useful to be able to download the .well-known file as a proper JSON object when viewing it in a browser.
To do so, the content-type header of the response must be set to application/json. Edit the file /etc/nginx/sites-available/default and add the following inside the server block that serves the HTTPS requests:
location /.well-known/ {
default_type application/json;
}
Then restart the nginx service
sudo systemctl restart nginx
Generating Gmail keys
Follow the Google documentation to enable S/MIME for client-side encryption in your organization and create a service account to interact with the Gmail API.
Configure KMS CLIent (CLI)
The cosmian command line interface (CLI) simplifies the setup of S/MIME keys and certificates for users.
After completing the setup, update your KMS CLI with the necessary information for the service account you created for the Gmail API.
Choosing the Certificate Authority
First you need an intermediate CA (Certificate Authority) that is trusted by Google and compliant with Gmail X509 expectations (read the expected X509 extensions).
This CA will issue your users certificates:
-
either your intermediate CA is one of the Google recommended CA, follow this page to make sure it is (note that Actalis can provide CA certificates for free). In that case:
-
at first, you need to import the issuer intermediate CA certificate into Eviden KMS since Google already trusts the root CA.
ckms certificates import -f pkcs12 issuer_ca_certificate.p12 -p \ PASSWORD issuer_ca_certificate -
then, you need to import your users S/MIME certificates one by one using KMS CLI.
-
-
either your intermediate CA is an internal or custom CA:
- that you already have (remember that this custom CA must have the expected Google X509 extensions).
You will have to upload the full CA chain in
admin.google.com->Apps/Google Workspace/Settingsfor Gmail/User Settings/S/MIME (and wait for provisioning to be fully done, few hours expected).
- that you already have (remember that this custom CA must have the expected Google X509 extensions).
You will have to upload the full CA chain in
The Google Root CA is actually the following chain (root CA + intermediate CA + any leaf public certificates). Allow a few hours for Google to complete the provisioning.
Build your Google Root CA following those steps: Exporting and viewing and do not forget to export the Google expected root CA
- that you do not have, in that case follow those instructions to generate your own CA chain and upload the Google Root CA in admin.google.com.
Managing administrator access rights
If multiple administrators will be generating key-pairs for users, ensure that each administrator has the appropriate access rights to the imported certificate chain elements:
- the issuer certificate ID (given when importing the Certificate Authority)
- the issuer private key ID
- the issuer public key ID
In order to get the issuer private key ID and issuer public key ID, run the following command:
ckms attributes get -i issuer_ca_certificate
You'll use the ID of the issuer's private key (imported from the certificate chain) to later sign users' public keys and create their certificates.
Create user key-pair
Gmail uses key-pairs (an RSA private key wrapped with its associated certificate) and identities (the ID of an uploaded key-pair, associated with a user) to sign and encrypt emails using S/MIME.
These objects are uploaded to Google via the Gmail API.
You can create a key-pair (RSA private key and user certificate chain) and upload it to the Gmail API using the following command:
ckms google key-pairs create --cse-key-id CSE_KEY_ID \
--subject-name "C=FR, ST=IdF, L=Paris, O=ORGANIZATION, OU=DEPARTMENT, CN=user@organization.com, emailAddress=user@organization.com" \
-i ISSUER_PRIVATE_KEY_ID --leaf-certificate-extensions user.ext user@your_organization.com
If you already have an existing RSA key-pair for the user, you can specify it in the command.
Using an existing leaf certificate
Instead of generating a new leaf certificate, you can use an existing one by specifying either:
--leaf-certificate-id CERT_ID: Use a certificate already stored in KMS--leaf-certificate-pkcs12-file /path/to/cert.p12: Use a local certificate file
When using an existing leaf certificate, the --leaf-certificate-extensions parameter is not required.
Remember that existing X509 certificate must comply the Google CSE requirements. X509 flags are expected by Google Gmail CSE for S/MIME.
Example with an existing PKCS12 certificate:
ckms google key-pairs create --cse-key-id CSE_KEY_ID \
--subject-name "C=FR, ST=IdF, L=Paris, O=ORGANIZATION, OU=DEPARTMENT, CN=user@organization.com, emailAddress=user@organization.com" \
--leaf-certificate-pkcs12-file /path/to/cert.p12 --leaf-certificate-pkcs12-password secret user@your_organization.com
Once created, the ID of the key pair and the certificate will be displayed.
Note: It may take up to 24 hours for Google to propagate the Client-Side Encryption (CSE) activation for a user within the Gmail API, allowing you to upload the S/MIME elements.
Insert user identity
After creating the key-pair, you must associate it with the user's identity. To do so, run the following command:
ckms google identities insert \
--user-id user@your_organization.com CREATED_KEYPAIR_ID
You can manage key-pairs (get, list, enable, disable, obliterate) and identities (get, list, delete, patch) using the other available commands in the ckms commands documentation.
Note: It may take a few hours for Google to propagate the uploaded elements, after which users can begin using S/MIME for secure email exchanges.
User experience
To send a client-side encrypted email within your organization, a user needs to turn on the additional encryption option in the message window (lock -> Turn on additional encryption). Only users with CSE activated can encrypt and decrypt encrypted emails.
To send a client-side encrypted email outside your organization, a user needs to send a message to the recipient with their digital signature, without CSE turned on. The recipient then needs to reply to the message with their digital signature. Then the sender can choose to add CSE to email sent to the external recipient.
Encrypted emails will be automatically decrypted from Gmail interface.
Learn more about CSE user experience
Migrating existing Google Drive encrypted content to a new key service
This guide explains how to migrate encrypted content in Google Drive to a new key management service (KMS), specifically using Eviden KMS.
For a complete overview of Google's migration flow and all available options, refer to Google's official technical documentation.
Eviden KMS migration support and configuration
Eviden KMS supports the Google Client-Side Encryption (CSE) migration process by implementing the required endpoints, including:
-
POST <KMS_PUBLIC_URL>/google_cse/rewrap -
POST <KMS_PUBLIC_URL>/google_cse/privilegedunwrap
These endpoints allow Eviden KMS to serve as either the source or target key service during a migration.
JWT Authentication for Migration
Google's migration flow requires both key services (KACLS) to authenticate with each other via signed JWTs. To support this:
Eviden KMS generates a dedicated RSA key pair at startup (if not already present in the database).
- The private key is stored under the ID:
google_cse_rsa - The public key is stored under the ID:
google_cse_rsa_pk
Note: the JWT tokens MUST have their audience set to kacls-migration.
Key Persistence Across Restarts & Multiple Instances
To ensure consistent JWT signatures and seamless privileged unwrap operations across multiple instances or restarts, you can manually provide a persistent RSA private key using the --google-cse-migration-key CLI option.
This key must be in PEM-encoded PKCS#8 format.
Public Key Exposure
To allow other KACLS to verify JWT signatures, Eviden KMS exposes its public RSA key at:
GET <KMS_PUBLIC_URL>/google_cse/certs
This endpoint serves a JWKS (JSON Web Key Set) containing the public signing key.
Migrating existing emails to Gmail CSE
This documentation focuses on migrating email messages from a PST or Mbox archive to Gmail CSE. An overview of all migration options is provided in this blog article and covers other options such as migrating from Virtru or Microsoft Exchange.
A more general view of all the migration options to and from Gmail can be found at this link
Install the migration utility
Download the migration utility from the first link above.
Make sure you look at the included readme file for the scopes that must be associated with the service account (see below).
Create a service account credential with domain-wide access
Head to the GCP console and follow the Google Documentation on creating a Service Account
Create a service account
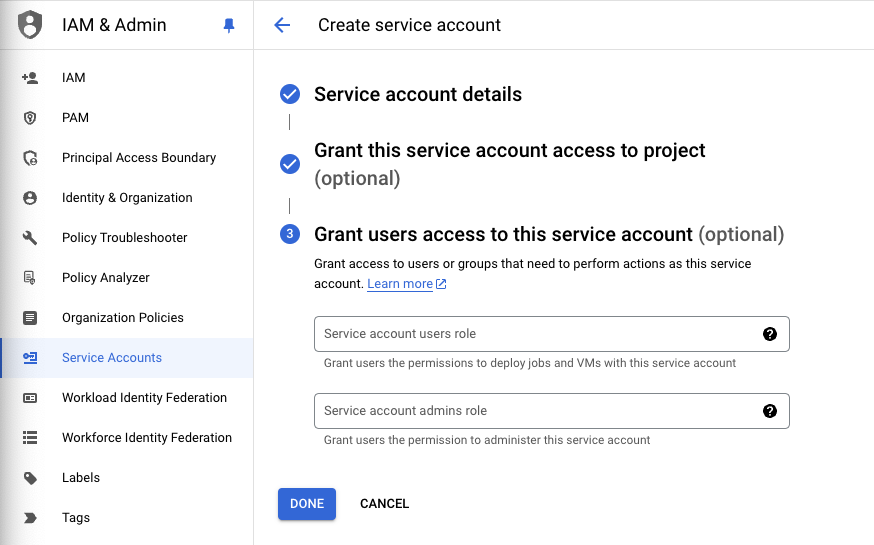
Create a key in JSON format
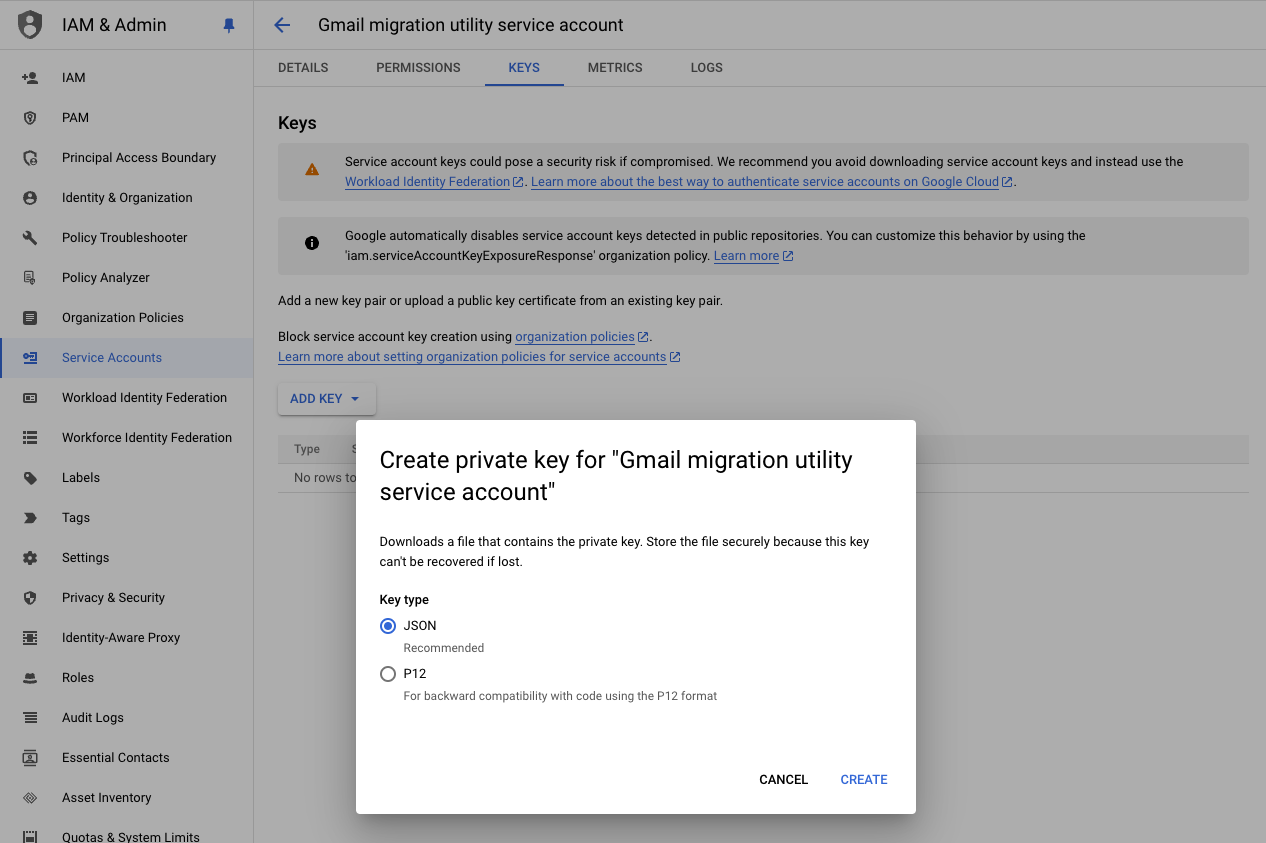
The key will be saved to your computer. The key will be provided to the migration utility.
Grant the GMail API domain-wide access
Open the Google Workspace Admin and follow
the instructions
in the paragraph Set up domain-wide delegation for a client
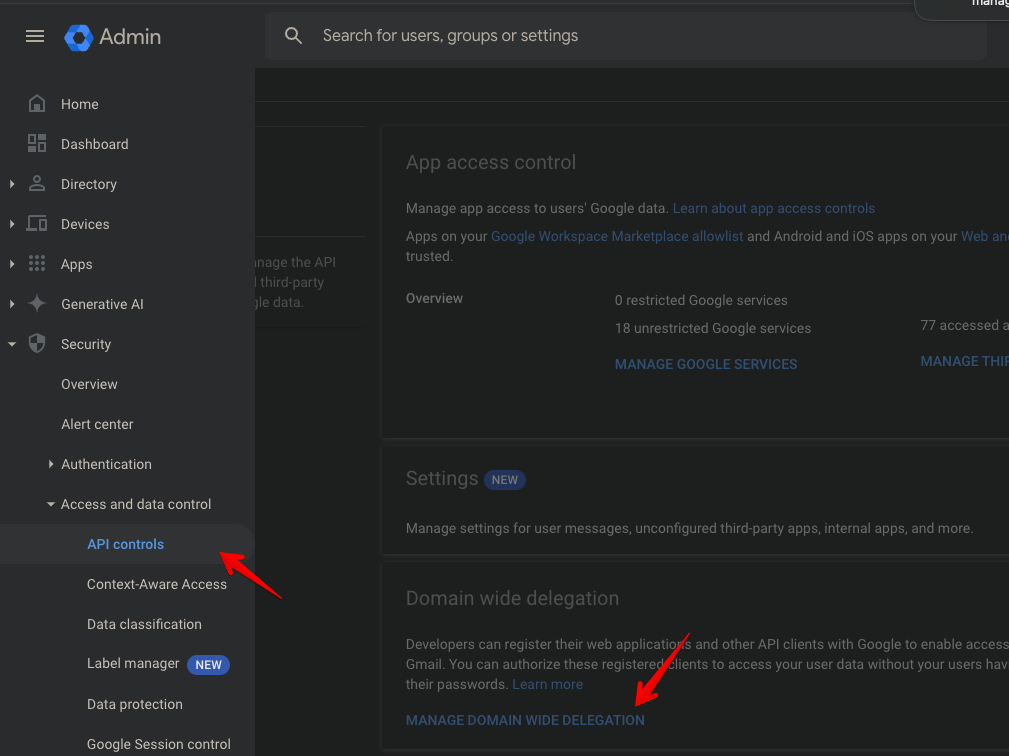
Create a new API client, the client ID is available in the Details of the service account
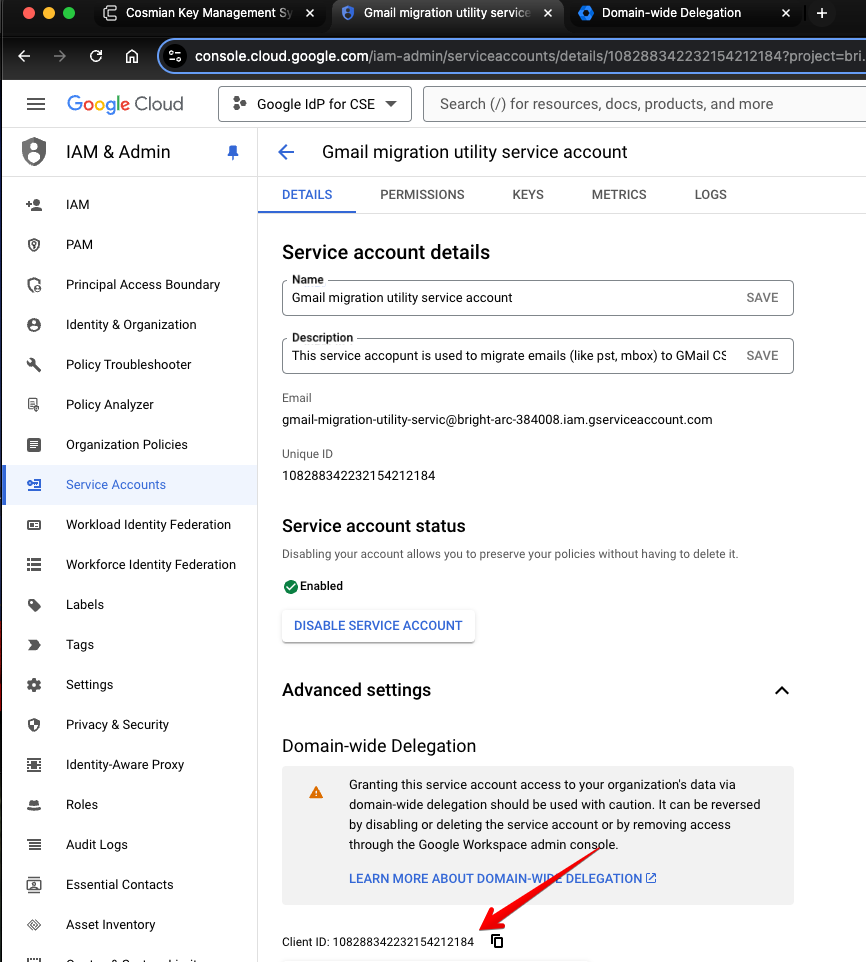 on the Google Cloud Console.
The OAuth scopes required are:
-
https://www.googleapis.com/auth/gmail.readonlyfor a dry run -
https://www.googleapis.com/auth/gmail.modifywhen performing the actual migration
For more details on Google OAuth scopes, check this reference
Migrate example usage
Perform a dry-run over two input files to verify that they can be parsed and that their messages can be encrypted in preparation for migration:
For Windows:
gmail-cse-migrate.exe -input user1.pst -input user2.pst -api-credential c:\my_svc_acct.json -dryrun -logfile log.txt
If it looks good, then run the command again in migration mode:
gmail-cse-migrate.exe -input user1.pst -input user2.pst -api-credential c:\my_svc_acct.json -logfile log.txt
For macOS:
/gmail-cse-migrate \
-api-credential=./gmail-migration-service-account-key.json \
-input=user1.mbox \
-logfile=./log.txt -dryrun
Version: gmail_cse_migrate-24.11.0.2 (darwin)
Download URI:
https://dl.google.com/clientsideencryption/gmail-cse-migrate/macos/latest/gmail-cse-migrate.dmg
COMPLETED
Inspected: 1 file in 0 directories
Found: 163 messages in 1 .mbox file
Failures: 6 messages in .mbox files failed to parse
MIGRATION
Processed: 127 messages
Skipped: 127 messages were not uploaded due to dryrun
Skipped: 36 already encrypted messages were not migrated
PARTIAL SUCCESS
LOG FILE WRITTEN TO
./log.txt
Export Data from GMail
If you need to export data from Gmail, the easiest is to use TakeOut, which you can find here
To export data for a single user, follow this documentation
To export the whole organization data, follow this documentation
Test coverage
This page lists which parts of the Google Workspace CSE support are exercised by automated tests,
and which are not. It covers the KACLS endpoints served by the KMS (/google_cse/*) and the
ckms google commands.
All the tests marked Offline run in a plain cargo test: they need no Google account, no
Google network access and none of the CI secrets. Only one test needs real Google credentials.
Running the tests
| Scope | Command | Credentials |
|---|---|---|
| Server endpoints, token validation, crypto, startup | cargo test -p cosmian_kms_server google_cse | none |
ckms google commands (clap actions) | cargo test -p cosmian_kms_cli_actions --features non-fips google_cmd | none |
ckms google through the ckms binary | cargo test -p ckms --features non-fips google_cmd | none |
| All of the above, plus the real Google token test | mise run test:google-cse | The real Google test needs TEST_GOOGLE_OAUTH_CLIENT_ID, TEST_GOOGLE_OAUTH_CLIENT_SECRET and TEST_GOOGLE_OAUTH_REFRESH_TOKEN (CI only); without them it is skipped with a warning, and fails when CI is set |
Server endpoints
The tests use a local identity provider: tokens are signed with a locally generated RSA key and the JWKS is loaded in memory. Endpoints are tested through the real Actix HTTP stack.
| Endpoint | Offline coverage | Gap |
|---|---|---|
GET /google_cse/status | Response fields, kacls_url built from kms_public_url, missing kms_public_url | none |
GET /google_cse/certs | JWK content, kid equals the one in create_jwt tokens, signature verified by the production signed-token validation, failure when the public key is destroyed | none |
POST /google_cse/wrap and /unwrap | Round trip, google_email over email, case-insensitive email match, email mismatch, missing email, unknown signing key, garbage token, wrong resource_name, bad base64, truncated and tampered wrapped keys | none |
POST /google_cse/digest | Hash equals compute_resource_key_hash for an empty perimeter, migration verifier authorization token, missing email | none |
POST /google_cse/privilegedwrap and /privilegedunwrap | Round trip, Drive audience check, wrong resource_name, migration token issued by another KACLS, real loopback HTTP request from the new KACLS to the original KACLS | none |
POST /google_cse/privatekeysign | SHA256withRSA, SHA512withRSA, SHA256withRSA/PSS, SHA512withRSA/PSS with PKCS#1 and PKCS#8 keys (FIPS and non-FIPS), SHA-1 variants (non-FIPS only), rsa_pss_salt_length, unknown algorithm, bad digest | none |
POST /google_cse/privatekeydecrypt | PKCS#1 v1.5 and OAEP (SHA-1, SHA-256, SHA-512) with PKCS#1 and PKCS#8 keys, OAEP label, unknown algorithm, bad ciphertext, bad base64 | The end-to-end create-pair flow with a PKCS#12 certificate (pkcs12_certify) runs only with --features non-fips |
POST /google_cse/privilegedprivatekeydecrypt | Same algorithm matrix (PKCS#1 key), SPKI hash mismatch, unknown SPKI hash algorithm | PKCS#8 wrapped keys are not accepted by this endpoint |
POST /google_cse/rewrap | Two-KACLS DEK migration: outbound privilegedunwrap, re-wrap, hash, rejection, bad source URL, missing email | Production-handler success: the SSRF guard rejects offline loopback targets |
POST /google_cse/wrapprivatekey | none | Not implemented: the handler returns an empty 200 |
POST /google_cse/delegate | none | Not implemented: the handler returns an empty 200 |
Token validation
| Check | Offline coverage | Gap |
|---|---|---|
Authorization token: signature, kid, issuer, audience, crit, nested JWT, empty and malformed tokens | Covered | none |
Role, resource_name and kacls_url checks, audience post-check | Covered by unit tests of the extracted helpers | The helpers are compiled out of the insecure feature; the wiring in release builds is not run end to end |
| Authentication token signature | Covered through the production signed-token validation on the /certs key | In test builds the authentication token is decoded without signature check, so HTTP tests do not verify it |
Token expiry (exp) | none | Disabled in test builds |
| Real Google-issued tokens and Google JWKS | routes::google_cse::jwt::tests::test_wrap_auth | Needs the CI credentials; the only ignored server test |
Server startup and configuration
| Area | Offline coverage | Gap |
|---|---|---|
google_cse_rsa key pair: generation, reuse, import from google_cse_migration_key, invalid PEM | Covered | The UNIQUE constraint race branch |
JWKS URIs and issuers: defaults, whitelist, KMS_GOOGLE_CSE_<APP>_JWKS_URI, KMS_GOOGLE_CSE_<APP>_JWT_ISSUER, KMS_GOOGLE_CSE_AUDIENCE | Covered | none |
ckms google commands
The Gmail API is replaced by a local mock server: the token endpoint comes from token_uri and the
API base URL from the optional gmail_api_base_url field of gmail_api_conf.
| Command | Offline coverage | Gap |
|---|---|---|
google key-pairs create | All certificate options (extensions, existing certificate, PKCS#12), --dry-run, push to Gmail with the expected PKCS#7 and KACLS metadata, Gmail error, existing RSA key, invalid key id (non-private key, no linked public key) | These tests run only with --features non-fips: a FIPS cargo test does not cover create |
google key-pairs get, list, enable, disable, obliterate | HTTP method, path, bearer token | none |
google identities get, list, insert, delete, patch | HTTP method, path, body, bearer token | none |
| Gmail client | OAuth token request, token endpoint error, non-JSON token response, invalid service-account key, Gmail error with and without JSON body, missing gmail_api_conf | The real Gmail API contract is not tested |
ckms binary dispatch | identities list, key-pairs list, key-pairs get error | Runs only with --features non-fips. The other subcommands are covered at the clap level only |
HSM-backed CSE (using_hsm.rs) | none | Ignored: needs a Utimaco HSM and Google credentials |
Compliance of the simulated Google payloads
The tests build the requests and tokens Google would send. They follow Google's CSE API reference:
| Payload | What the tests use |
|---|---|
| Docs, Drive, Calendar and Meet authorization token | Issuer gsuitecse-tokenissuer-drive@system.gserviceaccount.com, audience cse-authorization, claims email, role, resource_name, perimeter_id, kacls_url, iat, exp; roles writer (wrap), reader (unwrap) |
| Gmail authorization token | Issuer gsuitecse-tokenissuer-gmail@system.gserviceaccount.com, claims message_id, resource_name, spki_hash (base64 SHA-256 of the DER public key), spki_hash_algorithm, kacls_url; roles signer (privatekeysign), decrypter (privatekeydecrypt) |
| Migration authorization token | Roles migrator (rewrap) and verifier (digest) |
| Authentication token | IdP issuer, aud, email and the optional google_email |
KACLS migration JWT (privilegedunwrap) | iss is the URL of the requesting KACLS, kacls_url is the URL of the KACLS decrypting the data, audience kacls-migration, keys published at <iss>/certs |
| Request bodies | Exact field names of each endpoint; reason and perimeter_id are optional and a test omits them; rsa_oaep_label is base64-encoded |
| Wrapped private key | AES-GCM nonce || ciphertext || tag without additional data, created like ckms google key-pairs create does |
Deliberate differences from the reference:
expandiatare numbers, as RFC 7519 requires, although the reference tables list them as strings./statusalso returnskacls_url, a Cosmian extension used by the CLI and the web UI.- Tests that disable token validation send placeholder tokens: they are ignored by the server.
- One fixture captured from a real Gmail token also carries the
kacls_owner_domainclaim.
Known gaps
wrapprivatekeyanddelegateare not implemented, so they are not tested.digestandrewrapalways validate the authorization token, even whengoogle_cse_disable_tokens_validationis set.- Production-handler
rewrapsuccess cannot use loopback offline because its SSRF guard rejects it; injected-client migration logic is covered. - Real Google tokens are validated by one test, which runs only in the upstream CI.
- In a FIPS build the SHA-1 signatures, the
key-pairs createtests, theckmsbinary tests and the PKCS#12 create-pair test are not run.
Manual Setup for MongoDB Client-Side Field Level Encryption (CSFLE) with KMIP
This guide walks through the manual setup process for enabling Client-Side Field Level Encryption in MongoDB using a KMIP-compatible Key Management System (KMS).
Overview
| Item | Details |
|---|---|
| Protocol | KMIP 1.0 over TCP/TLS with mutual certificate authentication |
| Port | 5696 (IANA-registered KMIP port) |
| Key type | AES-256 symmetric key |
| MongoDB version | MongoDB Enterprise 6.0 and above |
| Eviden KMS feature | Requires non-FIPS build |
Prerequisites
Packages
- MongoDB Enterprise ≥
6.0 - Python ≥
3.8 - Python packages:
pymongodnspython
- MongoDB Crypt Shared Library:
- Download from the MongoDB Enterprise downloads section (e.g.,
mongo_crypt_v1.so) - Install to:
/opt/mongo_crypt_shared/mongo_crypt_v1.so
- Download from the MongoDB Enterprise downloads section (e.g.,
- Eviden KMS:
- Eviden KMS endpoint:
your-cosmian_kms-server:port - TLS certs:
- Client cert:
/opt/kms-certs/client.pem - CA cert:
/opt/kms-certs/ca.pem
- Client cert:
- Eviden KMS endpoint:
- Key Vault Namespace:
- Database:
encryption - Collection:
__keyVault
- Database:
- Schema Target Collection (example):
- Database:
medical - Collection:
patients
- Database:
- Alternative Key Name (for the DEK):
yourSecretKeyAlias
Step-by-Step Guide
⚠️ This tutorial was done in a DB test environment with an external Eviden KMS.
1. Define environment variable
Ensure that the path to the crypt shared library is defined:
export CRYPT_SHARED_LIB_PATH=/opt/mongo_crypt_shared/mongo_crypt_v1.so
2. Clean up existing DEKs (optional)
from pymongo import MongoClient
client = MongoClient("mongodb://localhost:27017")
client["encryption"]["__keyVault"].delete_many({"keyAltNames": ["yourSecretKeyAlias"]})
3. Generate a new DEK manually
from pymongo.encryption import ClientEncryption
from pymongo import MongoClient
from bson.codec_options import CodecOptions
kms_providers = {
"kmip": {
"endpoint": "your-cosmian_kms-server:port"
}
}
tls_options = {
"kmip": {
"tlsCertificateKeyFile": "/opt/kms-certs/client.pem",
"tlsCAFile": "/opt/kms-certs/ca.pem"
}
}
client = MongoClient("mongodb://localhost:27017")
client_encryption = ClientEncryption(
kms_providers=kms_providers,
key_vault_namespace="encryption.__keyVault",
key_vault_client=client,
codec_options=CodecOptions(),
kms_tls_options=tls_options
)
data_key_id = client_encryption.create_data_key("kmip", key_alt_names=["yourSecretKeyAlias"])
print(f"Created DEK with ID: {data_key_id}")
4. Define your encryption schema
schema_map = {
"medical.patients": {
"bsonType": "object",
"properties": {
"ssn": {
"encrypt": {
"keyId": [data_key_id],
"bsonType": "string",
"algorithm": "AEAD_AES_256_CBC_HMAC_SHA_512-Deterministic"
}
}
}
}
}
5. Create the encrypted MongoClient
from pymongo.encryption_options import AutoEncryptionOpts
auto_encryption_opts = AutoEncryptionOpts(
kms_providers=kms_providers,
key_vault_namespace="encryption.__keyVault",
schema_map=schema_map,
kms_tls_options=tls_options,
crypt_shared_lib_path=CRYPT_SHARED_LIB_PATH
)
secure_client = MongoClient("mongodb://localhost:27017", auto_encryption_opts=auto_encryption_opts)
6. Insert encrypted data
db = secure_client["medical"]
collection = db["patients"]
collection.drop()
collection.insert_one({
"nom": "Doe",
"ssn": "123-45-6789"
})
print("Encrypted document inserted.")
Notes
- Replace
your-cosmian_kms-server:portwith your KMIP endpoint (e.g.cosmian-kms.example.com:5696). - Replace certificate paths if different.
- The
ssnfield will be transparently encrypted on insert, and decrypted on read. - This setup requires MongoDB Enterprise, as CSFLE is not supported in the Community Edition.
Reading Encrypted Data with MongoDB CSFLE (Client-Side Field Level Encryption)
Step-by-Step Guide
This guide walks you through reading encrypted documents stored in MongoDB using automatic decryption with the CSFLE feature.
1. Set the Shared Crypt Library Path
Make sure the environment variable is set to the location of your shared crypt library:
export CRYPT_SHARED_LIB_PATH=/opt/mongo_crypt_shared/mongo_crypt_v1.so
2. (Optional) Read Raw Encrypted Documents
You can view the encrypted form of the documents using a regular (non-CSFLE-enabled) MongoDB client:
from pymongo import MongoClient
client = MongoClient("mongodb://localhost:27017")
print("🔒 Raw encrypted documents:")
for doc in client.medical.patients.find():
print(doc)
3. Define KMS Provider Configuration
kms_providers = {
"kmip": {
"endpoint": "your-cosmian_kms-server:port"
}
}
tls_options = {
"kmip": {
"tlsCertificateKeyFile": "/opt/kms-certs/client.pem",
"tlsCAFile": "/opt/kms-certs/ca.pem"
}
}
4. Configure AutoEncryptionOpts
This will enable automatic decryption using the shared library:
import os
from pymongo.encryption_options import AutoEncryptionOpts
CRYPT_SHARED_LIB_PATH = os.getenv("CRYPT_SHARED_LIB_PATH", "/opt/mongo_crypt_shared/mongo_crypt_v1.so")
auto_encryption_opts = AutoEncryptionOpts(
kms_providers=kms_providers,
key_vault_namespace="encryption.__keyVault",
kms_tls_options=tls_options,
crypt_shared_lib_path=CRYPT_SHARED_LIB_PATH
)
5. Create a Secure Client with CSFLE Enabled
from pymongo import MongoClient
secure_client = MongoClient(
"mongodb://localhost:27017",
auto_encryption_opts=auto_encryption_opts
)
6. Read Decrypted Documents
secure_db = secure_client["medical"]
secure_coll = secure_db["patients"]
print("🔓 Automatically decrypted documents:")
for doc in secure_coll.find():
print(doc)
Result
Encrypted fields will be automatically decrypted in the returned documents, provided the proper key is stored in your key vault and accessible via the configured Eviden KMS.
Additional Notes
- Make sure the key vault namespace (
encryption.__keyVault) matches the namespace used during encryption. - This method works only with MongoDB Enterprise or MongoDB Atlas with CSFLE support.
MySQL Enterprise 8.4 + Eviden KMS Integration
Executive Summary
This document provides a comprehensive guide for integrating MySQL Enterprise with Eviden Key Management System (KMS) using the keyring_okv plugin for Transparent Data Encryption (TDE). This lab demonstrates secure key management and data encryption at rest in a controlled environment.
Version Requirements
Minimum Versions for TDE with keyring_okv
| Component | Minimum Version | Notes |
|---|---|---|
| MySQL Enterprise | 8.0+ | keyring_okv plugin available in Enterprise Edition |
| Eviden KMS | 5.14+ | Full KMIP 1.1 compatibility |
| KMIP Protocol | 1.1 | Standard protocol version supported by keyring_okv |
| OpenSSL | 3.0+ | For TLS 1.3 and mTLS certificate support |
Note: This lab uses MySQL 8.4.7 and Eviden KMS 5.14+ which are the stable, production-ready versions recommended for new deployments.
Technical Specifications
System Requirements
| Component | Version | Specification |
|---|---|---|
| MySQL Enterprise Server | 8.4.7-commercial | Generic Linux x86_64 binary (glibc 2.28) |
| Eviden KMS | 5.14+ | KMIP 1.1 server with socket support |
| Operating System | Ubuntu 24.04 LTS (Noble) | Debian 10+, RHEL 8+, or any modern Linux (x86_64) |
| OpenSSL | 3.6.2 (+ 3.1.2 FIPS provider) | For TLS/mTLS communication |
| Network | Dedicated subnet | Low-latency, isolated lab network |
Network Architecture
flowchart LR
subgraph network["Isolated Lab Network"]
kms["Eviden KMS v5.14+<br/>HTTP: 9998 (HTTPS)<br/>KMIP: 5696 (TLS)<br/>DB: SQLite"]
mysql["MySQL Enterprise v8.4.7<br/>Port 3306 (MySQL)<br/>KMIP via TLS<br/>keyring_okv plugin"]
kms <-->|"KMIP 1.1 over TLS 1.3"| mysql
end
Key Management Flow
flowchart TB
innodb["MySQL InnoDB"]
tek["Generates encryption key (TEK)"]
okv["keyring_okv plugin (MySQL 8.0+)"]
kms["Eviden KMS v5.14+<br/>(Port 5696)"]
db["SQLite Database (persistent)"]
innodb --> tek
tek --> okv
okv -->|"Connects via KMIP (TLS)"| kms
kms -->|"Stores / retrieves master key"| db
Architecture Overview
Component Roles
Eviden KMS (v5.14+):
- Acts as external Key Management System
- Manages encryption keys for MySQL
- Provides KMIP 1.1 protocol support
- Stores keys in persistent SQLite database
- Enforces mutual TLS (mTLS) authentication with client certificates
- Independent of MySQL lifecycle
MySQL Enterprise (v8.0.13+, ideally 8.4+):
- Runs
keyring_okvplugin as KMIP client - Generates and manages Transparent Data Encryption (TDE) keys
- Encrypts table data at rest using master key from KMS
- Communicates with KMS via secure KMIP protocol
- Does NOT store master keys locally (security by design)
- Maintains in-memory cache during uptime for performance
Security Model
- Authentication: Mutual TLS (mTLS) with X.509 certificates
- Encryption: AES-256 for data, TLS 1.3 for transport
- Key Storage: Centralized in Eviden KMS (never persisted on MySQL filesystem)
- Key Access: Only via authenticated KMIP protocol over TLS
- Cache Invalidation: Automatic on KMS unavailability
Prerequisites
Hardware Requirements
- Eviden KMS Server: 1 vCPU, 2 GB RAM, 10 GB storage
- MySQL Enterprise Server: 2 vCPU, 4 GB RAM, 20 GB storage
- Network: Low-latency connection (<10 ms ping recommended)
Software Requirements
On Eviden KMS Host (v5.14+):
- Ubuntu 20.04+, | RHEL 8+ | or equivalent
- Ope | x86_64 architecturenSSL 3.0+
- Rust toolchain (if building from source)
On MySQL Enterprise Host (v8.0.13+, v8.4.7+ recommended):
- Ubuntu 24.04 LTS
- libaio1t64 (or libaio compatibility layer)
- libncurses-dev or libncurses6
- xz-utils
- OpenSSL 3.0+
Certificates and Keys (PKI)
For mutual TLS authentication:
- CA certificate (
ca.crt) - CA private key (
ca.key) - for signing - Server certificate with key (
kms.p12or separate files) - Client certificate for MySQL (
mysql-client.crt) - Client private key for MySQL (
mysql-client.key)
Installation and Configuration
Step 1: Prepare Eviden KMS (v5.14+)
1.1 Deploy Eviden KMS Server
Choose your Linux distribution and refer to installation guide
Verify the installed version and configuration file location:
cosmian_kms --version
cat /etc/cosmian/kms.toml
1.2 Configure KMS TOML File
Edit kms.toml:
default_username = "admin"
force_default_username = true
[logging]
otlp = "" # Disabled for lab
enable_metering = false
rust_log = "info,cosmian_kms=debug"
## rolling_log_dir = "path_to_logging_directory"
## rolling_log_dir = "path_to_logging_directory"
[tls]
tls_p12_file = "scripts/certifs/kms.p12"
tls_p12_password = "YOURTLSPASSWORD"
clients_ca_cert_file = "scripts/certifs/ca.crt"
[socket_server]
socket_server_start = true
socket_server_port = 5696
socket_server_hostname = "0.0.0.0"
[http]
port = 9998
hostname = "0.0.0.0"
[ui_config]
ui_index_html_folder = "/usr/local/cosmian/ui/dist"
kms_public_url = "https://localhost:9998"
[db]
database-type="mysql"
database-url="mysql://kms_user:kms_password@mysql-server:3306/kms"
Key Configuration Notes:
clients_ca_cert_fileis required for mTLS validationsocket_server_port5696 is standard KMIP port- Ensure database path is on persistent storage
1.3 Start Eviden KMS (v5.14+)
export COSMIAN_KMS_CONF=/path/to/kms.toml
RUST_LOG=INFO ./cosmian_kms > /tmp/kms.log 2>&1 &
# Verify listening ports
ss -lntp | grep cosmian_kms
# Expected output:
# LISTEN ... :5696 ... cosmian_kms (KMIP socket)
# LISTEN ... :9998 ... cosmian_kms (HTTP API)
Step 2: Prepare MySQL Enterprise Host (v8.0.13+, v8.4.7+ recommended)
2.1 Install Prerequisites
# On MySQL host
sudo apt update
sudo apt install -y libaio1t64 libncurses-dev xz-utils openssl
# Create libaio compatibility symlink for Ubuntu 24.04
sudo ln -s /usr/lib/x86_64-linux-gnu/libaio.so.1t64 \
/usr/lib/x86_64-linux-gnu/libaio.so.1
2.2 Extract MySQL Enterprise Binary (v8.0.13+)
cd /usr/local
# For MySQL 8.4.7:
sudo tar xvf /tmp/mysql-commercial-8.4.7-linux-glibc2.28-x86_64.tar.xz
# Or for MySQL 8.0.x (8.0.13+):
# sudo tar xvf /tmp/mysql-commercial-8.0.xx-linux-glibc2.28-x86_64.tar.xz
sudo ln -sf mysql-commercial-8.4.7-linux-glibc2.28-x86_64 mysql
sudo chown -R mysql:mysql /usr/local/mysql*
2.3 Create MySQL System User and Directories
sudo groupadd mysql 2>/dev/null || true
sudo useradd -r -g mysql -s /bin/false mysql 2>/dev/null || true
sudo mkdir -p /var/lib/mysql-data /var/log/mysql /var/run/mysqld
sudo chown -R mysql:mysql /var/lib/mysql-data /var/log/mysql /var/run/mysqld
2.4 Initialize MySQL Data Directory
cd /usr/local/mysql
sudo -u mysql ./bin/mysqld \
--initialize \
--user=mysql \
--datadir=/var/lib/mysql-data \
--log-error=/var/log/mysql/mysqld.log
# Capture temporary root password
grep "temporary password" /var/log/mysql/mysqld.log
# Save this password for next step
Step 3: Configure KMIP Client Certificates
3.1 Generate MySQL Client Certificate
# On a machine with CA key access
cd /path/to/pki
# Generate MySQL client private key
openssl genrsa -out mysql-client.key 4096
# Create Certificate Signing Request
openssl req -new \
-key mysql-client.key \
-out mysql-client.csr \
-subj "/CN=mysql-kmip-client/O=Lab/C=FR"
# Sign with CA
openssl x509 -req \
-in mysql-client.csr \
-CA ca.crt \
-CAkey ca.key \
-CAcreateserial \
-out mysql-client.crt \
-days 365 \
-sha256
# Resulting files:
# - mysql-client.crt (client certificate)
# - mysql-client.key (client private key)
# - ca.crt (CA certificate - already existing)
3.2 Copy Certificates to MySQL Host
# From PKI machine to MySQL host
scp mysql-client.crt mysql-client.key ca.crt \
user@mysql-host:/tmp/
# On MySQL host
sudo mkdir -p /usr/local/mysql/mysql-keyring-okv/ssl
sudo cp /tmp/mysql-client.crt /usr/local/mysql/mysql-keyring-okv/ssl/cert.pem
sudo cp /tmp/mysql-client.key /usr/local/mysql/mysql-keyring-okv/ssl/key.pem
sudo cp /tmp/ca.crt /usr/local/mysql/mysql-keyring-okv/ssl/CA.pem
# Set proper permissions
sudo chown -R mysql:mysql /usr/local/mysql/mysql-keyring-okv/ssl
sudo chmod 600 /usr/local/mysql/mysql-keyring-okv/ssl/key.pem
sudo chmod 644 /usr/local/mysql/mysql-keyring-okv/ssl/cert.pem
sudo chmod 644 /usr/local/mysql/mysql-keyring-okv/ssl/CA.pem
Step 4: Configure keyring_okv Plugin (MySQL 8.0+)
4.1 Create okvclient.ora Configuration File
# On MySQL host
sudo tee /usr/local/mysql/mysql-keyring-okv/okvclient.ora > /dev/null <<'EOF'
SERVER=<kms-host>:5696
SSL_DIR=/usr/local/mysql/mysql-keyring-okv/ssl
SSL_CERT=cert.pem
SSL_KEY=key.pem
SSL_CA=CA.pem
EOF
sudo chown mysql:mysql /usr/local/mysql/mysql-keyring-okv/okvclient.ora
sudo chmod 600 /usr/local/mysql/mysql-keyring-okv/okvclient.ora
Configuration Notes:
- Replace
<kms-host>with actual KMS hostname/IP - Port 5696 is standard KMIP port
- SSL_DIR must point to directory containing cert, key, and CA
4.2 Create MySQL Configuration File (v8.0+)
# Create /etc/my.cnf
sudo tee /etc/my.cnf > /dev/null <<'EOF'
[mysqld]
user=mysql
basedir=/usr/local/mysql
datadir=/var/lib/mysql-data
socket=/var/run/mysqld/mysqld.sock
log-error=/var/log/mysql/mysqld.log
pid-file=/var/run/mysqld/mysqld.pid
port=3306
# KMIP Keyring Plugin (MUST load early, before InnoDB)
# Available in MySQL 8.0 Enterprise Edition
early-plugin-load=keyring_okv.so
keyring_okv_conf_dir=/usr/local/mysql/mysql-keyring-okv
# Optional: Enable TDE by default for new tables (MySQL 8.0.16+)
default_table_encryption=ON
EOF
Critical Configuration Points:
early-plugin-loadmust be set before InnoDB initializationkeyring_okv_conf_dirmust point to directory withokvclient.ora- Plugin must be loaded before any encrypted tables are accessed
- Requires MySQL 8.0 Enterprise Edition
default_table_encryptionrequires MySQL 8.0.16+
4.3 Set MySQL Root Password
# Start MySQL
sudo -u mysql /usr/local/mysql/bin/mysqld \
--datadir=/var/lib/mysql-data \
--log-error=/var/log/mysql/mysqld.log \
--socket=/var/run/mysqld/mysqld.sock &
sleep 5
# Connect with temporary password (from step 2.4)
/usr/local/mysql/bin/mysql -u root -p \
--socket=/var/run/mysqld/mysqld.sock
# Enter temporary password when prompted
# Inside MySQL:
ALTER USER 'root'@'localhost' IDENTIFIED BY 'NewSecurePassword123!';
FLUSH PRIVILEGES;
EXIT;
# Stop MySQL
sudo systemctl stop mysqld
sleep 3
Step 5: Start MySQL with KMS Integration
# Clean up any residual lock files
sudo rm -f /var/lib/mysql-data/*.lock
sudo rm -f /var/run/mysqld/mysqld.lock
# Start MySQL with configuration file
sudo -u mysql /usr/local/mysql/bin/mysqld \
--defaults-file=/etc/my.cnf &
sleep 5
# Verify running
ps aux | grep mysqld | grep -v grep
Capabilities and Features
Transparent Data Encryption (TDE)
Master Key Rotation
-- Rotate the master encryption key (generates new key in KMS)
ALTER INSTANCE ROTATE INNODB MASTER KEY;
Note: Rotation takes ~0.5 seconds; existing data remains accessible
Create Encrypted Tables
CREATE TABLE sensitive_data (
id INT PRIMARY KEY,
credit_card VARCHAR(20),
ssn VARCHAR(11)
) ENCRYPTION='Y';
Encrypt Existing Tables
-- Enable encryption on an unencrypted table
ALTER TABLE existing_table ENCRYPTION='Y';
Per-Tablespace Encryption (MySQL 8.0.13+)
-- Create a general tablespace with encryption (MySQL 8.0.13+)
-- All tables created in this tablespace will be encrypted
CREATE TABLESPACE ts_encrypted ADD DATAFILE 'ts_encrypted.ibd' ENCRYPTION='Y';
-- Create a table in the encrypted tablespace
CREATE TABLE secure_table (id INT PRIMARY KEY) TABLESPACE=ts_encrypted;
-- secure_table is automatically encrypted (inherits from tablespace)
-- OR encrypt an existing tablespace (MySQL 8.0.13+)
-- This affects all tables within the tablespace
ALTER TABLESPACE ts_existing ENCRYPTION='Y';
Key Management Verification
-- Check keyring plugin status
SELECT PLUGIN_NAME, PLUGIN_STATUS
FROM INFORMATION_SCHEMA.PLUGINS
WHERE PLUGIN_NAME = 'keyring_okv';
-- Verify encryption on table
SELECT * FROM INFORMATION_SCHEMA.INNODB_TABLESPACES
WHERE NAME = 'database/table_name';
-- Verify table definition
SHOW CREATE TABLE table_name\G
Data At Rest Verification
# Verify data is encrypted in file (no plaintext strings)
strings /var/lib/mysql-data/database/table_name.ibd | \
grep -i "sensitive_keyword" || \
echo "✓ No plaintext data found (encryption OK)"
Key Storage Architecture
- Master Key: Stored only in Eviden KMS database
- Tablespace Keys (TEK): Encrypted with master key, stored in InnoDB
- Cache: Kept in MySQL memory during runtime for performance
- Persistence: Survives MySQL restart (key retrieved from KMS)
- Security Boundary: Cache invalidated if KMS unreachable at startup
Limitations
- Single Master Key: One master encryption key per MySQL instance
- Network Dependency: KMS unavailability blocks new MySQL starts
- Cache Behavior: Data accessible from cache until MySQL restart
- No Local Fallback: Encrypted data inaccessible without KMS access at startup
- Version Requirements: Requires MySQL Enterprise 8.0+ with keyring_okv support
Testing and Validation
Test 1: Verify Plugin is Active
/usr/local/mysql/bin/mysql -u root -pYourPassword \
--socket=/var/run/mysqld/mysqld.sock <<'EOF'
SELECT PLUGIN_NAME, PLUGIN_STATUS
FROM INFORMATION_SCHEMA.PLUGINS
WHERE PLUGIN_NAME = 'keyring_okv';
EOF
Expected Output:
| keyring_okv | ACTIVE |
Pass Criteria: Plugin status is ACTIVE
Test 2: Create Encrypted Table and Verify Encryption
/usr/local/mysql/bin/mysql -u root -pYourPassword \
--socket=/var/run/mysqld/mysqld.sock <<'EOF'
-- Create encrypted table
CREATE TABLE mysql.test_tde (
id INT PRIMARY KEY,
secret VARCHAR(255)
) ENCRYPTION='Y';
-- Insert test data
INSERT INTO mysql.test_tde (id, secret) VALUES
(1, 'Sensitive-Data-001'),
(2, 'Sensitive-Data-002');
-- Retrieve data
SELECT * FROM mysql.test_tde;
-- Verify encryption setting
SELECT * FROM INFORMATION_SCHEMA.INNODB_TABLESPACES
WHERE NAME = 'mysql/test_tde';
EOF
Expected Output:
| ENCRYPTION: Y |
| STATE: normal |
Pass Criteria:
- Table created successfully
- Data inserted and retrieved
- ENCRYPTION field shows 'Y'
Test 3: Verify Data Encryption at Rest
# Verify no plaintext in datafile
strings /var/lib/mysql-data/mysql/test_tde.ibd | \
grep -i "Sensitive-Data" || \
echo "✓ No plaintext detected (encryption confirmed)"
Pass Criteria: No plaintext keywords found in binary file
Test 4: Convert Unencrypted Table to Encrypted
# Create a non-encrypted table with data
/usr/local/mysql/bin/mysql -u root -pYourPassword \
--socket=/var/run/mysqld/mysqld.sock <<'EOF'
CREATE TABLE mysql.test_unencrypted (
id INT PRIMARY KEY,
secret VARCHAR(255)
) ENCRYPTION='N';
-- Insert test data
INSERT INTO mysql.test_unencrypted (id, secret) VALUES
(1, 'Plaintext-Data-001'),
(2, 'Plaintext-Data-002'),
(3, 'Plaintext-Data-003');
-- Verify plaintext is visible in file (for reference)
SELECT * FROM mysql.test_unencrypted;
EOF
# Verify plaintext exists before encryption
strings /var/lib/mysql-data/mysql/test_unencrypted.ibd | \
grep -i "Plaintext-Data" && echo "✓ Plaintext found (expected)"
# Now convert to encrypted
/usr/local/mysql/bin/mysql -u root -pYourPassword \
--socket=/var/run/mysqld/mysqld.sock <<'EOF'
-- Convert table to encrypted (uses ALGORITHM=COPY internally)
ALTER TABLE mysql.test_unencrypted ENCRYPTION='Y';
-- Verify encryption is now active
SELECT * FROM INFORMATION_SCHEMA.INNODB_TABLESPACES
WHERE NAME = 'mysql/test_unencrypted';
-- Verify data is still accessible
SELECT * FROM mysql.test_unencrypted;
EOF
# Verify plaintext is now gone
strings /var/lib/mysql-data/mysql/test_unencrypted.ibd | \
grep -i "Plaintext-Data" || \
echo "✓ No plaintext found (encryption successful)"
# Restart MySQL to verify persistence
sudo systemctl stop mysqld
sleep 3
sudo -u mysql /usr/local/mysql/bin/mysqld \
--defaults-file=/etc/my.cnf &
sleep 5
# Verify data survives restart
/usr/local/mysql/bin/mysql -u root -pYourPassword \
--socket=/var/run/mysqld/mysqld.sock \
-e "SELECT * FROM mysql.test_unencrypted;"
Pass Criteria:
- Table encryption conversion succeeds
- Data remains accessible before and after conversion
- Plaintext data encrypted at rest
- Data persists after MySQL restart
Test 5: Master Key Rotation
/usr/local/mysql/bin/mysql -u root -pYourPassword \
--socket=/var/run/mysqld/mysqld.sock <<'EOF'
-- Rotate the master key
ALTER INSTANCE ROTATE INNODB MASTER KEY;
-- Verify table still accessible after rotation
SELECT COUNT(*) FROM mysql.test_tde;
-- Confirm data integrity
SELECT * FROM mysql.test_tde;
EOF
Expected Output:
Query OK, 0 rows affected (0.58 sec)
Pass Criteria:
- Key rotation succeeds
- Data remains accessible and intact
Test 6: Data Persistence After MySQL Restart
# Insert marker data
/usr/local/mysql/bin/mysql -u root -pYourPassword \
--socket=/var/run/mysqld/mysqld.sock <<'EOF'
INSERT INTO mysql.test_tde (id, secret) VALUES (999, 'Persistence-Check');
SELECT COUNT(*) as row_count FROM mysql.test_tde;
EOF
# Restart MySQL
sudo systemctl stop mysqld
sleep 3
sudo -u mysql /usr/local/mysql/bin/mysqld \
--defaults-file=/etc/my.cnf &
sleep 5
# Verify data survived
/usr/local/mysql/bin/mysql -u root -pYourPassword \
--socket=/var/run/mysqld/mysqld.sock <<'EOF'
SELECT * FROM mysql.test_tde WHERE id = 999;
SELECT COUNT(*) as rows_after_restart FROM mysql.test_tde;
EOF
Expected Output:
| id | secret |
|-----|--------------------|
| 999 | Persistence-Check |
rows_after_restart: (same as before restart)
Pass Criteria:
- Data persists after MySQL restart
- Master key successfully retrieved from KMS
- Row count unchanged
Test 7: TLS Communication Verification
# Test direct TLS connection to KMS KMIP endpoint
timeout 5 openssl s_client -connect <kms-host>:5696 \
-cert /usr/local/mysql/mysql-keyring-okv/ssl/cert.pem \
-key /usr/local/mysql/mysql-keyring-okv/ssl/key.pem \
-CAfile /usr/local/mysql/mysql-keyring-okv/ssl/CA.pem \
< /dev/null 2>&1 | grep "Verify return code"
Expected Output:
Verify return code: 0 (ok)
Pass Criteria: TLS handshake succeeds with valid certificates
Advanced Resilience Testing
Resilience Test 1: KMS Unavailability with MySQL Running
Scenario: Brief KMS outage while MySQL is operational
# Step 1: Verify data accessible (KMS running)
/usr/local/mysql/bin/mysql -u root -pYourPassword \
--socket=/var/run/mysqld/mysqld.sock \
-e "SELECT COUNT(*) FROM mysql.test_tde;"
# Step 2: Stop KMS
systemctl stop cosmian_kms
# Step 3: Verify data still accessible (from cache)
/usr/local/mysql/bin/mysql -u root -pYourPassword \
--socket=/var/run/mysqld/mysqld.sock \
-e "SELECT COUNT(*) FROM mysql.test_tde;"
# ✓ Data accessible (master key in MySQL memory cache)
# Step 4: Restart KMS
systemctl start cosmian_kms
# Step 5: Verify access continues
/usr/local/mysql/bin/mysql -u root -pYourPassword \
--socket=/var/run/mysqld/mysqld.sock \
-e "SELECT * FROM mysql.test_tde LIMIT 1;"
Results:
✓ Data accessible while KMS down (cache hit)
✓ Data accessible after KMS restart
✓ No service interruption during brief outage
Resilience Test 2: KMS Unavailability with MySQL Restart
Scenario: KMS down when MySQL starts (critical test)
# Step 1: Verify KMS is stopped
ps aux | grep cosmian_kms | grep -v grep
# (should return nothing)
# Step 2: Restart MySQL (KMS OFFLINE)
sudo systemctl stop mysqld
sleep 3
sudo -u mysql /usr/local/mysql/bin/mysqld \
--defaults-file=/etc/my.cnf &
sleep 5
# Step 3: Try to access encrypted data
/usr/local/mysql/bin/mysql -u root -pYourPassword \
--socket=/var/run/mysqld/mysqld.sock \
-e "SELECT * FROM mysql.test_tde;" 2>&1
Expected Error:
ERROR 3185 (HY000): Can't find master key from keyring,
please check in the server log if a keyring is loaded and initialized successfully.
Result:
✓ Security working correctly
✓ Encrypted data inaccessible without KMS
✓ MySQL started but cannot decrypt
Resilience Test 3: Recovery After KMS Outage + Restart
Scenario: Full recovery workflow after KMS was offline
# Step 1: KMS is still down, MySQL started with error above
# Step 2: Start KMS (v5.14+)
systemctl start cosmian_kms
# Step 3: MySQL still cannot access (cache was invalidated)
/usr/local/mysql/bin/mysql -u root -pYourPassword \
--socket=/var/run/mysqld/mysqld.sock \
-e "SELECT * FROM mysql.test_tde;" 2>&1
# Still ERROR 3185
# Step 4: Restart MySQL to reconnect to KMS
sudo systemctl stop mysqld
sleep 3
sudo -u mysql /usr/local/mysql/bin/mysqld \
--defaults-file=/etc/my.cnf &
sleep 5
# Step 5: Data now accessible
/usr/local/mysql/bin/mysql -u root -pYourPassword \
--socket=/var/run/mysqld/mysqld.sock \
-e "SELECT * FROM mysql.test_tde;"
Results:
✓ KMS restart does NOT automatically recover cached state
✓ MySQL restart required to re-establish KMS connection
✓ Data fully recoverable with proper startup order
Lessons Learned:
- Keep KMS and MySQL in sync (start/stop in order)
- Monitor KMS availability separately
- Set up automated alerts for KMS downtime
TDE Benchmark Report (1,000,000 rows)
Execution Times
| Operation | Encrypted Table (TDE) | Non-Encrypted Table | TDE Overhead |
|---|---|---|---|
| Bulk INSERT | 12.11 s | 11.05 s | +9% |
| Full scan SELECT (cold cache) | 2.06 s | 1.41 s | +47% |
| Full scan SELECT (warm cache) | 2.26 s | 1.46 s | +55% |
| Lookup SELECT (PK, warm) | 0.018 s | 0.015 s | ≈ 0% |
Performance by Workload Type
| Workload Type | TDE Impact | Comments |
|---|---|---|
| OLTP (INSERT / PK lookup) | 🟢 Low | Overhead negligible in production |
| Sequential scan | 🟠 Moderate | Crypto cost visible, especially with warm cache |
| Analytical (aggregations) | 🔴 Higher | CPU-bound, plan for extra CPU resources |
Troubleshooting
Issue: "Can't find master key from keyring"
Symptom:
ERROR 3185 (HY000): Can't find master key from keyring,
please check in the server log if a keyring is loaded and initialized successfully.
Root Causes:
- Eviden KMS (v5.14+) is not running or unreachable
- Network connectivity issue between MySQL and KMS
- Certificate authentication failed
- Plugin failed to initialize
Solutions:
-
Verify Eviden KMS (v5.14+) is running:
ps aux | grep cosmian_kms | grep -v grep ss -lntp | grep 5696 -
Check network connectivity:
nc -zv <kms-host> 5696 ping <kms-host> -
Verify certificate validity:
openssl x509 -in /usr/local/mysql/mysql-keyring-okv/ssl/cert.pem -text -noout # Check NotBefore and NotAfter dates -
Check MySQL error log:
tail -n 100 /var/log/mysql/mysqld.log | grep -i "keyring\|error\|tls" -
Verify okvclient.ora configuration:
cat /usr/local/mysql/mysql-keyring-okv/okvclient.ora -
Verify MySQL Enterprise version has keyring_okv support:
/usr/local/mysql/bin/mysql --version # Must be MySQL 8.0 Enterprise Edition or higher
Issue: "Encryption information can't be decrypted"
Symptom:
ERROR 12226: Encryption information in datafile: ./mysql/test_tde.ibd
can't be decrypted
Causes:
- Table was created with a key that's no longer accessible
- Datafile corruption
- KMS unavailable during startup
Solutions:
-
If test/development data:
# Remove problematic datafile sudo mv /var/lib/mysql-data/mysql/test_tde.ibd \ /var/lib/mysql-data/mysql/test_tde.ibd.backup # Restart MySQL sudo systemctl stop mysqld sleep 3 sudo -u mysql /usr/local/mysql/bin/mysqld \ --defaults-file=/etc/my.cnf & # Drop table and recreate /usr/local/mysql/bin/mysql -u root -pYourPassword \ --socket=/var/run/mysqld/mysqld.sock \ -e "DROP TABLE mysql.test_tde;" -
If production data, investigate:
- Check KMS (v5.14+) availability during startup
- Verify master key is accessible
- Check certificate validity
- Review MySQL error logs
Issue: Certificate Expiry
Symptom:
SSL: CERTIFICATE_VERIFY_FAILED
Solution:
# Check certificate expiry
openssl x509 -in /usr/local/mysql/mysql-keyring-okv/ssl/cert.pem \
-noout -dates
# Generate new certificate before expiry
openssl genrsa -out mysql-client.key.new 4096
openssl req -new \
-key mysql-client.key.new \
-out mysql-client.csr.new \
-subj "/CN=mysql-kmip-client/O=Lab/C=FR"
openssl x509 -req \
-in mysql-client.csr.new \
-CA ca.crt \
-CAkey ca.key \
-CAcreateserial \
-out mysql-client.crt.new \
-days 365 \
-sha256
# Replace certificates (during maintenance window)
sudo cp mysql-client.crt.new \
/usr/local/mysql/mysql-keyring-okv/ssl/cert.pem
sudo cp mysql-client.key.new \
/usr/local/mysql/mysql-keyring-okv/ssl/key.pem
sudo chown mysql:mysql /usr/local/mysql/mysql-keyring-okv/ssl/cert.pem
sudo chown mysql:mysql /usr/local/mysql/mysql-keyring-okv/ssl/key.pem
sudo chmod 600 /usr/local/mysql/mysql-keyring-okv/ssl/key.pem
# Restart MySQL to use new certificates
sudo systemctl stop mysqld
sleep 3
sudo -u mysql /usr/local/mysql/bin/mysqld \
--defaults-file=/etc/my.cnf &
References
Official Documentation
- MySQL Enterprise Edition
- MySQL keyring_okv KMIP Plugin
- MySQL Transparent Data Encryption
- MySQL 8.0 Release Notes
- Eviden KMS Documentation
- KMIP Specification
Key Files and Paths
| Component | Path |
|---|---|
| MySQL Binary | /usr/local/mysql/bin/mysqld |
| MySQL Config | /etc/my.cnf |
| Data Directory | /var/lib/mysql-data/ |
| Error Log | /var/log/mysql/mysqld.log |
| Socket File | /var/run/mysqld/mysqld.sock |
| KMIP Config | /usr/local/mysql/mysql-keyring-okv/okvclient.ora |
| SSL Certificates | /usr/local/mysql/mysql-keyring-okv/ssl/ |
| Eviden Config | /path/to/kms.toml |
| Eviden DB | /path/to/cosmian-kms/sqlite-data/kms.db |
Default Credentials (Lab Only)
| User | Password | Scope |
|---|---|---|
| root (MySQL) | Set during installation | Local MySQL |
| admin (Eviden) | Configured in kms.toml | KMS REST API |
SECURITY NOTE: Change all default credentials before production use.
Contact and Support
For issues related to:
- MySQL Enterprise: Oracle MySQL Support
- Eviden KMS: Eviden GitHub Issues
Using pg_tde with Eviden KMS and PostgreSQL 17 (Percona)
This guide demonstrates how to configure PostgreSQL 17 with Percona's pg_tde extension to use Eviden KMS for transparent data encryption (TDE).
Overview
| Item | Details |
|---|---|
| Protocol | KMIP 1.4 over TCP/TLS with mutual certificate authentication |
| Port | 5696 (IANA-registered KMIP port) |
| Key type | AES-128 symmetric key |
| PostgreSQL version | Percona Server for PostgreSQL 17.x and above |
| Eviden KMS feature | Works with both FIPS and non-FIPS builds |
Prerequisites
Before starting, ensure you have:
- PostgreSQL 17 Percona Server for PostgreSQL 17.x or later
pg_tdeextension installed- Access to a running Eviden KMS server
- Appropriate SSL certificates for KMIP communication TLS 1.2+
Before You Start: Understanding pg_tde Architecture
Global Architecture Overview
flowchart TB
app["Application / SQL Queries<br/>(SELECT, INSERT, UPDATE, DELETE)"]
plain["Data in plaintext in memory"]
subgraph pg["PostgreSQL + pg_tde Extension + Percona Patches"]
smgr["SMGR (Storage Manager) — Interception Layer"]
tde["TDE Tables<br/>(USING tde_heap)"]
nontde["Non-TDE Tables<br/>(standard heap)"]
enc["Encryption of pages<br/>(CBC-128)"]
noenc["No encryption"]
walenc["Encryption (optional, WAL only)<br/>(CTR-128) WAL"]
smgr --> tde & nontde
tde --> enc
nontde --> noenc & walenc
end
disk["Disk (encrypted data)<br/>WAL Files (encrypted if pg_tde.wal_encrypt = on)"]
app --> plain --> smgr
enc --> disk
noenc --> disk
walenc --> disk
KMIP Communication Flow
flowchart TB
pg["PostgreSQL + pg_tde<br/>(KMIP Client)"]
kms["Eviden KMS 5.6+<br/>(KMIP Server)<br/><br/>Supported operations:<br/>✓ Create · Get · Destroy · Register<br/>✓ Locate · Activate · Revoke<br/><br/>Protocol: KMIP 1.x and 2.x<br/>Profile: Baseline Server"]
pg -->|"KMIP over TLS 1.2/1.3<br/>Port 5696 (binary)<br/>Required: client_cert.pem, client_key.pem, ca_cert.pem"| kms
Configuration Steps
1. Configure PostgreSQL
Edit your postgresql.conf file to activate the TDE extension:1
shared_preload_libraries = 'pg_tde,percona_pg_telemetry'
Important: Changes to shared_preload_libraries require a PostgreSQL restart to take effect.1
sudo systemctl restart postgresql@17-main.service
2. Enable TDE Extension
Create the pg_tde extension in your target database(s):1
CREATE EXTENSION pg_tde;
This will automatically create event triggers needed for pg_tde operation.
3. Configure the KMS Key Provider
Connect to your PostgreSQL database and add the Eviden KMS as a key provider using the KMIP protocol:1
SELECT pg_tde_add_global_key_provider_kmip(
'kms_provider', -- Provider name (can be customized)
'kms-host.example.com', -- Your KMS server hostname
5696, -- KMIP port (default is 5696)
'/path/to/client_cert.pem', -- Client certificate file path
'/path/to/client_key.pem', -- Client private key file path
'/path/to/ca_cert.pem' -- Certificate Authority file path
);
Note: Replace the placeholder values with your actual KMS server details and certificate paths.1
Certificate Requirements:2
- All certificates must be in PEM format
- Client certificates must be X.509 compliant
- TLS 1.2 or higher is required for KMIP communication
- Certificate files must be readable by the PostgreSQL system user
4. Set the Default Encryption Key
Configure the default encryption key using the KMS provider:1
SELECT pg_tde_create_key_using_global_key_provider('key_01', 'kms_provider');
SELECT pg_tde_set_server_key_using_global_key_provider('key_01', 'kms_provider');
SELECT pg_tde_set_default_key_using_global_key_provider('key_01', 'kms_provider');
The first parameter (key_01) is the key identifier, and the second parameter (kms_provider) must match the provider name from step 3.1
What happens in this step:
pg_tde_create_key_using_global_key_provider()creates a Principal Key managed by Eviden KMSpg_tde_set_server_key_using_global_key_provider()sets the server-level default keypg_tde_set_default_key_using_global_key_provider()sets the database-level default key
5. Ensure Event Triggers Are Set
Event triggers are usually created automatically when the extension is installed. To verify or recreate them:1
CREATE EVENT TRIGGER pg_tde_ddl_start ON ddl_command_start
EXECUTE FUNCTION pg_tde_ddl_command_start_capture();
CREATE EVENT TRIGGER pg_tde_ddl_end ON ddl_command_end
EXECUTE FUNCTION pg_tde_ddl_command_end_capture();
If the trigger already exists, this error can be safely ignored.1
These triggers ensure that DDL operations (table creation, modification) properly handle encryption metadata.
6. Enable WAL Encrypt and TDE Enforce Encryption
Edit your postgresql.conf again and add:1
pg_tde.wal_encrypt = on
pg_tde.enforce_encryption = on
Important: Changes to pg_tde.wal_encrypt or pg_tde.enforce_encryption require a PostgreSQL restart to take effect.1
sudo systemctl restart postgresql@17-main.service
About these parameters:1
pg_tde.wal_encrypt = onencrypts Write-Ahead Log files (production-ready as of Percona PostgreSQL 17.5.3)pg_tde.enforce_encryption = onprevents creation of unencrypted tables when a default key is set (strongly recommended)
7. Create Encrypted Tables
CREATE TABLE sensitive_data (
id serial PRIMARY KEY,
secret_text text
) USING tde_heap;
The USING tde_heap clause ensures the table is encrypted using pg_tde.1
Important: Only tables created with USING tde_heap are encrypted. Existing non-TDE tables remain unencrypted unless migrated.
8. Verify if a Table is Encrypted
SELECT pg_tde_is_encrypted('public.sensitive_data'::regclass);
-- Expected output: t (true)
9. Insert and Query Data Transparently
Encryption is transparent; use standard SQL commands:1
INSERT INTO sensitive_data (secret_text) VALUES ('Top secret info');
SELECT * FROM sensitive_data;
Data is stored encrypted on disk but returned in plaintext when queried.1
10. Check Current Encryption Settings
SHOW pg_tde.wal_encrypt;
SHOW pg_tde.enforce_encryption;
SHOW pg_tde.inherit_global_providers;
Encryption Scope and What Gets Encrypted
✅ WHAT IS ENCRYPTED
Application Data
| Component | Status | Details |
|---|---|---|
Tables USING tde_heap | ✓ Encrypted | Complete row data, all columns3 |
| Index on TDE tables | ✓ Encrypted | B-trees, Hash, GiST, GIN, BRIN, etc.3 |
| TOAST tables | ✓ Encrypted | Compressed/out-of-page data e.g. long TEXT |
| Sequences (TDE tables) | ✓ Encrypted | Related to encrypted tables3 |
| Temporary tables (TDE) | ✓ Encrypted | Temporary tables for TDE data operations3 |
Logs and Transactions
| Component | With pg_tde.wal_encrypt = on | Details |
|---|---|---|
| WAL (Write-Ahead Log) | ✓ Encrypted | Transaction logs GA status since v17.5.3 |
| WAL before images | ✓ Encrypted | Row states before modification4 |
| WAL after images | ✓ Encrypted | Row states after modification4 |
Backup and Recovery
| Tool | Status | Notes |
|---|---|---|
pg_tde_basebackup | ✓ Supported | With --wal-method=stream or --wal-method=none1 |
pgBackRest | ✓ Supported | Compatible with encrypted WAL4 |
| WAL restore | ✓ Supported | Via pg_tde_restore_encrypt wrapper1 |
❌ WHAT IS NOT ENCRYPTED
System Metadata and Catalogs
| Component | Reason | Consequence |
|---|---|---|
| PostgreSQL system catalogs | Architectural | Table/column names, types remain plaintext |
| TDE table metadata | Architectural | Schema, table name, column name, data types |
Statistics (pg_stat_*) | Not supported | System statistics information |
| Configuration files | Not encrypted | postgresql.conf, pg_hba.conf |
Tables and Files
| Component | Reason | Solution |
|---|---|---|
Standard heap tables | By design | Only tde_heap tables are encrypted |
| Non-TDE tables | Selective | Create with USING tde_heap for encryption |
| Temporary files (>work_mem) | Limitation | Overflow data unencrypted on disk[5] |
| System log files | Not supported | PostgreSQL logs in plaintext on disk |
Key Management: DEK, Internal Keys and Principal Keys
Two-Level Key Architecture
pg_tde uses a two-level key hierarchy for data encryption:3
flowchart TB
principal["PRINCIPAL KEY (Master Key)<br/><br/>Stored externally in Eviden KMS via KMIP<br/>ONE per database<br/>Encrypts Internal Keys (AES-128-GCM)<br/>Accessible only via TLS KMIP connection<br/><br/>Created with pg_tde_create_key_using_global_key_provider()"]
internal["INTERNAL KEYS (Data Encryption Keys / DEK)<br/><br/>Stored locally in $PGDATA/pg_tde/<br/>Encrypted by Principal Key<br/>ONE unique key per relation (OID)<br/><br/>Tables: AES-128-CBC · WAL: AES-128-CTR · Keys: AES-128-GCM"]
data["ENCRYPTED DATA (User Data)<br/><br/>Table pages stored encrypted on disk<br/>Index pages stored encrypted<br/>WAL data encrypted (if pg_tde.wal_encrypt = on)"]
principal -->|"Encrypts via KMIP wrap (AES-128-GCM)"| internal
internal -->|"Encrypt (AES-128-CBC / CTR)"| data
Internal Keys (DEK) Details
Generation and Storage
| Aspect | Detail |
|---|---|
| Generation | Automatic when CREATE TABLE ... USING tde_heap3 |
| Identifier | Unique OID (Object Identifier) per relation3 |
| Location | $PGDATA/pg_tde/<database_oid>/3 |
| File | <relation_oid>.key binary, encrypted |
| Visibility | Not readable directly without Principal Key3 |
| Rotation | Via VACUUM FULL, ALTER TABLE SET ACCESS METHOD, or CREATE TABLE AS SELECT3 |
Disk Structure Example
$PGDATA/pg_tde/
├── global/ # Global section
│ ├── provider_config # Global provider configuration
│ └── server_key.key # WAL server key (if enabled)
│
└── 16384/ # Database OID (example)
├── provider_config # Database provider configuration
├── 16385.key # Internal key for table OID=16385
├── 16386.key # Internal key for index OID=16386
├── 16387.key # Internal key for index OID=16387
├── 16388.key # Internal key for TOAST OID=16388
└── 16389.key # Internal key for sequence OID=16389
Security Considerations
| Aspect | Detail | Recommendation |
|---|---|---|
| File Permissions | Inherited from $PGDATA pg:pg 700 | ✓ Good, ensure root cannot read |
| Backup Protection | DEK files copied with backup remain encrypted | ✓ Safe for off-site storage |
| RAM Cache | Principal Key and DEKs decrypted in RAM3 | ⚠️ Protect with: lock_memory, disable core dumps |
| Swap Memory | Keys can be paged to swap3 | ⚠️ Use encrypted swap (dm-crypt, zswap) |
Recommended Protections
# 1. Disable core dumps
echo "kernel.core_pattern = /dev/null" >> /etc/sysctl.conf
sysctl -p
# 2. Encrypt swap (optional but recommended)
# Use dm-crypt or zswap
# 3. Lock PostgreSQL memory (optional but recommended)
ulimit -l unlimited
# or in postgresql.conf:
# lock_memory = true
# 4. Secure KMS certificates
sudo chmod 400 /path/to/client_cert.pem
sudo chmod 400 /path/to/client_key.pem
sudo chown postgres:postgres /path/to/*.pem
Key Monitoring
Verify Current Keys
-- Check server default Principal Key
SELECT pg_tde_server_key_info();
-- Result: (key_name, provider_name)
-- Check current database Principal Key
SELECT pg_tde_key_info();
-- Check default Principal Key (if used)
SELECT pg_tde_default_key_info();
-- List all configured providers
SELECT * FROM pg_tde_list_all_global_key_providers();
SELECT * FROM pg_tde_list_all_database_key_providers();
Verify KMS Connectivity
-- Test Principal Key availability
SELECT pg_tde_verify_key();
SELECT pg_tde_verify_server_key();
SELECT pg_tde_verify_default_key();
-- If these fail: Check PostgreSQL logs for KMIP errors
-- tail -f $PGDATA/log/postgresql.log | grep -i kmip
Verification and Testing
Initial Setup Verification
-- 1. Verify extension is loaded
SELECT * FROM pg_extension WHERE extname = 'pg_tde';
-- 2. Verify configuration parameters
SHOW shared_preload_libraries;
SHOW pg_tde.wal_encrypt;
SHOW pg_tde.enforce_encryption;
-- 3. Verify KMS provider is configured
SELECT * FROM pg_tde_list_all_global_key_providers();
-- 4. Verify keys are set
SELECT pg_tde_server_key_info();
SELECT pg_tde_default_key_info();
-- 5. Verify KMS connectivity
SELECT pg_tde_verify_key();
SELECT pg_tde_verify_server_key();
-- 6. Create test table
CREATE TABLE test_encrypted (
id serial PRIMARY KEY,
data text
) USING tde_heap;
-- 7. Verify it's encrypted
SELECT pg_tde_is_encrypted('public.test_encrypted'::regclass);
-- Expected output: t (true)
-- 8. Test data insertion and retrieval
INSERT INTO test_encrypted (data) VALUES ('Test data');
SELECT * FROM test_encrypted;
-- Data should be returned in plaintext
WAL Encryption Verification
-- Check if WAL encryption is enabled
SHOW pg_tde.wal_encrypt;
-- Verify encryption is active
SELECT pg_tde_is_wal_encrypted();
-- Check WAL files (encrypted WAL segments have standard naming)
SELECT name FROM pg_ls_waldir()
ORDER BY name DESC LIMIT 5;
Troubleshooting & Solutions
Common Issues and Diagnostic Flow
1. PostgreSQL Fails to Start
ERROR: could not load shared library "pg_tde"
or
ERROR: could not connect to KMIP server
Diagnostic steps:
# 1. Check if extension is compiled correctly
ls -la $PGINSTALL/lib/pg_tde.so
# 2. Check PostgreSQL logs
tail -f $PGDATA/log/postgresql.log
# 3. Verify KMS is reachable
telnet <kms-host> 5696
# 4. Check certificate paths
ls -la /path/to/*.pem
file /path/to/client_cert.pem
SQL Verification:
SELECT pg_tde_verify_key();
SELECT pg_tde_verify_server_key();
SELECT * FROM pg_tde_list_all_global_key_providers();
Solutions:
- Verify
shared_preload_librariescontainspg_tde - Restart PostgreSQL after configuration changes
- Ensure Eviden KMS is running:
telnet <kms-host> 5696 - Check firewall/network between PostgreSQL and KMS
2. TLS Certificate Verification Failed
ERROR: SSL/TLS certificate verification failed
DETAIL: certificate verify failed / self signed certificate
Diagnostic:
# Verify certificate details
openssl x509 -in /path/to/ca_cert.pem -text -noout
# Check certificate expiration
openssl x509 -in /path/to/client_cert.pem -noout -dates
# Verify certificate chain
openssl verify -CAfile /path/to/ca_cert.pem /path/to/client_cert.pem
# Test KMIP connection manually (if PyKMIP available)
python3 -m kmip.demos.client -b /path/to/client_cert.pem \
-k /path/to/client_key.pem \
-ca /path/to/ca_cert.pem \
--server <kms-host> --port 5696
Solutions:
- Verify certificate files exist and are readable:
ls -la /path/to/*.pem - Check certificate expiration dates
- Verify CA certificate chain is complete
- Ensure certificate paths in
pg_tde_add_global_key_provider_kmip()are correct
3. Key Not Found or Access Denied
ERROR: Failed to retrieve principal key 'key_01' from KMS provider 'kms_provider'
DETAIL: Key not found / Access denied
Diagnostic:
-- Verify KMS connectivity
SELECT pg_tde_verify_key();
SELECT pg_tde_verify_server_key();
-- Check configured keys
SELECT pg_tde_key_info();
SELECT pg_tde_server_key_info();
-- Check provider configuration
SELECT * FROM pg_tde_list_all_global_key_providers();
Solutions:
- Verify the key exists on Eviden KMS
- Verify the key name matches exactly (case-sensitive)
- Check KMS user/role has permissions to access the key
- Verify database OID if using database-level keys:
SELECT datoid FROM pg_database WHERE datname = current_database(); - Check
$PGDATA/pg_tde/directory permissions
4. Performance Degradation After Enabling TDE
Problem: Slower queries, high CPU usage
Diagnostic:
-- Check cache hit ratio
SELECT sum(heap_blks_read) / (sum(heap_blks_read) +
sum(heap_blks_hit)) AS cache_hit_ratio
FROM pg_stat_user_tables;
-- Check query plans
EXPLAIN ANALYZE SELECT * FROM sensitive_data LIMIT 1000;
Solutions:
-
Increase
shared_buffersto reduce disk I/O -
Check CPU supports AES-NI (hardware acceleration):
grep -o 'aes' /proc/cpuinfo | head -1 -
Monitor I/O performance with
iostat -x 1 -
Note: Percona reports ~10% overhead in most cases4
Certificate Management Best Practices
# 1. Organize certificate files
mkdir -p /etc/postgresql/kmip-certs
sudo cp /path/to/*.pem /etc/postgresql/kmip-certs/
sudo chmod 400 /etc/postgresql/kmip-certs/*.pem
sudo chown postgres:postgres /etc/postgresql/kmip-certs/
# 2. Set correct paths in pg_tde configuration
SELECT pg_tde_add_global_key_provider_kmip(
'kms_provider',
'kms-host.example.com',
5696,
'/etc/postgresql/kmip-certs/client_cert.pem',
'/etc/postgresql/kmip-certs/client_key.pem',
'/etc/postgresql/kmip-certs/ca_cert.pem'
);
# 3. Monitor certificate expiration
openssl x509 -in /etc/postgresql/kmip-certs/client_cert.pem -noout -dates | \
grep notAfter
# 4. Plan certificate rotation before expiration
# Test with new certificates before cutover
Operational Considerations
Migration from Non-TDE to TDE Tables
flowchart TB
start["Migration: non-TDE → TDE table"]
m1["Method 1: CREATE TABLE AS"]
m2["Method 2: ALTER TABLE"]
m1a["CREATE TABLE t_new USING tde_heap<br/>AS SELECT * FROM t_old"]
m2a["ALTER TABLE t_old<br/>SET ACCESS METHOD tde_heap"]
m1b["DROP TABLE t_old<br/>ALTER TABLE t_new RENAME TO t_old"]
m2b["Recreates index, constraints, foreign keys"]
done["✓ TDE table created (exclusive lock)"]
start --> m1 & m2
m1 --> m1a --> m1b --> done
m2 --> m2a --> m2b --> done
Impact:
- Exclusive lock on table during migration
- Complete data rewrite
- Time proportional to table size
- Disk usage x2 during operation
Recommendation: Perform during maintenance window on production systems.
Key Rotation
Principal Key Rotation
-- 1. Create new key on Eviden KMS
SELECT pg_tde_create_key_using_global_key_provider(
'key_02', 'kms_provider'
);
-- 2. Switch to new key
-- (Re-encrypts all internal keys)
SELECT pg_tde_set_default_key_using_global_key_provider(
'key_02', 'kms_provider'
);
-- 3. Verify rotation is complete
SELECT pg_tde_default_key_info();
-- 4. Old key can be archived/destroyed after verification
-- (Eviden KMS: key revoke/destroy operations)
Notes:
- Internal keys are re-encrypted (non-blocking operation)
- Old key retained for recovery purposes
- Does not re-encrypt user data (only wraps internal keys)
- Minimal performance impact
Internal Key Rotation (Existing Tables)
No direct in-place internal key rotation. Use one of these workarounds:
-- Method 1: VACUUM FULL (simpler but locks table)
VACUUM FULL sensitive_data;
-- Note: Table remains in memory during operation
-- Method 2: CREATE TABLE AS (more controlled)
CREATE TABLE sensitive_data_new USING tde_heap AS
SELECT * FROM sensitive_data;
-- Recreate indexes
CREATE INDEX idx_sensitive_data_id ON sensitive_data_new(id);
-- Swap tables
DROP TABLE sensitive_data;
ALTER TABLE sensitive_data_new RENAME TO sensitive_data;
-- Verify new encryption
SELECT pg_tde_is_encrypted('public.sensitive_data'::regclass);
Performance Comparison:
| Method | Lock Duration | Disk I/O | Downtime |
|---|---|---|---|
| VACUUM FULL | Full table | Low | Minimal |
| CREATE TABLE AS | Full table | High (copy all) | Moderate |
Backup and Recovery
Physical Backup with Encrypted WAL
# Full backup with streaming WAL
pg_tde_basebackup -D /path/to/backup \
--wal-method=stream \
-R \
-v
# Or with archived WAL (requires WAL archiving configured)
pg_tde_basebackup -D /path/to/backup \
--wal-method=none \
-R
# WAL archiving setup (in postgresql.conf)
archive_mode = on
archive_command = 'pg_tde_archive_decrypt %f %p | pgbackrest archive-push %p'
# WAL restore setup (in recovery.conf or postgresql.conf)
restore_command = 'pgbackrest archive-get %f %p'
Recovery Point Objective (RPO)
flowchart TB
base["pg_tde_basebackup (baseline)"]
wal["WAL segments (archived via archive_command)"]
pitr["Allows PITR up to last WAL segment"]
rpo["RPO = 1 WAL segment (16 MB by default)<br/>TO = Time to replay WAL"]
base --> wal --> pitr --> rpo
Failover and Standby Setup
Standby Configuration with Patroni
# patroni.yml for pg_tde with Eviden KMS
postgresql:
# Use pg_tde_rewind, NOT standard pg_rewind if WAL encrypted
pg_rewind: pg_tde_rewind
parameters:
shared_preload_libraries: pg_tde
pg_tde.wal_encrypt: on
pg_tde.enforce_encryption: on
# Archive settings
archive_mode: on
archive_command: "pg_tde_archive_decrypt %f %p | pgbackrest archive-push %p"
restore_command: "pgbackrest archive-get %f %p"
Failover Considerations
| Aspect | Impact | Solution |
|---|---|---|
| KMS Availability | Critical | Primary and standby must both access KMS |
| Certificates | Critical | Distribute certificates to all replicas |
| Principal Key | Critical | Key must be accessible during recovery |
| Encrypted WAL | High | Use pg_tde_rewind not standard pg_rewind[5] |
Important: If using encrypted WAL, pg_rewind is incompatible. Use pg_tde_rewind instead.[5]
Eviden KMS Compatibility
Supported features with pg_tde:2
- KMIP 1.x and 2.x protocols
- Baseline Server profile (fully compliant)
- AES-128-CBC, AES-128-CTR, AES-128-GCM algorithms
- Key creation, retrieval, destruction, rotation
- TLS 1.2+ for secure communication
Backup and Replication Tools Compatibility:
| Tool | With WAL Encryption | Notes |
|---|---|---|
| pg_tde_basebackup | ✓ Supported1 | Recommended tool |
| pgBackRest | ✓ Supported4 | Production-ready |
| Patroni | ✓ Supported4 | Use pg_tde_rewind |
| pg_rewind | ✗ Incompatible[5] | Use pg_tde_rewind instead |
| pg_createsubscriber | ✗ Incompatible[5] | Create subscriber manually |
| pg_receivewal | ✗ Incompatible[5] | Use pgBackRest or Patroni |
| Barman | ✗ Incompatible[5] | Use pgBackRest instead |
Ongoing Maintenance
-
Monitor KMS connectivity:
SELECT pg_tde_verify_key(); -
Plan key rotation:
- Principal keys: Via Eviden KMS management
- Internal keys: Via table recreation (VACUUM FULL or ALTER TABLE SET ACCESS METHOD)
-
Backup strategy:
- Use
pg_tde_basebackuporpgBackRest - Archive encrypted WAL files
- Test recovery procedures regularly
- Use
-
Certificate rotation:
- Plan before expiration
- Test with new certificates before cutover
References
- Percona pg_tde Documentation
- Eviden KMS KMIP Support
- Percona pg_tde Architecture
- Percona WAL Encryption Blog (2025-09-01)
- Percona pg_tde Limitations
Official Documentation Links
Microsoft SQL Server External (EKM)
Eviden KMS integrates with Microsoft SQL Server External key management using a Windows DLL implementing the SQL Server Extensible Key Management (EKM).
The Windows DLL is a SQL Server EKM provider that forwards key operations to the Eviden KMS over mutual TLS. This allows SQL Server features like column-level encryption and Transparent Data Encryption (TDE) to use keys managed by the Eviden KMS, without exposing key material to the SQL Server host.
The Windows DLL is available in a separate project on GitHub; pre-built signed DLLs are available for download.
Architecture & Workflow
The sequence diagram below shows how SQL Server interacts with the Cosmian EKM Provider DLL (cosmian_ekm_sql_server.dll), which forwards KMIP/REST operations over TLS to the Eviden KMS, persisting key state in the configured KMS database backend:
sequenceDiagram
autonumber
participant MSSQL as Microsoft SQL Server
participant EKM as EKM Provider DLL (cosmian_ekm_sql_server.dll)
participant KMS as Eviden KMS Server
participant DB as KMS Database Backend (PostgreSQL / MySQL / SQLite / Redis)
Note over MSSQL,EKM: Initialization & Authentication
MSSQL->>EKM: Open provider & authenticate credential (mapped KMS username)
EKM->>EKM: Load config.toml & client certificate
EKM-->>MSSQL: Provider ready
Note over MSSQL,DB: Asymmetric / Symmetric Key Provisioning
MSSQL->>EKM: CREATE ASYMMETRIC KEY ... FROM PROVIDER [CosmianEKM]
EKM->>KMS: POST /kmip (KMIP Create KeyPair / Key)
KMS->>DB: Store key pair & attributes in DB
DB-->>KMS: Key UID persisted
KMS-->>EKM: KMIP Response with key UID
EKM-->>MSSQL: Key handle returned to SQL Server
Note over MSSQL,DB: TDE / Column Encryption Key Operations
MSSQL->>EKM: Encrypt / Decrypt DEK using EKM Key
EKM->>KMS: POST /kmip (KMIP Encrypt / Decrypt Request)
KMS->>DB: Retrieve wrapping key via ObjectCache / DB
DB-->>KMS: Key material retrieved
KMS->>KMS: Perform crypto operation
KMS-->>EKM: KMIP Encrypt/Decrypt Response (ciphertext / unwrapped DEK)
EKM-->>MSSQL: Result returned to SQL Server Engine
Deployment Guide
This document explains how to install and configure the Cosmian EKM SQL Server provider, starting from a signed DLL. Follow the steps in order.
Prerequisites
| Requirement | Notes |
|---|---|
| Windows Server 2016+ or Windows 10/11 | x64 |
| SQL Server 2016+ (any edition) with EKM support | Standard or Enterprise; Express does not support EKM |
| Eviden KMS 5.x | Must run on the same machine (or be network-reachable) |
Signed cosmian_ekm_sql_server.dll | See the KMS repository for build instructions |
| PowerShell 5.1 (elevated) | For the setup scripts |
sqlcmd on the system PATH | Part of SQL Server Tools or installable standalone |
1. Install SQL Server
Install SQL Server with default settings. The instance name used throughout
this guide is the default instance (MSSQLSERVER). For a named instance,
substitute MSSQL$<InstanceName> wherever a service name is needed.
Ensure the SQL Server Database Engine service account is noted
(default: NT SERVICE\MSSQLSERVER).
2. Start the Eviden KMS
The KMS must be running and accessible before SQL Server loads the EKM provider.
# Example — adjust paths and config file as needed
cosmian_kms_server.exe --config kms_server.toml
The KMS must be configured with:
- TLS certificate trusted by this machine (or
accept_invalid_certs = trueinconfig.tomlduring development) - At least one client certificate entry matching the SQL Server credential identity
Verify the KMS is reachable:
Test-NetConnection -ComputerName localhost -Port 9998
3. Prepare the machine (one-time)
# Creates directories and grants ACLs to the SQL Server service account
scripts\Initialize-EkmEnvironment.ps1
# Creates the Authenticode code-signing certificate (if not already present)
scripts\New-EkmCertificate.ps1
These are one-time operations per machine.
4. Install the provider configuration
Create C:\ProgramData\Cosmian\EKM\config.toml (see
config.toml.example for the full schema):
max_age_seconds = 1800
stale_collector_period_seconds = 120
[kms]
server_url = "https://localhost:9998"
accept_invalid_certs = false # set true only for local dev
[[kms.certificates]]
username = "admin"
client_cert = 'C:\ProgramData\Cosmian\EKM\admin.cert.pem'
client_key = 'C:\ProgramData\Cosmian\EKM\admin.key.pem'
Copy the mTLS client certificate and key files to the paths referenced above, and copy the KMS CA certificate so TLS verification succeeds.
5. Deploy the DLL
# Must be run as Administrator
scripts\Deploy-EkmDll.ps1
This script:
- Verifies the DLL's Authenticode signature.
- Stops the
MSSQLSERVERservice. - Copies the DLL to
C:\Program Files\Cosmian\EKM\cosmian_ekm_sql_server.dll. - Starts the
MSSQLSERVERservice. - Registers (or re-registers)
CosmianEKMas a cryptographic provider.
To deploy to a named instance or skip the service restart:
scripts\Deploy-EkmDll.ps1 -SqlServiceName "MSSQL`$MyInstance"
scripts\Deploy-EkmDll.ps1 -SkipServiceRestart # register only
6. Enable EKM in SQL Server
Connect to SQL Server (e.g. via SSMS or sqlcmd) and run:
EXEC sp_configure 'show advanced options', 1;
RECONFIGURE;
EXEC sp_configure 'EKM provider enabled', 1;
RECONFIGURE;
7. Register the provider
If Deploy-EkmDll.ps1 was run with -SkipRegistration, register manually:
CREATE CRYPTOGRAPHIC PROVIDER CosmianEKM
FROM FILE = 'C:\Program Files\Cosmian\EKM\cosmian_ekm_sql_server.dll';
Verify:
SELECT name, is_enabled FROM sys.cryptographic_providers WHERE name = 'CosmianEKM';
8. Create a credential and map it to a login
Each SQL Server login that uses EKM keys must have a credential that maps to a
KMS identity (the username in config.toml).
-- Create the credential
CREATE CREDENTIAL Cosmian_EKM_Cred
WITH IDENTITY = 'admin', -- must match [[kms.certificates]] username
SECRET = 'unused'
FOR CRYPTOGRAPHIC PROVIDER CosmianEKM;
-- Map to a Windows login (adjust the login name)
ALTER LOGIN [HOSTNAME\YourLogin] ADD CREDENTIAL Cosmian_EKM_Cred;
9. Create keys
USE master;
-- Asymmetric key (RSA 2048)
CREATE ASYMMETRIC KEY MyRsaKey
FROM PROVIDER CosmianEKM
WITH ALGORITHM = RSA_2048,
PROVIDER_KEY_NAME = 'my-rsa-key',
CREATION_DISPOSITION = CREATE_NEW;
-- Symmetric key (AES 256)
CREATE SYMMETRIC KEY MyAesKey
FROM PROVIDER CosmianEKM
WITH ALGORITHM = AES_256,
PROVIDER_KEY_NAME = 'my-aes-key',
CREATION_DISPOSITION = CREATE_NEW;
10. Column-level encryption (quick check)
USE master;
-- Symmetric key protected by the EKM asymmetric key
CREATE SYMMETRIC KEY ColKey
WITH ALGORITHM = AES_256
ENCRYPTION BY ASYMMETRIC KEY MyRsaKey;
-- Encrypt
OPEN SYMMETRIC KEY ColKey DECRYPTION BY ASYMMETRIC KEY MyRsaKey;
SELECT ENCRYPTBYKEY(KEY_GUID('ColKey'), N'Hello EKM!');
CLOSE SYMMETRIC KEY ColKey;
11. Transparent Data Encryption (TDE)
-- Create a login backed by the EKM asymmetric key
CREATE LOGIN Cosmian_TDE_Login FROM ASYMMETRIC KEY MyRsaKey;
-- Credential for unattended access
CREATE CREDENTIAL Cosmian_TDE_Cred
WITH IDENTITY = 'admin', SECRET = 'unused'
FOR CRYPTOGRAPHIC PROVIDER CosmianEKM;
ALTER LOGIN Cosmian_TDE_Login ADD CREDENTIAL Cosmian_TDE_Cred;
-- Enable TDE on a database
USE MyDatabase;
CREATE DATABASE ENCRYPTION KEY
WITH ALGORITHM = AES_256
ENCRYPTION BY SERVER ASYMMETRIC KEY MyRsaKey;
ALTER DATABASE MyDatabase SET ENCRYPTION ON;
Monitor encryption progress:
SELECT db.name, dek.encryption_state, dek.percent_complete
FROM sys.dm_database_encryption_keys dek
JOIN sys.databases db ON dek.database_id = db.database_id;
State 3 means fully encrypted.
12. Run integration tests
# All-in-one: build + sign + deploy + copy test config
scripts\Prepare-Integration-Tests.ps1
# Then run the tests
cargo test --test integration -- --test-threads=1
Troubleshooting
Provider not loading
Check the EKM log file:
C:\ProgramData\Cosmian\EKM\logs\cosmian_ekm.log.<date>
"Cannot open database / invalid object name"
The SQL Server service account needs Modify rights on
C:\ProgramData\Cosmian\EKM\. Re-run Initialize-EkmEnvironment.ps1.
KMS connection errors
- Verify
config.tomlhas the correctserver_url. - Confirm the client certificate CN or SAN matches the SQL credential identity.
- Check the KMS server is running:
Test-NetConnection localhost -Port 9998.
Key operations fail after redeployment
If the DLL is replaced, SQL Server must be restarted to reload it. Run
Deploy-EkmDll.ps1 (which handles the restart automatically).
Oracle Database Transparent Data Encryption (TDE)
Oracle Database Transparent Data Encryption (TDE) enables automatic encryption of data at rest in Oracle databases. Users can execute SQL queries normally while TDE handles encryption transparently in the background. Encryption keys are stored directly in the database but can be encrypted using Oracle Key Vault or directly with Hardware Security Modules (HSM) via PKCS#11.
Eviden provides two deployment modes for Oracle TDE integration:
- Oracle Key Vault + HSM Mode: Uses Oracle Key Vault as an intermediary with HSM as Root-of-Trust
- Direct HSM Mode: Direct communication between Oracle Database and HSM via PKCS#11 interface
Mode 1: Oracle Key Vault + HSM Integration
Oracle Key Vault centralizes encryption key management, offering secure storage and distribution for Oracle databases and enterprise applications. It uses wallets to the crucial TDE master key which acts as the Key-Encryption-Key (KEK) for TDE. The master key is stored in a wallet that is protected by a password. This wallet provides a secure and centralized location for managing encryption keys.
For enhanced security, Hardware Security Modules (HSM) can be integrated with Oracle Key Vault to provide additional protection for these wallets. This configuration establishes a Root-of-Trust (RoT): when an HSM is deployed with Oracle Key Vault, the RoT remains in the HSM. The HSM RoT protects the Transparent Data Encryption (TDE) wallet password, which protects the TDE master key, which in turn protects all the encryption keys, certificates, and other security artifacts managed by the Oracle Key Vault server. Note that the HSM in this RoT usage scenario does not store any customer encryption keys. The customer keys are stored and managed directly by the Oracle Key Vault server.
Using HSM as a RoT is intended to mitigate attempts to recover keys from an Oracle Key Vault server which has been started in an unauthorized environment. Physical loss of an Oracle Key Vault server from a facility is one example of such a scenario.
When an Oracle Key Vault server is HSM-enabled, Oracle Key Vault contacts the HSM every five minutes (or whatever you have set the monitoring interval to) to ensure that the Root of Trust key is available and the TDE wallet password can be decrypted.
What Eviden provides is:
- a HSM client: this is a PKCS#11 provider library that make the Oracle Key Vault a HSM client itself. It enables the Root-of-Trust by protecting the Oracle Key Vault wallets passwords. That library also provides a KMS client to communicate with the KMS server.
- a KMS server that is interrogated by the KMS client. The KMS server can either front a HSM or act as a HSM but deployed in a secure environment.
graph TD
subgraph oracle_db[Oracle Database]
okvclient[okvclient.jar]
dek[Encryption Keys
encrypted by
TDE Master Key]
end
okvclient -- OKV endpoint --> OKV
subgraph OKV[Oracle Key Vault]
subgraph hsm_client[Eviden HSM client]
kms_client[Eviden KMS client]
pkcs11_lib[libcosmian_pkcs11.so]
end
subgraph wallet[Wallet protected by HSM]
tde[TDE Master Key]
end
tde --> hsm_client
end
kms_client -- REST API --> KMS[Eviden KMS Server]
KMS --> HSM
subgraph HSM[HSM]
kek[Wallet Encryption Key]
end
Oracle Key Vault Configuration
Before configuring a HSM such as described in Oracle Key Vault, some steps are needed:
For Oracle Database OS, the PKCS#11 library is available here: cosmian-pkcs11.
-
Extract the package:
unzip cosmian-pkcs11-non-fips-static-openssl_5.28.0_linux-amd64.zip -
Copy the PKCS#11 provider library to the Oracle Key Vault server to
/usr/local/okv/hsm/generic/libcosmian_pkcs11.so -
Copy the configuration of the PKCS#11 provider library to
/usr/local/okv/hsm/generic/ckms.toml -
Override the OKV generic HSM configuration files:
/usr/local/okv/hsm/generic/okv_hsm_env
COSMIAN_PKCS11_LOGGING_LEVEL="trace" CKMS_CONF="/usr/local/okv/hsm/generic/ckms.toml" COSMIAN_PKCS11_LOGGING_FOLDER="/var/okv/log/hsm"/usr/local/okv/hsm/generic/okv_hsm_conf
# Oracle Key Vault HSM vendor configuration file # Lines must be shorter than 4096 characters. # The vendor name, to be displayed on the HSM page on the management console. VENDOR_NAME="Cosmian" # The location of the PKCS#11 library. This file must be preserved on upgrade. PKCS11_LIB_LOC="/usr/local/okv/hsm/generic/libcosmian_pkcs11.so" # A colon-separated list of the full paths of files and directories that must # be preserved on upgrade. All of these files and directories should have been # created by the HSM client software setup; none should have existed on Oracle # Key Vault by default. These will be necessary when upgrading to a version # of Oracle Key Vault that is running on a higher major OS version. # Do not use wildcards. PRESERVED_FILES="" -
At this point, the symmetric key labeled
OKV 18.1 HSM Root Keyhas been created in KMS server by Oracle Key Vault. -
Then you can follow the official HSM-Enabling in a Standalone Oracle Key Vault Deployment.
Mode 2: Direct HSM Integration
For simplified deployments or environments where Oracle Key Vault is not available, Oracle Database can communicate directly with HSM via PKCS#11. In this mode, the Eviden PKCS#11 library (libcosmian_pkcs11.so) provides direct access to the Eviden KMS server, which manages the TDE master keys in the HSM.
This approach eliminates Oracle Key Vault from the architecture, reducing complexity while maintaining the security benefits of HSM-protected keys.
graph TD
subgraph oracle_server[Oracle Database Server]
subgraph oracle_db[Oracle Database]
tde_engine[TDE Engine]
dek[Data Encryption Keys
encrypted by
TDE Master Key]
end
pkcs11[Eviden PKCS#11 Library
libcosmian_pkcs11.so]
end
tde_engine -- PKCS#11 --> pkcs11
pkcs11 -- REST API --> KMS[Eviden KMS Server]
KMS --> HSM
subgraph HSM[HSM]
master_key[TDE Master Key]
end
The sequence diagram below shows how Oracle TDE interacts with libcosmian_pkcs11.so, which translates PKCS#11 calls into KMIP requests over HTTPS (/kmip or /kmip/2_1) to Eviden KMS, persisting key state in the KMS database backend:
sequenceDiagram
autonumber
participant ORA as Oracle Database (TDE Engine)
participant P11 as cosmian_pkcs11 (libcosmian_pkcs11.so)
participant KMS as Eviden KMS Server
participant DB as KMS Database Backend (PostgreSQL / MySQL / SQLite / Redis)
Note over ORA,P11: Keystore Initialization
ORA->>P11: C_Initialize & C_OpenSession
P11->>P11: Read ckms.toml (KMS URL, credentials)
P11-->>ORA: CKR_OK
ORA->>P11: C_Login (User PIN)
P11-->>ORA: CKR_OK
Note over ORA,DB: TDE Master Key Creation & Management
ORA->>P11: C_GenerateKey (AES-256 Master Key, CKA_LABEL="ORACLE_TDE_...")
P11->>KMS: POST /kmip (KMIP Create Request: AES-256 SymmetricKey)
KMS->>DB: Store encrypted key & attributes
DB-->>KMS: Key UID persisted
KMS-->>P11: KMIP Create Response (Unique Identifier)
P11-->>ORA: PKCS#11 Object Handle (CKR_OK)
Note over ORA,DB: Column / Tablespace Encryption Key Wrapping
ORA->>P11: C_EncryptInit & C_Encrypt (Wrap DEK with Master Key)
P11->>KMS: POST /kmip (KMIP Encrypt Request with key UID and DEK)
KMS->>DB: Fetch Master Key (via ObjectCache / DB)
DB-->>KMS: Encrypted Master Key
KMS->>KMS: Encrypt DEK
KMS-->>P11: KMIP Encrypt Response (Ciphertext data)
P11-->>ORA: Encrypted DEK stored in Oracle dictionary
Direct HSM Configuration
Linux
-
Install Eviden PKCS#11 Library
For Oracle Database OS, the PKCS#11 library is available here: cosmian-pkcs11.
# Extract library from PKCS#11 ZIP package. unzip cosmian-pkcs11-non-fips-static-openssl_5.28.0_linux-amd64.zip # Copy to Oracle's HSM directory mkdir -p /opt/oracle/extapi/64/hsm/Cosmian/ cp libcosmian_pkcs11.so /opt/oracle/extapi/64/hsm/Cosmian/ chown oracle:oinstall /opt/oracle/extapi/64/hsm/Cosmian/libcosmian_pkcs11.so -
Configure Eviden PKCS#11 Library
Create the configuration file
/home/oracle/.cosmian/ckms.toml:[http_config] server_url = "http://kms:9998"Set proper ownership:
mkdir -p /home/oracle/.cosmian/ chown oracle:oinstall /home/oracle/.cosmian/ckms.toml -
Prepare Oracle Directory Structure
# Create keystore directories mkdir -p /etc/ORACLE/KEYSTORES/FREE chown -R oracle:oinstall /etc/ORACLE/KEYSTORES/FREE # Setup logging chown -R oracle:oinstall /var/log -
Configure Oracle Database for PKCS#11
Set up TDE to use the HSM via PKCS#11:
-- Set WALLET_ROOT to point to the PKCS#11 library ALTER SYSTEM SET WALLET_ROOT='/opt/oracle/extapi/64/hsm/Cosmian/libcosmian_pkcs11.so' SCOPE=SPFILE; SHUTDOWN IMMEDIATE; STARTUP; -- Configure TDE to use HSM keystore ALTER SYSTEM SET TDE_CONFIGURATION='KEYSTORE_CONFIGURATION=HSM' SCOPE=BOTH SID='*'; SHUTDOWN IMMEDIATE; STARTUP; -
Create and Configure HSM Keystore
-- Open the HSM keystore ADMINISTER KEY MANAGEMENT SET KEYSTORE OPEN IDENTIFIED BY hsm_identity_pass; -- Create TDE master key in HSM with backup ADMINISTER KEY MANAGEMENT SET KEY IDENTIFIED BY hsm_identity_pass WITH BACKUP; -
Verify Configuration
-- Check keystore status COLUMN WRL_PARAMETER FORMAT A50; SET LINES 200; SELECT WRL_TYPE, WRL_PARAMETER, WALLET_TYPE, STATUS FROM V$ENCRYPTION_WALLET; -- Verify keys are stored in HSM COLUMN NAME FORMAT A40; SET LINES 400; SELECT KEY_ID, KEYSTORE_TYPE, CREATOR_DBNAME, ACTIVATION_TIME, KEY_USE, ORIGIN FROM V$ENCRYPTION_KEYS; -
Optional: Create Test Encrypted Table
-- Create a table with encrypted columns to verify TDE is working CREATE TABLE test_tde (something CHAR(32) ENCRYPT);
Windows
Oracle 26ai Free for Windows has two unfixed HSM/PKCS#11 issues that require workarounds when configuring TDE directly (without Oracle Key Vault):
-
skgdllDiscoverfinds nothing on Windows. The auto-discovery function only scans the hard-coded Linux path/opt/oracle/extapi/64/pkcs11/. No equivalent Windows path is scanned, so Oracle cannot locate any PKCS#11 DLL automatically. -
pkcs11_library_locationrejects Windows paths. TheALTER SYSTEM SETvalidator checks that the supplied path starts with/opt/oracle/extapi/64/pkcs11/. Any Windows path (C:\...) is rejected withORA-46707/ORA-32017.
The steps below apply the required workarounds.
-
Install Eviden PKCS#11 Library
Download
cosmian_pkcs11.dllfrom the release packages.The DLL must be placed at the drive-relative Linux path so that Oracle's
LoadLibrarycall resolves it. On Windows a path starting with/is treated as drive-relative (/opt/...→C:\opt\...on a system whereC:is the current drive).# Create the required directory structure New-Item -ItemType Directory -Force -Path 'C:\opt\oracle\extapi\64\pkcs11' # Install the DLL (both locations are used by Oracle) Copy-Item cosmian_pkcs11.dll 'C:\opt\oracle\extapi\64\pkcs11\cosmian_pkcs11.dll' New-Item -ItemType Directory -Force -Path "$env:ORACLE_HOME\extapi\64\hsm\Cosmian" Copy-Item cosmian_pkcs11.dll "$env:ORACLE_HOME\extapi\64\hsm\Cosmian\cosmian_pkcs11.dll" -
Configure Eviden PKCS#11 Library
Place
ckms.tomlalongside the DLL so it is found regardless of which Windows user account Oracle's service runs under:@' [http_config] server_url = "http://kms:9998" '@ | Set-Content -Path 'C:\opt\oracle\extapi\64\pkcs11\ckms.toml' -Encoding UTF8Note: The PKCS#11 library searches for
ckms.tomlin the following order:CKMS_CONFenvironment variable → directory containing the DLL →%USERPROFILE%\.cosmian\ckms.toml. -
Prepare Oracle Wallet Directory
# Create the wallet directory (adjust path to match your ORACLE_BASE) New-Item -ItemType Directory -Force -Path 'C:\app\oracle\admin\FREE\wallet' -
Configure Oracle Database for PKCS#11
Because
ALTER SYSTEM SET pkcs11_library_locationrejects Windows paths, set all three TDE parameters via a plain PFILE and restart withSTARTUP PFILE=:-- Step 1: capture current in-memory parameters to a text PFILE CREATE PFILE='C:\app\oracle\dbhomeFree\database\initFREE_pkcs11.ora' FROM MEMORY; SHUTDOWN IMMEDIATE;Edit the generated
initFREE_pkcs11.orawith a text editor and add (or update) the following three lines — using forward slashes throughout:*.wallet_root='C:/app/oracle/admin/FREE/wallet' *.tde_configuration='KEYSTORE_CONFIGURATION=HSM' *.pkcs11_library_location='/opt/oracle/extapi/64/pkcs11/cosmian_pkcs11.dll'Then restart and persist:
-- Step 2: start the instance using the edited PFILE STARTUP PFILE='C:\app\oracle\dbhomeFree\database\initFREE_pkcs11.ora'; -- Step 3: write the active configuration back to SPFILE CREATE SPFILE FROM MEMORY; -
Create and Configure HSM Keystore
-- Open the HSM keystore (loads cosmian_pkcs11.dll) ADMINISTER KEY MANAGEMENT SET KEYSTORE OPEN IDENTIFIED BY hsm_identity_pass; -- Create TDE master key in HSM ADMINISTER KEY MANAGEMENT SET KEY IDENTIFIED BY hsm_identity_pass; -
Verify Configuration
-- Check keystore status COLUMN WRL_PARAMETER FORMAT A50; SET LINES 200; SELECT WRL_TYPE, WRL_PARAMETER, WALLET_TYPE, STATUS FROM V$ENCRYPTION_WALLET; -- Verify keys are stored in HSM SET LINES 400; SELECT KEY_ID, KEYSTORE_TYPE, CREATOR_DBNAME, ACTIVATION_TIME, KEY_USE, ORIGIN FROM V$ENCRYPTION_KEYS; -
Optional: Create Test Encrypted Table
CREATE TABLE test_tde (something CHAR(32) ENCRYPT);
Troubleshooting:
- PKCS#11 log (service user):
C:\WINDOWS\ServiceProfiles\OracleService<SID>\.cosmian\cosmian-pkcs11.log - PKCS#11 log (current user):
%USERPROFILE%\.cosmian\cosmian-pkcs11.log - Oracle alert log:
%ORACLE_BASE%\diag\rdbms\free\<SID>\trace\alert_<SID>.log - Oracle trace dir:
%ORACLE_BASE%\diag\rdbms\free\<SID>\trace\
HSM Identity and Authentication
Architecture: libcosmian_pkcs11.so as a proxy
libcosmian_pkcs11.so is not an HSM driver. It is a thin proxy between Oracle Database
and the Eviden KMS server:
Oracle TDE Engine → libcosmian_pkcs11.so → (HTTP/HTTPS) → Eviden KMS Server → HSM
(PKCS#11 C API) (REST API via (slot + PIN
ckms.toml) managed here)
The KMS server is responsible for the actual HSM connection — including slot selection and HSM
PIN. Oracle never communicates directly with the HSM; libcosmian_pkcs11.so simply forwards
PKCS#11 operations to the KMS over the network.
What the SQL command does
ADMINISTER KEY MANAGEMENT SET KEYSTORE OPEN IDENTIFIED BY hsm_identity_pass;
Oracle's ADMINISTER KEY MANAGEMENT syntax always ends with IDENTIFIED BY <value>. This
command internally translates into two PKCS#11 calls:
C_OpenSession— opens a PKCS#11 session on the slot exposed bylibcosmian_pkcs11.so.C_Login(CKU_USER, pin=hsm_identity_pass)— passeshsm_identity_passas the PKCS#11 user PIN.
hsm_identity_pass and authentication modes
The value after IDENTIFIED BY in Oracle SQL is passed as the PIN to C_Login. The library
supports two modes, controlled by pkcs11_use_pin_as_access_token in ckms.toml:
pkcs11_use_pin_as_access_token | Behavior |
|---|---|
false (default) | C_Login accepts any PIN without validation and returns CKR_OK. The value hsm_identity_pass is a self-documenting placeholder — any non-empty string works. KMS authentication uses credentials from ckms.toml. |
true | C_Login treats the PIN as a short-lived OIDC/JWT bearer token forwarded to the KMS REST API. No credentials are stored in ckms.toml; Oracle supplies the token at keystore-open time. |
Bearer token mode (pkcs11_use_pin_as_access_token = true):
# ckms.toml
pkcs11_use_pin_as_access_token = true
[http_config]
server_url = "https://kms.example.com:9998"
Oracle then passes the JWT token directly:
ADMINISTER KEY MANAGEMENT SET KEYSTORE OPEN IDENTIFIED BY '<jwt_token>';
This approach lets Oracle authenticate to the KMS without storing any credentials in
ckms.toml or on the filesystem.
For all other KMS authentication methods (mTLS, static bearer token, OAuth2/OIDC), configure
ckms.toml using the CLI Authentication guide.
Wallet Migration
Oracle TDE supports migrating the master encryption key between a software wallet (file-based
keystore) and the HSM wallet backed by libcosmian_pkcs11.so. Both directions are supported
and are verified in CI by .mise/scripts/oracle/run_sql_commands.sh.
- Forward (SW → HSM): Oracle calls
C_GenerateKey(CKM_AES_KEY_GEN)to create a new master key in the KMS, thenC_Encryptto re-wrap DEKs. - Reverse (HSM → SW): Oracle calls
C_Decrypton the HSM master key to unwrap DEKs before re-encrypting under the new software key.
Configuration note: In pure HSM mode,
WALLET_ROOTpoints to the PKCS#11 library file path. In hybrid or file-only modes,WALLET_ROOTmust be a directory; Oracle then auto-discovers the library from/opt/oracle/extapi/64/hsm/<vendor>/lib<name>.so.Note:
libcosmian_pkcs11.soprior to version 5.20 reportedCKF_WRITE_PROTECTED, blockingC_GenerateKeyduring forward migration. This flag was removed in 5.20.
HSM Wallet → Software Wallet (Reverse Migration)
Starting from HSM-only mode, follow these steps. Each TDE_CONFIGURATION change requires a restart.
-- 1. Switch WALLET_ROOT from library path to a directory (required for file-based keystore)
ALTER SYSTEM SET WALLET_ROOT='/etc/ORACLE/KEYSTORES/FREE' SCOPE=SPFILE;
SHUTDOWN IMMEDIATE;
STARTUP;
-- 2. Create the software keystore
ADMINISTER KEY MANAGEMENT CREATE KEYSTORE IDENTIFIED BY <sw_password>;
-- 3. Switch to FILE|HSM hybrid mode (file primary, HSM secondary)
ALTER SYSTEM SET TDE_CONFIGURATION='KEYSTORE_CONFIGURATION=FILE|HSM' SCOPE=BOTH SID='*';
SHUTDOWN IMMEDIATE;
STARTUP;
-- 4. Open both keystores (software wallet first, then HSM)
ADMINISTER KEY MANAGEMENT SET KEYSTORE OPEN IDENTIFIED BY <sw_password>;
ADMINISTER KEY MANAGEMENT SET KEYSTORE OPEN IDENTIFIED BY <token>;
-- <token> = hsm_identity_pass (or JWT token if pkcs11_use_pin_as_access_token = true)
-- 5. Generate a new software master key and re-wrap DEKs
-- Oracle calls C_Decrypt on the HSM key to unwrap DEKs, then re-encrypts under the new software key.
ADMINISTER KEY MANAGEMENT SET ENCRYPTION KEY
IDENTIFIED BY <sw_password>
REVERSE MIGRATE USING <token>
WITH BACKUP;
-- 6. Switch to file-only mode
ALTER SYSTEM SET TDE_CONFIGURATION='KEYSTORE_CONFIGURATION=FILE' SCOPE=BOTH SID='*';
SHUTDOWN IMMEDIATE;
STARTUP;
ADMINISTER KEY MANAGEMENT SET KEYSTORE OPEN IDENTIFIED BY <sw_password>;
Software Wallet → HSM Wallet (Forward Migration)
Starting from file-only mode (after a reverse migration, or from a fresh software wallet),
with WALLET_ROOT already pointing to a directory:
-- 1. Switch to HSM|FILE hybrid mode (HSM primary, file secondary)
ALTER SYSTEM SET TDE_CONFIGURATION='KEYSTORE_CONFIGURATION=HSM|FILE' SCOPE=BOTH SID='*';
SHUTDOWN IMMEDIATE;
STARTUP;
-- 2. Open both keystores (HSM first, then software wallet)
ADMINISTER KEY MANAGEMENT SET KEYSTORE OPEN IDENTIFIED BY <token>;
ADMINISTER KEY MANAGEMENT SET KEYSTORE OPEN IDENTIFIED BY <sw_password>;
-- 3. Generate a new HSM master key and re-wrap DEKs
-- Oracle calls C_GenerateKey → C_Encrypt internally.
-- WITH BACKUP is omitted: ORA-46623 prevents backup creation in HSM|FILE mode.
ADMINISTER KEY MANAGEMENT SET ENCRYPTION KEY
IDENTIFIED BY <token>
MIGRATE USING <sw_password>;
-- 4. Switch to HSM-only mode
ALTER SYSTEM SET TDE_CONFIGURATION='KEYSTORE_CONFIGURATION=HSM' SCOPE=BOTH SID='*';
SHUTDOWN IMMEDIATE;
STARTUP;
ADMINISTER KEY MANAGEMENT SET KEYSTORE OPEN IDENTIFIED BY <token>;
Multiple Wallets Handling with the Same Database
Oracle TDE supports several multi-wallet configurations on a single database instance. The Eviden PKCS#11 library is transparent to these layouts: every keystore operation that reaches the HSM is forwarded to the KMS server regardless of the number of active wallets.
Combined HSM and Software Wallet
Oracle supports a combined keystore by setting KEYSTORE_CONFIGURATION=HSM|FILE. In this mode the TDE master key is generated and stored in the HSM (via the Eviden PKCS#11 library), while Oracle also maintains a local file-based software wallet. This is useful when an auto-login wallet is required for datafile decryption during automatic instance startup, or for keystore redundancy.
Configure the combined mode:
ALTER SYSTEM SET TDE_CONFIGURATION='KEYSTORE_CONFIGURATION=HSM|FILE' SCOPE=BOTH SID='*';
SHUTDOWN IMMEDIATE;
STARTUP;
With the combined configuration, both keystores must be opened explicitly before any key operation:
-- Open the HSM keystore (Eviden PKCS#11)
ADMINISTER KEY MANAGEMENT SET KEYSTORE OPEN IDENTIFIED BY hsm_identity_pass FOR HSM;
-- Open the file-based wallet (use the wallet password here)
ADMINISTER KEY MANAGEMENT SET KEYSTORE OPEN IDENTIFIED BY wallet_password FOR WALLET;
To rotate the TDE master key and update both keystores simultaneously:
ADMINISTER KEY MANAGEMENT SET KEY IDENTIFIED BY hsm_identity_pass
WITH BACKUP USING 'pre_rotation_backup' CONTAINER = ALL;
Per-PDB Isolated Keystores (Multitenant CDB)
In a multitenant Container Database (CDB), each Pluggable Database (PDB) can hold its own TDE master key. All PDB master keys are ultimately protected by the same Eviden KMS through the shared PKCS#11 library, while Oracle enforces key isolation at the PDB boundary.
Activate per-PDB isolated keystores:
-- In the CDB root: enable HSM for all containers
ALTER SYSTEM SET TDE_CONFIGURATION='KEYSTORE_CONFIGURATION=HSM' SCOPE=BOTH SID='*';
SHUTDOWN IMMEDIATE;
STARTUP;
-- Open the root keystore
ADMINISTER KEY MANAGEMENT SET KEYSTORE OPEN IDENTIFIED BY hsm_identity_pass CONTAINER = ALL;
-- Switch to a specific PDB and create its own master key
ALTER SESSION SET CONTAINER = pdb1;
ADMINISTER KEY MANAGEMENT SET KEY IDENTIFIED BY hsm_identity_pass
WITH BACKUP CONTAINER = CURRENT;
Each PDB master key is stored in the Eviden KMS under a unique label prefixed with ORACLE.SECURITY.TDE.HSM.MASTERKEY., ensuring tenant isolation within the same KMS server. No additional KMS configuration is required to support multiple PDBs.
Key Rotation Across Wallets
When rotating TDE master keys in a multi-wallet setup, always open all active keystores before issuing the SET KEY command so Oracle can re-wrap the existing data encryption keys:
-- Open both keystores (combined HSM+FILE example)
ADMINISTER KEY MANAGEMENT SET KEYSTORE OPEN IDENTIFIED BY hsm_identity_pass FOR HSM;
ADMINISTER KEY MANAGEMENT SET KEYSTORE OPEN IDENTIFIED BY wallet_password FOR WALLET;
-- Rotate the master key
ADMINISTER KEY MANAGEMENT SET KEY IDENTIFIED BY hsm_identity_pass
WITH BACKUP USING 'rotation_backup';
After rotation, verify the new key is active:
SELECT KEY_ID, KEYSTORE_TYPE, CREATOR_DBNAME, ACTIVATION_TIME, KEY_USE, ORIGIN
FROM V$ENCRYPTION_KEYS
ORDER BY ACTIVATION_TIME DESC;
Environment Variables Used by cosmian_pkcs11
The Eviden PKCS#11 library reads the following environment variables at startup (i.e. when
C_GetFunctionList is called). All variables are optional unless otherwise noted.
| Variable | Default | Description |
|---|---|---|
CKMS_CONF | (none) | Explicit path to a ckms.toml configuration file. Overrides all other discovery paths. |
COSMIAN_PKCS11_LOGGING_LEVEL | info | Log verbosity level: trace, debug, info, warn, or error. |
COSMIAN_PKCS11_LOGGING_FOLDER | ~/.cosmian/ | (Linux only) Directory where cosmian-pkcs11.log is written. On macOS/Windows the log is always written to ~/.cosmian/. |
COSMIAN_PKCS11_DISK_ENCRYPTION_TAG | disk-encryption | KMS object tag used to identify disk-encryption keys (VeraCrypt, LUKS). Override if your KMS objects use a different tag. |
COSMIAN_PKCS11_SSH_KEY_TAG | ssh-auth | KMS object tag used to identify SSH authentication keys. Override if your KMS objects use a different tag. |
COSMIAN_PKCS11_IGNORE_SESSIONS | false | When set to true, the module reuses a single internal session handle instead of creating one per C_OpenSession call. Intended for applications that call C_OpenSession more times than the token supports. |
Notes
- Variables must be set before the application loads the library (i.e. before the first
call to
C_GetFunctionList). Changes made after loading have no effect. - For Oracle Database (Linux), set variables in the Oracle instance environment before starting
the process, or via the
okv_hsm_envfile for Oracle Key Vault. - For Oracle Database (Windows), set them as system environment variables (visible to the Oracle service account) or in the Oracle service user's profile.
CKMS_CONFis the most commonly needed variable. Ifckms.tomlis not found through any discovery path,C_GetFunctionListreturnsCKR_FUNCTION_FAILEDand the library refuses to load.- The log file is always appended (never rotated). Monitor its size in long-running deployments.
Making variables persistent for the Oracle Database process (Linux)
Oracle Database runs as the OS user oracle (or a custom service account). Environment variables
must be present in that user's process environment at the moment the Oracle instance starts,
not only in an interactive shell. There are several standard approaches:
Option A — Oracle instance environment file (oraenv-style .env)
Oracle Database 12c and later can load a per-instance environment file from
$ORACLE_HOME/dbs/oraenv_<ORACLE_SID> or the path specified by ORACLE_ENV_PATH. Variables
placed there are injected before the instance starts:
# /etc/oratab (verified)
ORCL:/opt/oracle/product/19c/dbhome_1:Y
# /opt/oracle/product/19c/dbhome_1/dbs/oraenv_ORCL (create if absent, owned by oracle)
CKMS_CONF="/home/oracle/.cosmian/ckms.toml"
COSMIAN_PKCS11_DISK_ENCRYPTION_TAG="disk-encryption"
COSMIAN_PKCS11_LOGGING_LEVEL="info"
COSMIAN_PKCS11_LOGGING_FOLDER="/var/log/cosmian/"
Permissions: the file must be readable by the
oracleuser and must not be world-writable.
Option B — oracle user's login profile (~oracle/.bash_profile or ~oracle/.profile)
When Oracle is started manually (e.g. by running sqlplus / as sysdba then
startup) or via a wrapper script that sources the user profile, exporting
variables in the login profile is sufficient:
# ~oracle/.bash_profile (or ~/.profile for sh/ksh)
export CKMS_CONF="/home/oracle/.cosmian/ckms.toml"
export COSMIAN_PKCS11_DISK_ENCRYPTION_TAG="disk-encryption"
export COSMIAN_PKCS11_LOGGING_LEVEL="info"
export COSMIAN_PKCS11_LOGGING_FOLDER="/var/log/cosmian/"
~/.bashrc is not read for non-interactive sessions. Use .bash_profile
(Bash login), .profile (POSIX sh / ksh), or .zprofile (zsh).
When Oracle is started by systemd or another init system, this file is only
sourced if the unit uses User=oracle and the init system spawns a login
shell — which many do not.
Option C — systemd service unit (recommended when Oracle is managed by systemd)
This is the most reliable option when Oracle is controlled by a systemd unit file
(common for Oracle 19c+ on RHEL/OEL 8+):
# /etc/systemd/system/oracle-database.service.d/cosmian.conf
# (drop-in override — create the .d/ directory if absent)
[Service]
Environment="CKMS_CONF=/home/oracle/.cosmian/ckms.toml"
Environment="COSMIAN_PKCS11_DISK_ENCRYPTION_TAG=disk-encryption"
Environment="COSMIAN_PKCS11_LOGGING_LEVEL=info"
Environment="COSMIAN_PKCS11_LOGGING_FOLDER=/var/log/cosmian/"
Reload and restart after adding the drop-in:
sudo systemctl daemon-reload
sudo systemctl restart oracle-database
Verify the variables are visible to the running process:
sudo cat /proc/$(pgrep -o pmon)/environ | tr '\0' '\n' | grep -E 'CKMS|COSMIAN'
Option D — Oracle Key Vault okv_hsm_env (OKV deployments only)
If Oracle Key Vault (OKV) is the HSM manager, the canonical location is the OKV environment file that is sourced before every HSM operation:
# /usr/local/okv/hsm/generic/okv_hsm_env
CKMS_CONF="/usr/local/okv/hsm/generic/ckms.toml"
COSMIAN_PKCS11_DISK_ENCRYPTION_TAG="disk-encryption"
COSMIAN_PKCS11_LOGGING_LEVEL="info"
COSMIAN_PKCS11_LOGGING_FOLDER="/var/log/cosmian/"
See the Oracle Key Vault Administrator's Guide for details on
okv_hsm_envformat and reload procedure.
Verifying that Oracle sees the variables
After any of the above changes, confirm the library picks them up without restarting
Oracle-side applications** by running the diagnostic binary as the oracle user:
sudo -u oracle \
COSMIAN_PKCS11_LOGGING_LEVEL=debug \
ckms pkcs11 verify \
--dll /opt/oracle/extapi/64/hsm/Cosmian/libcosmian_pkcs11.so
If the correct tag and config path appear in the debug output, the variables are propagated correctly.
Verifying the library loads correctly
Use the ckms pkcs11 verify command (part of the Eviden KMS CLI) to confirm that the library
is loadable, ckms.toml is found, and the KMS server is reachable.
Modes 0 and 1 (no auth or static token/TLS cert — the default):
# Basic check (uses ~/.cosmian/ckms.toml by default)
ckms pkcs11 verify --dll /usr/local/lib/libcosmian_pkcs11.so
# Explicit config path
ckms pkcs11 verify \
--dll /opt/oracle/extapi/64/hsm/Cosmian/libcosmian_pkcs11.so \
--conf /home/oracle/.cosmian/ckms.toml
# Verbose — combine with logging env var to also capture library-side trace output
COSMIAN_PKCS11_LOGGING_LEVEL=debug \
ckms pkcs11 verify --dll /usr/local/lib/libcosmian_pkcs11.so
Mode 2 (pkcs11_use_pin_as_access_token = true — OIDC token supplied at keystore open):
A short-lived JWT must be obtained from your identity provider and passed via --token
(or the COSMIAN_PKCS11_TOKEN environment variable):
TOKEN=$(oidc-token my-oidc-profile) # example using oidc-agent; adapt to your IdP
ckms pkcs11 verify \
--dll /opt/oracle/extapi/64/hsm/Cosmian/libcosmian_pkcs11.so \
--conf /home/oracle/.cosmian/ckms.toml \
--token "$TOKEN"
Expected output when everything is working (modes 0 and 1):
[conf] Will use default home config: /home/oracle/.cosmian/ckms.toml
[load] Opening: /usr/local/lib/libcosmian_pkcs11.so
[load] OK: shared library opened
[C_GetFunctionList] OK: ckms.toml parsed
[C_Initialize] OK
[C_GetSlotList] OK: using slot ID 1
[C_OpenSession] OK: session opened on slot 1
[C_FindObjects] Enumerating objects by class:
CKO_DATA: N
CKO_PUBLIC_KEY: N
CKO_PRIVATE_KEY: N
CKO_SECRET_KEY: N
[C_FindObjects] OK: N PKCS#11 object(s) visible on KMS
[C_CloseSession] OK
[C_Finalize] OK
All checks passed.
Expected output for mode 2 (with --token):
[C_GetFunctionList] OK: ckms.toml parsed
[C_Initialize] OK
[C_GetSlotList] OK: using slot ID 1
[C_OpenSession] OK: session opened on slot 1
[C_Login] OK: session authenticated with provided token
[C_FindObjects] Enumerating objects by class:
...
All checks passed.
If --token is omitted with mode 2, object enumeration fails with CKR_USER_NOT_LOGGED_IN.
Authentication from Oracle to KMS
The Eviden PKCS#11 library (libcosmian_pkcs11.so on Linux, cosmian_pkcs11.dll on Windows) communicates with the Eviden KMS server over HTTP or HTTPS. Authentication is configured through the ckms.toml file that the library reads at startup.
Configuration File Discovery
The library resolves ckms.toml using the following search order:
CKMS_CONFenvironment variable — explicit path, takes precedence over everything else. For Oracle Key Vault, set this in/usr/local/okv/hsm/generic/okv_hsm_env.ckms.tomlbeside the PKCS#11 library — a file namedckms.tomlplaced in the same directory as the.so/.dll. Convenient when the library is deployed at a fixed path (e.g.C:\opt\oracle\extapi\64\pkcs11\ckms.tomlon Windows).~/.cosmian/ckms.toml— home directory of the OS user running the Oracle process (typically/home/oracle/.cosmian/ckms.tomlon Linux)./etc/cosmian/ckms.toml— system-wide fallback on Linux.
For Oracle Key Vault, set CKMS_CONF in the OKV environment file so all Oracle Key Vault processes share the same configuration:
# /usr/local/okv/hsm/generic/okv_hsm_env
CKMS_CONF="/usr/local/okv/hsm/generic/ckms.toml"
No Authentication (Development / Internal Networks)
For development environments or deployments where the KMS is on a fully trusted internal network:
[http_config]
server_url = "http://kms:9998"
Bearer Token Authentication
When the KMS server is configured with API-token or JWT/OIDC authentication, supply an access_token. The token is sent as an Authorization: Bearer <token> HTTP header on every request.
[http_config]
server_url = "https://kms.example.com:9998"
access_token = "<your-bearer-token>"
Note: storing a long-lived token in
ckms.tomlmeans any OS user who can read the file gains KMS access. For production, prefer TLS client certificates (below) or the OIDC dynamic-token mode.
OIDC / JWT Keystore Authentication (Dynamic Token)
This mode keeps zero credentials in ckms.toml. Instead, when Oracle opens the encrypted wallet, the DBA supplies a short-lived JWT from an identity provider via the IDENTIFIED BY clause. The library validates it against the KMS on every keystore open.
| Mode | ckms.toml credentials | When KmsClient is created | C_Login behavior |
|---|---|---|---|
| 0 — No auth | none | library load | no-op |
| 1 — Static token / TLS cert | token or cert paths | library load | no-op |
| 2 — OIDC dynamic token | none (flag only) | C_Login call | validates + uses token |
ckms.toml for mode 2
[http_config]
server_url = "https://kms.example.com:9998"
# No credentials stored here
pkcs11_use_pin_as_access_token = true
Oracle SQL
The value after IDENTIFIED BY becomes the bearer token sent to the KMS:
ADMINISTER KEY MANAGEMENT SET KEYSTORE OPEN
IDENTIFIED BY 'eyJhbGciOiJSUzI1NiIsInR5cCI6IkpXVCJ9...';
A wrapper script that fetches a fresh token before opening the keystore is strongly recommended:
#!/usr/bin/env bash
# Fetch a short-lived JWT (example using oidc-agent; adapt to your IdP)
TOKEN=$(oidc-token my-oidc-profile)
sqlplus -s / as sysdba <<EOF
ADMINISTER KEY MANAGEMENT SET KEYSTORE OPEN IDENTIFIED BY '$TOKEN';
EOF
Security properties
ckms.tomlcontains no secrets — reading the file grants nothing.- Each keystore open requires a fresh token from the IdP; expired tokens are rejected (
401 Unauthorizedfrom KMS →C_Loginfailure). - An empty
IDENTIFIED BYstring returnsCKR_PIN_INCORRECT(Oracle:ORA-28354). - Use
ckms pkcs11 verify --token <JWT>to test the full flow end-to-end; see Verifying the library loads correctly.
TLS Client Certificate Authentication (Recommended for Production)
Mutual TLS (mTLS) is the recommended authentication method for production deployments. Each Oracle host or database instance is provisioned with a unique client certificate; the KMS identifies and authorises callers by the certificate's Common Name (CN).
KMS server prerequisites: the server must be started in TLS mode with a CA certificate configured to validate client certificates. See TLS configuration and Authentication for the server-side setup.
PEM Certificates (FIPS-Compatible, Recommended)
[http_config]
server_url = "https://kms.example.com:9998"
# Client certificate in PEM format (leaf certificate, or leaf + intermediate chain)
tls_client_pem_cert_path = "/home/oracle/.cosmian/oracle-client.crt"
# Matching private key in PEM format (PKCS#8 or traditional RSA/EC)
tls_client_pem_key_path = "/home/oracle/.cosmian/oracle-client.key"
PKCS#12 Bundle (Non-FIPS Only)
[http_config]
server_url = "https://kms.example.com:9998"
# PKCS#12 bundle containing the client certificate and private key
tls_client_pkcs12_path = "/home/oracle/.cosmian/oracle-client.p12"
tls_client_pkcs12_password = "changeit"
Combined mTLS + Bearer Token (Multi-Factor)
[http_config]
server_url = "https://kms.example.com:9998"
tls_client_pem_cert_path = "/home/oracle/.cosmian/oracle-client.crt"
tls_client_pem_key_path = "/home/oracle/.cosmian/oracle-client.key"
# Additional JWT bearer token for a second authentication factor
access_token = "<JWT_BEARER_TOKEN>"
Server Certificate Pinning
To validate the KMS server against a specific PEM certificate (instead of the system CA bundle), use verified_cert. This is particularly useful when the KMS uses a self-signed or internal CA certificate:
[http_config]
server_url = "https://kms.example.com:9998"
# PEM-encoded server certificate expected from the KMS
verified_cert = """
-----BEGIN CERTIFICATE-----
MIIBxTCCAW...
-----END CERTIFICATE-----
"""
For testing only, you can disable server certificate verification entirely (not for production):
[http_config]
server_url = "https://kms.example.com:9998"
accept_invalid_certs = true # INSECURE — testing only
For the complete set of authentication options available on the KMS server side, see Authentication.
EDB Postgres Advanced Server TDE with Eviden KMS
This guide demonstrates how to configure EDB Postgres Advanced Server 17 Transparent Data Encryption (TDE) to use Eviden KMS as its key management server via KMIP over mTLS.
Overview
| Item | Details |
|---|---|
| Protocol | KMIP 2.1 over TCP/TLS with mutual certificate authentication (mTLS) |
| Port | 5696 or 15696 (configurable) |
| Key type | AES-256 symmetric key (CBC mode with PKCS#5 padding) |
| EDB version | EDB Postgres Advanced Server 15.2+ and 17.x |
| Client | edb_tde_kmip_client.py (shipped inside the EDB image) |
| Eviden KMS feature | Works in non-FIPS mode (PyKMIP uses ssl.wrap_socket) |
Architecture
flowchart TB
pg["EDB Postgres Advanced Server<br/>(initdb --data-encryption)"]
client["edb_tde_kmip_client.py<br/>(PGDATAKEYWRAPCMD / PGDATAKEYUNWRAPCMD)"]
kms["Eviden KMS<br/>(KMIP 2.1, mTLS, port 15696)"]
pg -- "wrap DEK on initdb" --> client
pg -- "unwrap DEK on startup" --> client
client -- "KMIP Encrypt / Decrypt<br/>AES-256-CBC" --> kms
During initdb --data-encryption:
- Postgres generates a random cluster DEK.
- It invokes
PGDATAKEYWRAPCMD— theedb_tde_kmip_client.py encryptcommand. - The client calls KMIP Encrypt on the Eviden KMS, which returns
[IV][ciphertext]. - The wrapped DEK is written to
pg_encryption/key.bin.
On every subsequent server start, Postgres calls PGDATAKEYUNWRAPCMD
(edb_tde_kmip_client.py decrypt) to unwrap the DEK before mounting the cluster.
Wire Format
The edb_tde_kmip_client.py script defines the on-disk format for the wrapped DEK:
key.bin = [16-byte IV][AES-256-CBC ciphertext]
This format is assembled client-side; the KMS is unaware of it.
KMIP Variants
The client supports two --variant options that differ in how they call KMIP:
| Variant | Encrypt | Decrypt |
|---|---|---|
pykmip (required for Eviden KMS) | Encrypt(data=DEK) → KMS returns IVCounterNonce=IV, Data=CT | Decrypt(Data=CT, IVCounterNonce=IV) — standard KMIP |
thales | Same as pykmip | Decrypt(Data=IV‖CT) — no IVCounterNonce; specific to Thales CipherTrust Manager |
Note: Eviden KMS follows the KMIP mandatory conformance requirement: a Decrypt request without
IVCounterNoncereturnsInvalid_Message. Always use--variant=pykmipwhen connectingedb_tde_kmip_client.pyto Eviden KMS.
Prerequisites
- A running Eviden KMS server with the KMIP socket enabled (
listen_address/port). - mTLS certificates: CA, server, and client certificate+key.
- EDB Postgres Advanced Server 15.2+ or 17.x.
edb_tde_kmip_client.pyinstalled via theedb-tde-kmip-clientpackage from EDB repositories.- Python 3 with PyKMIP (
pip3 install PyKMIP).
Configuration
1. KMS Configuration
Add the KMIP socket listener to kms.toml:
[server]
port = 9998
[server.kmip]
server_port = 15696
Generate or reuse mTLS certificates for the KMS and the EDB client. See Public Key Infrastructure (PKI) for details.
2. Create the Master Key
The edb_tde_kmip_client.py script does not implement key creation.
Use create_master_key.py (bundled with the Eviden KMS test scripts)
or any other KMIP client to create an AES-256 key:
# Using the bundled helper script
python3 .mise/scripts/edb_tde/create_master_key.py \
--pykmip-config-file=/path/to/pykmip.conf
# → prints the key UID, e.g. 0193a4b2-...
The pykmip.conf file must point to the Eviden KMS KMIP socket:
[client]
host = localhost
port = 15696
keyfile = /path/to/client.key
certfile = /path/to/client.crt
ca_certs = /path/to/ca.crt
3. Configure PGDATAKEYWRAPCMD / PGDATAKEYUNWRAPCMD
export PGDATAKEYWRAPCMD='python3 /usr/edb/kmip/client/edb_tde_kmip_client.py \
encrypt \
--pykmip-config-file=/path/to/pykmip.conf \
--key-uid=<UID from step 2> \
--variant=pykmip \
--out-file=%p'
export PGDATAKEYUNWRAPCMD='python3 /usr/edb/kmip/client/edb_tde_kmip_client.py \
decrypt \
--pykmip-config-file=/path/to/pykmip.conf \
--key-uid=<UID from step 2> \
--variant=pykmip \
--in-file=%p'
4. Initialize the Cluster
initdb -D /var/lib/edb/data -y -U enterprisedb \
--key-wrap-command="$PGDATAKEYWRAPCMD" \
--key-unwrap-command="$PGDATAKEYUNWRAPCMD"
initdb calls PGDATAKEYWRAPCMD once to seal the freshly generated cluster DEK.
5. Start the Server
pg_ctl -D /var/lib/edb/data start
Verify TDE is active:
SELECT data_encryption_version FROM pg_control_init();
-- Returns 1 if TDE is enabled
Key Rotation
To rotate the master key:
PGDATA=/var/lib/edb/data
OLD_KEY=<old UID>
NEW_KEY=<new UID created via create_master_key.py>
KMIP_CONF=/path/to/pykmip.conf
CLIENT=/usr/edb/kmip/client/edb_tde_kmip_client.py
cd $PGDATA/pg_encryption
cp key.bin key.bin.bak
python3 $CLIENT decrypt --in-file=key.bin \
--pykmip-config-file=$KMIP_CONF --key-uid=$OLD_KEY --variant=pykmip \
| python3 $CLIENT encrypt --out-file=key.bin \
--pykmip-config-file=$KMIP_CONF --key-uid=$NEW_KEY --variant=pykmip
sed -i "s/$OLD_KEY/$NEW_KEY/" $PGDATA/postgresql.conf
pg_ctl -D $PGDATA restart
Running the Integration Tests
The Eviden KMS repository includes a full integration test suite for EDB TDE.
It requires an EDB subscription token to pull the edb-postgres-advanced:17
Docker image.
EDB_SUBSCRIPTION_TOKEN=<token> \
mise run test:edb_tde --variant non-fips
The test suite:
- Logs in to
docker.enterprisedb.com, starts the EDB container. - Runs
initdbwith TDE — the realedb_tde_kmip_client.pyseals the cluster DEK against Eviden KMS over KMIP/mTLS. - Verifies
data_encryption_version = 1. - Exercises both
--variant=pykmipand--variant=thaleswrap/unwrap roundtrips. - Tests key rotation (re-wrap DEK with a new master key).
See .mise/scripts/edb_tde/README.md for full test documentation.
Reference
| Resource | Link |
|---|---|
| EDB TDE documentation | https://www.enterprisedb.com/docs/tde/latest/ |
| Thales CipherTrust integration | https://www.enterprisedb.com/docs/partner_docs/ThalesCipherTrustManager/05-UsingThalesCipherTrustManager/ |
| IBM Guardium CM integration | https://www.ibm.com/docs/en/guardium-cm/2.0.0?topic=ctc-configuring-postgresql-transparent-database-encryption-tde-key-management-guardium-cryptography-manager |
| Entrust KeyControl integration | https://nshielddocs.entrust.com/interops-docs/pdfs/EDB_Postgres_v16.4-Entrust_KeyControl_v10.3.1_(PUBLIC)_ig.pdf |
| PyKMIP documentation | https://pykmip.readthedocs.io/en/latest/client.html |
SAP ASE TDE with Eviden KMS
This guide describes the integration between Eviden KMS and SAP Sybase Adaptive Server Enterprise (ASE) for Transparent Data Encryption (TDE).
SAP ASE uses the Eviden PKCS#11 provider (libcosmian_pkcs11.so) as an external keystore to generate and store HSM-backed encryption keys.
The integration tests run in non-FIPS mode because the PKCS#11 provider test path currently builds with the non-fips feature.
Architecture
SAP ASE does not connect to KMIP directly. It loads the cosmian_pkcs11 provider library (libcosmian_pkcs11.so), which translates PKCS#11 operations into KMIP-over-HTTPS requests sent to Eviden KMS. The KMS persists key metadata and ciphertext in its configured database backend.
sequenceDiagram
autonumber
participant ASE as SAP ASE
participant PKCS11 as cosmian_pkcs11 (libcosmian_pkcs11.so)
participant KMS as Eviden KMS Server
participant DB as KMS Database Backend (PostgreSQL / MySQL / SQLite / Redis)
Note over ASE,PKCS11: Credential Configuration
ASE->>PKCS11: sp_encryption 'hsm_credential', 'lib=libcosmian_pkcs11.so; pin=...; slot=1'
PKCS11->>PKCS11: Load ckms.toml & client certificate
PKCS11-->>ASE: Credentials stored
Note over ASE,DB: Key Creation & Persistence
ASE->>PKCS11: CREATE ENCRYPTION KEY on external keystore
PKCS11->>KMS: POST /kmip (KMIP Create Request with client cert)
KMS->>DB: Register and activate AES key
DB-->>KMS: Key identifier and state stored
KMS-->>PKCS11: KMIP Create Response (Key UID)
PKCS11-->>ASE: HSM-backed key available (SQL success)
Prerequisites
- Docker and Docker Compose.
- A local checkout of the Eviden KMS repository.
- Test certificates under
test_data/certificates/client_server/(or production mTLS certificates). - Access to the SAP ASE Developer Edition installer. The default download URL is used by the test script, but can be overridden with
ASE_INSTALLER_URL.
| Product | Tested path | Test entry point |
|---|---|---|
| SAP ASE 16 | PKCS#11 provider (libcosmian_pkcs11.so) to KMS HTTPS endpoint | .mise/scripts/test/test_ase_tde.sh |
Configuration
The test builds the cosmian-ase-kmip Docker image for linux/amd64, builds libcosmian_pkcs11.so, and copies the provider into the running ASE container.
The provider reads a ckms.toml configuration file:
[http_config]
server_url = "https://host.docker.internal:<KMS_HTTP_PORT>"
accept_invalid_certs = true
tls_client_pkcs12_path = "/opt/sap/ASE-16_1/ssl/client.p12"
tls_client_pkcs12_password = "password"
Configure the ASE external keystore and provider credential with isql:
sp_configure 'external keystore', 0, 'HSM'
go
sp_configure 'enable encrypted columns', 1
go
sp_encryption 'system_encr_passwd', 'MasterPass1!'
go
sp_encryption 'hsm_credential', 'lib=libcosmian_pkcs11.so; pin=0000; slot=1'
go
create encryption key hsm_key on external keystore with keylength 256 init_vector random
go
The lib, pin, and slot parameters are passed to the PKCS#11 provider. KMIP endpoint, TLS, and KMS credentials remain in ckms.toml and are not configured as ASE KMIP parameters.
Integration Testing
Run the integration test with:
mise run test:ase --variant non-fips
The test verifies:
- mTLS rejection without a valid client certificate.
- Direct KMS REST encrypt/decrypt round-trip.
- Provider loading inside the SAP ASE container.
- Creation of an HSM-backed AES key via SQL
create encryption key. - Visibility and validation of the newly created key in KMS via
ckms locate.
Troubleshooting
- Provider loading failure: If ASE cannot load
libcosmian_pkcs11.so, inspect container logs and ensure the library is built forlinux/amd64and has no unsatisfied dynamic dependencies. - TLS negotiation error: If ASE fails during TLS negotiation with KMS, verify the CA certificate, server certificate hostname, client certificate/PKCS#12 bundle, and KMS client-CA trust configuration.
The complete reproducible procedure is in .mise/scripts/test/test_ase_tde.sh.
IBM Db2 LUW TDE with Eviden KMS
This guide describes the integration between Eviden KMS and IBM Db2 LUW (Linux, UNIX, Windows) for Transparent Data Encryption (TDE).
IBM Db2 connects to the Eviden KMS native KMIP socket server (KMIP 1.1) through IBM GSKit to create and retrieve the Database Encryption Master Key (DEMK).
Architecture
Db2 connects directly to the KMS binary KMIP socket over mutual TLS (mTLS) through GSKit. Db2 references a KMIP configuration file (ekeystore.cfg), which references a GSKit PKCS#12 keystore containing the client certificate and CA certificate.
sequenceDiagram
autonumber
participant Db2 as IBM Db2 LUW
participant GSKit as GSKit keystore
participant KMIP as KMS KMIP socket
participant KMS as Eviden KMS Server
participant DB as KMS Database Backend (PostgreSQL / MySQL / SQLite / Redis)
Db2->>GSKit: Read ekeystore.cfg and client certificate
Db2->>KMIP: TLS connection with client certificate (KMIP 1.1)
KMIP->>KMS: KMIP Register and Activate
KMS->>DB: Persist the DEMK & metadata
DB-->>KMS: DEMK identifier and state
KMS-->>KMIP: KMIP success response
KMIP-->>Db2: Encrypted database creation succeeds
Prerequisites
- Docker and Docker Compose.
- A local checkout of the Eviden KMS repository.
- Test certificates under
test_data/certificates/client_server/(or production mTLS certificates). - Access to the IBM Db2 Community Edition Docker image (requires
LICENSE=accept).
| Product | Tested path | Test entry point |
|---|---|---|
| IBM Db2 LUW 12.1+ | GSKit to KMS KMIP socket, KMIP 1.1 | .mise/scripts/test/test_db2_tde.sh |
Configuration
The test starts the db2-tde Compose service and creates a GSKit PKCS#12 keystore containing the KMS CA and the Db2 client certificate.
Db2 requires a KMIP client configuration file (e.g. ekeystore.cfg) inside the container:
VERSION=1
PRODUCT_NAME=OTHER
ALLOW_KEY_INSERT_WITHOUT_KEYSTORE_BACKUP=TRUE
SSL_KEYDB=<GSKit PKCS#12 path>
SSL_KEYDB_STASH=<GSKit stash path>
SSL_KMIP_CLIENT_CERTIFICATE_LABEL=db2kmip_client
PRIMARY_SERVER_HOST=kmserver.acme.com
PRIMARY_SERVER_KMIP_PORT=<KMS_KMIP_PORT>
PRODUCT_NAME=OTHERselects third-party KMIP key managers like Eviden KMS.KEYSTORE_LOCATIONmust point to this configuration file, not directly to the GSKit.p12file.
Configure Db2 Database Manager to use KMIP:
db2 "UPDATE DBM CFG USING KEYSTORE_TYPE KMIP KEYSTORE_LOCATION '<path-to-ekeystore.cfg>'"
Create an encrypted database:
db2 "CREATE DATABASE KMIPDB ENCRYPT CIPHER AES KEY LENGTH 256"
Db2 registers and activates the DEMK through the KMS KMIP socket.
Integration Testing
Run the integration test with:
mise run test:db2 --variant non-fips
The test verifies:
- mTLS rejection without a client certificate.
- Independent KMS REST encrypt/decrypt round-trip.
- GSKit keystore initialization and KMIP configuration.
- Encrypted database creation via
CREATE DATABASE ... ENCRYPT. - Verification that the master key is created and activated in KMS via
ckms locate.
Troubleshooting
- Keystore / client label error: If Db2 cannot create the database, verify that
gsk9certutil_64created the client labeldb2kmip_client, thatlibicuis installed, and thatKEYSTORE_LOCATIONreferencesekeystore.cfg. - TLS negotiation failure: Verify the CA, server certificate hostname / SANs, client certificate, and the KMS KMIP socket configuration.
The complete reproducible procedure is in .mise/scripts/test/test_db2_tde.sh.
InterSystems IRIS Database Encryption with Eviden KMS
InterSystems IRIS supports database encryption via the KMIP 2.0 protocol, allowing encryption keys to be managed externally by a dedicated Key Management System. Eviden KMS acts as the KMIP server: IRIS connects to it over a mutual TLS (mTLS) channel, retrieves or creates symmetric keys, and uses them to encrypt database files on disk.
Architecture overview
flowchart LR
subgraph iris["InterSystems IRIS"]
enc["Database encryption engine"]
kmip_client["KMIP 2.0 client\n(^SECURITY / ^EncryptionKey)"]
enc --> kmip_client
end
subgraph kms["Eviden KMS (non-FIPS)"]
socket["KMIP socket server\nport 5696 (TLS)"]
db["Key store"]
socket --> db
end
kmip_client -->|"mTLS — KMIP 2.0"| socket
The mTLS channel requires:
| Side | Material |
|---|---|
| KMS | Server certificate + private key (PKCS#12) |
| IRIS | Client certificate + private key + CA certificate |
| Both | Same CA that signed both certificates |
Prerequisites
| Component | Version | Notes |
|---|---|---|
| Eviden KMS | 5.0+ (non-FIPS build) | KMIP socket server requires --features non-fips |
| InterSystems IRIS | 2022.1+ | Community or Enterprise edition |
| KMIP protocol | 2.0 | Configured on the IRIS side |
| OpenSSL | 3.0+ | For TLS 1.3 |
FIPS note: The KMIP socket server is only available in the non-FIPS build of Eviden KMS. Start the server with
--features non-fipsor use the non-FIPS Docker image.
Certificate preparation
Both the KMS server and the IRIS client must present certificates signed by the same CA.
The repository ships test certificates under test_data/certificates/client_server/; for production, generate your own PKI.
test_data/certificates/client_server/
ca/
ca.crt ← CA certificate (trusted by both sides)
server/
kmserver.acme.com.p12 ← KMS server cert + key (PKCS#12, password: "password")
owner/
owner.client.acme.com.crt ← IRIS client certificate
owner.client.acme.com.key ← IRIS client private key
Starting Eviden KMS with the KMIP socket server
The KMIP socket server is disabled by default. Enable it with:
cosmian_kms \
--database-type sqlite \
--sqlite-path /var/lib/kms/data \
--socket-server-start true \
--socket-server-port 5696 \
--tls-p12-file /path/to/kmserver.acme.com.p12 \
--tls-p12-password <p12-password> \
--clients-ca-cert-file /path/to/ca.crt \
--port 9998 \
--hostname 0.0.0.0
| Flag | Purpose |
|---|---|
--socket-server-start | Enable the KMIP TCP/TLS socket listener |
--socket-server-port | TCP port for KMIP (default: 5696) |
--tls-p12-file | PKCS#12 bundle containing the server certificate and key |
--tls-p12-password | Password for the PKCS#12 bundle |
--clients-ca-cert-file | CA that must have signed every connecting client cert |
Verify the socket is up:
openssl s_client -connect <kms-host>:5696 \
-cert /path/to/client.crt \
-key /path/to/client.key \
-CAfile /path/to/ca.crt \
-quiet 2>&1 | head -5
# Expected: "Verify return code: 0 (ok)"
Configuring IRIS
All configuration is done via ObjectScript in the %SYS namespace. You can run these commands interactively in the IRIS terminal, via the Management Portal, or in batch mode with iris session IRIS -B.
Step 1 — Create a TLS/SSL configuration
IRIS uses named SSL configurations to reference certificate material. Create one for the Eviden KMS connection:
zn "%SYS"
; Create a client TLS configuration using the Security.SSLConfigs ObjectScript API
set tls = ##class(Security.SSLConfigs).%New()
set tls.Name = "CosmianKMSTLS"
set tls.Enabled = 1
set tls.Type = 1 ; 1 = client
set tls.CertificateFile = "/path/to/client.crt"
set tls.PrivateKeyFile = "/path/to/client.key"
set tls.CAFile = "/path/to/ca.crt"
set tls.VerifyPeer = 1 ; verify KMS server cert
set sc = tls.%Save()
write $select(sc=1:"OK",1:"ERROR: "_$system.Status.GetErrorText(sc)),!
Type = 1configures the SSL entry as a client configuration. SetVerifyPeer = 1to enforce server-certificate verification (recommended for production).
Step 2 — Register the KMIP server
The documented command-line interface for KMIP server management is ^SECURITY option 14.
Run it from a %SYS terminal session and follow the interactive prompts:
do ^SECURITY
14 ← KMIP server setup
1 ← Create KMIP server
CosmianKMS ← Server name
Eviden KMS – mTLS ← Description
<kms-host> ← Host DNS name or IP
5696 ← TCP port
2.0 ← OASIS KMIP protocol version
CosmianKMSTLS ← SSL/TLS configuration name (from Step 1)
Y ← Non-blocking I/O (recommended)
N ← Auto-reconnect
30 ← I/O timeout in seconds
N ← Log KMIP messages
N ← Debug SSL/TLS
Y ← Confirm creation
0 ← Back
q ← Quit
Step 3 — Create an encryption key
Use the ^EncryptionKey routine to create a key on the external KMIP server:
- From the IRIS terminal, run
do ^EncryptionKey. - Select 5 – Manage KMIP server.
- Enter the server name:
CosmianKMS. - Select 2 – Create new key and choose the desired key length (256-bit recommended).
The key is created on the KMS and referenced in IRIS by its KMIP object identifier.
Step 4 — Activate the KMIP key for database encryption
After creating the key, activate it for database encryption using ^EncryptionKey
(IRIS docs — Activate a Database Encryption Key from a KMIP Server):
- Run
do ^EncryptionKey. - Select 3 – Database encryption.
- Select 1 – Activate database encryption keys.
- Select 2 – Use KMIP server.
- Enter the KMIP server name:
CosmianKMS. - Select the key number shown in the list (e.g.,
1for the first key).
The key is now activated in IRIS memory and can be used to encrypt databases.
Step 5 — Encrypt a database
- Go to the IRIS Management Portal → System Administration → Encryption → Database Encryption.
- Select the database you want to encrypt.
- Click Encrypt and choose the activated KMIP key.
- IRIS starts a background encryption task for that database.
Configuring with Docker
If IRIS runs inside a Docker container and the KMS runs on the Docker host, use
host.docker.internal as the KMS hostname and pass the --add-host flag:
docker run \
--add-host host.docker.internal:host-gateway \
--volume /path/to/certs:/iris-kmip-certs:ro \
intersystemsdc/iris-community:latest
Mount the CA certificate, client certificate, and client key under /iris-kmip-certs/
and reference those paths in the ObjectScript configuration above.
CI integration
The repository includes an automated mTLS integration test that:
- Builds and starts Eviden KMS (non-FIPS) with the KMIP socket server.
- Validates the mTLS sad path (connection without a client certificate is rejected).
- Validates the mTLS happy path (connection with a valid client certificate succeeds).
- Pulls the IRIS Docker image.
- Detects whether KMIP support is available by probing
^SECURITYoption 14. - If KMIP is available:
- Creates a TLS configuration (
Security.SSLConfigsAPI). - Creates a KMIP server entry via
^SECURITYoption 14 (documented command-line interface). - Creates a symmetric encryption key via
^EncryptionKeyoption 5. - Activates the KMIP key for database encryption via
^EncryptionKeyoption 3 → 1 → 2 (per IRIS docs — Activate a Database Encryption Key from a KMIP Server). - Enables encryption on the TEST namespace database (
SYS.DatabaseAPI). - Verifies at-rest encryption: inserts test data, proves it is NOT readable in
IRIS.DAT, proves it IS readable via IRIS session.
- Creates a TLS configuration (
- If KMIP is not available (Community edition): reports SKIPPED cleanly — the mTLS test still passes.
IRIS editions and KMIP support
| Edition | KMIP support | Detection |
|---|---|---|
IRIS Community (intersystemsdc/iris-community) | No | ^SECURITY option 14 not available |
| IRIS Enterprise / licensed | Yes | ^SECURITY option 14 shows KMIP server setup sub-menu |
The test script detects KMIP availability at runtime by probing ^SECURITY option 14.
If the KMIP server setup sub-menu does not appear in the output, all IRIS KMIP steps are skipped gracefully.
The CI job exits 0 with the KMIP steps marked as SKIPPED when using the Community image.
False-positive protection: IRIS terminal batch mode echoes each command before executing it. A naïve
grep "OK_MARKER"would match the command echo (WRITE "OK_MARKER",!) even when the command failed. The test uses anchored grep (grep -q "^OK_MARKER$") to match only the bare output line produced by thewritecommand — not the surrounding echo.
Running the test
# Local run (uses Community image by default)
bash .mise/scripts/test/test_iris.sh --variant non-fips
# With a licensed IRIS image (full KMIP test)
IRIS_DOCKER_IMAGE=containers.intersystems.com/intersystems/iris:latest \
bash .mise/scripts/test/test_iris.sh --variant non-fips
# Via the Nix wrapper (matches CI exactly)
mise run test:iris --variant non-fips
Environment variables
| Variable | Default | Purpose |
|---|---|---|
IRIS_DOCKER_IMAGE | intersystemsdc/iris-community:latest | Override to use a licensed or ARM image |
IRIS_LICENSE_KEY | (empty) | ISC license key injected as ISC_PACKAGE_LICENSEKEY |
On ARM hardware (Apple Silicon, AWS Graviton), use
intersystemsdc/iris-community-arm64:latestor the script will automatically add--platform linux/amd64to run the x86-64 image via emulation.
GitHub Actions
The CI job (iris-mtls in .github/workflows/test_all.yml) runs on every PR
from the main repository and on every release tag. It supports two optional secrets
for accessing enterprise IRIS images from the InterSystems Container Registry:
| Secret / Variable | Purpose |
|---|---|
ISC_DOCKER_USERNAME | Username for containers.intersystems.com |
ISC_DOCKER_PASSWORD | Password for containers.intersystems.com |
IRIS_LICENSE_KEY | License key for licensed IRIS images |
IRIS_DOCKER_IMAGE (var) | Repository variable to override the image |
Troubleshooting
| Symptom | Likely cause | Fix |
|---|---|---|
handshake failure | IRIS client cert not signed by the KMS trusted CA | Ensure both certs share the same CA (--clients-ca-cert-file) |
Instance is not running | iris session called before IRIS fully initialized | Wait for the instance; retry for up to 120 s |
ERROR: <status code> | Wrong ^SECURITY option 14 prompt answer | Check the IRIS version; menu prompts may vary between releases |
KMS log: unexpected EOF | Client connected without a certificate (expected for sad path) | Normal — mTLS enforced; provide a valid client cert |
host.docker.internal not found | Docker Desktop < 4.0 or Linux without --add-host | Add --add-host host.docker.internal:host-gateway to docker run |
Veracrypt integration with Eviden KMS
The Eviden KMS is integrated with Veracrypt disk encryption using the Eviden KMS PKCS#11 provider library.
Veracrypt is a free, open-source disk encryption software for Windows, macOS, and Linux, and is a successor to TrueCrypt, certified by ANSSI. Veracrypt has undergone a formal security evaluation by the BSI.
Using the Eviden KMS PKCS#11 provider library, Veracrypt can use keys stored in the KMS to encrypt and decrypt volumes.
See the PKCS#11 provider module reference page for the mechanisms and Cryptoki versions supported by the library.

Installing the PKCS#11 provider library on Veracrypt
Go to Veracrypt Settings > Security Tokens and use the Select Library...
button to select the Eviden KMS PKCS#11 library for your operating system.
Then click OK.
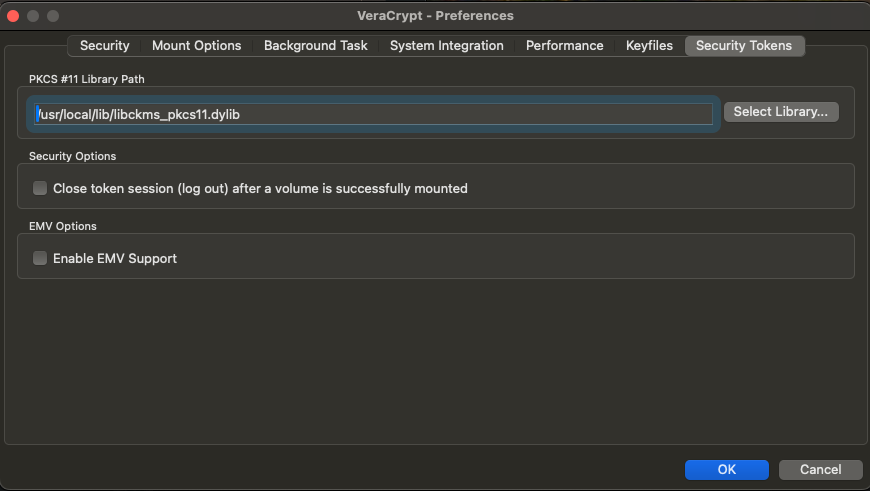
Configuring access to the KMS
The PKCS#11 provider library uses the same configuration file as the CLI.
See Authenticating users to the KMS to learn how to configure the KMS to use OpenID Connect or certificate authentication. Please note that the KMS can also manage the machines' certificates.
Here is an example configuration file for the PKCS#11 provider library accessing the KMS using a PKCS#12 file for authentication.
[kms_config.http_config]
server_url = "https://kms.acme.com:9999"
ssl_client_pkcs12_path = "./certificates/machine123.acme.p12"
ssl_client_pkcs12_password = "machine123_pkcs12_password"
To use Open ID connect, install the KMS CLI from https://package.cosmian.com/kms/ and
use the ckms login command to authenticate to the KMS first.
Logging
The PKCS#11 module logs to the cosmian-pkcs11.log file in the same .cosmian subdirectory of the configuration file.
The COSMIAN_PKCS11_LOGGING_LEVEL environment variable controls logging of the PKCS#11 module.
The logging level can be set to trace, debug, info, warn, or error, and defaults to info
when not set.
Creating keys to use with Veracrypt
The keys used to encrypt Veracrypt volumes are created in the KMS as Symmetric Keys and must
carry at least two tags, one being disk-encryption. The other tag(s) will be displayed to the
user in the Veracrypt GUI when selecting the key to use to mount the volume. The other tag(s) can
also be used to identify the key when using Veracrypt CLI.
To create a key using the CLI, which will be shown as vol1 to the user, use the following command:
ckms sym keys create -t disk-encryption -t vol1
The keys are exposed to Veracrypt as PKCS#11 token files (CKO_DATA objects).
The label shown in the Veracrypt GUI is the first user-defined tag sorted alphabetically (e.g. vol1).
The PKCS#11 provider discovers disk-encryption keys using the tag disk-encryption by default.
To use a different tag, set the COSMIAN_PKCS11_DISK_ENCRYPTION_TAG environment variable before
starting Veracrypt.
COSMIAN_PKCS11_DISK_ENCRYPTION_TAG=my-veracrypt-keys veracrypt
Keys must remain non-sensitive (exportable) so the PKCS#11 provider can
retrieve the key material. This is the default for ckms sym keys create.
Do not forget to grant Get access to the key to the machine that will mount the Veracrypt volume.
ckms access-rights grant <MACHINE_CN> <KEY_ID> get
where <MACHINE_CN> is the Common Name of the certificate used to authenticate the machine to the
KMS and <KEY_ID> is the ID of the key created in the previous step.
Mounting a Veracrypt volume using the GUI
When mounting a Veracrypt volume, select the Use keyfiles option and select the key to use to
mount the volume using the Keyfiles... button.
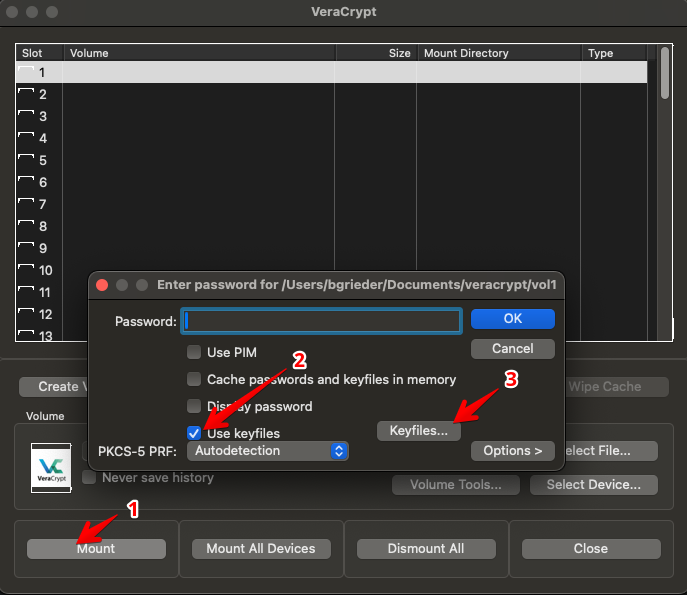
Click Add Token Files...
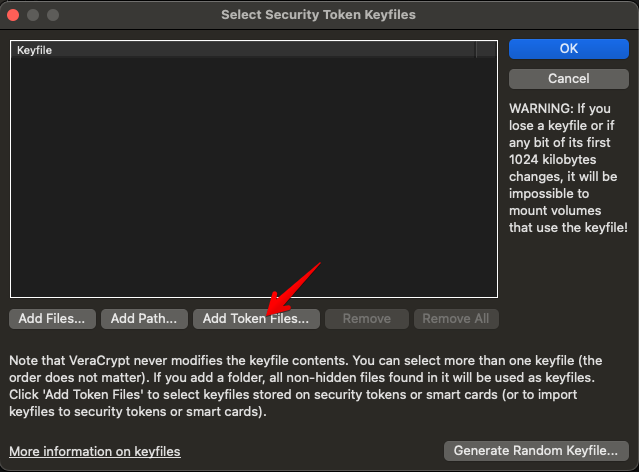
Select the key to use to mount the volume and click OK
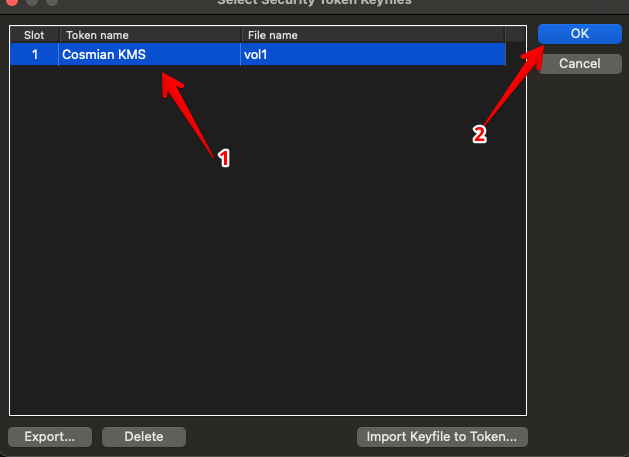
Mounting a Veracrypt volume using the CLI
When mounting a Veracrypt volume using the CLI, use the -k option followed by
token://slot/1/file/vol1 where vol1 is the other tag chosen to identify the key in the KMS.
Revoking the access to a key
To revoke access to the key, either
- remove the access to the key <KEY_ID> for the machine <MACHINE_CN> using the following command:
ckms access-rights revoke <MACHINE_CN> <KEY_ID> get
- revoke the key itself using the following command:
ckms sym keys revoke <KEY_ID>
Note: a revoked key can never be reused.
Rotating a key
To rotate a key,
- Create a new key.
- Grant access to the machine to the new key.
- Perform the key rotation/change in the Veracrypt GUI or CLI.
- Revoke the access to the old key for the machine.
- Optionally revoke the old key itself.
LUKS
The Eviden KMS can provision secrets to open Linux LUKS encrypted partitions. The secret never leaves the KMS and can be used to unlock the partition at boot time.
Installing p11-kit and the Eviden KMS PKCS#11 module
The Eviden KMS provides a PKCS#11 module that can be used to access the KMS from applications that support PKCS#11, using the p11-kit framework.
See the PKCS#11 provider module reference page for the mechanisms and Cryptoki versions supported by the library.
With LUKS, the system provided systemd-cryptenroll command must have support for p11-kit which you can check by running systemd-cryptenroll --help and checking for the +P11KIT flag.
❯ systemd-cryptenroll --version
systemd 253 (253.5-1ubuntu6.1)
+PAM +AUDIT +SELINUX +APPARMOR +IMA +SMACK +SECCOMP +GCRYPT -GNUTLS +OPENSSL +ACL +BLKID +CURL
+ELFUTILS +FIDO2 +IDN2 -IDN +IPTC +KMOD +LIBCRYPTSETUP +LIBFDISK +PCRE2 -PWQUALITY
+P11KIT +QRENCODE +TPM2 +BZIP2 +LZ4 +XZ +ZLIB +ZSTD -BPF_FRAMEWORK -XKBCOMMON +UTMP +SYSVINIT
default-hierarchy=unified
Unfortunately, Ubuntu 22.04 does not provide p11-kit support; however the setup works fine for Ubuntu 24.04.
1. Install the p11-kit package
Ubuntu 24.04
sudo apt install p11-kit cryptsetup
Rocky Linux 9
sudo dnf install p11-kit cryptsetup
2. Create the PKCS#11 configuration and module directories
sudo mkdir -p /etc/pkcs11/modules
3. Create a configuration file for the PKCS#11 module
sudo tee /etc/pkcs11/pkcs11.conf <<EOF
# This setting controls whether to load user configuration from the
# ~/.config/pkcs11 directory. Possible values:
# none: No user configuration
# merge: Merge the user config over the system configuration (default)
# only: Only user configuration, ignore system configuration
user-config: merge
EOF
4. Copy the PKCS#11 module to the pkcs11 directory
sudo cp libcosmian_pkcs11.so /usr/local/lib/
5. Create a configuration file for the cosmian PKCS#11 module
sudo tee /etc/pkcs11/modules/cosmian_pkcs11.module <<EOF
# Eviden KMS PKCS#11 module
module: /usr/local/lib/libcosmian_pkcs11.so
EOF
6. Check that the module loads correctly
> p11-kit list-modules
...
cosmian_pkcs11: /usr/local/lib/libcosmian_pkcs11.so
library-description: Eviden KMS PKCS#11 provider
library-manufacturer: Cosmian
library-version: x.y
token: Cosmian-KMS
manufacturer: Cosmian
model: software
serial-number: x.y.z
flags:
rng
write-protected
login-required
user-pin-initialized
protected-authentication-path
token-initialized
Configuring the access to the KMS
The PKCS#11 module uses the same configuration file as the CLI. Since it may be run as a system user, the configuration file should be made available in /etc/cosmian/ckms.toml.
See Authenticating users to the KMS to learn how to configure the KMS to use Open ID Connect or certificate authentication.
Here is an example configuration file for the PKCS#11 provider library accessing the KMS using a PKCS#12 file for authentication.
[http_config]
server_url = "https://kms.acme.com:9999"
ssl_client_pkcs12_path = "./certificates/machine123.acme.p12"
ssl_client_pkcs12_password = "machine123_pkcs12_password"
To use Open ID connect, install the KMS CLI from Cosmian packages and use the ckms login command to authenticate to the KMS first.
Logging
The PKCS#11 module logs to the cosmian-pkcs11.log file in the same .cosmian subdirectory of the configuration file.
The COSMIAN_PKCS11_LOGGING_LEVEL environment variable controls logging of the PKCS#11 module.
The logging level can be set to trace, debug, info, warn, or error, and defaults to info
when not set.
Creating an RSA key pair using openssl and importing it into the Eviden KMS
To generate a self-signed certificate with RSA 2048bit key and in PKCS12 format, you can use the OpenSSL command-line tool. Here are the steps:
1. Generate a new private key
openssl genpkey -algorithm RSA -out private_key.pem -pkeyopt rsa_keygen_bits:2048
2. Create a self-signed certificate
openssl req -new -x509 -key private_key.pem -out cert.pem -days 365
3. Convert the certificate and private key to PKCS12 format
openssl pkcs12 -export -out certificate.p12 -inkey private_key.pem -in cert.pem
4. Import the PKCS12 file into the Eviden KMS using a disk-encryption tag
ckms certificates import -f pkcs12 -t disk-encryption certificate.p12 disk-encryption
The private key in the PKCS12 file was imported with id: 6fc631...
Tags:
- disk-encryption
A tag different from disk-encryption can be used, but it must be set in the
in the COSMIAN_PKCS11_DISK_ENCRYPTION_TAG environment variable when enrolling the token (sse
below).
Creating a LUKS partition
First, allocate some space, then create a LUKS partition using cryptsetup.
1. Allocating space for the LUKS partition
LUKS partitions can be created from either disk partitions or files.
From a file
Use either dd or fallocate to create a file that will be used as the LUKS partition.
# Create a 1GB file
fallocate -l 1G /path/to/file
Then use path/to/file as the device to encrypt.
From a disk partition
Using parted, determine or create a partition on the disk that you want to encrypt.
In this example, we assume the disk is available as /dev/vda.
If needed, use partedto resize the last partition and create free space at the end of the disk.
sudo parted /dev/vda
(parted) print free
Number Start End Size File system Name Flags
17.4kB 1049kB 1031kB Free Space
1 1049kB 1128MB 1127MB fat32 boot, esp
2 1128MB 3276MB 2147MB ext4
3 3276MB 102GB 98.7GB
102GB 103GB 1079MB Free Space
Make a 4th partition /dev/vda4 from the free space at the end.
(parted) mkpart 4 102GB 103GB
2. Creating a LUKS 2 partition on the allocated space
Enter a passphrase to protect the partition when prompted. The encrypted passphrase will be stored in the LUKS header in key slot 0.
sudo cryptsetup luksFormat --type luks2 --key-slot 0 /dev/vda4
or alternatively, if you created a file:
sudo cryptsetup luksFormat --type luks2 --key-slot 0 /path/to/file
Make sure to remember the passphrase, as it will be needed to unlock the partition
during cryptenroll or when rotating the RSA keys.
Enrolling the LUKS partition with the Eviden KMS
The RSA key pair is searched on the KMS using a tag controlled by
the COSMIAN_PKCS11_DISK_ENCRYPTION_TAG environment variable.
When not set, the default tag searched is disk-encryption.
1. Enroll the partition with the Eviden KMS
# this is equivalent to
# sudo COSMIAN_PKCS11_LOGGING_LEVEL=info COSMIAN_PKCS11_DISK_ENCRYPTION_TAG=disk-encryption systemd-cryptenroll /dev/vda4 --pkcs11-token-uri=pkcs11:token=Cosmian-KMS
> sudo systemd-cryptenroll --pkcs11-token-uri=pkcs11:token=Cosmian-KMS /dev/vda4
🔐 Please enter current passphrase for disk /dev/vda4: *************
cosmian-pkcs11 module logging at INFO level to file /var/log/cosmian-pkcs11.log
Successfully logged into security token 'Cosmian-KMS' via protected authentication path.
New PKCS#11 token enrolled as key slot 1.
3. Verify the enrollment
> sudo cryptsetup luksDump /dev/vda4
LUKS header information
Version: 2
Epoch: 5
...
Keyslots:
0: luks2
....
1: luks2
Key: 512 bits
Priority: normal
Cipher: aes-xts-plain64
Cipher key: 512 bits
PBKDF: pbkdf2
Hash: sha512
...
Tokens:
0: systemd-pkcs11
pkcs11-uri: pkcs11:token=Cosmian-KMS
pkcs11-key: 0b 94 e0 ...
...
4. Test attaching the LUKS partition to /dev/mapper/myluks using the Cosmian-KMS token in slot 0
> sudo cryptsetup open --type luks2 --token-id=0 --token-only /dev/vda4 myluks
cosmian-pkcs11 module logging at INFO level to file /var/log/cosmian-pkcs11.log
Successfully logged into security token 'Cosmian-KMS' via protected authentication path.
Successfully decrypted key with security token.
5. Format the LUKS partition (do this only once)
sudo mkfs.ext4 /dev/mapper/myluks
6. Mount the partition
sudo mkdir /mnt/myluks #only once
sudo mount /dev/mapper/myluks /mnt/myluks
7. Close the LUKS partition
sudo umount /mnt/myluks
sudo cryptsetup close myluks
Automatically unlocking the LUKS partition at boot
To automatically unlock the LUKS partition at boot, you cannot use the /etc/crypttab file
because the network is not available when systemd-cyptsetup is run.
You need to create a systemd service that unlocks the LUKS partition at the right time, after the network is available.
1. Create the bash script that unlocks and mounts the partition
sudo tee -a /root/mount_myluks.sh <<EOF
#!/bin/bash
set -e
set -x
# unlock the partition
cryptsetup open --type luks2 --token-id=0 --token-only /dev/vda4 myluks
# mount the partition
mount /dev/mapper/myluks /mnt/myluks
EOF
sudo chmod +x /root/mount_myluks.sh
2. Create the systemd service file
sudo tee -a /etc/systemd/system/mount_myluks.service <<EOF
[Unit]
Description=open and mount the encrypted /dev/vda4 to /mnt/myluks
Wants=network-online.target
After=network-online.target
[Service]
Type=oneshot
ExecStart=/bin/bash /root/mount_myluks.sh
[Install]
WantedBy=multi-user.target
EOF
3. Enable the service
> sudo systemctl enable mount_myluks.service
Created symlink /etc/systemd/system/multi-user.target.wants/mount_myluks.service → /etc/systemd/system/mount_myluks.service.
sudo systemctl daemon-reload
4. Reboot the machine to test the service
sudo reboot
The LUKS partition should be automatically unlocked and mounted at boot to /mnt/myluks.
Check dmesg, and /var/log/cosmian-pkcs11.log for any errors.
Rotating the keys
To rotate the keys used to encrypt the LUKS partition, you can generate a new key pair and import it into the Eviden KMS.
Then, you can re-enroll the LUKS partition with the new key. You MUST know the passphrase to perform this operation.
1. Wipe the old key from the LUKS partition
sudo systemd-cryptenroll /dev/vda4 --wipe-slot=pkcs11
Wiped slot 1.
2. Revoke the old key from the Eviden KMS
ckms certificates revoke -k 6fc631... "revoked"
Successfully revoked: 6fc631....
3. Follow the steps to generate a new key pair and import it into the Eviden KMS
4. Enroll the LUKS partition with the new key; you will be prompted for the passphrase
External documentation
Prim'X CRYHOD
The Eviden KMS can be used to unlock Prim'x CRYHOD partitions
Configuring Prim'X CRYHOD
If you get the following pop-up when trying to encrypt a disk
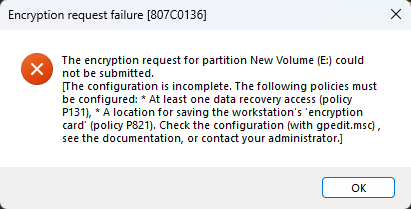
Additional configuration is required.
Launch the CRYHOD policies application.
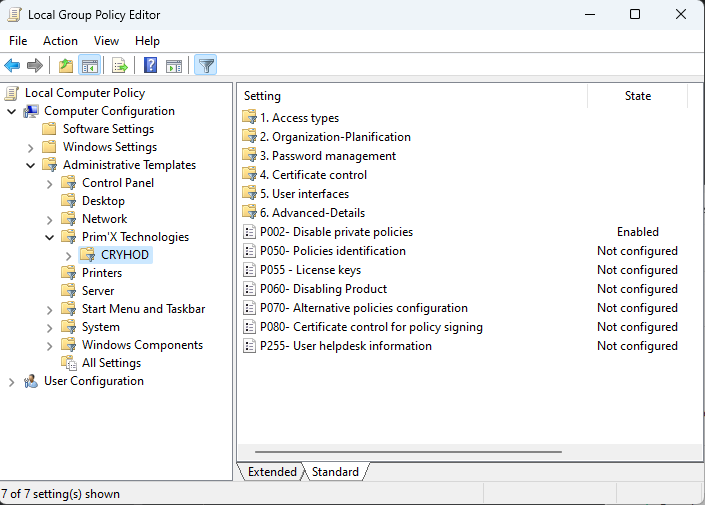
Configure the P131 policy:
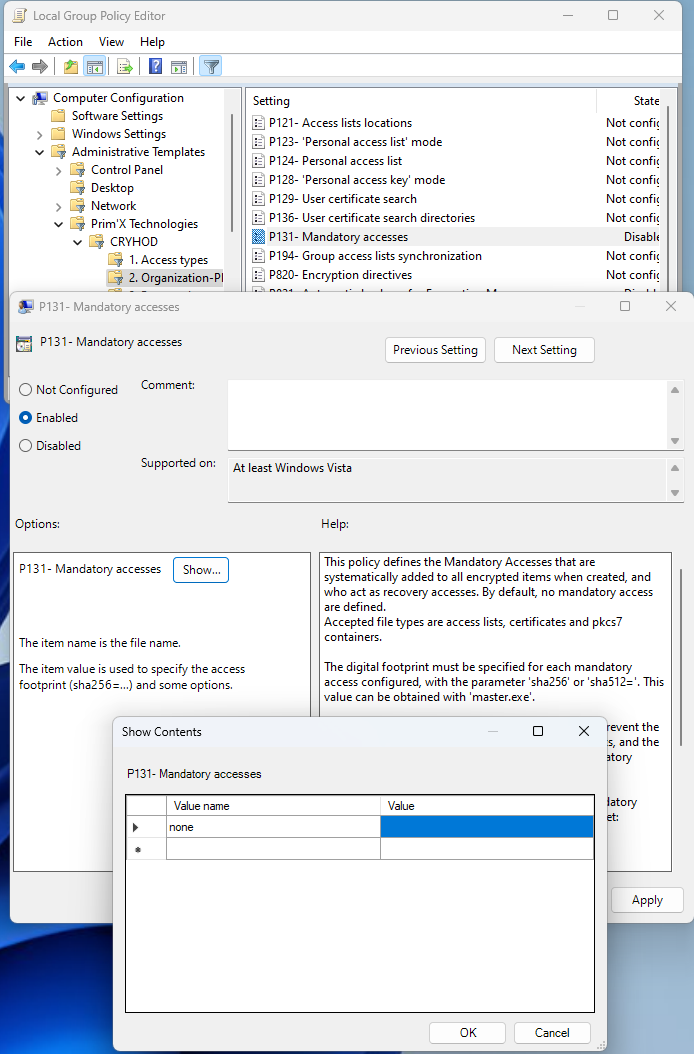
For testing, you can set the value to th.
Configure the P821 policy:
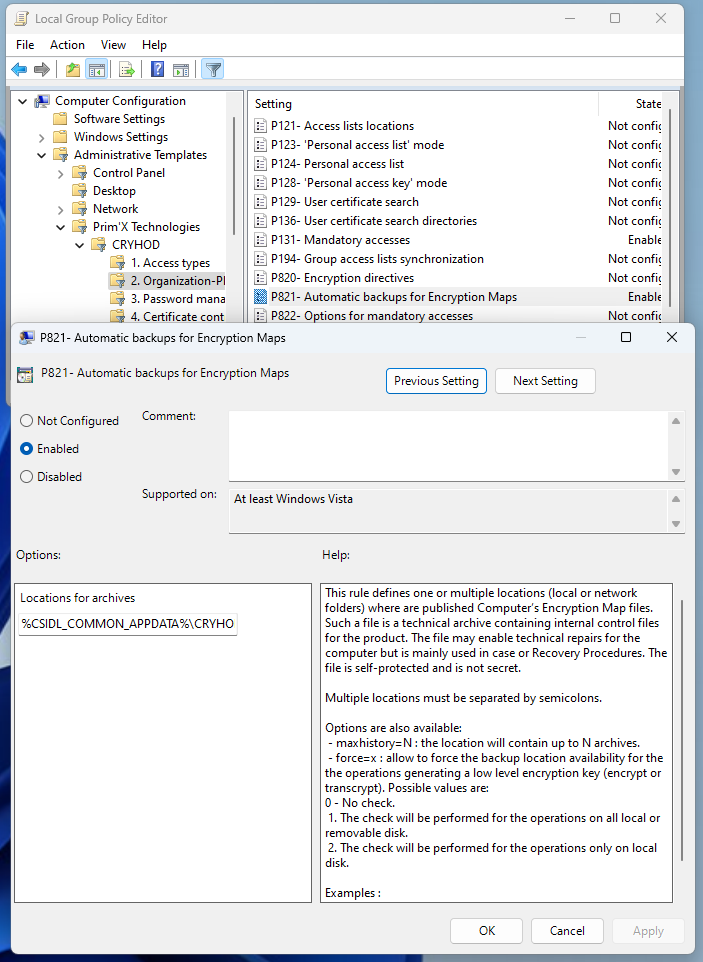
For testing, you can keep the default values.
Configuring the location of the PKCS#11 provider using the policy P296
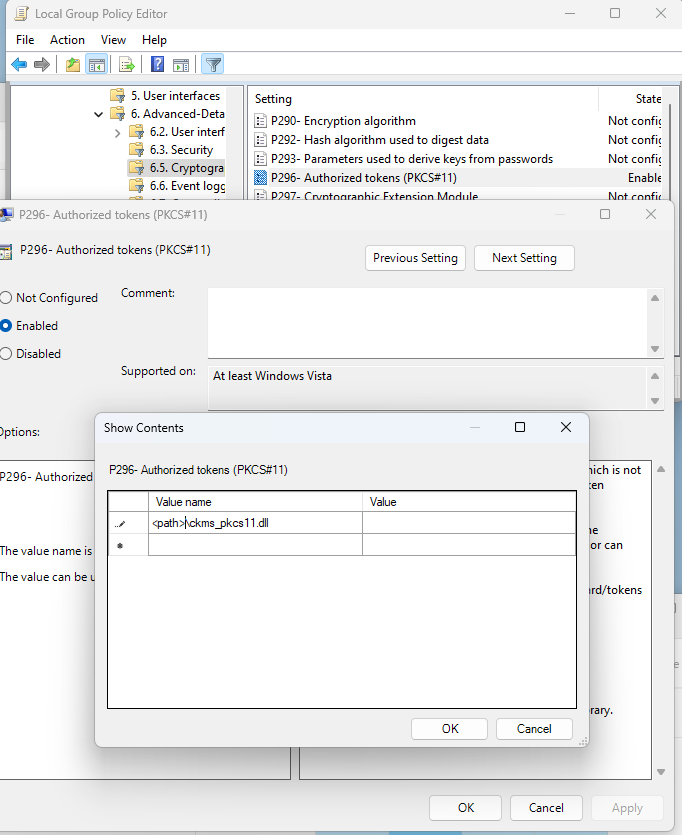
Enter the full path of the cosmian_pkcs11.dll as the value name and leave the value empty.
Note: if you change the value, kill all CRYHOD processes or restart for the change to take into effect
Encrypting a partition
Launch Computer Encryption Center
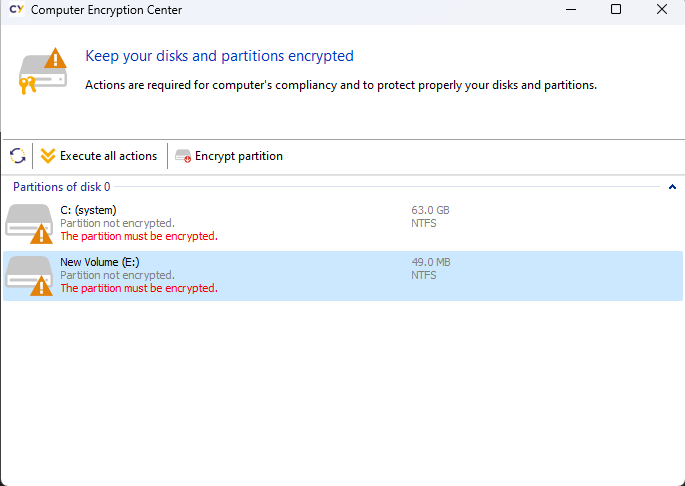
And select the partition to encrypt.
Then select Key stored in a smart card or USB device (PKCS#11)
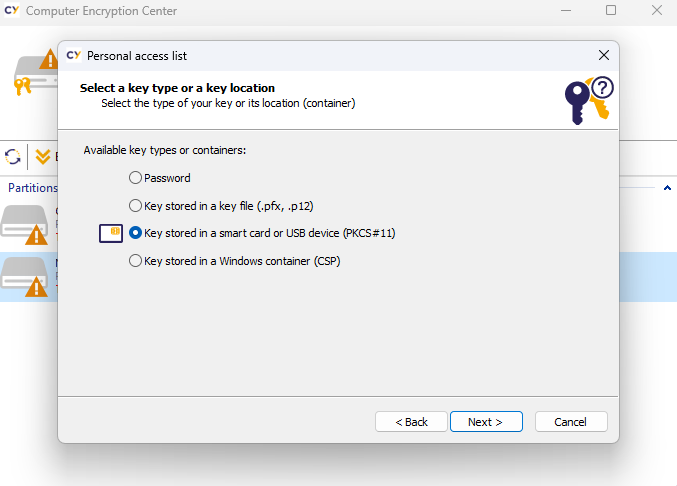
Click next; the Comsian KMS should appear in the list
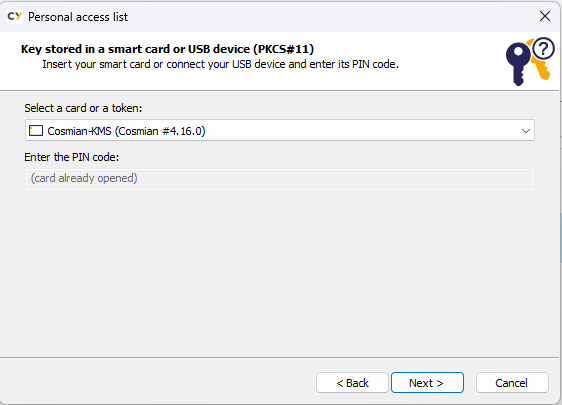
Click next
Adjusting the KMS location and authentication
The configuration file is located in the User home .cosmian sub-directory,
in the ckms.toml file.
See Authenticating users to the KMS to learn how to configure the KMS to use Open ID Connect or certificate authentication. Please note that the KMS can also manage the machines' certificates.
Here is an example configuration file for the PKCS#11 provider library accessing the KMS using a PKCS#12 file for authentication.
[http_config]
server_url = "https://kms.acme.com:9999"
ssl_client_pkcs12_path = "./certificates/machine123.acme.p12"
ssl_client_pkcs12_password = "machine123_pkcs12_password"
Viewing the logs
By default, the logs are available in the User home .cosmian sub-directory.
Get-Content -path C:\<USER HOME>\.cosmian\cosmian-pkcs11.log -wait
The log level can be adjusted using the COSMIAN_PKCS11_LOGGING_LEVEL environment variable.
setx COSMIAN_PKCS11_LOGGING_LEVEL "debug"
Creating an RSA private key and Certificate to use with CRYHOD
Create an RSA key with 2048 bits and the disk-encryption tag.
This tag is the default tag searched. The value can be changed by setting
the COSMIAN_PKCS11_DISK_ENCRYPTION_TAG environment variable.
cosmian.exe rsa keys create -s 2048 -t disk-encryption
Public key unique identifier: ec572e57-eab0-481c-9393-805a11c12ac0_pk
Private key unique identifier: ec572e57-eab0-481c-9393-805a11c12ac0
VMware vSphere VM Encryption with an External KMS
This guide explains how to protect your VMware vSphere infrastructure using Eviden KMS as an external Key Management Server (KMS), and walks you through the full setup:
- Why use an external KMS with vSphere?
- Architecture and security principles
- What gets protected
- Setting up certificates
- Configuring the KMS server
- Connecting vCenter
Overview
| Item | Details |
|---|---|
| Protocol | KMIP 1.1 over TCP/TLS with mutual certificate authentication |
| Port | 5696 (IANA-registered KMIP port) |
| Key type | AES-256 symmetric key |
| vSphere version | vSphere 6.5 and above (Standard Key Provider) |
| Eviden KMS feature | Works with both FIPS and non-FIPS builds |
Why Use an External KMS with vSphere?
VMware vSphere supports three key provider types (since vSphere 6.5/7.0):
| Key Provider | Available Since | External KMS Required |
|---|---|---|
| Standard Key Provider | vSphere 6.5 | Yes (KMIP) |
| Trusted Key Provider | vSphere 7.0 | Yes (KMIP + vSphere Trust Authority) |
| Native Key Provider | vSphere 7.0 U2 | No (built-in, keys stored in vCenter) |
Using a Standard Key Provider backed by an external, dedicated KMS is the recommended approach for production environments and regulated industries because it provides:
- Separation of duties: encryption keys are stored in a dedicated, hardened system — completely separate from the compute infrastructure they protect. A compromised ESXi host or vCenter cannot expose the master keys.
- Centralised key lifecycle management: key creation, rotation, revocation, and auditing are managed in one place across all workloads.
- Compliance readiness: many frameworks (PCI-DSS, HIPAA, GDPR, SOC 2, FedRAMP) explicitly require that encryption keys be managed independently from the data they protect.
- FIPS 140-3 compliance: Eviden KMS operates in FIPS 140-3 validated mode, satisfying the cryptographic requirements of the most demanding regulatory environments.
- Zero-trust posture: even with physical access to a storage array or datastore, data remains unintelligible without authorised key access from the KMS.
References
Architecture and Security Principles
Key Hierarchy
vSphere VM encryption uses a two-level key hierarchy to minimize key exposure:
| Key | Generated by | Stored | Purpose |
|---|---|---|---|
| Key Encryption Key (KEK) | External KMS (Eviden) | KMS only | Wraps (encrypts) the DEK |
| Data Encryption Key (DEK) | ESXi host | With the VM (wrapped by KEK) | Encrypts VM disk I/O |
The KEK never leaves the KMS in plaintext. ESXi hosts receive the KEK transiently in memory to unwrap the DEK; neither key is ever persisted unprotected on the hypervisor or storage.
Communication Flow
sequenceDiagram
autonumber
participant Admin as vSphere Admin
participant VC as vCenter Server
participant KMS as Eviden KMS
participant ESXi as ESXi Host
participant DS as Datastore (VMDK)
Admin->>VC: Assign VM Storage Policy<br/>(Encryption enabled)
VC->>KMS: KMIP Create — request new KEK<br/>(mTLS, port 5696)
KMS-->>VC: KEK ID + KEK (AES-256)
VC->>ESXi: Push KEK (in-memory, encrypted channel)
ESXi->>ESXi: Generate DEK locally (AES-256 XTS)
ESXi->>ESXi: Wrap DEK with KEK → wrapped DEK
ESXi->>DS: Store VM files encrypted<br/>(VMDK, VMX, swap — AES-256 XTS)
ESXi->>DS: Store wrapped DEK alongside VM
Note over KMS,DS: KEK resides only in KMS.<br/>Wrapped DEK stored with VM.<br/>Plaintext DEK exists only in ESXi RAM.
rect rgb(240, 248, 255)
Note over VC,ESXi: On VM power-on (key refresh)
ESXi->>VC: Request KEK for this VM
VC->>KMS: KMIP Get (KEK ID)<br/>(mTLS)
KMS-->>VC: KEK
VC-->>ESXi: KEK (in-memory)
ESXi->>ESXi: Unwrap DEK using KEK
ESXi->>DS: Decrypt/Encrypt disk I/O using DEK
end
Network Architecture
graph TB
subgraph Mgmt["Management Network (isolated)"]
VC["vCenter Server\n(KMIP client)"]
end
subgraph KMSZone["KMS DMZ / Secure Zone"]
KMS["Eviden KMS\nport 5696 (KMIP/TLS)\nport 9998 (HTTP API)"]
DB[("Key Store\n(SQLite / PostgreSQL\n/ Redis-findex)")]
KMS --- DB
end
subgraph Compute["Compute Cluster"]
ESXi1["ESXi Host 1"]
ESXi2["ESXi Host 2"]
ESXiN["ESXi Host N"]
end
subgraph Storage["Storage Network"]
SAN["SAN / NFS Datastore\n(encrypted VMDKs)"]
end
VC -- "KMIP 1.1+\nmTLS (port 5696)\nCertificate Auth" --> KMS
VC -- "Push KEK\n(encrypted, in-memory)" --> ESXi1
VC -- "Push KEK" --> ESXi2
VC -- "Push KEK" --> ESXiN
ESXi1 -- "AES-256 XTS\nencrypted I/O" --> SAN
ESXi2 -- "AES-256 XTS\nencrypted I/O" --> SAN
ESXiN -- "AES-256 XTS\nencrypted I/O" --> SAN
style KMSZone fill:#e8f5e9,stroke:#388e3c
style Mgmt fill:#e3f2fd,stroke:#1565c0
style Compute fill:#fff3e0,stroke:#e65100
style Storage fill:#fce4ec,stroke:#c62828
Security Properties
| Property | How it is enforced |
|---|---|
| Encryption at rest | All VMDK files, VM swap files, VM core dumps, and the VM configuration (VMX) are encrypted with AES-256 XTS on the ESXi host before any write to the datastore |
| Key separation | KEK lives only inside Eviden KMS; the ESXi host holds the plaintext DEK in RAM only for the duration of active I/O |
| Mutual TLS (mTLS) | Both vCenter and Eviden KMS authenticate each other with X.509 certificates over every KMIP connection; no unauthenticated key request can succeed |
| No keys on storage | The datastore contains only the wrapped DEK (ciphertext); raw key material is never written to disk outside the KMS |
| Audit trail | Every KMIP operation (Create, Get, Activate, Revoke, Destroy) is logged by Eviden KMS with timestamp, caller identity, and key ID |
| Key rotation | VMware supports re-keying VMs (shallow re-key: new KEK; deep re-key: new DEK + new KEK) without downtime on vSphere 7.0+ |
| FIPS 140-3 | Eviden KMS uses a FIPS 140-3 validated OpenSSL 3.x provider; all symmetric keys use AES-256; all asymmetric operations use NIST-approved curves |
| Revocation / disaster recovery | Revoking the KEK in Eviden KMS immediately prevents any new VM power-on or vMotion, enabling a cryptographic kill-switch |
What Gets Protected
Encryption at Rest
When a VM Storage Policy with encryption is applied, the following objects are transparently encrypted:
- VMDK files (flat and sparse) — all disk data via AES-256 XTS
- VM configuration file (
.vmx) - VM swap file (
.vswp) — prevents memory snooping via storage - VM core dump files (
.vmss,.vmem) — prevents key material leakage in snapshots and crash dumps - Snapshot delta disks (
.vmdkdelta files created during snapshot)
Items not encrypted by VM encryption: vSphere log files, NVRAM state, and the vSphere datastore catalogue itself. Use datastore-level encryption (vSAN Encryption or storage-array encryption) as a complement for full coverage.
Encryption in Transit
All key material travels over mutually authenticated TLS:
- vCenter ↔ KMS: KMIP 1.1+ over TLS 1.2+, enforced by certificate pinning on both sides
- vCenter ↔ ESXi: key distribution uses the internal vSphere encrypted management channel
- KMS API: Eviden KMS exposes its management API over HTTPS (TLS 1.2+); the KMIP socket server runs on a dedicated port (default 5696)
Access Control
- Only vCenter Server (identified by its client certificate) can request keys from the KMS
- ESXi hosts never communicate directly with the KMS; they receive KEKs from vCenter through the authenticated management plane
- Eviden KMS access control enforces per-key and per-user permissions; the vCenter service account should be granted the minimum set of KMIP operations (
Create,Get,Activate,Revoke,Locate)
Prerequisites
- OpenSSL (≥ 1.1.1) installed and on your PATH
- A working copy of
openssl.cnfwith a[ v3_ca ]section - UNIX shell (bash, zsh, etc.)
- A directory to store your certificates, e.g.,
/etc/ssl/{{ORG_NAME}}_certs - VMware vSphere: 6.5 or higher
1. Generate Your CA
Create a 2048-bit RSA private key for your CA, then issue a self-signed root certificate:
# 1. Generate CA private key
openssl genrsa -out ca.key 2048
# 2. Create self-signed CA certificate (10 year validity)
openssl req -x509 -nodes -days 3650 \
-new -key ca.key \
-out ca.crt \
-config openssl.cnf \
-extensions v3_ca \
-subj "/C=<COUNTRY>/ST=<STATE>/L=<CITY>/O=<ORG_NAME>/OU=<UNIT>/CN=<CA_COMMON_NAME>"
ca.key: CA private key (keep this highly secure!)ca.crt: Public root certificate, used to sign and verify downstream certificates
2. Generate Server Key & CSR
Create a new 2048-bit RSA key for your KMS server and a CSR including EKU extensions:
openssl req -newkey rsa:2048 -nodes \
-keyout server.key \
-out server.csr \
-subj "/CN=<SERVER_COMMON_NAME>/O=<ORG_NAME>/C=<COUNTRY>" \
-addext "keyUsage = digitalSignature, keyEncipherment" \
-addext "extendedKeyUsage = clientAuth, serverAuth"
server.key: Server's private keyserver.csr: Certificate Signing Request, withclientAuth&serverAuthEKUs
3. Sign the Server Certificate
Use your CA to sign the CSR, embedding the same EKU settings in the issued certificate:
openssl x509 -req \
-in server.csr \
-CA ca.crt -CAkey ca.key -CAcreateserial \
-out server.crt \
-days 365 \
-extfile <(printf "[req_ext]\n\
keyUsage = digitalSignature,keyEncipherment\n\
extendedKeyUsage = clientAuth,serverAuth\n") \
-extensions req_ext
server.crt: The signed certificate, valid for 1 year
4. Verify the Certificate Extensions
Confirm that your certificate contains the correct EKU fields:
openssl x509 -in server.crt -text -noout | grep -A1 "Extended Key Usage"
Expected output:
X509v3 Extended Key Usage:
TLS Web Server Authentication, TLS Web Client Authentication
5. Export to PKCS#12
Bundle your server certificate, private key, and CA chain into a single .p12 archive:
openssl pkcs12 -export \
-in server.crt \
-inkey server.key \
-certfile ca.crt \
-out server.p12 \
-name "{{SERVER_ALIAS}}" \
-passout pass:<P12_PASSWORD>
server.p12: PKCS#12 archive containing your key and certificates<P12_PASSWORD>: Password to unlock the archive — use a strong secret!
6. Configure the KMS Server (kms.toml)
Below is a template kms.toml. Update file paths, usernames, and passwords as required:
# General Configuration
default_username = "<USERNAME>"
force_default_username = false
socket_server_start = true
[http]
port = 9998
hostname = "0.0.0.0"
# TLS configuration moved to [tls] section
# See the [tls] section below for certificate configuration
authority_cert_file = "/etc/ssl/{{ORG_NAME}}_certs/ca.crt"
Start the KMS with:
systemctl start cosmian_kms
vCenter Integration
Step 1: Go on your vCenter UI and add a Key Provider

Step 2: Add new Standard KMS Provider

Step 3: Set up your Standard Key Provider

Step 4: Trust the newly added Eviden KMS

Step 5: Establish Trust with the Eviden KMS


Step 6: Go on the KMS server and get .crt and .key certificates

Step 7: Upload KMS Credentials and establish trust

Step 8: Your KMS is connected

Bonus: Encrypt your Virtual Machine

Keep all private keys secure and back up your CA key (
ca.key) offline in an encrypted vault.
Synology DSM — NAS Volume Encryption with Eviden KMS
Synology DiskStation Manager (DSM) 7.x supports delegating NAS volume encryption key management to an external KMIP-compliant Key Management Server. By connecting a Synology NAS to Eviden KMS, you ensure that volume encryption keys are never stored on the NAS itself: they live in a centrally managed, audited, and optionally HSM-backed key store.
Overview
| Item | Details |
|---|---|
| Protocol | KMIP 1.2 over TCP/TLS with mutual certificate authentication |
| Port | 5696 (IANA-registered KMIP port) |
| Key type | AES-256 symmetric key |
| DSM version | DSM 7.1 and above |
| Eviden KMS feature | Requires non-FIPS build (PKCS#12 TLS + AES-CBC key wrapping) |
What Synology DSM does
When you configure an external KMS in DSM, the NAS performs the following KMIP operations on every volume creation and every subsequent volume mount:
| Step | KMIP Operation | Purpose |
|---|---|---|
| 1 | DiscoverVersions | Negotiate KMIP protocol version |
| 2 | Query | Enumerate server capabilities (6 query functions) |
| 3 | Locate | Check whether the volume key already exists |
| 4 | Register | Register a SecretData object (opaque 32-byte key material, KMIP 1.x OperationPolicyName="default" attribute included) |
| 5 | Activate | Transition the key from PreActive to Active state |
| 6 | ModifyAttribute | Rename the key to the volume UUID |
| 7 | GetAttributes | Verify key attributes (state, object type) |
| 8 | Get | Retrieve key material to mount the encrypted volume |
| 9 | Locate | Find the key by name after a NAS reboot |
| 10 | Revoke | Revoke the key during volume deletion or key rotation |
| 11 | Destroy | Delete the key from the KMS |
Two fixes were required for full Synology DSM 7.2.2 compatibility:
OperationPolicyName(issue #796): DSM includes this KMIP 1.x attribute (deprecated in 1.3, removed in 2.0) in everyRegisterrequest. The server now silently ignores it instead of emitting a confusingWARNlog entry.ModifyAttribute(issue #760): DSM callsModifyAttributeimmediately afterRegisterto rename the key to the volume UUID. This operation was not fully implemented and caused DSM to report "cannot create keys". It is now fully supported.
Prerequisites
- Eviden KMS server running in non-FIPS mode
- TLS enabled on the KMS server with a valid PKCS#12 certificate
- Client certificate and CA certificate for mutual TLS authentication
- DSM 7.1 or later with the Encryption Key Manager feature enabled (see Control Panel → Security → Encryption Key Manager)
Server-Side Setup
1. Configure TLS
Synology DSM requires mutual certificate authentication over TLS. Edit your
kms.toml:
[tls]
tls_p12_file = "/etc/cosmian/kms/server.p12"
tls_p12_password = "your-p12-password"
clients_ca_cert_file = "/etc/cosmian/kms/clients-ca.crt"
[socket_server]
socket_server_start = true
socket_server_port = 5696 # standard KMIP port
socket_server_hostname = "0.0.0.0"
2. Issue a client certificate for the NAS
The NAS identifies itself to the KMS using a client TLS certificate signed by
the clients_ca_cert_file CA. Use OpenSSL or the cosmian CLI to generate
the certificate:
# Generate a CA and a client certificate (example using OpenSSL)
openssl genrsa -out clients-ca.key 4096
openssl req -new -x509 -days 3650 -key clients-ca.key \
-subj "/CN=KMS Clients CA" -out clients-ca.crt
openssl genrsa -out synology-nas.key 2048
openssl req -new -key synology-nas.key \
-subj "/CN=synology-nas-01" -out synology-nas.csr
openssl x509 -req -days 3650 -in synology-nas.csr \
-CA clients-ca.crt -CAkey clients-ca.key -CAcreateserial \
-out synology-nas.crt
3. Start Eviden KMS
cosmian_kms --config /etc/cosmian/kms/kms.toml
Or via Docker:
docker run -p 9998:9998 -p 5696:5696 \
-v /etc/cosmian/kms:/etc/cosmian/kms:ro \
-e COSMIAN_KMS_CONF=/etc/cosmian/kms/kms.toml \
ghcr.io/cosmian/kms:latest
DSM-Side Configuration
- Log in to Synology DSM as an administrator.
- Go to Control Panel → Security → Encryption Key Manager.
- Click Add KMS Server.
- Fill in the connection details:
| Field | Value |
|---|---|
| KMS Server Address | IP or hostname of the Eviden KMS host |
| Port | 5696 |
| Client Certificate | PEM or PKCS#12 file you issued for the NAS |
| Private Key | Matching private key (if not bundled in PKCS#12) |
| CA Certificate | clients-ca.crt (the CA that signed the KMS server cert) |
- Click Test Connection — DSM will run a
DiscoverVersions+Queryprobe. - Click Save.
Encrypting a volume
- Open Storage Manager.
- Select the volume you want to encrypt.
- Click Encrypt and choose the KMS server you just configured.
- DSM will call
Create → Activate → Get → GetAttributesand mount the encrypted volume.
Automated CI Testing
Because Synology DSM is proprietary hardware/software, there is no official
Docker image available for automated testing. Instead, the Eviden KMS test
suite includes a Python simulation client (scripts/synology_dsm_client.py)
that replays the exact KMIP operation sequence performed by DSM.
Running the simulation locally
# Build KMS server (non-FIPS required)
cargo build --bin cosmian_kms --features non-fips
# Start the KMS server with KMIP socket enabled (uses scripts/kms.toml)
COSMIAN_KMS_CONF=scripts/kms.toml \
cargo run --bin cosmian_kms --features non-fips &
# Wait until both ports are ready (HTTP: 9998, KMIP: 15696)
# Then run the DSM simulation
python3.11 scripts/synology_dsm_client.py \
--configuration scripts/pykmip.conf \
--verbose
Or use the convenience test runner:
bash scripts/test_synology_dsm.sh simulate
Running via nix-shell (recommended for CI parity)
mise run test:synology_dsm --variant non-fips
GitHub Actions CI
The Synology DSM simulation is included in the CI matrix in
.github/workflows/test_all.yml under the synology_dsm job (non-FIPS only):
matrix:
type:
- ...
- synology_dsm
features: [fips, non-fips]
exclude:
- type: synology_dsm
features: fips
The CI job:
- Builds Eviden KMS with
--features non-fips. - Starts the server with TLS and the KMIP socket enabled.
- Runs
scripts/synology_dsm_client.pyagainst it. - Asserts that all 10 steps (DiscoverVersions → Destroy) succeed.
Simulation Script Reference
| Script | Purpose |
|---|---|
scripts/synology_dsm_client.py | Python KMIP client replicating DSM's operation sequence |
scripts/test_synology_dsm.sh | Local test runner (prereq checks + venv activation) |
.mise/scripts/test_synology_dsm.sh | CI entry point (builds server, starts it, runs test) |
scripts/pykmip.conf | Shared PyKMIP TLS configuration (host, port, certs) |
scripts/kms.toml | KMS server configuration used by KMIP tests |
Troubleshooting
DSM reports "Connection failed"
- Verify that port 5696 is reachable from the NAS (firewall rules).
- Confirm
socket_server_start = trueandtls_p12_fileis set inkms.toml. - Check KMS logs:
RUST_LOG=cosmian_kms_server=debug cargo run …
DSM reports "Certificate verification failed"
- The NAS client certificate must be signed by the CA listed in
clients_ca_cert_fileinkms.toml. - The KMS server certificate must be trusted by the NAS. Upload the server's CA certificate to DSM under Control Panel → Security → Certificate.
ModifyAttribute returns an error
- Ensure you are running Eviden KMS ≥ 5.17 which includes the
ModifyAttributefix for Synology DSM compatibility (issue #760). - The operation requires the key to be in Active state. Call
ActivatebeforeModifyAttribute.
Key not found after NAS reboot
- DSM uses
Locatewith the key name to reconnect. Ensure the key name is unique and consistent across reboots. - Check that the client certificate presented on reconnect is the same one used at creation time (or that both have access rights granted in the KMS access policy).
OperationPolicyName warning in server logs
Older DSM versions (using the KMIP 1.0 protocol) include an OperationPolicyName
attribute in their Register/Create requests. This attribute was deprecated in
KMIP 1.3 and removed in KMIP 2.0+. Eviden KMS ≥ 5.18 silently ignores it
(issue #796). Earlier versions log
a harmless WARN entry; the key operation still succeeds.
Security Considerations
- Mutual TLS: Always require client certificate authentication
(
clients_ca_cert_fileset inkms.toml) so that only authorised NAS devices can access keys. - Key access policy: Use the Eviden KMS policy to restrict each NAS to its own keys.
- Key rotation: Revoke and re-create keys periodically. DSM will re-encrypt the volume DEK with the new KMS key on the next mount.
- Audit logging: Enable KMS access logs (
RUST_LOG=info) and forward them to a SIEM for compliance.
VAST Data — Storage Encryption with Eviden KMS
VAST Data storage clusters use KMIP for external encryption key management (EKM). By connecting a VAST Data cluster to Eviden KMS, you ensure that data encryption keys (DEKs) and key encryption keys (KEKs) are centrally managed, audited, and never stored unprotected on the storage appliance.
Overview
| Item | Details |
|---|---|
| Protocol | KMIP 1.4 binary TTLV over HTTP/TLS with mutual certificate authentication |
| Endpoint | POST /kmip on the KMS HTTP port (default 9998) |
| Key types | AES-256 symmetric keys |
| Key creation | In batches of 2–3 keys per encryption group |
| VAST version | VAST Data Platform 5.x and above |
| Eviden KMS mode | FIPS and non-FIPS builds supported |
What VAST Data does
When you configure an external KMS in the VAST Data management console, the storage cluster performs the following KMIP operations for encryption key lifecycle management:
| Step | KMIP Operation | Purpose |
|---|---|---|
| 1 | DiscoverVersions | Session initialization handshake (once per connection) |
| 2 | Create | Create an AES-256 symmetric key (CryptographicUsageMask = Encrypt|Decrypt) |
| 3 | AddAttribute ×3 | Set Name, ObjectGroup, and OperationPolicyName (3 calls per key) |
| 4 | Activate | Transition the key from Pre-Active to Active state |
| 5 | Locate | Find a key by its VAST-assigned name (VAST_EKM_KEY_2_<uuid>_<index>) |
| 6 | Get | Retrieve plaintext key material |
| 7 | GetAttributes | Verify key State (Active) and ActivationDate (polled every ~61 seconds) |
| 8 | ReKey | Rotate an active key — generates new key material with a new Unique Identifier |
| 9 | Revoke | Revoke a key during decommissioning |
| 10 | Destroy | Permanently delete the key from the KMS |
Key lifecycle workflow
The following sequence diagram shows the complete lifecycle as observed in production logs (June 2026):
sequenceDiagram
participant V as VAST Data
participant K as Eviden KMS
Note over V,K: Session Start
V->>K: DiscoverVersions (KMIP 1.4)
Note over V,K: Key Creation (per encrypted path, 2–3 keys)
loop For each key in group
V->>K: Create (AES-256 SymmetricKey)
V->>K: AddAttribute (Name)
V->>K: AddAttribute (ObjectGroup)
V->>K: AddAttribute (OperationPolicyName)
V->>K: Activate
end
Note over V,K: Initial Key Fetch
loop For each key
V->>K: Locate (by name)
V->>K: Get (plaintext key material)
end
Note over V,K: Continuous Monitoring (~61s interval)
loop Forever
loop For each key
V->>K: Locate (by name)
V->>K: GetAttributes (State, ActivationDate)
end
end
Note over V,K: Key Rotation (triggered externally)
loop For each key to rotate
V->>K: Locate (find current key by name)
V->>K: ReKey (new UID returned, old key stays Active)
V->>K: Locate (verify new key by name)
V->>K: Get (fetch new key material)
end
Note over V,K: Key Decommissioning (later, on encrypted path deletion)
loop For each key to retire
V->>K: Locate (find key by name)
V->>K: Revoke (Active → Deactivated)
V->>K: Locate (confirm state)
V->>K: Destroy (permanently delete)
end
Key naming convention
VAST creates keys with structured names following the pattern:
VAST_EKM_KEY_2_<encryption_group_uuid>_<index>
VAST_EKM_KEY_2_— static prefix (version 2 of VAST's naming scheme)<encryption_group_uuid>— UUID identifying the encrypted path/group_<index>— 0-based index within the group (typically 0 or 1)
These names are used in Locate operations to find keys associated with
specific encryption groups. After ReKey, the name is transferred to the
new replacement key.
Prerequisites
- Eviden KMS server running (FIPS or non-FIPS mode)
- TLS enabled on the KMS with mutual certificate authentication
- Client certificate and CA certificate configured for the VAST cluster
- VAST Data Platform 5.x or later with External Key Manager (EKM) feature enabled
Server-Side Setup
1. Configure TLS
VAST Data connects via HTTP POST to /kmip using KMIP 1.4 binary TTLV with
mutual TLS authentication. Configure your kms.toml:
[tls]
tls_cert_file = "/etc/cosmian/kms/server.crt"
tls_key_file = "/etc/cosmian/kms/server.key"
clients_ca_cert_file = "/etc/cosmian/kms/clients-ca.crt"
2. Generate client certificates
Create a client certificate for the VAST cluster signed by the same CA
configured in clients_ca_cert_file:
# Generate VAST client key and CSR
openssl genrsa -out vast-client.key 2048
openssl req -new -key vast-client.key -out vast-client.csr \
-subj "/CN=vast-cluster-01/O=VAST Data"
# Sign with CA
openssl x509 -req -in vast-client.csr \
-CA clients-ca.crt -CAkey clients-ca.key -CAcreateserial \
-out vast-client.crt -days 365
# Convert to PKCS#12 for VAST (if required by your VAST version)
openssl pkcs12 -export -in vast-client.crt -inkey vast-client.key \
-out vast-client.p12 -name "vast-cluster-01"
VAST-Side Configuration
1. Navigate to EKM settings
In the VAST Data management console:
- Go to Settings → Security → External Key Manager
- Click Add External KMS
2. Enter KMS connection details
| Field | Value |
|---|---|
| KMS Address | <kms-server-hostname> |
| KMS Port | 9998 (default KMS HTTP port) |
| Client Certificate | Upload vast-client.crt |
| Client Key | Upload vast-client.key |
| CA Certificate | Upload the CA that signed the KMS server certificate |
3. Test connection
Use the Test Connection button in the VAST management console to verify
connectivity. A successful test performs a Create + Get + Destroy cycle.
Compatibility Notes
KMIP 1.x attributes
VAST sends the OperationPolicyName("default") attribute via AddAttribute
after key creation (or inline in the Create template, depending on VAST version).
This is a KMIP 1.x attribute that was deprecated in KMIP 1.3 and removed in KMIP 2.0.
The Eviden KMS stores this attribute as a vendor extension and returns it in
GetAttributes responses to KMIP 1.4 clients. A log warning is emitted during
deserialization:
WARN KMIP 2.1 does not support the KMIP 1 attribute OperationPolicyName("default")
This warning is informational and does not affect functionality. The attribute is
preserved across ReKey rotations (transferred to the replacement key along with
Name and other attributes).
ReKey behavior
When VAST sends a ReKey request, the KMS implements KMIP 2.1 §6.1.46:
- The KMS creates a new symmetric key with a new Unique Identifier
- The Name attribute is transferred from the old key to the new key
- Bidirectional links are set:
ReplacementObjectLinkon old → new,ReplacedObjectLinkon new → old - The old key's State is unchanged (it remains
Active) — the KMIP spec does not deactivate the existing key during ReKey - VAST can then
Locateby name and finds the new key
VAST expects the ReKey response to return a different Unique Identifier
from the original. After rotation, the old key remains Active in the database.
Later, when VAST decommissions an encrypted path, it sends Locate → Revoke →
Locate → Destroy for each key to retire.
Monitoring interval
VAST polls the KMS every ~61 seconds per key with Locate + GetAttributes
to verify keys remain in Active state with a valid ActivationDate. This is
normal health-check behavior and produces high-volume but lightweight traffic.
Troubleshooting
| Symptom | Cause | Fix |
|---|---|---|
unsupported KMIP 1 operation: ReKey | KMS version < 5.22.0 missing ReKey support | Upgrade Eviden KMS to 5.22.0+ |
| Rotate key fails / cannot create new encrypted path | KMS < 5.23.0 dropped OperationPolicyName via AddAttribute | Upgrade to 5.23.0+; re-apply OPN on affected keys with AddAttribute |
OperationPolicyName warnings in KMS logs | Normal — VAST sends this deprecated KMIP 1.x attribute | No action required; informational warning only |
| TLS handshake failure | Certificate mismatch or missing CA | Verify clients_ca_cert_file matches the CA that signed VAST's client cert |
tlsv1 alert decrypt error (SSL alert 51) in KMS logs | VAST background reconnection attempt with stale connection state | Transient; no action required — the KMIP workflow itself is unaffected |
| Connection reset by peer (os error 104) | Network instability | Transient; VAST will reconnect automatically |
Verified Operations
The following KMIP operations have been validated with VAST Data production environments (logs from June 2026):
| Operation | Status | Notes |
|---|---|---|
DiscoverVersions | ✅ | Session initialization; confirms KMIP 1.4 support |
Create | ✅ | AES-256 SymmetricKey; 76 keys created across 5 days |
AddAttribute | ✅ | Called 3× per key: Name, ObjectGroup, OperationPolicyName |
Activate | ✅ | Transitions key to Active state |
Locate | ✅ | By Name (UninterpretedTextString); ~11,800 calls over 5 days |
Get | ✅ | Plaintext key material retrieval; 182 calls |
GetAttributes | ✅ | State + ActivationDate; ~11,500 calls (monitoring) |
ReKey | ✅ | Key rotation with new UUID; 16 rotations observed |
Revoke | ✅ | Key revocation before destruction; 69 calls |
Destroy | ✅ | Permanent key deletion; 69 calls |
Veeam Backup & Replication — KMS Encryption Key Management
Veeam Backup & Replication supports delegating backup encryption key management to an external KMIP-compliant Key Management Server. By connecting Veeam to Eviden KMS, encryption keys for backup jobs are never stored on the Veeam infrastructure itself: they are managed in a centrally audited, optionally HSM-backed key store.
Overview
| Item | Details |
|---|---|
| Protocol | KMIP 1.4 over TCP/TLS with mutual certificate authentication |
| Port | 5696 (IANA-registered KMIP port) |
| Key type | RSA-2048 asymmetric key pair |
| Veeam version | Veeam Backup & Replication 12 and above |
| Eviden KMS feature | Works with both FIPS and non-FIPS builds |
What Veeam does
When you configure an external KMS in Veeam, the Veeam server performs the following KMIP operations for each protected backup job:
| Step | KMIP Operation | Purpose |
|---|---|---|
| 1 | Locate | Find an existing key by name / identifier |
| 2 | Get (PublicKey) | Retrieve the RSA public key to encrypt backup metadata |
| 3 | CreateKeyPair | Create a new RSA-2048 key pair when none exists |
| 4 | Activate | Transition the key pair from PreActive to Active state |
| 5 | Get (PrivateKey) | Retrieve the RSA private key for decryption during restore |
| 6 | Destroy | Delete the key pair on job removal or rotation |
Two fixes were required for full Veeam Backup & Replication compatibility. Both are included in Eviden KMS as of the version that introduced this documentation:
-
KeyValueattributes inGetresponse (bug fix): Veeam's KMIP 1.4 decoder forPublicKeyandPrivateKeyexpects theKeyValuestructure to contain only key material — it does not support anyAttributeelements insideKeyValue. Previous versions of Eviden KMS embedded all object metadata attributes (state, identifiers, links, etc.) insideKeyValuewhen converting from the internal KMIP-2.1 representation to KMIP-1.4 wire format. This caused Veeam to throwKmipUnexpectedTagException: Unexpected Tag 66, expected Attributeand abort the key retrieval. The server now strips all attributes fromKeyValuefor asymmetric keys when responding to KMIP 1.x clients. -
TLS session ID context (bug fix): Veeam reuses KMIP connections via TLS session resumption. When both
SSL_VERIFY_PEERand OpenSSL session caching are active, OpenSSL requires a session-ID context to be set on the server acceptor. Without it, session-resumption attempts fail withssl_get_prev_session:session id context uninitialized, causing each reconnect to produce an SSPI authentication error on the Veeam side. The server now callsSSL_CTX_set_session_id_contextduring TLS acceptor initialisation.
Prerequisites
- Eviden KMS server 4.x or later (both FIPS and non-FIPS builds are supported)
- TLS enabled on the KMS socket server (port 5696) with mutual certificate authentication
- A server TLS certificate and the corresponding CA to be trusted by Veeam
- A client certificate (signed by a CA known to the KMS) to authenticate Veeam
Server-Side Setup
1. Configure TLS and the KMIP socket server
Edit your kms.toml:
[tls]
tls_p12_file = "/etc/cosmian/kms/server.p12"
tls_p12_password = "your-p12-password"
clients_ca_cert_file = "/etc/cosmian/kms/clients-ca.crt"
[socket_server]
socket_server_start = true
socket_server_port = 5696
socket_server_hostname = "0.0.0.0"
2. Issue a client certificate for Veeam
Veeam identifies itself to the KMS using a client TLS certificate signed by
the clients_ca_cert_file CA:
# Generate a CA and a client certificate
openssl genrsa -out clients-ca.key 4096
openssl req -new -x509 -days 3650 -key clients-ca.key \
-subj "/CN=KMS Clients CA" -out clients-ca.crt
openssl genrsa -out veeam-client.key 2048
openssl req -new -key veeam-client.key \
-subj "/CN=veeam-backup-server" -out veeam-client.csr
openssl x509 -req -days 3650 -in veeam-client.csr \
-CA clients-ca.crt -CAkey clients-ca.key -CAcreateserial \
-out veeam-client.crt
Bundle the client certificate and key as a PKCS#12 file for import into Veeam:
openssl pkcs12 -export \
-in veeam-client.crt -inkey veeam-client.key \
-certfile clients-ca.crt \
-out veeam-client.p12 -passout pass:veeam-p12-password
3. Start Eviden KMS
cosmian_kms --config /etc/cosmian/kms/kms.toml
Or via Docker (note the -p 5696:5696 for the KMIP socket port):
docker run -p 9998:9998 -p 5696:5696 \
-v /etc/cosmian/kms:/etc/cosmian/kms:ro \
-e COSMIAN_KMS_CONF=/etc/cosmian/kms/kms.toml \
ghcr.io/cosmian/kms:latest
Veeam-Side Configuration
- In the Veeam Backup & Replication console, open Menu → Manage Credentials (or Encryption Manager depending on your version).
- Add a new KMS Server with the following parameters:
| Field | Value |
|---|---|
| Server name / IP | Hostname or IP of your Eviden KMS host |
| Port | 5696 |
| Certificate | Upload the PKCS#12 file (veeam-client.p12) |
| Password | The PKCS#12 password |
| KMS CA Certificate | Upload the KMS server CA certificate (ca.crt or the CA that signed the server certificate) |
- Click Test Connection. Veeam will perform a
Locateprobe against the server. A successful test shows a green check-mark. - Assign the KMS server to a backup job under Job Properties → Storage → Advanced → Encryption.
Troubleshooting
| Symptom | Likely cause | Fix |
|---|---|---|
KmipUnexpectedTagException: Unexpected Tag 66, expected Attribute | Old Eviden KMS version (pre-fix) embedding attributes inside KeyValue | Upgrade Eviden KMS |
A call to SSPI failed / SSL_ERROR_SSL on reconnect | TLS session-ID context not set | Upgrade Eviden KMS |
Test Connection fails with certificate error | CA mismatch or self-signed cert | Verify clients_ca_cert_file contains the CA that signed the Veeam client cert, and that Veeam trusts the KMS server certificate |
| Key not found after Veeam server migration | Unique identifier stored by Veeam differs from KMS | Re-configure the KMS server entry in Veeam; the keys remain in the KMS store |
Snowflake Native App for Large-Scale Data Encryption
Eviden offers a Snowflake Native App that seamlessly integrates with the Eviden KMS to provide robust encryption and decryption capabilities directly within your Snowflake environment. This solution builds upon the Python UDF library to deliver enterprise-grade cryptographic operations at scale.
The Native App exposes dedicated encrypt and decrypt functions that can be called directly from Snowflake SQL
queries, allowing you to implement column-level encryption without modifying your existing data workflows.
You can find the Snowflake Native App on GitHub, where comprehensive documentation covers deployment procedures, configuration options, and usage examples to help you get started quickly.
User Defined Functions in Python for Eviden KMS
Eviden maintains a Python UDF library that enables efficient, large-scale cryptographic operations with the Eviden KMS.
Purpose and Applications
These User Defined Functions (UDFs) are designed specifically for:
- Data processing platforms like PySpark, Databricks, Snowflake, and Kafka
- Implementing application-level encryption in Big Data environments
- Protecting sensitive data by encrypting it before storage and only decrypting during processing
- Minimizing clear-text exposure of sensitive information
Technical Capabilities
The library provides:
- Batch processing capabilities for efficient encryption/decryption
- Parallelization to optimize throughput
- Support for multiple encryption contexts and key identifiers
- Performance optimizations for Big Data workloads
Expected throughput is in the range of 5 million decryption in 5 seconds with a 10 vCPU KMS instance.
Supported Cryptographic Algorithms
The UDFs support several NIST-approved and RFC-standardized algorithms:
- AES-GCM (NIST SP 800-38D): Standard authenticated encryption
- AES-GCM-SIV (RFC 8452): Deterministic authenticated encryption with nonce misuse resistance
- AES-XTS (NIST SP 800-38E): Storage encryption for fixed-length data
- ChaCha20-Poly1305 (RFC 8439): High-performance authenticated encryption
Performance Considerations
Key performance factors include:
- Network latency between the UDF execution environment and KMS server
- Batch size optimization for your specific workload
- Algorithm selection based on security requirements
- Potential use of deterministic encryption (like AES-GCM-SIV) for performance-critical applications
Check the encryption and decryption a scale section for details.
Getting Started
For implementation details, examples, and best practices, refer to
the GitHub repository, particularly the tests directory which
contains practical code samples for various use cases.
Kubernetes Integrations
Eviden KMS provides a complete suite of Kubernetes integrations, from deploying the KMS server itself to deep integration with the Kubernetes secrets management ecosystem:
| Page | Description |
|---|---|
| Helm Chart Deployment | Deploy the Eviden KMS server on Kubernetes using the bundled Helm chart |
| KMS Provider Plugin | Encrypt Kubernetes Secrets at rest in etcd using the KMS v2 API |
| Secrets Store CSI Driver Provider | Mount KMS-managed secrets as files inside pods |
| Kubernetes Operator | Sync KMS secrets into native Secret objects via a KMSSecret CRD |
Deployment first
All integrations assume a running Eviden KMS server. The recommended way to run the KMS on Kubernetes is the Helm chart. Once the server is up, choose the integration that matches your workload needs:
flowchart TD
HELM["Deploy KMS server\n(Helm chart)"] --> Q1
Q1{Do you need to<br/>encrypt all etcd Secrets?}
Q1 -- Yes --> PLUGIN["KMS Provider Plugin\n(etcd at-rest encryption)"]
Q1 -- No --> Q2{How do workloads<br/>consume secrets?}
Q2 -- "As mounted files\n(read from /mnt/secrets/...)" --> CSI["Secrets Store CSI Driver Provider\n(files injected into pods)"]
Q2 -- "As env vars or k8s Secret refs\n(require a real k8s Secret)" --> OPERATOR["Kubernetes Operator\n(KMSSecret → k8s Secret sync)"]
| Criterion | KMS Provider Plugin | CSI Driver Provider | Operator |
|---|---|---|---|
| Encryption scope | Whole cluster (all Secrets in etcd) | Per-pod, opt-in | Per-pod, opt-in |
| Secret consumption | Transparent (kubectl / existing code) | Files mounted in pod | Native Secret object |
| Control-plane access required | Yes (runs on every control-plane node) | No | No |
| Kubernetes Secrets created | Existing ones | No | Yes (KMSSecret CRD) |
| Key rotation support | Re-encrypt with kubectl replace | Automatic (CSI rotation) | Automatic (controller loop) |
Kubernetes — Helm Chart Deployment
Eviden KMS can be deployed on Kubernetes using the bundled Helm chart
(charts/cosmian-kms/). The chart supports both FIPS and non-FIPS images, multiple
database backends, and production-grade features such as TLS, autoscaling, network
policies, and pod disruption budgets.
Once the KMS server is running on Kubernetes you can enable the other integrations:
- KMS Provider Plugin — etcd Secret encryption
- Secrets Store CSI Driver Provider — pod-mounted secrets
- Kubernetes Operator —
KMSSecretCRD sync
Prerequisites
- Kubernetes 1.24+
- Helm 3.8+
- An external PostgreSQL or MySQL database for production/HA deployments
The default sqlite backend is suitable for single-replica, non-HA use only.
For production and high-availability deployments, use postgresql or mysql with
an external database. Refer to the High Availability guide
for architecture details.
If you enable audit logging, do not point multiple replicas at the same audit file (e.g. a shared PVC). The file backend is not safe for concurrent writers from different pods: only one replica will actually log events. Keep audit files per-pod (the chart default) and ship them off with a sidecar/log agent, or use the PostgreSQL audit backend for a single consolidated trail.
Container images
The KMS container images are published to the GitHub Container Registry (GHCR), multi-arch (amd64 + arm64), and signed with Cosign:
| Image | Description |
|---|---|
ghcr.io/cosmian/kms-fips | FIPS 140-3 compliant (default) |
ghcr.io/cosmian/kms | Non-FIPS — additional algorithms (Covercrypt, Redis-findex, …) |
Installing
Add the Helm repository
The chart is published to GitHub Pages. Add it once and keep it up to date:
helm repo add cosmian https://cosmian.github.io/kms
helm repo update
Minimal install
helm install my-kms cosmian/cosmian-kms \
--set kms.database.type=postgresql \
--set kms.database.url="postgresql://kms:kms@postgres:5432/kms"
Choosing the image variant
The chart defaults to the FIPS image (ghcr.io/cosmian/kms-fips). To use the
non-FIPS image instead:
helm install my-kms cosmian/cosmian-kms \
--set image.repository=ghcr.io/cosmian/kms
HSM
The official KMS images (FIPS and non-FIPS) load the vendor PKCS#11 client library of the HSM at
runtime. The vendor HSM models are built for Linux x86_64 only: pin the pod to amd64 nodes. Keep
the image unmodified and add the HSM through the chart's extension values:
- an init container copies the vendor client library from a small image you build from the
vendor package into an
emptyDirvolume, and the KMS loads it from there through the model's library-path environment variable; - the vendor configuration and credentials come from Kubernetes Secrets, mounted with
extraVolumes/extraVolumeMounts; extraArgssets--hsm-model,--hsm-slotand--hsm-admin, andextraEnvpasses the slot password from a Secret asKMS_HSM_PASSWORD.- with the FIPS image,
command: [env, -u, OPENSSL_CONF, cosmian_kms]for a vendor library that embeds its own OpenSSL and cannot load the image's FIPSOPENSSL_CONF(Trustway Proteccio).
The vendor library is upgraded independently of the KMS image, no image holds a secret, and the
chart's default hardening (UID 1000, read-only root filesystem) is kept. The image ships the C++
runtime (libstdc++.so.6, libgcc_s.so.1) in /usr/local/cosmian/lib/hsm, which is on
LD_LIBRARY_PATH. If the vendor library needs other libraries outside glibc, copy them next to it
and append that directory to LD_LIBRARY_PATH.
| HSM | --hsm-model | Library path variable | Vendor configuration | Guide |
|---|---|---|---|---|
| Thales Luna | luna | LUNA_PKCS11_LIB | Chrystoki.conf in the directory set by ChrystokiConfigurationPath | Luna on Kubernetes |
| Trustway Proteccio | proteccio | PROTECCIO_PKCS11_LIB | /etc/proteccio (read-only); FIPS image: command override | Proteccio on Kubernetes |
| Trustway Crypt2pay | crypt2pay | CRYPT2PAY_PKCS11_LIB | c2p.xml set by C2P_CONF, in a writable, persistent directory | Crypt2pay on Kubernetes |
Database configuration
By default the chart deploys with the sqlite backend, backed by a
PersistentVolumeClaim. For production, set the database type and connection string:
# PostgreSQL
helm install my-kms cosmian/cosmian-kms \
--set kms.database.type=postgresql \
--set kms.database.url="postgresql://kms:kms@postgres:5432/kms"
# MySQL
helm install my-kms cosmian/cosmian-kms \
--set kms.database.type=mysql \
--set kms.database.url="mysql://kms:kms@mysql:3306/kms"
Never use --set kms.database.clearDatabase=true in production. It wipes the
database on every pod restart.
Referencing an existing Secret
To avoid storing database credentials in values.yaml, reference an existing
Kubernetes Secret:
helm install my-kms cosmian/cosmian-kms \
--set kms.database.type=postgresql \
--set kms.database.existingSecret=my-db-secret
The Secret must contain a database-url key. For redis-findex backends, a
redis-master-password key is also expected.
Accessing the web UI
The KMS container serves the bundled web UI on the same port as the KMIP/REST API
(default 9998), at the application root and its client-side routes (/login,
/sym, /rsa, /certificates, etc.). No separate Service or port is required.
The UI is enabled by default (kms.uiEnabled: true).
Local access via port-forward
kubectl port-forward svc/my-kms-cosmian-kms 9998:9998
# then open http://127.0.0.1:9998
External access
Enable the Ingress or set the Service type to LoadBalancer:
# Ingress
helm install my-kms cosmian/cosmian-kms \
--set ingress.enabled=true \
--set ingress.hosts[0].host=kms.example.com \
--set ingress.hosts[0].paths[0].path=/ \
--set ingress.hosts[0].paths[0].pathType=Prefix
# LoadBalancer
helm install my-kms cosmian/cosmian-kms \
--set service.type=LoadBalancer
If the KMS is reachable at a hostname other than localhost/127.0.0.1, add
that origin to kms.corsAllowedOrigins — the browser sends an Origin header
on every API request, and the server rejects requests from origins not in the
list.
Configuration
See values.yaml
for the full list of configurable parameters. Key settings:
| Key | Description |
|---|---|
image.repository / image.tag | KMS container image; tag defaults to the chart appVersion |
kms.database.type | sqlite, postgresql, mysql, or redis-findex (non-FIPS only) |
kms.database.url / kms.database.existingSecret | Connection string or existing Secret for non-sqlite backends |
kms.uiEnabled | Serve the bundled web UI (default true) |
kms.tls.enabled / kms.tls.existingSecret | Terminate TLS on the KMS listener using a kubernetes.io/tls Secret |
kms.corsAllowedOrigins | Comma-separated CORS allowed origins (required for UI with non-localhost access) |
persistence.* | PVC settings for the sqlite backend |
ingress.* | Optional Ingress in front of the Service |
autoscaling.* | Optional HorizontalPodAutoscaler |
podDisruptionBudget.* | Optional PodDisruptionBudget |
networkPolicy.* | Optional NetworkPolicy restricting ingress to the KMS port |
resources | CPU/memory requests and limits |
extraEnv / extraEnvFrom / extraArgs | Escape hatches for settings not covered by a dedicated value (e.g. --hsm-model) |
initContainers / extraVolumes / extraVolumeMounts | Extra init containers and volumes (e.g. HSM client runtime and configuration) |
command | Replaces the image entrypoint; the chart-built args are passed to it (e.g. Proteccio with the FIPS image) |
Every kms.* value maps to a KMS_* environment variable or CLI flag consumed
directly by the cosmian_kms binary. See
crate/server/src/config/command_line/
in the main repository for the authoritative list.
Upgrading
helm repo update
helm upgrade my-kms cosmian/cosmian-kms \
--set kms.database.type=postgresql \
--set kms.database.url="postgresql://kms:kms@postgres:5432/kms"
Uninstalling
helm uninstall my-kms
Uninstalling does not delete the PVC created for the sqlite backend. Delete it
manually if the data is no longer needed:
kubectl delete pvc my-kms-cosmian-kms
Implementation notes
- The chart always passes explicit
--database-type/--hostname/--portarguments, because the Docker image's entrypoint script only reads$COSMIAN_KMS_CONFor environment-only configuration when invoked with zero arguments. - The container runs as the image's built-in
kmsuser (uid/gid1000); this is pinned explicitly viapodSecurityContext.runAsUser/runAsGroupbecause the image has noUSERdirective of its own (it defaults to root), which Kubernetes rejects whenrunAsNonRoot: trueis set without a matching UID. KMS_ROOT_DATA_PATHis pinned to a dedicatedemptyDirvolume (/var/lib/cosmian-kms/workspace). Its server-side default is a relative path resolved against$HOME, which is not writable for the container's non-root user.
How the Helm chart is published
On every KMS release tag (v*), a GitHub Actions workflow packages the chart with
helm/chart-releaser-action and
pushes it to a GitHub Pages–hosted Helm repository at
https://cosmian.github.io/kms. No manual action is required.
Kubernetes KMS Provider Plugin
The Eviden KMS Kubernetes plugin (kubernetes-kms-plugin) is a standalone binary that
implements the Kubernetes KMS v2 provider API.
It allows Kubernetes to encrypt etcd Secrets at rest using AES-256-GCM keys stored and
managed by the Eviden KMS.
The plugin runs on every Kubernetes control-plane node. It communicates with the
kube-apiserver through a Unix domain socket — it never needs to be deployed as a Pod.
Kubernetes control-plane nodes are always Linux regardless of the OS used by worker nodes.
sequenceDiagram
participant U as kubectl / API client
participant A as kube-apiserver
participant P as kubernetes-kms-plugin<br/>(gRPC · Unix socket)
participant K as Eviden KMS
participant E as etcd
Note over U,E: Secret creation (Encrypt)
U->>A: kubectl create secret
A->>P: gRPC EncryptRequest (plaintext DEK)
P->>K: KMIP Encrypt (KEK UID + plaintext)
K-->>P: ciphertext + IV + AEAD tag
P-->>A: gRPC EncryptResponse (ciphertext · key_id · annotations)
A->>E: store k8s:enc:kms:v2:cosmian-kms: + ciphertext
Note over U,E: Secret retrieval (Decrypt)
U->>A: kubectl get secret
A->>P: gRPC DecryptRequest (ciphertext + annotations)
P->>K: KMIP Decrypt (key_id + ciphertext + IV + AEAD tag)
K-->>P: plaintext DEK
P-->>A: gRPC DecryptResponse (plaintext DEK)
A-->>U: Decrypted Secret
Prerequisites
| Requirement | Details |
|---|---|
| Eviden KMS ≥ 5.26.0 | Running and reachable from every control-plane node |
| Kubernetes ≥ 1.29 | KMS v2 API is stable from 1.29 |
| AES-256 KEK | Pre-created in the KMS; record its UID |
| Linux on control-plane | The plugin uses a Unix socket; Windows and macOS are development-only |
Create the KEK
On the machine running (or managing) the KMS, create a wrapping key:
ckms sym keys create \
--algorithm aes \
--number-of-bits 256 \
--tag kms-wrapping-key
# Note the returned UID — you will need it in the plugin config.
Installation
ARCH=$(dpkg --print-architecture) # amd64 or arm64
VERSION=<VERSION>
curl -fsSL \
"https://package.cosmian.com/kms/${VERSION}/deb/${ARCH}/kubernetes-kms-plugin_${VERSION}_${ARCH}.deb" \
-o kubernetes-kms-plugin.deb
sudo dpkg -i kubernetes-kms-plugin.deb
# Binary: /usr/local/bin/kubernetes-kms-plugin
# Systemd unit: /lib/systemd/system/kubernetes-kms-plugin.service
# Config dir: /etc/kubernetes-kms-plugin/ (write config.yaml before starting)
Configuration
Create the configuration directory and file on each control-plane node:
sudo mkdir -p /etc/kubernetes-kms-plugin
sudo tee /etc/kubernetes-kms-plugin/config.yaml > /dev/null << 'EOF'
cosmian_kms:
# URL of the Eviden KMS server
server_url: "https://kms.example.com:9998"
# Optional: API key authentication
# api_key: "YOUR_API_KEY"
# Optional: mutual TLS
# tls_cert: "/etc/kubernetes-kms-plugin/client.crt"
# tls_key: "/etc/kubernetes-kms-plugin/client.key"
# ca_cert: "/etc/kubernetes-kms-plugin/ca.crt"
# UID of the AES-256-GCM wrapping key (KEK) stored in the KMS
wrapping_key_uid: "YOUR_KEK_UID"
# Unix socket path exposed to the kube-apiserver
socket_path: "/var/run/kubernetes-kms-plugin/kms.sock"
EOF
sudo chmod 600 /etc/kubernetes-kms-plugin/config.yaml
Only server_url and wrapping_key_uid are required. socket_path defaults to
/var/run/kubernetes-kms-plugin/kms.sock.
KMS reachability
The control-plane nodes must be able to reach the KMS server over the network:
| Setup | Typical server_url |
|---|---|
| KMS on the same host | http://127.0.0.1:9998 |
| KMS on another server | https://kms.internal:9998 |
| KMS on macOS host (minikube Docker) | http://host.docker.internal:9998 |
| KMS on macOS host (minikube QEMU) | http://192.168.64.1:9998 |
| KMS in a Kubernetes service | http://cosmian-kms.kms-ns.svc.cluster.local:9998 |
Running the plugin
Systemd (Ubuntu / Debian / RHEL)
The deb and rpm packages install a production-hardened systemd unit to
/lib/systemd/system/kubernetes-kms-plugin.service. Once you have written the
configuration file, enable and start the service:
sudo systemctl enable --now kubernetes-kms-plugin
sudo systemctl status kubernetes-kms-plugin
Expected output:
Active: active (running)
...cosmian_kms_k8s_plugin: gRPC server listening on Unix socket \
socket=/var/run/kubernetes-kms-plugin/kms.sock
Alpine (OpenRC)
For tarball installations on Alpine Linux, register an OpenRC service:
cat > /etc/init.d/kubernetes-kms-plugin << 'EOF'
#!/sbin/openrc-run
description="Eviden KMS Kubernetes Plugin"
command=/usr/local/bin/kubernetes-kms-plugin
command_args="--config /etc/kubernetes-kms-plugin/config.yaml"
command_background=true
pidfile=/run/kubernetes-kms-plugin.pid
EOF
chmod +x /etc/init.d/kubernetes-kms-plugin
mkdir -p /run/kubernetes-kms-plugin
rc-update add kubernetes-kms-plugin default
rc-service kubernetes-kms-plugin start
Kubernetes API server configuration
kubeadm clusters (Ubuntu / Debian / RHEL)
-
Copy the EncryptionConfiguration to every control-plane node:
sudo tee /etc/kubernetes/encryption-config.yaml > /dev/null << 'EOF' apiVersion: apiserver.config.k8s.io/v1 kind: EncryptionConfiguration resources: - resources: - secrets providers: - kms: apiVersion: v2 name: cosmian-kms endpoint: unix:///var/run/kubernetes-kms-plugin/kms.sock timeout: 5s - identity: {} # fallback: decrypts pre-existing unencrypted secrets EOF -
Edit
/etc/kubernetes/manifests/kube-apiserver.yamland add:spec: containers: - command: - kube-apiserver # --- add this flag --- - --encryption-provider-config=/etc/kubernetes/encryption-config.yaml # ...existing flags... volumeMounts: # --- add this mount --- - mountPath: /etc/kubernetes/encryption-config.yaml name: enc-config readOnly: true - mountPath: /var/run/kubernetes-kms-plugin name: kms-sock volumes: # --- add these volumes --- - hostPath: path: /etc/kubernetes/encryption-config.yaml type: File name: enc-config - hostPath: path: /var/run/kubernetes-kms-plugin type: DirectoryOrCreate name: kms-sockThe
kubeletstatic pod controller detects the manifest change and restarts the apiserver automatically (usually within 30 seconds). -
Re-encrypt existing Secrets (run once per cluster, not per node):
kubectl get secrets --all-namespaces -o json | kubectl replace -f -
minikube
# Write encryption config inside the minikube VM
docker exec <profile> tee /etc/kubernetes/encryption-config.yaml > /dev/null << 'EOF'
apiVersion: apiserver.config.k8s.io/v1
kind: EncryptionConfiguration
resources:
- resources:
- secrets
providers:
- kms:
apiVersion: v2
name: cosmian-kms
endpoint: unix:///var/run/kubernetes-kms-plugin/kms.sock
timeout: 5s
- identity: {}
EOF
# Patch the apiserver manifest (adds flag + volumeMounts + volumes via sed or direct edit)
# See the kubeadm section above for the exact YAML structure.
# minikube certs live at /var/lib/minikube/certs/etcd/ (not /etc/kubernetes/pki/).
# Wait for apiserver to restart
until kubectl get nodes --context <profile> 2>/dev/null | grep -q Ready; do
echo "Waiting..."; sleep 5
done
k3s
# k3s uses a single binary; pass the flag via the config file
sudo tee -a /etc/rancher/k3s/config.yaml > /dev/null << 'EOF'
kube-apiserver-arg:
- "encryption-provider-config=/etc/kubernetes/encryption-config.yaml"
EOF
# Mount the socket directory and config (add volumes to /etc/rancher/k3s/config.yaml)
# Then restart k3s:
sudo systemctl restart k3s
kind
# kind uses a kubeadm config — add the flag at cluster creation time
cat > kind-config.yaml << 'EOF'
kind: Cluster
apiVersion: kind.x-k8s.io/v1alpha4
nodes:
- role: control-plane
kubeadmConfigPatches:
- |
kind: ClusterConfiguration
apiServer:
extraArgs:
encryption-provider-config: /etc/kubernetes/encryption-config.yaml
extraVolumes:
- name: enc-config
hostPath: /etc/kubernetes/encryption-config.yaml
mountPath: /etc/kubernetes/encryption-config.yaml
readOnly: true
- name: kms-sock
hostPath: /var/run/kubernetes-kms-plugin
mountPath: /var/run/kubernetes-kms-plugin
extraMounts:
- hostPath: /path/to/encryption-config.yaml
containerPath: /etc/kubernetes/encryption-config.yaml
- hostPath: /var/run/kubernetes-kms-plugin
containerPath: /var/run/kubernetes-kms-plugin
EOF
kind create cluster --config kind-config.yaml
How encryption works
For each Encrypt call the plugin:
- Sends a KMIP
Encryptrequest to the KMS using the configured KEK UID. - The KMS returns
ciphertext,iv(nonce), andaead_tag. - The IV and AEAD tag are stored in the KMSv2
annotationsmap under:iv.k8s-kms.cosmian.comaead-tag.k8s-kms.cosmian.com
- The
key_idreturned equals the KEK UID, which Kubernetes stores alongside the ciphertext.
For each Decrypt call:
- The plugin uses the
key_idprovided by kube-apiserver (stored alongside the ciphertext in etcd) to select the KEK for the KMIPDecryptcall. This supports decrypting data encrypted with an older KEK after key rotation. - It extracts the IV and AEAD tag from annotations.
- It sends a KMIP
Decryptrequest to the KMS and returns the plaintext.
Manual testing
1. Verify the plugin is running
sudo systemctl status kubernetes-kms-plugin
# Expected: Active: active (running)
sudo journalctl -u kubernetes-kms-plugin -n 20 --no-pager
# Expected log line:
# cosmian_kms_k8s_plugin: gRPC server listening on Unix socket
# socket=/var/run/kubernetes-kms-plugin/kms.sock
2. Create a test Secret
kubectl create secret generic kms-test \
--from-literal=password=supersecret \
-n default
3. Verify ciphertext in etcd
The etcd-<node> pod in kube-system exposes etcdctl.
Cert paths differ by distribution:
| Distribution | Cert path in the etcd pod |
|---|---|
| kubeadm | /etc/kubernetes/pki/etcd/ |
| minikube | /var/lib/minikube/certs/etcd/ |
| k3s | /var/lib/rancher/k3s/server/tls/etcd/ |
| kind | /etc/kubernetes/pki/etcd/ |
NODE_NAME=$(kubectl get node -o jsonpath='{.items[0].metadata.name}')
CERT_DIR=/etc/kubernetes/pki/etcd # adjust per table above
kubectl exec -n kube-system "etcd-${NODE_NAME}" -- \
etcdctl \
--endpoints=https://127.0.0.1:2379 \
--cacert="${CERT_DIR}/ca.crt" \
--cert="${CERT_DIR}/server.crt" \
--key="${CERT_DIR}/server.key" \
get /registry/secrets/default/kms-test \
| head -c 120
Expected output begins with:
/registry/secrets/default/kms-test
k8s:enc:kms:v2:cosmian-kms:
<binary ciphertext>
The k8s:enc:kms:v2:cosmian-kms: prefix confirms the KMS plugin is encrypting the Secret.
4. Verify round-trip decryption
kubectl get secret kms-test -n default \
-o jsonpath='{.data.password}' | base64 -d
# Expected: supersecret
If the KMS server is unreachable the apiserver refuses to serve the Secret — confirming that data at rest is truly protected by the KMS.
Troubleshooting
Plugin fails to start
| Symptom | Likely cause | Fix |
|---|---|---|
connection refused to KMS | Wrong server_url or KMS not running | Check server_url and KMS status |
permission denied on socket | Socket directory not writable | Check RuntimeDirectory permissions |
config file not found | Wrong path | Use --config /etc/kubernetes-kms-plugin/config.yaml |
wrapping_key_uid not found | KEK does not exist in KMS | Re-create the KEK with ckms sym keys create |
Apiserver crashloops after enabling encryption
The apiserver starts before the plugin socket exists. Ensure:
- The
kubernetes-kms-pluginservice is enabled (systemctl enable) and already running before the apiserver reads the manifest. - The socket directory exists:
sudo mkdir -p /var/run/kubernetes-kms-plugin. - The
identity: {}fallback provider is present inEncryptionConfiguration— this allows the apiserver to decrypt pre-existing unencrypted Secrets on startup.
etcdctl: command not found
etcdctl is only available inside the etcd-<node> pod. Access it via:
kubectl exec -n kube-system etcd-<node> -- etcdctl ...
It is not available via minikube ssh or as a system binary on most distributions.
Security considerations
-
The Unix socket must be readable only by the
kube-apiserverprocess (mode0600). -
The
config.yamlmust be readable only by the plugin process (mode0600). -
The KEK should be created with restricted access controls in the KMS.
-
Rotate the KEK regularly and re-encrypt Secrets after rotation with:
kubectl get secrets --all-namespaces -o json | kubectl replace -f - -
In high-availability clusters, install and configure the plugin on every control-plane node before enabling encryption.
Secrets Store CSI Driver Provider
The Eviden KMS CSI provider (cosmian-kms-csi-provider) implements the
Kubernetes Secrets Store CSI Driver provider
interface. It allows pods to mount KMS-managed secrets as files in their filesystem
without ever storing those secrets in a Kubernetes Secret object.
Unlike the KMS Provider Plugin, this component runs as a gRPC
server on worker nodes (as a DaemonSet), not on control-plane nodes. It is called by
the CSI driver whenever a pod is scheduled that references a SecretProviderClass.
sequenceDiagram
participant K as kubelet
participant D as secrets-store-csi-driver<br/>(DaemonSet)
participant P as cosmian-kms-csi-provider<br/>(DaemonSet, Unix socket)
participant M as Eviden KMS
Note over K,M: Pod scheduled with CSI volume
K->>D: MountRequest (SecretProviderClass)
D->>P: gRPC Mount (objects list)
P->>M: KMIP Get (object UID)
M-->>P: plaintext secret value
P-->>D: MountResponse (files + metadata)
D-->>K: tmpfs volume mounted at /mnt/secrets-store/
Note over K,M: Secret available as a file inside the pod
Prerequisites
| Requirement | Details |
|---|---|
| Eviden KMS ≥ 5.26.0 | Running and reachable from every worker node |
| Kubernetes ≥ 1.25 | Secrets Store CSI Driver stable API |
| Helm ≥ 3.8 | Used to install the CSI driver and the provider |
| Secrets Store CSI Driver | Installed via Helm (see below) |
Install the Secrets Store CSI Driver
helm repo add secrets-store-csi-driver \
https://kubernetes-sigs.github.io/secrets-store-csi-driver/charts
helm install csi-secrets-store \
secrets-store-csi-driver/secrets-store-csi-driver \
--namespace kube-system \
--set syncSecret.enabled=false \
--set enableSecretRotation=true \
--set rotationPollInterval=1m
Enable enableSecretRotation if you want in-place file updates when a secret is rotated
in the KMS.
Installation
The CSI provider is packaged together with the Eviden KMS Helm chart. Install the provider DaemonSet alongside the KMS server:
helm repo add cosmian https://cosmian.github.io/kms
helm repo update
helm install cosmian-kms cosmian/kms \
--namespace cosmian-kms --create-namespace \
--set csiProvider.enabled=true
To install only the provider (KMS server is deployed elsewhere):
helm install cosmian-kms-csi cosmian/kms \
--namespace cosmian-kms --create-namespace \
--set server.enabled=false \
--set csiProvider.enabled=true \
--set csiProvider.kmsUrl=https://kms.example.com:9998
Configuration
Create the configuration file at /etc/cosmian-kms-csi/config.yaml on every worker node
(or mount it via a ConfigMap in the DaemonSet):
cosmian_kms:
# URL of the Eviden KMS server
server_url: "https://kms.example.com:9998"
# Optional: API key authentication
# api_key: "YOUR_API_KEY"
# Optional: mutual TLS
# tls_cert: "/etc/cosmian-kms-csi/client.crt"
# tls_key: "/etc/cosmian-kms-csi/client.key"
# ca_cert: "/etc/cosmian-kms-csi/ca.crt"
# Unix socket path (must match the DaemonSet hostPath)
socket_path: "/var/run/cosmian-kms-provider.sock"
Only server_url is required. socket_path defaults to /var/run/cosmian-kms-provider.sock.
Usage
1. Pre-create a secret in the KMS
# Create a symmetric key (or any KMS object)
ckms sym keys create \
--algorithm aes \
--number-of-bits 256 \
--tag db-password
# Note the UID returned — e.g. "5f3a1b2c-4d56-..."
You can also create arbitrary secret data (e.g. passwords, API keys) using the ckms
CLI or the KMS web UI.
2. Create a SecretProviderClass
apiVersion: secrets-store.csi.x-k8s.io/v1
kind: SecretProviderClass
metadata:
name: db-password
namespace: default
spec:
provider: cosmian-kms
parameters:
objects: |
- objectName: "db-password"
kmsUID: "5f3a1b2c-4d56-..." # UID of the KMS object
The objects list can reference multiple KMS objects. Each produces a separate file
inside the pod at <mountPath>/<objectName>.
Pinning an object version
Each object entry accepts an optional objectVersion. When it is empty or absent, the provider always serves the current content of the KMS object. When it is set, it must be the version of the object's current content, that is the lower-case hexadecimal SHA-256 digest of the bytes the provider returns; otherwise the mount fails with a FailedPrecondition error (object '<uid>' has version <actual> but the SecretProviderClass pins objectVersion <expected>).
objects: |
- objectName: "db-password"
kmsUID: "5f3a1b2c-4d56-..."
objectVersion: "9f86d081884c7d659a2feaa0c55ad015a3bf4f1b2b0b822cd15d6c15b0f00a08"
A pinned objectVersion makes pods refuse to start (or to re-mount on rotation) when the secret was changed in the KMS, so only pin versions you intend to freeze. Releases before this behavior ignored the field: any objectVersion value that is not a content digest must be removed (or emptied) before upgrading.
3. Mount the SecretProviderClass in a Pod
apiVersion: v1
kind: Pod
metadata:
name: app
namespace: default
spec:
containers:
- name: app
image: nginx
volumeMounts:
- name: secrets
mountPath: /mnt/secrets
readOnly: true
volumes:
- name: secrets
csi:
driver: secrets-store.csi.k8s.io
readOnly: true
volumeAttributes:
secretProviderClass: db-password
The secret value is available inside the container at /mnt/secrets/db-password.
Secret rotation
When enableSecretRotation=true is set on the CSI driver, it re-calls the provider at
the configured rotationPollInterval. If the KMS object value has changed (the provider
detects this via a SHA-256 hash of the returned bytes), the CSI driver updates the
in-memory tmpfs mount atomically. The pod sees the new file content without a restart.
To rotate a secret:
- In the KMS, update the object (e.g. replace the key material or secret value).
- Wait for
rotationPollInterval— the file inside the running pod will be updated automatically.
Security considerations
- The Unix socket (
/var/run/cosmian-kms-provider.sock) must only be accessible by the CSI driver. KuberneteshostPathvolumes enforce this via file permissions. - The configuration file containing the
api_keyor TLS key must be mode0600and owned by the provider process user. - Secret data is held in a
tmpfs(in-memory) volume in the pod — it is never written to the node's disk. - Use mutual TLS (
tls_cert,tls_key,ca_cert) in production to authenticate the provider to the KMS server.
Troubleshooting
| Symptom | Likely cause | Fix |
|---|---|---|
pod has unbound immediate PersistentVolumeClaims | CSI driver not installed | Install secrets-store-csi-driver via Helm |
provider not found: cosmian-kms | Provider DaemonSet not running on the node | Check kubectl get pods -n kube-system -l app=cosmian-kms-csi-provider |
connection refused to KMS | Wrong server_url or KMS unreachable | Verify server_url from inside the node |
object not found in mount | Wrong kmsUID in SecretProviderClass | Verify the UID with ckms objects get <uid> |
| File not updating on rotation | enableSecretRotation not enabled | Reinstall CSI driver with --set enableSecretRotation=true |
Inspect provider logs
# Find the provider pod on the same node as your failing pod
kubectl get pods -n kube-system -l app=cosmian-kms-csi-provider -o wide
# Tail provider logs
kubectl logs -n kube-system <provider-pod> -f
Kubernetes Operator
The Eviden KMS Kubernetes Operator (cosmian-kms-operator) manages KMSSecret custom
resources. Each KMSSecret object tells the operator to fetch a secret from the Cosmian
KMS and materialise it as a native Kubernetes Secret, keeping it in sync as the KMS
value changes.
The operator runs two components concurrently:
- Controller — reconciles
KMSSecretCRD instances, creates/updatesSecretobjects, and optionally triggers rolling restarts of dependentDeployment/StatefulSetworkloads. - Admission webhook — mutates new
Podspecs that carry thekms.cosmian.com/inject: "true"annotation, injecting an init-container that writes KMS secrets directly to a shared volume before the application container starts.
flowchart LR
CRD["KMSSecret CRD"] -->|reconcile| CTL["Controller\n(cosmian-kms-operator)"]
CTL -->|KMIP Get| KMS["Eviden KMS"]
KMS -->|secret value| CTL
CTL -->|create/update| SEC["k8s Secret"]
SEC -->|volume mount / env var| APP["Application Pod"]
Prerequisites
| Requirement | Details |
|---|---|
| Eviden KMS ≥ 5.26.0 | Running and reachable from the operator pod |
| Kubernetes ≥ 1.25 | CRD v1 support |
| Helm ≥ 3.8 | Used to install the operator |
| cluster-admin access | Required to install CRDs and ClusterRoleBindings |
Installation
helm repo add cosmian https://cosmian.github.io/kms
helm repo update
helm install cosmian-kms-operator cosmian/kms \
--namespace cosmian-kms-operator --create-namespace \
--set server.enabled=false \
--set operator.enabled=true \
--set operator.kmsUrl=https://kms.example.com:9998 \
--set operator.kmsApiKey=YOUR_API_KEY
Configuration
kms:
server_url: "https://kms.example.com:9998"
# Optional API key authentication
api_key: "YOUR_API_KEY"
# Optional API key injected from a Kubernetes Secret
# api_token_secret_ref:
# name: kms-api-token
# key: token
# Optional mutual TLS
# tls_cert: "/etc/cosmian-kms-operator/client.crt"
# tls_key: "/etc/cosmian-kms-operator/client.key"
# ca_cert: "/etc/cosmian-kms-operator/ca.crt"
# How often each KMSSecret is re-fetched when no individual refreshInterval is set
default_refresh_interval: "1h"
webhook:
# Port for the admission webhook HTTPS server
port: 9443
# TLS certificate and key for the webhook server (auto-generated if omitted)
# tls_cert: "/etc/cosmian-kms-operator/webhook.crt"
# tls_key: "/etc/cosmian-kms-operator/webhook.key"
KMSSecret CRD reference
apiVersion: kms.cosmian.com/v1
kind: KMSSecret
metadata:
name: postgres-credentials
namespace: velo-infra
spec:
# UID of the KMS object to fetch
secretId: "5f3a1b2c-4d56-7890-abcd-ef1234567890"
# Name of the Kubernetes Secret to create/update (same namespace)
targetSecret: "postgres-credentials"
# Key inside Secret.data (default: "value")
key: "password"
# Re-fetch interval (overrides default_refresh_interval)
refreshInterval: "30m"
# Extra labels added to the managed Secret
labels:
app: postgres
# Deployments to rolling-restart when the value changes
restartDeployments:
- postgres
# StatefulSets to rolling-restart when the value changes
restartStatefulSets: []
Status fields
status:
ready: "True" # "True" | "False"
message: "synced" # human-readable last result
Using the admission webhook (inject mode)
The webhook mutates pods annotated with kms.cosmian.com/inject: "true". It injects an
init-container (cosmian-kms-operator inject) that:
- Fetches the requested KMS objects by UID.
- Writes each secret value as a file inside a shared
emptyDirvolume. - The main container finds the files at the configured mount path on startup.
Example Pod annotation
apiVersion: v1
kind: Pod
metadata:
name: app
annotations:
kms.cosmian.com/inject: "true"
kms.cosmian.com/secrets: |
- name: db-password
uid: "5f3a1b2c-4d56-7890-abcd-ef1234567890"
path: /mnt/secrets/db-password
spec:
containers:
- name: app
image: myapp:latest
volumeMounts:
- name: kms-secrets
mountPath: /mnt/secrets
readOnly: true
volumes:
- name: kms-secrets
emptyDir:
medium: Memory # tmpfs — never written to disk
After the init-container completes, /mnt/secrets/db-password contains the plaintext
secret value.
Security considerations
- Grant the operator only the RBAC permissions it needs:
get/list/watchonKMSSecretCRDs,create/update/deleteonSecretin the target namespaces. - Use
api_token_secret_refto inject the KMS API key from a KubernetesSecretrather than embedding it in the operator configuration file. - The managed
Secretobjects are standard Kubernetes Secrets; apply RBAC restrictions to limit which pods can read them. - For etcd-at-rest encryption of the created Secrets, combine the operator with the KMS Provider Plugin.
Troubleshooting
| Symptom | Likely cause | Fix |
|---|---|---|
KMSSecret stuck in ready: "False" | KMS unreachable or wrong secretId | Check operator logs and verify the UID with ckms objects get <uid> |
Managed Secret not updated after rotation | refreshInterval not elapsed | Set a shorter refreshInterval or force reconcile by annotating the CRD |
| Webhook rejecting pods | Webhook TLS mismatch | Rotate the webhook certificate and update the MutatingWebhookConfiguration |
| Init-container crashloops | Invalid KMS URL or missing API key | Check init-container logs with kubectl logs <pod> -c cosmian-kms-inject |
Inspect operator logs
kubectl logs -n cosmian-kms-operator \
-l app=cosmian-kms-operator -f
FortiGate / FortiOS — External KMS via KMIP
Fortinet FortiGate appliances running FortiOS 7.4+ support delegating cryptographic key storage to an external KMIP-compliant Key Management Server. Connecting FortiOS to Eviden KMS lets network appliances retrieve their encryption keys from a centrally audited, optionally HSM-backed key store.
Overview
| Item | Details |
|---|---|
| Protocol | KMIP 1.0–1.4 over TCP/TLS |
| Port | 5696 (IANA-registered KMIP port) |
| FortiOS version | FortiOS 7.4 and above (tested on FortiOS 7.6.0 / FortiGate 40F) |
| Eviden KMS feature | Works with both FIPS and non-FIPS builds |
KMIP operations used by FortiOS
| KMIP Operation | Purpose |
|---|---|
Create | Create a symmetric key |
Locate | Find an existing key by name using TemplateAttribute filter |
Get | Retrieve key material |
Activate | Transition the key to Active state |
Destroy | Delete a key on removal or rotation |
FortiOS uses an older KMIP 1.x encoding that required specific server-side fixes, included as of Eviden KMS 5.22.0:
-
Authenticationwrapper (bug fix): FortiOS wraps its credentials using the fullAuthentication { Credential { CredentialType, CredentialValue } }nesting required by the KMIP 1.0 specification. Earlier server versions looked forCredentialTypeas a direct child ofAuthenticationand failed withmissing field 'CredentialType'. The TTLV deserializer now handles the correct nesting for all KMIP 1.x clients. -
Locatename filter viaTemplateAttribute(bug fix): FortiOS wrapsAttributeitems inside aTemplateAttributestructure in theLocaterequest payload. Without the matchingtemplate_attributefield on the KMIP 1.4Locatetype, the server silently discarded the name filter, causing everyLocateto match all objects andMaximumItems=1to always return the same first key regardless of the requested name. The server now correctly readsTemplateAttribute-wrapped filters from KMIP 1.0/1.1 clients.
Configuration
1. Enable the KMIP socket server
Add a [socket_server] section to your kms.toml:
[socket_server]
port = 5696
# TLS is required; FortiOS verifies the server certificate
tls_cert_file = "/etc/kms/server.crt"
tls_key_file = "/etc/kms/server.key"
# Optional: require client certificates
# tls_ca_file = "/etc/kms/ca.crt"
See Enabling TLS and Configuration file reference for full details.
2. Configure FortiOS
In the FortiGate web UI (or via CLI):
config system kmip
set status enable
set server-ip <KMS server IP>
set server-port 5696
set ca-cert <path to KMS CA certificate>
end
Refer to the Fortinet KMIP documentation for your FortiOS version to complete key-encryption policy assignment.
Related resources
OpenSSH Integration
The Eviden KMS PKCS#11 provider enables OpenSSH to use SSH keys stored in the KMS for authentication. The private key never leaves the KMS: every signing operation is performed server-side and only the signature is returned to the SSH client.
See the PKCS#11 provider module reference page for the mechanisms and Cryptoki versions supported by the library.
How it works
- You create an asymmetric key pair in the KMS and tag it with
ssh-auth. - You export the corresponding public key and add it to
~/.ssh/authorized_keyson every server you want to reach. - You tell OpenSSH to use the Eviden PKCS#11 library (
libcosmian_pkcs11.so) as its hardware security token provider. - When you
sshto a server, OpenSSH callsC_Signthrough the library, which forwards the signing request to the KMS. Only the signature comes back.
Supported algorithms
| Algorithm | Key size / curve | PKCS#11 mechanism |
|---|---|---|
| ECDSA | NIST P-256 | CKM_ECDSA |
| ECDSA | NIST P-384 | CKM_ECDSA |
| EdDSA | Ed25519 | CKM_EDDSA |
| RSA PKCS#1 v1.5 | 2048 bit | CKM_RSA_PKCS |
| RSA PKCS#1 v1.5 | 4096 bit | CKM_RSA_PKCS |
Prerequisites
- A running Eviden KMS instance (see the Quick-start guide).
- The
ckmsCLI configured and authenticated against it. - OpenSSH client ≥ 7.3 (ships with every modern Linux / macOS).
- The
libcosmian_pkcs11.so(Linux) orlibcosmian_pkcs11.dylib(macOS) shared library. If you installed the Eviden KMS CLI package this is already at/usr/local/lib/libcosmian_pkcs11.so.
Step 1 — Create the SSH key pair in the KMS
Tag the key pair with ssh-auth so that the PKCS#11 provider can discover it.
ECDSA P-256 (recommended)
ckms ec keys create --curve nist-p256 --tag ssh-auth --tag my-laptop
Ed25519 (non-FIPS builds only)
ckms ec keys create --curve ed25519 --tag ssh-auth --tag my-laptop
RSA 4096
ckms rsa keys create --size_in_bits 4096 --tag ssh-auth --tag my-laptop
After the command succeeds, record the private-key ID and public-key ID printed by the CLI:
Private key unique identifier : 3fa85f64-5717-4562-b3fc-2c963f66afa6
Public key unique identifier : 3fa85f64-5717-4562-b3fc-2c963f66afa6_pk
Step 2 — Export the public key for authorized_keys
Export the public key from the KMS in PKCS#8 / SubjectPublicKeyInfo format and then convert it to
the OpenSSH wire format that goes into authorized_keys.
# Export the public key as PEM-encoded SubjectPublicKeyInfo (SPKI)
ckms ec keys export \
--key-id 3fa85f64-5717-4562-b3fc-2c963f66afa6_pk \
--key-format pkcs8-pem \
/tmp/id_ecdsa_kms.pub.pem
# Convert to OpenSSH public key format
ssh-keygen -f /tmp/id_ecdsa_kms.pub.pem -e -m pkcs8 > /tmp/id_ecdsa_kms.pub
# Optionally add a comment
cat /tmp/id_ecdsa_kms.pub
# ecdsa-sha2-nistp256 AAAA…== (no comment yet)
# Append to authorized_keys on each target server
cat /tmp/id_ecdsa_kms.pub | ssh user@server "cat >> ~/.ssh/authorized_keys"
For RSA keys, substitute ckms ec keys export with ckms rsa keys export.
Step 3 — Configure the OpenSSH client
Option A — Per-connection flag
ssh -I /usr/local/lib/libcosmian_pkcs11.so user@server
Option B — Add to ~/.ssh/config (permanent)
Host *
PKCS11Provider /usr/local/lib/libcosmian_pkcs11.so
Or scope it to a specific host:
Host my-server.example.com
User alice
PKCS11Provider /usr/local/lib/libcosmian_pkcs11.so
Environment variables
| Variable | Default | Description |
|---|---|---|
COSMIAN_KMS_CLI_CONF | ~/.cosmian/kms.toml | Path to the ckms client config (KMS URL, credentials). |
COSMIAN_PKCS11_LOGGING_LEVEL | info | Log level for the provider: trace, debug, info, warn, error. |
COSMIAN_PKCS11_SSH_KEY_TAG | ssh-auth | The KMS vendor tag used to discover SSH key pairs. Override to use a custom tag. |
Verification
# List the key pairs that the provider will expose
COSMIAN_PKCS11_LOGGING_LEVEL=debug ssh -I /usr/local/lib/libcosmian_pkcs11.so user@server whoami
You should see lines similar to the following in the debug output and the remote command's output:
debug1: provider /usr/local/lib/libcosmian_pkcs11.so: manufacturerID <cosmian>
debug1: have 1 keys from provider /usr/local/lib/libcosmian_pkcs11.so
Troubleshooting
no keys found or authentication rejected
- Verify the public key is in
~/.ssh/authorized_keyson the server. - Check the KMS tag: the private and public key pair must be tagged with
ssh-auth(or the value you set inCOSMIAN_PKCS11_SSH_KEY_TAG). - Run
ckms ec keys locate --tag ssh-authto confirm the KMS returns your key.
provider ... not supported or unsupported algorithm
- The Ed25519 / EdDSA mechanism (
CKM_EDDSA) requires a non-FIPS build of the Eviden KMS and library. In FIPS mode, use ECDSA P-256 or RSA instead.
COSMIAN_KMS_CLI_CONF not set or connection refused
- The library reads the same
ckmsconfiguration file as the CLI. Make sure the environment variable points to a valid configuration and that the KMS server is reachable.
macOS — library not loaded
macOS requires code-signed PKCS#11 libraries to be loaded by SSH. Use the .dylib built for
macOS and ensure it is in your library path:
ssh -I /usr/local/lib/libcosmian_pkcs11.dylib user@server
OpenPGP Key Support
Eviden KMS supports OpenPGP transferable secret and public keys (ObjectType::PGPKey) in non-FIPS builds only.
OpenPGP keys can be created, imported, exported, and used for the KMIP Encrypt, Decrypt, Sign, and
SignatureVerify operations. See the supported objects and
supported formats pages for the KMIP-level summary. To use KMS-managed
RSA keys as a GnuPG smartcard instead, see GnuPG smartcard.
flowchart TD
GPG["GnuPG (gpg)"]
CLIENTS["ckms CLI, Web UI,<br/>custom KMIP/REST apps"]
subgraph KMS["Eviden KMS server (non-FIPS)"]
DISPATCH["KMIP dispatcher"]
ENGINE["OpenPGP engine<br/>RFC 4880 / RFC 9580 v4"]
DB[("Database")]
end
GPG <-.->|"key files, signatures,<br/>messages"| CLIENTS
CLIENTS -->|"KMIP 2.1 (TTLV)"| DISPATCH
DISPATCH --> ENGINE
ENGINE <--> DB
The OpenPGP engine creates keys and runs Encrypt (SEIPD v1, AES-256), Decrypt (binary or armor),
Sign (detached, SHA-256) and SignatureVerify (primary key and subkeys). GnuPG never talks to the
server directly: key files, signatures and messages move between gpg and the clients.
OpenPGP algorithms (Ed25519, Curve25519, RSA key profiles) are not FIPS 140-3 approved.
PGPKey support is compiled out of FIPS builds; creating or importing an OpenPGP key on a
FIPS server returns a NotSupported error.
Supported versions and formats
GnuPG
| Item | Support |
|---|---|
| Interoperability suite | The pgp_gnupg_tests suite (24 tests) and .mise/scripts/test/test_gnupg.sh run against the gpg found in PATH. The repository does not pin or install a GnuPG version for it. |
| Last verified version | GnuPG 2.5.18 (libgcrypt 1.12.1): all 24 tests pass. |
| Minimum version | Not tested below the version above. Ed25519/Curve25519 keys (eddsa/ecdh cv25519) and --pinentry-mode loopback, which the commands on this page use, are GnuPG 2.1+ features, so older releases cannot follow them. |
gnupg-pkcs11-scd smartcard | Separate integration, see GnuPG smartcard. |
Standards
| Standard | Role in Eviden KMS |
|---|---|
| RFC 4880 (OpenPGP Message Format) | Packet formats read and written: v4 transferable keys, v3 PKESK, v1 SEIPD. |
| RFC 9580 (OpenPGP, obsoletes RFC 4880) | Same v4 structures (§10.1, §10.2), ASCII armor (§6), detached signatures. v6 keys and v2 SEIPD (AEAD) are not produced or decrypted. |
| RFC 3156 (PGP/MIME) | Encrypted and signed MIME bodies produced by GnuPG are decrypted/verified by the KMS (covered by the interoperability suite). The KMS does not build MIME messages. |
| RFC 2440 | Historic, not targeted. |
Formats and packet versions
| Object | Format | Version | Direction |
|---|---|---|---|
| Transferable public / secret key | ASCII armor (-----BEGIN PGP PUBLIC KEY BLOCK----- / PRIVATE KEY BLOCK) | v4 | Import, export (pgp-public, pgp-secret) |
| Transferable public / secret key | Binary packets | v4 | Import, export (pgp-public-binary, pgp-secret-binary) |
| Encrypted message | Binary: PKESK v3 + SEIPD v1 (AES-256) | RFC 4880 / RFC 9580 §5.13.1 | Encrypt output |
| Encrypted message | Binary or ASCII armor | PKESK + SEIPD v1 (compressed payloads are decompressed) | Decrypt input |
| Detached signature | Binary (SHA-256, made with the primary key) | v4 signature | Sign output |
| Detached signature | Binary or ASCII armor | v4 signature, primary key or any subkey | SignatureVerify input |
| Inline, cleartext signatures | not supported | n/a | rejected |
| SEIPD v2 / AEAD (packet tag 20), passphrase-protected secret keys | not supported | n/a | rejected |
Imported keys of another packet version are parsed by the underlying
pgp crate (0.21), which reports the version in the pgp_key_version
attribute; only v4 is generated and exercised by the test suites, so v3, v5 and v6 keys are not supported.
Key profiles
OpenPGP keys are created via KMIP Create with ObjectType::PGPKey, or the ckms pgp keys create
command. Two algorithm profiles are supported:
- Ed25519 (default): an Ed25519 primary key (certify and sign) with a Curve25519/cv25519 ECDH encryption subkey.
- RSA: an RSA primary key (certify and sign) with an RSA encryption subkey. Supported modulus sizes are 2048, 3072, or 4096 bits.
Keys are generated unprotected inside the KMS protection boundary.
flowchart LR
subgraph ED["Ed25519 profile (default)"]
EP["Primary key<br/>Ed25519<br/>certify and sign"] --> ES["Subkey<br/>Curve25519 ECDH<br/>encrypt"]
end
subgraph RS["RSA profile"]
RP["Primary key<br/>RSA 2048 / 3072 / 4096<br/>certify and sign"] --> RE["Subkey<br/>RSA<br/>encrypt"]
end
UID["User ID packet<br/>from pgp-user-id"] -.-> EP
UID -.-> RP
Import and export formats
ckms and the Web UI accept both ASCII-armored and binary OpenPGP transferable keys for import.
Secret-key imports must be unprotected.
ckms CLI
- Import:
--key-format pgpaccepts armored or binary transferable public keys and unprotected secret keys. - Export:
--key-format pgp-secretandpgp-publicproduce ASCII-armored keys.pgp-secret-binaryandpgp-public-binaryproduce binary packet keys.
Web UI
- Import: OpenPGP > Keys > Import accepts ASCII-armored (
.asc) or binary key files. - Export: OpenPGP > Keys > Export offers OpenPGP Secret Key (.asc), OpenPGP Public Key (.asc), OpenPGP Secret Key (binary .pgp), and OpenPGP Public Key (binary .pgp).
Identification and tags
- System tag — the KMS automatically attaches the
_pgpsystem tag to every created or imported OpenPGP key, alongside the user-supplied tags. - User ID — the
pgp-user-idvendor attribute (VENDOR_ATTR_PGP_USER_ID) holds the OpenPGP User ID packet, e.g.Alice <alice@example.com>. It is set from--user-idonckms pgp keys create, and is carried back out as the User ID when the key is exported to GnuPG.
Interoperability with GnuPG
The KMS interoperates directly with GnuPG (gpg); see Supported versions for the
versions covered. The commands below are the exact commands
exercised by the .mise/scripts/test/test_gnupg.sh end-to-end suite.
KMS → GnuPG
Create an Ed25519 key, export it, and let gpg verify a KMS signature and decrypt a KMS-encrypted
message:
sequenceDiagram
actor U as User
participant C as ckms
participant K as Eviden KMS
participant G as gpg
U->>C: pgp keys create (Ed25519, tag pgp-ci)
C->>K: Create PGPKey
U->>C: pgp export (pgp-secret)
C->>K: Export
K-->>U: transferable secret key
U->>G: import the exported key
U->>C: pgp sign
C->>K: Sign
K-->>U: detached signature
U->>G: verify the signature
U->>C: pgp encrypt
C->>K: Encrypt
K-->>U: PKESK + SEIPD message
U->>G: decrypt the message
# Create the key and export the secret armor so gpg can decrypt
ckms pgp keys create --algorithm ed25519 --user-id "CI <ci@example.com>" --tag pgp-ci
ckms pgp export --tag pgp-ci --key-format pgp-secret sec.asc
gpg --batch --import sec.asc
ckms pgp export --tag pgp-ci --key-format pgp-secret-binary sec.pgp
gpg --batch --import sec.pgp
# KMS signs, gpg verifies
ckms pgp sign --tag pgp-ci -o data.sig data.txt
gpg --verify data.sig data.txt
# KMS encrypts, gpg decrypts
ckms pgp encrypt --tag pgp-ci -o msg.bin data.txt
gpg --decrypt msg.bin > out.txt
GnuPG → KMS
Generate an unprotected key in GnuPG with an explicit encryption subkey, import it into the KMS, and let the KMS decrypt a GnuPG-encrypted message and verify a GnuPG-produced detached signature:
# 1. Generate an unprotected key with an encryption subkey (non-AEAD preferences)
cat << 'EOF' | gpg --batch --yes --no-tty --pinentry-mode loopback --passphrase "" --generate-key
Key-Type: eddsa
Key-Curve: ed25519
Key-Usage: sign,cert
Subkey-Type: ecdh
Subkey-Curve: cv25519
Subkey-Usage: encrypt
Preferences: AES256 AES192 AES SHA512 SHA384 SHA256 ZLIB BZIP2 ZIP Uncompressed
Name-Real: GPG User
Name-Email: gpg@example.com
Expire-Date: 0
%no-protection
%commit
EOF
# 2. Export the secret armor and import it into the KMS under a fresh ID
gpg --batch --armor --export-secret-keys "gpg@example.com" > gpg-sec.asc
ckms pgp import --key-format pgp gpg-sec.asc gpg-imported
# 3. GnuPG encrypts, KMS decrypts
gpg --batch --trust-model always --recipient "gpg@example.com" --output msg.gpg --encrypt data.txt
ckms pgp decrypt -k gpg-imported -o out.txt msg.gpg
diff data.txt out.txt
# 4. GnuPG signs (binary and ASCII-armored detached), KMS verifies
gpg --batch --local-user "gpg@example.com" --detach-sign --output gpg.sig data.txt
ckms pgp sign-verify -k gpg-imported data.txt gpg.sig
gpg --batch --local-user "gpg@example.com" --armor --detach-sign --output gpg.asc data.txt
ckms pgp sign-verify -k gpg-imported data.txt gpg.asc
sequenceDiagram
actor U as User
participant G as gpg
participant C as ckms
participant K as Eviden KMS
U->>G: generate unprotected key with encryption subkey
U->>G: export secret keys (armor)
U->>C: pgp import (key-format pgp)
C->>K: Import PGPKey
U->>G: encrypt to the recipient
U->>C: pgp decrypt
C->>K: Decrypt
K-->>U: plaintext
U->>G: detach-sign data.txt
U->>C: pgp sign-verify
C->>K: SignatureVerify
K-->>U: signature valid
gpg --quick-generate-key does not create an encryption subkey by default, and batch-generated
keys default to SEIPDv2/AEAD packets the KMS cannot decrypt. Use the explicit --generate-key
parameter file above, which adds an ecdh/cv25519 encryption subkey and pins non-AEAD
preferences. GnuPG keys imported into the KMS must be unprotected (%no-protection / empty
passphrase), because the KMS cannot use passphrase-protected secret keys.
gpg --encrypt to a freshly imported key requires --trust-model always; without it GnuPG
refuses with "There is no assurance this key belongs to the named user".
Applicable standards and format adoption
OpenPGP has evolved through the IETF standards track:
- RFC 2440 (Historic) — initial IETF OpenPGP specification (obsoleted by RFC 4880).
- RFC 4880 (Standards Track) — defines version 4 (v4) Transferable Secret and Public Keys and Symmetrically Encrypted Integrity Protected Data (v1 SEIPD).
- RFC 9580 (Standards Track, July 2024, obsoletes RFC 4880, 5581, 6637) — current IETF standard defining version 6 (v6) keys and v2 SEIPD with AEAD, while formally preserving and specifying version 4 key format and packet structures (§10.1 Transferable Public Keys, §10.2 Transferable Secret Keys).
Format adoption in Eviden KMS
Eviden KMS strictly adopts the IETF OpenPGP Transferable Key format (RFC 4880 and RFC 9580 §10.1 & §10.2, v4 packets) and v1 SEIPD (AES-256) encryption:
- Key encapsulation: managed objects are stored and transferred using standard v4 Key packets.
In KMIP, these are represented by vendor extensions
KeyFormatType::OpenPgpSecretKey(0x88800007) andKeyFormatType::OpenPgpPublicKey(0x88800008). - Message encryption: produces standard v3 PKESK packets followed by a v1 SEIPD container (RFC 9580 §5.1.1, §5.13.1, §10.3.2.1).
- Interoperability: because Eviden KMS generates and expects standard RFC 4880 / RFC 9580 v4 structures, it interoperates out-of-the-box with any standard OpenPGP implementation, including GnuPG and commercial OpenPGP-compliant tooling. Non-standard extensions, such as experimental AEAD packet types (packet tag 20), are rejected by the server parser.
flowchart LR
PT["Plaintext"] --> ENC["Encrypt<br/>KMIP Encrypt on a PGPKey"]
ENC --> OUT["Binary OpenPGP message"]
OUT --> PKESK["PKESK v3<br/>session key encrypted<br/>to the encryption subkey"]
OUT --> SEIPD["SEIPD v1<br/>AES-256 with integrity protection<br/>wrapping the literal data"]
Limitations
The server pins the following constraints for OpenPGP keys. Each is asserted by the
pgp_gnupg_tests interoperability suite in crate/test_kms_server/src/pgp_gnupg_tests.rs.
OpenPGP secret keys stored in the KMS cannot be passphrase-protected. Decrypt and Sign
return OpenPGP secret key is passphrase-protected; Decrypt/Sign are not supported. Import
unprotected secret keys only.
EncryptandSignalways emit binary OpenPGP packets (PKESK + SEIPDv1/AES-256; detached binary signatures). Callers needing ASCII armor must armor the output themselves.SignatureVerifyaccepts only detached signatures (gpg --detach-sign). Inline (gpg --sign) and cleartext (gpg --clearsign) signatures are rejected.DecryptandSignatureVerifyaccept both binary and ASCII-armored inputs.- The KMS verifies against the primary key first, then every public subkey — a signing-subkey signature validates against the published certificate.
- Supplying
DigestedDatatoSignorSignatureVerifyreturns an error: OpenPGP signatures require the full message. - Supplying
InitIndicatororCorrelationValue(streaming / multi-part) returns an error: streaming is not supported for OpenPGP keys.
OpenPGP keys cannot be wrapped at Create time using wrapping_key_id: the server's at-rest
wrap path does not support the PGPKey encoding. A wrapped OpenPGP key cannot be unwrapped on
export either; requesting an explicit KeyFormatType on a wrapped key returns an error.
Glossary
| Term | Definition |
|---|---|
| AEAD | Authenticated Encryption with Associated Data. In OpenPGP, the mode used by SEIPD v2 (packet tag 20), which the KMS rejects. |
| AES | Advanced Encryption Standard. The KMS encrypts OpenPGP messages with AES-256 (256-bit key). |
| API | Application Programming Interface. |
| ASCII armor | Text encoding of binary OpenPGP packets between -----BEGIN PGP …----- and -----END PGP …----- lines (RFC 9580 §6). |
| CI | Continuous Integration. |
| CLI | Command-Line Interface; here the ckms tool. |
| ECDH | Elliptic Curve Diffie-Hellman. Algorithm of the OpenPGP encryption subkey on Curve25519. |
| Ed25519 | Edwards-curve Digital Signature Algorithm (EdDSA) on Curve25519. Algorithm of the signing primary key in the default profile. |
| FIPS | Federal Information Processing Standards; here FIPS 140-3, the NIST cryptographic-module standard. |
| HTTP | Hypertext Transfer Protocol. |
| IETF | Internet Engineering Task Force, publisher of the RFCs. |
| KMIP | Key Management Interoperability Protocol (OASIS standard); the KMS speaks KMIP 2.1. |
| KMS | Key Management System; here Eviden KMS. |
| MIME | Multipurpose Internet Mail Extensions. |
| NIST | National Institute of Standards and Technology. |
| OpenPGP | The IETF standard for encrypting and signing data and for managing keys, defined by RFC 4880 and RFC 9580. GnuPG is an implementation. |
| PGP | Pretty Good Privacy, the original software from which OpenPGP derives; also the label in armor headers and in ObjectType::PGPKey. |
| PGP/MIME | Encrypted and signed email using MIME, defined by RFC 3156. |
| PKCS#11 | Public-Key Cryptography Standards #11, the Cryptoki token API used by the GnuPG smartcard integration. |
| PKESK | Public-Key Encrypted Session Key packet: the message's session key encrypted to a recipient's public key. The KMS emits v3. |
| REST | Representational State Transfer; the HTTP interface of the KMS. |
| RFC | Request for Comments, an IETF specification document. |
| RSA | Rivest-Shamir-Adleman public-key algorithm. Supported sizes: 2048, 3072, 4096 bits. |
| SEIPD | Symmetrically Encrypted and Integrity Protected Data packet: the encrypted payload of a message. The KMS emits and reads v1 only. |
| SHA-256 | Secure Hash Algorithm with a 256-bit digest, used for detached signatures. |
| Subkey | Key bound to a primary key and used for one purpose, for example encryption. |
| TPK | Transferable Public Key (or Transferable Secret Key): a key with its User ID, subkeys and binding signatures, in the RFC 4880 §11 / RFC 9580 §10 format. |
| TTLV | Tag-Type-Length-Value, the KMIP binary encoding. |
| UI | User Interface; here the Web UI of the KMS. |
| User ID | OpenPGP packet naming the key owner, for example Alice <alice@example.com>. |
| WASM | WebAssembly; the Web UI uses it to build KMIP requests in the browser. |
GnuPG smartcard (gnupg-pkcs11-scd)
gnupg-pkcs11-scd is a drop-in replacement for
GnuPG's scdaemon that bridges GnuPG's smartcard protocol to any PKCS#11 module. Pointed at the
Eviden KMS PKCS#11 provider (libcosmian_pkcs11), it lets gpg sign and decrypt with
KMS-managed RSA keys as if they were stored on a smartcard. The private key never leaves the
KMS: every private-key operation is performed server-side and only the result is returned.
See the PKCS#11 provider module reference page for the mechanisms and Cryptoki versions supported by the library. For OpenPGP keys held and used directly by the KMS (no smartcard emulation), see OpenPGP key support.
How it works
- You create an RSA key pair in the KMS and tag it
gnupg-card. - You certify the public key (self-signed X.509) and tag the certificate
gnupg-cardas well. gnupg-pkcs11-scdloadslibcosmian_pkcs11, enumerates the certificates and private keys, and presents each matching pair to GnuPG as a virtual smartcard key.- When GnuPG signs or decrypts,
gnupg-pkcs11-scdcallsC_Sign/C_Decryptthrough the library, which forwards the request to the KMS.
flowchart LR
GPG["gpg"] --> AGENT["gpg-agent"]
AGENT -- "Assuan protocol" --> SCD["gnupg-pkcs11-scd<br/>replaces scdaemon"]
SCD -- "PKCS11 API" --> LIB["libcosmian_pkcs11"]
LIB -- "KMIP over HTTPS" --> KMS["Eviden KMS<br/>private keys never leave"]
KMS -.-> HSM[("HSM-resident KEK<br/>optional, wraps keys at rest")]
sequenceDiagram
participant G as gpg-agent
participant S as gnupg-pkcs11-scd
participant P as libcosmian_pkcs11
participant K as Eviden KMS
G->>S: LEARN --force
S->>P: C_FindObjects (certificates and private keys)
P->>K: Locate objects tagged gnupg-card
K-->>P: certificate and private key
P-->>S: objects with matching CKA_ID
S-->>G: key fingerprint and subject
G->>S: SETDATA digest, then PKSIGN
S->>P: C_Sign with CKM_RSA_PKCS (DigestInfo)
P->>K: Sign (pre-computed digest)
K-->>P: RSA signature
P-->>S: signature
S-->>G: signature
Constraints
From the upstream gnupg-pkcs11-scd manual (CONSTRAINTS section):
- Only RSA key pairs are supported (no EC / EdDSA).
- For every private key object, a certificate object (
CKO_CERTIFICATE) with an identicalCKA_IDmust exist.
The provider satisfies the second constraint by construction: a certificate created from a public
key with ckms certificates certify --public-key-id-to-certify inherits that public key's link to
its private key, and both the certificate's and the private key's CKA_ID are the private key's
KMS unique identifier.
flowchart LR
PK["Public key"] -- "PrivateKeyLink" --> SK["Private key<br/>tag gnupg-card<br/>CKA_ID = KMS key id"]
CERT["X.509 certificate<br/>tag gnupg-card<br/>CKA_ID = KMS key id"] -- "certified from the public key<br/>inherits PrivateKeyLink" --> SK
Prerequisites
- A running Eviden KMS instance (see the Quick-start guide).
- The
ckmsCLI configured and authenticated against it. - The
libcosmian_pkcs11.so(Linux) orlibcosmian_pkcs11.dylib(macOS) shared library, e.g./usr/local/lib/libcosmian_pkcs11.so. gnupg-pkcs11-scdinstalled (apt install gnupg-pkcs11-scd, built from source, or thegnupg-pkcs11-scdnixpkgs package) and GnuPG 2.x.
Step 1 — Create an RSA key pair and a self-signed certificate tagged gnupg-card
ckms rsa keys create --size_in_bits 2048 --tag gnupg-card
# Private key unique identifier: <private-key-id>
# Public key unique identifier: <public-key-id>
ckms certificates certify \
--public-key-id-to-certify <public-key-id> \
--subject-name "CN=Alice,O=Acme" \
--days 1095 \
--tag gnupg-card
Do not pass --issuer-private-key-id: without an issuer, the KMS self-signs the certificate with
the private key linked to the public key, which keeps the CKA_ID of the certificate and the
private key identical.
The discovery tag defaults to gnupg-card; override it with COSMIAN_PKCS11_GNUPG_KEY_TAG
(same pattern as COSMIAN_PKCS11_SSH_KEY_TAG and COSMIAN_PKCS11_DISK_ENCRYPTION_TAG).
Step 2 — Configure gnupg-pkcs11-scd
~/.gnupg/gnupg-pkcs11-scd.conf:
providers cosmian
provider-cosmian-library /usr/local/lib/libcosmian_pkcs11.so
provider-cosmian-allow-protected-auth
~/.gnupg/gpg-agent.conf:
scdaemon-program /usr/bin/gnupg-pkcs11-scd
The library advertises CKF_PROTECTED_AUTHENTICATION_PATH (authentication comes from the ckms
configuration), so provider-cosmian-allow-protected-auth makes gnupg-pkcs11-scd skip the PIN
prompt entirely.
Step 3 — Register the card with GnuPG
gpg-connect-agent 'scd learn --force' /bye
gpg --card-status
Then either register the key as a new primary key with gpg --card-edit → admin → generate,
or attach it to an existing key with gpg --edit-key <MASTER_KEY_ID> → addcardkey. Both flows
are described in the GNUPG INTEGRATION section of the
upstream manual.
Environment variables
| Variable | Default | Description |
|---|---|---|
COSMIAN_KMS_CLI_CONF | ~/.cosmian/kms.toml | Path to the ckms client config (KMS URL, credentials). |
COSMIAN_PKCS11_LOGGING_LEVEL | info | Log level for the provider: trace, debug, info, warn, error. |
COSMIAN_PKCS11_GNUPG_KEY_TAG | gnupg-card | The KMS tag used to discover GnuPG smartcard certificates and private keys. |
Troubleshooting
The key does not appear in scd learn
- Both the private key and the certificate must carry the
gnupg-cardtag (or the value ofCOSMIAN_PKCS11_GNUPG_KEY_TAG). - The key must be RSA. Non-RSA keys are not supported by
gnupg-pkcs11-scd. - If the certificate's
CKA_IDdiffers from the private key's,gnupg-pkcs11-scdsilently drops the key. Always certify via--public-key-id-to-certifyon the exact key pair, and do not use a different issuer key unless you are intentionally chaining a CA. - Run
pkcs11-tool --module /usr/local/lib/libcosmian_pkcs11.so --list-objectsand compare theID:fields of the certificate and private key objects.
COSMIAN_KMS_CLI_CONF not set or connection refused
- The library reads the same
ckmsconfiguration file as the CLI. Make sure the environment variable points to a valid configuration and that the KMS server is reachable from thegpg-agentenvironment.
Automated tests
mise run test:gnupg runs the OpenPGP interoperability suite and then this integration end to
end: a KMS server whose keys are wrapped by a SoftHSM2 key-encryption key, an RSA key pair and
self-signed certificate tagged gnupg-card, LEARN and PKSIGN driven through the real
gnupg-pkcs11-scd, and an openssl verification of the resulting signature.
PyKMIP
The Eviden KMS strives to be compatible with the PyKMIP client library, which is widely used for KMIP protocol interactions. This document provides a comprehensive guide to testing and validating PyKMIP compatibility with the Eviden KMS server.
Overview
| Item | Details |
|---|---|
| Protocol | KMIP 1.2 over TCP/TLS with mutual certificate authentication |
| Port | 5696 (IANA-registered KMIP port) |
| Library | PyKMIP (Python KMIP client library) |
| Eviden KMS feature | Requires non-FIPS build |
Purpose of PyKMIP compatibility tests
The PyKMIP compatibility tests serve to:
- Verify that our KMS server correctly implements the KMIP protocol standard
- Ensure interoperability with existing KMIP client implementations
- Catch any regression issues that might break compatibility with PyKMIP clients
- Validate that common KMIP operations work as expected across different client implementations
- Test edge cases and error handling for unsupported operations
Prerequisites
- Python 3.x installed on your system
- PyKMIP library (will be installed by setup script)
- Eviden KMS server running and accessible with KMIP socket server enabled
- All scripts must be executed from the project root directory (not from within the
scripts/directory) - Virtual environment (.venv) set up and activated for Python dependencies
Quick Start
The fastest way to test PyKMIP compatibility is to use the automated test runner:
# 1. Set up the environment (from project root)
./scripts/setup_pykmip.sh
# 2. Start the KMS server (in another terminal)\
pkill -f cosmian_kms # Stop any existing instance
COSMIAN_KMS_CONF=./scripts/kms.toml cargo run --bin cosmian_kms --features non-fips
# 3. Run all compatibility tests
./scripts/test_pykmip.sh all
# 4. Or run specific operations
./scripts/test_pykmip.sh query -v
./scripts/test_pykmip.sh create
./scripts/test_pykmip.sh check
The test runner automatically:
- Activates the Python virtual environment
- Validates prerequisites and connectivity
- Executes the requested operations with proper error handling
- Provides detailed output and status reporting
- Runs with timeout protection to prevent hanging tests
Supported Operations
The current test suite supports the following KMIP operations:
Core Operations
- query - Discover server capabilities and protocol versions
- create - Create symmetric keys
- create_keypair - Create RSA key pairs
- get - Retrieve an object
- get_attributes - Retrieve object attributes
- destroy - Delete objects from the server
- locate - Find objects by search criteria
Cryptographic Operations
- encrypt - Encrypt data using managed keys
- decrypt - Decrypt data using managed keys
- mac - Generate Message Authentication Codes
- activate - Activate objects for use
Management Operations
- revoke - Revoke objects and certificates
- discover_versions - Discover supported KMIP protocol versions
Special Commands
- all - Execute all supported operations in sequence
- check - Validate prerequisites and connectivity
- rust-test - Run Rust-based PyKMIP integration tests
Experimental/Unsupported Operations
- certify - Certificate signing (implemented via separate module
pykmip_certify.py, uses operations not yet supported by Eviden KMS)
Note: Some operations may fail due to server limitations or KMIP 1.x compatibility constraints. The test runner handles these gracefully and provides detailed error reporting.
Understanding Test Results
The test script provides comprehensive output for each operation with clear status indicators:
Success Case
Operations that complete successfully will show:
{
"operation": "Create",
"status": "success",
"unique_identifier": "abc123-def456-789",
"additional_info": {
...
}
}
Failure Case
Operations that fail will show:
{
"operation": "MAC",
"status": "error",
"error": "Invalid parameter provided",
"details": "Cryptographic algorithm not supported"
}
Test Summary
After running all operations, you'll see a summary like:
======================================
FINAL TEST RESULTS SUMMARY
======================================
✅ SUCCESSFUL operations (12/13):
✅ query
✅ create
✅ get_attributes
✅ get
✅ destroy
✅ encrypt
✅ decrypt
✅ locate
✅ discover_versions
✅ mac
✅ activate
✅ revoke
✅ create_keypair
🔍 certify (not supported in PyKMIP - workaround under study)
Operation Status Types
- ✅ SUCCESS: Operation completed and returned successful status
- ❌ FAILED: Operation returned error status or threw exception
- ⚠️ TIMEOUT: Operation timed out after 30 seconds
- 🔍 UNSUPPORTED: Operation not supported by server or KMIP version
Troubleshooting
Common Issues
-
Script execution fails: Ensure you're running from the project root, not from
scripts/# Wrong - don't do this cd scripts && ./test_pykmip.sh # Correct - run from project root ./scripts/test_pykmip.sh all -
PyKMIP import errors: Run
setup_pykmip.shto install dependenciesError: No module named 'kmip' Solution: ./scripts/setup_pykmip.sh -
Connection refused: Verify the KMS server is running with KMIP socket server enabled
Error: Connection refused on port 5696 Solution: Check server is running and socket_server_start = true in config -
Virtual environment not found: The test runner requires a .venv directory
Error: Virtual environment not found Solution: Run ./scripts/setup_pykmip.sh to create .venv -
TLS/Certificate errors: Verify certificate paths and validity
Error: [SSL: CERTIFICATE_VERIFY_FAILED] Solution: Check certificate files in test_data/certificates/client_server/ -
Operation timeouts: Some operations may timeout due to server processing time
Error: Operation timed out after 30 seconds Solution: Check server logs, increase timeout, or use -v for verbose output
Advanced Troubleshooting
Enable verbose output to see detailed operation information:
./scripts/test_pykmip.sh query -v
Check server logs while running tests:
# In another terminal
tail -f logs/server.log
Test connectivity manually:
./scripts/test_pykmip.sh check
Run individual operations to isolate issues:
./scripts/test_pykmip.sh create -v
./scripts/test_pykmip.sh get -v
File Structure
The PyKMIP test suite consists of the following files:
scripts/
├── README_PYKMIP.md # Additional documentation
├── setup_pykmip.sh # Environment setup script
├── verify_pykmip.sh # Configuration verification script
├── test_pykmip.sh # Main compatibility test runner
├── pykmip_client.py # PyKMIP client implementation (12 operations)
├── pykmip_certify.py # Separate certify operation module
├── pykmip.conf # PyKMIP configuration file
├── kms.toml # KMS server configuration for testing
├── activate_venv.sh # Virtual environment activation helper
└── certify_implementation_summary.py # Certify operation analysis script
Key Files
test_pykmip.sh: Main test runner with colored output, timeout protection, and comprehensive error handlingpykmip_client.py: Core client implementing 12 KMIP operations with JSON output formattingpykmip_certify.py: Modular implementation of certificate-related operations (experimental)pykmip.conf: Configuration file with TLS settings, authentication, and server connection detailskms.toml: KMS server configuration optimized for PyKMIP compatibility testing
Configuration
The pykmip.conf file contains the connection settings for the PyKMIP client. Key configuration sections:
Server Connection
[server]
host=127.0.0.1
port=5696
TLS Configuration
[tls]
client_cert_file=test_data/certificates/client_server/owner/owner.client.acme.com.crt
client_key_file=test_data/certificates/client_server/owner/owner.client.acme.com.key
ca_cert_file=test_data/certificates/client_server/ca/ca.crt
Protocol Settings
[protocol]
kmip_version=1.0
Ensure these parameters match your KMS server setup:
- Server hostname/IP and port (default: 127.0.0.1:5696)
- TLS certificate paths (must exist and be valid)
- KMIP protocol version compatibility
KMS Server Configuration
Your KMS server must be configured to accept KMIP connections. Key settings in scripts/kms.toml:
[server]
# Enable KMIP socket server
socket_server_start = true
socket_server_port = 5696
socket_server_hostname = "0.0.0.0"
[tls]
# Server certificate and key
# For FIPS mode (default build):
tls_cert_file = "test_data/certificates/client_server/server/kmserver.acme.com.crt"
tls_key_file = "test_data/certificates/client_server/server/kmserver.acme.com.key"
# For non-FIPS mode:
# tls_p12_file = "test_data/certificates/client_server/server/kmserver.acme.com.p12"
# tls_p12_password = "password"
clients_ca_cert_file = "test_data/certificates/client_server/ca/ca.crt"
Contributing
When adding new PyKMIP compatibility tests:
-
Add new operations to the
operationsarray intest_pykmip.sh:operations=("activate" "create" "create_keypair" "decrypt" "destroy" "discover_versions" "encrypt" "get" "locate" "mac" "query" "revoke") -
Implement operation functions in
pykmip_client.py:def perform_new_operation(proxy, verbose=False): """Implement new KMIP operation""" if verbose: print("Performing new operation...") # Implementation here return {"operation": "NewOperation", "status": "success"} -
Add to argument parser choices in
pykmip_client.py:parser.add_argument('--operation', default='query', choices=['activate', 'create', ..., 'new_operation'], help='KMIP operation to perform') -
Update help text in
test_pykmip.shto include the new operation -
Handle modular operations like certify by creating separate files:
- Create
pykmip_operation.pyfor complex operations - Import and call from main client:
from pykmip_operation import perform_operation
- Create
-
Test both success and failure scenarios to ensure proper error handling
-
Update this README if new setup steps or dependencies are required
Testing Best Practices
- Always test with both verbose (
-v) and normal output modes - Verify operations work individually and in the "all" test suite
- Check for JSON serialization issues with complex data types
- Ensure timeout handling works correctly for long-running operations
- Document any server limitations or KMIP version constraints
Available Operations (Detailed Examples)
Using the Test Runner (Recommended)
The test runner (test_pykmip.sh) automatically handles environment setup and provides consistent output formatting:
# Run all operations with summary report
./scripts/test_pykmip.sh all
# Run specific operation with verbose output
./scripts/test_pykmip.sh query -v
# Check prerequisites and connectivity
./scripts/test_pykmip.sh check
# Run individual operations
./scripts/test_pykmip.sh create
./scripts/test_pykmip.sh encrypt
./scripts/test_pykmip.sh mac
Manual Client Usage (Advanced)
For direct client access with custom parameters:
1. Query Server Capabilities
source .venv/bin/activate
python scripts/pykmip_client.py \
--configuration scripts/pykmip.conf \
--operation query \
--verbose
2. Create Symmetric Key
source .venv/bin/activate
python scripts/pykmip_client.py \
--configuration scripts/pykmip.conf \
--operation create
3. Create RSA Key Pair
source .venv/bin/activate
python scripts/pykmip_client.py \
--configuration scripts/pykmip.conf \
--operation create_keypair
4. Test Encryption/Decryption
source .venv/bin/activate
python scripts/pykmip_client.py \
--configuration scripts/pykmip.conf \
--operation encrypt
python scripts/pykmip_client.py \
--configuration scripts/pykmip.conf \
--operation decrypt
5. Activate Objects
source .venv/bin/activate
python scripts/pykmip_client.py \
--configuration scripts/pykmip.conf \
--operation activate
Related Documentation
- KMIP Protocol Support
- TLS Configuration
- Authentication
- PyKMIP Official Documentation
- Eviden KMS Server Documentation
KMIP Compliance with ovh/kmip-go
The Eviden KMS server is validated against ovh/kmip-go, an independent, production-grade Go implementation of the KMIP 1.0–1.4 protocol developed and maintained by OVHcloud. The library is production-tested against the OVHcloud KMS, making it a meaningful independent reference for verifying Eviden KMS protocol conformance.
Client / server roles
graph TD
subgraph "ovh/kmip-go (Go client)"
KC["kmipclient.Client\nKMIP 1.0 · 1.1 · 1.2 · 1.3 · 1.4"]
end
subgraph "Eviden KMS (server)"
SS["Socket — port 15696\nmTLS / binary TTLV"]
CORE["KMIP Operations"]
DB[("Key store")]
end
KC -- "KMIP TTLV over TLS" --> SS
SS --> CORE
CORE --> DB
style KC fill:#e3f2fd,stroke:#1976D2
style SS fill:#fff3e0,stroke:#FF9800
style CORE fill:#fff3e0,stroke:#FF9800
style DB fill:#fce4ec,stroke:#E91E63
| Component | Role |
|---|---|
| Eviden KMS | KMIP Server — socket on port 15696, mTLS |
| ovh/kmip-go | KMIP Client — sends requests, validates responses against the spec |
The client connects to a live KMS instance with a pinned protocol version
(kmipclient.EnforceVersion), so the same binary validates all five wire-format
versions in the same run.
Relationship with PyKMIP
graph LR
PY["PyKMIP 0.10.0\n(Python — KMIP 1.2)"]
GO["ovh/kmip-go 0.9.2\n(Go — KMIP 1.0 → 1.4)"]
KMS["Eviden KMS\nport 15696"]
PY -- "Synology DSM scenario\nKMIP 1.2" --> KMS
GO -- "Full-range compliance\nKMIP 1.0 – 1.4" --> KMS
style PY fill:#fffde7,stroke:#FFC107
style GO fill:#e3f2fd,stroke:#1976D2
style KMS fill:#e8f5e9,stroke:#388E3C
Both suites exercise the server as independent KMIP clients. PyKMIP covers a specific device integration scenario; ovh/kmip-go covers all supported protocol versions systematically.
KMIP operations supported
The table below lists the KMIP operations the server exposes, the protocol versions at which they are exercised, and the key objects or algorithms involved.
graph LR
subgraph "Key lifecycle"
CR[Create] --> AC[Activate] --> RV[Revoke] --> DS[Destroy]
end
subgraph "Attributes"
GA[GetAttributes]
GAL[GetAttributeList]
AA[AddAttribute]
MA[ModifyAttribute]
DA[DeleteAttribute]
end
subgraph "Discovery"
DV[DiscoverVersions]
QU[Query]
end
subgraph "Object access"
GT[Get]
LO[Locate]
CKP[CreateKeyPair]
end
subgraph "Cryptographic"
EN[Encrypt]
DE[Decrypt]
SN[Sign]
SV[SignatureVerify]
end
subgraph "Batch"
BA[Batch — multi-op]
end
| Operation | KMIP versions | Key objects / algorithms |
|---|---|---|
Create | 1.0 · 1.1 · 1.2 · 1.3 · 1.4 | AES-256 symmetric key |
Activate | 1.0 · 1.1 · 1.2 · 1.3 · 1.4 | Transitions Pre-Active → Active |
Revoke | 1.0 · 1.1 · 1.2 · 1.3 · 1.4 | Key compromise reason |
Destroy | 1.0 · 1.1 · 1.2 · 1.3 · 1.4 | Permanent deletion |
Get | 1.0 · 1.1 · 1.2 · 1.3 · 1.4 | Returns the managed object |
GetAttributes | 1.0 · 1.1 · 1.2 · 1.3 · 1.4 | Version-filtered attribute set |
GetAttributeList | 1.0 · 1.1 · 1.2 · 1.3 · 1.4 | Version-filtered attribute names |
AddAttribute | 1.4 | Standard and x- custom attributes |
ModifyAttribute | 1.4 | Enforces read-only rules per spec |
DeleteAttribute | 1.4 | Response carries the deleted attribute |
Locate | 1.4 | By UniqueIdentifier, Name, Object Group, Algorithm |
CreateKeyPair | 1.4 | RSA-2048, EC P-256 |
DiscoverVersions | 1.4 | Enumerates supported versions |
Query | 1.4 | Reports supported operations |
Encrypt | 1.2 · 1.4 | AES-256-GCM |
Decrypt | 1.2 · 1.4 | AES-256-GCM round-trip |
Sign | 1.4 | RSA-2048-PSS / SHA-256 |
SignatureVerify | 1.4 | RSA-2048-PSS / SHA-256 |
| Batch | 1.4 | Multiple operations in one KMIP message |
Attribute version-gating
The OASIS KMIP specification introduces attributes progressively. The server returns only the attributes defined for the client's declared protocol version — returning a newer attribute to an older client would violate the spec and break real-world clients that have no decoder for it.
timeline
title Attribute introduction per KMIP version
section KMIP 1.0
Core set : Unique Identifier · Object Type
: Cryptographic Algorithm · Cryptographic Length
: State · Initial Date · Lease Time
section KMIP 1.1
Fresh : Marks freshly generated key material
section KMIP 1.2
Alternative Name : Alternate key identifiers
Original Creation Date : When the key material originated
section KMIP 1.3
Random Number Generator : RNG parameters
section KMIP 1.4
Sensitive : Key material sensitivity flag
Always Sensitive : Historical sensitivity latch
Extractable : Whether key material can be exported
Never Extractable : Historical extractability latch
sequenceDiagram
participant C12 as Client (KMIP 1.2)
participant C14 as Client (KMIP 1.4)
participant KMS as Eviden KMS
Note over C12,KMS: Same key — two protocol versions
C12->>KMS: GetAttributeList(uid) [v1.2 wire]
KMS-->>C12: [Unique Identifier, Object Type, …, Fresh]
Note right of C12: Always Sensitive absent ✅
C14->>KMS: GetAttributeList(uid) [v1.4 wire]
KMS-->>C14: [… Fresh, Always Sensitive, Extractable, …]
Note right of C14: Always Sensitive present ✅
| Attribute | Not returned before | Returned from |
|---|---|---|
Fresh | KMIP 1.0 | KMIP 1.1 |
Alternative Name, Original Creation Date | KMIP 1.0–1.1 | KMIP 1.2 |
Random Number Generator | KMIP 1.0–1.2 | KMIP 1.3 |
Sensitive, Always Sensitive, Extractable, Never Extractable | KMIP 1.0–1.3 | KMIP 1.4 |
Attribute mutability
The KMIP specification defines, for every attribute, whether a client may modify or delete it. The server enforces these rules.
sequenceDiagram
participant C as Client (KMIP 1.4)
participant KMS as Eviden KMS
Note over C,KMS: KMIP 1.4 §3.23 — Initial Date is not modifiable by the client
C->>KMS: ModifyAttribute(uid, "Initial Date", any-value)
KMS-->>C: OperationFailed · Attribute_Read_Only ✅
Note over C,KMS: KMIP 1.4 §3.47 — Comment is modifiable by the client
C->>KMS: AddAttribute(uid, "Comment", "my-comment")
KMS-->>C: Success ✅
C->>KMS: ModifyAttribute(uid, "Comment", "updated")
KMS-->>C: Success ✅
C->>KMS: DeleteAttribute(uid, "Comment")
KMS-->>C: Success + {deleted Attribute} ✅
Server-managed attributes — Always Sensitive, Initial Date, Cryptographic Length,
and others — are protected from client writes.
Client-managed attributes — Name, Comment, Description, custom x- attributes,
and others — support the full add / modify / delete lifecycle.
Key lifecycle
stateDiagram-v2
[*] --> PreActive : Create / Register
PreActive --> Active : Activate
Active --> Deactivated : Revoke
Deactivated --> Destroyed : Destroy
Destroyed --> [*]
Active --> Active : Get · GetAttributes · GetAttributeList\nLocate · Encrypt · Decrypt\nSign · SignatureVerify
Cryptographic operations
Symmetric — AES-256-GCM
sequenceDiagram
participant C as Client (KMIP 1.4)
participant KMS as Eviden KMS
C->>KMS: Create(AES-256, Encrypt|Decrypt)
KMS-->>C: UniqueIdentifier
C->>KMS: Activate(uid)
C->>KMS: Encrypt(uid, AES-GCM, plaintext)
KMS-->>C: {ciphertext, IV, AuthTag}
C->>KMS: Decrypt(uid, AES-GCM, ciphertext, IV, AuthTag)
KMS-->>C: plaintext
Asymmetric — RSA-2048-PSS and EC P-256
sequenceDiagram
participant C as Client (KMIP 1.4)
participant KMS as Eviden KMS
C->>KMS: CreateKeyPair(RSA-2048, Sign|Verify)
KMS-->>C: {PrivateKeyUID, PublicKeyUID}
C->>KMS: Activate(PrivateKeyUID) · Activate(PublicKeyUID)
C->>KMS: Sign(PrivateKeyUID, RSA-PSS-SHA256, data)
KMS-->>C: signature
C->>KMS: SignatureVerify(PublicKeyUID, RSA-PSS-SHA256, data, signature)
KMS-->>C: ValidityIndicator = Valid
Running
# MISE task — builds KMS, starts server, runs tests, cleans up
mise run test:kmip-go
# Manual (KMS already running on port 15696)
cd .mise/scripts/kmip-go
KMIP_GO_REPO_ROOT=$(git rev-parse --show-toplevel) \
go test -v -count=1 -timeout 120s ./...
The tests share the KMS configuration and test certificates used by the PyKMIP suite
(kms.toml and test_data/certificates/client_server/).
Deploying email encryption with S/MIME
S/MIME is a standard for public key encryption and signing of MIME data. It is used to secure email messages and is supported by most email clients and servers.
- Deploying email encryption with S/MIME
- Overview of the S/MIME workflow
- Generating a key pair and a certificate
- Exporting and viewing
- Loading the PKCS#12 file in an email client
- Apple mail, MacOS
- Outlook, Windows
Overview of the S/MIME workflow
To enable S/MIME, a user will go through the following steps:
Setup (once)
- Generate a key pair and a certificate holding the correct x509 extensions for S/MIME
- Import this certificate and private key (usually in the form of a PKCS#12 file) in its email client
Handshake (once per recipient)
- Send a signed, non-encrypted, email to a recipient to share its certificate
- Receive a signed, encrypted, or non-encrypted, email from the recipient and import its certificate
No further actions are required to exchange signed encrypted emails with this recipient.
Generating a key pair and a certificate
For interoperability, the user certificate should be ultimately signed by a public certificate authority commonly found on email clients. If you want to use your own certificate authority, for internal use or test purposes, please see the instructions below on how to create a root CA and an intermediate CA.
Please note that these certificates require certain x509 extensions to be compatible with Google CSE S/MIME and some other operators. Check the Google requirements for details.
For a user, there are 3 main possibilities to generate a key pair and an S/MIME certificate:
Getting a user certificate from a public certificate authority
Many public authorities can issue user S/MIME certificates. Some authorities even provide free certificates for personal use. This is the case of Actalis for instance.
Some email clients, such as Outlook, consider the email address to be case-sensitive. Make sure the email address in your request matches the email address you are using in your email client.
Once generated, these authorities will provide you with a PKCS#12 file containing the certificate and the private key. The file is usually protected by a password.
This file can directly be imported in your email client.
If you wish to store it in the KMS, you can import it using the following command:
ckms certificates import --format pkcs12 --pkcs12-password mysecret \
--replace john_doe.p12 john.doe@acme.com
To export it as a PEM file, use the following command:
ckms certificates export --format pem --certificate-id john.doe@acme.com john_doe.pem
Getting an intermediate signer certificate from a public certificate authority
If you have many users, you will probably want top buy an intermediate certificate from a public certificate authority. This intermediate certificate will be used to sign the user certificates.
First, import the intermediate certificate and its private key in the KMS:
ckms certificates import --format pkcs12 --pkcs12-password mysecret \
--replace intermediate.p12 acme_intermediate_ca
Then generate a user certificate signed by the intermediate certificate.
Creating an S/MIME certificate authority with a root and intermediate CA
If you wish to be your own certificate authority, you can create a root and an intermediate CA.
Create a Root CA
Say, we are ACME Inc. Let us create a self-signed root certificate with the following details:
- Common Name: ACME Root CA
- Organization: ACME
- Organizational Unit: IT
- Locality: New York
- State: New York
- Country: US
- Validity: 10 years (3650 days)
- Key Algorithm: NIST P-256
ckms certificates certify \
--certificate-id acme_root_ca \
--generate-key-pair \
--algorithm rsa4096 \
--subject-name "CN=ACME Root CA,OU=IT,O=ACME,L=New York,ST=New York,C=US" \
--days 3650 \
--certificate-extensions ca.ext
The ca.ext file should contain the following content (which should meet Google CSE):
[ v3_ca ]
subjectKeyIdentifier=hash
basicConstraints=critical,CA:TRUE
Create an Intermediate CA
Let us create an intermediate CA signed by the Root CA. This intermediate will be used to issue end-users S/MIME certificates. It will be created with the following details:
- Common Name: ACME Intermediate CA
- Organization: ACME
- Organizational Unit: IT
- Locality: New York
- State: New York
- Country: US
- Validity: 5 years (1825 days)
- Key Algorithm: NIST P-256
- Extensions: a
intermediate.extfile with the following content:
[ v3_ca ]
basicConstraints=critical,CA:TRUE,pathlen:0
keyUsage=critical,keyCertSign,digitalSignature
extendedKeyUsage=emailProtection
subjectKeyIdentifier=hash
authorityKeyIdentifier=keyid:always,issuer
crlDistributionPoints=URI:https://acme.com/crl.pem
Note: these extensions make the intermediate CA compatible with Google CSE for GMail S/MIME requirements
ckms certificates certify \
--certificate-id acme_intermediate_ca \
--issuer-certificate-id acme_root_ca \
--generate-key-pair \
--algorithm rsa4096 \
--subject-name "CN=ACME S/MIME intermediate,OU=IT,O=ACME,L=New York,ST=New York,C=US" \
--days 1825 \
--certificate-extensions intermediate.ext
Generate a user certificate signed by the intermediate certificate
Then, generate a user certificate signed by the intermediate certificate:
Important some email clients, such as Outlook, consider the email address to be case-sensitive. Make sure the email address in the certificate Common Name matches the email address you are using in your email client.
To be used for S/MIME, the user certificate needs to have certain extensions which are set in a
file containing a [ v3_ca ] section.
Say we want to create an S/MIME certificate for user john.doe@acme.com<, signed by the intermediate
certificate, with the following details:
- Common Name:
john.doe@acme.com - Organization: ACME
- Organizational Unit: IT
- Locality: San Francisco
- State: California
- Country: US
- Validity: 1 year (365 days)
- Key Algorithm: NIST P-256
- Extensions: a user.ext file with the following content:
The user.ext file should contain the following content (which should meet Google CSE
requirements):
[ v3_ca ]
keyUsage=critical,nonRepudiation,digitalSignature,dataEncipherment,keyEncipherment
extendedKeyUsage=emailProtection
subjectKeyIdentifier=hash
authorityKeyIdentifier=keyid:always,issuer
Issue the following command to generate the certificate:
ckms certificates certify --certificate-id john.doe@acme.com \
--issuer-certificate-id acme_intermediate_ca \
--generate-key-pair --algorithm nist-p256 \
--subject-name "CN=john.doe@acme.com,OU=IT,O=ACME,L=San Francisco,ST=California,C=US" --days 365 \
--certificate-extensions user.ext
Exporting and viewing
Use the ckms certificates export command to export the certificate and the private key in the
desired format. Most email clients require the certificate and the private key to be in a PKCS#12
file.
PKCS#12 format
To export the certificate and the private key in PKCS#12 format,
use either the pkcs12 or pkcs12-legacy format option.
The pkcs12-legacy format is deprecated but is compatible with older versions of OpenSSL (1.1.x)
and some keystores such as the Java keystore or the macOS keychain.
ckms certificates export --certificate-id john.doe@acme.com \
--format pkcs12-legacy --pkcs12-password mysecret \
john_doe.p12
OpenSSL can be used to view the content of the PKCS#12 file.
You will need to provide the password you used to protect the file (mysecret above).
If you are using OpenSSL 3.0 and above and want to view a legacy PKCS#12 file,
add the -legacy option:
> openssl pkcs12 -info -in john_doe.p12 -nodes
Enter Import Password:
MAC Iteration 2048
MAC verified OK
PKCS7 Encrypted data: Certificate bag
Bag Attributes
localKeyID: 82 C3 F3 83 32 68 ED B4 71 15 96 12 0B 01 4C 34 8D 58 DC 58
subject=/CN=john.doe@acme.com/OU=IT/C=US/ST=California/L=San Francisco/O=ACME
issuer=/CN=ACME S/MIME intermediate/OU=IT/C=US/ST=New York/L=New York/O=ACME
-----BEGIN CERTIFICATE-----
MIICQDCCAeagAwIBAgIBADAKBggqhkjOPQQDAjByMSEwHwYDVQQDDBhBQ01FIFMv
TUlNRSBpbnRlcm1lZGlhdGUxCzAJBgNVBAsMAklUMQswCQYDVQQGEwJVUzERMA8G
A1UECAwITmV3IFlvcmsxETAPBgNVBAcMCE5ldyBZb3JrMQ0wCwYDVQQKDARBQ01F
MB4XDTI0MDkxMzA5MzkwMloXDTI1MDkxMzA5MzkwMlowcjEaMBgGA1UEAwwRam9o
bi5kb2VAYWNtZS5jb20xCzAJBgNVBAsMAklUMQswCQYDVQQGEwJVUzETMBEGA1UE
CAwKQ2FsaWZvcm5pYTEWMBQGA1UEBwwNU2FuIEZyYW5jaXNjbzENMAsGA1UECgwE
QUNNRTBZMBMGByqGSM49AgEGCCqGSM49AwEHA0IABOvAZj+RBjElLMWVipGx+rbG
mniD8NApM2inWLN+1avvd2QslOh9mhiT18u2KJkrjG9hIbVh8cyr4/dxtWL6Goij
bTBrMAsGA1UdDwQEAwIDyDATBgNVHSUEDDAKBggrBgEFBQcDBDAcBgNVHREEFTAT
gRFqb2huLmRvZUBhY21lLmNvbTApBgNVHR8EIjAgMB6gHKAahhhodHRwczovL2Fj
bWUuY29tL2NybC5wZW0wCgYIKoZIzj0EAwIDSAAwRQIgYUf5lGAU3dQ9wIPdX5x+
RtJioGwdVZZmprEAdNL203wCIQDbDk9yRjfPUUWph05LlC45EA8B3OJYEShdo3s9
pImIww==
-----END CERTIFICATE-----
Certificate bag
Bag Attributes: <No Attributes>
subject=/CN=ACME S/MIME intermediate/OU=IT/C=US/ST=New York/L=New York/O=ACME
issuer=/CN=ACME Root CA/OU=IT/C=US/ST=New York/L=New York/O=ACME
-----BEGIN CERTIFICATE-----
MIICJjCCAc2gAwIBAgIBADAKBggqhkjOPQQDAjBmMRUwEwYDVQQDDAxBQ01FIFJv
b3QgQ0ExCzAJBgNVBAsMAklUMQswCQYDVQQGEwJVUzERMA8GA1UECAwITmV3IFlv
cmsxETAPBgNVBAcMCE5ldyBZb3JrMQ0wCwYDVQQKDARBQ01FMB4XDTI0MDkxMzA5
MzYwNVoXDTI5MDkxMjA5MzYwNVowcjEhMB8GA1UEAwwYQUNNRSBTL01JTUUgaW50
ZXJtZWRpYXRlMQswCQYDVQQLDAJJVDELMAkGA1UEBhMCVVMxETAPBgNVBAgMCE5l
dyBZb3JrMREwDwYDVQQHDAhOZXcgWW9yazENMAsGA1UECgwEQUNNRTBZMBMGByqG
SM49AgEGCCqGSM49AwEHA0IABEG7Ei75r1WuGrfMdXEQseoxf4n5KM7Bov5GIP+0
ZSHt2CYEgIkvBElHiLtDs2XP8vPmHKQPA2fOTIqsxGG7NPijYDBeMA8GA1UdEwQI
MAYBAf8CAQAwCwYDVR0PBAQDAgKEMBMGA1UdJQQMMAoGCCsGAQUFBwMEMCkGA1Ud
HwQiMCAwHqAcoBqGGGh0dHBzOi8vYWNtZS5jb20vY3JsLnBlbTAKEBggqhkjOPQQD
AgNHADBEAiBbVpxNtT+wLNxAUIrA9r9fR4UT1aCw15rShZZiCjrvcAIgURwRsODz
bB/+NeaLa9WgwjtZk7Vm1c7fVnb30TBcN78=
-----END CERTIFICATE-----
Certificate bag
Bag Attributes: <No Attributes>
subject=/CN=ACME Root CA/OU=IT/C=US/ST=New York/L=New York/O=ACME
issuer=/CN=ACME Root CA/OU=IT/C=US/ST=New York/L=New York/O=ACME
-----BEGIN CERTIFICATE-----
MIIBujCCAV+gAwIBAgIBADAKBggqhkjOPQQDAjBmMRUwEwYDVQQDDAxBQ01FIFJv
b3QgQ0ExCzAJBgNVBAsMAklUMQswCQYDVQQGEwJVUzERMA8GA1UECAwITmV3IFlv
cmsxETAPBgNVBAcMCE5ldyBZb3JrMQ0wCwYDVQQKDARBQ01FMB4XDTI0MDkxMzA5
MzQxNFoXDTM0MDkxMTA5MzQxNFowZjEVMBMGA1UEAwwMQUNNRSBSb290IENBMQsw
CQYDVQQLDAJJVDELMAkGA1UEBhMCVVMxETAPBgNVBAgMCE5ldyBZb3JrMREwDwYD
VQQHDAhOZXcgWW9yazENMAsGA1UECgwEQUNNRTBZMBMGByqGSM49AgEGCCqGSM49
AwEHA0IABPj86uAwMjnITXnnnLY9wmHbxtGz2IWAN7JLdbmD77RfbpvcK+BxMzVI
20ITcWv8dyfhcMLyBa+ygDVPgVK1jLQwCgYIKoZIzj0EAwIDSQAwRgIhAJenykHa
jjVPke8vX+GyaMTqNJZN94QyCYHgqUeDeZVCAiEAuokqc/TfyzvkzmWcJgeGsFyM
Nk/pqUsPr8eR1sHQWgg=
-----END CERTIFICATE-----
PKCS7 Data
Shrouded Keybag: Bag Attributes
localKeyID: 82 C3 F3 83 32 68 ED B4 71 15 96 12 0B 01 4C 34 8D 58 DC 58
Key Attributes: <No Attributes>
-----BEGIN PRIVATE KEY-----
MIGHTAgEAMBMGByqGSM49AgEGCCqGSM49AwEHBG0wawIBAQQge5si3Le85K18XOLc
ae8QE50qCE0yUMipcPvHwZM1k1ChRANCAATrwGY/kQYxJSzFlYqRsfq2xpp4g/DQ
KTNop1izftWr73dkLJTofZoYk9fLtiiZK4xvYSG1YfHMq+P3cbVi+hqI
-----END PRIVATE KEY-----
Exporting for Google CSE S/MIME
To export the expected Google CSE Root certificate in order to import it in the Apps/Google Workspace/Settings for Gmail/User Settings, proceed as follows:
openssl pkcs12 -in john_doe.p12 -cacerts -nokeys -out ca.pem -passin pass:"$MY_PASSWD"
openssl pkcs12 -in john_doe.p12 -clcerts -nokeys -out certificate.pem -passin pass:"$MY_PASSWD"
cp certificate.pem fullchain.pem
cat ca.pem >>fullchain.pem
PEM format
To export the certificate only, in PEM format, use the following command:
ckms certificates export --certificate-id john.doe@acme.com --format pem john_doe.pem
You can then view its content, using openssl for instance:
> openssl x509 -inform pem -text -in john_doe.pem
Certificate:
Data:
Version: 3 (0x2)
Serial Number: 0 (0x0)
Signature Algorithm: ecdsa-with-SHA256
Issuer: CN=ACME S/MIME intermediate, OU=IT, C=US, ST=New York, L=New York, O=ACME
Validity
Not Before: Sep 11 14:09:25 2024 GMT
Not After : Sep 11 14:09:25 2025 GMT
Subject: CN=john.doe@acme.com, OU=IT, C=US, ST=California, L=San Francisco, O=ACME
Subject Public Key Info:
Public Key Algorithm: id-ecPublicKey
Public-Key: (256 bit)
pub:
04:4b:0e:f2:7b:5b:93:91:1c:4a:a2:d1:91:24:ce:
a4:6e:97:5c:41:9f:fd:92:74:70:83:05:64:69:58:
41:46:c5:64:bc:5e:89:30:d6:83:c8:06:64:f6:e8:
b9:a2:a9:2f:ad:e5:93:fd:49:45:4c:e5:c3:2b:29:
e1:7e:a0:16:a9
ASN1 OID: prime256v1
NIST CURVE: P-256
X509v3 extensions:
X509v3 Key Usage:
Digital Signature, Non Repudiation, Key Agreement
X509v3 Extended Key Usage:
E-mail Protection
X509v3 Subject Alternative Name:
<EMPTY>
X509v3 CRL Distribution Points:
Full Name:
URI:https://acme.com/crl.pem
Signature Algorithm: ecdsa-with-SHA256
30:45:02:21:00:cf:31:c9:f1:a7:d7:f5:cd:3a:b6:e3:4e:13:
20:ef:e1:6d:b9:21:55:66:27:c4:5d:b0:68:29:f2:07:7e:5b:
eb:02:20:1d:92:ff:52:1d:c2:f1:ab:34:f7:d7:f1:29:87:bc:
f5:33:3c:0b:6c:93:23:4c:4f:c7:69:c1:df:23:95:0e:78
-----BEGIN CERTIFICATE-----
MIICLTCCAdOgAwIBAgIBADAKBggqhkjOPQQDAjByMSEwHwYDVQQDDBhBQ01FIFMv
TUlNRSBpbnRlcm1lZGlhdGUxCzAJBgNVBAsMAklUMQswCQYDVQQGEwJVUzERMA8G
A1UECAwITmV3IFlvcmsxETAPBgNVBAcMCE5ldyBZb3JrMQ0wCwYDVQQKDARBQ01F
MB4XDTI0MDkxMTE0MDkyNVoXDTI1MDkxMTE0MDkyNVowcjEaMBgGA1UEAwwRam9o
bi5kb2VAYWNtZS5jb20xCzAJBgNVBAsMAklUMQswCQYDVQQGEwJVUzETMBEGA1UE
CAwKQ2FsaWZvcm5pYTEWMBQGA1UEBwwNU2FuIEZyYW5jaXNjbzENMAsGA1UECgwE
QUNNRTBZMBMGByqGSM49AgEGCCqGSM49AwEHA0IABEsO8ntbk5EcSqLRkSTOpG6X
XEGf/ZJ0cIMFZGlYQUbFZLxeiTDWg8gGZPbouaKpL63lk/1JRUzlwysp4X6gFqmj
WjBYMAsGA1UdDwQEAwIDyDATBgNVHSUEDDAKBggrBgEFBQcDBDAJBgNVHREEAjAA
MCkGA1UdHwQiMCAwHqAcoBqGGGh0dHBzOi8vYWNtZS5jb20vY3JsLnBlbTAKEBggq
hkjOPQQDAgNIADBFAiEAzzHJ8afX9c06tuNOEyDv4W25IVVmJ8RdsGgp8gd+W+sC
IB2S/1IdwvGrNPfX8SmHvPUzPAtskyNMT8dpwd8jlQ54
-----END CERTIFICATE-----
Loading the PKCS#12 file in an email client
Apple mail, MacOS
To use your S/MIME certificate, load it in the login keychain:

Then, in the Mail application, create a new email and tick the "encrypt" and "sign" boxes:

When handshaking with a new recipient, send a signed email to the recipient (not encrypted).
When receiving a signed email from the recipient, import the recipient's certificate in your contacts.
Outlook, Windows
Setup
In Outlook (classic) go to File -> Options -> Trust Center -> Trust Center Settings

Then go to Email Security and click on Import/Export to import the PKCS#12 file.

Finally, go to the Email Security and click the Settings... button of Default Setting. In the popup, select the certificate you just imported, adjust the hash algorithm to SHA256 for maximum compatibility and make sure you tick the box "Send these certificates with signed messages."

Sending a message
Click on New Email, then Options -> Encrypt and Sign.
To perform a handshake with a new recipient, send a first email to the recipient that is signed only (not encrypted).

Terraform / OpenTofu Provider
The Cosmian KMS Terraform provider allows DevOps and platform engineering teams to manage cryptographic keys, certificates, and access rights in Eviden KMS as infrastructure-as-code, with full GitOps support.
| Attribute | Value |
|---|---|
| Provider source | Cosmian/kms |
| Terraform Registry | registry.terraform.io/providers/Cosmian/kms |
| GitHub repository | github.com/Cosmian/terraform-provider-kms |
| Current version | v0.1.1 |
| License | Mozilla Public License 2.0 |
| KMS version | Eviden KMS ≥ 5.0 |
Requirements
- Terraform ≥ 1.0 or OpenTofu ≥ 1.6
- A running Eviden KMS instance (see installation guide)
Installation
Declare the provider in your Terraform configuration:
terraform {
required_providers {
kms = {
source = "Cosmian/kms"
version = "~> 0.1"
}
}
}
Then run:
terraform init
Provider Configuration
API key authentication (recommended)
provider "kms" {
server_url = "https://kms.example.com:9998"
api_key = var.kms_api_key # or set COSMIAN_KMS_API_KEY env var
}
mTLS client certificate authentication
provider "kms" {
server_url = "https://kms.example.com:9998"
tls_cert_file = "/etc/kms/client.crt"
tls_key_file = "/etc/kms/client.key"
ca_cert_file = "/etc/kms/ca.pem" # optional — verify KMS server certificate
}
Environment variables
All provider arguments can be supplied via environment variables, which is the recommended approach for CI/CD pipelines:
| Argument | Environment variable |
|---|---|
server_url | COSMIAN_KMS_SERVER_URL |
api_key | COSMIAN_KMS_API_KEY |
export COSMIAN_KMS_SERVER_URL="https://kms.example.com:9998"
export COSMIAN_KMS_API_KEY="my-secret-api-key"
terraform apply
Resources
kms_symmetric_key
Creates an AES symmetric key via KMIP Create.
resource "kms_symmetric_key" "data_key" {
algorithm = "AES"
key_length_bits = 256
name = "database-encryption-key"
tags = ["env=prod", "team=data"]
}
output "data_key_uid" {
value = kms_symmetric_key.data_key.id
}
Arguments
| Argument | Type | Required | Description |
|---|---|---|---|
algorithm | string | yes | Cryptographic algorithm. AES (default) |
key_length_bits | number | yes | Key size in bits: 128, 192, or 256 |
name | string | no | Human-readable name stored as a KMIP Name attribute |
tags | list(string) | no | List of key=value tags attached to the object |
Attributes
| Attribute | Description |
|---|---|
id | KMS UID of the created key (UUID) |
kms_key_pair
Creates an asymmetric key pair via KMIP CreateKeyPair.
resource "kms_key_pair" "signing_pair" {
algorithm = "RSA"
key_length_bits = 4096
name = "code-signing"
}
output "private_key_uid" {
value = kms_key_pair.signing_pair.private_key_uid
}
output "public_key_uid" {
value = kms_key_pair.signing_pair.public_key_uid
}
Arguments
| Argument | Type | Required | Description |
|---|---|---|---|
algorithm | string | yes | RSA, EC |
key_length_bits | number | yes | RSA: 2048, 3072, 4096. EC: curve size (256, 384, 521) |
name | string | no | Human-readable key pair name |
tags | list(string) | no | Tags for both keys |
Attributes
| Attribute | Description |
|---|---|
private_key_uid | KMS UID of the private key |
public_key_uid | KMS UID of the public key |
kms_certificate
Creates or imports an X.509 certificate via KMIP Certify.
resource "kms_key_pair" "ca_pair" {
algorithm = "RSA"
key_length_bits = 4096
name = "internal-ca"
}
resource "kms_certificate" "internal_ca" {
subject_name = "CN=Internal CA,O=Example,C=FR"
key_pair_uid = kms_key_pair.ca_pair.private_key_uid
is_ca = true
validity_days = 3650
}
Arguments
| Argument | Type | Required | Description |
|---|---|---|---|
subject_name | string | yes | Distinguished Name (DN) of the certificate subject |
key_pair_uid | string | yes | UID of the KMS private key to sign with |
is_ca | bool | no | Whether to add the CA basic constraint. Default: false |
validity_days | number | no | Certificate validity period in days. Default: 365 |
tags | list(string) | no | Tags attached to the certificate object |
Attributes
| Attribute | Description |
|---|---|
id | KMS UID of the certificate |
kms_access_right
Grants a user access rights to a KMS object via the KMS grant endpoint.
resource "kms_access_right" "alice_can_decrypt" {
object_uid = kms_symmetric_key.data_key.id
user_id = "alice@example.com"
operations = ["Get", "Decrypt"]
}
Arguments
| Argument | Type | Required | Description |
|---|---|---|---|
object_uid | string | yes | UID of the KMS object to grant access to |
user_id | string | yes | Identity of the user (email, sub claim, or DN) |
operations | list(string) | yes | KMIP operation names to grant: Get, Decrypt, Encrypt, Sign, Verify, Export, Destroy, … |
Data Sources
data.kms_symmetric_key
Reads an existing symmetric key by UID.
data "kms_symmetric_key" "existing_key" {
unique_identifier = "550e8400-e29b-41d4-a716-446655440000"
}
data.kms_key_pair
Reads an existing key pair.
data "kms_key_pair" "existing_pair" {
private_key_uid = "uuid-of-private-key"
}
data.kms_access_list
Lists all access rights on a KMS object.
data "kms_access_list" "key_grants" {
object_uid = kms_symmetric_key.data_key.id
}
output "granted_users" {
value = data.kms_access_list.key_grants.users
}
Import
All resources support terraform import to bring existing KMS objects under Terraform management.
# Symmetric key
terraform import kms_symmetric_key.data_key 550e8400-e29b-41d4-a716-446655440000
# Key pair — format: private_uid:public_uid
terraform import kms_key_pair.signing_pair \
aaaa0000-0000-0000-0000-000000000001:bbbb0000-0000-0000-0000-000000000002
# Certificate
terraform import kms_certificate.internal_ca cccc0000-0000-0000-0000-000000000003
Complete example
The following configuration creates a 256-bit AES key and a 4096-bit RSA signing pair, then
grants alice@example.com decrypt rights on the AES key:
terraform {
required_providers {
kms = {
source = "Cosmian/kms"
version = "~> 0.1"
}
}
}
provider "kms" {
# server_url and api_key read from COSMIAN_KMS_SERVER_URL / COSMIAN_KMS_API_KEY
}
resource "kms_symmetric_key" "app_dek" {
algorithm = "AES"
key_length_bits = 256
name = "app-data-encryption-key"
tags = ["app=myapp", "env=prod"]
}
resource "kms_key_pair" "app_signing" {
algorithm = "RSA"
key_length_bits = 4096
name = "app-signing-key"
tags = ["app=myapp", "env=prod"]
}
resource "kms_access_right" "alice_decrypt" {
object_uid = kms_symmetric_key.app_dek.id
user_id = "alice@example.com"
operations = ["Get", "Decrypt"]
}
output "dek_uid" { value = kms_symmetric_key.app_dek.id }
output "private_key_uid" { value = kms_key_pair.app_signing.private_key_uid }
output "public_key_uid" { value = kms_key_pair.app_signing.public_key_uid }
Apply it against a local KMS instance:
docker run -d -p 9998:9998 --name kms ghcr.io/cosmian/kms:latest
export COSMIAN_KMS_SERVER_URL=http://localhost:9998
terraform init
terraform apply
Local development and testing
Clone the provider repository and build the binary:
git clone https://github.com/Cosmian/terraform-provider-kms
cd terraform-provider-kms
make build # produces ./terraform-provider-kms
Configure Terraform to use the local binary instead of the registry version by creating or
editing ~/.terraformrc:
provider_installation {
dev_overrides {
"Cosmian/kms" = "/absolute/path/to/terraform-provider-kms"
}
direct {}
}
Run the acceptance tests against a local KMS server:
docker run -d -p 9998:9998 --name kms ghcr.io/cosmian/kms:latest
export TF_ACC=1
export COSMIAN_KMS_SERVER_URL=http://localhost:9998
make testacc
Related
- Terraform Registry — Cosmian/kms
- Provider GitHub repository
- OpenAPI / REST API
- Kubernetes integrations
- Helm chart deployment
SPIRE / SPIFFE — Workload Identity and FIPS-Backed PKI
Eviden KMS serves as the single
vault_addrfor SPIRE: it implements the transit and PKI engines (/v1/transit/*,/v1/{pki_mount}/*) directly, and transparently proxies all auth requests (/v1/auth/*) to the Cosmian Authentication Server (auth-verifier), which handles AppRole login, token lifecycle, and Kubernetes auth. Together they let SPIRE (the SPIFFE Runtime Environment) use Cosmian's FIPS 140-3 KMS as its certificate authority and key custodian — without requiring a separate secrets management cluster or a reverse proxy.
End-to-end flow
sequenceDiagram
participant Admin as Platform Admin
participant AuthV as auth-verifier<br/>(/login + /auth/* — admin API)
participant KMS as Eviden KMS<br/>(vault_addr — /v1/auth/* proxy<br/>+ /v1/transit/*, /v1/pki/*)
participant Server as SPIRE Server
participant Agent as SPIRE Agent
participant Mistral as AI Agent Workload<br/>(e.g. Mistral agent)
Admin->>KMS: 0. Create PKI CA key<br/>ckms certificates certify --tag vault_pki_ca
KMS-->>Admin: 200 OK (key stored, tag: vault_pki_ca)
Admin->>AuthV: 1a. Admin login (directly)<br/>POST /login?realm=_ (HTTP Basic)
AuthV-->>Admin: session cookie
Admin->>AuthV: 1b. Create the SPIRE server AppRole, read role_id, mint secret_id<br/>POST .../role/{name} · GET .../role/{name}/role-id · POST .../role/{name}/secret-id
AuthV-->>Admin: role_id + secret_id
Note over Admin,Server: Admin configures SPIRE with the role_id + secret_id
Server->>KMS: 2. AppRole login<br/>POST /v1/auth/approle/login<br/>{role_id, secret_id}
KMS->>AuthV: proxy /v1/auth/* → /auth/*
AuthV-->>Server: Vault token (hvs.xxxx)
Server->>KMS: 3. Sign intermediate CA<br/>POST /v1/pki/root/sign-intermediate<br/>(X-Vault-Token, CSR, uri_sans)
Note over KMS: validate X-Vault-Token via AuthV<br/>(30 s cache), KMIP Certify
KMS-->>Server: signed cert + ca_chain
Note over Server,Agent: 4. SPIRE Agent attests to SPIRE Server<br/>(join_token in this demo)
Agent-->>Mistral: 5. Workload API (unix socket)<br/>fetch JWT-SVID
Mistral->>Mistral: 6. Validate SPIFFE ID,<br/>trust domain, expiry
Note over Mistral: The workload's identity is its SPIFFE SVID —<br/>it never calls the KMS and holds no AppRole credentials.
Steps 1–4 are the SPIRE server's Vault-compatible flow: it logs in with its AppRole, then uses the KMS PKI engine to sign its intermediate CA and (optionally) the transit engine to store and use its own signing keys. Steps 5–6 are the only interaction the AI agent workload has with SPIRE: it authenticates to the SPIRE Agent through the Workload API and receives a SPIFFE SVID (JWT-SVID and/or X.509-SVID), which it uses to authenticate to other services. The workload never talks to the KMS and holds no AppRole credentials — SPIFFE identity (5–6) and the KMS AppRole (2–4) are two independent, non-overlapping capabilities: the former for the workload, the latter for the SPIRE server.
What is it?
SPIFFE (Secure Production Identity Framework For Everyone) defines
a standard for issuing cryptographic identities — SVIDs (SPIFFE Verifiable
Identity Documents) — to software workloads, identified by a spiffe://<trust-domain>/...
URI. SPIRE is the reference runtime that issues and rotates these identities.
SPIRE needs two things from an external secrets/PKI backend:
- An
UpstreamAuthorityto sign its intermediate CA certificate. - A
KeyManagerto store the private keys it uses internally.
Both of SPIRE's built-in vault plugins use a specific HTTP API for crypto operations and
authentication. Eviden KMS implements the subset of that API SPIRE needs: it handles the
Transit engine (/v1/transit/*) and the PKI engine
(/v1/{pki_mount}/root/sign-intermediate) natively, and transparently proxies all
AppRole auth calls (/v1/auth/*) to the Cosmian Authentication Server. Point SPIRE's
vault_addr at the KMS, and every private key SPIRE would normally manage itself is
generated, stored, and used exclusively inside the FIPS 140-3-validated KMS.
Why use it?
| Need | How this integration addresses it |
|---|---|
| Private-key custody | SPIRE's CA and transit keys are generated and stored exclusively inside Eviden KMS — never on the SPIRE server's local disk. |
| FIPS 140-3 compliance | All signing operations (CA rotation, transit sign) are executed by the FIPS-validated KMS, not by SPIRE's built-in disk/memory key manager. |
| No additional cluster to operate | Reuses infrastructure you already run (Eviden KMS + auth-verifier) instead of standing up and hardening a separate secrets management cluster just for SPIRE. |
| Centralized audit trail | Every CA signature and transit sign call is a KMIP operation logged by the KMS with identity, timestamp, and key identifier. |
| Post-quantum-ready transit keys | Transit keys support ml-dsa-65 (non-FIPS builds) alongside classical ecdsa-p256/p384 and rsa-2048/4096. |
Drop-in vault_addr | SPIRE's UpstreamAuthority "vault" and KeyManager "vault" plugins need no code changes — only configuration pointing vault_addr at the KMS. No nginx or extra proxy required. |
Who should use it?
- Platform/security teams implementing machine-to-machine (M2M) workload authentication between services or AI agents, who already run (or plan to run) Eviden KMS.
- SPIRE operators who want FIPS 140-3/HSM-backed key custody for SPIRE's CA and transit keys without deploying and operating a separate secrets management cluster.
- Teams issuing identities to AI agent workloads (e.g. LLM-backed autonomous agents) that need short-lived, verifiable SPIFFE identities (JWT-SVIDs or X.509-SVIDs) to authenticate to each other and to internal services.
Architecture
KMS acts as the single vault_addr for the entire SPIRE deployment. Internally it routes
by path: /v1/transit/* and /v1/pki/* are handled directly, while /v1/auth/* is
transparently proxied to auth-verifier. SPIRE never needs to know about the two-service
split — it connects to one endpoint.
flowchart LR
subgraph Cosmian ["Cosmian Backend"]
direction TB
KMS["Eviden KMS :9998<br/>vault_addr<br/>/v1/auth/* → proxy<br/>/v1/transit/*, /v1/pki/* → native"]
AuthV["auth-verifier :8443<br/>/v1/auth/* (AppRole, token)"]
KMS -- "/v1/auth/* proxy<br/>(AppRole login,<br/>token lookup)" --> AuthV
KMS -. "token lookup-self<br/>(30 s cache)" .-> AuthV
end
subgraph SPIRE ["SPIRE Runtime"]
direction TB
SS[SPIRE Server]
SA[SPIRE Agent]
SS -- "CA + transit keys" --> SA
end
subgraph Workloads ["Workloads"]
direction TB
MA1[AI Agent #1]
MA2[AI Agent #2]
end
Admin(["Platform Admin"])
Admin -- "1. provision AppRoles + PKI CA key" --> Cosmian
SS -- "2. vault_addr<br/>(AppRole login,<br/>PKI/transit calls)" --> KMS
SA -- "Workload API<br/>(unix socket)" --> MA1
SA -- "Workload API<br/>(unix socket)" --> MA2
KMS proxies /v1/auth/* to the auth-verifier URL configured via
vault_auth_verifier_url. No nginx or additional reverse proxy is needed — the same
TLS client already used for token validation is reused for the proxy.
KMS endpoint groups
The KMS exposes three distinct path groups under its vault_addr. Each group has a
different purpose, a different caller, and a different backend implementation.
| Path group | Handled by | Caller | Purpose | Output type |
|---|---|---|---|---|
/v1/auth/* | auth-verifier (proxied) | SPIRE server | AppRole login, token validation, renewal, revocation — all HTTP methods forwarded transparently | Vault token (hvs.*) / 204 No Content |
/v1/{mount}/keys/* | Eviden KMS (native) | SPIRE KeyManager | Create (CreateKeyPair), read (Find+Get), configure (no-op), list (Find), delete (Revoke+Destroy) asymmetric key pairs; private key sensitive=true (non-exportable) | TransitKeyInfo (name, type, public key PEM, version map) / 204 No Content |
/v1/{mount}/sign/{name}/{hash_alg} | Eviden KMS (native) | SPIRE KeyManager | Server-side signing (Sign); private key never leaves the KMS | Signature string (vault:v1: prefix + base64) |
/v1/{mount}/root/sign-intermediate | Eviden KMS (native) | SPIRE UpstreamAuthority | Sign a SPIRE intermediate CA CSR with the pre-provisioned Root CA key (Find→Certify→Find+Get) — only implemented PKI path | SignIntermediateResult (signed cert PEM, issuing CA PEM, CA chain PEMs) |
/v1/auth/* — Authentication proxy
Handled by auth-verifier (the KMS forwards all /v1/auth/* requests transparently).
The KMS never processes credentials itself.
| Method | Path | Caller | Purpose | Output type |
|---|---|---|---|---|
POST | /v1/auth/approle/login | SPIRE server | Exchange role_id+secret_id for a Vault token | Vault token (hvs.* string + lease metadata) |
GET | /v1/auth/token/lookup-self | KMS middleware (internal) | Validate an X-Vault-Token and retrieve entity_id (used as KMS owner) | Token metadata (entity_id, expire_time, policies) |
POST | /v1/auth/token/renew-self | SPIRE server | Extend a token's TTL | Renewed Vault token (same hvs.* string, updated lease_duration) |
POST | /v1/auth/token/revoke-self | SPIRE server | Immediately invalidate the caller's own token | 204 No Content |
All HTTP methods (GET, POST, PUT, DELETE) on any /v1/auth/{path} are forwarded
unchanged to auth-verifier — the KMS never inspects the body or response of auth requests.
For admin operations (create/delete roles, mint
secret_id), operators call the auth-verifier directly — those paths are not proxied by the KMS. See Two planes below.
/v1/{mount}/keys/* and /v1/{mount}/sign/* — Transit engine
Handled natively by the KMS. Caller: SPIRE server (KeyManager "vault" plugin).
Requires X-Vault-Token; the entity_id from the token becomes
the KMIP object owner, enforcing per-AppRole isolation.
Each transit key is stored as a KMIP PrivateKey+PublicKey pair tagged
vault_transit:{name}, with sensitive=true set at creation time — the private key is
permanently non-exportable at every API surface.
| Method | Path | KMIP op | Purpose | Output type |
|---|---|---|---|---|
POST/PUT | /v1/{mount}/keys/{name} | CreateKeyPair | Create a named key pair | TransitKeyInfo (name, type, version map with public key PEM) |
GET | /v1/{mount}/keys/{name} | Find→Get | Read key metadata and public key PEM | TransitKeyInfo (same shape as create) |
GET | /v1/{mount}/keys | Find | List all transit key names owned by the caller | Key name list |
POST | /v1/{mount}/keys/{name}/config | (no-op) | Accept SPIRE's config call without error | 204 No Content |
DELETE | /v1/{mount}/keys/{name} | Revoke+Destroy | Permanently delete key pair | 204 No Content |
POST/PUT | /v1/{mount}/sign/{name}/{hash_alg} | Sign | Sign a pre-hashed input server-side (private key never leaves KMS) | Signature string (vault:v1: prefix + base64) |
/v1/{mount}/root/sign-intermediate — PKI engine (single endpoint)
Scope note: The KMS implements only this one path from the full Vault PKI namespace. Other PKI paths (
/v1/{mount}/ca,/v1/{mount}/issue/*,/v1/{mount}/cert/*, etc.) are not implemented and will return404. SPIRE'sUpstreamAuthority "vault"plugin calls onlysign-intermediate, so no other path is needed.
Handled natively by the KMS. Caller: SPIRE server (UpstreamAuthority "vault" plugin).
Requires X-Vault-Token (authentication only — the signing always executes as the server
admin, so the caller's AppRole does not need to own the CA key).
| Method | Path | KMIP ops | Purpose | Output type |
|---|---|---|---|---|
POST/PUT | /v1/{mount}/root/sign-intermediate | Find → Certify → Find+Get (CA cert chain) | Sign a SPIRE intermediate CA CSR with the pre-provisioned Root CA key | SignIntermediateResult (signed intermediate certificate PEM, issuing CA certificate PEM, CA chain PEM list) |
The CA key is located by the tag configured in vault_pki_ca_key_label (default
vault_pki_ca). The Root CA key and its certificate never leave the KMS — only the
newly signed intermediate certificate is returned. Returns HTTP 500 if the CA key or
its linked certificate is absent.
Authentication for
/v1/transit/*and/v1/pki/*: every request to these native KMS paths must carry a validX-Vault-Tokenheader. The KMS validates it by calling/v1/auth/token/lookup-selfon the auth-verifier (results cached for 30 s). The token determines the owner of all KMS objects created or used during the request, ensuring strict multi-tenant isolation.
Two planes: data plane vs management plane
This deployment has two distinct access planes, and conflating them is the most common source of confusion:
| Plane | Who | Reaches | Endpoints |
|---|---|---|---|
| Data plane | SPIRE servers | the KMS only | /v1/auth/approle/login, /v1/auth/token/*, /v1/transit/*, /v1/pki/* |
| Management plane | Platform operators | the auth-verifier directly | /login?realm=_ (admin), /auth/approle/* (role/secret-id CRUD) |
Why AppRole creation is not on the data plane: creating a role or minting a
secret_id requires an admin session cookie obtained from the auth-verifier's
POST /login?realm=_ (HTTP Basic admin credentials). The KMS proxy only forwards
/v1/auth/* and does not forward cookies or expose /login, so admin operations
cannot and should not traverse the KMS. This is deliberate: the public,
SPIRE-facing endpoint (the KMS) never carries privileged admin credentials.
Consequence for deployment: the auth-verifier's admin API is reached directly by
operators — it is a separate endpoint from the KMS, never proxied by it. Because that
admin API mints AppRoles (and therefore access to any tenant's keys), it is strongly
recommended to keep it on a limited-exposure endpoint (a private network, localhost on
the host, or an mTLS-gated ingress) rather than the open internet. The KMS remains the
only endpoint the SPIRE server ever touches.
Provisioning AppRoles (operator, management plane)
An operator creates one AppRole per SPIRE tenant and hands the tenant its role_id +
secret_id out-of-band. Point --auth-verifier-url directly at the auth-verifier
(all ckms vault approle sub-commands are admin operations against it):
export CKMS_VAULT_AUTH_URL="https://auth-verifier.internal:8443" # the auth-verifier
export CKMS_VAULT_ADMIN_USER="admin"
export CKMS_VAULT_ADMIN_PASSWORD="…"
# 1. Create a role for a SPIRE server (its NAME becomes the KMS object owner).
ckms vault approle create-role spire-prod --token-ttl 3600 --token-policies default
# 2. Read the stable role_id and mint a secret_id — give both to the SPIRE operator.
ckms vault approle get-role-id spire-prod
ckms vault approle generate-secret-id spire-prod
SPIRE performs the data-plane AppRole login itself against the KMS
vault_addr(POST /v1/auth/approle/login); there is nologinsub-command inckms vault approle.Keep the
secret_id_accessorreturned bygenerate-secret-idin a secure store — it is the only handle available to revoke thesecret_idwithout deleting the entire role. See Manage AppRole credentials for rotation and automation guidance.
Equivalent raw calls (used by the test harness provision.sh): POST /login?realm=_
for the admin cookie, then POST /auth/approle/role/{name} and
POST /auth/approle/role/{name}/secret-id against the auth-verifier.
Setup (installation and configuration)
This section is the systematic, production-oriented checklist to stand up the full stack. Each step links to the detailed reference for that component. In order:
| # | Step | What you do | Reference |
|---|---|---|---|
| 1 | Install Eviden KMS | Install and start the KMS (Docker, Linux packages, macOS, or Windows). | KMS installation |
| 2 | Install the auth-verifier | Deploy the Cosmian Authentication Server that the KMS proxies /v1/auth/* to. | authentication/server/documentation/docs/installation.md |
| 3 | Enable the Vault API on the KMS | Turn on the SPIRE-compatible API and point it at the auth-verifier. | Configuration reference |
| 4 | Create the PKI CA key | Create the KMS key the PKI engine signs intermediate CAs with. | PKI CA key provisioning |
| 5 | Provision AppRoles | Create one AppRole per SPIRE server and hand out its role_id/secret_id. | Provisioning AppRoles |
| 6 | Configure the SPIRE server | Point SPIRE's vault_addr at the KMS and wire the UpstreamAuthority/KeyManager plugins. | SPIRE server configuration |
| 7 | Start SPIRE and verify | Start the SPIRE server/agent and confirm the intermediate CA is signed and SVIDs issue. | Quick start |
Step 3 — Enable the Vault API on the KMS
Set at least these in the KMS configuration (full list in the Configuration reference):
[vault]
vault_api_enabled = true
# The auth-verifier from step 2 — reached internally by the KMS (server-to-server).
vault_auth_verifier_url = "https://auth.example.com:8443"
vault_auth_verifier_ca_cert = "/etc/cosmian/certs/auth-verifier-ca.crt"
vault_transit_mount = "transit"
vault_pki_mount = "pki"
vault_pki_ca_key_label = "vault_pki_ca"
SPIRE server configuration
Point SPIRE's vault_addr at the KMS (not the auth-verifier — the KMS proxies
/v1/auth/* for you). A complete server.conf:
server {
bind_address = "0.0.0.0"
bind_port = "8081"
# Trust domain — must match the SPIFFE IDs used by your workloads.
trust_domain = "example.org"
data_dir = "/var/lib/spire/server"
log_level = "INFO"
ca_subject = {
country = ["FR"],
organization = ["Example"],
common_name = "Example SPIRE Intermediate CA",
}
ca_ttl = "24h" # how often SPIRE rotates its intermediate CA
default_x509_svid_ttl = "1h" # workload SVID lifetime
}
plugins {
# ── Upstream Authority: Eviden KMS PKI engine (Vault-compatible) ─────────
# Signs SPIRE's intermediate CA CSR via the KMS. Built-in to SPIRE — no
# plugin_cmd required. vault_addr points at the KMS; the KMS proxies
# /v1/auth/* to the auth-verifier and handles /v1/pki/* natively.
UpstreamAuthority "vault" {
plugin_data {
vault_addr = "https://kms.example.com:9998"
# CA cert that verifies the KMS TLS certificate.
ca_cert_path = "/etc/spire/server/kms-ca.crt"
# AppRole login — credentials are read from the environment variables
# VAULT_APPROLE_ID and VAULT_APPROLE_SECRET_ID (the role_id/secret_id
# you provisioned in step 5). Do not hard-code the secret here.
approle_auth {
approle_auth_mount_point = "approle"
}
# Must match vault_pki_mount on the KMS (default: "pki").
pki_mount_point = "pki"
}
}
# ── Key Manager ───────────────────────────────────────────────────────────
# Stores SPIRE's own signing keys. "disk" is built-in and sufficient for most
# deployments. SPIRE's Vault-backed KeyManager ("vault") is a separate,
# externally-distributed plugin (not bundled in the SPIRE image); if you use
# it, point transit_engine_path at the KMS transit mount.
KeyManager "disk" {
plugin_data {
keys_path = "/var/lib/spire/server/keys.json"
}
}
# ── Node Attestor ─────────────────────────────────────────────────────────
# join_token is the simplest for a first bring-up; for production prefer a
# stronger attestor such as x509pop or a platform-specific one (TPM, k8s_psat).
NodeAttestor "join_token" {
plugin_data {}
}
# ── Data Store ────────────────────────────────────────────────────────────
DataStore "sql" {
plugin_data {
database_type = "sqlite3"
connection_string = "/var/lib/spire/server/datastore.sqlite3"
}
}
}
Provide the AppRole credentials from step 5 to the SPIRE server process via environment variables (e.g. in the systemd unit or container env):
export VAULT_APPROLE_ID="<role_id>"
export VAULT_APPROLE_SECRET_ID="<secret_id>"
The AppRole name (e.g.
spire-prod) becomes the KMS object owner, so each SPIRE server gets an isolated key namespace on the shared KMS. See Cross-AppRole isolation.
Detailed flows
0. PKI CA key provisioning (prerequisite)
Before SPIRE can sign its intermediate CA, the KMS must hold a CA key with the tag
configured in --vault-pki-ca-key-label (default: vault_pki_ca). Create it once with
the ckms CLI:
# Generate a P-384 key pair and a self-signed root CA certificate in KMS.
# The --tag value must match vault_pki_ca_key_label in the KMS configuration.
ckms --accept-invalid-certs \
certificates certify \
--generate-key-pair \
--algorithm nist-p384 \
--certificate-id vault_pki_ca_cert \
--subject-name "CN=My Root CA,O=Acme,C=FR" \
--tag vault_pki_ca \
--days 3650
This step must complete before SPIRE server starts — the
POST /v1/pki/root/sign-intermediatecall (step 3 of the end-to-end flow) fails immediately if the key is absent.
Then, once the AppRoles exist (step 1), grant each SPIRE server's KMS identity
(spire:<AppRole name>) the certify access right on the CA private key. A valid
Vault token only authenticates the caller; without this grant sign-intermediate
returns 403 Forbidden, so a token issued for another purpose (e.g. transit-only)
cannot obtain an intermediate CA certificate chaining to your root:
# The private key UID is the bare UUID returned by locate (the public key ends in `_pk`).
ckms --accept-invalid-certs locate --tag vault_pki_ca
ckms --accept-invalid-certs access-rights grant spire:spire-server-a certify \
--object-uid <ca-private-key-uid>
The CA key must be owned by the server admin (default_username); keys that are
only shared with it are ignored, and exactly one owned key may carry the label. CSRs
must not request their own basicConstraints — the KMS always sets
CA:TRUE, pathlen:0.
1. AppRole provisioning (admin bootstrap)
An administrator provisions one AppRole per SPIRE server. AI agent workloads do not
need a KMS AppRole — they authenticate to SPIRE (and, through it, to other services) via
their SPIFFE SVID, not via the KMS. See Workload SVID issuance.
sequenceDiagram
participant Admin
participant AuthV as auth-verifier
Admin->>AuthV: POST /login?realm=_ (Basic auth)
AuthV-->>Admin: session cookie
Admin->>AuthV: POST /v1/auth/approle/role/spire-server<br/>{token_ttl, token_policies, secret_id_ttl}
AuthV-->>Admin: 200 OK
Admin->>AuthV: GET /v1/auth/approle/role/spire-server/role-id
AuthV-->>Admin: {"data":{"role_id":"..."}}
Admin->>AuthV: POST /v1/auth/approle/role/spire-server/secret-id
AuthV-->>Admin: {"data":{"secret_id":"...","secret_id_accessor":"..."}}
AppRole credentials — what role_id and secret_id mean
Two distinct kinds of "admin" appear in this integration — do not confuse them:
| Term | What it is | Used for |
|---|---|---|
| Auth-verifier admin | A human administrator account (Admin struct) authenticated with username + password in the _ realm. | Calling POST /v1/auth/approle/role/{name} and other role-management endpoints. |
| AppRole | A machine identity with role_id + secret_id credentials. No relationship to the Admin concept. | Used by the SPIRE server to obtain hvs.* tokens from auth-verifier. |
An AppRole has three credentials, each with a distinct purpose and lifecycle:
| Credential | What it is | Analogy | Stability |
|---|---|---|---|
role_id | Stable UUID auto-assigned by auth-verifier when the AppRole is created. | Machine username. | Permanent. Changing it requires reconfiguring all consumers (SPIRE config, agent config). |
secret_id | A one-time or time-limited random secret generated on demand by an admin. | Machine password. | Ephemeral. Rotate freely via generate-secret-id; invalidate the old one via its secret_id_accessor. |
secret_id_accessor | Opaque UUID returned alongside secret_id. | Revocation handle. | Never given to SPIRE — kept by the human admin for rotation and revocation only. |
From AppRole credentials to KMS object ownership — the exact chain
The role_id UUID is only used at login time to look up the AppRole record.
What the KMS ultimately uses as the object owner is the AppRole name — a
human-readable string like "spire-server" (or, per tenant, "spire-server-a"/"spire-server-b").
① SPIRE sends login:
POST /v1/auth/approle/login → { role_id: "<UUID>", secret_id: "<one-time-secret>" }
② auth-verifier looks up AppRole by role_id → finds AppRole with name = "spire-server"
Issues token: hvs.xxxxx carrying entity = "spire-server" (the NAME, not the UUID)
③ KMS spire_token_middleware validates the token:
GET /auth/token/lookup-self → { data: { entity_id: "spire-server", ... } }
④ KMS sets: AuthenticatedUser { username: "spire-server" }
→ every KMS object created under this token is owned by "spire-server"
The mapping from AppRole name to KMS owner is therefore 1-to-1:
| AppRole name | KMS username | KMS objects owned |
|---|---|---|
spire-server-a | spire-server-a | Signed intermediate certificates and transit key pairs owned by tenant A's server |
spire-server-b | spire-server-b | Signed intermediate certificates and transit key pairs owned by tenant B's server |
spire-server-a cannot read, sign with, or delete objects owned by spire-server-b,
and vice versa — each AppRole has a fully isolated KMS object namespace.
PKI root CA exception. The root CA
PrivateKey(taggedvault_pki_ca) is owned by the server admin (default_username), not by any AppRole. Thesign-intermediatehandler always looks up the CA key among keys owned by the server admin, regardless of which AppRole token the caller presents. This is intentional: the root CA is shared infrastructure, not a per-tenant resource. AppRole authentication on the PKI endpoint only proves who is requesting the signature; the caller must additionally hold thecertifyaccess right on the CA private key (see PKI CA key provisioning).Transit keys are resolved by name among keys owned by the calling AppRole only — a key another user shares under the same name is never used. Creating a transit key whose name already exists is a no-op (Vault semantics), not a duplicate.
2. SPIRE intermediate CA rotation (PKI engine)
SPIRE's UpstreamAuthority "vault" plugin logs in with its AppRole, then submits a CSR
to be signed as its intermediate CA.
sequenceDiagram
participant Server as SPIRE Server
participant KMS as Eviden KMS
participant AuthV as auth-verifier
Server->>KMS: POST /v1/auth/approle/login<br/>{role_id, secret_id}
KMS->>AuthV: proxy /v1/auth/*
AuthV-->>Server: {"auth":{"client_token":"hvs.xxxx", ...}}
Server->>KMS: POST /v1/pki/root/sign-intermediate<br/>X-Vault-Token: hvs.xxxx<br/>{csr, uri_sans, common_name, ttl}
Note over KMS: validate X-Vault-Token via AuthV (30 s cache)<br/>KMIP Certify using vault_pki_ca_key_label
KMS-->>Server: {"data":{"certificate","issuing_ca","ca_chain"}}
uri_sans (at least one spiffe:// URI) is mandatory — the KMS rejects a request with
an empty list with HTTP 400. The ca_chain in the response excludes the root and the
signed certificate itself (Vault ≥1.11 semantics).
3. Transit key lifecycle (KeyManager engine)
SPIRE's KeyManager "vault" plugin drives this engine. The lifecycle of a transit key
is the same regardless of which AppRole-authenticated client (in practice, SPIRE's
KeyManager "vault" plugin) calls it:
sequenceDiagram
participant Client
participant KMS as Eviden KMS
Client->>KMS: POST /v1/transit/keys/{name}<br/>{"type":"ecdsa-p256"}
Note over KMS: KMIP CreateKeyPair<br/>tag vault_transit:{name}<br/>exportable forced false
KMS-->>Client: 204 No Content
Client->>KMS: GET /v1/transit/keys/{name}
KMS-->>Client: {"data":{"name","type","latest_version":1,<br/>"keys":{"1":{"public_key":"<PEM>","creation_time"}}}}
Client->>KMS: POST /v1/transit/sign/{name}/{alg}<br/>{"input":"<base64>","prehashed":true,<br/>"signature_algorithm":"pss|pkcs1v15"}
Note over KMS: KMIP Sign<br/>(RSA: signature_algorithm honored, default pss)
KMS-->>Client: {"data":{"signature":"vault:v1:<base64>"}}
4. Vault token validation (cross-service call, cached)
Every request into the KMS's /v1/transit/* and /v1/pki/* scopes carries an
X-Vault-Token header. The KMS validates it against auth-verifier and caches the result
for 30 seconds (configurable) to avoid a round-trip on every request:
sequenceDiagram
participant Client
participant KMS as Eviden KMS<br/>(vault_token_middleware)
participant AuthV as auth-verifier
Client->>KMS: request with X-Vault-Token: hvs.xxxx
KMS->>KMS: hash = SHA-256(token)
alt cache hit (< vault_token_cache_ttl_secs old)
KMS-->>KMS: reuse cached entity/policies
else cache miss
KMS->>AuthV: GET /v1/auth/token/lookup-self<br/>X-Vault-Token: hvs.xxxx
AuthV-->>KMS: {"data":{"entity_id","policies":[...]}}
KMS->>KMS: cache result for vault_token_cache_ttl_secs
end
KMS-->>Client: proceed to route handler (or 403 if invalid)
5. Workload SVID issuance (AI agent identity)
JWT-SVIDs are signed by the SPIRE Server using its JWT signing key. When the
KeyManager "vault" plugin is configured, that signing key lives exclusively in the KMS
transit engine — the SPIRE Server calls /v1/transit/sign/{name}/{hash_alg} every time it
mints a SVID. The KMS performs the cryptographic operation server-side and returns the
signature; the private key never leaves the KMS.
The workload itself only needs the SPIRE Agent unix socket — it never talks to the KMS directly for SVID issuance:
sequenceDiagram
participant Workload as AI Agent Workload
participant Agent as SPIRE Agent
participant Server as SPIRE Server
participant KMS as Eviden KMS<br/>(transit engine)
Workload->>Agent: fetch JWT-SVID (Workload API, unix socket)
Agent->>Server: request JWT-SVID for workload
Server->>KMS: POST /v1/transit/sign/{jwt-key}/{hash_alg}<br/>X-Vault-Token: hvs.xxxx<br/>{"input": "<base64 claims>", "prehashed": true}
Note over KMS: KMIP Sign — private key never leaves KMS
KMS-->>Server: {"data":{"signature":"vault:v1:<base64>"}}
Note over Server: assembles JWT: header.claims.<KMS signature>
Server-->>Agent: JWT-SVID (spiffe://trust-domain/workload-id)
Agent-->>Workload: JWT-SVID + JWKS bundle (for validation)
Workload->>Workload: validate SPIFFE ID, trust domain, expiry
The JWKS bundle (public key) used to verify the JWT-SVID is fetched from the SPIRE Server's trust bundle endpoint — which serves the public key corresponding to the transit key pair stored in the KMS. Only the KMS holds the private half.
Why this matters for security: even if the SPIRE Server process is compromised, the attacker cannot extract the JWT signing key — it exists only as a KMIP
PrivateKeyobject withsensitive=trueinside the KMS. They can call/v1/transit/signwhile their token is valid, but that window is bounded byvault_token_ttl_secsand closed by revoking the AppRolesecret_id(see Incident response).
Quick start (local demo stack)
The KMS repository ships a working end-to-end demo under test_data/spire/ (used by the
project's own integration tests). It runs Eviden KMS and auth-verifier as regular host
processes and the SPIRE server, SPIRE agent, and AI agent workload containers via Docker
Compose.
The fastest way to run the full stack from source:
mise run test:spire --variant non-fips
For a step-by-step breakdown (matching the numbered steps in the end-to-end flow diagram above):
# 0. Generate local test TLS certificates (once)
bash test_data/spire/certs/generate-test-certs.sh
# Start auth-verifier and KMS as host processes (vault API enabled in kms.toml)
auth_verifier test_data/spire/config/auth_verifier.toml &
cosmian_kms --config test_data/spire/config/kms.toml &
# 0. Create the PKI CA key in KMS (must exist before SPIRE starts)
ckms --accept-invalid-certs \
certificates certify --generate-key-pair --algorithm nist-p384 \
--certificate-id vault_pki_ca_cert \
--subject-name "CN=Eviden KMS Root CA,O=Cosmian,C=FR" \
--tag vault_pki_ca --days 3650
# 1. Provision AppRoles (one per SPIRE server tenant; the harness also mints a
# throwaway "mistral-agents" AppRole purely to smoke-test the transit engine)
# Admin API calls go directly to auth-verifier (port 8443).
# The smoke-test login uses the KMS vault_addr (port 9998), which proxies to auth-verifier.
AUTH_VERIFIER_URL=https://localhost:8443 \
VAULT_ADDR=https://localhost:9998 \
VAULT_CACERT=test_data/spire/certs/ca.crt \
bash test_data/spire/setup/provision.sh
# 2–4. Start SPIRE server (injects APPROLE_* env from provision output),
# generate join token, start SPIRE agent
docker compose --profile spire up -d spire-server
# ... (see .mise/tasks/test/spire for the full token-generation and agent-start sequence)
A successful run shows the SPIRE server signing its intermediate CA through the PKI engine, then each workload container printing its issued SPIFFE ID and a passing identity check.
In a production deployment, Eviden KMS and auth-verifier run as long-lived services (not
cargo run/dev processes), and SPIRE Agent should use a stronger node attestor (e.g.x509popor TPM-based attestation) instead of thejoin_tokenattestor used in this local demo.
Getting started (customer/operator guide)
This section is the day-one checklist for customers who operate their own SPIRE server against a Cosmian-managed KMS deployment. It covers:
- Provision your AppRole (you are the administrator —
kms.example.com:8443) - Configure SPIRE to use the KMS as its Vault-compatible backend
- Verify end-to-end connectivity before starting SPIRE
┌──────────────────────────────────────┐
│ kms.example.com │
SPIRE server ──vault_addr──▶ │ KMS :443 (/v1/transit, /v1/pki) │
Admin ops ──:8443──────▶ │ Auth-verifier :8443 (AppRoles) │
└──────────────────────────────────────┘
- KMS (
https://kms.example.com) handles cryptographic operations (transit keys, PKI signing) and proxies AppRole login requests. - Auth-verifier (
https://kms.example.com:8443) manages identities (AppRole CRUD). You connect to it directly to create and manage AppRoles.
Prerequisites — download the auth-verifier CA certificate
The auth-verifier uses a private CA. Extract it from the TLS handshake:
openssl s_client -connect kms.example.com:8443 -showcerts </dev/null 2>/dev/null \
| python3 -c "
import sys, re
certs = re.findall(r'(-----BEGIN CERTIFICATE-----.*?-----END CERTIFICATE-----)',
sys.stdin.read(), re.DOTALL)
print(certs[1])
" > auth-ca.pem
# Verify
openssl x509 -in auth-ca.pem -noout -subject
The auth-verifier sends its CA certificate as the second certificate in the TLS handshake chain. This command extracts it and saves it to
auth-ca.pem.
1. Create your AppRole
AppRoles are managed directly on the auth-verifier. Authenticate as admin (HTTP Basic Auth) to get a session cookie, then use that cookie for all management operations.
Option A — using ckms (recommended)
Install ckms from the Cosmian releases page, then:
export CKMS_VAULT_AUTH_URL="https://kms.example.com:8443"
export CKMS_VAULT_AUTH_CA_CERT="auth-ca.pem"
export CKMS_VAULT_ADMIN_USER="admin"
export CKMS_VAULT_ADMIN_PASSWORD="change_me"
# Create the role (1-hour token TTL)
ckms vault approle create-role spire-prod --token-ttl 3600
# Read the stable role_id
export VAULT_APPROLE_ID=$(ckms vault approle get-role-id spire-prod)
echo "role_id: $VAULT_APPROLE_ID"
# Mint a secret_id — see §"Manage AppRole credentials" for rotation and automation guidance
export VAULT_APPROLE_SECRET_ID=$(
ckms vault approle generate-secret-id spire-prod \
| awk '/^secret_id:/{print $2}')
echo "secret_id: $VAULT_APPROLE_SECRET_ID"
Option B — using curl only (no ckms required)
AUTH_URL="https://kms.example.com:8443"
AUTH_CA="auth-ca.pem"
ADMIN_USER="admin"
ADMIN_PASSWORD="change_me"
ROLE_NAME="spire-prod"
COOKIE_JAR="/tmp/auth-admin-cookies.txt"
# Step 1 — Get an admin session cookie
curl -s -c "$COOKIE_JAR" --cacert "$AUTH_CA" \
-X POST -u "$ADMIN_USER:$ADMIN_PASSWORD" \
-H "Content-Type: application/json" -d "{}" \
"$AUTH_URL/login?realm=_"
echo ""
# Step 2 — Create the AppRole
curl -s -b "$COOKIE_JAR" --cacert "$AUTH_CA" \
-X POST -H "Content-Type: application/json" \
-d '{"token_ttl":3600,"secret_id_ttl":0,"token_policies":["default"],"bind_secret_id":true}' \
"$AUTH_URL/auth/approle/role/$ROLE_NAME"
echo ""
# Step 3 — Read the stable role_id
export VAULT_APPROLE_ID=$(curl -s -b "$COOKIE_JAR" --cacert "$AUTH_CA" \
"$AUTH_URL/auth/approle/role/$ROLE_NAME/role-id" \
| python3 -c "import sys,json; print(json.load(sys.stdin)['data']['role_id'])")
echo "role_id: $VAULT_APPROLE_ID"
# Step 4 — Generate a secret_id
SECRET_RESP=$(curl -s -b "$COOKIE_JAR" --cacert "$AUTH_CA" \
-X POST -H "Content-Type: application/json" -d '{"ttl":0,"num_uses":0}' \
"$AUTH_URL/auth/approle/role/$ROLE_NAME/secret-id")
export VAULT_APPROLE_SECRET_ID=$(echo "$SECRET_RESP" \
| python3 -c "import sys,json; print(json.load(sys.stdin)['data']['secret_id'])")
echo "secret_id: $VAULT_APPROLE_SECRET_ID"
Session duration: the
_ea_admin cookie is valid for the session duration configured on the auth-verifier (default: several hours). Rerun Step 1 if subsequent calls return401 Session error.Key isolation: the AppRole name (
spire-prod) becomes your isolated namespace on the KMS. Another tenant's AppRole can never read, sign with, or delete your transit keys or PKI certificates.One-shot script:
test_data/spire/setup/kms_setup.shruns all four steps above end-to-end (ROLE_NAME=my-spire bash test_data/spire/setup/kms_setup.sh).
2. Verify your AppRole credentials
Before configuring SPIRE, confirm the credentials work end-to-end:
KMS_URL="https://kms.example.com"
# Exchange AppRole credentials for a KMS token
TOKEN=$(curl -s \
-X POST -H "Content-Type: application/json" \
-d "{\"role_id\":\"$VAULT_APPROLE_ID\",\"secret_id\":\"$VAULT_APPROLE_SECRET_ID\"}" \
"$KMS_URL/v1/auth/approle/login" \
| python3 -c "import sys,json; print(json.load(sys.stdin)['auth']['client_token'])")
echo "Token: $TOKEN"
# Validate the token and inspect your identity
curl -s -H "X-Vault-Token: $TOKEN" "$KMS_URL/v1/auth/token/lookup-self"
echo ""
# List transit keys owned by your AppRole (empty on first use)
curl -s -H "X-Vault-Token: $TOKEN" "$KMS_URL/v1/transit/keys"
echo ""
A 200 response with "entity_id": "spire-prod" confirms credentials and KMS
connectivity are working.
3. Configure your SPIRE server
Add a vault upstream authority to server.conf (point vault_addr at the KMS,
not the auth-verifier — the KMS proxies /v1/auth/* for you):
UpstreamAuthority "vault" {
plugin_data {
# KMS base URL — not the auth-verifier URL.
vault_addr = "https://kms.example.com"
# KMS uses a Let's Encrypt certificate — trusted by default.
# Provide ca_cert_path only if using a private CA.
# ca_cert_path = "/etc/spire/server/kms-ca.crt"
# Credentials are read from environment variables:
# VAULT_APPROLE_ID / VAULT_APPROLE_SECRET_ID
approle_auth {
approle_auth_mount_point = "approle"
}
# PKI mount (default: "pki").
pki_mount_point = "pki"
}
}
Optional: store SPIRE's own keys in the KMS (Transit KeyManager)
KeyManager "vault" {
plugin_data {
vault_addr = "https://kms.example.com"
approle_auth {
approle_auth_mount_point = "approle"
}
transit_engine_path = "transit"
key_name = "spire-server-key"
}
}
Set the environment variables, then start SPIRE:
export VAULT_APPROLE_ID="<role_id from step 1>"
export VAULT_APPROLE_SECRET_ID="<secret_id from step 1>"
spire-server run -config /etc/spire/server/server.conf
4. Manage AppRole credentials
Why rotate secret_id
There are three distinct reasons, each with different urgency:
| Trigger | When it bites | Action |
|---|---|---|
secret_id_ttl expiry | The secret_id becomes invalid after the configured TTL. A running SPIRE server is unaffected (its Vault token is independent), but the next restart silently fails to log in — a time-bomb that strikes at the worst moment. | Rotate before the TTL expires or set secret_id_ttl = 0 (no expiry). |
| Security hygiene / rotation policy | Even with secret_id_ttl = 0, a leaked secret_id lets an attacker obtain tokens. Rotating it periodically limits the window during which a compromised credential is usable. | Rotate before every deployment, or on a schedule (e.g., 30 days). |
| Incident response | If a secret_id is suspected to have leaked, revoking it via its secret_id_accessor immediately prevents any future login. The running SPIRE server's current token remains valid until it expires. | Revoke via secret_id_accessor; see Incident response. |
Production recommendation — set
secret_id_ttl = 0(no expiry) to eliminate the time-bomb scenario. Rotatesecret_idonly on deployment and on security incidents. Never setnum_uses = 1for a long-lived SPIRE server: if SPIRE restarts unexpectedly before a newsecret_idis provisioned, it will fail to come back.
Who rotates secret_id
Only a platform operator with management-plane admin access to the auth-verifier
can mint a new secret_id. The SPIRE server itself holds only data-plane credentials:
it can log in and obtain tokens, but it cannot create roles or generate new secret_ids.
This separation is intentional — but it means credential renewal requires an
out-of-band administrative step that must be integrated into your deployment process.
Platform operator → auth-verifier management API → new secret_id
(POST /auth/approle/role/{name}/secret-id)
Operator → injects new secret_id into SPIRE env → SPIRE restarts
The secret_id_accessor returned when the secret_id was minted is the only handle
available to revoke it. Store the accessor securely — it is required for the
incident-response procedure and has no other purpose.
Rotate secret_id (CLI)
# Option A — ckms
export VAULT_APPROLE_SECRET_ID=$(
ckms vault approle generate-secret-id spire-prod \
| awk '/^secret_id:/{print $2}')
# Option B — curl (reuse cookie jar from Step 1)
SECRET_RESP=$(curl -s -b "$COOKIE_JAR" --cacert "$AUTH_CA" \
-X POST -H "Content-Type: application/json" -d '{"ttl":0,"num_uses":0}' \
"$AUTH_URL/auth/approle/role/$ROLE_NAME/secret-id")
export VAULT_APPROLE_SECRET_ID=$(echo "$SECRET_RESP" \
| python3 -c "import sys,json; print(json.load(sys.stdin)['data']['secret_id'])")
After generating the new secret_id, update SPIRE's configuration or environment
variable and restart the SPIRE server. The old secret_id remains valid until
explicitly revoked via its accessor.
Automation patterns
Because the SPIRE server cannot mint its own secret_id, renewal requires operator
tooling. Choose the pattern that fits your infrastructure:
| Pattern | How | When to use |
|---|---|---|
secret_id_ttl = 0, manual rotation | Never expire the secret_id; rotate only on deployment or incident. | Simplest; acceptable when deploy frequency is high relative to any rotation policy. |
| Pre-deployment CI pipeline | Pipeline step calls generate-secret-id, writes result to a Kubernetes Secret or encrypted store, then restarts SPIRE. | Best fit for GitOps-style deployments where SPIRE is redeployed on every release. |
| Kubernetes Operator (recommended) | The Cosmian KMS Kubernetes Operator calls generate-secret-id, materialises the result as a Secret, and triggers a rolling restart — all declaratively. | Best for Kubernetes-native teams; no imperative scripts. |
| External Secrets Operator (ESO) | ESO PushSecret or a custom generator calls POST /auth/approle/role/{name}/secret-id on the auth-verifier and writes the result to a K8s Secret. | Kubernetes teams already running ESO; requires a custom generator since the auth-verifier is not a vanilla Vault. |
| PAM-orchestrated rotation (Segura, CyberArk, etc.) | The PAM's rotation workflow calls POST /auth/approle/role/{name}/secret-id on the auth-verifier, vaults the result, then delivers the new secret_id to SPIRE and triggers a restart. | Enterprise environments where a PAM already owns credential lifecycle and audit trails. Full TISAX-compliant session recording. |
num_uses = 1 (one-shot) | Mint a single-use secret_id immediately before each restart; SPIRE consumes it at login. | Strongest security posture; requires tight coupling between the operator and restart orchestration. Not suitable if SPIRE may restart unexpectedly. |
PAM integration (Segura, CyberArk, and equivalents)
A Privileged Access Manager (PAM) such as Segura is a natural fit for AppRole credential lifecycle management: it already owns privileged account inventory, rotation schedules, and full audit recording (required for TISAX). The integration is entirely on the PAM configuration side — no KMS code changes are required.
How it works
The PAM takes on the role that the Kubernetes Operator plays in simpler deployments: it calls the auth-verifier management API on a schedule (or on demand), vaults the result, and delivers it to SPIRE.
sequenceDiagram
participant PAM as PAM (Segura / CyberArk)
participant AuthV as auth-verifier<br/>(management plane)
participant Vault as PAM Secret Store
participant SPIRE as SPIRE server
Note over PAM: Rotation trigger (schedule or incident)
PAM->>AuthV: POST /login?realm=_<br/>(HTTP Basic: admin credentials)
AuthV-->>PAM: session cookie
PAM->>AuthV: POST /auth/approle/role/{name}/secret-id<br/>(session cookie, {"ttl":0,"num_uses":0})
AuthV-->>PAM: {"data":{"secret_id":"<new>","secret_id_accessor":"<accessor>"}}
PAM->>Vault: Store secret_id + secret_id_accessor<br/>(tagged: role={name}, rotated_at=now)
Note over Vault: Previous secret_id_accessor archived<br/>(kept for emergency revocation)
PAM->>SPIRE: Deliver new secret_id<br/>(inject into SPIRE env/config)
PAM->>SPIRE: Trigger restart (kubectl rollout restart,<br/>systemd restart, or equivalent)
Note over SPIRE: Restarts, logs in with new secret_id<br/>POST /v1/auth/approle/login → new token
What the PAM must store
| Item | Where in PAM | Purpose |
|---|---|---|
role_id | PAM account record for spire-{name} | Stable — never changes; used at every login |
secret_id | PAM secret (rotated on schedule) | Delivered to SPIRE env before each restart |
secret_id_accessor | PAM secret, archived with timestamp | Emergency revocation handle — POST /auth/approle/role/{name}/secret-id-accessor/destroy |
| auth-verifier admin credential | PAM account (privileged) | Required to call the management API; must be a strong credential, session-recorded |
Required API calls (in order)
The PAM needs to make exactly two HTTP calls to the auth-verifier (not the KMS):
Step 1 — Admin login (once per rotation workflow execution):
POST /login?realm=_
Host: auth-verifier.internal:8443
Authorization: Basic <base64(admin_user:admin_password)>
Content-Type: application/json
{}
Response: Set-Cookie: session=<cookie> — valid for the duration of the rotation session.
Step 2 — Generate new secret_id (once per AppRole being rotated):
POST /auth/approle/role/{name}/secret-id
Host: auth-verifier.internal:8443
Cookie: session=<cookie>
Content-Type: application/json
{"ttl": 0, "num_uses": 0}
Response:
{
"data": {
"secret_id": "b4a3c2d1-...",
"secret_id_accessor": "f9e8d7c6-..."
}
}
The accessor is the only handle available to revoke this specific secret_id without
deleting the entire AppRole. Store it in the PAM alongside the secret_id it identifies.
Delivering the secret_id to SPIRE
After vaulting the new credentials, the PAM must update SPIRE's configuration. The exact mechanism depends on the deployment:
| Deployment | Delivery method |
|---|---|
| Kubernetes | Patch the Secret that SPIRE reads via secretKeyRef, then kubectl rollout restart deployment/spire-server |
| Systemd on VM | Write to the env file that ExecStart sources (e.g. /etc/spire/approle.env), then systemctl restart spire-server |
| Docker Compose | Update the .env file, then docker compose restart spire-server |
Important: the SPIRE server must be restarted after the credential is updated. A running SPIRE server holds a live Vault token — it does not re-read
secret_idfrom disk until the next login, which only happens on restart. The restart is therefore part of the rotation, not optional cleanup.
PAM session recording and TISAX audit
Every rotation workflow execution runs as a PAM-brokered privileged session:
- The admin credential used to call the auth-verifier is vaulted in the PAM — operators never see it in plaintext.
- The session is recorded end-to-end: which PAM user triggered the rotation, at what time, what responses were received.
- The
secret_id_accessorprovides a correlation handle: if asecret_idis later found to have been misused, the accessor links the credential back to the rotation session that created it.
This satisfies TISAX's non-repudiation requirements for privileged access to identity infrastructure without requiring any custom audit hook in the KMS or auth-verifier.
Kubernetes Operator (recommended):
The Cosmian KMS Kubernetes Operator is the recommended approach
for Kubernetes deployments. It handles the full lifecycle declaratively — no imperative
scripts, no image pinning, no RBAC for kubectl inside a Job:
- The Operator's
KMSSecretcustom resource callsPOST /auth/approle/role/{name}/secret-idon the auth-verifier on the configured schedule and materialises the result as a KubernetesSecret. - An
AppRoleRotationannotation on the SPIREDeploymenttells the Operator to trigger a rolling restart automatically once theSecretis updated. - The previous
secret_id_accessoris archived in the Operator's own state for emergency revocation.
See Cosmian KMS Kubernetes Operator — AppRole rotation for the full configuration reference.
Non-Kubernetes environments (VMs, bare-metal): use the PAM-orchestrated pattern described above, or a CI/CD pipeline step that calls
ckms vault approle generate-secret-idand injects the result before restarting the workload identity server process.
List and delete roles
# List all AppRoles
ckms vault approle list-roles
# curl equivalent
curl -s -b "$COOKIE_JAR" --cacert "$AUTH_CA" \
"$AUTH_URL/auth/approle/role?list=true"
# Delete a role (destroys all its secret_ids and revokes any outstanding tokens)
ckms vault approle delete-role spire-prod
# curl equivalent
curl -s -b "$COOKIE_JAR" --cacert "$AUTH_CA" -X DELETE \
"$AUTH_URL/auth/approle/role/spire-prod"
Configuration reference
Enable the SPIRE-compatible API on the KMS with these flags/environment variables
(crate/server/src/config/command_line/vault_config.rs):
| Flag | Environment variable | Default | Description |
|---|---|---|---|
--vault-api-enabled | KMS_VAULT_API_ENABLED | false | Enables the /v1/transit/*, /v1/<vault_pki_mount>/*, and /v1/auth/* (proxy) scopes. |
--vault-auth-verifier-url | KMS_VAULT_AUTH_VERIFIER_URL | (none) | Base URL of auth-verifier. Used for both X-Vault-Token validation (middleware) and as the upstream target for the /v1/auth/* proxy. Required when the API is enabled. |
--vault-auth-verifier-ca-cert | KMS_VAULT_AUTH_VERIFIER_CA_CERT | (none) | PEM CA certificate used to verify auth-verifier's TLS certificate (for self-signed/private CAs). |
--vault-auth-verifier-accept-invalid-certs | KMS_VAULT_AUTH_VERIFIER_ACCEPT_INVALID_CERTS | false | Skip TLS verification when calling auth-verifier. Test/dev only — use --vault-auth-verifier-ca-cert in production. |
--vault-transit-mount | KMS_VAULT_TRANSIT_MOUNT | transit | Mount name served at /v1/<mount>/keys/…. |
--vault-pki-mount | KMS_VAULT_PKI_MOUNT | pki | Mount name served at /v1/<mount>/root/sign-intermediate. |
--vault-pki-ca-key-label | KMS_VAULT_PKI_CA_KEY_LABEL | vault_pki_ca | KMIP tag of the KMS key used as the PKI engine's signing key. Must already exist in the KMS. |
--vault-token-cache-ttl-secs | KMS_VAULT_TOKEN_CACHE_TTL_SECS | 30 | Lifetime of cached lookup-self results. Set to 0 to disable caching. |
No extra proxy configuration is needed. The
/v1/auth/*proxy reusesvault_auth_verifier_urland the same TLS client built fromvault_auth_verifier_ca_cert(orvault_auth_verifier_accept_invalid_certs). Set SPIRE'svault_addrto the KMS HTTPS address (e.g.https://kms.example.com:9998).
CLI reference
ckms vault approle provisions and manages AppRole identities in auth-verifier
(crate/clients/clap/src/actions/vault/approle.rs):
| Subcommand | Auth required | Purpose |
|---|---|---|
create-role | auth-verifier admin¹ | Create or update a role (token_ttl, token_policies, secret_id_ttl). |
list-roles | auth-verifier admin¹ | List all roles. |
get-role-id | auth-verifier admin¹ | Retrieve a role's stable role_id. |
generate-secret-id | auth-verifier admin¹ | Generate a new secret_id for a role. |
destroy-secret-id | auth-verifier admin¹ | Invalidate a secret_id by its accessor. |
delete-role | auth-verifier admin¹ | Permanently delete a role. |
¹ "auth-verifier admin" means a human administrator account (Admin struct) in the
_ realm of the Cosmian Authentication Server — not an AppRole.
These subcommands authenticate to auth-verifier with
--admin-user/CKMS_VAULT_ADMIN_USER and --admin-password/CKMS_VAULT_ADMIN_PASSWORD
(plain username + password, distinct from the role_id/secret_id machine credentials).
The --auth-verifier-url/CKMS_VAULT_AUTH_URL flag points directly at auth-verifier,
bypassing the KMS proxy. Add --accept-invalid-certs (or --auth-verifier-ca-cert <pem>)
when the auth-verifier uses a self-signed/private CA. SPIRE performs the data-plane AppRole
login itself against the KMS vault_addr, so there is no login subcommand here.
HTTP endpoint reference
auth-verifier (/v1/auth/*):
| Method | Path | Purpose |
|---|---|---|
POST | /v1/auth/approle/login | Exchange role_id+secret_id for a Vault token (unauthenticated). |
POST | /v1/auth/approle/role/{name} | Create/update a role (admin). |
GET | /v1/auth/approle/role/{name}/role-id | Read a role's role_id (admin). |
POST | /v1/auth/approle/role/{name}/secret-id | Generate a secret_id (admin). |
POST | /v1/auth/approle/role/{name}/secret-id/destroy | Invalidate a secret_id (admin). |
DELETE | /v1/auth/approle/role/{name} | Delete a role (admin). |
GET | /v1/auth/approle/role | List roles (admin). |
GET | /v1/auth/token/lookup-self | Validate the caller's own token (used by the KMS middleware). |
POST | /v1/auth/token/renew-self | Renew the caller's own token. |
POST | /v1/auth/token/revoke-self | Revoke the caller's own token. |
/v1/auth/kubernetes/*is also available as an alternative login method (Kubernetes service-account JWT), for workloads running inside a Kubernetes cluster instead of using AppRole credentials.
Eviden KMS — Transit engine (mount: {vault_transit_mount}, default transit):
Each transit key is stored as an asymmetric key pair (PrivateKey + PublicKey) in
the KMS.
Both objects carry the tag vault_transit:{name}.
sensitive=true is set at creation time so the private key is permanently non-exportable
at every API surface (Vault HTTP, KMIP, ckms).
Signing is always performed server-side.
| Method | Path | KMIP operation | KMS object(s) | Tag / identifier | Key types |
|---|---|---|---|---|---|
POST | /v1/{mount}/keys/{name} | CreateKeyPair | PrivateKey + PublicKey created; sensitive=true | vault_transit:{name} on both objects | ecdsa-p256, ecdsa-p384, rsa-2048, rsa-4096 (FIPS + non-FIPS); ed25519, ml-dsa-65 (non-FIPS only) |
GET | /v1/{mount}/keys/{name} | Find → Get | PrivateKey read (by tag) → follows PublicKeyLink → PublicKey read (for PEM) | vault_transit:{name} | — |
GET | /v1/{mount}/keys | Find (all PrivateKey) | All PrivateKey objects read, filtered by tag prefix | prefix vault_transit: | — |
POST | /v1/{mount}/keys/{name}/config | (no-op) | none | — | — |
DELETE | /v1/{mount}/keys/{name} | Revoke (cascade) + Destroy (cascade, remove=true) | PrivateKey + linked PublicKey permanently deleted | vault_transit:{name} | — |
POST | /v1/{mount}/sign/{name}/{alg} | Sign | PrivateKey used (never exported); signature prefixed vault:v1: | vault_transit:{name} | — |
Eviden KMS — PKI engine (mount: {vault_pki_mount}, default pki):
The PKI CA key is a server-level resource owned by the server admin (default_username).
All three steps of the sign-intermediate flow execute as the server admin, regardless of
which AppRole token the caller presents — the token is validated for authentication only.
| Method | Path | KMIP operation(s) | KMS object(s) | Tag / identifier |
|---|---|---|---|---|
POST / PUT | /v1/{mount}/root/sign-intermediate | ① Find (CA PrivateKey) → ② Certify (creates signed Certificate) → ③ Find+Get (CA Certificate) | ① CA PrivateKey read as server admin; ② signed Certificate created in KMS (returned in response); ③ CA Certificate read via link chain: CA PrivateKey → PublicKeyLink → PublicKey → CertificateLink → Certificate | CA key tag: vault_pki_ca_key_label config (default vault_pki_ca); signed cert: auto-assigned UID; CA cert: resolved by KMIP link traversal |
Provisioning prerequisite: the CA
PrivateKeyand its linked CACertificatemust be created before SPIRE starts. Useckms certificates certify --generate-key-pair --tag vault_pki_ca ...(see the PKI CA key provisioning section above). The endpoint returns HTTP 500 if the CA key is absent.
Security notes
Cross-AppRole isolation
Auth-verifier alone is sufficient to enforce per-AppRole object isolation in the KMS. No additional access-control configuration is required.
The guarantee holds because:
-
Auth-verifier maps
role_id→ AppRolenameand embeds it asentity_idin the issued token. -
The KMS
spire_token_middlewarereadsentity_idfrom thelookup-selfresponse and setsAuthenticatedUser { username: entity_id }. -
Every
Find,Get,Sign,Revoke, andDestroycall in the transit handler passes thisusernameto the KMS database, which enforces:WHERE (objects.owner = :username OR read_access.userid = :username)
A token for "spire-server-b" therefore returns an empty result set for any object owned
by "spire-server-a" — not a 403, but a 404 (object not found).
This is enforced at the database layer and cannot be circumvented by manipulating HTTP headers.
⚠ Do not set
KMS_FORCE_DEFAULT_USERNAME=true(or--force-default-username) on a KMS instance used with this integration. That option replaces every authenticated identity — including AppRole tokens — with the server'sdefault_username, collapsing all AppRoles into a single shared owner and eliminating all cross-tenant isolation. Its default isfalse; the SPIRE integration requires it stays that way.
Other security notes
exportableis always forced tofalseserver-side, regardless of what a client requests — transit private keys can never leave the KMS.ml-dsa-65anded25519transit key types require the KMSnon-fipsfeature; they are unavailable in FIPS builds.ecdsa-p256,ecdsa-p384,rsa-2048, andrsa-4096are available in both FIPS and non-FIPS builds.- The 30-second token validation cache means a revoked token can still be accepted for
up to
vault_token_cache_ttl_secsseconds. Lower this value (or set it to0) if your threat model requires faster revocation propagation. - Prefer
--vault-auth-verifier-ca-certover--vault-auth-verifier-accept-invalid-certsin any non-throwaway environment — the latter disables TLS certificate verification entirely for calls to auth-verifier. - The KMS's
/v1/transit/*and/v1/pki/*scopes depend on auth-verifier being reachable: a cache-miss during an auth-verifier outage will cause new requests to those scopes to fail until connectivity is restored. Whenvault_api_enabled = true, this dependency extends to all scopes that acceptX-Vault-Token(KMIP,/v1/crypto, MS-DKE, tokenize): any request carrying anX-Vault-Tokenheader that is not in the cache will also fail during an auth-verifier outage. Clients that present anX-Vault-Tokenbut fall back to native auth on failure should not — the optional middleware rejects invalid/unresolvable tokens with403rather than falling through, to prevent a compromised token from being retried with a different identity. - Single authentication —
X-Vault-Tokenaccepted on all scopes: whenvault_api_enabled = true, a client that authenticates via AppRole does not need a separate native KMS credential (TLS client cert, JWT/OIDC, API token) to access KMIP or other endpoints. A validX-Vault-Tokenis sufficient for any KMS scope. Native auth methods continue to work unchanged for clients that do not sendX-Vault-Token. If a request carries anX-Vault-Tokenthat cannot be validated (cache miss and auth-verifier unreachable or rejects the token), the request is rejected with403— it does not fall through to native auth. - Transit
creation_timehas whole-second precision (KMIPInitialDateis POSIX seconds), unlike Vault's nanosecond timestamps. In a fast rotation-retry loop where two keys for the same logical SPIRE key id are created within the same wall-clock second, SPIRE's newest-key tiebreak may be non-deterministic. Operators should avoid sub-second rotation cycles until this is resolved.
Incident response
This section answers the two most critical security questions for operators: what happens when a SPIRE server is compromised, and how to bound the damage while waiting for a revoked certificate to expire.
Background: what a compromised SPIRE server can do
A SPIRE server holds:
- AppRole credentials (
role_id+secret_id) — used to authenticate to the KMS and request a fresh intermediate CA certificate. - A live
X-Vault-Token— valid forvault_token_ttl_secsseconds (default: 1 hour). - The ability to issue SVIDs to any workload whose SPIRE registration entry it controls.
An attacker who controls the SPIRE server process can therefore:
- Request new intermediate CA certificates (until the AppRole is revoked).
- Issue SVIDs to any registered workload identity — allowing impersonation.
- Perform transit operations (sign, encrypt) under the
spire-serverAppRole — but only on objects it owns. It cannot touch transit keys of other tenants' AppRoles (e.g.spire-server-b).
It cannot:
- Extract or export the KMS CA private key (KMIP
Sensitiveattribute blocks all export). - Access objects owned by other AppRoles — the KMS database enforces strict per-owner isolation.
- Forge a token for a different AppRole — the auth-verifier issues tokens, not the SPIRE server.
Step-by-step: responding to a compromised SPIRE server
Step 1 — Cut access immediately (revoke the secret_id)
The secret_id_accessor is the revocation handle you saved when you created the AppRole.
Revoking it means the SPIRE server cannot log in again once its current token expires.
# ckms
ckms vault approle destroy-secret-id spire-prod \
--accessor <accessor-uuid>
# curl
curl -s -b "$COOKIE_JAR" --cacert "$AUTH_CA" \
-X POST -H "Content-Type: application/json" \
-d '{"secret_id_accessor":"<accessor-uuid>"}' \
"$AUTH_URL/auth/approle/role/spire-prod/secret-id-accessor/destroy"
If you did not save the accessor, delete and re-create the entire AppRole. This is more disruptive but equally effective.
ckms vault approle delete-role spire-prod
ckms vault approle create-role spire-prod # then re-provision SPIRE
Step 2 — Wait for the live token to expire (or force-revoke it)
Revoking the secret_id stops future logins. The token the attacker already holds
remains valid for up to vault_token_ttl_secs seconds (default 1 h, configurable).
If you know the token value, revoke it immediately:
# The compromised SPIRE server's token
curl -s -H "X-Vault-Token: hvs.ATTACKER_TOKEN" \
-X POST https://<kms>:9998/v1/auth/token/revoke-self
If you do not know the token, lower vault_token_cache_ttl_secs to 0 in kms.toml
and restart the KMS. This forces a live lookup on every request — any token already
invalidated by the auth-verifier will be rejected immediately instead of being served
from cache.
Step 3 — Rotate the intermediate CA key
Even if the attacker never extracted the CA private key (they cannot — the KMS blocks export), SPIRE may have signed intermediate certificates under that key. Rotating the key label invalidates all trust chains that reference the old intermediate.
# 1. Create a new CA key pair with a new label
ckms certificates certify \
--generate-key-pair --algorithm nist-p384 \
--tag vault_pki_ca_new \
--subject-name "CN=Cosmian KMS Root CA v2,O=Cosmian,C=FR" \
--days 3650
# 2. Update kms.toml: vault_pki_ca_key_label = "vault_pki_ca_new"
# 3. Restart the KMS
After the restart, the old label (vault_pki_ca) is orphaned in the KMS database but
no longer reachable via the PKI endpoint.
Step 4 — Re-provision the legitimate SPIRE server
# Generate a new secret_id for the legitimate SPIRE server
ckms vault approle generate-secret-id spire-prod
# Update SPIRE server config with the new secret_id and the new CA label, then restart
Step 5 — Re-attest all SPIRE agents
SPIRE agents that were attested to the compromised SPIRE server must be re-attested to the new server. The fastest path is to:
- Restart the SPIRE server with a fresh join token.
- Clear each agent's data directory (
/var/lib/spire/agentor whereverdata_dirpoints). - Restart each agent — it will re-attest and fetch a fresh SVID.
Certificate revocation and blast-radius control
SVIDs are short-lived X.509 certificates issued by the SPIRE agent to workloads. A workload that already holds an SVID from a compromised SPIRE server will continue to present that SVID successfully until it expires — even after you have revoked the SPIRE server's AppRole and rotated the CA key.
The blast radius is therefore bounded by the SVID TTL, not by the revocation event.
SVID TTL (svid_ttl in SPIRE agent config) | Maximum post-revocation exposure |
|---|---|
| 1 hour (SPIRE default) | Up to 1 hour |
| 24 hours | Up to 24 hours |
| 1 hour with SPIFFE federation rotation | Until trust bundle propagates (minutes) |
Operational recommendation: keep SVIDs short-lived.
Set svid_ttl in your SPIRE agent configuration to the shortest value your workloads
can tolerate. One hour is a reasonable default for most services. For high-security
workloads, 5–15 minutes is achievable with modern SPIRE versions without meaningful
overhead.
# spire-agent.conf
agent {
svid_ttl = "1h" # ← keep this short; it is your blast-radius ceiling
...
}
Why rotating the CA key (Step 3) does help, eventually:
When the KMS CA key label changes, the new intermediate CA certificate issued by the re-provisioned SPIRE server has a different issuer chain. Validators that refresh their trust bundle from SPIRE (which they do on every SVID renewal) will eventually only trust the new chain. Old SVIDs signed under the old intermediate will stop being accepted once:
- The validator re-fetches its trust bundle from SPIRE (happens on SVID renewal), and
- The old SVID's TTL expires (the validator may cache the old bundle for one renewal cycle).
Summary: the three knobs that control blast radius
| Knob | Where to set it | Effect |
|---|---|---|
svid_ttl | SPIRE agent agent.conf | Caps how long a stolen SVID remains valid |
vault_token_ttl_secs | KMS kms.toml | Caps how long a stolen AppRole token lets the attacker sign new intermediates |
vault_token_cache_ttl_secs | KMS kms.toml | Caps revocation propagation delay (set to 0 during an incident for immediate effect) |
All three are configurable without code changes. Keep them as short as your workloads and network latency allow.
Adversarial test coverage
The integration harness (mise run test:spire --variant non-fips) does not stop at the
happy path. After the multi-tenant end-to-end flow (two independent SPIRE servers, four
Mistral workloads) and a SPIRE-server log gate, it runs a suite of adversarial /
negative-path tests that attack the auth, PKI, and transit surfaces. Each maps to a
numbered scenario; all are asserted live against a running KMS + auth-verifier stack.
| # | Attack / edge case | Expected behaviour | Where it runs |
|---|---|---|---|
| 1 | secret_id created with num_uses=1, 10 concurrent logins | Exactly one login succeeds (BEGIN IMMEDIATE + rows_affected guard) | test_negative_scenarios.sh |
| 2 | auth-verifier killed, then a proxied /v1/auth/* call | KMS returns 502 Bad Gateway; recovers after restart | .mise/tasks/test/spire (inline) |
| 3 | Token self-revoked, then replayed | Rejected (403); the vault_token_cache_ttl_secs window is the theoretical worst case | test_negative_scenarios.sh |
| 4 | sign-intermediate with empty/missing uri_sans, malformed CSR, or no token | 4xx (SPIFFE URI SAN mandatory; auth required) | test_negative_scenarios.sh |
| 5 | Transit key requested with exportable:true; unwrapped export of a sensitive key | exportable forced false; unwrapped export DENIED (ResultReason=Sensitive) | test_negative_scenarios.sh |
| 6 | Unsupported transit key type (FIPS algorithm rejection is a documented SKIP here) | Unknown type → 4xx (no 5xx / panic) | .mise/tasks/test/spire (inline) |
| 7 | Kubernetes login with unknown role, alg:none forged JWT, or missing fields | 4xx — never a 5xx | test_negative_scenarios.sh |
| 8 | AppRole login fuzzing: empty / non-JSON / wrong types / deeply nested / 1 MB body / wrong method | 4xx (413 for oversize); auth path healthy afterwards | test_negative_scenarios.sh |
| 9 | Proxy path traversal /v1/auth/../admins, %2e%2e, nested ..; unauthenticated admin CRUD via the proxy | Dot-segments → 400; unauth admin CRUD → 401 | test_negative_scenarios.sh |
| 10 | KMS started with a non-existent vault_pki_ca_key_label | sign-intermediate fails fast with 500 naming the missing label (no hang/panic) | .mise/tasks/test/spire (inline) |
| 11 | Cross-tenant: one tenant's token used to get / sign / delete / list another tenant's transit key | 404 on every cross-tenant access; key stays isolated and intact | test_negative_scenarios.sh |
| 12 | Two-step delete, then recreate a key with the same name | Delete → GET 404; recreate → 200 and usable (no orphaned KMIP object) | test_negative_scenarios.sh |
Cross-tenant isolation (scenario 11) is the strongest guarantee here: because the KMS object owner is the AppRole name (see AppRole credentials), two SPIRE servers with distinct AppRoles cannot see or touch each other's transit keys. The PKI root CA is intentionally shared — it is loaded as the server admin so that any authenticated tenant can chain to the same root, by design.
Troubleshooting
| Symptom | Cause | Fix |
|---|---|---|
| SPIRE startup fails with "key not found" | AppRole credentials/PKI CA key not provisioned yet | Run the provisioning step (provision.sh or equivalent ckms vault approle calls) before starting SPIRE. |
KMS returns 502 Bad Gateway on /v1/auth/* calls | auth-verifier not reachable by KMS | Confirm auth-verifier is up and vault_auth_verifier_url is correctly set in the KMS config. |
| Workload can't obtain an SVID | SPIRE workload registration entry missing or selector mismatch | List registered entries on the SPIRE server and verify the workload's selector matches its registration. |
403 permission denied calling /v1/transit/* or /v1/pki/* | Invalid, expired, or unrecognized X-Vault-Token | Re-run AppRole login to obtain a fresh token; confirm vault_auth_verifier_url on the KMS points to the correct auth-verifier instance. |
403 permission denied calling /v1/auth/approle/login | Invalid role_id or secret_id | Verify the AppRole was provisioned via the auth-verifier admin API; re-run provision.sh if credentials were lost. |
See also
- Eviden KMS installation — install and run the KMS (Docker, Linux packages, macOS, Windows).
- auth-verifier installation —
authentication/server/documentation/docs/installation.md— deploy the Cosmian Authentication Server that backs the KMS/v1/auth/*proxy. test_data/spire/setup/kms_setup.sh— Bash script that runs all provisioning steps in one shot (ROLE_NAME=my-spire bash test_data/spire/setup/kms_setup.sh).crate/server/documentation/openapi.yaml— OpenAPI schema for the/v1/transit/*and/v1/<pki_mount>/*paths.ckms vault approle --help— full CLI reference for AppRole provisioning.
Workload Authentication via SPIFFE JWT-SVID
In addition to acting as a Vault-compatible backend for SPIRE itself (described above), Eviden KMS natively supports authenticating application workloads using SPIFFE JWT-SVIDs.
Workloads running in Kubernetes clusters or bare-metal environments with SPIRE can authenticate
to KMS endpoints using standard bearer token semantics (Authorization: Bearer <JWT-SVID>).
Operator Decision Tree
Do you want workload authentication via SPIFFE?
├── Option A: mTLS Client Certificate Authentication
│ ├── Uses X.509 SVID (spire-agent / Envoy mTLS)
│ └── Identity is mapped from certificate Common Name (CN).
├── Option B: JWT-SVID Bearer Authentication
│ ├── Uses SPIRE OIDC Discovery Provider / JWKS endpoint
│ ├── Identity is mapped from `sub` claim (`spiffe://<trust-domain>/<path>`)
│ └── Requires `jwt_svid_auth = true` (--jwt-svid-auth).
└── Option C: Dual Layer (mTLS Transport + JWT-SVID Application)
├── Server configures both `[tls] clients_ca_cert_file` and `[idp_auth] jwt_svid_auth`
├── Client-certificate auth runs BEFORE the JWT middleware: a client cert with a CN
│ authenticates as that CN and any JWT-SVID / session cookie is ignored.
└── For the SPIFFE ID to be the identity, use client certs without a CN (or separate
listeners); otherwise expect CN precedence.
Architecture & Claim Mapping
- Standard OIDC vs. SPIFFE JWT-SVID: Standard OIDC/IdP tokens carry an
emailclaim. SPIFFE JWT-SVIDs contain noemailclaim; they identify workloads viasub = spiffe://<trust-domain>/<workload-path>. - Opt-In Flag (
--jwt-svid-auth/jwt_svid_auth = true): When enabled, the KMS JWT authentication middleware accepts tokens with noemailclaim providedsubbegins withspiffe://. The full SPIFFE URI is used as the KMSUserId/ object owner. The flag is global: it applies to all--jwt-auth-providerentries (there is no per-provider setting). - Audience is mandatory: with
--jwt-svid-auth, the server refuses to start if any--jwt-auth-providerentry has no audience (issuer,jwks_uri,audience), and a SPIFFEsubtoken without a non-emptyaudclaim is rejected. This follows the SPIFFE JWT-SVID specification (validators must reject SVIDs not addressed to them) and prevents cross-service replay.
KMS Server Configuration
1. JWT-SVID Only
In kms.toml:
[idp_auth]
jwt_auth_provider = [
"https://oidc-discovery.spire.local,https://oidc-discovery.spire.local/keys,cosmian-kms"
]
jwt_svid_auth = true
2. Dual Configuration (mTLS + JWT-SVID)
Precedence: actix runs wrapped middleware last-in-first-out, and the client-certificate middleware runs before the JWT middleware. A client certificate with a CN authenticates the request as that CN (
AuthMethod::Mtls); the JWT-SVID (and any session cookie) is then ignored. A certificate without a usable CN falls through to the JWT-SVID. To make the SPIFFE ID the identity, present CN-less client certificates or use separate listeners.
In kms.toml:
[tls]
tls_cert_file = "/etc/kms/kms.crt"
tls_key_file = "/etc/kms/kms.key"
clients_ca_cert_file = "/etc/kms/spire-ca.crt"
[idp_auth]
jwt_auth_provider = [
"https://oidc-discovery.spire.local,https://oidc-discovery.spire.local/keys,cosmian-kms"
]
jwt_svid_auth = true
Workload CLI Usage (ckms)
-
Mint a JWT-SVID for the workload using SPIRE:
spire-server jwt mint \ -spiffeID spiffe://cosmian-test-a.local/my-workload \ -audience cosmian-kms -
Configure
ckms.tomlto use the minted token:[http_config] server_url = "https://kms.example.com:9998" access_token = "<minted_jwt_svid>" -
Run
ckmscommands — all created keys and accesses are owned byspiffe://cosmian-test-a.local/my-workload:ckms sym keys create my-key ckms access-rights owned
HTTP / REST API Usage
Workloads can authenticate directly to KMIP or REST endpoints via Authorization: Bearer <JWT-SVID>:
# Check authenticated identity
curl -k -H "Authorization: Bearer ${JWT_SVID}" https://kms.example.com:9998/me
# Response:
# {"user":"spiffe://cosmian-test-a.local/my-workload"}
Expected Log Messages
-
When JWT-SVID authentication succeeds:
[DEBUG] cosmian_kms_server::middlewares::jwt::jwt_token_auth: JWT-SVID access granted to spiffe://cosmian-test-a.local/my-workload! -
When client certificate authentication succeeds:
[TRACE] cosmian_kms_server::middlewares::tls_auth: Client certificate common name: spire-client
Note on Web UI: With
--jwt-svid-auththe server advertisesSPIFFEin/ui/auth_methodand accepts a JWT-SVID posted by a trusted gateway toPOST /ui/login_svid. There is no login form. See Web UI SPIFFE authentication, including the shared-identity caveat.
SPIRE / SPIFFE — Native KMIP 2.1 Integration
The
kmipbuilt-in plugins let SPIRE speak KMIP 2.1 directly to any standards-compliant KMIP server — including Eviden KMS — over the standard binary TTLV / TCP/TLS transport (port 5696). No Vault-compatible layer, no auth-verifier proxy, no AppRole tokens. SPIRE's own signing keys and its intermediate CA are both stored and used exclusively inside the KMIP server, which executes all cryptographic operations using FIPS-approved algorithms.SPIRE fork: the plugin sources live in the Cosmian SPIRE fork:
- KeyManager
kmip— branchfeature/eviden-kms-plugins(tracking spiffe/spire#7235)- UpstreamAuthority
kmip— branchfeature/kmip-upstream-authorityThe plugins use
ovh/kmip-goas the Go KMIP client library and work with any KMIP 2.1-compliant server.E2E test: the KMS repo contains
mise run test:spire-kmipwhich builds spire-server from the SPIRE fork, starts KMS with the binary KMIP TCP socket, and validates the full SPIRE + KMS stack end-to-end with mTLS.
End-to-end flow
sequenceDiagram
participant Admin as Platform Admin
participant KMS as Eviden KMS<br/>:5696 (KMIP 2.1<br/>binary TTLV / TCP)
participant Server as SPIRE Server<br/>(kmip plugins)
participant Agent as SPIRE Agent
participant Workload as Workload<br/>(e.g. AI agent)
Admin->>KMS: 0. Create root CA key pair<br/>POST /kmip/2_1 CreateKeyPair (EC P-384)
KMS-->>Admin: PrivateKeyUID + PublicKeyUID
Admin->>KMS: 1. Create self-signed root CA cert<br/>POST /kmip/2_1 Certify<br/>(PublicKeyUID, CA extensions)
KMS-->>Admin: CertUID (linked to private key via CertificateLink)
Note over Admin,Server: Admin writes server.conf with<br/>ca_key_uid = PrivateKeyUID
Server->>KMS: 2a. Configure KeyManager<br/>KMIP Locate (Name: spire-server-id)<br/>→ recover existing keys on restart
KMS-->>Server: [] (empty on first start)
Server->>KMS: 2b. GenerateKey (x509-CA-A)<br/>KMIP CreateKeyPair (EC P-256)<br/>+ Activate<br/>+ Name attrs: spire-server-id, spire-key-id, spire-key-type
KMS-->>Server: PrivateKeyUID + PublicKeyUID
Server->>KMS: 2c. GetPublicKey<br/>KMIP Get (transparent key format, PublicKeyUID)
KMS-->>Server: DER-encoded PKIX public key
Server->>KMS: 3a. MintX509CA (on start + CA rotation)
Server->>KMS: 3b. KMIP Certify<br/>(CSR DER, PrivateKeyLink=ca_key_uid,<br/>x509-extension: basicConstraints=CA:TRUE,pathlen:0)
KMS-->>Server: Signed intermediate CA cert UID
Server->>KMS: 3c. KMIP Get (export cert)
KMS-->>Server: Signed intermediate CA cert DER
Server->>KMS: 3d. Auto-discover ca_cert_uid<br/>KMIP GetAttributes (CertificateLink)<br/>→ fetch root CA cert
KMS-->>Server: Root CA cert DER
Note over Server,Agent: 4. SPIRE Agent attests<br/>(join_token / x509pop / k8s_psat)
Agent-->>Workload: 5. Workload API (unix socket)<br/>fetch X.509-SVID or JWT-SVID
Server->>KMS: 6. SignData (SVID signing, periodic)<br/>KMIP Sign (DigestedData, ECDSAWithSHA256)
KMS-->>Server: ECDSA signature
Steps 0–1 are a one-time operator setup. Steps 2–3 happen automatically every time the SPIRE server starts or rotates its CA. Steps 4–6 are the ongoing SVID issuance lifecycle.
What it is
SPIFFE defines a standard for issuing cryptographic identities — SVIDs (SPIFFE Verifiable Identity Documents) — to software workloads. SPIRE is the reference runtime that issues and rotates these identities.
SPIRE requires two external capabilities from a backend:
- A
KeyManagerthat stores and uses the signing keys SPIRE uses internally. - An
UpstreamAuthoritythat signs SPIRE's intermediate CA certificate.
The kmip plugins provide both, speaking KMIP 2.1 binary TTLV over TCP/TLS (port 5696)
directly to any standards-compliant KMIP server. No Vault-compatible API layer, no separate
authentication service, no AppRole tokens.
Why use it?
| Need | How this integration addresses it |
|---|---|
| Private-key custody | SPIRE's CA and signing keys are generated, stored, and used exclusively inside the KMIP server — never on the SPIRE server's local disk |
| Compliance-ready crypto | All signing operations use FIPS-approved algorithms (EC P-256/P-384, RSA-2048/4096, SHA-256/384) |
| Minimal infrastructure | Only a KMIP 2.1 server is required — no auth-verifier, no separate secrets management cluster, no proxy |
| Native protocol | Speaks KMIP 2.1 binary TTLV over TCP/TLS — the canonical KMIP transport — rather than a compatibility shim |
| Vendor-neutral | Works with any KMIP 2.1-compliant server (Eviden KMS, PyKMIP, OpenBao) using standard KMIP Name attributes for key metadata |
| Centralized audit trail | Every Sign, CreateKeyPair, and Certify call is a KMIP operation logged by the server with identity, timestamp, and key identifier |
| Key recovery | On SPIRE server restart, the kmip KeyManager recovers all existing keys via a KMIP Locate on the spire-server-id Name attribute — no local state needed |
Architecture
flowchart LR
subgraph KMS ["Eviden KMS"]
direction TB
HTTPS["HTTPS endpoint<br/>:9998 (admin / JSON TTLV)"]
TCP["KMIP 2.1 TCP socket<br/>:5696 (binary TTLV)"]
Keys["Key objects<br/>(Name: spire-server-id)"]
Certs["Certificate objects<br/>(CertificateLink)"]
TCP --> Keys
TCP --> Certs
end
subgraph SPIRE ["SPIRE Server"]
direction TB
KM["KeyManager<br/>kmip<br/>(CreateKeyPair · Activate · Sign · Locate)"]
UA["UpstreamAuthority<br/>kmip<br/>(Certify · auto-discover ca_cert_uid)"]
end
subgraph Workloads ["Workloads"]
direction TB
SA["SPIRE Agent"]
WL["AI agent / service"]
SA --> WL
end
KM -- "KMIP 2.1 binary TTLV<br/>(TCP/TLS :5696, mTLS)" --> KMS
UA -- "KMIP 2.1 binary TTLV<br/>(TCP/TLS :5696, mTLS)" --> KMS
SPIRE -- "SPIFFE<br/>WorkloadAPI" --> SA
Both plugins authenticate to the KMIP server with mTLS (client certificate). No AppRole, no Vault tokens, no static bearer tokens.
Comparison with the Vault-compatible integration
| Aspect | kmip plugins (native KMIP) | vault plugins via KMS Vault API |
|---|---|---|
| KMS API used | KMIP 2.1 binary TTLV over TCP/TLS (:5696) | Vault-compatible REST (/v1/transit/, /v1/pki/) |
| Authentication | mTLS client certificate | AppRole (role_id + secret_id) via auth-verifier |
| Additional services | None | auth-verifier required |
| SPIRE config namespace | KeyManager "kmip" / UpstreamAuthority "kmip" | SPIRE built-in Vault plugins |
| Key discovery on restart | KMIP Locate by spire-server-id Name attribute | Key identifier file on disk |
| Compatible KMIP servers | Any KMIP 2.1 server (Eviden KMS, PyKMIP, OpenBao) | Eviden KMS only |
| SPIRE version required | Cosmian/spire branches feature/eviden-kms-plugins (KeyManager) and feature/kmip-upstream-authority (UpstreamAuthority) — tracking issue #7233 | Built-in to SPIRE ≥ 1.9 |
Choose the kmip plugins when you want a direct, minimal, vendor-neutral integration.
Choose the vault plugins with the KMS Vault-compatible API when you need
AppRole-based multi-tenant isolation or Vault token lifecycle features.
Prerequisites
KMS configuration
The KMIP server must expose a binary TTLV TCP socket in addition to (or instead of)
the HTTPS endpoint. For Eviden KMS, enable the [socket_server] section in kms.toml:
# kms.toml
default_username = "spire-server"
[http]
port = 9998
# Binary KMIP 2.1 TCP socket — required for the kmip SPIRE plugins.
[socket_server]
socket_server_start = true
socket_server_port = 5696
socket_server_hostname = "0.0.0.0"
# mTLS: trust client certificates signed by this CA.
[tls]
tls_cert_file = "/etc/kms/certs/kms.crt"
tls_key_file = "/etc/kms/certs/kms.key"
clients_ca_cert_file = "/etc/kms/certs/ca.crt"
The socket_server enables the standard KMIP TCP port (5696) alongside the HTTPS
endpoint. The SPIRE plugins connect to this TCP socket using binary TTLV encoding.
0. Create the root CA key pair
Before SPIRE starts, create an EC P-384 key pair and its self-signed CA certificate in
the KMS. The private key UID is what you put in ca_key_uid in server.conf.
Using ckms
# Create EC P-384 key pair with a predictable UID.
ckms --accept-invalid-certs ec keys create \
--curve nist-p384 \
--private-key-id spire-root-ca-key
# Create the self-signed root CA certificate.
# The --x509-extension-file sets basicConstraints=CA:TRUE so the cert is a valid signer.
# Note: cRLSign is omitted — Eviden KMS FIPS mode does not support it.
cat > /tmp/ca_ext.cnf <<'EOF'
[v3_ca]
basicConstraints=critical,CA:TRUE,pathlen:0
keyUsage=critical,keyCertSign,digitalSignature
EOF
ckms --accept-invalid-certs certificates certify \
--public-key-id spire-root-ca-key_pk \
--subject-name "CN=SPIRE Root CA,O=SPIFFE,C=US" \
--x509-extension-file /tmp/ca_ext.cnf
The KMS automatically stores a CertificateLink attribute on the public key pointing
to the new certificate. The kmip UpstreamAuthority plugin auto-discovers this
link after the first Certify call — you do not need to configure ca_cert_uid
explicitly.
Using curl (KMIP JSON TTLV via HTTPS)
KMS="https://kms.example.com:9998"
# Create EC P-384 key pair.
curl -s -X POST "$KMS/kmip/2_1" \
--cacert /etc/kms/ca.crt \
--cert /etc/kms/spire-client.crt \
--key /etc/kms/spire-client.key \
-H "Content-Type: application/json" -d '{
"tag": "CreateKeyPair",
"value": [
{"tag": "CommonAttributes", "value": [
{"tag": "CryptographicAlgorithm", "type": "Enumeration", "value": "EC"},
{"tag": "CryptographicDomainParameters", "value": [
{"tag": "RecommendedCurve", "type": "Enumeration", "value": "P384"}
]},
{"tag": "KeyFormatType", "type": "Enumeration", "value": "ECPrivateKey"},
{"tag": "ActivationDate", "type": "DateTime", "value": "2024-01-01T00:00:00Z"}
]},
{"tag": "PrivateKeyAttributes", "value": [
{"tag": "UniqueIdentifier", "type": "TextString", "value": "spire-root-ca-key"},
{"tag": "CryptographicUsageMask", "type": "Integer", "value": 1063425}
]},
{"tag": "PublicKeyAttributes", "value": [
{"tag": "CryptographicUsageMask", "type": "Integer", "value": 1051138}
]}
]
}'
# Create self-signed CA certificate (sets CertificateLink → enables auto-discovery).
# x509-extension is hex-encoded OpenSSL extension file content.
CA_EXT="[v3_ca]\nbasicConstraints=critical,CA:TRUE,pathlen:0\nkeyUsage=critical,keyCertSign,digitalSignature\n"
CA_EXT_HEX=$(printf "$CA_EXT" | xxd -p | tr -d '\n' | tr '[:lower:]' '[:upper:]')
curl -s -X POST "$KMS/kmip/2_1" \
--cacert /etc/kms/ca.crt \
--cert /etc/kms/spire-client.crt \
--key /etc/kms/spire-client.key \
-H "Content-Type: application/json" -d "{
\"tag\": \"Certify\",
\"value\": [
{\"tag\": \"UniqueIdentifier\", \"type\": \"TextString\", \"value\": \"spire-root-ca-key_pk\"},
{\"tag\": \"Attributes\", \"value\": [
{\"tag\": \"CertificateType\", \"type\": \"Enumeration\", \"value\": \"X509\"},
{\"tag\": \"CertificateAttributes\", \"value\": [
{\"tag\": \"CertificateSubjectCn\", \"type\": \"TextString\", \"value\": \"SPIRE Root CA\"},
{\"tag\": \"CertificateSubjectO\", \"type\": \"TextString\", \"value\": \"SPIFFE\"},
...
]},
{\"tag\": \"Attribute\", \"value\": [
{\"tag\": \"VendorIdentification\", \"type\": \"TextString\", \"value\": \"cosmian\"},
{\"tag\": \"AttributeName\", \"type\": \"TextString\", \"value\": \"x509-extension\"},
{\"tag\": \"AttributeValue\", \"type\": \"ByteString\", \"value\": \"$CA_EXT_HEX\"}
]}
]}
]
}"
SPIRE server configuration
Add the two kmip plugins to server.conf. Both use the same kmip_addr and
mTLS certificate paths.
server {
bind_address = "0.0.0.0"
bind_port = "8081"
trust_domain = "example.org"
data_dir = "/var/lib/spire/server"
log_level = "INFO"
ca_ttl = "24h"
default_x509_svid_ttl = "1h"
ca_subject {
country = ["US"]
organization = ["SPIFFE"]
common_name = ""
}
}
plugins {
DataStore "sql" {
plugin_data {
database_type = "sqlite3"
connection_string = "/var/lib/spire/server/datastore.sqlite3"
}
}
NodeAttestor "join_token" {
plugin_data {}
}
# ── KeyManager: SPIRE's own signing keys stored in the KMIP server ─────────
# The plugin creates asymmetric key pairs via KMIP CreateKeyPair, activates them,
# and tags them with standard KMIP Name attributes (spire-server-id, spire-key-id,
# spire-key-type). On restart, it recovers existing keys via KMIP Locate.
KeyManager "kmip" {
plugin_data {
# TCP address of the KMIP binary TTLV socket (standard port 5696).
kmip_addr = "kmip.example.com:5696"
# PEM CA cert that verifies the KMIP server TLS certificate.
# Omit if the server uses a publicly-trusted certificate.
ca_cert_path = "/etc/spire/kmip-ca.crt"
# mTLS client certificate (required for authentication).
client_cert_path = "/etc/spire/kmip-client.crt"
client_key_path = "/etc/spire/kmip-client.key"
# A stable identifier for this SPIRE server instance.
# All keys are tagged with Name "spire-server-id:<server_id>".
server_id = "spire-prod-server"
# Optional: skip TLS verification (test environments only).
# insecure_skip_verify = false
}
}
# ── UpstreamAuthority: SPIRE's intermediate CA signed by the KMIP server ────
# On startup the plugin sends the CSR via KMIP Certify with a PrivateKeyLink
# pointing to ca_key_uid. After signing, it auto-discovers the root CA certificate
# via the CertificateLink on the signed intermediate.
# Optionally set ca_cert_uid explicitly to skip auto-discovery.
UpstreamAuthority "kmip" {
plugin_data {
kmip_addr = "kmip.example.com:5696"
ca_cert_path = "/etc/spire/kmip-ca.crt"
client_cert_path = "/etc/spire/kmip-client.crt"
client_key_path = "/etc/spire/kmip-client.key"
# KMIP UniqueIdentifier of the root CA private key (set in step 0).
ca_key_uid = "spire-root-ca-key"
# Optional: KMIP UID of the root CA certificate.
# Auto-discovered from CertificateLink when omitted.
# ca_cert_uid = "..."
}
}
}
Start the SPIRE server:
spire-server run -config /etc/spire/server.conf
Detailed flows
KeyManager — key creation and recovery
sequenceDiagram
participant S as SPIRE Server
participant KM as kmip<br/>KeyManager
participant KMS as KMIP Server
Note over S,KMS: On Configure (startup / reconfigure)
S->>KM: Configure(kmip_addr, server_id, mTLS)
KM->>KMS: KMIP Locate<br/>(Name: spire-server-id:<server_id>)
KMS-->>KM: [uid1, uid2, ...] (existing keys)
loop for each recovered UID
KM->>KMS: KMIP GetAttributes (Name)
KMS-->>KM: spire-key-id, spire-key-type
KM->>KMS: KMIP GetAttributes (PublicKeyLink)
KMS-->>KM: pub_uid
KM->>KMS: KMIP Get (transparent key, pub_uid)
KMS-->>KM: DER-encoded PKIX public key
end
KM-->>S: Configure OK (N keys recovered)
Note over S,KMS: On GenerateKey (key rotation / first start)
S->>KM: GenerateKey(keyId="x509-CA-A", type=EC_P256)
KM->>KMS: KMIP CreateKeyPair (EC P-256)
KMS-->>KM: PrivateKeyUID + PublicKeyUID
KM->>KMS: KMIP Activate (PrivateKeyUID)
KM->>KMS: KMIP Activate (PublicKeyUID)
KM->>KMS: KMIP AddAttribute × 3<br/>(Name: spire-server-id, spire-key-id, spire-key-type)
KM->>KMS: KMIP Get (transparent key, PublicKeyUID)
KMS-->>KM: DER-encoded PKIX public key
KM-->>S: GenerateKeyResponse(PublicKey)
Note over KM: schedule Destroy for old key (background)
Note over S,KMS: On SignData
S->>KM: SignData(keyId, digest, SHA256/ECDSA)
KM->>KMS: KMIP Sign<br/>(PrivateKeyUID, DigestedData,<br/>ECDSAWithSHA256)
KMS-->>KM: DER-encoded ECDSA signature
KM-->>S: SignDataResponse(signature)
UpstreamAuthority — intermediate CA signing
sequenceDiagram
participant S as SPIRE Server
participant UA as kmip<br/>UpstreamAuthority
participant KMS as KMIP Server
Note over S,KMS: On Configure
S->>UA: Configure(kmip_addr, ca_key_uid, mTLS)
UA-->>S: Configure OK
Note over S,KMS: On MintX509CAAndSubscribe (startup + CA rotation)
S->>UA: MintX509CAAndSubscribe(CSR DER)
UA->>UA: Validate CSR
UA->>KMS: KMIP Certify (KMIP 2.1 enforced)<br/>(CertificateRequestValue=CSR DER,<br/>PrivateKeyLink=ca_key_uid,<br/>x509-extension: basicConstraints=CA:TRUE,pathlen:0)
KMS-->>UA: Signed cert UID
UA->>KMS: KMIP Get (signed cert UID)
KMS-->>UA: Signed cert DER
alt ca_cert_uid configured or auto-discovered
UA->>KMS: KMIP GetAttributes (CertificateLink)
KMS-->>UA: ca_cert_uid (discovered)
UA->>KMS: KMIP Get (ca_cert_uid)
KMS-->>UA: Root CA cert DER (upstream root)
else auto-discovery failed
Note over UA: Use signed cert as self-anchored root<br/>(not recommended for production)
end
UA-->>S: MintX509CAResponse<br/>(X509CaChain, UpstreamX509Roots)
Note over S: Stream kept open until context cancelled<br/>(live root rotation not yet supported)
Key recovery after SPIRE server restart
sequenceDiagram
participant S as SPIRE Server (restarted)
participant KM as kmip KeyManager
participant KMS as KMIP Server
S->>KM: Configure(server_id="spire-prod-server")
KM->>KMS: KMIP Locate<br/>(Name: spire-server-id:spire-prod-server)
KMS-->>KM: [uid-of-x509-CA-A, uid-of-jwt-signer-0]
loop for each uid
KM->>KMS: KMIP GetAttributes (Name)
KMS-->>KM: spire-key-id, spire-key-type
KM->>KMS: KMIP GetAttributes (PublicKeyLink)
KMS-->>KM: pub_uid
KM->>KMS: KMIP Get (transparent key, pub_uid)
KMS-->>KM: PKIX public key bytes
end
KM-->>S: 2 keys recovered — no key re-creation needed
Quick start (local demo)
From the KMS repository
The KMS repo contains mise run test:spire-kmip — a full end-to-end test that
builds both KMS and SPIRE from source, provisions the CA, and validates the
kmip plugins over binary KMIP TCP/TLS with mTLS:
# From the KMS repository root
mise run test:spire-kmip
The test:spire-kmip task orchestrates two independent sub-tasks sequentially — one
per plugin, each on its own SPIRE fork branch:
- Builds the KMS server and
ckmsCLI from source (non-FIPS) - KeyManager sub-task (
test:spire-kmip-key-manager): clonesCosmian/spirebranchfeature/eviden-kms-plugins, buildsspire-server, starts KMS with binary KMIP TCP socket (port 5696), and validates key creation via join token - UpstreamAuthority sub-task (
test:spire-kmip-upstream-authority): clonesCosmian/spirebranchfeature/kmip-upstream-authority, buildsspire-server, provisions the root CA key pair viackms, starts KMS with binary KMIP TCP socket (port 5697), and validates CA signing via join token - Both sub-tasks generate mTLS test certificates (CA, KMS server, SPIRE client)
- Both sub-tasks run
spire-server healthcheckand generate a join token to confirm plugin operation
From the SPIRE fork
The Cosmian SPIRE fork also contains Kind-based integration test suites that start their own KMS Docker container:
# Clone the SPIRE fork (KeyManager plugin)
git clone --branch feature/eviden-kms-plugins https://github.com/Cosmian/spire
cd spire
# Kind-based integration tests (start KMS Docker, deploy SPIRE into Kind)
test/integration/suites/key-manager-kmip/
# Clone the SPIRE fork (UpstreamAuthority plugin)
git clone --branch feature/kmip-upstream-authority https://github.com/Cosmian/spire
test/integration/suites/upstream-authority-kmip/
KMIP 1.x compliance tests (KMS repo)
The KMS repository also includes KMIP 1.x protocol compliance tests using the
ovh/kmip-go library, which can be run independently:
# From the KMS repository root — KMIP 1.0–1.4 compliance (not SPIRE-related)
mise run test:kmip-go
Plugin configuration reference
KeyManager "kmip"
| Field | Type | Required | Default | Description |
|---|---|---|---|---|
kmip_addr | string | ✅ | — | TCP address of the KMIP binary TTLV socket (e.g. kmip.example.com:5696) |
server_id | string | ✅ | — | Stable identifier for this SPIRE server. Used as the spire-server-id Name attribute on all key pairs. Must be unique per SPIRE instance. |
ca_cert_path | string | — | system pool | PEM file to verify the KMIP server TLS certificate. Omit for publicly-trusted certs. |
client_cert_path | string | — | — | PEM client certificate for mTLS authentication. If set, client_key_path is also required. |
client_key_path | string | — | — | PEM client private key for mTLS authentication. |
insecure_skip_verify | bool | — | false | Skip TLS verification. Test environments only. |
mTLS is the only authentication method supported by the kmip plugins. If
client_cert_path and client_key_path are both set, the plugin presents
the client certificate during the TLS handshake. If neither is set, the
plugin connects without a client certificate (anonymous TLS).
UpstreamAuthority "kmip"
| Field | Type | Required | Default | Description |
|---|---|---|---|---|
kmip_addr | string | ✅ | — | TCP address of the KMIP binary TTLV socket. |
ca_key_uid | string | ✅ | — | KMIP UniqueIdentifier of the root CA private key. Created in step 0. |
ca_cert_uid | string | — | auto-discovered | KMIP UID of the root CA certificate. When omitted, the plugin follows the CertificateLink attribute on the signed intermediate certificate. If discovery fails, the signed cert is used as a self-anchored root (not recommended for production). |
ca_cert_path | string | — | system pool | PEM file to verify the KMIP server TLS certificate. |
client_cert_path | string | — | — | PEM client certificate for mTLS. |
client_key_path | string | — | — | PEM client private key for mTLS. |
insecure_skip_verify | bool | — | false | Skip TLS verification. Test environments only. |
KMIP operations reference
KeyManager operations
| SPIRE gRPC method | KMIP operation | Key details |
|---|---|---|
Configure | Locate | Finds all PrivateKey objects with Name spire-server-id:<server_id> to rebuild the key map on restart. |
GenerateKey | CreateKeyPair | Creates EC P-256/P-384 or RSA-2048/4096 key pair. |
GenerateKey | Activate | Activates both private and public keys (KMIP keys start in PreActive state; Sign requires Active). |
GenerateKey | AddAttribute | Adds three standard KMIP Name attributes: spire-server-id:<id>, spire-key-id:<keyId>, spire-key-type:<type>. |
GenerateKey | Get(transparent) | Fetches the DER-encoded PKIX public key using transparent key format (fallback: unqualified Get). |
SignData | Sign(DigestedData) | Signs a pre-hashed digest using ECDSAWithSHA256/384/512, SHA256/384/512WithRSAEncryption, or RSASSAPSS. |
GetPublicKey | In-memory | Served from the local key map (populated at Configure + GenerateKey time). |
GetPublicKeys | In-memory | Returns all public keys in the local key map. |
| (key cleanup) | Destroy | Called in the background after key rotation. |
UpstreamAuthority operations
| SPIRE gRPC method | KMIP operation | Details |
|---|---|---|
Configure | — | Stores ca_key_uid and optional ca_cert_uid. |
MintX509CAAndSubscribe | Certify | Sends the DER-encoded CSR with PrivateKeyLink=ca_key_uid and x509-extension vendor attribute (basicConstraints=critical,CA:TRUE,pathlen:0). Enforces KMIP 2.1 (tag 0x420140 CertificateRequestValue). |
MintX509CAAndSubscribe | Get | Exports the signed intermediate certificate (DER) and the root CA certificate for the upstream X.509 roots bundle. |
MintX509CAAndSubscribe | GetAttributes(Link) | Auto-discovery: follows CertificateLink on the signed intermediate to find the root CA certificate UID. |
KMIP cryptographic usage masks
The KeyManager plugin sets FIPS-compliant CryptographicUsageMask values on every key:
| Key type | Object | Flags |
|---|---|---|
| EC P-256/P-384 | Private key | Sign, CertSign, CRLSign |
| EC P-256/P-384 | Public key | Verify |
| RSA 2048/4096 | Private key | Sign, Decrypt, UnwrapKey |
| RSA 2048/4096 | Public key | Verify, Encrypt, WrapKey |
Security notes
Key isolation
Each SPIRE server instance uses a unique server_id Name attribute. Keys tagged with
one server-id can be distinguished from another's — the KMIP server enforces object
ownership via the authenticated connection identity.
mTLS authentication
mTLS is the only authentication method supported by the kmip plugins. The KMIP server
validates the client certificate at the TLS layer, before any KMIP message is processed.
mTLS (client_cert_path + client_key_path) | |
|---|---|
| Credential type | X.509 client certificate + private key |
| Expiry | Hard NotAfter date — causes live failures when expired |
| Revocation | Revoke via CRL/OCSP or delete from the KMIP server's trust CA |
| Who rotates | PKI operator (same team who owns the server cert CA) |
| Rotation trigger | Certificate expiry; security incident |
| Automation | cert-manager, ACME, cron + openssl |
Managing mTLS client certificate lifecycle
The SPIRE plugins authenticate to the KMIP server using a client certificate
(client_cert_path / client_key_path). This certificate has a hard expiry date.
When it expires, every KMIP call fails immediately — including the periodic
Sign calls during normal operation, not only on restart.
Why rotate:
| Trigger | Impact | Action |
|---|---|---|
Certificate expiry (NotAfter reached) | All KMIP operations fail with a TLS handshake error. SPIRE cannot sign SVIDs or rotate its CA. | Renew certificate before expiry. Monitor notAfter proactively. |
| Private key compromise | An attacker holding the key can authenticate as the SPIRE server to the KMIP server and access its signing keys. | Revoke the old certificate; issue a new one immediately. |
Who rotates: The platform operator who owns the PKI (Certificate Authority) that issued the KMIP server's client certificate. This is typically the same team that manages the KMIP server certificate. The SPIRE server itself has no authority to renew its own credential.
Production recommendation: Issue client certificates with a 1-year validity and
set up automated renewal at the 80% mark (after ~10 months). The KMIP server trusts all
certificates issued by its configured clients_ca_cert_file CA, so you only need
to replace the leaf certificate — the trust anchor does not change.
Automation patterns:
| Pattern | How | When to use |
|---|---|---|
| cert-manager (Kubernetes) | Certificate resource issues a client cert; cert-manager renews automatically before expiry. Mount as a K8s Secret; SPIRE reads it from disk. | Best for Kubernetes deployments. |
| ACME / Let's Encrypt | Certbot or equivalent renews the cert, runs a post-renewal hook to restart SPIRE. | Suitable if your mTLS CA is ACME-compatible. |
| Cron + OpenSSL | Weekly cron checks openssl x509 -noout -checkend 2592000 -in /etc/spire/kmip-client.crt (30-day threshold); renews if close to expiry and restarts SPIRE. | Simple; no additional tooling. |
| SPIFFE-issued client cert (meta-SPIRE) | A separate SPIRE instance issues the KMIP client identity as a short-lived X.509-SVID. Requires the KMIP server to trust the meta-SPIRE CA. | Advanced; eliminates long-lived certs entirely. |
Minimal cron example:
#!/usr/bin/env bash
# /etc/cron.weekly/renew-kmip-client-cert
set -euo pipefail
CERT=/etc/spire/kmip-client.crt
KEY=/etc/spire/kmip-client.key
CA_KEY=/etc/pki/kmip-ca.key
CA_CERT=/etc/pki/kmip-ca.crt
DAYS_BEFORE_EXPIRY=30
if openssl x509 -noout -checkend $((DAYS_BEFORE_EXPIRY * 86400)) -in "$CERT" 2>/dev/null; then
echo "Client cert valid for more than ${DAYS_BEFORE_EXPIRY} days — no renewal needed."
exit 0
fi
echo "Renewing KMIP mTLS client certificate..."
openssl req -new -key "$KEY" -subj "/CN=spire-server" \
| openssl x509 -req -CA "$CA_CERT" -CAkey "$CA_KEY" \
-CAcreateserial -days 365 -out "$CERT"
# Restart SPIRE to pick up the new certificate.
systemctl restart spire-server
echo "Certificate renewed and SPIRE restarted."
If SPIRE is containerised, update the Secret holding the cert and roll the Deployment:
kubectl rollout restart deployment/spire-server -n spire.
CA key custody
The root CA private key (ca_key_uid) never leaves the KMIP server. The Certify
operation is a server-side signing operation — only the resulting certificate is
returned. The root CA key is marked non-exportable at creation time.
Root CA single-tier limitation
The current UpstreamAuthority implementation only supports a single-tier CA hierarchy
(root CA directly signing SPIRE's intermediate CA). Multi-tier hierarchies (root → intermediate
CA → SPIRE intermediate) require an additional ca_cert_uid pointing to the signing
intermediate rather than the root, and the root must be a trust anchor in SPIRE's bundle.
No live root rotation
MintX509CAAndSubscribe sends a single response on the stream and then blocks until
the context is cancelled. SPIRE's CA rotation is driven by SPIRE itself re-calling
MintX509CAAndSubscribe on schedule. Live upstream root rotation (the plugin proactively
pushing a new root) is not yet supported.
Go KMIP client libraries
SPIRE plugins: ovh/kmip-go (binary TTLV / TCP)
The kmip SPIRE plugins use ovh/kmip-go
(kmipclient package) as the Go KMIP client library. This library speaks
binary TTLV over TCP/TLS — the standard KMIP transport — and works with any
KMIP 2.1-compliant server.
| Package | Purpose |
|---|---|
kmipclient.Dial(addr, opts...) | Connect to a KMIP server over TCP/TLS |
client.CreateKeyPair().ECDSA(curve, ...) | KMIP CreateKeyPair |
client.Activate(uid) | KMIP Activate (PreActive → Active) |
client.Get(uid).WithKeyFormat(fmt) | KMIP Get (transparent key, certificate, etc.) |
client.Locate().WithAttribute(...) | KMIP Locate by Name attribute |
client.Sign(uid).WithCryptographicParameters(...) | KMIP Sign (DigestedData) |
client.AddAttribute(uid, name, value) | KMIP AddAttribute (Name attributes) |
client.Destroy(uid) | KMIP Destroy |
client.Request(ctx, payload) | Raw KMIP operation (used for Certify) |
General-purpose: github.com/Cosmian/kmip-go (JSON TTLV / HTTPS)
The Cosmian/kmip-go module provides a
minimal, zero-external-dependency KMIP 2.1 JSON TTLV over HTTPS client for
Eviden KMS. It is used by the KMS integration tests and by applications that
prefer the HTTP transport.
| Package symbol | Purpose |
|---|---|
NewClient(cfg) | Build an HTTPS client with mTLS (cert_auth) or Bearer token (token_auth) |
CreateKeyPair(ctx, KeyType, tags) | KMIP CreateKeyPair with FIPS-compliant usage masks |
GetPublicKey(ctx, publicKeyUID) | KMIP Get (PKCS8) → DER-encoded PKIX |
Locate(ctx, tags) | KMIP Locate by cosmian vendor tag |
Sign(ctx, uid, data, hash, sig) | KMIP Sign (DigestedData, pre-hashed) |
Destroy(ctx, uid) | KMIP Revoke + Destroy (KMIP lifecycle) |
Certify(ctx, csr, caKey, caCert, ext) | KMIP Certify (CSR signing) |
CreateSelfSignedCertificate(ctx, pubKeyUID, cn, ext) | KMIP Certify (self-signed) |
FakeKMS | Exported in-process httptest.Server for unit testing |
The kmip-go repository also contains:
- Test data as a git submodule (
test_data/) with mTLS certs and configs docker-compose.ymlwith pinnedghcr.io/cosmian/kms:5.26.0(plain HTTP + mTLS services)
Run integration tests against a live KMS Docker container:
# From the kmip-go repository root
mise run test:live # no-auth HTTP (ghcr.io/cosmian/kms:5.26.0)
mise run test:live --mtls # mTLS HTTPS (ghcr.io/cosmian/kms:5.26.0)
Troubleshooting
plugin not configured (codes.FailedPrecondition)
The Configure RPC was not called before the first operation. This typically happens if
BuiltIn() creates two separate Plugin instances (a known bug fixed in the
feature/eviden-kms-plugins branch — ensure you are on the correct branch).
basic constraints are not valid
The signed intermediate CA certificate does not have basicConstraints=CA:TRUE. Ensure:
- The
x509-extensionvendor attribute is included in theCertifyrequest (the plugin sets this automatically withbasicConstraints=critical,CA:TRUE,pathlen:0). - The root CA certificate itself was created with the CA extension
(
basicConstraints=critical,CA:TRUE,pathlen:0,keyUsage=critical,keyCertSign,digitalSignature).
no CertificateLink found
Auto-discovery of ca_cert_uid failed because the signed intermediate certificate does
not have a CertificateLink attribute pointing to the root CA certificate. Ensure
step 0 (create the self-signed CA certificate) was completed before starting SPIRE,
and that the KMIP server creates CertificateLink attributes on Certify responses.
Alternatively, set ca_cert_uid explicitly in the UpstreamAuthority configuration.
x509: certificate signed by unknown authority
The root CA certificate lacks the keyCertSign key usage. Recreate the root CA
certificate with the correct extensions:
[v3_ca]
basicConstraints=critical,CA:TRUE,pathlen:0
keyUsage=critical,keyCertSign,digitalSignature
failed to connect to KMIP server: dial tcp: connection refused
The KMIP binary TTLV TCP socket is not listening. Ensure the [socket_server] section
is present in kms.toml and socket_server_start = true:
[socket_server]
socket_server_start = true
socket_server_port = 5696
socket_server_hostname = "0.0.0.0"
KMIP server returned error: operation not supported
The Certify operation uses KMIP 2.1 tag 0x420140 (CertificateRequestValue).
If the KMIP server negotiates KMIP 1.4, this tag is rejected as unknown. The
UpstreamAuthority plugin enforces KMIP 2.1 (kmipclient.EnforceVersion(ovh.V2_1)),
so this error indicates the KMIP server does not support KMIP 2.1. Upgrade the
server or use a compatible KMIP version.
See also
- SPIRE / SPIFFE — Vault-compatible integration — the Vault-compatible approach using AppRole authentication and auth-verifier
- KMIP Go integration — other Go clients for Eviden KMS
- SPIRE tracking issue #7233 — feature request thread for native KMIP plugins in SPIRE
- SPIRE fork —
feature/eviden-kms-plugins— KeyManagerkmipplugin source (PR spiffe/spire#7235) - SPIRE fork —
feature/kmip-upstream-authority— UpstreamAuthoritykmipplugin source github.com/Cosmian/kmip-go— the Go HTTPS JSON TTLV client library for Eviden KMSovh/kmip-go— the Go KMIP client library used by the SPIRE plugins (binary TTLV / TCP)- KMIP 2.1 specification —
crate/kmip/src/(local copy)
Web UI SPIFFE Authentication via a Gateway/BFF
Eviden KMS can establish a Web UI session from a SPIFFE JWT-SVID posted by a trusted
gateway (or backend-for-frontend, BFF) to POST /ui/login_svid. Browsers cannot reach the SPIRE
Workload API, so the gateway is the component that holds SPIFFE credentials; the browser never
sees the JWT-SVID.
There is no login form or paste box for an SVID in the Web UI. A browser without a session sees only an informational notice that the deployment uses SPIFFE sessions established by a gateway.
The session identity is the sub (spiffe://<trust-domain>/<path>) of the JWT-SVID that
the gateway posts. If the gateway posts its own JWT-SVID whenever a browser has no
cookie, every anonymous browser receives a session as one shared SPIFFE identity:
there is no per-user authentication, authorization or audit. This is the same anti-pattern
as forcing every client onto a single admin account (rejected architectural anti-pattern:
forcing every client onto a single shared identity violates audit trail guarantees).
The gateway must authenticate the end user first (for example OIDC at the gateway)
and only then relay a session, ideally with an identity scoped to that user or group.
Server behaviour
| Aspect | Behaviour |
|---|---|
| Enablement | --jwt-svid-auth ([idp_auth] jwt_svid_auth = true), global to all --jwt-auth-provider entries |
| Audience | Mandatory on every --jwt-auth-provider entry (server refuses to start otherwise); the SVID must carry a non-empty aud |
| Advertisement | GET /ui/auth_method lists "SPIFFE" in auth_methods (priority JWT > SPIFFE > AUTH_VERIFIER > CERT) |
| Session identity | Read by the UI via GET /ui/whoami |
| No session | The browser shows an informational notice, no form |
POST /ui/login_svid
Request body:
{ "jwt_svid": "<token>" }
| Status | Meaning |
|---|---|
200 | {"next_step":"Authenticated"}; the auth_session cookie is set |
401 | The SVID is invalid (bad signature, issuer, expiry, audience, or not a SPIFFE subject) |
500 | --jwt-svid-auth is not enabled, or the session could not be stored |
Rules applied by the endpoint:
- Only tokens whose
substarts withspiffe://are accepted. A token with anemailclaim but a non-SPIFFEsubis rejected. - If validation fails, the JWKS is refreshed once and validation is retried, to cope with SPIRE key rotation.
- The full SPIFFE ID becomes the session
user_id. The cookie (auth_session) is encrypted,HttpOnlyandSameSite=Lax.
Reference design (illustrative)
The components below (Apache APISIX, spiffe-helper, spiffe-mtls-reloader) are an
illustrative deployment. They are not shipped or tested in this repository; only the
KMS side (/ui/login_svid, /ui/whoami, /ui/auth_method) is implemented and covered here.
Any gateway able to authenticate users and call the endpoint can be used.
flowchart LR
Browser["Web Browser"] -->|"1. authenticate user (e.g. OIDC)"| GW["Gateway / BFF"]
Agent["SPIRE Agent<br/>(Workload API)"] -->|"X.509-SVID + JWT-SVID"| GW
GW -->|"2. POST /ui/login_svid"| KMS["Eviden KMS"]
KMS -->|"JWKS"| OIDC["SPIRE OIDC<br/>Discovery Provider"]
KMS -->|"Set-Cookie auth_session"| GW
GW -->|"3. proxy with cookie"| KMS
sequenceDiagram
autonumber
participant Browser
participant GW as Gateway / BFF
participant OIDC as SPIRE OIDC Discovery Provider
participant KMS as Eviden KMS
Browser->>GW: GET / (no auth_session cookie)
GW->>Browser: Authenticate the end user (e.g. OIDC login)
Browser-->>GW: User authenticated
GW->>KMS: POST /ui/login_svid {"jwt_svid": "..."}
KMS->>OIDC: Fetch JWKS (cached; refreshed once on failure)
OIDC-->>KMS: Public keys
KMS->>KMS: Validate signature, issuer, expiry, audience, spiffe:// sub
KMS-->>GW: 200 {"next_step":"Authenticated"} + Set-Cookie auth_session
GW->>KMS: GET /ui/ (auth_session cookie)
KMS-->>GW: Web UI assets
GW-->>Browser: Web UI
Browser->>GW: GET /ui/whoami
GW->>KMS: Forward with cookie
KMS-->>Browser: 200 {"user_id": "spiffe://..."}
Transport (optional mTLS)
The gateway may connect to the KMS with an X.509-SVID
(clients_ca_cert_file = "/etc/kms/certs/spire-bundle.crt"). Client-certificate
authentication runs before the JWT middleware: if the presented certificate has a CN,
the request is authenticated as that CN and any JWT-SVID or session cookie is ignored. Use
CN-less client certificates, or separate listeners, if the SPIFFE session identity must win.
Server configuration
[ui_config]
enable = true
[idp_auth]
jwt_auth_provider = [
"https://<spire-oidc>:<port>,https://<spire-oidc>:<port>/keys,<kms-audience>"
]
jwt_svid_auth = true
[tls]
tls_cert_file = "/etc/kms/certs/tls.crt"
tls_key_file = "/etc/kms/certs/tls.key"
CLI (ckms) SPIFFE Authentication Architecture
Eviden KMS supports native zero-trust workload identity for the CLI (ckms) through SPIFFE (Secure Production Identity Framework For Everyone) and the SPIRE Agent Workload API.
With ckms login spire, workloads, automated pipelines, and operators running alongside a SPIRE Agent can authenticate directly against the local agent's Workload API over a Unix Domain Socket (gRPC) to acquire a SPIFFE JWT-SVID, saving it into the CLI configuration without requiring external binaries (spire-agent), long-lived API keys, or hardcoded passwords.
Prerequisites
- A KMS server started with
--jwt-svid-authand at least one--jwt-auth-provider "<issuer>,<jwks_uri>,<audience>"pointing at the SPIRE OIDC Discovery Provider. The audience is mandatory: the server refuses to start without it, and rejects SPIFFE JWT-SVIDs whoseaudis missing or empty. - A SPIRE Agent reachable from the host running
ckms, with a workload entry matching theckmsprocess. ckms login spire --audienceMUST use the audience configured on the KMS server.
Architecture Overview
flowchart LR
subgraph Host["Workload Host / Container Environment"]
CKMS["ckms CLI<br/>(ckms login spire)"]
Conf[("ckms.toml<br/>(access_token)")]
Agent["SPIRE Agent<br/>(Workload API)"]
Socket[("Unix Domain Socket<br/>/tmp/spire-agent/public/api.sock")]
end
subgraph SPIRE["SPIRE Infrastructure"]
Server["SPIRE Server<br/>(Trust Domain CA)"]
OIDC["SPIRE OIDC<br/>Discovery Provider"]
end
subgraph KMS["Eviden KMS Server"]
KMSEndpoint["KMS Server API<br/>(REST / KMIP)"]
end
CKMS -->|Workload API gRPC| Socket
Socket --> Agent
Agent <-->|Node & Workload Sync| Server
CKMS -->|Persist JWT-SVID| Conf
Conf -.->|Read Bearer Token| CKMS
CKMS -->|Authorization: Bearer JWT-SVID| KMSEndpoint
KMSEndpoint -->|JWKS Key Verification| OIDC
Detailed Sequence Flow: Workload Attestation & JWT-SVID Transport
The authentication lifecycle consists of three distinct phases: Workload API connection and local attestation, token persistence, and subsequent authenticated KMS operations.
sequenceDiagram
autonumber
participant CLI as ckms CLI
participant Conf as ckms.toml
participant Agent as SPIRE Agent (Workload API)
participant OIDC as SPIRE OIDC Discovery Provider
participant KMS as Eviden KMS Server
%% Phase 1: Local Workload Attestation & JWT-SVID Fetch
Note over CLI,Agent: Phase 1: Native Workload API Call & Peer Attestation
CLI->>Agent: Connect via SPIFFE_ENDPOINT_SOCKET (UNIX Domain Socket)
Note over CLI,Agent: Kernel verifies peer credentials (SO_PEERCRED: UID/GID/PID)
Agent->>Agent: Workload Attestor matches selectors (e.g., unix:uid)
CLI->>Agent: gRPC FetchJWTSVIDRequest(audience: [kms-audience], spiffe_id: [optional])
Agent-->>CLI: FetchJWTSVIDResponse(JWT-SVID token)
%% Phase 2: Configuration Persistence
Note over CLI,Conf: Phase 2: Configuration Storage
CLI->>Conf: Store token in http_config.access_token (clear vault_token)
CLI-->>CLI: Print success message
%% Phase 3: Authenticated KMS Operations
Note over CLI,KMS: Phase 3: Bearer-Authenticated KMS API Calls
CLI->>KMS: POST /kmip/2_1 (Authorization: Bearer <JWT-SVID>)
critical JWT-SVID Verification (jwt_auth_middleware, handle_jwt, resolve_authenticated_user)
KMS->>OIDC: Fetch JWKS public keys (cached in memory)
OIDC-->>KMS: RSA / EC verification keys
KMS->>KMS: Validate signature, issuer, expiry, non-empty audience, and subject SPIFFE ID
end
KMS-->>CLI: 200 OK (Key Created / Operation Response)
Security & Architectural Invariants
1. Pure Native Workload API Transport
- Protocol: Standard SPIFFE Workload API over gRPC on a local Unix Domain Socket (UDS).
- Socket Resolution: Taken from
--socket-pathwhen given (a bare absolute path such as/run/spire/agent.sock, or aunix:///path/tcp://host:portURI; bare paths getunix://prepended). When the flag is omitted, the standardSPIFFE_ENDPOINT_SOCKETenvironment variable is read (e.g.unix:///tmp/spire-agent/public/api.sock). - No External Binary Dependency: Implemented using the pure-Rust
spiffecrate (WorkloadApiClient). Does not shell out to thespire-agentCLI binary. - Kernel-Enforced Peer Attestation: The SPIRE Agent attests the calling
ckmsprocess using kernel peer credentials (SO_PEERCREDon Linux,LOCAL_PEERCREDon macOS/BSD). Workload entries can restrict authorization by UID, GID, path, or container metadata.
2. Application Identity & Bearer Transport
- Token Type: SPIFFE JWT-SVID conforming to the SPIFFE specification.
sub: Workload SPIFFE ID (spiffe://<trust-domain>/<path>).aud: Configured audience matching KMS server expectations.
- Client Configuration Storage:
- Saved as
http_config.access_tokeninckms.toml. - Clears any conflicting Vault tokens (
http_config.vault_token = None). - Seamlessly consumed by subsequent
ckmssubcommands (ckms sym ...,ckms rsa ...,ckms kmip ...).
- Saved as
- Server-Side Validation:
- Verified by the Actix-web
jwt_auth_middleware(handle_jwt→resolve_authenticated_user). - The token MUST carry a non-empty
aud; the server rejects SPIFFE subjects without one (SPIFFE JWT-SVID spec: validators reject SVIDs not addressed to them, preventing cross-service replay). - When
clients_ca_cert_file(mTLS) is also enabled, a client certificate with a CN is authenticated first and takes precedence over the bearer token. - Cryptographically checked against the SPIRE OIDC Discovery Provider JWKS endpoint.
- Flags: Requires
--jwt-auth-provider="<issuer>,<jwks_url>,<audience>"and--jwt-svid-auth.--jwt-svid-authis global (all providers) and the server refuses to start if any provider has no audience.
- Verified by the Actix-web
CLI Usage Reference
Command Syntax
ckms login spire --audience <AUDIENCE> [OPTIONS]
Options
| Flag | Environment Variable | Required | Description |
|---|---|---|---|
--audience | — | Yes | The expected JWT audience. Must match the audience configured in KMS --jwt-auth-provider (the third field is mandatory when --jwt-svid-auth is set). |
--spiffe-id | — | No | Specific SPIFFE ID to request if the agent serves multiple identities to this workload. |
--socket-path | — (no clap env binding) | No | Bare absolute path (/run/spire/agent.sock) or unix:///path / tcp://host:port URI of the Workload API socket. When omitted, SPIFFE_ENDPOINT_SOCKET is read from the environment. |
Example Workflow
# 1. Export the standard SPIFFE Workload API socket
export SPIFFE_ENDPOINT_SOCKET="unix:///tmp/spire-agent/public/api.sock"
# 2. Authenticate against the local SPIRE Agent
ckms login spire --audience dawn-kms
# 3. Perform cryptographic operations with the issued JWT-SVID
ckms sym keys create my-app-key
echo "Secret message" > message.txt
ckms sym encrypt --key-id my-app-key --output-file message.enc message.txt
Server Configuration Reference
In kms.toml:
[idp_auth]
jwt_auth_provider = [
"https://spire-oidc.spire.svc.cluster.local:8443,https://spire-oidc.spire.svc.cluster.local:8443/keys,dawn-kms"
]
jwt_svid_auth = true
Or via server command-line flags:
cosmian_kms_server \
--jwt-auth-provider "https://spire-oidc.spire.svc.cluster.local:8443,https://spire-oidc.spire.svc.cluster.local:8443/keys,dawn-kms" \
--jwt-svid-auth
Getting started
Eviden KMS can be installed on various platforms, including Docker, Ubuntu, Rocky Linux, macOS, and Windows.
It is prepackaged with an integrated web ui (except for macOS) that is available on the /ui path of the server.
The KMS is also available on the marketplaces of major cloud providers, prepackaged to run confidentially in an Eviden VM. Please check this page for more information.
When installed using the options below, the KMS server will be automatically configured to run using an SQLite database. If you wish to change the database configuration, please refer to the database guide.
For high availability and scalability, refer to the High Availability Guide.
Verifying release signatures
All Eviden KMS release packages (DEB, RPM, APK, DMG) are GPG-signed.
Each package is accompanied by a .asc signature file that can be used to verify its authenticity and integrity.
For Alpine .apk packages this is the only authenticity check: they are not signed with an abuild key,
so apk must be run with --allow-untrusted and cannot verify them itself.
Import the Eviden public key**
gpg --import cosmian-kms-public.asc
The key is also bundled inside DMG installers and available in the GitHub repository.
Verify a downloaded package**
gpg --verify <package>.asc <package>
For example:
# Debian package
gpg --verify cosmian-kms-server-non-fips-static-openssl_5.28.0_amd64.deb.asc \
cosmian-kms-server-non-fips-static-openssl_5.28.0_amd64.deb
# RPM package
gpg --verify cosmian-kms-server-non-fips-static-openssl_5.28.0_x86_64.rpm.asc \
cosmian-kms-server-non-fips-static-openssl_5.28.0_x86_64.rpm
# APK package (Alpine Linux)
gpg --verify cosmian-kms-server-non-fips_5.28.0-r0_x86_64.apk.asc \
cosmian-kms-server-non-fips_5.28.0-r0_x86_64.apk
# DMG package
gpg --verify cosmian-kms-server-non-fips-static-openssl-5.28.0_arm64.dmg.asc \
cosmian-kms-server-non-fips-static-openssl-5.28.0_arm64.dmg
A successful verification prints:
gpg: Good signature from "Eviden KMS Release <tech@cosmian.com>"
Installation
The KMS CLI lets you interact with the KMS from the command line. Install and configure it from KMS CLI.
Run the container as follows:
docker run -p 9998:9998 --name kms ghcr.io/cosmian/kms:latest
- The KMS UI is available at
http://localhost:9998/ui. - The KMS REST API is available on
http://localhost:9998, - The server stores its data inside the container in the
/root/cosmian-kms/sqlite-datadirectory.
A FIPS version is also available:
docker run -p 9998:9998 --name kms ghcr.io/cosmian/kms-fips:latest
To persist data between restarts, mount the /root/cosmian-kms/sqlite-data path to a filesystem
directory or a Docker volume:
docker run --rm -p 9998:9998 \
-v cosmian-kms:/root/cosmian-kms/sqlite-data \
--name kms ghcr.io/cosmian/kms:latest
A custom configuration file can be provided by mounting it in the container:
docker run --rm -p 9998:9998 \
-v cosmian-kms:/root/cosmian-kms/sqlite-data \
-v /path/to/your/kms.toml:/etc/cosmian/kms.toml \
--name kms ghcr.io/cosmian/kms:latest
Static vs Dynamic builds
- Static builds: ship with OpenSSL statically linked into the binary. Simplest to deploy; no external crypto libraries required; consistent behavior across environments.
- Dynamic builds: link OpenSSL dynamically. This allows replacing the OpenSSL shared library at runtime to use custom or system-provided crypto. On Linux, replace the relevant
.sofiles; on macOS, replace the.dylibfiles, ensuring ABI compatibility.
Available dynamic packages for Debian-based distributions:
# Non-FIPS dynamic (OpenSSL linked dynamically)
wget https://package.cosmian.com/kms/5.28.0/deb/amd64/non-fips/dynamic/cosmian-kms-server-non-fips-dynamic-openssl_5.28.0_amd64.deb
# FIPS dynamic
wget https://package.cosmian.com/kms/5.28.0/deb/amd64/fips/dynamic/cosmian-kms-server-fips-dynamic-openssl_5.28.0_amd64.deb
Available dynamic packages for Rocky Linux:
# Non-FIPS dynamic
wget https://package.cosmian.com/kms/5.28.0/rpm/amd64/non-fips/dynamic/cosmian-kms-server-non-fips-dynamic-openssl_5.28.0_x86_64.rpm
# FIPS dynamic
wget https://package.cosmian.com/kms/5.28.0/rpm/amd64/fips/dynamic/cosmian-kms-server-fips-dynamic-openssl_5.28.0_x86_64.rpm
To use custom OpenSSL with dynamic builds, install or place the desired OpenSSL
shared libraries here: /usr/local/cosmian/lib/ossl-modules.
On Windows, download the NSIS installer:
https://package.cosmian.com/kms/5.28.0/windows/x86_64/non-fips/static-openssl/cosmian-kms-server-non-fips-static-openssl_5.28.0_x86_64.exe
Run the installer to install Eviden KMS Server. The installer will:
- Install the KMS server with integrated web UI
- Set up the configuration file at
C:\Users\<username>\AppData\Local\Eviden KMS Server\kms.toml
After installation, you can run the server:
cosmian_kms --version
- The KMS UI is available at
http://localhost:9998/ui - The server uses the configuration file located at
C:\Users\<username>\AppData\Local\Eviden KMS Server\kms.toml - See the server configuration for more information
Deploying in a Cosmian Confidential VM
A KMS-ready instance based on Eviden Confidential VM can be deployed on virtual machines that supports AMD SEV-SNP or Intel TDX technologies, and is available on the marketplace of the major cloud providers.
If you are interested in the confidential computing technology and the Eviden VM, please first read the guide about how to setup an Eviden VM.
Deploy Eviden VM KMS on a cloud provider
Go the Eviden marketplace webpage of the chosen cloud provider.
Select an OS and continue until the Eviden VM KMS instance is spawned.
Here's the list of instance types by cloud provider
| Cloud provider | Azure | GCP | AWS |
|---|---|---|---|
| AMD | SNP | SNP | SNP |
| Standard_DCas_v5 | n2d-standard | M6a | |
| Standard_DCads_v5 | C6a | ||
| R6a | |||
| Intel | TDX | TDX | TDX |
| DCes_v5-series | c3-standard | Not available | |
| ECesv5-series | |||
| (preview) |
The Eviden KMS contains:
- a ready-to-go Nginx setup (listening on port
443and locally on port9998) - a ready-to-go KMS service
- the Eviden VM software stack. As reminder, Eviden VM Agent is listening
on port
5555.
Configure the KMS 📜
Default configuration
By default:
- the KMS server is locally listening on port 9998
- its database is a local Redis database with encrypted data using the scheme Findex.
- the KMS configuration file is located in the encrypted LUKS container
at
/var/lib/cosmian_vm/data/app.confand has the following content:
default_username = "admin"
[http]
port = 9998
hostname = "0.0.0.0"
[db]
database_type = "redis-findex"
database_url = "redis://0.0.0.0:6379"
redis_master_password = "master-password"
For testing purposes (connectivity, features, etc.), KMS server can also use a SQLite database by modifying the configuration file:
default_username = "admin"
[http]
port = 9998
hostname = "0.0.0.0"
The Eviden KMS configuration can potentially contain secrets
(such as this redis_master_password field), that is why
the configuration file is save in a LUKS container (default path: /var/lib/cosmian_vm/data).
To override the default
configuration, a new configuration SHOULD be sent remotely and securely via
the Eviden VM CLI following see app init.
Override the default configuration
The default configuration can be overridden remotely by using the Eviden VM CLI without any SSH connection.
It is safe to provide secrets (such as passwords) in
the configuration file because this file is going to be stored in the encrypted
folder (LUKS) of the Eviden VM KMS (which is mounted by default on /var/lib/cosmian_vm/data).
Eviden VM CLI has to be installed on the client machine (Ubuntu, RHEL or via Docker). Please follow the installation instructions.
Then proceed as follows:
cosmian_vm --url https://${EVIDEN_KMS_IP_ADDR}:5555 \
--allow-insecure-tls \
app init -c kms.toml
Processing the init of the deployed app...
The app has been configured and started
This command will send via an encrypted tunnel the configuration that will be
written in the remotely path /var/lib/cosmian_vm/data/app.conf which is
contained in an encrypted container (LUKS).
where kms.toml can be:
default_username = "admin"
[http]
port = 9998
hostname = "0.0.0.0"
[db]
database_type = "redis-findex"
database_url = "redis://<EXTERNAL_HOSTNAME_OR_IP>:6379"
redis_master_password = "master-password"
- The database type
redis-findexis a Redis database with encrypted data and encrypted indexes thanks to Cosmian Findex. - The
database_urlpoints to the Redis, typically an external managed Redis database. - The
redis_master_passwordis used to encrypt the Redis data and indexes.
Service
Systemd is used to supervise and run the KMS server and the Eviden VM agent.
As an administrator, you can see the running services with the following commands:
systemctl status cosmian_kms
systemctl status cosmian_vm_agent
You can read as well full logs using:
journalctl -u cosmian_kms
journalctl -u cosmian_vm_agent
Check the connection with the KMS
$ curl --insecure https://${EVIDEN_VM_IP_ADDR}/version
"5.28.0"
When the agent starts (see Snapshot the VM) self-signed certificate is created to enable HTTPS out of the box.
These certificates must be replaced by trusted ones using tools like
cosmian_certtool or Linux tools (certbot with Let's Encrypt for instance).
Snapshot the VM
Once the VM is configured as needed, Eviden VM Agent can do a snapshot of the VM containing fingerprint of the executables and metadata related to TEE and TPM.
The agent creates an encrypted folder (LUKS container) to store sensitive information, creates self-signed certificate for Nginx and starts a snapshot.
Wait for the agent to initialize the LUKS and generate the certificates. This is automatically at boot.
In short, to generate a snapshot, please follow.
The associated command is:
cosmian_vm --url https://${EVIDEN_VM_IP_ADDR}:5555 --allow-insecure-tls snapshot
Verify the Eviden VM KMS integrity ✅
Verifying trustworthiness of the Eviden VM KMS is exactly the same process as verifying the Eviden VM itself.
In short, to verify a snapshot, please follow.
The associated command is:
cosmian_vm --url https://${EVIDEN_VM_IP_ADDR}:5555 --allow-insecure-tls verify \
--snapshot cosmian_vm.snapshot
High-availability
This mode offers high availability through redundancy and load-balancing.
The KMS servers are stateless, so they can be scaled horizontally from a single node up to any number of nodes, simply by connecting them all to the same database and fronting them with a load balancer.

Architecture with HAProxy and Keepalived
%%{init: {"flowchart": {"curve": "linear"}}}%%
flowchart TB
%% Styling (reuses the same palette as the previous diagram version)
classDef client fill:#e1d5e7,stroke:#9673a6,stroke-width:2px,color:#000
classDef vip fill:#f8cecc,stroke:#b85450,stroke-width:2px,stroke-dasharray: 5 5,color:#000
classDef lb fill:#dae8fc,stroke:#6c8ebf,stroke-width:2px,color:#000
classDef kms fill:#d5e8d4,stroke:#82b366,stroke-width:2px,color:#000
classDef db fill:#ffe6cc,stroke:#d79b00,stroke-width:2px,color:#000
subgraph clients_group["💻 Clients (KMIP / HTTP)"]
client1["Client 1"]:::client
client2["Client 2"]:::client
clientN["Client n"]:::client
end
subgraph lb_cluster["🔀 Load balancers (HAProxy + Keepalived)"]
direction LR
vip["🌐 Virtual IP (VIP)"]:::vip
lb1["HAProxy + Keepalived<br/>LB 1 (MASTER)"]:::lb
lb2["HAProxy + Keepalived<br/>LB 2 (BACKUP)"]:::lb
end
subgraph kms_cluster["🛡️ KMS nodes"]
node1["Eviden KMS<br/>Node 1"]:::kms
node2["Eviden KMS<br/>Node 2"]:::kms
nodeN["Eviden KMS<br/>Node n"]:::kms
end
db[("🗄️ Shared database<br/>(SQL / Redis)")]:::db
client1 -->|single endpoint| vip
client2 --> vip
clientN --> vip
vip -.->|active on| lb1
vip -.->|standby on| lb2
lb1 --> node1 & node2 & nodeN
lb2 --> node1 & node2 & nodeN
node1 & node2 & nodeN --> db
All KMS clients (backup software, applications) connect exclusively to the Virtual IP (VIP). Individual KMS node IPs are never exposed to clients.
The number of KMS nodes can be adjusted at any time without reconfiguring clients: add a new node to the database and to the HAProxy backend, and it will start receiving traffic immediately.
Because the KMS nodes are stateless, the shared database is the source of truth: ensure you have regular database backups (and periodically test restores) using your database engine's recommended procedures. In-memory object caches validate lifecycle state and security-sensitive attributes against the shared database using a short bounded revalidation interval (2 seconds by default). This preserves hot-path cache performance while bounding cross-node propagation lag when keys are revoked, deactivated, or destroyed on any node.
Configuring the load balancer
Since the KMS servers are stateless, any load-balancing strategy may be selected, such as a simple round-robin.
When the Eviden KMS servers are configured to export an HTTPS port (as is the case when running inside a confidential VM):
- all the Eviden KMS servers should expose the same server certificate on their HTTPS port
- and the load balancer should be configured as an SSL load balancer (HAProxy is a good example of a high-performance SSL load balancer)
HAProxy Configuration
Use the same configuration on all HAProxy nodes — Keepalived handles which one is active.
In a typical two-node setup, HAProxy and Keepalived are installed on two dedicated load balancer nodes. Each load balancer node:
- runs HAProxy (load-balances requests to all KMS nodes)
- runs Keepalived (shares a Virtual IP between the HAProxy instances so clients have a single endpoint)
Typical configuration file path (may vary by distribution):
- HAProxy:
/etc/haproxy/haproxy.cfg
On systemd-based distributions, after updating the configuration you can restart HAProxy with:
sudo systemctl restart haproxy
Health checks use the Eviden KMS /health endpoint on the HTTP port (9998), while KMIP traffic is forwarded to
port 5696. Add or remove server lines in the backend to match your number of KMS nodes.
global
log /dev/log local0
maxconn 2000
user haproxy
group haproxy
defaults
log global
mode tcp # TCP mode: required for TLS/KMIP passthrough
option tcplog
timeout connect 5000ms
timeout client 50000ms
timeout server 50000ms
# Frontend for KMIP traffic (standard KMIP port)
frontend kmip_frontend
bind *:5696
default_backend kmip_backend
backend kmip_backend
mode tcp
balance roundrobin
# Health check via Eviden KMS /health endpoint (HTTP port 9998)
option httpchk GET /health
http-check expect status 200
# Check every 3s; mark DOWN after 3 failures, mark UP after 2 successes
default-server inter 3s fall 3 rise 2
# Add one line per KMS node.
# Traffic goes to port 5696; health is checked on port 9998.
server kms1 <kms1-ip>:5696 check port 9998
server kms2 <kms2-ip>:5696 check port 9998
# server kms3 <kms3-ip>:5696 check port 9998
# …
Keepalived Configuration
Keepalived manages the Virtual IP (VIP) across the load balancer nodes. Use the same configuration on all load balancer nodes,
adjusting only state and priority per node:
You must define a Virtual IP (VIP) that will be shared by the nodes. Keepalived ensures that only the current MASTER node responds to the VIP, so clients always connect to a single stable address.
Typical configuration file path (may vary by distribution):
- Keepalived:
/etc/keepalived/keepalived.conf
On systemd-based distributions, after updating the configuration you can restart Keepalived with:
sudo systemctl restart keepalived
| Load balancer node | state | priority |
|---|---|---|
| Primary | MASTER | highest value (e.g. 101) |
| Secondary | BACKUP | lower value (e.g. 100) |
| Additional | BACKUP | lower still (e.g. 99, 98, …) |
vrrp_script chk_haproxy {
script "killall -0 haproxy" # Checks that the HAProxy process is running
interval 2
weight 2
}
vrrp_instance VI_1 {
state MASTER # → BACKUP on all non-primary nodes
interface eth0 # Adapt to your network interface name
virtual_router_id 51 # Must be identical on all load balancer nodes
priority 101 # → Decrease by 1 for each additional node
advert_int 1
authentication {
auth_type PASS
auth_pass SecretPassword # Strong shared secret; must be identical on all nodes
}
virtual_ipaddress {
192.168.1.100 # VIP — configure this address in all KMS clients
}
track_script {
chk_haproxy
}
}
Failover behavior
| Event | Result |
|---|---|
| Active HAProxy node goes down | Keepalived promotes the next highest-priority HAProxy; VIP moves within ~2s |
| A KMS node goes down | HAProxy detects failure via /health within inter × fall ≈ 9s and stops routing to it; remaining nodes absorb the traffic |
| A KMS node recovers | HAProxy re-adds it after 2 successful checks (~6s) |
| A new KMS node is added | Add a server line to the HAProxy backend and reload HAProxy; no client reconfiguration needed |
Deployment options
You can run a single HAProxy instance (similar to using Nginx as a reverse-proxy/load balancer) in front of the KMS nodes. This provides load balancing but introduces a single point of failure (SPOF): if that HAProxy server goes down, clients cannot reach the KMS.
Using Keepalived (with at least two HAProxy instances) avoids the SPOF by providing a floating VIP.
If audit logging is enabled (--audit-enable), each KMS node must write to its own
audit file, not a shared/network volume. The file backend uses a local lock to serialize
writes; it only prevents corruption on a single node (e.g. during a rolling restart), not
across nodes. Pointing several replicas at the same audit file means only one of them will
ever actually write to it — the others sit idle, so you silently lose their events.
A centrally consolidated, multi-writer-safe audit trail requires the
PostgreSQL audit backend instead.
TOML configuration file
The KMS server can be configured using a TOML file. When a configuration file is provided,
the command line arguments are ignored (except --help / --version).
Interactive configuration wizard
The fastest way to create a valid configuration file is the built-in interactive wizard:
cosmian_kms configure
The wizard guides you step-by-step through all configuration sections:
| Step | Section | What it covers |
|---|---|---|
| 1/9 | Database | Type (SQLite / PostgreSQL / MySQL / Redis-Findex), URL, paths, cache settings |
| 2/9 | HTTP server | Listening port and hostname |
| 3/9 | TLS / Certificates | Enable TLS; optionally generates a self-signed PKI (CA → server + client certs) |
| 4/9 | KMIP socket server | Enable the binary KMIP socket listener (port 5696) |
| 5/9 | Authentication | API token, JWT/OIDC providers, mTLS client certificates |
| 6/9 | HSM | Model, admin user, slot numbers and passwords |
| 7/9 | Logging | Log level, OTLP endpoint, syslog, rolling logs |
| 8/9 | Proxy | Outbound proxy for JWKS fetch (URL, auth, exclusions) |
| 9/9 | Advanced | Workspace paths, KEK, MS DKE, KMIP policy, Google CSE, Azure EKM, AWS XKS, Web UI |
At the end the wizard writes the resulting TOML file to the default system path
(/etc/cosmian/kms.toml on Linux/macOS, C:\ProgramData\Cosmian\kms.toml on Windows)
and prints the command to start the server:
Start the server with:
cosmian_kms -c /etc/cosmian/kms.toml
Self-signed PKI generation
When TLS is enabled and you choose to generate certificates, the wizard creates a
complete PKI under the chosen output directory (default /etc/cosmian/):
| File | Description |
|---|---|
ca.crt | Self-signed CA certificate (RSA-4096, valid 10 years by default) |
server.crt | Server leaf certificate signed by the CA (RSA-2048) |
server.key | Server private key (PKCS#8 PEM) |
client.crt | Client leaf certificate signed by the CA — distribute to mTLS clients |
client.key | Client private key (PKCS#8 PEM) |
Distribute client.crt and client.key to any client that must authenticate
with mutual TLS. You can verify the chain at any time with:
openssl verify -CAfile /etc/cosmian/ca.crt /etc/cosmian/server.crt
openssl verify -CAfile /etc/cosmian/ca.crt /etc/cosmian/client.crt
Manual configuration
Configuration file loading precedence:
- Command line flag
-c/--config <FILE>(highest precedence). If the file does not exist, the server exits with an error. - Environment variable
COSMIAN_KMS_CONF(must point to an existing file). - Default system path:
/etc/cosmian/kms.toml(Linux/macOS) orC:\\ProgramData\\Cosmian\\kms.toml(Windows). - If none of the above files is found, the server falls back to parsing the command line arguments and environment variables.
Important: If a configuration file is found via the default system path (rule 3) and extra command-line arguments are also provided, the server exits with an error. This prevents silently ignoring arguments the user intended to take effect. To use a different configuration, point explicitly to it with
-c/--config <FILE>. Examples:
# Explicit configuration file
./cosmian-kms -c ./test_data/configs/server/auth/jwt.toml
# Using an environment variable
export COSMIAN_KMS_CONF=./test_data/configs/server/auth/jwt.toml
./cosmian-kms
The file should be a TOML file with the following structure:
# The default username to use when no authentication method is provided
default_username = "admin"
# When an authentication method is provided, perform the authentication
# but always use the default username instead of the one provided by the authentication method
force_default_username = false
# This setting enables the Microsoft Double Key Encryption service feature of this server.
#
# It should contain the external URL of this server as configured in Azure App Registrations
# as the DKE Service (<https://learn.microsoft.com/en-us/purview/double-key-encryption-setup#register-your-key-store>)
#
# The URL should be something like <https://cse.my_domain.com/ms_dke>
# ms_dke_service_url = "<ms dke service url>"
# The exposed URL of the KMS - this is required if Google CSE configuration is activated.
# If this server is running on the domain `cse.my_domain.com` with this public URL,
# The configured URL from Google admin should be something like <https://cse.my_domain.com/google_cse>
# The URL is also used during the authentication flow initiated from the KMS UI.
# kms_public_url = "kms-public-url"
# Print the server configuration information and exit
info = false
# The HSM model.
# `Thales Luna SA`, `Trustway Proteccio`, `Trustway Crypt2pay`, `Utimaco General Purpose HSM`,
# `Smartcard HSM`, `AWS CloudHSM`, `SoftHSM2`, and `Kryoptic` are natively supported.
# Other HSMs are supported too; specify `other` and check the documentation
# hsm_model = "softhsm2" # luna | softhsm2 | utimaco | proteccio | crypt2pay | smartcardhsm | aws_cloudhsm | gcp_cloud_hsm | kryoptic | other
# List of KMS usernames that are granted HSM admin privileges.
# HSM admins can create, destroy, and potentially export objects on the HSM.
# Use "*" as the only entry to grant all authenticated users admin access.
# Repeat the option or use a comma-separated list to specify multiple admins:
# `--hsm-admin alice@example.com --hsm-admin bob@example.com`
# or set `KMS_HSM_ADMIN=alice@example.com,bob@example.com`
# hsm_admin = ["admin"] # KMS users with admin rights on this HSM
# HSM slot number. The slots used must be listed.
# Repeat this option to specify multiple slots
# while specifying a password for each slot (or an empty string for no password)
# e.g.
# ```sh
# --hsm-slot 1 --hsm-password password1 \
# --hsm-slot 2 --hsm-password password2
# ```
# hsm_slot = [0] # PKCS#11 slot indices
# Password for the user logging in to the HSM Slot specified with `--hsm_slot`
# Provide an empty string for no password
# see `--hsm_slot` for more information.
# Set `KMS_HSM_PASSWORD` to avoid the password appearing in `ps` output.
# hsm_password = ["changeme"] # Login passwords (same order as hsm_slot)
#
# ── New multi-instance format ─────────────────────────────────────────────────
# Uses the new UID convention: hsm::<model>::<slot_id>::<key_id>
# To connect HSMs, declare one [[hsm_instances]] section per device.
# `Thales Luna SA`, `Trustway Proteccio`, `Trustway Crypt2pay`, `Utimaco General Purpose HSM`,
# `Smartcard HSM`, `SoftHSM2`, and `Kryoptic` are natively supported.
# Other HSMs are supported too; specify `other` and check the documentation.
#
# The first entry gets the routing prefix "hsm::<model>", the second
# "hsm::<model>_1", etc. Object UIDs take the form "<prefix>::<slot>::<key-id>".
#
## [[hsm_instances]]
## hsm_model = "softhsm2" # luna | softhsm2 | utimaco | proteccio | crypt2pay | smartcardhsm | aws_cloudhsm | gcp_cloud_hsm | kryoptic | other
## hsm_admin = ["tech@example.com"] # KMS users with admin rights on this HSM
## hsm_slot = [0] # PKCS#11 slot indices (use softhsm2-util --show-slots to list them)
## hsm_password = ["changeme"] # Login passwords (same order as hsm_slot)
#
## [[hsm_instances]]
## hsm_model = "utimaco"
## hsm_admin = ["tech@example.com"]
## hsm_slot = [0, 1]
## hsm_password = ["slot0pass", "slot1pass"]
# Force all newly created and imported keys to be wrapped by the key specified in this field.
# This is most useful to ensure that an HSM key wraps all keys in the KMS database.
# Note: This setting is ignored when a key is imported in JSON TTLV format and is already wrapped.
# key_encryption_key = "kek ID"
# Specifies which KMIP object types should be automatically unwrapped when retrieved.
# Repeat this option to specify multiple object types
# e.g.
# ```sh
# --default-unwrap-type SecretData \
# --default-unwrap-type SymmetricKey
# ```
# default_unwrap_type = ["SecretData", "SymmetricKey"]
# **Deprecated** — use `--crypto-officer-users` (under `[roles]`) instead.
#
# List of users who have the right to create and import objects and grant
# the `Create` access right to other users. Kept for backward compatibility;
# if set and `[roles] crypto_officer_users` is not configured, these users
# are promoted to the `CryptoOfficer` role automatically on startup.
# privileged_users = ["<user_id_1>", "<user_id_2>"]
# Interval in seconds between background refreshes of the `kms.objects.total`
# and `kms.keys.active.count` metrics. Each refresh runs a full COUNT over the
# objects table, which is expensive on very large databases.
# Set to 0 to disable both the startup seed and the periodic refresh.
# Default: 30.
# metrics_count_interval_secs = 30
# Check the database configuration documentation pages for more information
[db]
# The main database of the KMS server that holds default cryptographic objects and permissions.
# - postgresql: `PostgreSQL`. The database URL must be provided
# - mysql: `MySql` or `MariaDB`. The database URL must be provided
# - sqlite: `SQLite`. The data will be stored at the `sqlite_path` directory
# A key must be supplied on every call
# - redis-findex [non-FIPS]: a Redis database with encrypted data and indexes thanks to Findex.
# The Redis URL must be provided, as well as the redis-master-password and the redis-findex-label
database_type = "sqlite"
# The URL of the database for `Postgres`, `MySQL`, or `Findex-Redis`
# database_url = "<database-url>"
# The directory path of the `SQLite`
# sqlite_path = "<sqlite-path>"
# redis-findex: a master password used to encrypt the Redis data and indexes
# redis_master_password = "<redis master password>"
# Clear the database on start.
# WARNING: This will delete ALL the data in the database
clear_database = false
# When a wrapped object is fetched from the database,
# it is unwrapped and stored in the unwrapped cache.
# This option specifies the maximum age in minutes of the unwrapped objects in the cache
# after its last use.
# The default is 15 minutes.
# About 2/3 of the objects will be evicted after this time; the other 1/3 will be evicted
# after a maximum of 150% of the time.
unwrapped_cache_max_age = 15 # minutes
# TLS configuration of the Socket server and HTTP server
[tls]
# The server's X.509 certificate in PEM format.
# Provide a PEM containing the server leaf certificate,
# optionally followed by intermediate certificates (full chain). When provided along with
# `--tls-key-file`, the servers will start in TLS mode.
# Do not use in combination with `--tls-p12-file`.
# tls_cert_file = "path/to/server.crt"
# The server's private key in PEM format (PKCS#8 or traditional format).
# Must correspond to the certificate in `--tls-cert-file`.
# Do not use in combination with `--tls-p12-file`.
# tls_key_file = "path/to/server.key"
# Optional certificate chain in PEM format (intermediate CAs).
# If not provided, the chain may be appended to `--tls-cert-file` instead.
# Do not use in combination with `--tls-p12-file`.
# tls_chain_file = "path/to/chain.pem"
# The KMS server optional PKCS#12 Certificates and Key file as an alternative
# to providing the key, certificate and chain in PEM format.
# When provided, the Socket and HTTP server will start in TLS Mode.
# tls_p12_file = "[tls p12 file]"
# The password to open the PKCS#12 Certificates and Key file
# tls_p12_password = "[tls p12 password]"
# The server's optional X. 509 certificate in PEM format validates the client certificate presented for authentication.
# If provided, clients must present a certificate signed by this authority for authentication.
# Mandatory to start the socket server.
# clients_ca_cert_file = "[authority cert file]"
# The socket server listens to KMIP binary requests on the IANA-registered 4696 port.
# The socket server will only start if the TLS configuration is provided **and** client certificate authentication
# is enabled.
[socket_server]
# Start the KMIP socket server? If this is set to true, the TLS config must be provided, featuring a server PKCS#12 file and a client certificate authority certificate file
# socket_server_start = false
# The KMS socket server port
# socket_server_port = 5696
# The KMS socket server hostname
# socket_server_hostname = "0.0.0.0"
# The HTTP server listens to KMIP requests on the /kmip and /kmip/2_1 endpoints.
# It also serves the web UI on the /ui endpoint.
# If the TLS configuration is provided, the server will start in HTTPS mode.
[http]
# The KMS HTTP server port
port = 9998
# The KMS HTTP server hostname
hostname = "0.0.0.0"
# An optional API token to use for authentication on the HTTP server.
# api_token_id = "<secret-api-token>"
# Maximum number of requests per second per IP address allowed by the rate limiter.
# When set, the server enforces this limit to mitigate `DoS` and brute-force attacks.
# Requests exceeding the limit receive HTTP 429 Too Many Requests.
# Leave unset (default) to disable rate limiting.
# rate_limit_per_second = 100
# Number of actix-web HTTP worker threads.
# Defaults to the number of logical CPUs. On I/O-heavy workloads (e.g. `PostgreSQL` backend)
# setting this to `2 * <number of CPU cores>` improves throughput by keeping more Tokio
# threads busy while others are waiting on network I/O.
# Can also be set via the `TOKIO_WORKER_THREADS` environment variable (Tokio runtime),
# but this flag controls only the actix-web application workers.
# http_workers = 8
# Comma-separated list of origins allowed to make cross-origin requests to the KMIP API.
# Required for any Web UI deployment: the browser Fetch API sends an `Origin` header on
# every POST request — even when the page is served by the KMS itself — and actix-cors
# rejects it unless the exact origin appears in this list.
# The value must match byte-for-byte what the user types in the browser address bar
# (scheme + hostname + port). The server bind address (`0.0.0.0`) and the server IP
# are not equivalent to a DNS hostname. The Docker image pre-populates loopback
# addresses; add any custom hostname explicitly. Example: `http://kms.example.com:9998`.
# cors_allowed_origins = ["http://localhost:9998", "http://127.0.0.1:9998"]
# If using a forward proxy for outbound JWKS requests,
# set the proxy parameters here.
[proxy]
# The proxy URL:
# - e.g., `https://secure.example` for an HTTP proxy
# - e.g., `socks5://192.168.1.1:9000` for a SOCKS proxy
# proxy_url = "https://proxy.example.com:8080"
# Set the Proxy-Authorization header username using Basic auth.
# proxy_basic_auth_username = "[proxy username]"
# Set the Proxy-Authorization header password using Basic auth.
# proxy_basic_auth_password = "[proxy password]"
# Set the Proxy-Authorization header to a specified value.
# proxy_custom_auth_header = "my_custom_auth_token"
# The No Proxy exclusion list to this Proxy
# proxy_exclusion_list = ["domain1", "domain2"]
# Check the Authenticating Users documentation pages for more information.
[idp_auth]
# JWT authentication provider configuration.
#
# The expected argument is --jwt-auth-provider="`PROVIDER_CONFIG_1`" --jwt-auth-provider="`PROVIDER_CONFIG_2`" ...
# where each `PROVIDER_CONFIG_N` defines one identity provider configuration.
#
# Each provider configuration `PROVIDER_CONFIG_N` should be in the format: "`JWT_ISSUER_URI,JWKS_URI,JWT_AUDIENCE_1,JWT_AUDIENCE_2,...`"
# where:
# - `JWT_ISSUER_URI`: The issuer URI of the JWT token (required)
# - `JWKS_URI`: The JWKS (JSON Web Key Set) URI (optional, defaults to <JWT_ISSUER_URI>/.well-known/jwks.json)
# - `JWT_AUDIENCE_1..N`: One or more audience values for the JWT token (optional)
#
# Examples:
# --jwt-auth-provider="https://accounts.google.com,https://www.googleapis.com/oauth2/v3/certs, kacls-migration, another-audience"
# --jwt-auth-provider="https://login.microsoftonline.com/612da4de-35c0-42de-ba56-174b69062c96/v2.0,https://login.microsoftonline.com/612da4de-35c0-42de-ba56-174b69062c96/discovery/v2.0/keys"
# --jwt-auth-provider="https://<your-tenant>.<region>.auth0.com/""
# This argument can be repeated to configure multiple identity providers.
# jwt_auth_provider = [
# "https://accounts.google.com,https://www.googleapis.com/oauth2/v3/certs,my-audience,another_client_id",
# "https://auth0.example.com,,my-app",
# "https://keycloak.example.com/auth/realms/myrealm,,"
# ]
# Accept SPIFFE JWT-SVIDs from the configured `--jwt-auth-provider` issuers.
#
# A SPIFFE JWT-SVID carries no `email` claim, only a `sub` claim shaped as `spiffe://<trust-domain>/<workload-path>`. When this flag is enabled, a JWT that validates successfully (signature, issuer, audience, expiry) against a configured issuer but has no `email` claim is authenticated using its `sub` claim **only if** `sub` starts with `spiffe://`; every other JWT still requires `email` as before.
#
# The flag is global: it applies to every `--jwt-auth-provider`. Every provider MUST specify an audience (`issuer,jwks_uri,audience`), and the SVID MUST carry a matching `aud` claim; otherwise the server refuses to start, since an SVID minted for another service could be replayed against the KMS.
#
# Disabled by default: enabling it only makes sense when the configured issuer(s) are a SPIFFE-aware JWKS source (e.g. a SPIRE OIDC Discovery Provider).
# jwt_svid_auth = false
[workspace]
# The root folder where the KMS will store its data A relative path is taken relative to the user's HOME directory
# root_data_path = "./cosmian-kms"
# The folder to store temporary data (non-persistent data readable by no one but the current instance during the current execution)
# tmp_path = "/tmp"
# Check the logging documentation pages for more information
[logging]
# An alternative to setting the `RUST_LOG` environment variable.
# Setting this variable will override the `RUST_LOG` environment variable
rust_log = "info,cosmian_kms=info"
# The OTLP collector URL for gRPC
# (for instance, <https://localhost:4317>)
# If not set, the telemetry system will not be initialized.
# Must use https:// in production.
# Use --otlp-allow-insecure to permit plaintext http:// connections.
# otlp = "http://localhost:4317"
# Do not log to stdout
quiet = false
# Log to syslog
log_to_syslog = false
# The directory for daily rolling logs: <rolling_log_name>.YYYY-MM-DD.
# File logging is disabled unless this option is explicitly set.
# Suggested paths:
# Linux: /var/log/
# Windows: C:\Users\<username>\AppData\Local\Cosmian KMS Server
# macOS: ~/Library/Logs/
#
# WARNING: Windows environment variables (e.g. %LOCALAPPDATA%) are NOT
# expanded. Use the fully-resolved path.
# rolling_log_dir = "/var/log/"
# The name of the rolling log file: <rolling_log_name>.YYYY-MM-DD.
# Defaults to `cosmian_kms` if not set.
# rolling_log_name = "cosmian_kms"
# Enable metering in addition to tracing when telemetry is enabled
# enable_metering = false
# The name of the environment (development, test, production, etc.)
# This will be added to the telemetry data if telemetry is enabled
# environment = "development"
# Enable ANSI colors in the logs to stdout
ansi_colors = false
# Generic configuration to edit the path to static UI application files
# To use the Web UI, ensure the `kms_public_url` is set to the correct public URL above.
[ui_config]
# The UI distribution folder
# ui_index_html_folder = "/usr/local/cosmian/ui/dist"
# Configuration for the handling of authentication with OIDC from the KMS UI.
# This is used to authenticate users when they access the KMS UI.
# The same Identity Provider must **also** be configured in the [idp_auth] section above.
[ui_config.ui_oidc_auth]
# The client ID of the configured OIDC tenant for UI Auth
# ui_oidc_client_id = "<client id>"
# The client secret of the configured OIDC tenant for UI Auth
# ui_oidc_client_secret = "<client secret>" (optional)
# The issuer URI of the configured OIDC tenant for UI Auth
# ui_oidc_issuer_url = "<issuer-url>"
# The logout URI of the configured OIDC tenant for UI Auth
# ui_oidc_logout_url = "<logout-url>"
[google_cse_config]
# This setting turns on endpoints handling Google CSE feature
google_cse_enable = false
# This setting turns off the validation of the tokens used by this server's Google Workspace CSE feature
# google_cse_disable_tokens_validation = false
# This setting contains the list of KACLS server URLs that can access this server for Google CSE migration, through the privilegedunwrap endpoint (used to fetch exposed jwks on server start)
# google_cse_incoming_url_whitelist = ["[kacls_url_1]", "[kacls_url_2]"]
# PEM PKCS8 RSA private key used to ensure consistency of certificate handling and privileged unwrap operations across server restarts and multiple server instances. If not provided, a random key will be generated at server startup
# google_cse_migration_key = "<google_cse_existing_migration_key>"
[azure_ekm_config]
# This setting turns on/off the endpoints handling Azure EKM features
azure_ekm_enable = false
[aws_xks_config]
# This setting turns on endpoints handling the AWS XKS feature
aws_xks_enable = false
[kmip.allowlists]
[notifications.smtp]
# The KMS HTTP server port
port = 0
[jwks_endpoint]
# Enable the `GET /.well-known/jwks.json` endpoint.
#
# When set, the server publicly exposes all active public keys whose
# `CryptographicUsageMask` includes `Verify` as a RFC 7517 JSON Web Key Set.
# The endpoint is **unauthenticated** — no credentials are required to fetch it,
# and no authentication middleware is applied. Defaults to `false`.
jwks_endpoint_enabled = false
# Maximum number of public keys returned in a single JWKS response.
#
# When the server holds more eligible keys than this limit, the response is
# truncated and an `X-JWKS-Truncated: true` header is added to signal consumers.
# Increase this value if your deployment performs frequent key rotation and all
# overlapping verification keys must be simultaneously discoverable.
jwks_endpoint_max_keys = 50
# Automatically tag key pairs created via the REST crypto API for JWKS inclusion.
#
# When `true` (the default), every key pair created via `POST /v1/crypto/keys`
# receives the `"jwks"` tag and immediately appears in
# `GET /.well-known/jwks.json`.
#
# Set to `false` to disable this behaviour globally. Operators must then
# manually tag each public key via `POST /v1/crypto/keys/{kid}/tags` before
# it is published in the JWKS document.
#
# This setting has no effect on keys created directly through the KMIP protocol.
jwks_endpoint_auto_tag = true
[auth_verifier]
# Accept invalid or self-signed TLS certificates when fetching the JWKS.
#
# **Development and testing only.** Never set this in production.
auth_verifier_accept_invalid_certs = false
[vault]
# Enable the Vault-compatible `/v1/transit/` and `/v1/<vault_pki_mount>/` scopes.
#
# Defaults to `false`. Set to `true` to enable the Vault-compatible API. Requires `vault_auth_verifier_url` to be set.
vault_api_enabled = false
# Skip TLS certificate verification when calling the auth-verifier.
#
# **Security warning**: only set this to `true` in test or development environments. In production, use `vault_auth_verifier_ca_cert` to provide the correct CA certificate. Defaults to `false`.
vault_auth_verifier_accept_invalid_certs = false
# Vault transit mount name used by the `/v1/<mount>/keys/…` routes.
#
# Transit keys are served at `/v1/<vault_transit_mount>/keys/<name>`.
# Defaults to `"transit"`.
vault_transit_mount = ""
# Vault PKI mount name used by the `/v1/<mount>/root/sign-intermediate` route.
#
# Defaults to `"pki"`.
vault_pki_mount = ""
# KMIP label of the KMS key used as the intermediate CA signing key for the PKI engine.
#
# The key must already exist in the KMS (create with `ckms ec keys create --tag <label>`).
# Defaults to `"vault_pki_ca"`.
vault_pki_ca_key_label = ""
# Lifetime of vault token validation cache entries in seconds.
#
# Successful `lookup-self` responses from the auth-verifier are cached
# for this duration to reduce round-trips on every transit/PKI request.
# Set to `0` to disable caching. Defaults to `30`.
vault_token_cache_ttl_secs = 0
[roles]
# Require a split-key ceremony to activate the Crypto Officer role.
#
# When `true`, users listed in `crypto_officer_users` are candidates only —
# the role is inactive until a KMIP `JoinSplitKey` with all shares tagged
# `x-cosmian-crypto-officer-ceremony` completes.
crypto_officer_require_ceremony = false
# Users with the Crypto Officer role.
#
# May manage key lifecycle (create, import, certify, rekey, activate, revoke, destroy)
# and access raw key material.
# When active, gains ownership bypass on all Managed Objects.
# When set, only listed users (plus those explicitly granted the `Create` right) can
# create and import objects.
# crypto_officer_users = ["alice@example.com", "bob@example.com"]
# Hex-encoded 32-byte secret for ceremony record encryption.
#
# Required when any role has `require_ceremony = true`.
# All ceremony activation records are AES-256-GCM encrypted with keys
# derived from this secret, preventing forgery via direct database writes
# and protecting participant identities at rest.
#
# Generate with: `openssl rand -hex 32`
# ceremony_secret = ""
# UID of a KMS symmetric key to use as the ceremony record sealing key.
#
# When set, key material is fetched from the KMS object store after database
# initialization and used in place of `ceremony_secret`. This enables:
# - Key rotation via standard KMIP `ReKey` / `Rotate` operations.
# - HSM-backed sealing when the referenced key is HSM-resident.
# - Audit trail: each retrieval of the ceremony key is logged.
#
# If both `ceremony_secret` and `ceremony_key_id` are set, `ceremony_key_id` takes precedence.
#
# **Bootstrap constraint**: the ceremony sealing key must be created before
# enabling `crypto_officer_require_ceremony = true`. Create it while the server
# is in config-only CO mode (no ceremony required), then enable ceremony mode:
#
# ```bash
# # 1. Start server with require_ceremony = false
# # 2. Create the sealing key:
# ckms sym keys create --id ceremony-seal-2026 --number-of-bits 256
# # 3. Set ceremony_key_id = "ceremony-seal-2026" in kms.toml
# # 4. Enable require_ceremony = true and restart
# ```
# ceremony_key_id = ""
# UID of a KMS symmetric key to use for AES-KW (RFC 5649) wrapping of split-key shares.
#
# When set, `CreateSplitKey` encrypts each share's raw bytes with this key (AES-128/192/256-KWP)
# before storing in the database. `JoinSplitKey` automatically detects the
# `x-cosmian-share-wrapping-key` vendor attribute on each share and unwraps the bytes before
# XOR reconstruction.
#
# The wrapping key must already exist in the KMS object store and must be an AES symmetric key.
# When the KMS is HSM-backed, this key can be HSM-resident, providing hardware boundary
# protection equivalent to purpose-built HSM split-key solutions.
#
# Generate a suitable key before enabling ceremony mode:
# ```bash
# ckms sym keys create --id ceremony-wrap-2026 --number-of-bits 256
# ```
#
# Rotate by creating a new key, updating this value, and re-running the ceremony
# (existing wrapped shares require the original key; re-ceremony is mandatory on rotation).
# ceremony_wrapping_key_id = "ceremony-wrap-key"
[crl]
# Default CRL validity period in days for CA certificates managed by this server.
#
# When a CRL is generated without an explicit validity override (e.g., via
# `GET /certificates/{id}/crl?validity_days=N`), this value is used.
#
# This value is in whole days (minimum 1 day / 24 h); enterprise PKIs commonly
# use 7–28 days. Avoid the practical minimum of 1 day unless
# `crl_refresh_overlap_hours` is also lowered below 24: a 1-day CRL satisfies
# the default 24-hour refresh-overlap condition immediately after creation,
# causing the hourly scheduler to continuously re-sign it.
#
# Valid range: 1–365 when set via the CLI flag.
# Default: 7.
#
# This range is enforced by clap's argument parser only; it is not
# currently re-validated when the value comes from a TOML config file, so
# a value outside 1–365 in `kms.toml` is silently accepted.
crl_default_validity_days = 7
# How often (in hours) the background CRL refresh scheduler wakes up to
# check whether any stored CRL needs to be regenerated.
#
# Set to 0 to disable the background scheduler entirely.
# When disabled, CRLs are only refreshed on certificate revocation events.
#
# The scheduler is only spawned when `kms_public_url` is ALSO configured
# (the CDP endpoint must be active); with `kms_public_url` unset, this
# setting has no effect and CRLs are only refreshed on revocation events,
# which can allow an expired CRL to be served in the meantime.
#
# Default: 1 (wake up hourly).
crl_refresh_check_hours = 1
# CRL overlap window in hours.
#
# The background scheduler regenerates a CRL when its `nextUpdate` timestamp
# is within this many hours of the current time. This prevents relying parties
# from seeing an expired CRL during the window between expiry and the next
# revocation-triggered regeneration.
#
# Analogy: EJBCA "CRL Overlap Time" (default 10 % of validity); AWS PCA uses
# a 1-day overlap by default.
#
# Default: 24 (regenerate 24 hours before expiry).
crl_refresh_overlap_hours = 24
[ocsp]
# Enable the OCSP responder endpoint at `GET /ocsp/{encoded_request}` and `POST /ocsp/`.
#
# When `false` (default) all `/ocsp/` routes return 404.
ocsp_enabled = false
# OCSP response validity period in seconds (`thisUpdate` → `nextUpdate`).
#
# Determines how long a signed response may be cached by relying parties and
# CDN/proxy intermediaries per RFC 5019 §5. Shorter values increase freshness;
# longer values reduce load on the KMS (and HSM) signing key.
#
# Default: 86400 (24 hours).
ocsp_cache_ttl_secs = 86400
# Nonce handling policy for OCSP responses (RFC 9654 §2.1).
#
# - `optional` (default): echo the nonce if present, proceed without one if absent.
# - `required`: reject requests that carry no nonce (returns `malformedRequest`).
# - `ignore`: never include a nonce in responses (suitable for pre-produced/cached responses).
#
# Per RFC 9654 §2.1, the responder MUST accept nonces of 16–128 octets and echo
# them verbatim. Nonces shorter than 16 octets are silently ignored.
ocsp_nonce_policy = "optional"
# Include the signing certificate in OCSP `BasicResponse`s.
#
# Only the signer certificate itself is embedded — not its issuing chain.
# Set to `true` (default) when `ocsp_responder_cert_uid` is configured so that
# clients can verify the delegated responder's own certificate without an
# additional fetch; delegated responders whose signer chain includes
# intermediates the client does not already trust must distribute those
# intermediates out of band. Safe to set `false` when the CA signs responses
# directly.
#
# This is a bare CLI switch: passing `--ocsp-include-cert-chain` only ever
# sets it to `true` (already the default). To set it to `false`, use the
# `ocsp_include_cert_chain = false` key in the TOML config file instead.
ocsp_include_cert_chain = true
# Archive-cutoff extension value in seconds (RFC 6960 §4.4.4).
#
# When non-zero, the `id-pkix-ocsp-archive-cutoff` extension is added to each
# `BasicResponse` with value = now − `ocsp_archive_cutoff_secs`. This tells clients
# how far back the responder maintains revocation records.
#
# Set to 0 (default) to disable the extension.
# Typical values: 365 days = 31536000.
ocsp_archive_cutoff_secs = 0
[est]
# Enable the EST endpoints under `/.well-known/est/`.
#
# When `false` (default) all `/.well-known/est/` routes return 404.
est_enabled = false
# UID of the CA certificate object in the KMS that signs EST-enrolled certificates.
#
# The CA private key must be linked to this certificate. Must be set when
# `est_enabled = true`. Certificates are issued as the reserved `[enrollment-service]`
# identity: the CA owner must grant it `certify` on this certificate and on its private
# key (plus `create` when `crypto_officer_users` is set). Issued certificates are owned by
# the CA owner.
# est_ca_uid = "..."
# Require TLS client-certificate authentication for `/simpleenroll` (RFC 7030 §3.3.2).
#
# When `true` (default) initial enrollment is only accepted over mutual TLS.
# When `false`, HTTP Basic authentication (RFC 7030 §3.2.3) with
# `est_bootstrap_username` / `est_bootstrap_password` is accepted as a fallback for
# devices that have no certificate yet. `/simplereenroll` always requires a client
# certificate (RFC 7030 §4.2.2).
est_require_client_cert = true
# Username accepted for HTTP Basic bootstrap authentication on `/simpleenroll`.
# est_bootstrap_username = "..."
# Password accepted for HTTP Basic bootstrap authentication on `/simpleenroll`.
#
# At least 8 characters. Prefer the `KMS_EST_BOOTSTRAP_PASSWORD` environment variable (or
# the configuration file) to the command line, where it is visible in the process list.
# est_bootstrap_password = "..."
# Name of the `[templates.<name>]` section whose issuance policy (key type and size,
# EKU, Subject/SAN patterns, validity) is enforced on EST enrollments.
#
# Required when `est_enabled = true`. The template must set `subject_cn_regex` (or
# `allow_any_identity = true`): the enrollment secret authenticates a class of devices,
# not the name a device asks for.
# est_template = "iot_device"
[scep]
# Enable the SCEP endpoint at `/scep`.
#
# When `false` (default) the `/scep` route returns 404.
scep_enabled = false
# UID of the CA certificate object in the KMS that signs SCEP-enrolled certificates.
#
# SCEP encrypts requests to the CA public key, so this MUST be an RSA CA whose private
# key is linked to the certificate. Must be set when `scep_enabled = true`.
# Certificates are issued as the reserved `[enrollment-service]` identity: the CA owner
# must grant it `certify` on this certificate and on its private key (plus `create` when
# `crypto_officer_users` is set). Issued certificates are owned by the CA owner.
# scep_ca_uid = "..."
# Shared secret a device must put in the PKCS#10 `challengePassword` attribute for an
# initial enrollment (`PKCSReq`). Must be set when `scep_enabled = true`.
#
# At least 8 characters. Prefer the `KMS_SCEP_CHALLENGE_PASSWORD` environment variable (or
# the configuration file) to the command line, where it is visible in the process list.
# scep_challenge_password = "..."
# Accept `RenewalReq` messages signed with a still-valid certificate issued by the SCEP
# CA without requiring the challenge password (RFC 8894 §2.3, §2.4).
#
# When `false`, renewal requests are rejected with `badRequest`.
scep_allow_renewal_without_challenge = true
# Name of the `[templates.<name>]` section whose issuance policy (key type and size,
# EKU, Subject/SAN patterns, validity) is enforced on SCEP enrollments.
#
# Required when `scep_enabled = true`. The template must set `subject_cn_regex` (or
# `allow_any_identity = true`): the enrollment secret authenticates a class of devices,
# not the name a device asks for.
# scep_template = "iot_device"
# Certificate templates for EST / SCEP enrollment. Regular expressions are anchored.
# [templates.iot_device]
# name = "iot_device"
# min_rsa_key_bits = 2048
# allowed_ec_curves = ["prime256v1"]
# allowed_ekus = ["clientAuth"]
# max_validity_days = 365
# default_validity_days = 90
# subject_cn_regex = "[a-z0-9-]+\\.iot\\.example\\.com"
# SANs are default-deny: a CSR carrying a SAN type without a pattern below is refused, and
# iPAddress / URI SANs (no pattern) need `allow_any_identity = true` with no `san_*_regex`.
# san_dns_regex = "[a-z0-9-]+\\.iot\\.example\\.com"
# san_email_regex = ".*@example\\.com"
# san_upn_regex = ".*@example\\.com"
# A template must set `subject_cn_regex`, or opt in to any subject name explicitly (this also
# accepts the `serialNumber`, `UID` and `emailAddress` subject attributes, and any SAN when no
# `san_*_regex` is set).
# allow_any_identity = false
[audit]
enabled = false
channel_capacity = 0
trusted_proxy_cidrs = []
failure_mode = "continue"
[audit.file]
[audit.postgres]
CORS configuration
Cross-Origin Resource Sharing (CORS) controls which browser origins are allowed to make requests to the KMS HTTP API.
When cors_allowed_origins is not set in the configuration file, CLI, or
environment, the server builds the allowed-origins list automatically:
- The standard loopback addresses (
localhost,127.0.0.1,0.0.0.0,[::1],[::]) on the configured port and scheme (HTTP or HTTPS) are always included so the bundled Web UI works out-of-the-box when accessed from the same machine. - If
kms_public_urlis set, its value is automatically appended to the default list. This means that in the common deployment scenario wherekms_public_urlis configured (e.g.https://kms.example.com), the Web UI is accessible at that URL without any additionalcors_allowed_originsentry.
When cors_allowed_origins is set explicitly, the automatic defaults
(including kms_public_url) are not merged in — the explicit list is used
verbatim. This lets operators lock down the allow-list precisely.
Although the KMS serves its own Web UI from the same host and port, the
browser's Fetch API sends an Origin header on every non-GET/HEAD request
(including POST) — even when the request originates from the same page. The
actix-cors middleware compares this header against the explicit allow-list and
returns HTTP 400 if the value is not present. There is no DNS resolution or
network-interface expansion: the comparison is a byte-for-byte string match.
This means the origins in the allow-list must contain the exact URL the user
types in the browser's address bar — scheme, hostname, and port all included.
Configuring 0.0.0.0 (the bind address) or the server's IP address does not
match a hostname-based origin such as http://kms.example.com:9998, and vice
versa.
The binary automatically provides loopback addresses
(localhost, 127.0.0.1, 0.0.0.0, [::1], [::] on the configured port) so that
browser access from the same machine works out-of-the-box. Any other hostname,
IP address, or port must be added explicitly.
CLI clients (ckms, scripts, curl) do not send an Origin header and are
not affected by this setting.
[http]
# Allow a Vite dev-server and a custom front-end to reach the KMIP API.
cors_allowed_origins = ["http://127.0.0.1:5173", "https://app.example.com"]
The same list can be provided via the environment variable
KMS_CORS_ALLOWED_ORIGINS (comma-separated) or the CLI flag
--cors-allowed-origins.
Every origin in cors_allowed_origins can issue authenticated
cross-origin requests to the KMS — session cookies and credentials are
forwarded for each listed origin.
- **Only add origins you fully control and trust.** A compromised or
malicious site listed here can read and manage all cryptographic objects
accessible to the authenticated user.
- **Never use a wildcard (`*`).** `actix-cors` rejects a wildcard when
`supports_credentials()` is active, and a wildcard CORS policy would
expose every user's keys to any website on the internet.
- **Add every URL users will type in their browser** — scheme, hostname,
and port must all match exactly. `0.0.0.0` (bind address) and the
server's IP address are not interchangeable with the DNS hostname used
by the browser.
- **Security note:** while a user is authenticated to the KMS, avoid
browsing untrusted sites in the same browser session. CORS is a
browser-enforced defense in depth; its effectiveness depends on the
browser correctly implementing the same-origin policy, which cannot be
guaranteed across all browser versions and configurations.
**Enterprise integration scopes are not affected by this setting.**
The Google CSE, Microsoft DKE, and AWS XKS endpoints retain their own
permissive CORS policy as required by their respective integration
contracts — `cors_allowed_origins` has no effect on those routes.
Configuration Examples
This page provides a comprehensive collection of TOML configuration file examples for the Eviden KMS server. Each configuration has been validated and tested to ensure it works correctly with the KMS server.
All configuration examples can be used by:
- Saving the content to a file (e.g.,
kms.toml) - Starting the server with:
cosmian_kms_server -c kms.tomlor using the environment variableCOSMIAN_KMS_CONF=kms.toml
Note on default path: If no
-cflag orCOSMIAN_KMS_CONFvariable is set, the server automatically loads/etc/cosmian/kms.toml(Linux/macOS) orC:\ProgramData\Cosmian\kms.toml(Windows) when it exists. If that file is present and you also pass command-line arguments, the server exits with an error to prevent your arguments from being silently ignored.
For complete documentation on all available configuration options, see the Configuration file reference.
Quick Start Configurations
basic-http
Basic HTTP server configuration with default settings.
# Basic HTTP configuration
[http]
port = 9998
hostname = "0.0.0.0"
cors_allowed_origins = ["http://localhost:9998", "http://127.0.0.1:9998"]
Use case: Development, testing, or internal networks where TLS is not required.
Authentication Configurations
jwt-auth
JWT authentication using Google as the identity provider.
# JWT authentication configuration using idp_auth format
[idp_auth]
# issuer,jwks[,aud1[,aud2...]] (jwks & audiences optional; any-of when multiple)
jwt_auth_provider = ["https://accounts.google.com,https://www.googleapis.com/oauth2/v3/certs,cosmian_kms,another_client_id"]
Use case: Authenticate users with Google Identity tokens, suitable for organizations using Google Workspace.
api-token-auth
API token authentication using a symmetric key.
# API token authentication configuration
[http]
port = 9998
hostname = "0.0.0.0"
cors_allowed_origins = ["http://localhost:9998", "http://127.0.0.1:9998"]
api_token_id = "test-symmetric-key-id"
Use case: Service-to-service authentication or when using a pre-shared symmetric key for authentication.
cors-configuration
Cross-Origin Resource Sharing (CORS) configuration for browser clients.
# CORS configuration for browser-based clients
[http]
port = 9998
hostname = "0.0.0.0"
# Allow the bundled Web UI and any Vite dev server running on the same machine
cors_allowed_origins = ["http://localhost:9998", "http://127.0.0.1:9998"]
Use case: When a browser-based client (e.g. the bundled Web UI or a Vite dev server) runs on a different origin from the KMS server. In production behind a load balancer, set this to your public URL. Leave unset to restrict to same-origin only.
tls-client-cert
TLS client certificate authentication with mutual TLS.
# TLS Client Certificate Authentication
[tls]
# For FIPS mode (default build):
tls_cert_file = "certificates/server.crt"
tls_key_file = "certificates/server.key"
clients_ca_cert_file = "certificates/ca.crt"
# For non-FIPS mode:
# tls_p12_file = "certificates/server.p12"
# tls_p12_password = "password"
# clients_ca_cert_file = "certificates/ca.crt"
Use case: High-security environments requiring mutual TLS authentication with client certificates.
multifactor-tls-jwt
Multi-factor authentication combining TLS client certificates and JWT tokens.
# Multi-factor TLS + JWT authentication (idp_auth format)
[tls]
# For FIPS mode (default build):
# tls_cert_file = "certificates/server.crt"
# tls_key_file = "certificates/server.key"
# clients_ca_cert_file = "certificates/ca.crt"
# For non-FIPS mode:
tls_p12_file = "certificates/server.p12"
tls_p12_password = "password"
clients_ca_cert_file = "certificates/ca.crt"
[idp_auth]
# Empty audience example: no audiences after JWKS URL (audience check skipped)
jwt_auth_provider = ["https://accounts.google.com,https://www.googleapis.com/oauth2/v3/certs,"]
Use case: Maximum security environments requiring both certificate and token-based authentication.
multifactor-jwt-api
Multi-factor authentication combining JWT tokens and API token authentication.
# Multi-factor JWT + API token authentication (idp_auth format)
[idp_auth]
# Multiple audiences example (any-of)
jwt_auth_provider = ["https://accounts.google.com,https://www.googleapis.com/oauth2/v3/certs,frontend,cli"]
[http]
port = 9998
hostname = "0.0.0.0"
cors_allowed_origins = ["http://localhost:9998", "http://127.0.0.1:9998"]
api_token_id = "test-symmetric-key-id"
Use case: Flexible authentication allowing both user JWT tokens and service API tokens.
Database Configurations
mysql-database
MySQL database configuration for production deployments.
# MySQL database configuration
[db]
database_type = "mysql"
database_url = "mysql://kms_user:kms_password@mysql-server:3306/kms"
Use case: Production deployments requiring a robust, scalable database backend.
mysql-with-cert
MySQL database with client certificate authentication.
# MySQL database configuration with client certificate
[db]
database_type = "mysql"
database_url = "mysql://mysql_server:3306/kms"
# Note: Configure client certificate via command-line option:
# --mysql-user-cert-file cert.p12
Use case: MySQL deployments requiring certificate-based database authentication.
postgresql-database
PostgreSQL database configuration for production deployments.
# PostgreSQL database configuration
[db]
database_type = "postgresql"
database_url = "postgres://kms_user:kms_password@postgres-server:5432/kms"
Use case: Production deployments requiring strong reliability, advanced SQL features, and horizontal scaling options.
sqlite-database
Lightweight embedded SQLite configuration (default when no DB settings are provided).
# SQLite database configuration (default path)
[db]
database_type = "sqlite"
sqlite_path = "./sqlite-data" # Defaults to ./sqlite-data
# clear_database = false # Set to true to wipe the DB on each start (DANGEROUS)
Use case: Local development, testing, or small single-instance deployments where simplicity outweighs concurrency needs.
redis-findex-database
Redis with Findex encrypted data and searchable indexes (non-FIPS build only).
# Redis Findex database configuration (non-FIPS feature)
[db]
database_type = "redis-findex"
database_url = "redis://redis-server:6379"
redis_master_password = "change_me_master_password" # Master password derives encryption key
Use case: Environments requiring encrypted server-side indexes and low-latency lookups with application-level protection.
Google Workspace CSE Configuration
google-cse
Complete Google Workspace Client-Side Encryption setup.
# Google CSE configuration
kms_public_url = "http://localhost:9998"
# JWT authentication with Google
[idp_auth]
jwt_auth_provider = ["https://accounts.google.com,https://www.googleapis.com/oauth2/v3/certs,"]
# Google CSE configuration
[google_cse_config]
google_cse_enable = true
Use case: Enabling Google Workspace Client-Side Encryption for Gmail and Drive.
Logging and Monitoring Configurations
otlp-logging
OpenTelemetry (OTLP) logging configuration with Jaeger integration.
# OTLP logging configuration
[logging]
otlp = "http://localhost:4317"
quiet = true
Use case: Centralized logging and distributed tracing with OpenTelemetry-compatible systems.
file-logging
Rolling file logging configuration.
# Rolling file logging
[logging]
rolling_log_dir = "/var/log/"
rolling_log_name = "kms"
rust_log = "info,cosmian_kms_server=debug"
Use case: Production deployments requiring persistent log files with rotation.
syslog-logging
System logging configuration for Linux systems.
# Syslog logging
[logging]
log_to_syslog = true
quiet = true
rust_log = "warn,cosmian_kms_server=info"
Use case: Integration with system logging infrastructure on Linux servers.
Production Configurations
production-https
Complete production configuration with HTTPS, authentication, and MySQL.
# Production HTTPS configuration
kms_public_url = "https://kms.example.com"
[http]
port = 443
hostname = "0.0.0.0"
cors_allowed_origins = ["https://kms.example.com"]
[tls]
# For FIPS mode (default build):
# tls_cert_file = "/etc/ssl/kms/server.crt"
# tls_key_file = "/etc/ssl/kms/server.key"
# For non-FIPS mode:
tls_p12_file = "/etc/ssl/kms/server.p12"
tls_p12_password = "secure_password"
[idp_auth]
jwt_auth_provider = ["https://accounts.google.com,https://www.googleapis.com/oauth2/v3/certs,kms.example.com"]
[db]
database_type = "mysql"
database_url = "mysql://kms_user:secure_password@mysql.internal:3306/kms"
[logging]
rolling_log_dir = "/var/log/"
rust_log = "warn,cosmian_kms_server=info"
Use case: Full production deployment with security, scalability, and monitoring.
ui-load-balanced
Production configuration exposing the Web UI behind a load balancer, with deterministic session cookies across KMS instances.
# Public URL exposed by the load balancer
kms_public_url = "https://kms-ui.example.com"
[http]
port = 9998
hostname = "0.0.0.0"
cors_allowed_origins = ["https://kms-ui.example.com"]
# UI configuration: static assets served from this folder
[ui_config]
ui_index_html_folder = "./ui/dist"
# Session salt used to derive the UI session cookie encryption key.
# This value MUST be identical across all KMS instances behind the
# same load balancer so any instance can decrypt the UI session cookie.
ui_session_salt = "change-me-and-keep-secret"
[logging]
rust_log = "info,cosmian_kms_server=info"
Use case: Web UI deployments behind a load balancer where UI session cookies must remain valid across all KMS instances.
ha-cluster
High-availability cluster configuration.
# High-availability cluster configuration
kms_public_url = "https://kms-cluster.example.com"
[http]
port = 9998
hostname = "0.0.0.0"
cors_allowed_origins = ["https://kms-cluster.example.com"]
[tls]
# For FIPS mode (default build):
# tls_cert_file = "/etc/ssl/kms/server.crt"
# tls_key_file = "/etc/ssl/kms/server.key"
# For non-FIPS mode:
tls_p12_file = "/etc/ssl/kms/server.p12"
tls_p12_password = "cluster_password"
[db]
database_type = "postgresql"
database_url = "postgres://kms_user:password@postgres-cluster:5432/kms"
[logging]
otlp = "http://jaeger-collector:4317"
rust_log = "info,cosmian_kms_server=info"
Use case: High-availability deployments with load balancing and shared database.
Specialized Configurations
redis-findex
Redis with Findex configuration for encrypted storage.
# Redis with Findex configuration
[db]
database_type = "redis-findex"
database_url = "redis://redis-server:6379"
redis_master_password = "secure_master_password"
[logging]
rust_log = "info,cosmian_kms_server=info,cosmian_findex_client=debug"
Use case: Zero-trust environments with application-level encryption of database contents.
hsm-integration
Hardware Security Module (HSM) integration.
# HSM integration configuration
[hsm]
pkcs11_library = "/usr/lib/libpkcs11.so"
slot_number = 1
pin = "hsm_user_pin"
[logging]
rust_log = "info,cosmian_kms_server=info"
Use case: Hardware-backed key protection using PKCS#11 compatible HSMs.
key-wrapping
Automatic key wrapping with a Key Encryption Key (KEK) and selective automatic unwrapping.
# Key wrapping configuration
# Force all newly created and imported keys to be wrapped by the specified KEK
key_encryption_key = "hsm-kek-id"
# Automatically unwrap specific object types when retrieved
default_unwrap_type = ["SymmetricKey", "SecretData"]
[logging]
rust_log = "info,cosmian_kms_server=info"
Use case: Ensure all keys in the KMS database are wrapped by an HSM key for enhanced security. The server transparently unwraps keys when needed, caching them in memory without storing clear-text keys in the database. Commonly used with HSM integration to protect all KMS keys with a master KEK stored in the HSM. The cache expires after a configurable duration (default 15 minutes).
development-debug
Development configuration with detailed debugging.
# Development debugging configuration
[http]
port = 9998
hostname = "127.0.0.1"
cors_allowed_origins = ["http://localhost:9998", "http://127.0.0.1:9998"]
[logging]
rust_log = "debug,cosmian_kms_server=trace,actix_web=debug"
Use case: Development and troubleshooting with maximum logging detail.
Testing Configurations
integration-test
Configuration for integration testing environments.
# Integration testing configuration
[http]
port = 19998
hostname = "127.0.0.1"
cors_allowed_origins = ["http://localhost:19998", "http://127.0.0.1:19998"]
[db]
database_type = "sqlite"
sqlite_path = "./test-sqlite-data"
cleanup_on_startup = true
[logging]
quiet = true
rust_log = "error"
Use case: Automated testing environments with isolated database and minimal logging.
Related Documentation
- Configuration file reference - Complete parameter documentation
- Command line arguments - CLI options reference
- Authentication - Detailed authentication setup
- Database configuration - Database backend options
- TLS configuration - TLS and certificate setup
- Logging - Logging and monitoring options
- Monitoring - Monitoring and dashboarding
Server CLI
Usage: cosmian_kms [OPTIONS] [KEY_ENCRYPTION_KEY]
Arguments:
[KEY_ENCRYPTION_KEY]
Force all keys imported or created in the KMS, which are not protected by a key encryption key, to be wrapped by the specified key encryption key (KEK)
Options:
-c, --config <COSMIAN_KMS_CONF>
Explicit configuration file path provided via -c / --config. When set, this file takes precedence over the `COSMIAN_KMS_CONF` environment variable and the default system path. All other command line arguments (except `--help` / `--version`) and environment variables are ignored once the configuration file is loaded
--vendor-identification <VENDOR_IDENTIFICATION>
The vendor identification string reported in KMIP `QueryServerInformation` responses
[env: KMS_VENDOR_IDENTIFICATION=]
[default: cosmian]
--default-username <DEFAULT_USERNAME>
The default username to use when no authentication method is provided
[env: KMS_DEFAULT_USERNAME=]
[default: admin]
--force-default-username
When an authentication method is provided, perform the authentication
but always use the default username instead of the one provided by the authentication method
[env: KMS_FORCE_DEFAULT_USERNAME=]
--ms-dke-service-url <MS_DKE_SERVICE_URL>
This setting enables the Microsoft Double Key Encryption service feature of this server.
It should contain the external URL of this server as configured in Azure App Registrations
as the DKE Service (<https://learn.microsoft.com/en-us/purview/double-key-encryption-setup#register-your-key-store>)
The URL should be something like <https://cse.my_domain.com/ms_dke>
[env: KMS_MS_DKE_SERVICE_URL=]
--info
Print the server configuration information and exit
--print-default-config
Serialize the default server configuration as TOML to stdout and exit. This is used to keep the documentation in sync with the Rust struct
--hsm-model <HSM_MODEL>
The HSM model.
`Thales Luna SA`, `Trustway Proteccio`, `Trustway Crypt2pay`, `Utimaco General Purpose HSM`,
`Smartcard HSM`, `AWS CloudHSM`, `SoftHSM2`, and `Kryoptic` are natively supported.
Other HSMs are supported too; specify `other` and check the documentation
[default: proteccio]
[possible values: luna, proteccio, crypt2pay, utimaco, softhsm2, smartcardhsm, aws_cloudhsm, gcp_cloud_hsm, kryoptic, other]
--hsm-admin <HSM_ADMIN>...
List of KMS usernames that are granted HSM admin privileges.
HSM admins can create, destroy, and potentially export objects on the HSM.
Use "*" as the only entry to grant all authenticated users admin access.
Repeat the option or use a comma-separated list to specify multiple admins:
`--hsm-admin alice@example.com --hsm-admin bob@example.com`
or set `KMS_HSM_ADMIN=alice@example.com,bob@example.com`
[env: KMS_HSM_ADMIN=]
[default: admin]
--hsm-slot <HSM_SLOT>
HSM slot number. The slots used must be listed.
Repeat this option to specify multiple slots
while specifying a password for each slot (or an empty string for no password)
e.g.
```sh
--hsm-slot 1 --hsm-password password1 \
--hsm-slot 2 --hsm-password password2
```
[env: KMS_HSM_SLOT=]
--hsm-password <HSM_PASSWORD>
Password for the user logging in to the HSM Slot specified with `--hsm_slot`
Provide an empty string for no password
see `--hsm_slot` for more information.
Set `KMS_HSM_PASSWORD` to avoid the password appearing in `ps` output.
[env: KMS_HSM_PASSWORD=]
--default-unwrap-type <DEFAULT_UNWRAP_TYPE>
Specifies which KMIP object types should be automatically unwrapped when retrieved.
Repeat this option to specify multiple object types
e.g.
```sh
--default-unwrap-type SecretData \
--default-unwrap-type SymmetricKey
```
[possible values: All, Certificate, CertificateRequest, OpaqueObject, PGPKey, PrivateKey, PublicKey, SecretData, SplitKey, SymmetricKey]
--kms-public-url <KMS_PUBLIC_URL>
The exposed URL of the KMS - this is required if Google CSE configuration is activated.
If this server is running on the domain `cse.my_domain.com` with this public URL,
The configured URL from Google admin should be something like <https://cse.my_domain.com/google_cse>
The URL is also used during the authentication flow initiated from the KMS UI.
[env: KMS_PUBLIC_URL=]
--database-type <DATABASE_TYPE>
The main database of the KMS server that holds default cryptographic objects and permissions.
- postgresql: `PostgreSQL`. The database URL must be provided
- mysql: `MySql` or `MariaDB`. The database URL must be provided
- sqlite: `SQLite`. The data will be stored at the `sqlite_path` directory
A key must be supplied on every call
- redis-findex [non-FIPS]: a Redis database with encrypted data and indexes thanks to Findex.
The Redis URL must be provided, as well as the redis-master-password and the redis-findex-label
[env: KMS_DATABASE_TYPE=]
[possible values: postgresql, mysql, sqlite, redis-findex]
--database-url <DATABASE_URL>
The URL of the database for `Postgres`, `MySQL`, or `Findex-Redis`
[env: KMS_DATABASE_URL=]
--sqlite-path <SQLITE_PATH>
The directory path of the `SQLite`
[env: KMS_SQLITE_PATH=]
[default: ./sqlite-data]
--redis-master-password <REDIS_MASTER_PASSWORD>
redis-findex: a master password used to encrypt the Redis data and indexes
[env: KMS_REDIS_MASTER_PASSWORD=]
--clear-database
Clear the database on start.
WARNING: This will delete ALL the data in the database
[env: KMS_CLEAR_DATABASE=]
--max-connections <MAX_CONNECTIONS>
Maximum number of connections for the relational database pool. When not provided, falls back to the current defaults: - `PostgreSQL`/`MySQL`: min(10, 2 × CPU cores), fallback 10 - `SQLite`: number of CPUs
[env: KMS_DB_MAX_CONNECTIONS=]
--unwrapped-cache-max-age <UNWRAPPED_CACHE_MAX_AGE>
When a wrapped object is fetched from the database,
it is unwrapped and stored in the unwrapped cache.
This option specifies the maximum age in minutes of the unwrapped objects in the cache
after its last use.
The default is 15 minutes.
About 2/3 of the objects will be evicted after this time; the other 1/3 will be evicted
after a maximum of 150% of the time.
[env: KMS_UNWRAPPED_CACHE_MAX_AGE=]
[default: 15]
--unwrapped-cache-max-size <UNWRAPPED_CACHE_MAX_SIZE>
Maximum number of entries in the unwrapped key cache.
When the cache is full, the least-recently-used entry is evicted.
Set this above the number of distinct wrapped keys in your deployment
to avoid LRU thrashing. The default is 1000.
[env: KMS_UNWRAPPED_CACHE_MAX_SIZE=]
[default: 1000]
--unwrapped-cache-max-ttl <UNWRAPPED_CACHE_MAX_TTL>
Absolute time-to-live in minutes for entries in the unwrapped key cache.
When set, a cached unwrapped key is evicted at most this many minutes after
it was first inserted, regardless of how frequently it is accessed.
This caps plaintext key residency for continuously-used (hot) keys and
satisfies compliance policies that require a hard upper bound on in-memory
key material exposure.
When not set (the default), only the time-to-idle window applies and hot
keys may remain cached indefinitely.
When set, value must be ≥ `unwrapped-cache-max-age`.
[env: KMS_UNWRAPPED_CACHE_MAX_TTL=]
--disable-unwrapped-cache
Disable the unwrapped key cache entirely.
When set, every operation that needs plaintext key material will perform
a full KEK-unwrap (or HSM call) on every request instead of serving the
key from memory.
Use this in high-security environments where no plaintext key material
should persist in process memory beyond a single operation.
Disabling the cache significantly increases CPU and HSM load.
[env: KMS_DISABLE_UNWRAPPED_CACHE=]
--socket-server-start
Start the KMIP socket server? If this is set to true, the TLS config must be provided, featuring a server PKCS#12 file and a client certificate authority certificate file
[env: KMS_SOCKET_SERVER_START=]
--socket-server-port <SOCKET_SERVER_PORT>
The KMS socket server port
[env: KMS_SOCKET_SERVER_PORT=]
[default: 5696]
--socket-server-hostname <SOCKET_SERVER_HOSTNAME>
The KMS socket server hostname
[env: KMS_SOCKET_SERVER_HOSTNAME=]
[default: 0.0.0.0]
--tls-p12-file <TLS_P12_FILE>
The KMS server optional PKCS#12 Certificates and Key file as an alternative
to providing the key, certificate and chain in PEM format.
When provided, the Socket and HTTP server will start in TLS Mode.
[env: KMS_TLS_P12_FILE=]
--tls-p12-password <TLS_P12_PASSWORD>
The password to open the PKCS#12 Certificates and Key file
[env: KMS_TLS_P12_PASSWORD=]
--tls-cert-file <TLS_CERT_FILE>
The server's X.509 certificate in PEM format.
Provide a PEM containing the server leaf certificate,
optionally followed by intermediate certificates (full chain). When provided along with
`--tls-key-file`, the servers will start in TLS mode.
Do not use in combination with `--tls-p12-file`.
[env: KMS_TLS_CERT_FILE=]
--tls-key-file <TLS_KEY_FILE>
The server's private key in PEM format (PKCS#8 or traditional format).
Must correspond to the certificate in `--tls-cert-file`.
Do not use in combination with `--tls-p12-file`.
[env: KMS_TLS_KEY_FILE=]
--tls-chain-file <TLS_CHAIN_FILE>
Optional certificate chain in PEM format (intermediate CAs).
If not provided, the chain may be appended to `--tls-cert-file` instead.
Do not use in combination with `--tls-p12-file`.
[env: KMS_TLS_CHAIN_FILE=]
--clients-ca-cert-file <CLIENTS_CA_CERT_FILE>
The server's optional X. 509 certificate in PEM format validates the client certificate presented for authentication.
If provided, clients must present a certificate signed by this authority for authentication.
Mandatory to start the socket server.
[env: KMS_CLIENTS_CA_CERT_FILE=]
--tls-cipher-suites <TLS_CIPHER_SUITES>
Colon-separated list of TLS cipher suites to enable:
Example: --tls-cipher-suites `"TLS_AES_256_GCM_SHA384:TLS_AES_128_GCM_SHA256"`
If not specified, OpenSSL default cipher suites will be used:
ECDHE-ECDSA-CHACHA20-POLY1305:ECDHE-RSA-CHACHA20-POLY1305:ECDHE-ECDSA-AES128-GCM-SHA256:\
ECDHE-RSA-AES128-GCM-SHA256:ECDHE-ECDSA-AES256-GCM-SHA384:ECDHE-RSA-AES256-GCM-SHA384:\
DHE-RSA-AES128-GCM-SHA256:DHE-RSA-AES256-GCM-SHA384:ECDHE-ECDSA-AES128-SHA256:ECDHE-RSA-AES128-SHA256:\
ECDHE-ECDSA-AES128-SHA:ECDHE-RSA-AES256-SHA384:ECDHE-RSA-AES128-SHA:ECDHE-ECDSA-AES256-SHA384:\
ECDHE-ECDSA-AES256-SHA:ECDHE-RSA-AES256-SHA:DHE-RSA-AES128-SHA256:DHE-RSA-AES128-SHA:\
DHE-RSA-AES256-SHA256:DHE-RSA-AES256-SHA:ECDHE-ECDSA-DES-CBC3-SHA:ECDHE-RSA-DES-CBC3-SHA:\
EDH-RSA-DES-CBC3-SHA:AES128-GCM-SHA256:AES256-GCM-SHA384:AES128-SHA256:AES256-SHA256:AES128-SHA:\
AES256-SHA:DES-CBC3-SHA:!DSS"
Otherwise, the ANSSI TLS 1.2 guide recommends prioritizing AEAD suites using ECDHE
key exchange, with AES-GCM/AES-CCM (preferred) and ChaCha20-Poly1305 as an acceptable
alternative.
Example (TLS 1.2):
`TLS_ECDHE_ECDSA_WITH_AES_256_GCM_SHA384:TLS_ECDHE_ECDSA_WITH_AES_128_GCM_SHA256:TLS_ECDHE_ECDSA_WITH_AES_256_CCM:TLS_ECDHE_ECDSA_WITH_AES_128_CCM:TLS_ECDHE_ECDSA_WITH_CHACHA20_POLY1305_SHA256:TLS_ECDHE_RSA_WITH_AES_256_GCM_SHA384:TLS_ECDHE_RSA_WITH_AES_128_GCM_SHA256:TLS_ECDHE_RSA_WITH_CHACHA20_POLY1305_SHA256`
[env: KMS_TLS_CIPHER_SUITES=]
--port <PORT>
The KMS HTTP server port
[env: KMS_PORT=]
[default: 9998]
--hostname <HOSTNAME>
The KMS HTTP server hostname
[env: KMS_HOSTNAME=]
[default: 0.0.0.0]
--api-token-id <API_TOKEN_ID>
An optional API token to use for authentication on the HTTP server.
[env: KMS_API_TOKEN=]
--rate-limit-per-second <RATE_LIMIT_PER_SECOND>
Maximum number of requests per second per IP address allowed by the rate limiter.
When set, the server enforces this limit to mitigate `DoS` and brute-force attacks.
Requests exceeding the limit receive HTTP 429 Too Many Requests.
Leave unset (default) to disable rate limiting.
[env: KMS_RATE_LIMIT_PER_SECOND=]
--cors-allowed-origins <CORS_ALLOWED_ORIGINS>
Comma-separated list of origins allowed to make cross-origin requests to the KMIP API.
Required for any Web UI deployment: the browser Fetch API sends an `Origin` header on
every POST request — even when the page is served by the KMS itself — and actix-cors
rejects it unless the exact origin appears in this list.
The value must match byte-for-byte what the user types in the browser address bar
(scheme + hostname + port). The server bind address (`0.0.0.0`) and the server IP
are not equivalent to a DNS hostname. The Docker image pre-populates loopback
addresses; add any custom hostname explicitly. Example: `http://kms.example.com:9998`.
[env: KMS_CORS_ALLOWED_ORIGINS=]
--http-workers <HTTP_WORKERS>
Number of actix-web HTTP worker threads.
Defaults to the number of logical CPUs. On I/O-heavy workloads (e.g. `PostgreSQL` backend)
setting this to `2 * <number of CPU cores>` improves throughput by keeping more Tokio
threads busy while others are waiting on network I/O.
Can also be set via the `TOKIO_WORKER_THREADS` environment variable (Tokio runtime),
but this flag controls only the actix-web application workers.
[env: KMS_HTTP_WORKERS=]
--jwks-enabled
Enable the `GET /.well-known/jwks.json` endpoint.
When set, the server exposes all public keys with the `Verify` usage mask as a
RFC 7517 JSON Web Key Set. Defaults to `false`; set to `true` to enable public key
discovery for JWT verification.
[env: KMS_JWKS_ENABLED=]
--proxy-url <PROXY_URL>
The proxy URL:
- e.g., `https://secure.example` for an HTTP proxy
- e.g., `socks5://192.168.1.1:9000` for a SOCKS proxy
[env: KMS_PROXY_URL=]
--proxy-basic-auth-username <PROXY_BASIC_AUTH_USERNAME>
Set the Proxy-Authorization header username using Basic auth.
[env: KMS_PROXY_BASIC_AUTH_USERNAME=]
--proxy-basic-auth-password <PROXY_BASIC_AUTH_PASSWORD>
Set the Proxy-Authorization header password using Basic auth.
[env: KMS_PROXY_BASIC_AUTH_PASSWORD=]
--proxy-custom-auth-header <PROXY_CUSTOM_AUTH_HEADER>
Set the Proxy-Authorization header to a specified value.
[env: KMS_PROXY_CUSTOM_AUTH_HEADER=]
--proxy-exclusion-list <PROXY_EXCLUSION_LIST>
The No Proxy exclusion list to this Proxy
[env: KMS_PROXY_NO_PROXY=]
--jwt-auth-provider <JWT_AUTH_PROVIDER>
JWT authentication provider configuration.
The expected argument is --jwt-auth-provider="`PROVIDER_CONFIG_1`" --jwt-auth-provider="`PROVIDER_CONFIG_2`" ...
where each `PROVIDER_CONFIG_N` defines one identity provider configuration.
Each provider configuration `PROVIDER_CONFIG_N` should be in the format: "`JWT_ISSUER_URI,JWKS_URI,JWT_AUDIENCE_1,JWT_AUDIENCE_2,...`"
where:
- `JWT_ISSUER_URI`: The issuer URI of the JWT token (required)
- `JWKS_URI`: The JWKS (JSON Web Key Set) URI (optional, defaults to <JWT_ISSUER_URI>/.well-known/jwks.json)
- `JWT_AUDIENCE_1..N`: One or more audience values for the JWT token (optional)
Examples:
--jwt-auth-provider="https://accounts.google.com,https://www.googleapis.com/oauth2/v3/certs, kacls-migration, another-audience"
--jwt-auth-provider="https://login.microsoftonline.com/612da4de-35c0-42de-ba56-174b69062c96/v2.0,https://login.microsoftonline.com/612da4de-35c0-42de-ba56-174b69062c96/discovery/v2.0/keys"
--jwt-auth-provider="https://<your-tenant>.<region>.auth0.com/""
This argument can be repeated to configure multiple identity providers.
[env: KMS_JWT_AUTH_PROVIDER=]
--jwt-svid-auth
Accept SPIFFE JWT-SVIDs from the configured `--jwt-auth-provider` issuers.
A SPIFFE JWT-SVID carries no `email` claim, only a `sub` claim shaped as `spiffe://<trust-domain>/<workload-path>`. When this flag is enabled, a JWT that validates successfully (signature, issuer, audience, expiry) against a configured issuer but has no `email` claim is authenticated using its `sub` claim **only if** `sub` starts with `spiffe://`; every other JWT still requires `email` as before.
The flag is global: it applies to every `--jwt-auth-provider`. Every provider MUST specify an audience (`issuer,jwks_uri,audience`), and the SVID MUST carry a matching `aud` claim; otherwise the server refuses to start, since an SVID minted for another service could be replayed against the KMS.
Disabled by default: enabling it only makes sense when the configured issuer(s) are a SPIFFE-aware JWKS source (e.g. a SPIRE OIDC Discovery Provider).
[env: KMS_JWT_SVID_AUTH=]
--enable
Disable the embedded web UI. When set to false, the UI HTML assets are not served and all `/ui/` routes return 404
[env: KMS_UI_ENABLE=]
-u, --ui-index-html-folder <UI_INDEX_HTML_FOLDER>
The UI distribution folder
[env: COSMIAN_UI_DIST_PATH=]
--ui-session-salt <UI_SESSION_SALT>
A secret salt used to derive the session cookie encryption key.
This MUST be identical across all KMS instances behind the same load balancer.
This should only be provided when `ui_index_html_folder` is explicitly defined.
[env: KMS_SESSION_SALT=]
--ui-oidc-client-id <UI_OIDC_CLIENT_ID>
The client ID of the configured OIDC tenant for UI Auth
[env: UI_OIDC_CLIENT_ID=]
--ui-oidc-client-secret <UI_OIDC_CLIENT_SECRET>
The client secret of the configured OIDC tenant for UI Auth
[env: UI_OIDC_CLIENT_SECRET=]
--ui-oidc-issuer-url <UI_OIDC_ISSUER_URL>
The issuer URI of the configured OIDC tenant for UI Auth
[env: UI_OIDC_ISSUER_URL=]
--ui-oidc-logout-url <UI_OIDC_LOGOUT_URL>
The logout URI of the configured OIDC tenant for UI Auth
[env: UI_OIDC_LOGOUT_URL=]
--google-cse-enable
This setting turns on endpoints handling Google CSE feature
[env: KMS_GOOGLE_CSE_ENABLE=]
--google-cse-disable-tokens-validation
This setting turns off the validation of the tokens used by this server's Google Workspace CSE feature
[env: KMS_GOOGLE_CSE_DISABLE_TOKENS_VALIDATION=]
--google-cse-incoming-url-whitelist <GOOGLE_CSE_INCOMING_URL_WHITELIST>
This setting contains the list of KACLS server URLs that can access this server for Google CSE migration, through the privilegedunwrap endpoint (used to fetch exposed jwks on server start)
[env: KMS_GOOGLE_CSE_INCOMING_URL_WHITELIST=]
--google-cse-migration-key <GOOGLE_CSE_MIGRATION_KEY>
PEM PKCS8 RSA private key used to ensure consistency of certificate handling and privileged unwrap operations across server restarts and multiple server instances. If not provided, a random key will be generated at server startup
[env: KMS_GOOGLE_CSE_MIGRATION_KEY=]
--azure-ekm-enable
This setting turns on/off the endpoints handling Azure EKM features
[env: KMS_AZURE_EKM_ENABLE=]
--azure-ekm-path-prefix <AZURE_EKM_PATH_PREFIX>
Optional path prefix set within Managed HSM during EKM configuration.
Enables multi-customer use or isolation of different MHSM pools using the same proxy.
Must be max 64 characters: letters (a-z, A-Z), numbers (0-9), slashes (/), dashes (-).
[env: KMS_AZURE_EKM_PATH_PREFIX=]
--azure-ekm-disable-client-auth
WARNING: This bypasses mTLS authentication entirely. Only use for testing!
[env: KMS_AZURE_EKM_DISABLE_CLIENT_AUTH=]
--azure-ekm-proxy-vendor <AZURE_EKM_PROXY_VENDOR>
Proxy vendor name to report in /info endpoint
[env: KMS_AZURE_EKM_PROXY_VENDOR=]
[default: Cosmian]
--azure-ekm-proxy-name <AZURE_EKM_PROXY_NAME>
Proxy name to report in /info endpoint
[env: KMS_AZURE_EKM_PROXY_NAME=]
[default: "EKM Proxy Service"]
--azure-ekm-ekm-vendor <AZURE_EKM_EKM_VENDOR>
EKMS vendor name report in the /info endpoint
[env: KMS_AZURE_EKM_VENDOR=]
[default: Cosmian]
--azure-ekm-ekm-product <AZURE_EKM_EKM_PRODUCT>
Product Name and Version of the EKMS to report in the /info endpoint
[env: KMS_AZURE_EKM_PRODUCT=]
[default: "Cosmian KMS v5.28.0"]
--root-data-path <ROOT_DATA_PATH>
The root folder where the KMS will store its data A relative path is taken relative to the user's HOME directory
[env: KMS_ROOT_DATA_PATH=]
[default: ./cosmian-kms]
--tmp-path <TMP_PATH>
The folder to store temporary data (non-persistent data readable by no one but the current instance during the current execution)
[env: KMS_TMP_PATH=]
[default: /tmp]
--rust-log <RUST_LOG>
An alternative to setting the `RUST_LOG` environment variable.
Setting this variable will override the `RUST_LOG` environment variable
[env: KMS_RUST_LOG=]
--otlp <OTLP>
The OTLP collector URL for gRPC
(for instance, <https://localhost:4317>)
If not set, the telemetry system will not be initialized.
Must use https:// in production.
Use --otlp-allow-insecure to permit plaintext http:// connections.
[env: KMS_OTLP_URL=]
--otlp-allow-insecure
Allow insecure (plaintext HTTP) OTLP connections. WARNING: Enabling this exposes telemetry data (including encryption operation metadata) over an unencrypted channel. Only use for development or when the collector is on localhost
[env: KMS_OTLP_ALLOW_INSECURE=]
--quiet
Do not log to stdout
[env: KMS_LOG_QUIET=]
--log-to-syslog
Log to syslog
[env: KMS_LOG_TO_SYSLOG=]
--rolling-log-dir <ROLLING_LOG_DIR>
The directory for daily rolling logs: <rolling_log_name>.YYYY-MM-DD.
File logging is disabled unless this option is explicitly set.
Suggested paths:
Linux: /var/log/
Windows: C:\Users\<username>\AppData\Local\Cosmian KMS Server
macOS: ~/Library/Logs/
WARNING: Windows environment variables (e.g. %LOCALAPPDATA%) are NOT
expanded. Use the fully-resolved path.
[env: KMS_ROLLING_LOG_DIR=]
--rolling-log-name <ROLLING_LOG_NAME>
The name of the rolling log file: <rolling_log_name>.YYYY-MM-DD.
Defaults to `cosmian_kms` if not set.
[env: KMS_ROLLING_LOG_NAME=]
--enable-metering
Enable metering in addition to tracing when telemetry is enabled
[env: KMS_ENABLE_METERING=]
--environment <ENVIRONMENT>
The name of the environment (development, test, production, etc.)
This will be added to the telemetry data if telemetry is enabled
[env: KMS_ENVIRONMENT=]
[default: development]
--ansi-colors
Enable ANSI colors in the logs to stdout
[env: KMS_ANSI_COLORS=]
--crypto-officer-users <CRYPTO_OFFICER_USERS>
Users with the Crypto Officer role.
May manage key lifecycle (create, import, certify, rekey, activate, revoke, destroy)
and access raw key material.
When active, gains ownership bypass on all Managed Objects.
When set, only listed users (plus those explicitly granted the `Create` right) can
create and import objects.
--crypto-officer-require-ceremony
Require a split-key ceremony to activate the Crypto Officer role.
When `true`, users listed in `crypto_officer_users` are candidates only —
the role is inactive until a KMIP `JoinSplitKey` with all shares tagged
`x-cosmian-crypto-officer-ceremony` completes.
--ceremony-secret <CEREMONY_SECRET>
Hex-encoded 32-byte secret for ceremony record encryption.
Required when any role has `require_ceremony = true`.
All ceremony activation records are AES-256-GCM encrypted with keys
derived from this secret, preventing forgery via direct database writes
and protecting participant identities at rest.
Generate with: `openssl rand -hex 32`
[env: KMS_CEREMONY_SECRET=]
--ceremony-key-id <CEREMONY_KEY_ID>
UID of a KMS symmetric key to use as the ceremony record sealing key.
When set, key material is fetched from the KMS object store after database
initialization and used in place of `ceremony_secret`. This enables:
- Key rotation via standard KMIP `ReKey` / `Rotate` operations.
- HSM-backed sealing when the referenced key is HSM-resident.
- Audit trail: each retrieval of the ceremony key is logged.
If both `ceremony_secret` and `ceremony_key_id` are set, `ceremony_key_id` takes precedence.
**Bootstrap constraint**: the ceremony sealing key must be created before
enabling `crypto_officer_require_ceremony = true`. Create it while the server
is in config-only CO mode (no ceremony required), then enable ceremony mode:
```bash
# 1. Start server with require_ceremony = false
# 2. Create the sealing key:
ckms sym keys create --id ceremony-seal-2026 --number-of-bits 256
# 3. Set ceremony_key_id = "ceremony-seal-2026" in kms.toml
# 4. Enable require_ceremony = true and restart
```
[env: KMS_CEREMONY_KEY_ID=]
--ceremony-wrapping-key-id <CEREMONY_WRAPPING_KEY_ID>
UID of a KMS symmetric key to use for AES-KW (RFC 5649) wrapping of split-key shares.
When set, `CreateSplitKey` encrypts each share's raw bytes with this key (AES-128/192/256-KWP)
before storing in the database. `JoinSplitKey` automatically detects the
`x-cosmian-share-wrapping-key` vendor attribute on each share and unwraps the bytes before
XOR reconstruction.
The wrapping key must already exist in the KMS object store and must be an AES symmetric key.
When the KMS is HSM-backed, this key can be HSM-resident, providing hardware boundary
protection equivalent to purpose-built HSM split-key solutions.
Generate a suitable key before enabling ceremony mode:
```bash
ckms sym keys create --id ceremony-wrap-2026 --number-of-bits 256
```
Rotate by creating a new key, updating this value, and re-running the ceremony
(existing wrapped shares require the original key; re-ceremony is mandatory on rotation).
[env: KMS_CEREMONY_WRAP_KEY_ID=]
--aws-xks-enable
This setting turns on endpoints handling the AWS XKS feature
[env: KMS_AWS_XKS_ENABLE=]
--aws-xks-region <AWS_XKS_REGION>
The AWS XKS region to use for signing requests (sigv4)
[env: KMS_AWS_XKS_REGION=]
--aws-xks-service <AWS_XKS_SERVICE>
The AWS XKS service name to use for signing requests (sigv4)
[env: KMS_AWS_XKS_SERVICE=]
--aws-xks-sigv4-access-key-id <AWS_XKS_SIGV4_ACCESS_KEY_ID>
The AWS XKS `SigV4` access key ID used to sign requests
[env: KMS_AWS_XKS_SIGV4_ACCESS_KEY_ID=]
--aws-xks-sigv4-secret-access-key <AWS_XKS_SIGV4_SECRET_ACCESS_KEY>
[env: KMS_AWS_XKS_SIGV4_SECRET_ACCESS_KEY=]
--kmip-policy-id <POLICY_ID>
KMIP algorithm policy selector.
Accepted values (case-insensitive):
- `DEFAULT`: enforce the built-in conservative allowlists (aligned with ANSSI/NIST/FIPS).
- `CUSTOM`: enforce the allowlists provided under `[kmip.allowlists]`.
[env: KMS_POLICY_ID=]
--auto-rotation-check-interval-secs <AUTO_ROTATION_CHECK_INTERVAL_SECS>
Interval in seconds between background auto-rotation checks.
Set to 0 (default) to disable the auto-rotation background task.
When enabled, must be at least 60 seconds to avoid excessive database churn.
[default: 0]
--metrics-count-interval-secs <METRICS_COUNT_INTERVAL_SECS>
Interval in seconds between background refreshes of the `kms.objects.total`
and `kms.keys.active.count` metrics. Each refresh runs a full COUNT over the
objects table, which is expensive on very large databases.
Set to 0 to disable both the startup seed and the periodic refresh.
Default: 30.
[default: 30]
--keyset-warn-depth <KEYSET_WARN_DEPTH>
Depth at which a successful keyset chain decryption triggers a server-side warning.
Keyset chain traversal is unbounded (stopped only by cycle detection);
this threshold emits a warning log so operators can flag stale ciphertexts.
Default: 5.
[default: 5]
--backend <BACKEND>
Possible values:
- vault: `HashiCorp` Vault KV-v2. Path format: `secret://<mount>/<path>[#<field>]`
- aws-ssm: AWS Systems Manager Parameter Store. Path format: `secret://<region>/<parameter-name>`
- azure-kv: Azure Key Vault. Path format: `secret://<vault-name>/secrets/<name>[/<version>]`
- cosmian-kms: Another Cosmian KMS server (KMIP Get). Path format: `secret://<host>[:<port>]/<object-id>`
[env: KMS_SECRET_BACKEND=]
--vault-addr <VAULT_ADDR>
[env: VAULT_ADDR=]
[default: http://127.0.0.1:8200]
--vault-token <VAULT_TOKEN>
[env: VAULT_TOKEN=]
[default: ""]
--aws-access-key-id <AWS_ACCESS_KEY_ID>
[env: AWS_ACCESS_KEY_ID=]
[default: ""]
--aws-secret-access-key <AWS_SECRET_ACCESS_KEY>
[env: AWS_SECRET_ACCESS_KEY=]
[default: ""]
--aws-session-token <AWS_SESSION_TOKEN>
[env: AWS_SESSION_TOKEN=]
--azure-tenant-id <AZURE_TENANT_ID>
[env: AZURE_TENANT_ID=]
[default: ""]
--azure-client-id <AZURE_CLIENT_ID>
[env: AZURE_CLIENT_ID=]
[default: ""]
--azure-client-secret <AZURE_CLIENT_SECRET>
[env: AZURE_CLIENT_SECRET=]
[default: ""]
--cosmian-kms-secret-token <COSMIAN_KMS_SECRET_TOKEN>
[env: COSMIAN_KMS_SECRET_TOKEN=]
--cosmian-kms-insecure-certs
[env: COSMIAN_KMS_INSECURE_CERTS=]
--jwks-endpoint-enabled
Enable the `GET /.well-known/jwks.json` endpoint.
When set, the server publicly exposes all active public keys whose
`CryptographicUsageMask` includes `Verify` as a RFC 7517 JSON Web Key Set.
The endpoint is **unauthenticated** — no credentials are required to fetch it,
and no authentication middleware is applied. Defaults to `false`.
[env: KMS_JWKS_ENDPOINT_ENABLED=]
--jwks-endpoint-max-keys <JWKS_ENDPOINT_MAX_KEYS>
Maximum number of public keys returned in a single JWKS response.
When the server holds more eligible keys than this limit, the response is
truncated and an `X-JWKS-Truncated: true` header is added to signal consumers.
Increase this value if your deployment performs frequent key rotation and all
overlapping verification keys must be simultaneously discoverable.
[env: KMS_JWKS_ENDPOINT_MAX_KEYS=]
[default: 50]
--jwks-endpoint-auto-tag
Automatically tag key pairs created via the REST crypto API for JWKS inclusion.
When `true` (the default), every key pair created via `POST /v1/crypto/keys`
receives the `"jwks"` tag and immediately appears in
`GET /.well-known/jwks.json`.
Set to `false` to disable this behaviour globally. Operators must then
manually tag each public key via `POST /v1/crypto/keys/{kid}/tags` before
it is published in the JWKS document.
This setting has no effect on keys created directly through the KMIP protocol.
[env: KMS_JWKS_ENDPOINT_AUTO_TAG=]
--vault-api-enabled
Enable the Vault-compatible `/v1/transit/` and `/v1/<vault_pki_mount>/` scopes.
Defaults to `false`. Set to `true` to enable the Vault-compatible API. Requires `vault_auth_verifier_url` to be set.
[env: KMS_VAULT_API_ENABLED=]
--vault-auth-verifier-url <VAULT_AUTH_VERIFIER_URL>
Base URL of the auth-verifier server used to validate `X-Vault-Token` headers.
Required when `vault_api_enabled = true`. Example: `https://auth.example.com`
[env: KMS_VAULT_AUTH_VERIFIER_URL=]
--vault-auth-verifier-ca-cert <VAULT_AUTH_VERIFIER_CA_CERT>
Path to a PEM-encoded CA certificate used to verify the auth-verifier's TLS certificate.
Optional. When set, the KMS will trust this CA when connecting to `vault_auth_verifier_url`. Useful when auth-verifier uses a self-signed or private CA certificate.
[env: KMS_VAULT_AUTH_VERIFIER_CA_CERT=]
--vault-auth-verifier-accept-invalid-certs
Skip TLS certificate verification when calling the auth-verifier.
**Security warning**: only set this to `true` in test or development environments. In production, use `vault_auth_verifier_ca_cert` to provide the correct CA certificate. Defaults to `false`.
[env: KMS_VAULT_AUTH_VERIFIER_ACCEPT_INVALID_CERTS=]
--vault-transit-mount <VAULT_TRANSIT_MOUNT>
Vault transit mount name used by the `/v1/<mount>/keys/…` routes.
Transit keys are served at `/v1/<vault_transit_mount>/keys/<name>`.
Defaults to `"transit"`.
[env: KMS_VAULT_TRANSIT_MOUNT=]
[default: transit]
--vault-pki-mount <VAULT_PKI_MOUNT>
Vault PKI mount name used by the `/v1/<mount>/root/sign-intermediate` route.
Defaults to `"pki"`.
[env: KMS_VAULT_PKI_MOUNT=]
[default: pki]
--vault-pki-ca-key-label <VAULT_PKI_CA_KEY_LABEL>
KMIP label of the KMS key used as the intermediate CA signing key for the PKI engine.
The key must already exist in the KMS (create with `ckms ec keys create --tag <label>`).
Defaults to `"vault_pki_ca"`.
[env: KMS_VAULT_PKI_CA_KEY_LABEL=]
[default: vault_pki_ca]
--vault-token-cache-ttl-secs <VAULT_TOKEN_CACHE_TTL_SECS>
Lifetime of vault token validation cache entries in seconds.
Successful `lookup-self` responses from the auth-verifier are cached
for this duration to reduce round-trips on every transit/PKI request.
Set to `0` to disable caching. Defaults to `30`.
[env: KMS_VAULT_TOKEN_CACHE_TTL_SECS=]
[default: 30]
--audit-enable
Enable the structured audit event pipeline.
When disabled (the default) no audit file is created and no background writer task is spawned. The value can also be toggled at config-file level (`[audit] enable = true`).
[env: KMS_AUDIT_ENABLE=]
--audit-file-path <AUDIT_FILE_PATH>
Path to the JSONL audit log file.
When `--audit-enable` is set and this option is omitted, the file
defaults to `<root-data-path>/audit.jsonl`.
[env: KMS_AUDIT_FILE_PATH=]
--audit-file-max-size-bytes <AUDIT_FILE_MAX_SIZE_BYTES>
Stops all further writes once the audit file reaches this many bytes.
The event that would reach this size is replaced by a final
`audit:size-cap-reached` event. Later events are dropped according to
`--audit-failure-mode` until the log is remediated and the KMS is restarted.
Omitted (the default) means unlimited. Must be > 0 when set.
[env: KMS_AUDIT_FILE_MAX_SIZE_BYTES=]
--audit-postgres-url <AUDIT_POSTGRES_URL>
`PostgreSQL` connection URL for the audit database.
When set, audit events are written to this `PostgreSQL` database instead of the
JSONL file — backend selection is config-time only, based solely on whether this
is set; there is no runtime fallback between the two: a connectivity failure at
startup still aborts the server. If `--audit-file-path` is also set, it is only
used to log a warning that it's ignored (or, on connection failure, that it is
NOT used as a fallback). This database MUST be a different database than the
main object-storage database (`--database-url`) when that database is also
`PostgreSQL` — the server refuses to start otherwise, since sharing one database
would let the KMS's own object-store role bypass the audit database's
append-only grants.
[env: KMS_AUDIT_POSTGRES_URL=]
--audit-instance-id <AUDIT_INSTANCE_ID>
Identifies this KMS instance's audit hash chain when using the `PostgreSQL`
backend.
Must be STABLE across restarts and UNIQUE per KMS instance sharing the same audit
database — a second instance reusing an `instance_id` is rejected at startup by an
advisory-lock check, before any event is written. Required (no default) when
`--audit-postgres-url` is set. Kubernetes deployments should set this from the
`StatefulSet` ordinal or the downward API, not an ephemeral pod hostname.
[env: KMS_AUDIT_INSTANCE_ID=]
--audit-channel-capacity <AUDIT_CHANNEL_CAPACITY>
Capacity of the bounded in-memory channel between request threads and the
audit writer task.
When the channel is full, incoming events are dropped (non-blocking) and
an `error!` is logged. Each event is ≈500 B, so the default (4 096 × 500 B
≈ 2 MiB) absorbs short bursts without blocking request threads.
Must be ≥ 1. Raise this value if you see `"AuditFileStore: channel full"`
in the server log under sustained high load.
[env: KMS_AUDIT_CHANNEL_CAPACITY=]
[default: 4096]
--audit-trusted-proxy-cidrs <AUDIT_TRUSTED_PROXY_CIDRS>
Only set this if the KMS sits behind a reverse proxy or load balancer.
When set, `X-Forwarded-For` is trusted only if the direct TCP peer is one of the
proxy addresses listed here; the client address is then the rightmost entry that is
not itself a listed proxy. It is recorded as the audit `client_ip` and keys the EST/SCEP
failed-authentication lockout. This must be scoped to your proxy's own address(es) —
trusting it from any peer lets a remote attacker forge `client_ip` in the audit trail.
Format: comma-separated IP addresses or CIDR blocks, e.g.
`"10.0.0.0/8,172.16.0.0/12"`. Single IPs can be expressed as `/32` (IPv4)
or `/128` (IPv6).
[env: KMS_AUDIT_TRUSTED_PROXY_CIDRS=]
--audit-failure-mode <AUDIT_FAILURE_MODE>
What to do when an audit event cannot be queued (channel full or writer dead).
`continue` (default): log the error, keep serving normally.
`reject`: return HTTP 503 to the client. The KMIP operation has already
executed at this point — this signals that its outcome was not recorded,
it does not prevent the operation from completing.
Possible values:
- continue: Log the error and keep serving — no service disruption (default)
- reject: Return 503 to the client when the event could not be queued
[env: KMS_AUDIT_FAILURE_MODE=]
[default: continue]
--crl-default-validity-days <CRL_DEFAULT_VALIDITY_DAYS>
Default CRL validity period in days for CA certificates managed by this server.
When a CRL is generated without an explicit validity override (e.g., via
`GET /certificates/{id}/crl?validity_days=N`), this value is used.
This value is in whole days (minimum 1 day / 24 h); enterprise PKIs commonly
use 7–28 days. Avoid the practical minimum of 1 day unless
`crl_refresh_overlap_hours` is also lowered below 24: a 1-day CRL satisfies
the default 24-hour refresh-overlap condition immediately after creation,
causing the hourly scheduler to continuously re-sign it.
Valid range: 1–365 when set via the CLI flag.
Default: 7.
This range is enforced by clap's argument parser only; it is not
currently re-validated when the value comes from a TOML config file, so
a value outside 1–365 in `kms.toml` is silently accepted.
[default: 7]
--crl-refresh-check-hours <CRL_REFRESH_CHECK_HOURS>
How often (in hours) the background CRL refresh scheduler wakes up to
check whether any stored CRL needs to be regenerated.
Set to 0 to disable the background scheduler entirely.
When disabled, CRLs are only refreshed on certificate revocation events.
The scheduler is only spawned when `kms_public_url` is ALSO configured
(the CDP endpoint must be active); with `kms_public_url` unset, this
setting has no effect and CRLs are only refreshed on revocation events,
which can allow an expired CRL to be served in the meantime.
Default: 1 (wake up hourly).
[default: 1]
--crl-refresh-overlap-hours <CRL_REFRESH_OVERLAP_HOURS>
CRL overlap window in hours.
The background scheduler regenerates a CRL when its `nextUpdate` timestamp
is within this many hours of the current time. This prevents relying parties
from seeing an expired CRL during the window between expiry and the next
revocation-triggered regeneration.
Analogy: EJBCA "CRL Overlap Time" (default 10 % of validity); AWS PCA uses
a 1-day overlap by default.
Default: 24 (regenerate 24 hours before expiry).
[default: 24]
--ocsp-enabled
Enable the OCSP responder endpoint at `GET /ocsp/{encoded_request}` and `POST /ocsp/`.
When `false` (default) all `/ocsp/` routes return 404.
--ocsp-ca-uid <OCSP_CA_UID>
UID of the CA certificate object in the KMS.
Used to verify that incoming OCSP requests are for certificates issued by
this CA (by comparing issuer name hash and key hash), and to retrieve
certificate states for revocation lookup.
Must be set when `ocsp_enabled = true`.
--ocsp-responder-cert-uid <OCSP_RESPONDER_CERT_UID>
UID of the dedicated OCSP signing certificate (RFC 6960 §4.2.2.2 authorized responder).
When set, OCSP responses are signed by this delegated key+certificate rather
than the CA's own private key. The referenced certificate MUST have:
- `extKeyUsage: OCSPSigning` (OID 1.3.6.1.5.5.7.3.9)
It SHOULD also have the `id-pkix-ocsp-nocheck` extension (OID
1.3.6.1.5.5.7.48.1.5, RFC 6960 §4.2.2.2.1) — this is only one of three
RFC-sanctioned ways to let relying parties check the responder certificate's
own revocation status (the others being a CDP/AIA pointer, or local policy), so
its absence is not required, only logged as a warning.
The `OCSPSigning` requirement is enforced at request time: the server rejects
the delegated certificate (and refuses to sign) if it is missing.
The referenced key is loaded into an in-process OpenSSL key for signing;
this path does not currently dispatch to `kms.crypto_oracles`, so a
non-extractable HSM-resident key will fail here while an extractable key
is exported from the HSM to sign.
When unset, the CA's own private key is used (acceptable for small deployments;
not recommended for production CAs where the signing key must stay offline).
--ocsp-cache-ttl-secs <OCSP_CACHE_TTL_SECS>
OCSP response validity period in seconds (`thisUpdate` → `nextUpdate`).
Determines how long a signed response may be cached by relying parties and
CDN/proxy intermediaries per RFC 5019 §5. Shorter values increase freshness;
longer values reduce load on the KMS (and HSM) signing key.
Default: 86400 (24 hours).
[default: 86400]
--ocsp-nonce-policy <OCSP_NONCE_POLICY>
Nonce handling policy for OCSP responses (RFC 9654 §2.1).
- `optional` (default): echo the nonce if present, proceed without one if absent.
- `required`: reject requests that carry no nonce (returns `malformedRequest`).
- `ignore`: never include a nonce in responses (suitable for pre-produced/cached responses).
Per RFC 9654 §2.1, the responder MUST accept nonces of 16–128 octets and echo
them verbatim. Nonces shorter than 16 octets are silently ignored.
[default: optional]
--ocsp-include-cert-chain
Include the signing certificate in OCSP `BasicResponse`s.
Only the signer certificate itself is embedded — not its issuing chain.
Set to `true` (default) when `ocsp_responder_cert_uid` is configured so that
clients can verify the delegated responder's own certificate without an
additional fetch; delegated responders whose signer chain includes
intermediates the client does not already trust must distribute those
intermediates out of band. Safe to set `false` when the CA signs responses
directly.
This is a bare CLI switch: passing `--ocsp-include-cert-chain` only ever
sets it to `true` (already the default). To set it to `false`, use the
`ocsp_include_cert_chain = false` key in the TOML config file instead.
--ocsp-archive-cutoff-secs <OCSP_ARCHIVE_CUTOFF_SECS>
Archive-cutoff extension value in seconds (RFC 6960 §4.4.4).
When non-zero, the `id-pkix-ocsp-archive-cutoff` extension is added to each
`BasicResponse` with value = now − `ocsp_archive_cutoff_secs`. This tells clients
how far back the responder maintains revocation records.
Set to 0 (default) to disable the extension.
Typical values: 365 days = 31536000.
[default: 0]
--est-enabled
Enable the EST endpoints under `/.well-known/est/`.
When `false` (default) all `/.well-known/est/` routes return 404.
--est-ca-uid <EST_CA_UID>
UID of the CA certificate object in the KMS that signs EST-enrolled certificates.
The CA private key must be linked to this certificate. Must be set when
`est_enabled = true`. Certificates are issued as the reserved `[enrollment-service]`
identity: the CA owner must grant it `certify` on this certificate and on its private
key (plus `create` when `crypto_officer_users` is set). Issued certificates are owned by
the CA owner.
--est-require-client-cert <EST_REQUIRE_CLIENT_CERT>
Require TLS client-certificate authentication for `/simpleenroll` (RFC 7030 §3.3.2).
When `true` (default) initial enrollment is only accepted over mutual TLS.
When `false`, HTTP Basic authentication (RFC 7030 §3.2.3) with
`est_bootstrap_username` / `est_bootstrap_password` is accepted as a fallback for
devices that have no certificate yet. `/simplereenroll` always requires a client
certificate (RFC 7030 §4.2.2).
[default: true]
[possible values: true, false]
--est-bootstrap-username <EST_BOOTSTRAP_USERNAME>
Username accepted for HTTP Basic bootstrap authentication on `/simpleenroll`.
--est-bootstrap-password <EST_BOOTSTRAP_PASSWORD>
Password accepted for HTTP Basic bootstrap authentication on `/simpleenroll`.
At least 8 characters. Prefer the `KMS_EST_BOOTSTRAP_PASSWORD` environment variable (or
the configuration file) to the command line, where it is visible in the process list.
[env: KMS_EST_BOOTSTRAP_PASSWORD]
--est-template <EST_TEMPLATE>
Name of the `[templates.<name>]` section whose issuance policy (key type and size,
EKU, Subject/SAN patterns, validity) is enforced on EST enrollments.
Required when `est_enabled = true`. The template must set `subject_cn_regex` (or
`allow_any_identity = true`): the enrollment secret authenticates a class of devices,
not the name a device asks for.
--scep-enabled
Enable the SCEP endpoint at `/scep`.
When `false` (default) the `/scep` route returns 404.
--scep-ca-uid <SCEP_CA_UID>
UID of the CA certificate object in the KMS that signs SCEP-enrolled certificates.
SCEP encrypts requests to the CA public key, so this MUST be an RSA CA whose private
key is linked to the certificate. Must be set when `scep_enabled = true`.
Certificates are issued as the reserved `[enrollment-service]` identity: the CA owner
must grant it `certify` on this certificate and on its private key (plus `create` when
`crypto_officer_users` is set). Issued certificates are owned by the CA owner.
--scep-challenge-password <SCEP_CHALLENGE_PASSWORD>
Shared secret a device must put in the PKCS#10 `challengePassword` attribute for an
initial enrollment (`PKCSReq`). Must be set when `scep_enabled = true`.
At least 8 characters. Prefer the `KMS_SCEP_CHALLENGE_PASSWORD` environment variable (or
the configuration file) to the command line, where it is visible in the process list.
[env: KMS_SCEP_CHALLENGE_PASSWORD]
--scep-allow-renewal-without-challenge <SCEP_ALLOW_RENEWAL_WITHOUT_CHALLENGE>
Accept `RenewalReq` messages signed with a still-valid certificate issued by the SCEP
CA without requiring the challenge password (RFC 8894 §2.3, §2.4).
When `false`, renewal requests are rejected with `badRequest`.
[default: true]
[possible values: true, false]
--scep-template <SCEP_TEMPLATE>
Name of the `[templates.<name>]` section whose issuance policy (key type and size,
EKU, Subject/SAN patterns, validity) is enforced on SCEP enrollments.
Required when `scep_enabled = true`. The template must set `subject_cn_regex` (or
`allow_any_identity = true`): the enrollment secret authenticates a class of devices,
not the name a device asks for.
-h, --help
Print help (see a summary with '-h')
-V, --version
Print version
Databases
By default, the server runs using a SQLite database, but it can be configured to use a choice of databases: SQLite encrypted, PostgreSQL, MariaDB, MySQL, and Percona XtraDB Cluster, as well as Redis, using the Redis-with-Findex configuration.
Selecting the database
All databases, except SQLite, can be used in a high-availability setup.
The SQLite database can serve high loads and millions of objects, and is very suitable for scenarios that do not demand high availability.
Redis with Findex
Redis-with-Findex provides application-level encryption over Redis, combining AES-256-GCM encrypted objects with encrypted Findex indexes. See the dedicated Redis with Findex page for a full description, encryption details, and configuration reference.
Connection Workflow
The following sequence diagram illustrates how the Eviden KMS connects to its backing database backend, initializes pools and schema verification, and processes client requests end-to-end:
sequenceDiagram
autonumber
actor Client as KMS Client (CLI / REST / KMIP)
participant KMS as Eviden KMS Server
participant Pool as Connection Pool (deadpool-postgres / mysql_async / SQLite)
participant DB as SQL Database (PostgreSQL / MySQL / SQLite)
Note over KMS,DB: Server Startup & Pool Initialization
KMS->>Pool: Initialize pool with credentials & TLS options
Pool->>DB: Open initial connection(s)
DB-->>Pool: Connection established
KMS->>DB: Verify schema & migration markers (parameters table)
DB-->>KMS: Migration state OK (ready)
Note over KMS: KMS is operational and ready to serve requests
Note over Client,DB: End-to-End Operation (e.g. Create / Locate / Rekey)
Client->>KMS: Request operation (e.g., Create AES key via REST/KMIP)
KMS->>KMS: Authenticate client & authorize operation
KMS->>Pool: Acquire pooled connection
Pool->>DB: Execute parameterized SQL query (INSERT/SELECT)
DB-->>Pool: Query result / rows affected
Pool-->>KMS: Return result & release connection to pool
KMS-->>Client: Return KMIP / REST response
Configuring the database
The database parameters may be configured either:
- the TOML configuration file
- or the arguments passed to the server on the command line.
SQLite
This is the default configuration. To use SQLite, no additional configuration is needed.
[db]
database_type = "sqlite"
sqlite_path = "./sqlite-data"
PostgreSQL
[db]
database_type = "postgresql"
database_url = "postgres://kms_user:kms_password@pgsql-server:5432/kms"
Before running the server, a dedicated database with a dedicated user should be created on the PostgreSQL instance.
These sample instructions create a database called kms owned by a user kms_user with password kms_password:
-
Connect to psql under user
postgressudo -u postgres psql # or `psql -U postgres` -
Create user
kms_userwith passwordkms_passwordcreate user kms_user with encrypted password 'kms_password'; -
Create database
kmsunder ownerkms_usercreate database kms owner=kms_user;
PostgreSQL High-Availability (multi-host)
The KMS supports multi-host PostgreSQL connection strings for high-availability deployments
(streaming replication, Patroni, pgBouncer clusters, etc.). The database-url value is treated
as a raw string so that host1:port,host2:port syntax — which the standard URL parser cannot
handle — is passed directly to the PostgreSQL driver.
Use the target_session_attrs query parameter to control which node the driver connects to:
| Value | Behaviour |
|---|---|
read-write | Connect only to the primary (default for HA) |
any | Connect to any available node (suitable for read replicas) |
read-only | Connect only to a standby |
The driver tries hosts left to right in the URL. With target_session_attrs=read-write,
standbys are automatically skipped (they return transaction_read_write=off), so the primary
is always found regardless of its position. However, put the expected primary first to
avoid an unnecessary round-trip to the standby on every new connection under normal
conditions.
Example — two-node HA cluster (primary listed first):
[db]
database_type = "postgresql"
database_url = "postgresql://kms_user:kms_password@primary:5432,standby:5432/kms?target_session_attrs=read-write"
The URL must start with postgresql:// or postgres://; any other scheme is rejected at
startup.
Replication and standby writability
In standard PostgreSQL streaming replication, the standby node operates in hot standby
mode: it accepts read queries but rejects all writes. The KMS requires a read-write
connection for every operation, so target_session_attrs=read-write will skip a standby
automatically — but this also means the KMS cannot use the standby as a fallback by
itself. The standby only becomes usable by the KMS after it has been promoted to
primary.
Replication is entirely managed by the PostgreSQL infrastructure — the KMS does not configure, trigger, or monitor it.
Recommended setup: use an HA manager
For automatic failover, deploy an HA manager such as Patroni, pg_auto_failover, or repmgr. These tools:
- Monitor the primary continuously.
- Promote the standby when the primary is unreachable.
- Demote the old primary back to standby automatically when it recovers (Patroni uses
pg_rewindto resync it with the new primary's WAL timeline).
The KMS URL requires no change: with target_session_attrs=read-write the driver
always connects to whichever node is currently the primary.
What happens when the primary goes down then comes back up?
| Phase | State | KMS behaviour |
|---|---|---|
| Primary down, standby still read-only | No writable node exists | KMS retries exhaust (≤ ~3.2 s), requests fail with a database error |
| HA manager promotes the standby | Standby becomes new primary | KMS reconnects on next retry/request, normal operation resumes |
| Old primary recovers | HA manager demotes it to new standby | Transparent; KMS skips it (read-only) and connects to the new primary |
| Old primary recovers without an HA manager | Old primary restarts as a standalone node — data divergence risk | Manual intervention required before reconnecting the KMS |
After a permanent failover without an HA manager, the roles of primary:5432 and
standby:5432 are reversed. The KMS still works (it finds the read-write node), but it
tries the old-primary address first on every connection, adding latency. To avoid this,
front the cluster with a virtual IP (Keepalived, AWS RDS Multi-AZ endpoint, Azure
Flexible Server read-write endpoint, GCP Cloud SQL HA endpoint) and use a single-host
URL — failover then becomes completely transparent to the KMS.
PostgreSQL failover retry
When a PostgreSQL primary fails over, the driver may return transient connection errors before the new primary is ready. The KMS automatically retries failed queries with exponential backoff for the following PostgreSQL SQLSTATE codes:
| SQLSTATE | Meaning |
|---|---|
08001 | sqlclient_unable_to_establish_sqlconnection |
08004 | sqlserver_rejected_establishment_of_sqlconnection |
57P02 | crash_shutdown |
57P03 | cannot_connect_now |
No additional configuration is required; the retry behaviour is enabled automatically for all PostgreSQL connections.
MySQL, MariaDB, or Percona XtraDB Cluster
The KMS supports MySQL-compatible databases including MySQL, MariaDB, and Percona XtraDB Cluster.
All use the same configuration with database-type=mysql.
As of version 5.13.0, the KMS schema includes PRIMARY KEY constraints on all tables, making it fully compatible with:
- Percona XtraDB Cluster (with
pxc_strict_mode=ENFORCING) - MariaDB Galera Cluster
- Any MySQL clustering solution requiring PRIMARY KEYs for replication
[db]
database_type = "mysql"
database_url = "mysql://kms_user:kms_password@mysql-server:3306/kms"
Use a certificate to authenticate to MySQL or MariaDB with the `mysql-user-cert-file` option to
specify the certificate file name.
**Example context**: say the certificate is called `cert.p12`
and is in a directory called `/certificate` on the host disk.
docker run --rm -p 9998:9998 \
--name kms ghcr.io/cosmian/kms:latest \
-v /certificate/cert.p12:/root/cosmian-kms/cert.p12 \
--database-type=mysql \
--database-url=mysql://mysql_server:3306/kms \
--mysql-user-cert-file=cert.p12
Redis with Findex
For Redis-with-Findex configuration, see the dedicated Redis with Findex page.
Securing database connections with TLS / mTLS
The KMS supports TLS-encrypted connections and mutual TLS (mTLS) client-certificate authentication
for PostgreSQL and MySQL-compatible databases. All TLS parameters are configured directly in the
database-url as query parameters — no extra CLI flags or TOML keys are needed.
PostgreSQL TLS / mTLS
PostgreSQL TLS is configured using the standard libpq-style query parameters in the connection URL.
| Parameter | Description |
|---|---|
sslmode | TLS mode: disable, allow, prefer (default), require, verify-ca, verify-full |
sslrootcert | Path to the CA certificate (PEM) used to verify the server |
sslcert | Path to the client certificate (PEM) for mTLS |
sslkey | Path to the client private key (PEM) for mTLS |
Server-authenticated TLS only (encrypt the connection and verify the server certificate):
[db]
database_type = "postgresql"
database_url = "postgres://kms:kms@pgsql-server:5432/kms?sslmode=verify-ca&sslrootcert=/path/to/ca.crt"
Mutual TLS (mTLS) (encrypt + verify server certificate + present a client certificate):
[db]
database_type = "postgresql"
database_url = "postgres://kms:kms@pgsql-server:5432/kms?sslmode=verify-full&sslrootcert=/path/to/ca.crt&sslcert=/path/to/client.crt&sslkey=/path/to/client.key"
disable– no TLS at all.allow/prefer(default) – TLS is used if the server offers it, otherwise the connection silently falls back to plaintext. The server certificate is not verified.require– the connection fails if the server does not support TLS. The server certificate is not verified, unlesssslrootcertis also set, in which case it is verified against that CA (the hostname is still not checked).verify-ca– the server certificate is verified against the CA but the hostname is not checked.verify-full– the server certificate is verified against the CA and the hostname must match. This is the recommended mode for production.
Any other sslmode value is rejected at startup. When sslrootcert is set, only that CA is
trusted (the system CA store is not consulted). All certificates must be in PEM format.
MySQL / MariaDB TLS / mTLS
MySQL TLS is configured using query parameters in the connection URL.
Both dash (ssl-mode) and underscore (ssl_mode) variants are accepted.
| Parameter | Description |
|---|---|
ssl-mode | TLS mode: DISABLED, PREFERRED, REQUIRED, VERIFY_CA, VERIFY_IDENTITY |
ssl-ca | Path to the CA certificate (PEM) for server verification |
ssl-client-identity | Path to the client PKCS#12 (.p12) bundle for mTLS |
ssl-client-identity-password | Password protecting the PKCS#12 bundle |
Server-authenticated TLS only (encrypt the connection and verify the server certificate):
[db]
database_type = "mysql"
database_url = "mysql://kms:kms@mysql-server:3306/kms?ssl-mode=VERIFY_CA&ssl-ca=/path/to/ca.crt"
Mutual TLS (mTLS) (encrypt + verify server certificate + present a client certificate):
[db]
database_type = "mysql"
database_url = "mysql://kms:kms@mysql-server:3306/kms?ssl-mode=VERIFY_CA&ssl-ca=/path/to/ca.crt&ssl-client-identity=/path/to/client.p12&ssl-client-identity-password=secret"
DISABLED– no TLS at all.PREFERRED/REQUIRED– TLS is used but the server certificate is not verified.VERIFY_CA– the server certificate is verified against the CA.VERIFY_IDENTITY– the server certificate is verified against the CA and the hostname must match.
MySQL client-certificate authentication requires the certificate and private key bundled as a
PKCS#12 (.p12) file — PEM files are not supported.
You can create the bundle using OpenSSL:
openssl pkcs12 -export \
-in client.crt -inkey client.key \
-out client.p12 -passout pass:secret
PKCS#12 client identity (ssl-client-identity) is not available in FIPS mode.
MySQL mTLS with client certificates requires the non-fips feature.
Clearing the database
The KMS server can be configured to clear the database on restart automatically.
The cleanup operation will delete all objects and keys stored in the database.
[db]
clear_database = true
Database migration
Depending on the KMS database evolution, a migration can happen between 2 versions of the KMS server. It will be clearly written in the CHANGELOG.md. In that case, a generic database upgrade mechanism is run on startup.
At first, the table context is responsible for storing the software run's version and the database's state.
The state can be one of the following:
ready: the database is ready to be usedupgrading: the database is being upgraded
On startup, the server checks if the software version is greater than the last version run:
-
if no, it simply starts;
-
If yes:
- it looks for all upgrades to apply in order from the last version run to this version;
- if there is any to run, it sets an upgrading flag on the db state field in the context table;
- it runs all the upgrades in order.
- it sets the flag from upgrading to ready;
On every call to the database, a check is performed on the db state field to check if the database is upgrading. If yes, calls fail.
Upgrades resist being interrupted in the middle and resumed from the start if that happens.
MySQL schema update (5.13.0)
As of version 5.13.0, the MySQL schema was updated to include PRIMARY KEY constraints on the tags and read_access tables to ensure compatibility with MySQL clustering solutions (e.g., Percona XtraDB Cluster with pxc_strict_mode=ENFORCING, MariaDB Galera).
New installations of 5.13.0+ automatically create the corrected tables.
Existing installations upgrading to 5.13.0 will keep the old table definitions if those tables already exist. If you rely on clustering/replication that requires PRIMARY KEYs, apply the following manual migration before starting the KMS:
-- Fix tags table
ALTER TABLE tags
DROP INDEX id,
MODIFY id VARCHAR(128) NOT NULL,
MODIFY tag VARCHAR(255) NOT NULL,
ADD PRIMARY KEY (id, tag);
-- Fix read_access table
ALTER TABLE read_access
DROP INDEX id,
MODIFY id VARCHAR(128) NOT NULL,
MODIFY userid VARCHAR(255) NOT NULL,
ADD PRIMARY KEY (id, userid);
Notes:
- Run these statements using a privileged MySQL user (e.g.,
root). - Ensure application access is paused during the migration.
- No data loss occurs; this operation converts UNIQUE constraints to PRIMARY KEYs and enforces NOT NULL.
The Unwrapped Objects Cache
For the full technical reference on the KMS in-memory caches — architecture, public API, configuration options, and security trade-offs — see Object Cache and Unwrapped Cache.
The unwrapped cache is a memory cache, and it is not persistent. The unwrapped cache is used to store unwrapped objects that are fetched from the database.
When a wrapped object is fetched from the database, it is unwrapped and stored in the unwrapped cache. Further calls to the same object will use the unwrapped object from the cache until the cache expires.
The time in minutes after which an unused object is evicted from the cache is configurable
using the unwrapped_cache_max_age setting. The default is 15 minutes.
When HSM keys wrap objects, a long expiration time will reduce the number of calls made to HSM to unwrap the object. However, increasing the cache time will increase the memory used by the KMS server and expose the key in clear text in the memory for a longer time.
Database tables
This page describes the tables used by the KMS server to persist its data, and the links between them. It applies to the SQL backends: SQLite, PostgreSQL, MySQL, MariaDB, and Percona XtraDB Cluster.
The Redis-with-Findex backend does not use relational tables; see Redis with Findex.
Overview
The KMS schema is small and consists of six tables:
| Table | Purpose |
|---|---|
parameters | Internal key/value store (migration state, database version, one-time markers) |
objects | KMIP objects (keys, certificates, secrets, and so on) |
read_access | Per-user read permissions granted on objects |
tags | Tags attached to objects, used by Locate |
crypto_officer_activations | Records of the Crypto Officer activation ceremony |
crls | Most recently signed CRL per issuer CA (RFC 5280 §5), for CDP serving after restart |
The links between tables are logical relationships (enforced by the application, not by SQL foreign-key constraints).
erDiagram
OBJECTS ||--o{ READ_ACCESS : "grants (read_access.id = objects.id)"
OBJECTS ||--o{ TAGS : "tagged (tags.id = objects.id)"
OBJECTS ||--o{ OBJECTS : "wraps (objects.wrapping_key_id = objects.id)"
OBJECTS ||--o| CRLS : "signs (crls.issuer_id = objects.id)"
PARAMETERS {
string name PK
string value
}
OBJECTS {
string id PK
string object
string attributes
string state
string owner
string wrapping_key_id FK
}
READ_ACCESS {
string id FK
string userid
string permissions
}
TAGS {
string id FK
string tag
}
CRLS {
string issuer_id PK
bytes crl_der
int crl_number
string generated_at
string next_update
}
CRYPTO_OFFICER_ACTIVATIONS {
timestamp activated_at
text sealed_record
timestamp revoked_at
varchar revoked_by
}
objects
The central table. One row per KMIP object.
| Column | Type | Description |
|---|---|---|
id | VARCHAR(128) | Primary key. The object's unique identifier (UID). |
object | VARCHAR (PG/SQLite) / LONGTEXT (MySQL) | The serialized KMIP object (JSON). |
attributes | jsonb (PG) / json (MySQL) | The KMIP attributes attached to the object. |
state | VARCHAR(32) | The KMIP lifecycle state of the object (for example Active, Destroyed). |
owner | VARCHAR(255) | The user identifier of the object's owner. |
wrapping_key_id | VARCHAR(128) | The UID of the key that wraps this object. Self-reference to objects.id. |
The following secondary indexes are created on objects:
| Index | Columns | Backends |
|---|---|---|
idx_objects_owner | owner | all |
idx_objects_state | state | all |
idx_objects_wrapping_key_id | wrapping_key_id | all |
idx_objects_rotate_name | RotateName attribute, owner (partial: RotateName present) | PostgreSQL, SQLite |
idx_objects_rotate_auto | state (partial: RotateAutomatic = true) | PostgreSQL, SQLite |
idx_objects_type_state | ObjectType attribute, state | PostgreSQL, SQLite |
Indexes are created at server startup. On an existing large database, the first start after an upgrade takes proportionally longer, and PostgreSQL blocks writes to objects while each new index builds.
read_access
Stores the operations that a given user is allowed to perform on a given object.
| Column | Type | Description |
|---|---|---|
id | VARCHAR(128) | The object UID. References objects.id. |
userid | VARCHAR(255) | The user identifier granted access. |
permissions | json | The operations granted to the user, serialized as JSON. |
The pair (id, userid) is unique.
In PostgreSQL and SQLite it is declared UNIQUE (id, userid); in MySQL (since 5.13.0) it is the composite PRIMARY KEY (id, userid).
A secondary index idx_read_access_userid is created on userid.
tags
Stores the tags attached to objects. Tags are used to locate objects by tag.
| Column | Type | Description |
|---|---|---|
id | VARCHAR(128) | The object UID. References objects.id. |
tag | VARCHAR(255) | A single tag. |
The pair (id, tag) is unique.
In PostgreSQL and SQLite it is declared UNIQUE (id, tag); in MySQL (since 5.13.0) it is the composite PRIMARY KEY (id, tag).
A secondary index idx_tags_tag_id on (tag, id) supports Locate-by-tags lookups.
parameters
A generic key/value store used internally by the KMS for database metadata.
| Column | Type | Description |
|---|---|---|
name | VARCHAR(128) | Primary key. The parameter name. |
value | VARCHAR(256) | The parameter value. |
Known parameters:
name | Meaning |
|---|---|
db_state | The database migration state: ready or upgrading. |
db_version | The version of the KMS software that last ran against this database. |
wrapping_key_id_backfilled | A one-time marker recording that the objects.wrapping_key_id backfill has completed. |
crypto_officer_activations
Records the Crypto Officer activation ceremony. One row is added each time the Crypto Officer role is activated via a split-key ceremony.
| Column | Type | Description |
|---|---|---|
activated_at | TIMESTAMP | When the activation was created (defaults to CURRENT_TIMESTAMP). |
sealed_record | TEXT | The sealed record produced by the activation ceremony (AES-256-GCM encrypted). |
revoked_at | TIMESTAMP | When the activation was revoked, or NULL while still active. |
revoked_by | VARCHAR(255) | The user who revoked the activation. |
In MySQL, an additional id INTEGER PRIMARY KEY AUTO_INCREMENT column is added.
In PostgreSQL and SQLite there is no explicit id column; the active activation is the latest row where revoked_at IS NULL.
crls
Stores the most recently generated CRL for each issuer CA, persisted so that the
public CDP endpoint (GET /public/certificates/{issuer_id}/crl) can serve the
last signed CRL immediately after a server restart without requiring a manual
generate-crl call.
One row per CA certificate. The row is replaced atomically on every CRL regeneration
(upsert on issuer_id).
| Column | Type | Description |
|---|---|---|
issuer_id | VARCHAR(128) | Primary key. The UID of the issuer CA certificate in the objects table. |
crl_der | BYTEA (PG) / BLOB (SQLite) / LONGBLOB (MySQL) | DER-encoded signed CRL bytes. |
crl_number | BIGINT | Monotonically increasing CRL sequence number (RFC 5280 §5.2.3). |
generated_at | VARCHAR(32) | ISO-8601 UTC timestamp of when this CRL was signed. |
next_update | VARCHAR(32) | ISO-8601 UTC timestamp of CRL expiry (= generated_at + validity days). |
The Redis-with-Findex backend stores each CRL as a JSON value under the key
crl:<issuer_id>.
Links between tables
objects.idis referenced byread_access.idandtags.id: one object can have many access rows and many tags.objects.wrapping_key_idpoints toobjects.id: a wrapping key is itself an object, and many objects can be wrapped by the same key.crls.issuer_idlogically referencesobjects.id(the CA certificate): one CA has at most one current CRL row.objects.ownerandread_access.useridhold user identifiers. Users are authenticated identities and are not stored in a dedicated table.parametersandcrypto_officer_activationsare standalone and do not referenceobjects.
These relationships are managed by the application layer (crate/server_database/) rather than database foreign-key constraints.
Redis with Findex
The KMS can store its entire database in Redis using the Redis-with-Findex backend. Redis-with-Findex combines application-level encryption with encrypted, searchable indexes, so the KMS can query encrypted data without revealing it to the Redis server.
Redis-with-Findex is gated behind the non-fips feature and is not available in FIPS mode.
Configuration
Redis-with-Findex requires the database URL and a master password:
[db]
database_type = "redis-findex"
database_url = "redis://localhost:6379"
redis_master_password = "password"
redis_findex_label = "label"
The corresponding environment variables are KMS_DATABASE_TYPE, KMS_DATABASE_URL (also KMS_REDIS_URL), KMS_REDIS_MASTER_PASSWORD, and KMS_REDIS_FINDEX_LABEL.
For the full database configuration reference, including TLS, clearing, and migration, see Databases.
When clear_database is set, the KMS issues a FLUSHDB to Redis on startup, deleting all keys in the selected Redis database.
What it is
With Redis-with-Findex, the KMS server encrypts all data before sending it to Redis:
- Objects and permissions are encrypted with AES-256-GCM using a key derived from a master password.
- Indexes are built with Findex, an Eviden cryptographic algorithm that produces encrypted indexes over encrypted data.
The indexes are also stored in Redis, allowing fast encrypted queries (for example
Locateby tag or attribute) without the KMS ever sending plaintext to Redis.
Redis-with-Findex provides post-quantum resistance on both the encrypted data and the encrypted indexes.
When to use it
Redis-with-Findex is most useful when:
- The KMS servers run inside a confidential VM or an enclave. In this case the secret used to encrypt the Redis data and indexes is protected by the VM or enclave and cannot be recovered at runtime by inspecting the KMS servers' memory.
- The KMS servers are run by a trusted party, but the Redis backend is managed by an untrusted third party.
It is the database selected to run the Eviden KMS in the cloud or any other zero-trust environment.
How encryption keys are derived
- A master password is provided at startup (
redis_master_password). - A 32-byte master key is derived from the password using Argon2 (salt
rediswithfindex_). - A database key is derived from the master key (salt
db) and is used to encrypt the object and permission data with AES-256-GCM. - The master key is also used by the Findex encryption layer to encrypt the searchable indexes.
The master password never leaves the KMS server; only the derived keys are used in memory.
Connection & Operation Workflow
The sequence diagram below shows how the Eviden KMS connects to Redis, initializes cryptographic keys in memory, and performs encrypted storage and indexing operations:
sequenceDiagram
autonumber
actor Client as KMS Client (CLI / REST / KMIP)
participant KMS as Eviden KMS Server (Enclave / Confidential VM)
participant Findex as Cosmian Findex Engine
participant Redis as Redis Server (Remote / Untrusted)
Note over KMS,Redis: Startup & In-Memory Key Derivation
KMS->>KMS: Derive Master Key via Argon2 (salt: rediswithfindex_)
KMS->>KMS: Derive Database Key via Master Key (AES-256-GCM)
KMS->>Redis: TCP / TLS Connect & AUTH
Redis-->>KMS: Connection established
KMS->>Redis: Check metadata keys (db_state, db_version)
Redis-->>KMS: State: ready
Note over Client,Redis: Storing an Object (e.g. Create Key)
Client->>KMS: Create AES key request
KMS->>KMS: Encrypt object data with DB Key (AES-256-GCM)
KMS->>Findex: Generate encrypted search tokens for tags & attributes
Findex-->>KMS: Encrypted index entries
KMS->>Redis: SET encrypted object by UID & update Findex keys
Redis-->>KMS: OK (Redis never sees plaintext key material or search terms)
KMS-->>Client: Key created (returns UID)
Concurrent writes
Every object write (create, update, state change, delete, and multi-object batches) runs as a single Lua script on Redis. The script checks that each object still has the value the KMS read, then applies all the writes, or none. If another writer changed an object in between, the KMS re-reads and retries the whole batch (up to 64 attempts), so concurrent updates never overwrite each other. The Findex index is updated after the object write is committed; searches discard index hits whose stored object no longer matches.
The script touches several keys in one call, which Redis Cluster rejects when the keys live in different hash slots (CROSSSLOT).
Use a standalone Redis, not Redis Cluster.
Data layout in Redis
Redis-with-Findex does not use relational tables (see Database tables for the SQL schema). Instead it stores:
| Data | Storage |
|---|---|
| Objects | AES-256-GCM encrypted values, keyed by object UID |
| Permissions | Encrypted, indexed through Findex |
| Searchable indexes | Findex encrypted indexes (Redis is used as the Findex memory layer) |
| Database metadata | Internal keys holding the database state (ready/upgrading) and version |
| Ceremony records | Encrypted records under key names obfuscated with the master key |
Migration
Version boundary: Redis-with-Findex databases created with KMS 5.12.0 or later carry a ready state marker and a version key in Redis, and start cleanly with the current KMS (5.26).
Databases created with KMS earlier than 5.12.0 do not have these markers.
The KMS refuses to start against a marker-less database and prints an error asking you to export and re-import; there is no in-place upgrade path for those databases.
Supported upgrade paths:
| Source version | Path to 5.26 |
|---|---|
| ≥ 5.12 | Upgrade directly; no data migration needed. |
| < 5.12 | Export all objects from the old KMS, start a fresh 5.26 instance, re-import. |
KMS Cache Mechanisms
The database layer uses three in-memory caches backed by
moka::future::Cache:
ObjectCache, UnwrappedCache, and RotateNameCache.
This page documents those caches and inventories the other runtime cache
mechanisms used by the server.
Unless stated otherwise, cache state is process-local and is not shared between
KMS replicas.
ObjectCache and UnwrappedCache serve object retrieval and key unwrapping.
RotateNameCache serves keyset-generation resolution, especially for delegated
HSM operations.
Runtime cache inventory
| Mechanism | Scope and stored data | Lifetime or bound |
|---|---|---|
ObjectCache | Wrapped database object and fingerprint by UID | Configurable capacity and idle age |
UnwrappedCache | Unwrapped object and wrapped-object fingerprint by UID | Configurable capacity and idle age; optional absolute TTL |
RotateNameCache | Matching keyset UIDs and attributes by selector and owner | 10,000 entries; 2-second TTL |
ObjectHandlesCache | PKCS#11 object handle by object-ID bytes, per HSM slot | 100-entry LRU; no TTL |
supported_oaep_hash_cache | Supported RSA-OAEP hash mechanisms, per HSM slot | Populated on first probe; no TTL |
KeyMetadataCache | No active implementation in the current base_hsm source | Key metadata is read from the HSM on demand |
SpireTokenCache | SHA-256 token hash to validated identity and policies | vault_token_cache_ttl_secs; expired-entry sweep at 100,000 entries |
JwksManager | JWKS URI to parsed JWK set | 60-second refresh throttle; 5-second force-refresh cooldown |
| Generated CRL cache | Issuer certificate UID to locally generated CRL | 60-second in-memory freshness window; database fallback |
| Fetched CRL cache | Distribution-point URI to downloaded CRL bytes | At most 300 seconds and only while the CRL remains fresh |
| OCSP response cache | CA and full CertID to signed response bytes | ocsp_cache_ttl_secs; at most 10,000 entries |
| JOSE CEK entry | A synthetic-UID entry in UnwrappedCache | Shares UnwrappedCache bounds and fingerprint validation |
| Microsoft DKE response | cache.exp client-cache hint, not a KMS memory cache | One day |
The detailed sections below describe the three database caches. The other runtime caches are described in the HSM, authentication/JWKS, certificate, and client cache hint sections.
Architecture overview
graph TD
CALLER -->|retrieve_object| DB[Database]
CALLER -->|get_unwrapped| GU[get_unwrapped]
CALLER -->|find_by_rotate_name| RNC[RotateNameCache]
DB -->|get| OC[ObjectCache]
OC -->|miss| BS[(Backing Store<br/>SQLite / Postgres)]
GU -->|peek| UC[UnwrappedCache]
UC -->|miss| CRYPTO[unwrap_object<br/>KEK unwrap]
RNC -->|miss| RESOLVE[Keyset resolution<br/>SQL / HSM scan]
OC -->|stores| OC_VAL["wrapped ObjectWithMetadata<br/>+ fingerprint"]
UC -->|stores| UC_VAL["unwrapped key material<br/>+ fingerprint of wrapped"]
RNC -->|stores| RNC_VAL["matching UIDs + attributes"]
style BS fill:#f9f,stroke:#333
style CRYPTO fill:#f99,stroke:#333
style RESOLVE fill:#f99,stroke:#333
style OC fill:#9f9,stroke:#333
style UC fill:#9f9,stroke:#333
style RNC fill:#9f9,stroke:#333
| Cache | Key | Value | Miss path |
|---|---|---|---|
| ObjectCache | UID string | Arc<ObjectWithMetadata> (wrapped) + fingerprint | DB fetch → insert → return |
| UnwrappedCache | UID string | unwrapped Object + fingerprint of wrapped | Crypto unwrap → insert → return |
| RotateNameCache | (name, generation, owner) | matching UIDs + KMIP attributes | SQL query or HSM scan → insert → return |
RotateNameCache is an implementation cache; it has no operator-facing
configuration. It is bounded to 10,000 entries and uses a 2-second TTL. The
cache is populated by Database::find_by_rotate_name, which resolves a keyset
name to its generations across the configured object stores. For HSM-backed
objects, a miss can require a PKCS#11 C_FindObjects scan followed by
C_GetAttributeValue calls; a hit avoids that scan on the delegated
Sign/Verify/Encrypt/Decrypt hot path.
The cache key includes the requesting owner so one user's resolution cannot be reused for another user's objects. Explicit generation filters are also isolated from bare/latest lookups. After a rotation commits, the relevant bare/latest entry is invalidated immediately; the TTL remains a bounded staleness safeguard for paths that do not explicitly invalidate it. A rotation can therefore become visible immediately through the normal commit paths, while uncovered mutation paths are stale for at most the TTL.
ObjectCache
Source: crate/server_database/src/core/object_cache.rs
Caches full ObjectWithMetadata as read from the database to eliminate repeated
DB round-trips on the hot path.
Public API
| Method | Returns | Description |
|---|---|---|
get(uid) | Option<Arc<ObjectWithMetadata>> | Lock-free lookup. Returns cheap Arc clone. |
insert(uid, owm) | DbResult<()> | Store with fingerprint of owm.object(). |
insert_arc(uid, arc_owm) | DbResult<()> | Store from existing Arc (saves one allocation). |
invalidate(uid) | — | Remove entry. |
validate_cache(uid, current) | DbResult<()> | Compare fingerprints; invalidate on mismatch. |
Callers
Database::retrieve_object()—get()on hot path,insert()on missDatabase::retrieve_object_arc()—get(),insert_arc()on missDatabase::update_object()—invalidate()on writeDatabase::validate_cache()—validate_cache()after forced re-fetch
Scenarios
S1 — Cold start (first access)
sequenceDiagram
participant C as Caller
participant DB as Database
participant OC as ObjectCache
participant BS as Backing Store
C->>DB: retrieve_object("key-1")
DB->>OC: get("key-1")
OC-->>DB: None
DB->>BS: retrieve("key-1")
BS-->>DB: ObjectWithMetadata (wrapped)
DB->>OC: insert("key-1", owm)
DB-->>C: owm
S2 — Hot path (cache hit)
sequenceDiagram
participant C as Caller
participant DB as Database
participant OC as ObjectCache
C->>DB: retrieve_object("key-1")
DB->>OC: get("key-1")
OC-->>DB: cached entry found
DB-->>C: owm via Arc unwrap_or_clone
S3 — retrieve_object_arc (zero-copy Arc path)
sequenceDiagram
participant C as Caller
participant DB as Database
participant OC as ObjectCache
participant BS as Backing Store
C->>DB: retrieve_object_arc("key-1")
DB->>OC: get("key-1")
alt Cache hit
OC-->>DB: cached Arc found
DB-->>C: Arc clone (pointer bump)
else Cache miss
OC-->>DB: None
DB->>BS: retrieve("key-1")
BS-->>DB: owm
DB->>OC: insert_arc("key-1", Arc.new(owm))
DB-->>C: Arc
end
S4 — Out-of-band mutation detected
sequenceDiagram
participant DB as Database
participant OC as ObjectCache
Note over DB: Another process mutated "key-1"
DB->>OC: validate_cache("key-1", current_db_object)
OC->>OC: fingerprint(cached) != fingerprint(current)?
OC->>OC: invalidate("key-1")
Note over OC: Next get() triggers fresh DB fetch
S5 — Object update invalidates cache
sequenceDiagram
participant C as Caller
participant DB as Database
participant OC as ObjectCache
C->>DB: update_object("key-1", new_obj, new_attrs)
DB->>OC: invalidate("key-1")
DB->>DB: persist to backing store
Note over OC: Entry removed, next get() is miss
S6 — Eviction (automatic)
moka eviction requires no explicit call:
| Policy | Trigger | Effect |
|---|---|---|
| LRU | max_capacity exceeded | Least-recently-used entry evicted |
| TTL | time_to_idle elapsed without access | Entry evicted |
RotateNameCache
Source: crate/server_database/src/core/rotate_name_cache.rs
Caches the result of Database::find_by_rotate_name, the shared keyset lookup
used to resolve RotateName and generation selectors. This is distinct from
ObjectCache: it caches a multi-object keyset query, not an individual object.
Why this cache exists
Every delegated Sign/Verify/Encrypt/Decrypt call that names a bare key UID
(no @N generation suffix) must first answer "which generation is the
latest?". For an HSM-backed store that answer is not free: it requires a full
C_FindObjects scan of the slot followed by a C_GetAttributeValue
round-trip for every object found, on every call — even for a key that has
never been rotated.
Without the cache, that scan sits directly on the hot path and, because the
lookup fans through the same Database::find_by_rotate_name chokepoint,
concurrent operations all pay it simultaneously. RotateNameCache remembers
the resolution for a short TTL (2 seconds) so repeat calls skip the scan
entirely; correctness is preserved by eagerly invalidating the relevant entry
the moment a local rotation commits (see below).
Behavior
| Property | Behavior |
|---|---|
| Key | (name, generation, owner) |
| Value | Vec<(UID, Attributes)> for matching generations |
| Default capacity | 10,000 entries |
| TTL | 2 seconds |
| Concurrency | Lock-free moka::future::Cache |
| Invalidation | By keyset name (all owners and generations) or by member UID on local writes |
| Empty results | Never cached |
On a miss, the existing multi-store lookup runs unchanged. On a hit, the
database query or HSM slot scan is skipped. The owner is part of the key to
preserve access isolation, and generation is part of the key to prevent an
explicit historical lookup from sharing the bare/latest result.
Invalidation and consistency
Every local write through Database invalidates the affected entries eagerly:
- creating an object with a
RotateName(including a re-key's new generation) clears every entry for that keyset name, for all owners and generation filters; - updating, re-labelling (HSM
CKA_LABEL), changing the state of (revoke, destroy) or deleting an object clears every entry that lists it as a member.
Empty results are not cached, so a newly created keyset is visible at once.
Writes performed by other KMS nodes sharing the same database are only seen
once the 2-second TTL expires. Paths whose correctness depends on the current
keyset state — re-key eligibility (enforce_keyset_latest) and rotation-time
generation allocation (selecting which generation to increment on the next
re-key) — therefore bypass the cache through
Database::find_by_rotate_name_uncached. The delegated crypto hot path
(Sign/Verify/Encrypt/Decrypt) does not bypass the cache.
RotateNameCache is internal and is not configurable through the server
configuration file or command-line options.
UnwrappedCache
Source: crate/server_database/src/core/unwrapped_cache.rs
Caches unwrapped key material to avoid repeated KEK-unwrap cryptographic operations. The fingerprint of the wrapped object is stored alongside the unwrapped payload so stale entries (after key re-wrapping or KEK rotation) are silently rejected.
Public API
| Method | Returns | Description |
|---|---|---|
peek(uid, wrapped) | DbResult<Option<Object>> | Returns unwrapped object if fingerprint matches. |
insert(uid, wrapped, unwrapped) | DbResult<()> | Stores unwrapped with wrapped fingerprint. |
clear_cache(uid) | — | Removes entry. |
validate_cache(uid, object) | DbResult<()> | Fingerprint check; invalidate on mismatch. |
Security guard: insert returns Err if wrapped == unwrapped (defense-in-depth
against plaintext-persistence bugs).
Callers
KMS::get_unwrapped()—peek()+insert()on miss- KMIP ReKey / ReKeyKeyPair —
clear_cache()after rotation Database::validate_cache()chain —validate_cache()for defense-in-depth
Scenarios
U1 — First unwrap (cold)
sequenceDiagram
participant G as get_unwrapped()
participant UC as UnwrappedCache
participant CR as Crypto
G->>UC: peek("key-1", wrapped_obj)
UC-->>G: None (no entry)
G->>CR: unwrap_object(wrapped_obj)
Note over CR: KEK unwrap
CR-->>G: unwrapped Object
G->>UC: insert("key-1", wrapped_obj, unwrapped_obj)
Note over UC: Stores fingerprint(wrapped) + unwrapped
G-->>G: return unwrapped
U2 — Subsequent unwrap (hot, zero crypto)
sequenceDiagram
participant G as get_unwrapped()
participant UC as UnwrappedCache
G->>UC: peek("key-1", wrapped_obj)
UC->>UC: fingerprint matches?
UC-->>G: Some(unwrapped_obj)
Note over G: No cryptographic operation
G-->>G: return unwrapped
U3 — Key re-wrapped (KEK rotation)
sequenceDiagram
participant G as get_unwrapped()
participant UC as UnwrappedCache
participant CR as Crypto
Note over G: wrapped_obj changed (new KEK after rotation)
G->>UC: peek("key-1", new_wrapped_obj)
UC->>UC: fingerprint mismatch
UC-->>G: None (stale entry rejected)
G->>CR: unwrap_object(new_wrapped_obj)
CR-->>G: unwrapped Object
G->>UC: insert("key-1", new_wrapped_obj, unwrapped)
Note over UC: New fingerprint replaces old entry
G-->>G: return unwrapped
U4 — Security guard (wrapped == unwrapped)
sequenceDiagram
participant G as get_unwrapped()
participant UC as UnwrappedCache
Note over G: Bug: caller passes already-unwrapped object
G->>UC: insert("key-1", obj, obj)
UC->>UC: wrapped == unwrapped?
UC-->>G: Err("wrapped and unwrapped objects should be different")
Note over UC: Prevents plaintext-persistence bugs
U5 — Explicit invalidation on key rotation
sequenceDiagram
participant R as ReKey / Rekeyer
participant UC as UnwrappedCache
R->>UC: clear_cache("key-1")
Note over UC: Entry removed
Note over UC: Next get_unwrapped() triggers crypto unwrap
U6 — Concurrent workers (double-unwrap acceptable)
sequenceDiagram
participant W1 as Worker 1
participant W2 as Worker 2
participant UC as UnwrappedCache
participant CR as Crypto
W1->>UC: peek("key-1", wrapped)
UC-->>W1: None (cold)
W2->>UC: peek("key-1", wrapped)
UC-->>W2: None (W1 has not inserted yet)
W1->>CR: unwrap_object(...)
CR-->>W1: unwrapped
W1->>UC: insert("key-1", wrapped, unwrapped)
Note over W2: Received None, must also unwrap
W2->>CR: unwrap_object(...)
CR-->>W2: unwrapped
W2->>UC: insert("key-1", wrapped, unwrapped)
Note over UC: Double unwrap on cold start is acceptable
End-to-end: JOSE decrypt
Full trace of POST /v1/crypto/decrypt with alg: RSA-OAEP. The RSA wrapping
key (persistent DB object, identified by kid) passes through both caches.
The RSA-OAEP CEK is cached as a separate UnwrappedCache entry, keyed by a
SHA-256 digest of the JWE encrypted_key field.
sequenceDiagram
participant J as JOSE /decrypt
participant RF as retrieve_object_for_operation
participant DB as Database
participant OC as ObjectCache
participant GU as get_unwrapped()
participant UC as UnwrappedCache
participant CR as Crypto
participant OS as OpenSSL
J->>RF: retrieve_object_for_operation(kid, Decrypt)
RF->>DB: retrieve_objects(kid)
alt ObjectCache hit
DB->>OC: get(kid)
OC-->>DB: cached (wrapped)
else ObjectCache miss
DB->>OC: get(kid)
OC-->>DB: None
DB->>DB: fetch from SQLite or Postgres
DB->>OC: insert(kid, owm)
end
DB-->>RF: owm (wrapped)
RF->>GU: get_unwrapped(kid, wrapped_obj, user)
alt UnwrappedCache hit
GU->>UC: peek(kid, wrapped_obj)
UC-->>GU: Some(unwrapped_obj)
Note over GU: No crypto
else UnwrappedCache miss
GU->>UC: peek(kid, wrapped_obj)
UC-->>GU: None
GU->>CR: unwrap_object(wrapped_obj)
Note over CR: KEK unwrap
CR-->>GU: unwrapped Object
GU->>UC: insert(kid, wrapped_obj, unwrapped_obj)
end
GU-->>RF: unwrapped Object
RF->>RF: owm.set_object(unwrapped)
RF-->>J: owm with plaintext key
J->>OS: kmip_private_key_to_openssl(owm.object())
OS-->>J: OpenSSL PKey Private
J->>OS: RSA private decrypt(encrypted_key)
OS-->>J: CEK (Content Encryption Key)
J->>OS: AES-GCM decrypt(ciphertext, CEK)
OS-->>J: plaintext
J->>UC: insert_cek(sha256(encrypted_key), cek)
Note over J,UC: CEK cached in UnwrappedCache for subsequent decrypt calls
Per-scenario cache behavior
| Scenario | ObjectCache | UnwrappedCache | DB round-trip | Crypto unwrap |
|---|---|---|---|---|
| 1st access, cold | miss → DB → insert | miss → crypto → insert | ✓ | ✓ |
| 2nd access, hot | hit | hit | — | — |
| Key re-wrapped (new KEK) | hit (wrapped) | miss → crypto → insert | — | ✓ |
| Cache evicted (TTL / LRU) | miss → DB → insert | miss → crypto → insert | ✓ | ✓ |
| Object updated in DB | invalidated → miss → DB | still valid (fingerprint unchanged) | ✓ | — |
| KEK rotated (Rekey) | invalidated | clear_cache() called explicitly | ✓ | ✓ (next access) |
JOSE CEK Cache (RSA-OAEP path)
The /v1/crypto/encrypt and /v1/crypto/decrypt endpoints support a
RSA-OAEP / RSA-OAEP-256 key-management algorithm (RFC 7516). Each
decryption requires an RSA private-key operation to unwrap the ephemeral
Content Encryption Key (CEK). When the same JWE token is decrypted
repeatedly, this operation is repeated on every call.
The CEK is stored in UnwrappedCache after the first successful unwrap so
subsequent requests for the same token skip the RSA operation entirely.
Cache key
"jose_cek_{SHA-256-hex(encrypted_key_bytes)}"
The JWE encrypted_key field (the RSA-OAEP ciphertext of the CEK) uniquely
identifies a token because RSA-OAEP encryption is randomised. SHA-256 keeps the
map key compact: 64 hex chars regardless of RSA key size.
Fingerprint source
The RSA private-key KMIP Object is passed as the fingerprint source at
insert() and peek() time. If the key is re-imported or re-wrapped (its
serialised form changes), the fingerprint stored in the cache entry no longer
matches and peek() returns None, forcing a fresh RSA-OAEP unwrap and
re-population.
/encrypt → /decrypt cross-path caching
When /encrypt is called, the freshly generated CEK is inserted into the cache
immediately after wrapping, keyed by the encrypted_key returned in the JWE
response. The first /decrypt call for that token will get a cache hit if both
calls share the same server instance and the key has not changed.
If /encrypt uses a public-key KMIP object while /decrypt uses the linked
private-key KMIP object, the fingerprints differ. In that case the first decrypt
call replaces the stale entry with a correctly fingerprinted one; all subsequent
decrypts hit the cache.
TTL and sizing
CEK cache entries share the same UnwrappedCache TTL and LRU capacity as
wrapped KMS keys:
| Parameter | CLI flag | Description |
|---|---|---|
| Max entries | --unwrapped-cache-max-size | Default 1000. Increase for workloads with many concurrent JWE tokens. |
| Time-to-idle | --unwrapped-cache-max-age | Entries evicted after this idle period. |
RFC 7516 §11.5 — implicit rejection preserved
Only genuinely unwrapped CEKs are inserted. The random substitute key generated
when RSA-OAEP decryption fails (padding oracle countermeasure) is never
cached. This preserves the constant-time rejection guarantee: an attacker
submitting an invalid encrypted_key still causes AES-GCM to fail at tag
verification, and no cache entry is written.
dir mode
The dir key-management algorithm uses a KMS-stored symmetric key directly.
That path delegates to the KMIP Encrypt/Decrypt pipeline which already
passes through UnwrappedCache via get_unwrapped(). No additional caching is
required.
Configuration
Both caches are configured via the server configuration file or CLI flags:
| Parameter | CLI flag | Default | Description |
|---|---|---|---|
object_cache_max_size | --cache-max-size | 1000 | Max entries in ObjectCache before LRU eviction |
object_cache_max_age | --cache-max-age | 15 s | Time-to-idle: entry evicted after this idle period (seconds) |
unwrapped_cache_max_size | --unwrapped-cache-max-size | 1000 | Max entries in UnwrappedCache |
unwrapped_cache_max_age | --unwrapped-cache-max-age | 15 s | Time-to-idle for UnwrappedCache entries (seconds) |
unwrapped_cache_max_ttl | --unwrapped-cache-max-ttl | (none) | Absolute time-to-live ceiling (seconds). When set, every entry is evicted at min(TTI, TTL) regardless of access frequency. See Security considerations. |
disable_unwrapped_cache | --disable-unwrapped-cache | false | Completely bypass the UnwrappedCache. Every operation performs a full KEK unwrap. See Disabling the UnwrappedCache. |
TTL vs TTI:
max_age(time-to-idle) resets on every cache hit. A frequently accessed key is never evicted by TTI alone.max_ttlis an absolute ceiling independent of access frequency. For compliance environments that require a maximum plaintext-key exposure window, always setmax_ttl.
Security considerations
-
ObjectCache never stores plaintext keys. It mirrors the database: objects are stored as-retrieved (wrapped). All callers provide the DB state.
-
UnwrappedCache validates against wrapped fingerprint.
peek()compares the caller'swrapped_objectfingerprint against the stored fingerprint. If the wrapped object changed (re-wrapped, corrupted), the entry is silently rejected. -
Security guard rejects
wrapped == unwrapped.insert()returns an error if the caller passes an already-unwrapped object as the wrapped argument. This is defense-in-depth against plaintext-persistence bugs. -
UnwrappedCache does NOT participate in persistence. Unlike ObjectCache (checked by
retrieve_objectbefore every DB read), UnwrappedCache is only consulted byget_unwrapped(). Objects from UnwrappedCache are consumed in-memory for cryptographic operations and never written back to the database. -
Concurrent cold-start double-unwrap is acceptable. If two workers call
get_unwrapped()simultaneously for a cold key, both perform the cryptographic unwrap. The secondinsert()overwrites the first. This wastes one unwrap but avoids lock contention — a tradeoff favoring throughput. -
TTI amplifies plaintext exposure window. With the default 15-second time-to-idle, a continuously accessed key's plaintext material stays resident indefinitely. For compliance environments with a bounded key-exposure requirement (e.g. FIPS operational security policies, PCI-DSS, or NIS2), set
--unwrapped-cache-max-ttlto enforce an absolute ceiling:cosmian_kms --unwrapped-cache-max-ttl 60 # evict plaintext after at most 60 s -
Memory-zeroization on eviction. When an entry is evicted from
UnwrappedCache, the plaintextObjectis explicitly zeroized before deallocation. AllZeroizing<Vec<u8>>byte buffers (symmetric keys, private-key components) andSafeBigIntfields are overwritten with zeroes. This reduces the window during which sensitive key material could be recovered from freed memory pages. -
CPU-level side-channel risk (CacheFX / Prime+Probe). Plaintext key material held in the
UnwrappedCacheoccupies resident DRAM pages. Modern CPU microarchitectural attacks (Prime+Probe, Flush+Reload) can potentially exfiltrate AES round-key material and RSA/EC private-key bits from shared L3 cache lines. These attacks require local code execution on the same physical host. Mitigations:- Keep
--unwrapped-cache-max-ttllow (≤ 60 s) to limit the attack window. - Use
--disable-unwrapped-cachein high-security deployments where KEK unwrap latency is acceptable. - Run the KMS on dedicated (non-shared) hardware or inside a hardware-enforced enclave (SEV-SNP, TDX) to eliminate co-tenant cache-sharing.
- Keep
Disabling the UnwrappedCache
The UnwrappedCache trades security for performance: every cache hit saves a
full KEK-unwrap operation but keeps plaintext key material in process memory
between calls.
To disable it entirely — so that every operation performs a fresh cryptographic unwrap and no plaintext key material is ever cached — use:
# CLI flag
cosmian_kms --disable-unwrapped-cache
# Environment variable
KMS_DISABLE_UNWRAPPED_CACHE=true cosmian_kms
# Configuration file (kms.toml / server.toml)
disable_unwrapped_cache = true
When disabled:
peek()always returnsNone, causing everyget_unwrapped()to perform the full KEK-unwrap cryptographic operation.insert()is a no-op; plaintext key material is never stored in the cache.- The
ObjectCache(wrapped objects) is not affected: database round-trips are still cached for performance.
Trade-off: Disabling the UnwrappedCache increases per-operation latency by one full asymmetric-key operation (RSA-OAEP or ECDH unwrap). For a 2048-bit RSA KEK on a modern server, this is typically 0.5–2 ms per call. For symmetric KEKs (AES-256 key-wrap), the overhead is under 0.1 ms.
The ObjectCache can be configured to very short TTI or very small capacity to
reduce wrapped-object retention, but it cannot be disabled via a flag — set
--cache-max-age 1 --cache-max-size 1 to minimise its footprint if needed.
HSM slot caches
Source: crate/hsm/base_hsm/src/slots.rs and
crate/hsm/base_hsm/src/session/session_impl.rs.
SlotManager creates one object-handle cache and one OAEP hash support cache
for each HSM slot.
The caches are in memory and shared with sessions opened for that slot.
ObjectHandlesCache
ObjectHandlesCache maps an object identifier byte vector to a
CK_OBJECT_HANDLE.
Session::get_object_handle() checks the cache before querying PKCS#11.
On a miss, it searches CKA_ID, falls back to CKA_LABEL if needed, then
inserts the discovered handle.
The cache is a 100-entry LruCache protected by a Mutex.
A hit updates LRU recency and therefore still takes the mutex.
There is no time-based expiry.
The KMS removes the entry after destroying its object; clear_object_handles()
clears the cache explicitly.
OAEP hash support cache
supported_oaep_hash_cache is a slot-shared
Mutex<Option<Vec<CK_MECHANISM_TYPE>>>.
On its first call, Session::get_supported_oaep_hash() creates a temporary
RSA-2048 key pair and tests RSA-OAEP encryption with SHA-1, SHA-256, SHA-384,
and SHA-512.
It stores the mechanisms that succeed and reuses the list for later calls.
The cache has no TTL or separate capacity and is discarded with its
SlotManager.
Key metadata is not cached
The current base_hsm source has no KeyMetadataCache type or field.
Session::get_key_metadata() reads the relevant metadata from PKCS#11 when
called; ObjectHandlesCache caches handles, not key metadata.
The SlotManager session pool is a resource-reuse pool, not a cache of key or
object data.
Authentication and JWKS caches
SPIRE token validation
Source: crate/server/src/middlewares/spire_token.rs.
SpireTokenCache stores successful auth-verifier lookup results under the
SHA-256 hash of the raw token.
The cached value is the resolved entity and policies; the raw bearer token is
not stored in the cache.
Failed validations are not cached.
vault_token_cache_ttl_secs controls entry lifetime, defaults to 30 seconds,
and can be set to 0 to disable cache hits.
When the map reaches 100,000 entries, insertion triggers an expired-entry
sweep; live entries are not evicted to enforce a hard capacity.
A still-valid cached token can therefore remain accepted until its TTL expires
after the auth-verifier revokes it.
See the SPIRE/SPIFFE integration guide for
the operational setting.
JWKS verification keys
Source: crate/server/src/middlewares/jwt/jwks.rs.
JwksManager keeps parsed JWK sets in a process-local map keyed by JWKS URI.
Initialization fetches the configured sets.
Calls to refresh() fetch no more often than once every 60 seconds; a forced
refresh bypasses that throttle but has a 5-second cooldown.
A refresh replaces the in-memory map with the sets fetched successfully in
that refresh.
The manager has no entry-count bound or disk persistence.
Certificate response caches
CRL caches
The server uses two distinct CRL caches:
GENERATED_CRL_CACHEstores the latest locally generated CRL by issuer certificate UID. An entry is used for up to 60 seconds, after which the public CRL endpoint reloads the sharedcrlsdatabase table and refreshes its local copy. If the database read fails, the handler may serve the previous in-memory copy.CRL_CACHE_MAPstores downloaded CRLs by distribution-point URI for certificate validation. An entry is reused for at most 300 seconds and only while the CRL remains valid throughnextUpdate. Expired entries are purged when a fetched CRL is inserted.
Both caches are process-local hash maps protected by Tokio RwLocks.
They have no explicit entry-count limit.
Sources: crate/server/src/core/operations/generate_crl.rs and
crate/server/src/core/operations/validate.rs.
OCSP response cache
Source: crate/server/src/routes/ocsp/handler.rs.
OCSP_CACHE stores signed DER responses by CA UID and the complete CertID
(serial, hash algorithm, issuer-name hash, and issuer-key hash).
The configured ocsp_cache_ttl_secs controls both entry expiry and the
response's advertised cache lifetime; its default is 86,400 seconds.
The cache holds at most 10,000 entries and purges expired entries before
inserting at capacity.
Only single-CertID requests without an honored nonce are cacheable.
Unknown certificate statuses and responses under a compromised CA are not
cached.
The Revoke operation immediately evicts the response for the revoked
certificate; other entries expire by TTL.
Client-side cache hints
The Microsoft DKE endpoint includes a cache.exp value in its public-key
response, set to one day in the future.
This tells the Office client how long it may cache the public key; the KMS does
not keep a corresponding in-memory DKE key cache.
See the Microsoft DKE integration
guide.
Authentication
The KMS server offers flexible authentication options, supporting multiple authentication methods that can operate independently or in combination with each other, providing multi-factor authentication capabilities.
Authentication Modes
Non-authenticated Mode (Default)
By default, if no authentication methods are configured, the server operates in non-authenticated mode. All requests are mapped to the default user, which can be configured using:
--default-username <DEFAULT_USERNAME>
The default username to use when no authentication is configured
[env: KMS_DEFAULT_USERNAME=]
[default: admin]
Authenticated Mode
When one or more authentication methods are enabled, the server requires successful authentication for all requests. The authentication mechanism works in a cascading fashion, attempting each configured method until one succeeds.
Available Authentication Methods
The KMS server supports three primary authentication methods:
- TLS Client Certificates: Authentication based on X.509 client certificates
- JWT Tokens: Authentication with OpenID-compliant JWT access tokens
- API Tokens: Authentication using a pre-shared API token
These methods can be used individually or in combination for enhanced security.
Authentication Flow
When multiple authentication methods are configured, the server follows this process:
- If TLS Client Certificate authentication is enabled and a valid certificate is presented, the user is authenticated
- If JWT authentication is enabled and a valid JWT token is presented, the user is authenticated
- If API Token authentication is enabled and a valid token is presented, the user is authenticated
- If all configured authentication methods fail, access is denied with a 401 Unauthorized response
A successful authentication at any step will grant access and subsequent authentication methods will be skipped.
Configuring Authentication Methods
TLS Client Certificate Authentication
To enable certificate-based authentication, the server must be started with TLS and a certificate authority (CA) for client verification:
# For FIPS mode (default build):
docker run -p 9998:9998 --name kms ghcr.io/cosmian/kms-fips:latest \
--tls-cert-file server.crt \
--tls-key-file server.key \
--clients-ca-cert-file client_ca.cert.pem
# For non-FIPS mode:
# docker run -p 9998:9998 --name kms ghcr.io/cosmian/kms:latest \
# --tls-p12-file kms.server.p12 \
# --tls-p12-password password \
# --clients-ca-cert-file client_ca.cert.pem
The server extracts the username from the certificate's Subject Common Name (CN) field. Specifically, the Common Name of the client certificate subject is used directly as the username for authentication purposes. If the certificate is valid but does not contain a Common Name, authentication will fail.
Example of a subject with a CN field:
C=FR, ST=Ile-de-France, L=Paris, O=Cosmian Tech, CN=john.doe@example.com
In this example, john.doe@example.com would become the authenticated username.
Clients must present a valid certificate signed by the specified authority.
JWT Token Authentication
The server supports JWT tokens compatible with OpenID Connect. Configure JWT authentication with:
docker run -p 9998:9998 --name kms ghcr.io/cosmian/kms:latest \
--jwt-auth-provider="https://accounts.google.com,https://www.googleapis.com/oauth2/v3/certs,cosmian_kms"
The JWT authentication provider configuration uses the format: "JWT_ISSUER_URI,JWKS_URI,JWT_AUDIENCE_1,JWT_AUDIENCE_2,..." where:
- JWT_ISSUER_URI: The issuer URI of the JWT token (required)
- JWKS_URI: The JWKS (JSON Web Key Set) URI (optional, defaults to
<JWT_ISSUER_URI>/.well-known/jwks.json) - JWT_AUDIENCE_n: Zero or more allowed audiences (optional). If multiple are provided, validation succeeds if the token
audcontains any of them (any-of). If omitted, audience validation is skipped.
Examples:
"https://accounts.google.com,https://www.googleapis.com/oauth2/v3/certs,my-audience""https://auth0.example.com,,my-app"(JWKS URI will default)"https://keycloak.example.com/auth/realms/myrealm,,"(no audience, JWKS URI will default)"https://issuer.example.com,https://issuer.example.com/jwks.json,frontend,cli"(multi-audience)
JWT tokens must be passed in the HTTP Authorization header:
Authorization: Bearer <JWT_TOKEN>
The server extracts the username from the token's email claim.
Supported Signing Algorithms
The KMS server automatically detects the signing algorithm from the JWT header (alg claim) and validates accordingly. The following signing algorithms from the jsonwebtoken library are supported; tokens using the none algorithm (for example, Algorithm::None / alg: "none") are explicitly rejected:
| Category | Algorithms |
|---|---|
| HMAC (symmetric) | HS256, HS384, HS512 |
| RSA PKCS#1 | RS256, RS384, RS512 |
| RSA-PSS | PS256, PS384, PS512 |
| ECDSA | ES256, ES384 |
| EdDSA | EdDSA (Ed25519) |
The algorithm is picked up from the token's alg header — no server-side configuration is required. The signing key must be published in the JWKS endpoint and matched by its kid claim.
PKCE Support
The KMS supports PKCE (Proof Key for Code Exchange) in two complementary ways:
- CLI / API clients (
ckmsand direct API usage): PKCE is used to obtain JWT tokens from the IDP. The client secret is optional — PKCE provides the security guarantee instead. - KMS Web UI: PKCE is mandatory. The browser login flow always sends
code_challenge_method=S256. The IDP application must be configured accordingly (see the PKCE Authentication guide for per-provider instructions).
For detailed information including required IDP settings, provider-specific examples, and troubleshooting, see the PKCE Authentication guide.
Multiple Identity Providers
To support multiple identity providers, repeat the JWT authentication provider parameter:
--jwt-auth-provider="https://accounts.google.com,https://www.googleapis.com/oauth2/v3/certs,cosmian_kms,another_client_id" \
--jwt-auth-provider="https://login.microsoftonline.com/<TENANT_ID>/v2.0,https://login.microsoftonline.com/<TENANT_ID>/discovery/v2.0/keys,<CLIENT_ID>"
API Token Authentication
API Token authentication uses a symmetric key stored in the KMS as the authentication token:
-
Generate a symmetric key and note its ID:
ckms sym keys create -
Export the key in base64 format:
ckms sym keys export -k <SYMMETRIC_KEY_ID> -f base64 api_token.base64 -
Start the server with the API token ID:
docker run -p 9998:9998 --name kms ghcr.io/cosmian/kms:latest \
--api-token-id <SYMMETRIC_KEY_ID>
-
Configure the client to use the API token:
Authorization: Bearer <BASE64_TOKEN>
When using API token authentication, the authenticated user will be the default username.
Force Default Username
If you want to enforce a consistent username regardless of the authentication method, use:
--force-default-username <true|false>
Force using the default username regardless of the authentication method
[env: KMS_FORCE_DEFAULT_USERNAME=]
[default: false]
When enabled, the server still performs the authentication validation to ensure the client has valid credentials, but it ignores the username that would normally be extracted (such as the certificate's Common Name or JWT email claim) and instead maps all authenticated requests to the default username.
This feature is particularly useful in scenarios where:
- You want consistent user identity across all requests regardless of authentication method
- You prefer to manage access control independently from the authentication credentials
- You're transitioning between authentication methods but need to maintain consistent audit trails
When force-default-username is enabled with multiple authentication methods, the server will still cascade through the authentication methods, but always use the default username upon successful authentication.
Multi-Factor Authentication Examples
Example 1: Client Certificate and JWT Authentication
# For FIPS mode (default build):
docker run -p 9998:9998 --name kms ghcr.io/cosmian/kms-fips:latest \
--tls-cert-file server.crt \
--tls-key-file server.key \
--clients-ca-cert-file client_ca.cert.pem \
--jwt-auth-provider="https://accounts.google.com,https://www.googleapis.com/oauth2/v3/certs,"
# For non-FIPS mode:
# docker run -p 9998:9998 --name kms ghcr.io/cosmian/kms:latest \
# --tls-p12-file kms.server.p12 \
# --tls-p12-password password \
# --clients-ca-cert-file client_ca.cert.pem \
# --jwt-auth-provider="https://accounts.google.com,https://www.googleapis.com/oauth2/v3/certs,"
In this configuration:
- Clients can authenticate using either a valid client certificate or a valid JWT token
- If both are provided, the certificate is checked first
Example 2: JWT and API Token Authentication
docker run -p 9998:9998 --name kms ghcr.io/cosmian/kms:latest \
--jwt-auth-provider="https://accounts.google.com,https://www.googleapis.com/oauth2/v3/certs," \
--api-token-id <SYMMETRIC_KEY_ID>
- Clients can authenticate using either a valid JWT token or the API token
- JWT authentication is attempted first, followed by API token verification
Common Identity Provider Configurations
Google ID Tokens
--jwt-auth-provider="https://accounts.google.com,https://www.googleapis.com/oauth2/v3/certs,"
Auth0
--jwt-auth-provider="https://<your-tenant>.<region>.auth0.com/,,"
Note: the trailing / is required in the issuer URI. The JWKS URI will default to the well-known endpoint.
Microsoft Entra ID (Azure AD)
--jwt-auth-provider="https://login.microsoftonline.com/<TENANT_ID>/v2.0,https://login.microsoftonline.com/<TENANT_ID>/discovery/v2.0/keys,<CLIENT_ID>"
Okta
--jwt-auth-provider="https://<OKTA_TENANT_NAME>.com,https://<OKTA_TENANT_NAME>.com/oauth2/v1/keys,<OKTA_CLIENT_ID>"
Using PKCE Authentication with KMS
This document covers PKCE (Proof Key for Code Exchange) authentication with the Eviden KMS, for two distinct contexts:
- CLI / API clients — the
ckmscommand-line tool and any direct API client uses PKCE to authenticate against the KMS server. Client secrets are optional in this flow. - KMS Web UI — the browser-based UI uses PKCE to log users in through an OIDC Identity Provider (IDP). PKCE is mandatory for the web UI flow and cannot be disabled.
Overview
PKCE enhances the security of OAuth 2.0 authentication flows by eliminating the need for client secrets. This makes it particularly valuable for:
- Public clients that cannot securely store client secrets
- Mobile applications
- Single-page applications
- Desktop applications
- CLI tools
Benefits of PKCE
- Improved Security: Eliminates the need to store and manage client secrets
- Simplified Deployment: Reduces configuration complexity for public clients
- Protection Against CSRF & Authorization Code Interception: The code verifier provides additional security
- Standards Compliance: Follows OAuth 2.0 and OpenID Connect standards
How PKCE Works
-
Authorization Request:
- Client generates a random code verifier and derives a SHA-256 code challenge from it
- Client requests authorization with the code challenge (
code_challenge_method=S256) - User authenticates and the IDP issues an authorization code
-
Token Exchange:
- Client sends the authorization code and the original code verifier to the token endpoint
- The IDP verifies that the code verifier matches the previously received challenge
- The IDP issues access and ID tokens upon successful verification
Web UI — Configuring Your Identity Provider
The KMS web UI login flow is a strict OIDC Authorization Code + PKCE flow. Every parameter listed below is hardcoded by the server; your IDP application must be configured to match them exactly.
Mandatory IDP Application Settings
| Requirement | Value the KMS sends | What to configure in the IDP |
|---|---|---|
| Grant type | grant_type=authorization_code | Enable the Authorization Code grant on the IDP application |
| Token endpoint auth method | Client credentials are sent as form body fields (client_id + optional client_secret) | Set the token endpoint authentication method to client_secret_post — not client_secret_basic (HTTP Basic), which is the default in many IDPs |
| PKCE | code_challenge_method=S256 with a 32-byte random verifier | Enable PKCE on the application; S256 must be supported (plain is not accepted) |
| Response type | response_type=code | Ensure the Authorization Code response type is allowed |
| Scopes | scope=openid email | Allow both openid and email scopes; the email claim must be included in the returned ID token — without it the KMS cannot identify the user |
Audience (aud) claim | Validated against the configured client_id (exact match) | The ID token's aud claim must exactly equal the client_id string. Some IDPs (e.g. Keycloak) add extra audience values or service-account names by default — disable this or add an audience mapper that restricts aud to the client_id only |
| Redirect URI | <KMS_PUBLIC_URL>/ui/callback | Register this exact URI as an allowed redirect/callback URI in the IDP application |
Client Secret
The client secret is optional. If configured, it is sent as a client_secret form field alongside the other token exchange parameters (client_secret_post method). If your IDP requires a client secret, set it via:
[oidc]
ui_oidc_client_secret = "your-secret-here"
Provider-Specific Notes
Auth0
- In the Auth0 dashboard, set Token Endpoint Authentication Method to
POST(this corresponds toclient_secret_post). - Enable PKCE on the application (Applications → Settings → Advanced → Grant Types → tick Authorization Code).
- Under Advanced Settings → OAuth, set OIDC Conformant to ON.
- The
audclaim in Auth0 ID tokens equals theclient_idby default — no extra configuration needed.
Microsoft Entra ID (Azure AD)
- Register a Single-Page Application (SPA) or Web application. Entra ID enables PKCE automatically for SPA registrations.
- The
audclaim in Entra ID ID tokens equals the Application (client) ID — this matches the KMS expectation. - Entra ID uses
client_secret_postby default for web applications that have a secret; for SPA applications no secret is used. - Required scopes:
openid,email(orprofileifemailis provided via Microsoft Graph).
Keycloak
- In Client Settings, set Access Type to confidential (if using a secret) or public (secret-less).
- Standard Flow Enabled: ON.
- Proof Key for Code Exchange Code Challenge Method: S256.
- Client Authentication → set Client Authenticator to Client Id and Secret and Token Endpoint Auth Method to POST (
client_secret_post). - Audience: by default Keycloak may add the Keycloak-internal service account to the
audclaim. Add a Hardcoded audience mapper (or Audience resolve mapper restricted to the client ID) to ensureaudcontains only theclient_id.
- Google's OAuth2 endpoints officially support PKCE but still require a client secret.
- The ID token's
audequals the OAuth2 client ID. - Required scopes:
openid,email.
CLI / API Client — PKCE with Optional Client Secret
The KMS CLI (ckms) and API clients use PKCE to authenticate against the KMS server. The client secret is optional in this flow.
Example: Entra ID
-
CLI configuration
[http_config.oauth2_conf] client_id = "f052524e-7518-40e7-2579-219c0b48b125" authorize_url = "https://login.microsoftonline.com/612da4de-35c0-42de-ba56-174c4e562c96/oauth2/authorize" token_url = "https://login.microsoftonline.com/612da4de-35c0-42de-f3c6-174b69062c96/oauth2/token" scopes = [ "email", "openid", ] # client_secret = <-- Not Set -
KMS Server Configuration
Important: on Entra ID, configure the redirect URL (
http://localhost:17899/authorization) as Native/Desktop (not Single Page Application).[idp_auth] # issuer,jwks,audience (audience omitted) jwt_auth_provider = ["https://login.microsoftonline.com/612da4de-35c0-42de-f3c6-174b69062c96/v2.0,https://login.microsoftonline.com/612da4de-35c0-42de-f3c6-174b69062c96/discovery/v2.0/keys,"]
Example: Auth0
-
CLI configuration
[http_config.oauth2_conf] client_id = "OUfH4FuzDAW99Ck3R4Rb7ROziOZEalIH" authorize_url = "https://acme.eu.auth0.com/authorize" token_url = "https://acme.eu.auth0.com/oauth/token" scopes = [ "email", "openid", ] # client_secret = <-- Not SetNote: Google's IdP officially supports PKCE but still requires a client secret.
-
KMS Server Configuration
[idp_auth] jwt_auth_provider = ["https://acme.eu.auth0.com/,https://acme.eu.auth0.com/.well-known/jwks.json,"]
The client handles:
- Code challenge generation using SHA-256
- Automatic inclusion of PKCE parameters in authorization requests
- Code verifier inclusion during token exchange
Server-Side Handling
The KMS server validates JWT tokens using JWKS (JSON Web Key Sets), which is compatible with PKCE-obtained tokens. The server:
- Extracts the JWT token from the
Authorization: Bearerheader - Validates the token's signature using the JWKS endpoint
- Verifies the token's claims (issuer, audience, expiration, etc.)
- Extracts the user's identity from the
emailclaim
Transitioning from Client Secret to PKCE
- Update your client code to use the PKCE-enabled client library
- Configure your identity provider to support PKCE (see provider notes above)
- Remove client secrets from your configuration (CLI flow only — the web UI always uses
client_secret_postif a secret is present)
The server-side JWT validation remains unchanged.
Troubleshooting
| Symptom | Likely cause |
|---|---|
| Token exchange returns 401 | IDP requires client_secret_basic but the KMS sends client_secret_post — change the IDP application's token endpoint auth method |
Token validation failed: InvalidAudience | The ID token aud does not exactly match client_id — see the Keycloak or provider-specific notes above |
Missing email claim / user ID is empty | The IDP application does not include email in the ID token — enable the email scope and/or add an email claim mapper |
| IDP rejects the authorization request | The IDP application does not support response_type=code or PKCE with code_challenge_method=S256 — enable these in the IDP application settings |
Missing PKCE verifier on callback | The browser session was lost (e.g. the session cookie expired or the server restarted between login and callback) |
References
Authorizing users with access rights
The authorization system in the Eviden Key Management Service (KMS) operates based on two fundamental principles:
-
Ownership: Every cryptographic object has an assigned owner. The ownership is established when an object is created using any of the following KMIP operations:
Create,CreateKeyPair, orImport. As an owner, a user holds the privilege to carry out all supported KMIP operations on their objects. -
Access rights delegation: owners can grant access rights, allowing one or more users to perform certain KMIP operations on an object. When granted such rights, a user can invoke the corresponding KMIP operation on the KMS for that particular object. The owner retains the authority to withdraw these access rights at any given time.
Table of Contents
- Delegable KMIP operations
- The Get super-privilege
- Special handling of the Create permission
- Privileged users
- The wildcard user *
- HSM keys and authorization
- Authentication vs. authorization
- Typical workflow: per-user keys with limited permissions
- Access management endpoints
- Authorization rules summary
Delegable KMIP operations
Owners can delegate the following KMIP operations to other users via the grant and revoke endpoints (or the CLI commands ckms access-rights grant / ckms access-rights revoke):
| Operation | Description |
|---|---|
create | Create new cryptographic objects (symmetric keys, key pairs, …) |
certify | Issue or renew X.509 certificates |
decrypt | Decrypt ciphertext using a managed key |
derive_key | Derive a new key from an existing key |
destroy | Permanently destroy an object |
encrypt | Encrypt plaintext using a managed key |
export | Export an object (key material + metadata) from the KMS |
get | Retrieve an object — this is a super-privilege (see below) |
get_attributes | Read the KMIP attributes of an object |
hash | Compute a cryptographic hash |
import | Import an external object into the KMS |
locate | Search for objects matching given attributes |
mac | Compute a Message Authentication Code |
revoke | Revoke (deactivate) an object |
rekey | Re-key an existing symmetric key |
sign | Generate a digital signature |
signature_verify | Verify a digital signature |
validate | Validate a certificate chain |
set_attribute | Set (replace) an attribute on an object |
modify_attribute | Modify an existing attribute on an object |
add_attribute | Add a new attribute value to an object |
delete_attribute | Remove an attribute from an object |
Multiple operations can be granted or revoked in a single call. For example, using the CLI:
# Grant encrypt and decrypt to user "alice"
ckms access-rights grant alice -i <object-uid> encrypt decrypt
# Revoke the get privilege from user "bob"
ckms access-rights revoke bob -i <object-uid> get
The Get super-privilege
The Get operation has a special role in the permission model: it acts as a super-privilege that implies every other
object-level operation.
When checking whether a user is authorized to perform a given operation on an object, the KMS evaluates the following rules in order:
- Owner check — if the requesting user is the owner of the object, access is always granted.
- Explicit permission — if the user has been explicitly granted the requested operation (e.g.
encrypt), access is granted. Getfallback — if the user holds theGetpermission on the object, access is granted regardless of the specific operation requested.
In other words, granting Get to a user on an object is equivalent to granting that user encrypt, decrypt,
export, sign, derive_key, and every other object-level operation — except lifecycle operations (revoke,
destroy) which still require their own explicit grant.
This design allows owners to share full read/use access to an object with a single permission, without individually enumerating every operation.
Because Get implies all other operation-level permissions, it should be granted with care.
If you only need a user to encrypt data with a key, grant encrypt — not get.
Practical example
| Granted permissions | Can the user encrypt? | Can the user export? | Can the user destroy? |
|---|---|---|---|
encrypt | Yes | No | No |
get | Yes | Yes | No |
encrypt, destroy | Yes | No | Yes |
get, destroy | Yes | Yes | Yes |
The destroy and revoke operations are never implied by get. They must always be granted explicitly
because they are irreversible lifecycle transitions.
Special handling of the Create permission
The Create operation is not bound to a specific object — it controls whether a user is allowed to create new objects
in the KMS. Internally it is stored against the wildcard object identifier *.
- When granting or revoking
create, no object UID is required. Createcan be combined with object-level operations in the same request; the server will separate and process them accordingly.
Privileged users
By default, all users are allowed to create or import objects in the KMS.
However, when the KMS server is configured with a list of privileged users, object creation rights are restricted as follows:
- Privileged users can create or import objects and are authorized to grant or revoke object creation permissions for other users.
- Regular users cannot create or import objects unless they have explicitly been granted permission by a privileged user.
- Regular users cannot grant or revoke creation permissions for others.
- Privileged users cannot revoke object creation permissions from other privileged users.
Operations gated by the privileged-user restriction
Because the following operations all result in a new cryptographic object being created in the KMS, they are all subject to the same privileged-user check:
| Operation | Reason |
|---|---|
Create | Creates a new symmetric key or secret data object |
CreateKeyPair | Creates a new asymmetric key pair |
Import | Imports an external object into the KMS |
Register | Registers an externally-generated object |
Certify | May create a new key pair when issuing a certificate |
ReKey | Creates a new replacement symmetric key |
ReKeyKeyPair | Creates a new replacement asymmetric key pair |
ReKey and ReKeyKeyPair also require the caller to hold the Rekey permission on the existing key being
re-keyed. Both conditions must be satisfied: the user must be allowed to create new objects and be allowed
to rekey the specific existing key.
The wildcard user *
In addition to regular users, a special user called * (the wildcard user) can be used to grant access rights on
objects to all users. When a permission is granted to *, every authenticated user benefits from that permission
on the targeted object. Individual per-user grants are merged with the wildcard grants when evaluating access.
HSM keys and authorization
Keys stored in an HSM follow a stricter permission model than regular KMS keys. Authorization metadata (owner, grants) is still managed by the KMS, but two important differences apply.
Comparison with regular KMS keys
| Aspect | KMS keys | HSM keys |
|---|---|---|
| Key material stored in | KMS database (encrypted) | HSM hardware |
Get is a super-privilege | Yes — implies all operations | No — each operation must be granted explicitly |
Get ↔ Export equivalence | No | Yes — holding either grants both |
Destroy / Revoke delegable | Yes | No — blocked; admin-only |
Create | Any user (or privileged users if configured) | HSM admin only |
Locate visibility | All owned / granted objects | Non-admins see only keys with ≥ 1 explicit grant |
Who is an HSM admin?
Users listed in the server's hsm_admin configuration for a given HSM instance are
its admins. Admins bypass all permission checks for that HSM — they can create,
destroy, and perform any operation on its keys.
Permission evaluation for HSM keys
Request arrives for operation OP on key hsm::<model>::<slot>::<id>
│
├─ Is the user an HSM admin for this instance? ──▶ YES → Granted
│
├─ Does the user have OP explicitly granted? ──────▶ YES → Granted
│
├─ Is OP = Export and user has Get? ───────────────▶ YES → Granted
├─ Is OP = Get and user has Export? ─────────────▶ YES → Granted
│
└─ Otherwise ──────────────────────────────────────────────▶ Denied
What can and cannot be delegated
| Operation | Delegable via grant? | Notes |
|---|---|---|
encrypt, decrypt, sign, mac | Yes | All standard cryptographic operations |
get | Yes | Also implies export (equivalence) |
export | Yes | Also implies get (equivalence) |
get_attributes, locate | Yes | |
set_attribute, modify_attribute, add_attribute, delete_attribute | Yes | Operate on KMS metadata only; do not access HSM hardware |
create | Yes (admin to another admin) | Non-admin cannot receive create on HSM |
destroy | No | Blocked — admin-only, cannot be delegated |
revoke | No | Blocked — HSM objects do not use KMIP lifecycle states |
Unlike regular KMS keys, granting Get on an HSM key does not imply encrypt,
decrypt, sign, or any other operation. Each operation must be granted
individually.
See the HSM operations page for HSM admin configuration details.
Authentication vs. authorization
It is important to distinguish authentication from authorization:
- Authentication determines who the user is. The KMS supports TLS client certificates, JWT tokens, and API tokens. See the Authentication page for details on how to configure these methods and how user identities are established.
- Authorization determines what an authenticated user is allowed to do with a given cryptographic object. This is the permission model described on this page.
An API token (used for authentication) is not the same thing as a symmetric key stored in the KMS. The API token proves the user's identity; the symmetric key is a cryptographic object the user may or may not have permission to use.
Typical workflow: per-user keys with limited permissions
The kms.toml configuration file controls server-level settings only (authentication methods, database backend,
TLS, privileged users, etc.). It does not contain any user-to-key permission mapping.
Per-object access rights are managed dynamically at runtime through the REST API (/access/grant, /access/revoke)
or the CLI (ckms access-rights grant / ckms access-rights revoke).
The only authorization-related setting in kms.toml is privileged_users, which restricts who can create or import
new objects (see Privileged users above).
A common deployment pattern is to have an administrator create one symmetric key per user and grant only the
operations each user needs (e.g. encrypt and decrypt).
Step 1 — Create the key (as admin/owner)
# The admin creates a 256-bit AES key and tags it for easy lookup
ckms sym keys create --algorithm aes --number-of-bits 256 --tag user-alice-key
The command returns the key's unique identifier, for example a]b2c3d4-....
Step 2 — Grant limited permissions
# Grant only encrypt and decrypt to alice (identified by her authenticated username)
ckms access-rights grant alice@example.com -i a]b2c3d4-... encrypt decrypt
Alice can now encrypt and decrypt using this key, but she cannot export it, destroy it, or perform any other operation on it.
Step 3 — Alice uses the key
Alice authenticates to the KMS (via her client certificate, JWT token, or API token) and calls the encrypt/decrypt
endpoints referencing the key UID. The server verifies she holds the encrypt / decrypt permission before
proceeding.
Step 4 — Revoke access (if needed)
ckms access-rights revoke alice@example.com -i a]b2c3d4-... encrypt decrypt
Do not grant get if you only want to allow encrypt/decrypt — get is a super-privilege that implies all
object-level operations (see above).
Access management endpoints
The KMS exposes the following REST endpoints to manage access rights:
| Method | Endpoint | Description |
|---|---|---|
| POST | /access/grant | Grant operations on an object to a user |
| POST | /access/revoke | Revoke operations on an object from a user |
| GET | /access/list/{object_id} | List all access rights granted on an object (owner only) |
| GET | /access/owned | List all objects owned by the authenticated user |
| GET | /access/obtained | List all access rights obtained by the authenticated user |
| GET | /access/create | Check whether the authenticated user can create objects |
| GET | /access/privileged | Check whether the authenticated user is privileged |
Authorization rules summary
| Scenario | Access granted? |
|---|---|
| User is the object owner | Always |
| User has the exact requested operation granted | Yes |
User has Get granted (any operation except lifecycle) | Yes |
| User has no matching permission | Denied |
| User tries to grant/revoke their own permissions | Denied |
| Non-owner tries to grant permissions | Denied |
Role Management and Key Ceremony
Cosmian KMS supports two built-in roles, Operator and CryptoOfficer, so that day-to-day cryptographic use (encrypt, sign, decrypt) can be kept separate from key-lifecycle administration (create, activate, destroy, cross-user access). For deployments that want extra assurance around who can become a CryptoOfficer, the role can optionally require a split-key ceremony: instead of one person activating the role alone, the key that grants it is split across several people, and all of them must cooperate to activate it.
Table of Contents
- Role Management and Key Ceremony
The Officer/Operator two roles model
graph TB
subgraph "Role model"
CO["🔐 CryptoOfficer<br/>Lifecycle: Create, Import, Certify,<br/>Activate, Revoke, Destroy, ReKey,<br/>Get, Export, Attribute management<br/>+ ownership bypass on all objects<br/>+ all Operator operations (incl. crypto use)"]
Op["👤 Operator (default)<br/>Crypto use: Encrypt, Decrypt,<br/>Sign, MAC, Hash,<br/>GetAttributes, Locate, Validate"]
end
CO -. "superset of" .- Op
| Role | Config key | Allowed KMIP operations | Can access other users' objects? |
|---|---|---|---|
| Operator | (default, no config key) | Encrypt, Decrypt, Sign, SignatureVerify, MAC, Hash, GetAttributes, Locate, Validate | No |
| CryptoOfficer | crypto_officer_users | All Operator operations + Create, Certify, Import, Get, Export, ReKey, DeriveKey, Activate, Revoke, Destroy, Set/Modify/Add/DeleteAttribute, CreateSplitKey, JoinSplitKey, RNGSeed | Yes, ownership bypass |
RNGSeed (additional input to the server DRBG) is restricted to Crypto Officers once roles are configured; RNGRetrieve stays available to every authenticated user.
When crypto_officer_users is configured but a user is not in the list, the server
assigns the Operator role (minimum privilege). Users are never silently promoted.
The CryptoOfficer ownership bypass applies to KMS-managed objects only. Keys stored in an HSM are not covered: access to them stays governed by the HSM's own admin rules, regardless of CryptoOfficer status.
Turning on CryptoOfficer
There are two ways to grant the CryptoOfficer role, chosen per deployment.
Mode 1: Config-only (no ceremony)
[roles]
crypto_officer_users = ["key-mgr@example.com"]
crypto_officer_require_ceremony = false # default
key-mgr@example.com is a CryptoOfficer on first connection. Suitable when physical security
controls or organisational policy already enforce the required trust level.
Mode 2: Split-key ceremony required
[roles]
crypto_officer_users = [
"key-mgr@example.com",
"co-backup@example.com",
"co-auditor@example.com",
]
crypto_officer_require_ceremony = true
ceremony_secret = "0123456789abcdef0123456789abcdef0123456789abcdef0123456789abcdef"
CryptoOfficer privileges are inactive at startup. At least 3 users must be listed
in crypto_officer_users when require_ceremony = true (the server rejects fewer).
Each configured CO candidate activates independently by running their own ceremony
(JoinSplitKey with a fresh set of shares). Multiple COs can be simultaneously active
at any time — activating your own ceremony does not revoke any other currently active
CO.
Walkthrough: a 3-person ceremony
The diagram below follows a ceremony with three custodians, Alice, Bob, and Carol, (which is also the minimum the KMS accepts).
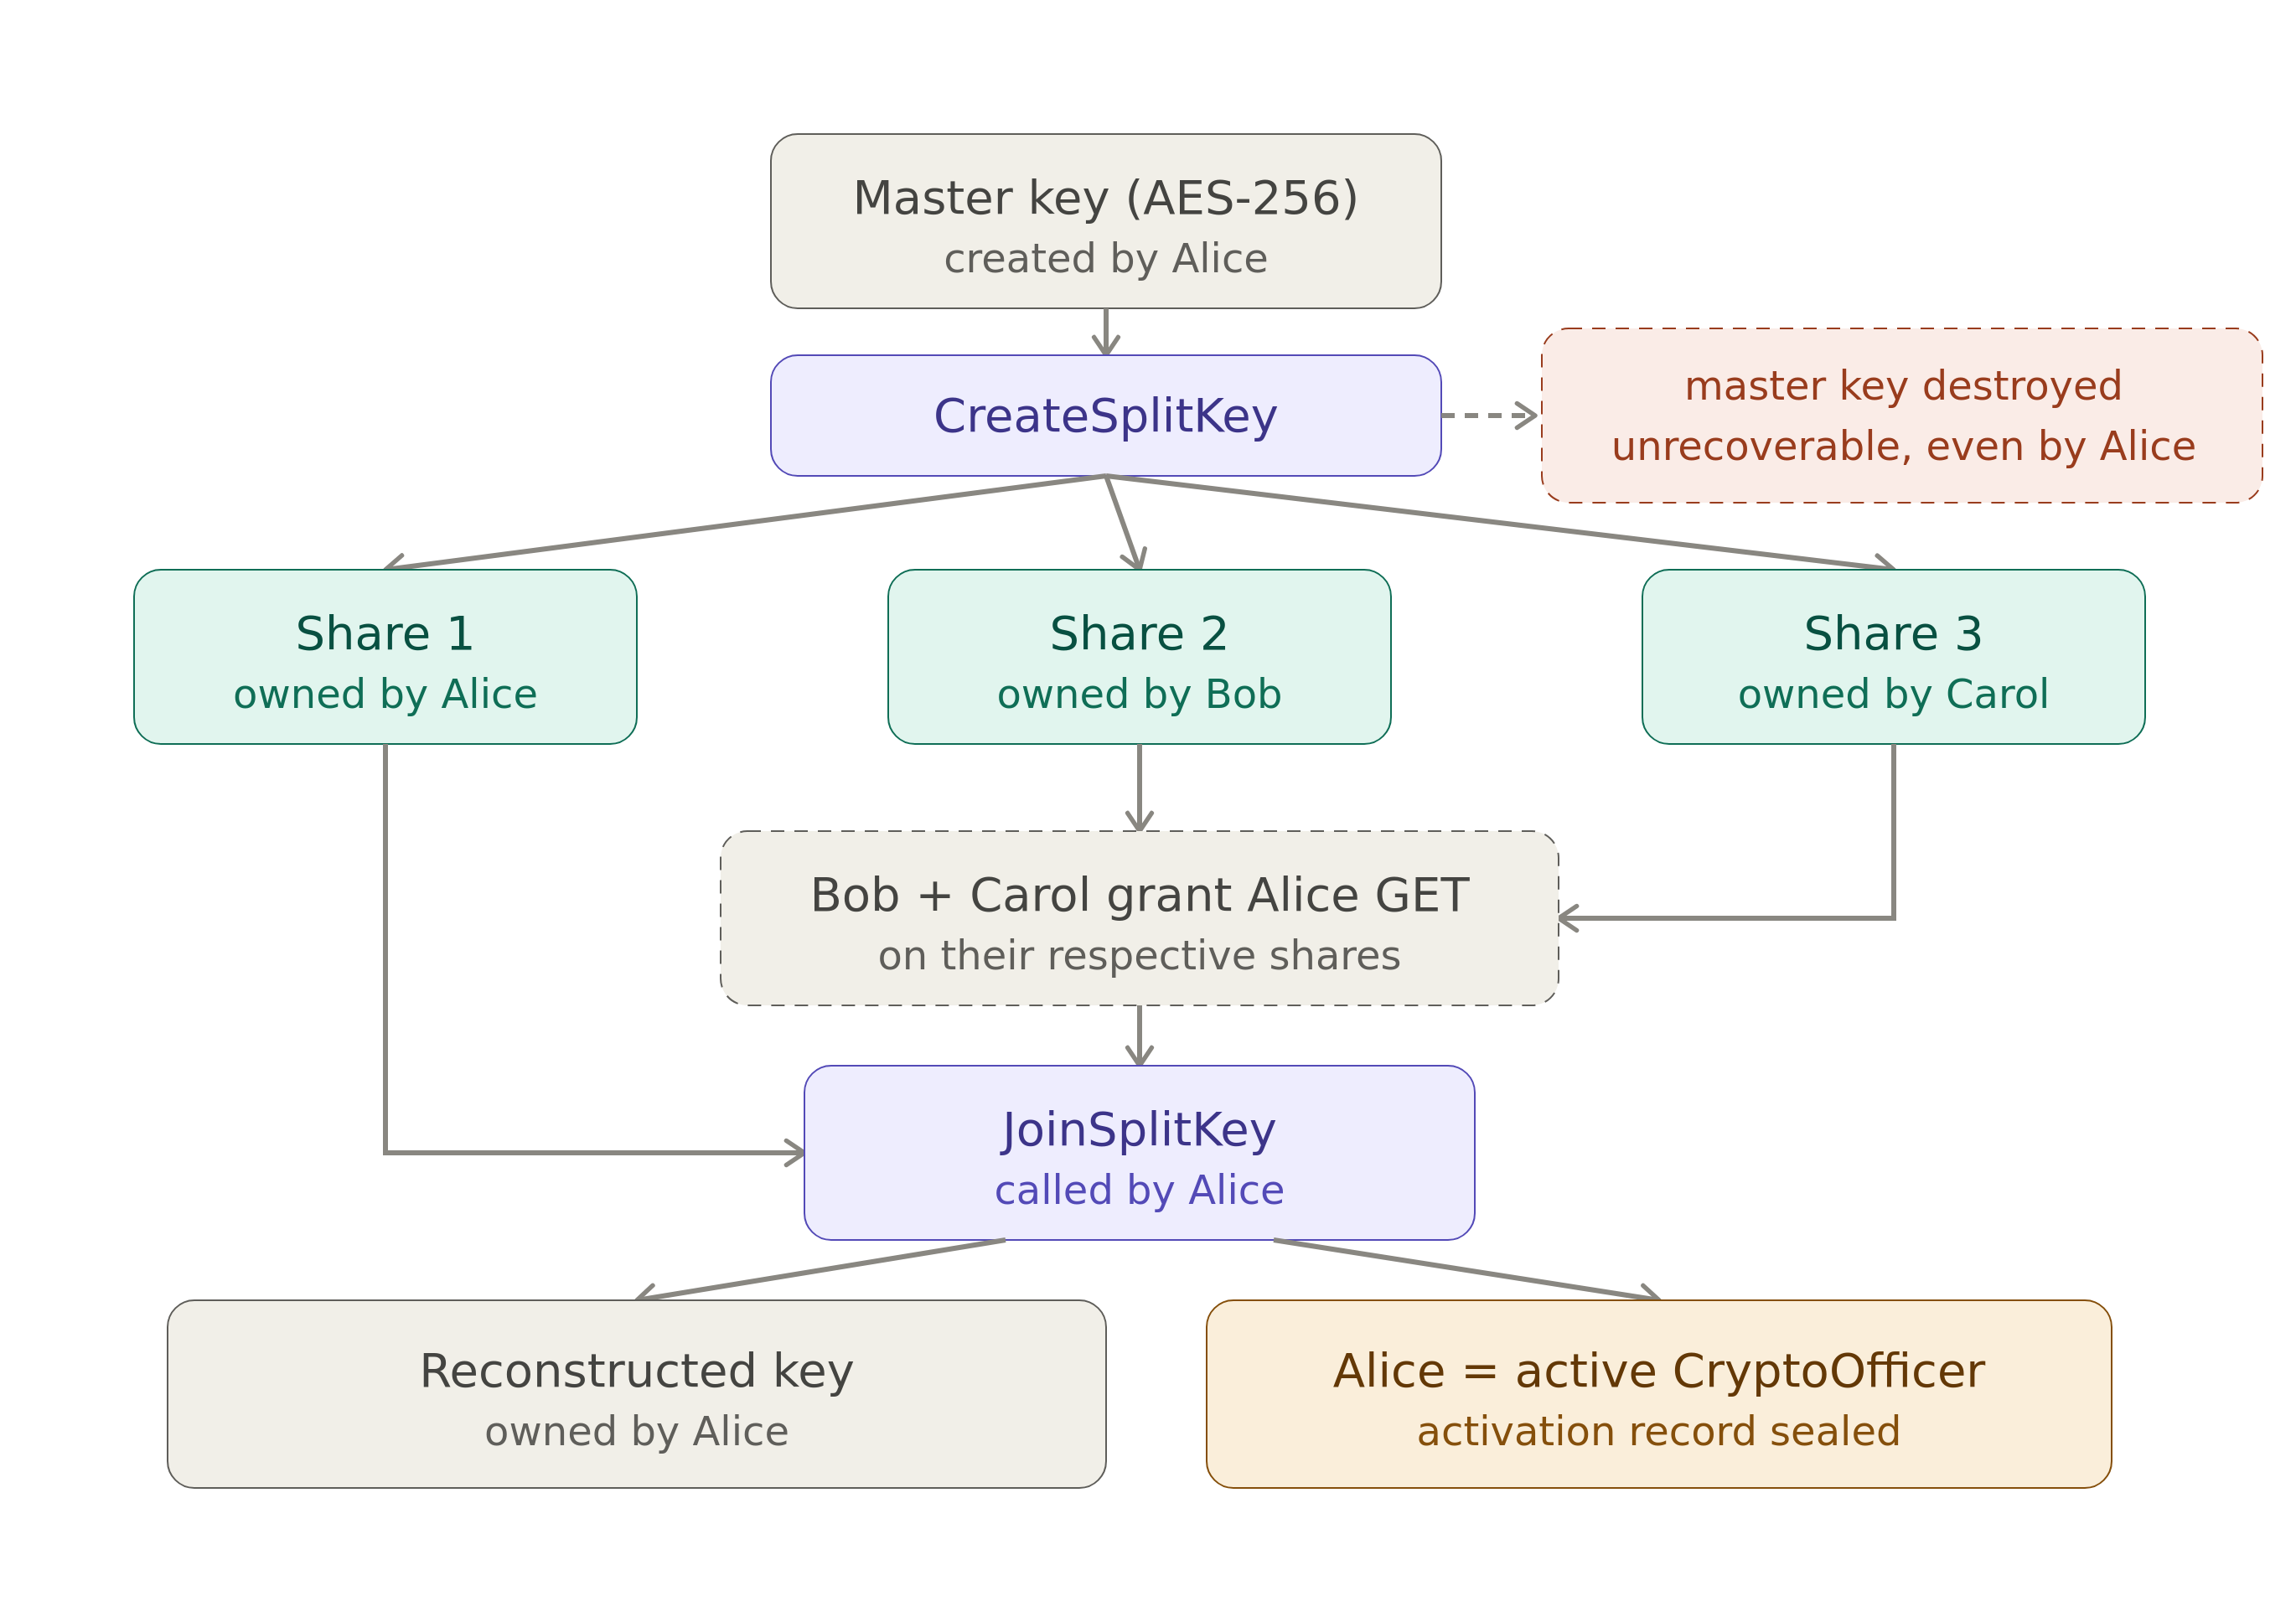
Alice creates the master key and splits it into three shares; the KMS destroys the original immediately, so from that point on not even Alice can recover it alone. Bob and Carol each hold a share Alice does not have. To activate the CryptoOfficer role, Alice needs her own share plus at least one of theirs, which means Bob or Carol must actively grant her access first, so Alice cannot silently activate on her own.
With two custodians, whoever creates the key can always compute the other person's share from the key and their own share, so no real cooperation is required. Three is the minimum where that shortcut disappears, which is why the KMS rejects fewer than 3 custodians at startup.
Phase 1: Provisioning
The number of shares is auto-determined from the crypto_officer_users count, and each
share is auto-assigned to a different CO candidate. No server restart is needed: the
ceremony candidate exemption lets a CO candidate call Create, CreateSplitKey, and
JoinSplitKey even before the ceremony completes, which is what breaks the
chicken-and-egg problem of needing the role to set up the role.
sequenceDiagram
actor Candidate as CO candidate
participant KMS
Candidate->>KMS: Create(AES-256) → key_id
Candidate->>KMS: SetAttribute(key_id, ceremony=true)
Candidate->>KMS: CreateSplitKey(key_id)
KMS-->>Candidate: share_1, share_2, ..., share_n
Note over Candidate: Distribute shares out-of-band,<br/>ask each CO to grant GET access
Phase 2: Activate Crypto Officer Role (JoinSplitKey)
The CO candidate assembles all $n$ share UIDs (after each other CO grants GET access to their share), then activates via one of two mechanisms, both reachable from the CLI and the Web UI:
- KMIP
JoinSplitKey(ckms sym keys join-split-key, or the Web UI's Join Split Key page): stores the reconstructed key as an Active managed object inobjects, owned by the caller. POST /access/crypto_officer/ceremony/activate(ckms access-rights crypto-officer activate, or the Web UI's Crypto Officer Role page): reconstructs the secret in RAM only to verify its SHA-256 fingerprint, then zeroizes it. No key object is stored.
Both run the same checks first:
- Retrieves each share (the candidate must have
Geton each) and validates them: same ceremony tag, same source key, correct count, and the candidate listed incrypto_officer_users. - Checks that at least one share belongs to a different CO: the activating candidate may own shares, but not all of them. This is what prevents solo self-activation.
Either way, the server persists the crypto_officer_activations record and the candidate
is now an active CryptoOfficer.
JoinSplitKey stores the reconstructed key as a usable KMS object; ceremony/activate
does not — the secret is RAM-only and zeroized immediately after the activation record
is written. Pick based on whether you need the reconstructed key as a managed object
afterward.
sequenceDiagram
actor Alice as Alice (CO candidate)
actor Bob as Bob
actor Carol as Carol
participant KMS
Bob->>KMS: GrantAccess(share_1 → Alice, Get)
Carol->>KMS: GrantAccess(share_3 → Alice, Get)
Alice->>KMS: JoinSplitKey([share_1, share_2, share_3])
KMS-->>Alice: Activated, CryptoOfficer role is now ACTIVE
Revoking
Any configured CO candidate may revoke the active CO's ceremony:
| Who calls | Outcome |
|---|---|
| Active CO (currently holds the ceremony) | Immediate self-revoke: 200 OK. |
Any other CO candidate (in crypto_officer_users, not currently active) | Peer revocation: revokes the active CO's role immediately. |
| Any other user | 401 Unauthorized. |
The reconstructed key is NOT revoked; only the crypto_officer_activations row
is updated. The demoted CO retains their reconstructed key as an Operator.
Emergency revocation (config path)
When all CO candidates are unavailable:
- Remove the user from
crypto_officer_usersinkms.toml. - Restart the KMS server.
Quick reference
Permission model
Request: operation OP by user U
│
├─ crypto_officer_users not configured
│ └─ Standard owner/grant check (no role restrictions)
│
└─ crypto_officer_users configured
│
├─ U not in crypto_officer_users
│ └─ role = Operator (fail-secure default)
│
└─ U in crypto_officer_users
│
├─ require_ceremony = false
│ └─ role = CryptoOfficer: GRANTED
│ (lifecycle + key output + ownership bypass)
│
└─ require_ceremony = true
│
├─ no active row in crypto_officer_activations
│ └─ role = Operator (dormant until ceremony completes)
│
└─ active row in crypto_officer_activations
└─ role = CryptoOfficer: GRANTED
Once a role is assigned (CryptoOfficer or Operator):
│
└─ OP in the role's allowed operations?
│
├─ No → DENIED (Unauthorized)
│
└─ Yes → handler-level ownership/grant check
│
├─ Denied → DENIED (Unauthorized)
└─ Granted → GRANTED
Configuration
[roles]
# ── CryptoOfficer role: key lifecycle management + ownership bypass ─────────
crypto_officer_users = ["key-mgr@example.com"]
# Set to true to require a JoinSplitKey ceremony before the role becomes active.
crypto_officer_require_ceremony = true
# Hex-encoded 32-byte secret for ceremony record encryption (AES-256-GCM).
# Required when crypto_officer_require_ceremony = true.
# Generate with: openssl rand -hex 32
ceremony_secret = "0123456789abcdef0123456789abcdef0123456789abcdef0123456789abcdef"
# (planned) UID of a KMS symmetric key to use as the ceremony sealing key.
# When set, takes precedence over ceremony_secret. Enables key rotation and HSM backing.
# The key must be created before enabling require_ceremony (use config-only mode first).
# ceremony_key_id = "ceremony-seal-2026"
Users not listed in crypto_officer_users automatically receive Operator privileges.
There is no operator_users config key; the Operator role is the implicit
fail-secure default.
CLI
# 1. Create ceremony key (as CO candidate, before ceremony)
ckms sym keys create --id ceremony-key-2026 --number-of-bits 256
# 2. Stamp ceremony marker (using the Crypto Officer Role Web UI page
# or directly via CLI):
ckms attributes set-attribute ceremony-key-2026 \
--vendor-id cosmian \
--attr-name x-cosmian-crypto-officer-ceremony \
--attr-value true
# 3. Split the key (server auto-assigns shares to CO candidates)
ckms sym keys create-split-key --key-id ceremony-key-2026 --ceremony
# Share count = crypto_officer_users.len() (auto-determined)
# Source key auto-destroyed after split
# 4. Each other CO grants you GET access to their share
# (run as each other CO candidate):
ckms access-rights grant <your-identity> -i <their-share-uid> get
# 5. Activate: JoinSplitKey IS the activation (no separate step needed)
ckms sym keys join-split-key <share_1_uid> <share_2_uid> <share_3_uid>
# → CO role activated; reconstructed key stored
# 6. Check status
ckms access-rights crypto-officer status
# 7. Revoke (self or peer)
ckms access-rights crypto-officer disable
REST API equivalents
# Status
curl -s https://<kms>/access/crypto_officer/status
# Activate (via JoinSplitKey)
curl -s -X POST https://<kms>/kmip/2_1 \
-H 'Content-Type: application/json' \
-d '{"tag":"JoinSplitKey","type":"Structure","value":[
{"tag":"ObjectType","type":"Enumeration","value":"SymmetricKey"},
{"tag":"PrivateKeyUniqueIdentifier","type":"TextString","value":"<share_1_uid>"},
{"tag":"PrivateKeyUniqueIdentifier","type":"TextString","value":"<share_2_uid>"},
{"tag":"PrivateKeyUniqueIdentifier","type":"TextString","value":"<share_3_uid>"},
{"tag":"SplitKeyMethod","type":"Enumeration","value":"XOR"}
]}'
# Revoke (self or peer)
curl -s -X POST https://<kms>/access/crypto_officer/disable
Role store vs. key store
Important security boundary:
| Store | Written by | Purpose |
|---|---|---|
crypto_officer_activations DB table | JoinSplitKey on ceremony shares, or POST /access/crypto_officer/ceremony/activate | Sole source of truth for CO role status. Sealed with AES-256-GCM under ceremony_secret. |
objects DB table | Every JoinSplitKey call (ceremony and non-ceremony) | Stores the reconstructed key as a managed KMS object owned by the caller. For ceremony shares the key is stored unconditionally before the activation side-effect runs. |
JoinSplitKeyKMIP operation: stores the reconstructed key inobjectsand writes the CO activation record. Suitable when you need the reconstructed key as a usable KMS object.POST /access/crypto_officer/ceremony/activate: reconstructs the secret in RAM only (for hash verification), writes the CO activation record, and does not store a key object.
The x-cosmian-crypto-officer-ceremony tag on shares identifies which shares belong to
a ceremony split. It does NOT grant any privilege. The server checks this tag only
during ceremony activation validation, never for privilege checks. This prevents an
attacker calling Create(key) + SetAttribute(x-cosmian-crypto-officer-ceremony=true)
from escalating to CO role.
Standards this design draws on
This design is inspired by two publications: FIPS 140-3 (cryptographic module role separation) and NIST SP 800-57 Part 2 Rev 1 (split knowledge and dual control as organizational practices to document). Neither standard mandates a specific implementation.
Related pages
Enabling TLS
The KMS activates two internal listeners: a socket server and an HTTP server.
The socket server listens to KMIP binary requests on the IANA-registered 5696 port. The socket server will only start if the TLS configuration is provided and client certificate authentication is enabled. It accepts at most 1,024 concurrent connections, aborts TLS handshakes that take more than 10 seconds, closes a connection that stays idle or stalled for 120 seconds, and rejects KMIP messages larger than 64 MiB. KMIP clients that keep a connection open between requests must reconnect after an idle period.
The HTTP server listens to KMIP requests on the /kmip and /kmip/2_1 endpoints.
It also serves the web UI on the /ui endpoint.
The HTTP server is always started, even if the TLS configuration is not provided.
The KMS server should be started using HTTPS when running in a zero-trust environment. Check the running in a zero-trust environment section for more information.
Quick start: the configuration wizard
The fastest way to enable TLS is the built-in interactive wizard:
cosmian_kms configure
At step 3/9 the wizard asks whether to enable TLS and then offers two paths:
The wizard creates a complete PKI under a directory you choose (default /etc/cosmian/):
| File | Description |
|---|---|
ca.crt | Self-signed CA certificate (RSA-4096, valid 10 years) |
server.crt | Server leaf certificate signed by the CA (RSA-2048) |
server.key | Server private key (PKCS#8 PEM) |
client.crt | Client certificate — distribute to mTLS clients |
client.key | Client private key (PKCS#8 PEM) |
It then asks whether to enable mutual TLS (mTLS) and optionally restricts the cipher suites. The resulting paths are written automatically to the TOML file.
At the end the wizard writes the resulting kms.toml and prints the start command. See the
full wizard reference for all
steps and the self-signed PKI file table.
For production deployments, use certbot or your organisation's PKI to obtain a valid certificate, then point the TOML fields to those files. See the certificate procedures guide for step-by-step instructions (certbot, BYO certs, PEM → PKCS#12 conversion).
Providing certificates
The KMS server supports two certificate formats depending on the build variant:
FIPS mode (default build): Requires PEM-formatted certificates and keys.
- Server certificate in PEM format (may include full chain)
- Private key in PEM format (PKCS#8 or traditional format)
- Optional separate chain file for intermediate CAs
Non-FIPS mode: Supports PKCS#12 format.
- Key and full certificate chain in PKCS#12 format
- Password to open the PKCS#12 file
When enabling client certificate authentication, the server's authority X509 certificate in PEM format must also be provided (for both modes). Multiple CA certificates can be concatenated in a single PEM file to support different certificate authorities.
Reference: manual configuration
The sections below document the raw TOML and CLI options.
The cosmian_kms configure wizard writes exactly these fields for you — use it
to avoid manual editing. See Quick start: the configuration wizard above.
TOML configuration file
Certificate information must be provided in the [tls] section of the TOML configuration file.
For FIPS mode (default build):
# TLS configuration of the Socket server and HTTP server
[tls]
# The server's X.509 certificate in PEM format.
# Provide a PEM containing the server leaf certificate,
# optionally followed by intermediate certificates (full chain).
tls_cert_file = "path/to/server.crt"
# The server's private key in PEM format (PKCS#8 or traditional format).
tls_key_file = "path/to/server.key"
# Optional certificate chain in PEM format (intermediate CAs).
# If not provided, the chain may be appended to tls_cert_file instead.
tls_chain_file = "path/to/chain.pem"
For non-FIPS mode:
# TLS configuration of the Socket server and HTTP server
[tls]
# The KMS server's optional PKCS#12 Certificates and Key file.
# If provided, this will start the server in HTTPS mode.
tls_p12_file = "path/to/server.p12"
# The password to open the PKCS#12 Certificates and Key file.
tls_p12_password = "your_password"
# The server's optional authority X509 certificate in PEM format
# used to validate the client certificate presented for authentication.
# If provided, clients must present a certificate signed by this authority for authentication.
# The server must run in TLS mode for this to be used.
# Multiple CA certificates can be concatenated in a single PEM file.
clients_ca_cert_file = "[authority cert file]"
# Optional colon-separated list of TLS cipher suites to enable.
# If not specified, OpenSSL default cipher suites will be used.
# Example: "TLS_AES_256_GCM_SHA384:TLS_AES_128_GCM_SHA256"
# ANSSI-recommended cipher suites:
# - For TLS 1.3 (preferred): TLS_AES_256_GCM_SHA384, TLS_AES_128_GCM_SHA256, TLS_CHACHA20_POLY1305_SHA256
# - For TLS 1.2 (compatibility): TLS_ECDHE_ECDSA_WITH_AES_256_GCM_SHA384, TLS_ECDHE_ECDSA_WITH_AES_128_GCM_SHA256, TLS_ECDHE_RSA_WITH_AES_256_GCM_SHA384
tls_cipher_suites = "[cipher suites]"
Command-line flags
Certificate information can be provided using the command line interface.
# The KMS server's optional PKCS#12 Certificates and Key file.
# If provided, this will start the server in HTTPS mode.
--tls-p12-file "[tls p12 file]"
# The password to open the PKCS#12 Certificates and Key file.
--tls-p12-password "[tls p12 password]"
# The server's optional authority X509 certificate in PEM format
# used to validate the client certificate presented for authentication.
# If provided, clients must present a certificate signed by this authority for authentication.
# The server must run in TLS mode for this to be used.
# Multiple CA certificates can be concatenated in a single PEM file.
--clients-ca-cert-file "[authority cert file]"
# Optional colon-separated list of TLS cipher suites to enable.
# If not specified, OpenSSL default cipher suites will be used.
# Example: "TLS_AES_256_GCM_SHA384:TLS_AES_128_GCM_SHA256"
--tls-cipher-suites "[cipher suites]"
openssl pkcs12 -export \
-in server.mydomain.com.fullchain.pem \
-inkey server.mydomain.com.privkey.pem \
-out server.mydomain.com.p12
Advanced TLS Configuration
TLS Protocol Versions
By default, the KMS server accepts both TLS 1.2 and TLS 1.3 connections.
Internally it uses the OpenSSL mozilla_intermediate_v5 profile, which sets TLS 1.2 as
the minimum protocol version and TLS 1.3 as the maximum.
The active protocol version range is automatically derived from the cipher suites you configure (see TLS Cipher Suites Selection below):
--tls-cipher-suites value | minimum TLS version | maximum TLS version |
|---|---|---|
| (not set — default) | TLS 1.2 | TLS 1.3 |
| Only TLS 1.3 suites | TLS 1.3 | TLS 1.3 |
| Only TLS 1.2 suites | TLS 1.2 | TLS 1.3 |
| Mixed TLS 1.2 + TLS 1.3 suites | TLS 1.2 | TLS 1.3 |
Enforce TLS 1.3 only — specify at least one TLS 1.3 cipher suite and no TLS 1.2 suites:
--tls-cipher-suites "TLS_AES_256_GCM_SHA384:TLS_AES_128_GCM_SHA256"
Keep TLS 1.2 compatibility — either leave --tls-cipher-suites unset (default), or include
at least one TLS 1.2 cipher suite:
--tls-cipher-suites "TLS_AES_256_GCM_SHA384:TLS_ECDHE_RSA_WITH_AES_256_GCM_SHA384"
TLS 1.2 is still considered secure when used with AEAD cipher suites (GCM/ChaCha20), but TLS 1.3 is preferred. Avoid enabling TLS 1.2 unless required for legacy client compatibility.
TLS Cipher Suites Selection
The KMS server supports custom TLS cipher suite configuration to meet specific security requirements. You can specify which cipher suites to enable using a colon-separated list.
For French regulatory compliance, follow ANSSI-NT-35 — Recommendations de sécurité relatives à TLS (v1.2, 2020): §2.1 forbids TLS 1.0 and TLS 1.1; §2.2 requires AEAD cipher suites with ECDHE key exchange — AES-GCM / AES-CCM preferred, ChaCha20-Poly1305 acceptable. TLS 1.3 satisfies these requirements natively. The English edition is also available: Security Recommendations for TLS (EN, v1.1, 2017).
The cipher suites are automatically categorized into TLS 1.3 and TLS 1.2 suites:
- TLS 1.3 cipher suites (preferred):
TLS_AES_256_GCM_SHA384,TLS_AES_128_GCM_SHA256,TLS_CHACHA20_POLY1305_SHA256,TLS_AES_128_CCM_SHA256,TLS_AES_128_CCM_8_SHA256 - TLS 1.2 cipher suites (for compatibility):
TLS_ECDHE_ECDSA_WITH_AES_256_GCM_SHA384,TLS_ECDHE_ECDSA_WITH_AES_128_GCM_SHA256,TLS_ECDHE_ECDSA_WITH_CHACHA20_POLY1305_SHA256,TLS_ECDHE_RSA_WITH_AES_256_GCM_SHA384,TLS_ECDHE_RSA_WITH_AES_128_GCM_SHA256,TLS_ECDHE_RSA_WITH_CHACHA20_POLY1305_SHA256
If only TLS 1.3 cipher suites are specified, the server will enforce TLS 1.3 minimum protocol version. If only TLS 1.2 cipher suites are specified, the server will support TLS 1.2 and above.
Example configurations:
# ANSSI-recommended TLS 1.3 only configuration
--tls-cipher-suites "TLS_AES_256_GCM_SHA384:TLS_AES_128_GCM_SHA256:TLS_CHACHA20_POLY1305_SHA256"
# Mixed TLS 1.2/1.3 configuration for compatibility
--tls-cipher-suites "TLS_AES_256_GCM_SHA384:TLS_ECDHE_ECDSA_WITH_AES_256_GCM_SHA384:TLS_ECDHE_RSA_WITH_AES_256_GCM_SHA384"
Multiple Certificate Authorities
The KMS server supports multiple certificate authorities for client certificate validation. You can concatenate multiple CA certificates in PEM format into a single file.
Example of multiple CA certificates in one file:
-----BEGIN CERTIFICATE-----
[First CA Certificate]
-----END CERTIFICATE-----
-----BEGIN CERTIFICATE-----
[Second CA Certificate]
-----END CERTIFICATE-----
-----BEGIN CERTIFICATE-----
[Third CA Certificate]
-----END CERTIFICATE-----
This allows clients with certificates issued by any of the specified CAs to authenticate successfully. The server will validate client certificates against all provided CA certificates.
KMS Server — Obtaining TLS Certificates
Three paths are described below, from quickest to most production-ready.
Path 1 — Auto-generate a self-signed PKI (recommended for quick start)
Run the interactive wizard and let it create a complete PKI for you:
cosmian_kms configure
At step 3/9 answer Yes to "Enable TLS?" and Yes to "Generate self-signed certificates". The wizard prompts for:
| Prompt | Default | Notes |
|---|---|---|
| Output directory | /etc/cosmian/ | All PEM files are written here |
| CA Common Name | Cosmian KMS CA | Identifies the root CA |
| Server CN | Cosmian KMS Server | Must match the server's hostname for strict clients |
| Client CN | Cosmian KMS Client | Embedded in the client certificate subject |
| CA validity (days) | 3650 | ~10 years |
| Server validity (days) | 365 | Renew annually |
| Client validity (days) | 365 | Renew annually |
The wizard then asks whether to enable mutual TLS (mTLS). If yes, it sets
clients_ca_cert_file automatically so the server validates client certificates.
Files written:
| File | Purpose |
|---|---|
ca.crt | Root CA certificate — import into clients that must trust the server |
server.crt | Server leaf certificate (signed by the CA) |
server.key | Server private key (PKCS#8 PEM) |
client.crt | Client leaf certificate — distribute to mTLS clients |
client.key | Client private key (PKCS#8 PEM) |
At the end the wizard writes kms.toml and prints the start command.
Note: Self-signed certificates are suitable for internal deployments and testing. For internet-facing or compliance-sensitive environments use a CA-signed certificate (see Path 2 below).
Path 2 — Obtain a CA-signed certificate with certbot (production)
Use certbot to obtain a free certificate from Let's Encrypt via a DNS challenge (no HTTP server required).
1. Install certbot
macOS (Homebrew):
brew install certbot
Debian / Ubuntu:
sudo apt install certbot
RHEL / CentOS / Fedora:
sudo dnf install certbot
2. Request a certificate using a DNS TXT record
You must have write access to the DNS zone for your domain.
sudo certbot certonly \
--manual \
--preferred-challenges dns \
-d kms.example.com
Certbot prints a DNS TXT record to add under _acme-challenge.kms.example.com.
Add it through your DNS provider's control panel, wait for propagation (usually
60–120 s), then press Enter to continue.
Certbot writes the certificate files under /etc/letsencrypt/live/kms.example.com/:
| File | Description |
|---|---|
fullchain.pem | Server certificate + intermediate chain |
privkey.pem | Server private key |
3. Reference the certificates in kms.toml
FIPS mode (default build):
[tls]
tls_cert_file = "/etc/letsencrypt/live/kms.example.com/fullchain.pem"
tls_key_file = "/etc/letsencrypt/live/kms.example.com/privkey.pem"
Non-FIPS mode — convert to PKCS#12 first (see Appendix), then:
[tls]
tls_p12_file = "/etc/ssl/kms/kms.example.com.p12"
tls_p12_password = "your_password"
4. Renewal
Let's Encrypt certificates expire after 90 days. Automate renewal with a cron job or systemd timer:
sudo certbot renew --quiet
Restart (or send SIGHUP to) the KMS server after renewal so it picks up the
new certificate.
Path 3 — Bring your own certificates
If your organisation has its own PKI, place the PEM files where the server can read them and point the TOML fields to them:
FIPS mode (default build):
[tls]
tls_cert_file = "/etc/ssl/kms/server.crt" # PEM, may include full chain
tls_key_file = "/etc/ssl/kms/server.key" # PKCS#8 or traditional PEM
# tls_chain_file = "/etc/ssl/kms/chain.pem" # Optional separate chain file
# Uncomment to require client certificates (mTLS):
# clients_ca_cert_file = "/etc/ssl/kms/ca.crt"
Non-FIPS mode:
[tls]
tls_p12_file = "/etc/ssl/kms/server.p12"
tls_p12_password = "your_password"
# clients_ca_cert_file = "/etc/ssl/kms/ca.crt" # Optional mTLS CA
Run cosmian_kms configure and choose "Provide your own certificate paths" at
step 3/9 to have the wizard fill in these values interactively.
Appendix: Converting PEM to PKCS#12
Required for non-FIPS mode when you have PEM files (e.g., from certbot or your own PKI):
openssl pkcs12 -export \
-in server.fullchain.pem \
-inkey server.privkey.pem \
-out server.p12
You will be prompted to set a password for the bundle. Use that password as
tls_p12_password in kms.toml.
Log output
The Eviden KMS server outputs logs to the console by default at INFO level.
For OTLP metrics & traces: see Metrics & Traces (OTLP). For the monitoring stack (Grafana, VictoriaMetrics, OTel Collector): see Monitoring stack setup. For audit logging (compliance, SIEM): see Audit logging. For every log call-site across all components: see Log call-site reference.
Adjusting the log level
The log level can be adjusted by setting either:
- the
RUST_LOGenvironment variable, - the
rust_logsetting in the TOML configuration file in the[logging]section, - the
--rust-logcommand line argument.
Available levels: trace, debug, info, warn, error. The default is info.
Example:
RUST_LOG=info,cosmian=info,cosmian_kms_server=info,actix_web=info,mysql=info
The first info sets the default log level for all crates. Individual crates can be overridden:
- To get detailed logs of user requests, set
cosmian_kms_servertodebug:
RUST_LOG=info,cosmian=info,cosmian_kms_server=debug,actix_web=info,mysql=info
- To debug HTTP issues, set
actix_webtodebug:
RUST_LOG=info,cosmian=info,cosmian_kms_server=info,actix_web=debug,mysql=info
⚠️ WARNING: Setting the log level to
debugortracemay leak sensitive information in the logs.
Console and syslog logging
Logging to the console is enabled by default. It can be disabled via:
- the
quietparameter in the TOML configuration file in the[logging]section, - the
--quietcommand line argument, - the
KMS_LOG_QUIETenvironment variable set totrue.
On Linux, logs can be redirected to syslog instead of stdout by setting:
- the
log_to_syslogparameter in the TOML configuration file in the[logging]section, - the
--log-to-syslogcommand line argument, - the
KMS_LOG_TO_SYSLOGenvironment variable set totrue.
Rolling log files
The server can write daily rolling log files. File logging is disabled unless
rolling_log_dir is explicitly configured (via --rolling-log-dir, the
KMS_ROLLING_LOG_DIR environment variable, or the TOML configuration).
Log files are named <name>.YYYY-MM-DD, where <name> defaults to kms.
When rolling_log_dir is set without specifying a path (e.g. via the
configuration wizard), the recommended platform-specific defaults are:
| Platform | Default directory |
|---|---|
| Linux | /var/log/ |
| Windows | C:\\Users\\<username>\\AppData\\Local\\Eviden KMS Server |
| macOS | ~/Library/Logs/ |
Warning (Windows): The server does not expand Windows environment variables such as
%LOCALAPPDATA%in configuration files. If you overriderolling_log_dirinkms.toml, you must use the fully-expanded path, for example:rolling_log_dir = "C:\\\\Users\\\\<username>\\\\AppData\\\\Local\\\\Eviden KMS Server"When
rolling_log_diris not set, the server resolves theLOCALAPPDATAenvironment variable at runtime and defaults toC:\\Users\\<username>\\AppData\\Local\\Eviden KMS Server. When running as a Windows service under LocalSystem, the variable may not be set; the server then falls back toC:\\ProgramData\\Eviden KMS Server.Note (macOS): The server defaults to
~/Library/Logs/which is the standard per-user log directory on macOS and is writable without root. If you run the server as a LaunchDaemon (root), you may override this with--rolling-log-dir /Library/Logs/.Graceful fallback: If the configured rolling log directory does not exist and cannot be created, or is not writable by the current process, the server disables file logging with a warning message on stderr and continues operating normally. This prevents the server from panicking due to inaccessible log paths.
The directory and file name can be overridden via:
- the
rolling_log_dir/rolling_log_nameentries in the TOML configuration file ([logging]section), - the
--rolling-log-dir/--rolling-log-namecommand line arguments, - the
KMS_ROLLING_LOG_DIR/KMS_ROLLING_LOG_NAMEenvironment variables.
Log Call-Site Directory
This page lists every production log call-site across all Eviden KMS components, grouped by domain and crate.
It is not listed in the navigation menu but is accessible via It is not listed in the navigation menu but is accessible via Logging and telemetry.
How to read this page
The index is organised by usage-domains. Within each domain, each table covers one crate (the UI section is an exception). All tables, ui included, have 5 columns:
| Column | Meaning |
|---|---|
| Level | error warn info debug trace |
| Message | Constant log string; interpolated values shown as {name} |
| File | Source file relative to the crate root |
| Variables | Each {name} — description; — when none |
| Notes | Reserved for security flags and operator guidance |
Rows are ordered by severity (error → warn → info → debug → trace), then
alphabetically by message. Test files are excluded.
Tip: The level filter defaults to
error. Switching toallortracereveals hundreds of rows and the page will become long.
Domain: KMS Server
cosmian_kms_server
Crate path: crate/server
RUST_LOG target: cosmian_kms_server
| Level | Message | File | Variables | Notes |
|---|---|---|---|---|
error | Authentication method configured, but no authentication provided | src/middlewares/ensure_auth.rs | - | Returns 401. Check middleware stack - auth is configured but no bearer/cert/API-token was sent. |
error | AWS XKS Sigv4 middleware should not be enabled if the aws_xks_params are not set | src/routes/aws_xks/sigv4_middleware.rs | - | Server misconfiguration - enable XKS routes only when aws_xks_params is set. |
error | Error handling socket client: {} | src/socket_server.rs | - | Unix socket handler crashed. The server continues running. |
error | Failed to open index.html: {e:?} | src/start_kms_server.rs | e: caught error | UI not served - verify ui_index_html_folder points to a built UI artifact. |
error | Socket server failed to acquire write lock for stop request: {} | src/socket_server.rs | - | Internal threading issue on shutdown. Server may need SIGTERM if it hangs. |
error | Socket server failed to connect to itself: {} | src/socket_server.rs | - | Internal stop-signal socket unreachable. Port may be in use by another process. |
error | Socket server failed to get local address for stop signal | src/socket_server.rs | - | Network/IPC failure. Check connectivity and port availability. |
error | Socket server failed to write stop request | src/socket_server.rs | - | Network/IPC failure. Check connectivity and port availability. |
error | Socket server stop signal contained error: {} | src/socket_server.rs | - | Stop channel returned an error. Inspect the formatted error value. |
error | Windows service failed: {e} | src/windows_service.rs | e: caught error | Fatal Windows service error. Check Windows Event Log for the full stack trace. |
error | {:?} {} 401 unauthorized: Client and server authentication tokens mismatch | src/middlewares/api_token/api_token_auth.rs | - | API token mismatch - rotate the kms_api_token_id / kms_api_token config values. |
error | {status_code} - {message} | src/routes/mod.rs | status_code: HTTP status codemessage: human-readable message text | Unhandled HTTP error response emitted to the client. |
error | {} | src/start_kms_server.rs | - | Catch-all error log. Inspect the formatted value for the actual error. |
warn | Activate: object {} is already Active, rejecting | src/core/operations/activate.rs | - | - |
warn | AWS XKS create: key {uid} already exists (ignoring creation). | src/routes/aws_xks/key_metadata.rs | uid: KMIP object UID | - |
warn | Azure EKM client authentication is disabled, this should only be done in tests, and won't work for production environments. | src/start_kms_server.rs | - | - |
warn | Failed to persist auto-activation of object {}: {} | src/core/retrieve_object_utils.rs | - | - |
warn | Fetch JWKS: {e} | src/middlewares/jwt/jwks.rs | e: caught error | - |
warn | Socket server: connection failed: {e} | src/socket_server.rs | e: caught error | - |
warn | UI folder invalid or Linux default detected, falling back to: {fallback:#?} | src/config/params/server_params.rs | fallback: fallback UI folder path | - |
warn | {:?} {} 401 unauthorized: bad JWT | src/middlewares/jwt/jwt_token_auth.rs | - | - |
warn | {error:?} | src/middlewares/jwt/jwt_token_auth.rs | error: error detail | ×2 in this file |
warn | {status_code} - {message} | src/routes/mod.rs | status_code: HTTP status codemessage: human-readable message text | - |
warn | {status} - {} | src/routes/jose/error.rs | status: HTTP response status | - |
info | AUTHENTICATION token: {:?} | src/routes/google_cse/jwt.rs | - | - |
info | AUTHORIZATION token headers: {:?} | src/routes/google_cse/jwt.rs | - | - |
info | AUTHORIZATION token: {:?} | src/routes/google_cse/jwt.rs | - | - |
info | azure EKM API enabled at {} | src/start_kms_server.rs | - | - |
info | Command line / file config: {clap_config:#?} | src/main.rs | clap_config: parsed CLI configuration | - |
info | Created Key Pair with cryptographic algorithm {:?} | src/core/operations/create_key_pair.rs | - | - |
info | Created Object of type {:?} | src/core/operations/create.rs | - | - |
info | Creating key pair for certification - private key: {sk_uid}, public key: {pk_uid} | src/core/operations/certify/resolve_subject.rs | sk_uid: private key UIDpk_uid: public key UID | - |
info | Destroyed object | src/core/operations/destroy.rs | - | - |
info | Encrypted Data : {encrypted_data:?} | src/routes/ms_dke/mod.rs | encrypted_data: encrypted data payload | - |
info | Exported object of type: {} | src/core/operations/export_get.rs | - | - |
info | Extracted IDP Configs: {:#?} | src/config/command_line/idp_auth_config.rs | - | - |
info | Feature Test enabled | src/main.rs | - | - |
info | Found Google CSE migration key, importing it. | src/start_kms_server.rs | - | - |
info | GET /access/list/{object_id} {user} | src/routes/access.rs | object_id: KMIP object UIDuser: authenticated user identity | - |
info | GET /access/obtained {user} | src/routes/access.rs | user: authenticated user identity | - |
info | GET /access/owned {user} | src/routes/access.rs | user: authenticated user identity | - |
info | GET /certs | src/routes/google_cse/mod.rs | - | - |
info | GET /download-cli {} | src/routes/mod.rs | - | - |
info | GET /google_cse/status {} | src/routes/google_cse/mod.rs | - | - |
info | GET /health {} | src/routes/health.rs | - | - |
info | GET /hsm/status {} | src/routes/mod.rs | - | - |
info | GET /me {user} | src/routes/access.rs | user: authenticated user identity | - |
info | GET /server-info {} | src/routes/mod.rs | - | - |
info | GET /version {} | src/routes/mod.rs | - | - |
info | GET /version {} | src/routes/ms_dke/mod.rs | - | - |
info | Key pair created for certification | src/core/operations/certify/resolve_subject.rs | - | - |
info | KMIP Request message with {} operation(s): {:?} | src/core/operations/message.rs | - | - |
info | KMS Server configuration: {server_params:#?} | src/start_kms_server.rs | server_params: server configuration (debug display) | - |
info | Load default provider | src/openssl_providers.rs | - | - |
info | Load FIPS provider | src/openssl_providers.rs | - | - |
info | Load legacy provider | src/openssl_providers.rs | - | - |
info | No migration key found, creating new RSA keypair. | src/start_kms_server.rs | - | - |
info | OpenSSL version: {ossl_version}, in {ossl_dir}, number: {ossl_number:x} | src/main.rs | ossl_version: OpenSSL version stringossl_dir: OpenSSL modules directoryossl_number: OpenSSL version number (hex) | - |
info | POST /access/grant | src/routes/access.rs | - | - |
info | POST /access/revoke | src/routes/access.rs | - | - |
info | POST /aws/kms/xks/v1/health - request id {} - operation {} | src/routes/aws_xks/health_status.rs | - | - |
info | POST /ekm/info api-version={} user={} | src/routes/azure_ekm/mod.rs | - | - |
info | POST /ekm/{}/metadata api-version={} user={} | src/routes/azure_ekm/mod.rs | - | - |
info | POST /ekm/{}/unwrapkey alg={:?} api-version={} user={} | src/routes/azure_ekm/mod.rs | - | - |
info | POST /ekm/{}/wrapkey alg={:?} api-version={} user={} | src/routes/azure_ekm/mod.rs | - | - |
info | POST /google_cse/delegate: not implemented yet | src/routes/google_cse/mod.rs | - | - |
info | POST /google_cse/wrapprivatekey: not implemented yet | src/routes/google_cse/mod.rs | - | - |
info | POST /google_cse/{info_msg} | src/routes/google_cse/mod.rs | info_msg: route info message | - |
info | POST /kms/xks/v1/keys/{key_id}/decrypt - operation: {} - id: {} - user: {} | src/routes/aws_xks/encrypt_decrypt/decrypt_.rs | key_id: XKS key identifier | - |
info | POST /kms/xks/v1/keys/{key_id}/encrypt - operation: {} - id: {} - user: {} | src/routes/aws_xks/encrypt_decrypt/encrypt_.rs | key_id: XKS key identifier | - |
info | POST /kms/xks/v1/keys/{key_id}/metadata - operation: {} - id: {} - user: {} | src/routes/aws_xks/key_metadata.rs | key_id: XKS key identifier | - |
info | Refreshing JWKS | src/middlewares/jwt/jwks.rs | - | - |
info | Response TTLV: {ttlv:?} | src/routes/kmip/handlers.rs | ttlv: TTLV-encoded response | - |
info | Revoked object type: {} | src/core/operations/revoke.rs | - | - |
info | RSA Keypair for Google CSE already exists (detected by UNIQUE constraint). Continuing without error. | src/start_kms_server.rs | - | - |
info | RSA Keypair for Google CSE already exists (pre-check). | src/start_kms_server.rs | - | - |
info | RSA Keypair for Google CSE already exists. | src/start_kms_server.rs | - | - |
info | RSA Keypair for Google CSE created. | src/start_kms_server.rs | - | - |
info | Server started with --info. Exiting | src/main.rs | - | - |
info | Serving index.html from {} | src/start_kms_server.rs | - | - |
info | Serving UI from {} | src/start_kms_server.rs | - | - |
info | Socket server listening on {} | src/socket_server.rs | - | - |
info | Socket server shutting down due to stop request | src/socket_server.rs | - | - |
info | Socket server stop signal sent | src/socket_server.rs | - | - |
info | Starting the HTTPS KMS server... | src/start_kms_server.rs | - | - |
info | Windows service received Stop signal, shutting down... | src/windows_service.rs | - | - |
info | Windows service reporting Running to SCM | src/windows_service.rs | - | - |
info | XKS Decrypt internal error: {:?} | src/routes/aws_xks/encrypt_decrypt/decrypt_.rs | - | - |
info | XKS Encrypt internal error: {:?} | src/routes/aws_xks/encrypt_decrypt/encrypt_.rs | - | - |
info | {} | src/main.rs | - | - |
debug | <== encrypted {} ciphertexts | src/core/operations/encrypt.rs | - | - |
debug | ==> encrypting {} clear texts | src/core/operations/encrypt.rs | - | - |
debug | [metrics-cron] Failed to build runtime: {} | src/cron.rs | - | - |
debug | [metrics-cron] Shutdown signal received; stopping cron thread | src/cron.rs | - | - |
debug | [OK] base64 of encrypted_dek has been removed | src/routes/google_cse/operations.rs | - | - |
debug | [OK] recovered private_key DER bytes (len: {}). Perform RSA decryption | src/routes/google_cse/operations.rs | - | - |
debug | [{idx}] Certificate carries id-ce-noRevAvail (RFC 9608): skipping CRL check | src/core/operations/validate.rs | idx: certificate index in validation chain | - |
debug | [{idx}] Verifying certificate: subject: {:?} | src/core/operations/validate.rs | idx: certificate index in validation chain | - |
debug | Access granted on {} | src/routes/access.rs | - | - |
debug | Access revoke for {} | src/routes/access.rs | - | - |
debug | Activate: object {} current state = {:?} | src/core/operations/activate.rs | - | - |
debug | Add Attribute: {} | src/core/operations/attributes/add.rs | - | - |
debug | AES-GCM decryption failed (expected for implicit rejection): {e} | src/routes/jose/aes_gcm.rs | e: caught error | - |
debug | algorithm: {ca:?}, ciphertext length: {} | src/core/operations/encrypt.rs | ca: cryptographic algorithm | - |
debug | allocation_size: {allocation_size} | src/routes/google_cse/operations.rs | allocation_size: allocated buffer size | ×2 in this file |
debug | API token authentication failed: {e:?} | src/middlewares/api_token/api_token_middleware.rs | e: caught error | - |
debug | Authentication token check: validation disabled | src/routes/google_cse/operations.rs | - | - |
debug | Building and signing certificate | src/core/operations/certify/build_certificate.rs | - | - |
debug | check algorithm | src/routes/google_cse/operations.rs | - | - |
debug | Client certificate authentication failed: {e:?} | src/middlewares/tls_auth.rs | e: caught error | - |
debug | computing resource_key_hash | src/routes/google_cse/operations.rs | - | - |
debug | Configuration TOML: {conf_str} | src/config/command_line/clap_config.rs | conf_str: configuration TOML string | ×2 in this file |
debug | Create key pair: {request} | src/core/operations/create_key_pair.rs | request: KMIP request (debug display) | - |
debug | create_user_decryption_key_: Access Policy: {access_policy:?} | src/core/cover_crypt/create_user_decryption_key.rs | access_policy: Covercrypt access policy expression | - |
debug | Created secret data with attributes: {} | src/core/kms/other_kms_methods.rs | - | - |
debug | Created symmetric key with attributes: {} | src/core/kms/other_kms_methods.rs | - | - |
debug | CSE Error: {:?} | src/routes/google_cse/mod.rs | - | - |
debug | decode encrypted_dek | src/routes/google_cse/operations.rs | - | - |
debug | decrypt private key | src/routes/google_cse/operations.rs | - | - |
debug | decrypt_bulk: ==> decrypted {} plaintexts | src/core/operations/decrypt.rs | - | - |
debug | decrypt_bulk: ==> decrypting {} ciphertexts | src/core/operations/decrypt.rs | - | - |
debug | Decryption Oracle for prefix: {prefix}, total ciphertext is {} bytes long | src/core/operations/decrypt.rs | prefix: decryption oracle prefix bytes | - |
debug | DeriveKey operation completed successfully | src/core/operations/derive_key.rs | - | - |
debug | DeriveKey operation starting | src/core/operations/derive_key.rs | - | - |
debug | DeriveKey: No derivation data (info) provided for HKDF | src/core/operations/derive_key.rs | - | - |
debug | DeriveKey: No iteration count provided for PBKDF2, using default | src/core/operations/derive_key.rs | - | - |
debug | EKM Error: {:?} | src/routes/azure_ekm/error.rs | - | - |
debug | Enable Google CSE JWT Authorization: {enable_google_cse_authentication} | src/start_kms_server.rs | enable_google_cse_authentication: whether Google CSE JWT auth is on | - |
debug | encode base64 wrapped_dek | src/routes/google_cse/operations.rs | - | - |
debug | encrypting with RSA {algorithm:?} {padding:?} hashing_fn:{hashing_fn:?} mgf1:{mgf1_hash_fn:?} label_len:{} | src/core/operations/encrypt.rs | algorithm: cryptographic algorithmpadding: asymmetric padding schemehashing_fn: hash functionmgf1_hash_fn: MGF1 hash function | - |
debug | entering | src/routes/google_cse/jwt.rs | - | - |
debug | entering | src/routes/google_cse/operations.rs | - | ×9 in this file |
debug | exiting with success | src/routes/google_cse/operations.rs | - | ×4 in this file |
debug | exiting with success: decrypt_size: {decrypt_size} | src/routes/google_cse/operations.rs | decrypt_size: decrypted payload length | ×2 in this file |
debug | exiting with success: {} | src/routes/google_cse/operations.rs | - | - |
debug | exporting private key with format: {:?} | src/core/operations/export_get.rs | - | - |
debug | fetching {jwks_uri} | src/middlewares/jwt/jwks.rs | jwks_uri: JWKS endpoint URL | - |
debug | from_rsa | src/routes/google_cse/operations.rs | - | - |
debug | Get Attributes: available vendor attributes: [{}] | src/core/operations/attributes/get.rs | - | - |
debug | Get Attributes: fallback vendor attribute match {}:{} from object attributes | src/core/operations/attributes/get.rs | - | - |
debug | Get Attributes: no vendor attributes present on object | src/core/operations/attributes/get.rs | - | - |
debug | Get Attributes: requested vendor attribute not found {}:{} | src/core/operations/attributes/get.rs | - | - |
debug | Get Attributes: returning vendor attribute match {}:{} | src/core/operations/attributes/get.rs | - | - |
debug | Get input certificates as bytes | src/core/operations/validate.rs | - | - |
debug | get rsa public key on {current_kacls_url} | src/routes/google_cse/operations.rs | current_kacls_url: current KACLS server URL | - |
debug | get_crl_bytes: exiting in success with {} CRLs | src/core/operations/validate.rs | - | - |
debug | get_status | src/routes/google_cse/operations.rs | - | - |
debug | Google CSE request authorized for user {authentication_email} | src/routes/google_cse/jwt.rs | authentication_email: email from the authentication token | - |
debug | Import: activation_date={:?} <= now, setting state to Active | src/core/operations/import.rs | - | - |
debug | Import: no activation_date or future date, setting state to PreActive | src/core/operations/import.rs | - | - |
debug | Imported object with uid: {} | src/core/operations/import.rs | - | - |
debug | Importing leaf certificate with attributes: {} | src/core/operations/import.rs | - | - |
debug | Importing PKCS12: private_key_id={:?}, leaf_certificate_id={:?}, chain={:?} | src/core/operations/import.rs | - | - |
debug | JWT Access granted to {email}! | src/middlewares/jwt/jwt_token_auth.rs | email: user email address | - |
debug | JWT authentication failed: {e:?} | src/middlewares/jwt/jwt_middleware.rs | e: caught error | - |
debug | Key successfully unwrapped with wrapping key: {} | src/core/wrapping/unwrap.rs | - | - |
debug | Key wrap type: {:?} | src/core/operations/export_get.rs | - | - |
debug | Key wrapped successfully by key {} | src/core/wrapping/wrap.rs | - | - |
debug | no token validation | src/routes/google_cse/operations.rs | - | - |
debug | Number of certificates in chain: {certificates_number} | src/core/operations/validate.rs | certificates_number: number of certificates in chain | - |
debug | object is not wrapped, no need to unwrap | src/core/wrapping/unwrap.rs | - | - |
debug | Object type: {}, with unique identifier: {}, destroyed by user {} | src/core/operations/destroy.rs | - | - |
debug | Object with unique identifier: {} revoked by user {} | src/core/operations/revoke.rs | - | - |
debug | OpenSSL Extensions: {} | src/core/operations/certify/build_certificate.rs | - | - |
debug | Parent CRL verification: revocation status: {res:?} | src/core/operations/validate.rs | res: result (debug display) | - |
debug | proxy_config: {config:#?} | src/config/params/proxy_params.rs | config: configuration (debug display) | - |
debug | re-wrapping key with current KMS | src/routes/google_cse/operations.rs | - | - |
debug | Register: activation_date={:?} <= now, setting state to Active | src/core/operations/register.rs | - | - |
debug | Register: no activation_date or future date, setting state to PreActive | src/core/operations/register.rs | - | - |
debug | Registered object with uid: {} | src/core/operations/register.rs | - | - |
debug | Request already authenticated, skipping Ensure Auth middleware | src/middlewares/ensure_auth.rs | - | - |
debug | request.encrypted_data_encryption_key: {} | src/routes/google_cse/operations.rs | - | - |
debug | Retrieved Attributes for {} {}, tags {:?} | src/core/operations/attributes/get.rs | - | - |
debug | retrieving RSA private key from KMS | src/routes/google_cse/operations.rs | - | - |
debug | Revocation status: result: {res:?} | src/core/operations/validate.rs | res: result (debug display) | - |
debug | RSA key pair generation: size in bits: {key_size_in_bits} | src/core/operations/create_key_pair.rs | key_size_in_bits: RSA key size in bits | - |
debug | RSA-OAEP encrypt: wrapped CEK ({} bytes) with {} ({} bit key) | src/routes/jose/encrypt.rs | - | - |
debug | RSA-OAEP unwrap failed or CEK size mismatch — using implicit rejection | src/routes/jose/decrypt.rs | - | - |
debug | Set Attribute: {} | src/core/operations/attributes/set.rs | - | - |
debug | Set Object Attribute: {} | src/core/operations/attributes/add.rs | - | - |
debug | Set Object Attribute: {} | src/core/operations/attributes/set.rs | - | - |
debug | Setting key_wrap_type to NotWrapped due to default_unwrap_types | src/core/operations/export_get.rs | - | - |
debug | Signature verification result: {validity_indicator:?} | src/core/operations/signature_verify.rs | validity_indicator: signature validity result | - |
debug | signature_verify: effective CP => alg={:?} pad={:?} hash={:?} dsa={:?} mgf1_hash={:?} | src/core/operations/signature_verify.rs | - | - |
debug | Sigv4 Middleware - Adding missing HOST header: {} | src/routes/aws_xks/sigv4_middleware.rs | - | - |
debug | Socket server received stop signal: {result:?} | src/socket_server.rs | result: operation result | - |
debug | socket server: client connected from {} | src/socket_server.rs | - | - |
debug | socket server: client {} disconnected | src/socket_server.rs | - | - |
debug | socket server: received request: {} | src/socket_server.rs | - | - |
debug | success | src/routes/google_cse/operations.rs | - | - |
debug | The wrapping key {wrapping_key_uid} is itself wrapped, unwrapping it first | src/core/wrapping/wrap.rs | wrapping_key_uid: UID of the wrapping key | - |
debug | tls_config: {config:#?} | src/config/params/tls_params.rs | config: configuration (debug display) | - |
debug | Token authentication successful | src/middlewares/api_token/api_token_auth.rs | - | - |
debug | unwrap key | src/routes/google_cse/operations.rs | - | ×2 in this file |
debug | Unwrapped cache hit | src/core/kms/other_kms_methods.rs | - | - |
debug | Unwrapped cache miss. Calling unwrap | src/core/kms/other_kms_methods.rs | - | - |
debug | user signed data via crypto oracle using: {uid} | src/core/operations/sign.rs | uid: KMIP object UID | - |
debug | validate_tokens | src/routes/google_cse/operations.rs | - | - |
debug | wrap dek | src/routes/google_cse/operations.rs | - | ×2 in this file |
debug | Xks Error: {:?} | src/routes/aws_xks/error.rs | - | - |
debug | XKS Proxy - Path not found: {} | src/routes/aws_xks/error.rs | - | - |
debug | {conf:#?} | src/config/params/server_params.rs | conf: configuration (debug display) | - |
debug | {request} | src/core/operations/attributes/modify.rs | request: KMIP request (debug display) | - |
debug | {request} | src/core/operations/attributes/set.rs | request: KMIP request (debug display) | - |
debug | {res:#?} | src/config/params/server_params.rs | res: result (debug display) | - |
debug | {ui_index_html_folder:#?} | src/config/params/server_params.rs | ui_index_html_folder: configured UI folder path | ×2 in this file |
debug | {wrap_request:?} | src/routes/google_cse/jwt.rs | wrap_request: CSE wrap request (debug display) | - |
debug | {} identifiers | src/core/operations/validate.rs | - | - |
trace | : | src/core/operations/attributes/dispatch_macros.rs | — | — |
trace | : {:?} | src/core/operations/attributes/dispatch_macros.rs | — | — |
trace | [api_token_auth] Authorization header received (length: {} chars) | src/middlewares/api_token/api_token_auth.rs | — | — |
trace | [api_token_auth] comparing client token ({} chars) with server token | src/middlewares/api_token/api_token_auth.rs | — | — |
trace | [destroy] DENY revoke-before-destroy (explicitly activated) uid={} type={:?} state={:?} activation_date={:?} initial_date={:?} | src/core/operations/destroy.rs | — | — |
trace | [destroy] Failed to destroy linked private key {}: {:?}. Continuing with public key destruction. | src/core/operations/destroy.rs | — | — |
trace | [destroy] policy-eval uid={} type={:?} db_state={:?} attr_state={:?} effective_state={:?} activation_date={:?} policy_state={:?} remove={} | src/core/operations/destroy.rs | — | — |
trace | [revoke] proceed-destroyed uid={uid} state={:?} | src/core/operations/revoke.rs | uid — … | — |
trace | [revoke] skip uid={uid} reason=state-not-revocable state={:?} | src/core/operations/revoke.rs | uid — … | — |
trace | algorithm: {:?}, padding: {:?}, hashing_fn: {:?} | src/core/operations/decrypt.rs | — | — |
trace | algorithm={:?}, data_len={} | src/core/operations/hash.rs | — | — |
trace | All certificates have been sorted | src/core/operations/validate.rs | — | ×2 in this file |
trace | Already an unwrapped key | src/core/kms/other_kms_methods.rs | — | — |
trace | Attribute: Object type {:?} does not have attributes (nor key block) | src/core/operations/attributes/add.rs | — | — |
trace | authentication token validated for {authentication_email} | src/routes/google_cse/jwt.rs | authentication_email — … | — |
trace | authorization token validated successfully | src/routes/google_cse/jwt.rs | — | — |
trace | Auto-activating object {} (activation_date {} <= now {}) | src/core/retrieve_object_utils.rs | — | — |
trace | build_pkcs12_for_private_key: {} with format: {:?} | src/core/operations/export_get.rs | — | — |
trace | building chain from leaf certificate: {} | src/core/operations/export_get.rs | — | — |
trace | building the PKCS12 | src/core/operations/export_get.rs | — | — |
trace | Certificate attribute link: {} | src/core/operations/certify/certify_op.rs | — | — |
trace | Certificate attributes links: None | src/core/operations/certify/certify_op.rs | — | — |
trace | certificate parent id is: {} | src/core/operations/export_get.rs | — | — |
trace | Certify KeypairAndSubjectName:{unique_identifier} : keypair data: {keypair_data} | src/core/operations/certify/certify_op.rs | unique_identifier — …keypair_data — … | — |
trace | Certify X509Req or Certificate:{unique_identifier} | src/core/operations/certify/certify_op.rs | unique_identifier — … | — |
trace | Checking key with ID: {} | src/core/retrieve_object_utils.rs | — | — |
trace | Checking permissions to wrap with key {wrapping_key_uid} | src/core/wrapping/wrap.rs | wrapping_key_uid — … | — |
trace | Checking usage mask for wrapping key {wrapping_key_uid} | src/core/wrapping/wrap.rs | wrapping_key_uid — … | — |
trace | ciphertext (ECB): {ciphertext:?}, aad: {aad:?}, padding_method: {padding_method:?} | src/core/operations/decrypt.rs | ciphertext — …aad — …padding_method — … | — |
trace | Client certificate common name: {} | src/middlewares/tls_auth.rs | — | — |
trace | configure_cipher_suites: Enable default cipher suites (mozilla_intermediate_v5) | src/tls_config.rs | — | — |
trace | configure_cipher_suites: Setting custom cipher string: {suites} | src/tls_config.rs | suites — … | — |
trace | Configuring client certificate verification for {} | src/tls_config.rs | — | — |
trace | converting the private key {} to openssl pkey | src/core/operations/export_get.rs | — | — |
trace | create_base_openssl_acceptor: creating OpenSSL SslAcceptorBuilder for {server_type} | src/tls_config.rs | server_type — … | — |
trace | Creating object of type {:?} with UID {} and attributes {} | src/core/operations/create.rs | — | — |
trace | Creating OpenSSL SslAcceptor for socket server | src/socket_server.rs | — | — |
trace | Creating OpenSSL SslAcceptorBuilder with TLS parameters | src/start_kms_server.rs | — | — |
trace | CRL deserialized OK: {crl_path} | src/core/operations/validate.rs | crl_path — … | ×2 in this file |
trace | cryptographic_algorithm: {cryptographic_algorithm} | src/core/operations/create_key_pair.rs | cryptographic_algorithm — … | — |
trace | curve: {curve} | src/core/operations/create_key_pair.rs | curve — … | — |
trace | Decrypt: uid={:?}, data_len={} | src/core/operations/decrypt.rs | — | — |
trace | DELETE /v1/crypto/keys/{kid} | src/routes/jose/keys.rs | kid — … | — |
trace | Description: {:?} | src/core/operations/attributes/add.rs | — | — |
trace | Discover versions: {} | src/core/operations/discover_versions.rs | — | — |
trace | ECB encrypt result: ciphertext_len={} | src/core/operations/encrypt.rs | — | — |
trace | ECB encrypt: plaintext_len={}, padding_method={padding_method:?} | src/core/operations/encrypt.rs | padding_method — … | — |
trace | effective RSA CP -> padding={:?} hashing={:?} mgf1={:?} label_len={} | src/core/operations/decrypt.rs | — | — |
trace | encrypt result: ciphertext_len={}, tag_len={} | src/core/operations/encrypt.rs | — | — |
trace | entering | src/routes/google_cse/jwt.rs | — | — |
trace | Entering get_key_and_cipher | src/core/operations/encrypt.rs | — | — |
trace | Entering import KMIP operation: uid={}, object_type={} | src/core/operations/import.rs | — | — |
trace | Entering message KMIP operation: {request} | src/core/operations/message.rs | request — … | — |
trace | entering. owm: {} | src/core/operations/encrypt.rs | — | — |
trace | export_get_private_key: {} for operation: {} | src/core/operations/export_get.rs | — | — |
trace | Extracting key block for decryption to identify key format type... | src/core/operations/decrypt.rs | — | — |
trace | Fetching public key: {public_key_name} and attempting to extract RSA modulus and public exponent from key material | src/routes/utils.rs | public_key_name — … | — |
trace | Found CRL URI: {crl_uri} | src/core/operations/validate.rs | crl_uri — … | — |
trace | found link to certificate: {} | src/core/certificate/find.rs | — | — |
trace | found link to public key: {}. Will get certificate link from there | src/core/certificate/find.rs | — | — |
trace | Found uid: {}, attributes: {} | src/core/operations/locate.rs | — | — |
trace | function={:?} | src/core/operations/pkcs11.rs | — | — |
trace | Get Attributes: Attributes: {} | src/core/operations/attributes/get.rs | — | — |
trace | Get Attributes: computing LinkType set | src/core/operations/attributes/get.rs | — | — |
trace | Get Attributes: Requested attributes: {req_attributes:?} | src/core/operations/attributes/get.rs | req_attributes — … | — |
trace | Get Attributes: Response: {} | src/core/operations/attributes/get.rs | — | — |
trace | Get Attributes: Retrieved object for get attributes: {} | src/core/operations/attributes/get.rs | — | — |
trace | GET KEY /{} {:?} | src/routes/ms_dke/mod.rs | — | — |
trace | Get: {} | src/core/operations/get.rs | — | — |
trace | get_crl_bytes: entering: uri_list: {uri_list:?} | src/core/operations/validate.rs | uri_list — … | — |
trace | got key bytes of length: {}, aead: {:?}. Proceeding to get the nonce... | src/core/operations/decrypt.rs | — | — |
trace | HMAC computed: {} bytes | src/core/operations/mac.rs | — | — |
trace | Ignoring tag {x:?} which does not match to an attribute | src/core/operations/attributes/get.rs | x — … | — |
trace | import opaque_object: uid={} | src/core/operations/import.rs | — | — |
trace | import secret_data: uid={} | src/core/operations/import.rs | — | — |
trace | Internal create key pair | src/core/operations/create_key_pair.rs | — | — |
trace | Internal create private key | src/core/kms/other_kms_methods.rs | — | — |
trace | Internal create private key (FIPS build) | src/core/kms/other_kms_methods.rs | — | — |
trace | Internal rekey key pair Covercrypt | src/core/cover_crypt/rekey_keys.rs | — | — |
trace | Issuer certificate id: {} | src/core/operations/certify/resolve_issuer.rs | — | — |
trace | Issuer private key id: {} | src/core/operations/certify/resolve_issuer.rs | — | — |
trace | Issuer Subject name: {:?} | src/core/operations/certify/certify_op.rs | — | — |
trace | iv_counter_nonce: {}, ciphertext: {}, authenticated_tag: {} | src/routes/google_cse/operations.rs | — | — |
trace | JWT Authentication... | src/middlewares/jwt/jwt_token_auth.rs | — | — |
trace | key id {} | src/core/operations/decrypt.rs | — | — |
trace | key_format_type: {key_format_type:?} | src/core/operations/export_get.rs | key_format_type — … | — |
trace | key_material key format: {:?} | src/core/operations/digest.rs | — | — |
trace | Leaf certificate extracted from PKCS12 | src/core/operations/import.rs | — | — |
trace | Link: {} | src/core/operations/attributes/add.rs | — | — |
trace | Mac: algorithm: {algorithm:?} | src/core/operations/mac.rs | algorithm — … | — |
trace | Mac: data len: {} | src/core/operations/mac.rs | — | — |
trace | matching on key format type: {:?} | src/core/operations/encrypt.rs | — | — |
trace | matching on key format type: {:?} | src/core/operations/sign.rs | — | — |
trace | matching on public key format type: {:?} | src/core/operations/decrypt.rs | — | — |
trace | ModifyAttribute: ActivationDate: {:?} | src/core/operations/attributes/modify.rs | — | — |
trace | ModifyAttribute: Link: {} | src/core/operations/attributes/modify.rs | — | — |
trace | ModifyAttribute: Name: {} | src/core/operations/attributes/modify.rs | — | — |
trace | ModifyAttribute: retrieved target object {} | src/core/operations/attributes/modify.rs | — | — |
trace | ModifyAttribute: VendorAttribute: {} | src/core/operations/attributes/modify.rs | — | — |
trace | Name: {name} | src/core/operations/attributes/add.rs | name — … | — |
trace | no effective cryptographic parameters; defaults will apply | src/core/operations/decrypt.rs | — | — |
trace | No issuer certificate id provided | src/core/operations/certify/resolve_issuer.rs | — | — |
trace | No issuer private key id provided | src/core/operations/certify/resolve_issuer.rs | — | — |
trace | No UI folder containing index.html found at {} | src/start_kms_server.rs | — | — |
trace | Non revocable keys detected: won't be revoked {non_revocable_key_id:?} | src/core/operations/revoke.rs | non_revocable_key_id — … | — |
trace | Not using Client Certificate Authentication with OpenSSL | src/start_kms_server.rs | — | — |
trace | OpenSSL Private Key instantiated before signing | src/core/operations/sign.rs | — | — |
trace | OpenSSL Public Key instantiated before encryption | src/core/operations/encrypt.rs | — | — |
trace | Operation processed successfully: {op} | src/core/operations/message.rs | op — … | — |
trace | params: {server_params:?} | src/core/kms/mod.rs | server_params — … | — |
trace | PKCS12 parsed successfully | src/core/operations/import.rs | — | — |
trace | plaintext length: {} bytes | src/core/operations/decrypt.rs | — | — |
trace | plaintext_len={}, nonce_len={}, aad_len={}, padding_method={padding_method:?} | src/core/operations/encrypt.rs | padding_method — … | — |
trace | POST /v1/crypto/decrypt | src/routes/jose/decrypt.rs | — | — |
trace | POST /v1/crypto/encrypt kid={} alg={} | src/routes/jose/encrypt.rs | — | — |
trace | POST /v1/crypto/keys kty={} | src/routes/jose/keys.rs | — | — |
trace | POST /v1/crypto/keys/unwrap | src/routes/jose/unwrap.rs | — | — |
trace | POST /v1/crypto/mac kid={} | src/routes/jose/mac.rs | — | — |
trace | POST /v1/crypto/sign kid={} | src/routes/jose/sign.rs | — | — |
trace | POST /v1/crypto/verify | src/routes/jose/verify.rs | — | — |
trace | POST /{key_name}/{key_id}/Decrypt {encrypted_data:?} | src/routes/ms_dke/mod.rs | key_name — …key_id — …encrypted_data — … | — |
trace | post_process_private_key: operation type: {operation_type:?} | src/core/operations/export_get.rs | operation_type — … | — |
trace | Private key attributes after lifecycle update: {} | src/core/operations/create_key_pair.rs | — | — |
trace | Private key extracted from PKCS12 | src/core/operations/import.rs | — | — |
trace | Private key linked to leaf certificate | src/core/operations/import.rs | — | — |
trace | Private key operation created | src/core/operations/import.rs | — | — |
trace | Private key wrapped and cached | src/core/operations/import.rs | — | — |
trace | process_secret_data: object_with_metadata: {} | src/core/operations/export_get.rs | — | — |
trace | process_symmetric_key: object_with_metadata: {} | src/core/operations/export_get.rs | — | — |
trace | processing key_value | src/core/operations/digest.rs | — | — |
trace | Processing KMIP operation: {operation_name} with user: {user:?} | src/core/operations/message.rs | operation_name — …user — … | — |
trace | Processing PKCS12 import | src/core/operations/import.rs | — | — |
trace | Public key attributes after lifecycle update: {} | src/core/operations/create_key_pair.rs | — | — |
trace | Public key extracted from PKCS12 | src/core/operations/import.rs | — | — |
trace | ReKey: {} | src/core/operations/rekey/symmetric/mod.rs | — | — |
trace | ReKeyKeyPair: {} | src/core/operations/rekey/keypair/mod.rs | — | — |
trace | Request: {:?} | src/routes/azure_ekm/mod.rs | — | ×4 in this file |
trace | request: {username} {} | src/start_kms_server.rs | username — … | — |
trace | Response message: {response_message} | src/core/operations/message.rs | response_message — … | — |
trace | Response sent to {} | src/socket_server.rs | — | — |
trace | Retrieved certificate: {} for private key: {} | src/core/certificate/find.rs | — | — |
trace | Retrieved object for: {} | src/core/operations/activate.rs | — | — |
trace | Retrieved object for: {} | src/core/operations/attributes/add.rs | — | — |
trace | Retrieving certificate for private key: {} | src/core/certificate/find.rs | — | — |
trace | Retrieving issuer private key and certificate: private_key_id: {:?}, certificate_id: {:?} | src/core/certificate/find.rs | — | — |
trace | RNGRetrieve: {} | src/core/operations/rng_retrieve.rs | — | — |
trace | Root and possibly leaf removed from initial certificate list. Left: {} | src/core/operations/validate.rs | — | — |
trace | Sensitive: {:?} | src/core/operations/attributes/add.rs | — | — |
trace | Set Attribute: Link: {} | src/core/operations/attributes/set.rs | — | — |
trace | Set Attribute: Name: {} | src/core/operations/attributes/set.rs | — | — |
trace | Set Attribute: Object type {:?} does not have attributes (nor key block) | src/core/operations/attributes/set.rs | — | — |
trace | Set Attribute: Retrieved target object | src/core/operations/attributes/set.rs | — | — |
trace | Set Attribute: Vendor Attribute: {} | src/core/operations/attributes/set.rs | — | — |
trace | sk_uid: {sk_uid}, pk_uid: {pk_uid} | src/core/operations/create_key_pair.rs | sk_uid — …pk_uid — … | — |
trace | state_allows: {state_allows}: state: {state}, operation_type: {operation_type} | src/core/retrieve_object_utils.rs | state_allows — …state — …operation_type — … | — |
trace | Subject name: {:?} | src/core/operations/certify/certify_op.rs | — | — |
trace | The wrapping key {wrapping_key_uid} is authorized to wrap keys | src/core/wrapping/wrap.rs | wrapping_key_uid — … | — |
trace | TLS Authentication... | src/middlewares/tls_auth.rs | — | — |
trace | TLS Authentication: no peer certificate found | src/middlewares/tls_auth.rs | — | — |
trace | Token authentication using this API token ID: {api_token_id} | src/middlewares/api_token/api_token_auth.rs | api_token_id — … | — |
trace | token decoded with {app_name} jwt config | src/routes/google_cse/jwt.rs | app_name — … | — |
trace | Try to validate token from issuer: {issuer_uri:?} | src/routes/google_cse/jwt.rs | issuer_uri — … | — |
trace | UID: {:?}, State: {:?}, Attributes: {} | src/core/operations/locate.rs | — | - |
trace | uid={:?} | src/core/operations/mac.rs | — | — |
trace | uid={:?}, data_len={} | src/core/operations/encrypt.rs | — | — |
trace | uid={} | src/core/operations/mac.rs | — | — |
trace | uid={} remove={} cascade={} | src/core/operations/destroy.rs | — | — |
trace | UIDs count (post-truncate): {} | src/core/operations/locate.rs | — | — |
trace | updated_master_secret_key_bytes len: {} | src/core/cover_crypt/create_user_decryption_key.rs | — | — |
trace | User {user} does not have permission for operation {operation_type:?} on object {} | src/core/retrieve_object_utils.rs | user — …operation_type — … | — |
trace | User {user} has permission for operation {operation_type:?} on object {} | src/core/retrieve_object_utils.rs | user — …operation_type — … | — |
trace | Using Client Certificate Authentication with OpenSSL | src/start_kms_server.rs | — | — |
trace | valid_jwt user claims: {:?} | src/routes/google_cse/jwt.rs | — | — |
trace | validate token: KACLS URL {google_cse_kacls_url} | src/routes/google_cse/jwt.rs | google_cse_kacls_url — … | — |
trace | Validate: {} | src/core/operations/validate.rs | — | — |
trace | validate_cse_authorization_token: KACLS URL {google_cse_kacls_url} | src/routes/google_cse/jwt.rs | google_cse_kacls_url — … | — |
trace | validating authentication token, expected JWT issuer: {} | src/middlewares/jwt/jwt_config.rs | — | — |
trace | validating CSE authorization token, expected issuer : {} | src/routes/google_cse/jwt.rs | — | — |
trace | Vendor Attribute: {} | src/core/operations/attributes/add.rs | — | — |
trace | verify_chain_signature: entering: number of certificates: {} | src/core/operations/validate.rs | — | — |
trace | verify_crls: exiting in success | src/core/operations/validate.rs | — | — |
trace | Waiting for test socket server to start... | src/socket_server.rs | — | — |
trace | wrapped_key length: {} chars | src/routes/google_cse/operations.rs | — | — |
trace | Wrapping key retrieved successfully: {wrapping_key} | src/core/wrapping/wrap.rs | wrapping_key — … | — |
trace | Wrapping key with id: {wrapping_key_id} | src/core/wrapping/wrap.rs | wrapping_key_id — … | — |
trace | {debug_msg}. Certificate: subject: {:?}, AKI: {:?}, SKI: {:?} | src/core/operations/validate.rs | debug_msg — … | — |
trace | {info_msg} request received | src/routes/google_cse/mod.rs | info_msg — … | — |
trace | {jwt_authorization_config:#?} | src/routes/google_cse/jwt.rs | jwt_authorization_config — … | — |
trace | {request} | src/core/operations/attributes/get.rs | request — … | — |
trace | {request} | src/core/operations/check.rs | request — … | — |
trace | {request} | src/core/operations/create.rs | request — … | — |
trace | {request} | src/core/operations/destroy.rs | request — … | — |
trace | {request} | src/core/operations/export.rs | request — … | — |
trace | {request} | src/core/operations/query.rs | request — … | — |
trace | {request} | src/core/operations/register.rs | request — … | — |
trace | {request} | src/core/operations/revoke.rs | request — … | — |
trace | {request} | src/core/operations/sign.rs | request — … | — |
trace | {request} | src/core/operations/signature_verify.rs | request — … | — |
trace | {} | src/core/operations/activate.rs | — | — |
trace | {} | src/core/operations/attributes/add.rs | — | — |
trace | {} | src/core/operations/attributes/delete.rs | — | — |
trace | {} | src/core/operations/locate.rs | — | — |
error | Failed to convert response message to TTLV: {} | src/routes/kmip/handlers.rs | — | ×2 in this file |
error | Failed to find KMIP version | src/routes/kmip/handlers.rs | — | — |
error | Failed to parse RequestMessage: {} | src/routes/kmip/handlers.rs | — | — |
error | Failed to process request: {} | src/routes/kmip/handlers.rs | — | ×2 in this file |
error | OpenSSL does not appear to be available (version number is 0). Please verify that OpenSSL is correctly installed and accessible. | src/main.rs | — | — |
warn | An Edwards Keypair on curve 25519 should not be requested to perform ECDH. Creating anyway. | src/core/operations/create_key_pair.rs | — | — |
warn | An Edwards Keypair on curve 448 should not be requested to perform ECDH. Creating anyway. | src/core/operations/create_key_pair.rs | — | — |
warn | Import: CRL check could not be completed ({e}), proceeding with {desired_state:?} state | src/core/operations/import.rs | e, desired_state | — |
warn | The UI index HTML folder does not contain an index.html file: {ui_index_html_folder:#?} | src/config/params/server_params.rs | ui_index_html_folder | — |
warn | Unsupported Block Cipher Mode for AES: {x:?}. The Authenticated Encryption Tag will NOT be extracted. | src/routes/kmip/handlers.rs | x | — |
warn | User-supplied keyUsage in extension config overrides the RFC-mandated PQC keyUsage extension (RFC 9881/9909/9935) | src/core/operations/certify/build_certificate.rs | — | — |
debug | ...unwrapping the key block with key uid: {unwrapping_key_uid} using an encryption oracle, user: {user} | src/core/wrapping/unwrap.rs | unwrapping_key_uid, user | — |
debug | ...unwrapping the key block with key uid: {unwrapping_key_uid} using the KMS, user: {user} | src/core/wrapping/unwrap.rs | unwrapping_key_uid, user | — |
debug | ...wrapping the key block with key uid: {wrapping_key_uid} using an encryption oracle, user: {user} | src/core/wrapping/wrap.rs | wrapping_key_uid, user | — |
debug | ...wrapping the key block with key uid: {wrapping_key_uid} using the KMS, user: {user} | src/core/wrapping/wrap.rs | wrapping_key_uid, user | — |
debug | [kms-init] Failed to seed kms.objects.total: {e} | src/core/kms/mod.rs | e | — |
debug | [metrics-cron] Failed to sync kms.objects.total: {} | src/cron.rs | — | — |
debug | [metrics-cron] kms.keys.active.count synced to {} | src/cron.rs | — | — |
debug | [metrics-cron] kms.objects.total synced to {} | src/cron.rs | — | — |
debug | [metrics-cron] reconcile_all_object_counts failed: {} | src/cron.rs | — | — |
debug | API Token Middleware: An authenticated user was found; there is no need to authenticate twice... | src/middlewares/api_token/api_token_middleware.rs | — | — |
debug | DeriveKey: No derivation data provided - this may be acceptable if a Secret Data object identifier is provided | src/core/operations/derive_key.rs | — | — |
debug | Import: certificate is revoked per CRL check, setting state to Compromised | src/core/operations/import.rs | — | — |
debug | JWT: An authenticated user was found; there is no need to authenticate twice... | src/middlewares/jwt/jwt_middleware.rs | — | — |
debug | Request bytes: {} | src/routes/kmip/handlers.rs | — | — |
debug | Request TTLV: {ttlv:#?} | src/routes/kmip/handlers.rs | ttlv | — |
debug | Response Message Bytes: {} | src/routes/kmip/handlers.rs | — | — |
debug | Response Message TTLV: {response_ttlv:#?} | src/routes/kmip/handlers.rs | response_ttlv | — |
debug | The user: {user}, is authorized to wrap with the key {wrapping_key_uid}. Encoding: {:?}, format: {} | src/core/wrapping/wrap.rs | user, wrapping_key_uid | — |
debug | This is a {major}.{minor} Decrypt message. Extracting Authenticated Encryption Tag of length {len} from Data field | src/routes/kmip/handlers.rs | major, minor, len | — |
trace | Certify PublicKeyAndSubjectName:{unique_identifier}: public key: {from_public_key} | src/core/operations/certify/certify_op.rs | unique_identifier, from_public_key | — |
trace | ciphertext: {ciphertext:?}, nonce: {nonce:?}, aad: {aad:?}, tag: {tag:?}, padding_method: {padding_method:?} | src/core/operations/decrypt.rs | ciphertext, nonce, aad, tag, padding_method | — |
trace | enter export_get op={:?} req={} | src/core/operations/export_get.rs | — | ×2 in this file |
trace | post-process symmetric key uid={} final_format={:?} | src/core/operations/export_get.rs | — | — |
trace | process_symmetric_key enter uid={} requested_format={:?} wrap_type={:?} | src/core/operations/export_get.rs | — | — |
trace | process_symmetric_key exit uid={} final_format={:?} | src/core/operations/export_get.rs | — | — |
trace | process_symmetric_key key_block initial format={:?} wrapped={} uid={} | src/core/operations/export_get.rs | — | — |
trace | process_symmetric_key missing key_value structure uid={} | src/core/operations/export_get.rs | — | — |
trace | process_symmetric_key set Raw uid={} | src/core/operations/export_get.rs | — | — |
trace | process_symmetric_key set TransparentSymmetricKey uid={} | src/core/operations/export_get.rs | — | — |
trace | processing symmetric key uid={} state={:?} requested_format={:?} | src/core/operations/export_get.rs | — | — |
trace | Request Message: {request_message} | src/routes/kmip/handlers.rs | request_message | — |
trace | Response Message: {response_message} | src/routes/kmip/handlers.rs | response_message | — |
trace | retrieved object uid={} type={:?} state={:?} key_fmt={:?} | src/core/operations/export_get.rs | — | — |
error | Failed to convert Response TTLV to bytes: {}: TTLV:\n{:#?} | src/routes/kmip/handlers.rs | — | — |
warn | Failed to process request:\n{response_message} | src/routes/kmip/handlers.rs | response_message | — |
info | \n{:?} | src/routes/kmip/handlers.rs | — | — |
trace | JWK has been found:\n{jwk:?} | src/middlewares/jwt/jwt_config.rs | jwk | — |
trace | JWK has been found:\n{jwk:?} | src/routes/google_cse/jwt.rs | jwk | — |
warn | Failed to persist auto-deactivation of object {}: {} | src/core/retrieve_object_utils.rs | - | ×2 in this file |
warn | failed to re-wrap dependant {dep_uid} with new key: {e}, skipping | src/core/operations/rekey/common.rs | dep_uid, e | - |
warn | failed to unwrap dependant {dep_uid}: {e}, skipping | src/core/operations/rekey/common.rs | dep_uid, e | - |
warn | skipping re-wrap of dependant {dep_uid}: owned by '{}', not by '{owner}' | src/core/operations/rekey/common.rs | dep_uid, owner | - |
warn | wrapped dependant {dep_uid} not found, skipping | src/core/operations/rekey/common.rs | dep_uid | - |
warn | {}: keyset chain depth {} ≥ warn threshold {} for uid {}; consider re-encrypting with the latest key | src/core/operations/key_ops/crypto_op.rs | - | - |
info | Rekey finalized: old={} → new={}, user={user} | src/core/operations/rekey/common.rs | user | - |
debug | [auto-rotate-cron] Failed to build runtime: {} | src/cron.rs | - | - |
debug | [auto-rotate-cron] Running scheduled key auto-rotation check | src/cron.rs | - | - |
debug | [auto-rotate-cron] Shutdown signal received; stopping cron thread | src/cron.rs | - | - |
trace | Auto-deactivating object {} (deactivation_date {} <= now {}) | src/core/retrieve_object_utils.rs | - | ×2 in this file |
trace | execute_keyset_try_each: key {} failed for {}: {} | src/core/operations/key_ops/crypto_op.rs | - | - |
trace | HSM ReKey: old={uid} → new={new_uid} (slot={slot_id}, gen={new_gen}), user={user} | src/core/operations/rekey/symmetric/hsm.rs | uid, new_uid, slot_id, new_gen, user | - |
trace | ReCertify: {} | src/core/operations/recertify.rs | - | - |
trace | ReKey: resolved keyset ref '{}' → '{}' | src/core/operations/rekey/symmetric/mod.rs | - | - |
trace | walk_keyset_chain: keyset '{}' has {} keys in chain | src/core/uid_utils.rs | - | - |
warn | ui_session_salt is not configured — using a randomly generated ephemeral session key. Sessions will be invalidated on server restart and are not portable across instances. For persistent sessions and load-balanced deployments, set `ui_session_salt` (or KMS_UI_SESSION_SALT) to a strong random secret value. | src/start_kms_server.rs | - | Emitted at session-key derivation time when ui_session_salt is absent. The ephemeral key means all browser sessions are lost on restart. Set ui_session_salt (or env KMS_UI_SESSION_SALT) to a stable 32-byte+ secret for production. |
trace | Found valid JWK in JWKS at `{jwks_uri}`: {jwk:#?} | src/middlewares/jwt/jwks.rs | jwks_uri, jwk | - |
trace | Ignoring invalid JWK in JWKS at `{jwks_uri}`: {e}: {v:#?} | src/middlewares/jwt/jwks.rs | jwks_uri, e, v | - |
trace | PKCS#11 `C_CloseSession` not yet implemented | src/core/operations/pkcs11.rs | - | - |
trace | PKCS#11 `C_Decrypt` not yet implemented | src/core/operations/pkcs11.rs | - | - |
trace | PKCS#11 `C_DecryptFinal` not yet implemented | src/core/operations/pkcs11.rs | - | - |
trace | PKCS#11 `C_DecryptInit` not yet implemented | src/core/operations/pkcs11.rs | - | - |
trace | PKCS#11 `C_DecryptUpdate` not yet implemented | src/core/operations/pkcs11.rs | - | - |
trace | PKCS#11 `C_DestroyObject` not yet implemented | src/core/operations/pkcs11.rs | - | - |
trace | PKCS#11 `C_Encrypt` not yet implemented | src/core/operations/pkcs11.rs | - | - |
trace | PKCS#11 `C_EncryptFinal` not yet implemented | src/core/operations/pkcs11.rs | - | - |
trace | PKCS#11 `C_EncryptInit` not yet implemented | src/core/operations/pkcs11.rs | - | - |
trace | PKCS#11 `C_EncryptUpdate` not yet implemented | src/core/operations/pkcs11.rs | - | - |
trace | PKCS#11 `C_Finalize` failed: {e} | src/core/operations/pkcs11.rs | e | - |
trace | PKCS#11 `C_FindObjects` not yet implemented | src/core/operations/pkcs11.rs | - | - |
trace | PKCS#11 `C_FindObjectsFinal` not yet implemented | src/core/operations/pkcs11.rs | - | - |
trace | PKCS#11 `C_FindObjectsInit` not yet implemented | src/core/operations/pkcs11.rs | - | - |
trace | PKCS#11 `C_GenerateKey` not yet implemented | src/core/operations/pkcs11.rs | - | - |
trace | PKCS#11 `C_GenerateKeyPair` not yet implemented | src/core/operations/pkcs11.rs | - | - |
trace | PKCS#11 `C_GenerateRandom` not yet implemented | src/core/operations/pkcs11.rs | - | - |
trace | PKCS#11 `C_GetAttributeValue` not yet implemented | src/core/operations/pkcs11.rs | - | - |
trace | PKCS#11 `C_GetInfo` failed: {e} | src/core/operations/pkcs11.rs | e | - |
trace | PKCS#11 `C_GetMechanismInfo` not yet implemented | src/core/operations/pkcs11.rs | - | - |
trace | PKCS#11 `C_GetMechanismList` not yet implemented | src/core/operations/pkcs11.rs | - | - |
trace | PKCS#11 `C_Initialize` called on already initialized library - treating as success | src/core/operations/pkcs11.rs | - | - |
trace | PKCS#11 `C_Initialize` failed: {e} | src/core/operations/pkcs11.rs | e | - |
trace | PKCS#11 `C_Login` not yet implemented | src/core/operations/pkcs11.rs | - | - |
trace | PKCS#11 `C_Logout` not yet implemented | src/core/operations/pkcs11.rs | - | - |
trace | PKCS#11 `C_OpenSession` not yet implemented | src/core/operations/pkcs11.rs | - | - |
trace | PKCS#11 `C_SeedRandom` not yet implemented | src/core/operations/pkcs11.rs | - | - |
trace | PKCS#11 `C_UnwrapKey` not yet implemented | src/core/operations/pkcs11.rs | - | - |
trace | PKCS#11 `C_WrapKey` not yet implemented | src/core/operations/pkcs11.rs | - | - |
trace | ReKeyKeyPair: resolved keyset ref '{}' → '{}' | src/core/operations/rekey/keypair/mod.rs | - | - |
warn | find_wrapped_by({old_uid}) failed — skipping re-wrap of dependants: {e} | src/core/operations/rekey/common.rs | old_uid, e | - |
warn | [auto-rotate] Failed to query keys due for rotation: {e} | src/core/operations/auto_rotate.rs | e | - |
warn | [auto-rotate] Failed to re-arm rotation policy on replacement {new_uid}: {e} | src/core/operations/auto_rotate.rs | new_uid, e | - |
warn | [auto-rotate] Failed to retrieve key {uid}: {e}; skipping | src/core/operations/auto_rotate.rs | uid, e | - |
warn | [auto-rotate] Failed to rotate key {uid} (owner={owner}): {e} | src/core/operations/auto_rotate.rs | uid, owner, e | - |
warn | [auto-rotate] Key {uid} not found; skipping | src/core/operations/auto_rotate.rs | uid | - |
info | [auto-rotate] Found {} key(s) due for rotation | src/core/operations/auto_rotate.rs | - | - |
info | [auto-rotate] Key {uid} (owner={owner}) rotation due in {days} day(s) (warning threshold: {threshold} days) | src/core/operations/auto_rotate.rs | uid, owner, days, threshold | - |
info | [auto-rotate] Key {uid} (owner={owner}, algo={algorithm}) rotated successfully | src/core/operations/auto_rotate.rs | uid, owner, algorithm | - |
debug | [auto-rotate] Failed to query keys for renewal warnings: {e} | src/core/operations/auto_rotate.rs | e | - |
debug | [auto-rotate] No keys due for rotation at {now} | src/core/operations/auto_rotate.rs | now | - |
debug | [auto-rotate] rotate_one_key returned: {e} | src/core/operations/auto_rotate.rs | e | - |
debug | [auto-rotate] Skipping HSM key {uid} | src/core/operations/auto_rotate.rs | uid | - |
debug | [auto-rotate] Skipping {uid}: object type {other:?} has no auto-rotation support | src/core/operations/auto_rotate.rs | uid, other | - |
debug | [auto-rotate] Skipping {uid}: PublicKey is rotated as part of its paired PrivateKey rotation | src/core/operations/auto_rotate.rs | uid | - |
warn | Azure EKM JSON deserialization error: {err} | src/routes/azure_ekm/mod.rs | err | - |
warn | JWKS endpoint enabled — all active public keys with the "jwks" tag will be publicly exposed (unauthenticated) at `{kms_public_url}/.well-known/jwks.json`. Up to {} keys will be served. Ensure this is intentional. Configure via the `[jwks_endpoint]` section in the server configuration file. | src/start_kms_server.rs | kms_public_url | - |
warn | JWKS response truncated: more than {} eligible public keys found | src/routes/jwks.rs | - | - |
warn | Key uid={uid} found by Locate but missing on retrieve — skipping | src/routes/jwks.rs | uid | - |
warn | Skipping key uid={uid} from JWKS (conversion failed): {e} | src/routes/jwks.rs | uid, e | - |
info | GET /.well-known/jwks.json | src/routes/jwks.rs | - | - |
trace | DELETE /v1/crypto/keys/{kid}/tags | src/routes/jose/tags.rs | kid | - |
trace | GET /v1/crypto/keys/{kid}/tags | src/routes/jose/tags.rs | kid | - |
trace | JWKS key order is database insertion order — not stable across restarts or backends. Returning {} eligible key(s); consumers must match by `kid`, not position. | src/routes/jwks.rs | - | - |
trace | POST /v1/crypto/keys/{kid}/tags | src/routes/jose/tags.rs | kid | - |
warn | CRYPTO_OFFICER_ACCESS: crypto officer {user} bypassed normal permission check on {id} for {operation_type:?} | src/core/retrieve_object_utils.rs | user, id, operation_type | - |
info | GET /access/crypto_officer/status {user} | src/routes/access.rs | user | - |
trace | {request} | src/core/operations/create_split_key.rs | request | - |
error | Failed to serialize response to JSON: {e} | src/routes/kmip/handlers.rs | e | - |
info | http_workers not configured; defaulting to total core count ({total}) | src/start_kms_server.rs | total | - |
info | KMS HTTP server configured with {http_workers} worker thread(s) | src/start_kms_server.rs | http_workers | - |
debug | POST /kmip {}.{} Binary. Request: {:?} {} | src/routes/kmip/handlers.rs | - | - |
debug | POST /kmip {}.{} JSON. Request: {:?} {} | src/routes/kmip/handlers.rs | - | - |
debug | POST /kmip/2_1. Request: {:?} {} | src/routes/kmip/handlers.rs | - | - |
warn | JOSE CEK cache insert error for {uid}: {e} | src/routes/jose/cek_cache.rs | uid, e | - |
warn | JOSE CEK cache peek error for {uid}: {e} | src/routes/jose/cek_cache.rs | uid, e | - |
warn | JOSE CEK cache: failed to construct KMIP SymmetricKey: {e} | src/routes/jose/cek_cache.rs | e | - |
warn | JOSE CEK cache: unexpected CEK length {other} bytes — not an AES-128/192/256 key | src/routes/jose/cek_cache.rs | other | - |
warn | JOSE CEK cache: unexpected object type for {uid} | src/routes/jose/cek_cache.rs | uid | - |
debug | JOSE CEK cache hit for {uid} | src/routes/jose/cek_cache.rs | uid | - |
debug | JOSE CEK cached for {uid} | src/routes/jose/cek_cache.rs | uid | - |
debug | TLS: an authenticated user was already present; skipping certificate check | src/middlewares/tls_auth.rs | - | - |
trace | get_attribute_list uid={uid} refs=[{}] | src/core/operations/attributes/get_list.rs | uid | - |
debug | Object with unique identifier: {handle} destroyed | src/core/operations/destroy.rs | handle | - |
trace | [destroy-core] certificate zeroization uid={handle} | src/core/operations/destroy.rs | handle | - |
trace | [destroy-core] opaque object zeroization uid={handle} len={} | src/core/operations/destroy.rs | handle | - |
trace | [destroy-core] uid={handle} type={:?} pre-state={:?} object={object} | src/core/operations/destroy.rs | handle, object | - |
trace | HSM get_key_type probe for '{handle}' failed: {e}; proceeding with destroy | src/core/operations/destroy.rs | handle, e | - |
trace | object_handle: {object_handle}, user: {user}, operation_type: {operation_type:?} | src/core/retrieve_object_utils.rs | object_handle, user, operation_type | - |
trace | Retrieving private key for certificate: certificate_handle: {:?} | src/core/certificate/find.rs | - | - |
error | SECURITY: KMS compiled with 'insecure' feature — ALL JWT and Auth Verifier signature validation is DISABLED. Any syntactically valid token is accepted without signature verification. This binary MUST NOT be used in production. | src/start_kms_server.rs | - | - |
warn | OIDC: discovery document at {discovery_url} is missing required fields | src/start_kms_server.rs | discovery_url | - |
warn | OIDC: failed to build HTTP client for discovery: {e} | src/start_kms_server.rs | e | - |
warn | OIDC: failed to build JwksManager for UI OIDC: {e} | src/start_kms_server.rs | e | - |
warn | OIDC: failed to fetch discovery document from {discovery_url}: {e} | src/start_kms_server.rs | discovery_url, e | - |
warn | OIDC: failed to parse discovery document from {discovery_url}: {e} | src/start_kms_server.rs | discovery_url, e | - |
warn | SECURITY: auth_verifier_accept_invalid_certs is TRUE — TLS certificate verification is DISABLED for Auth Verifier JWKS fetches. Only use in dev/test environments. | src/start_kms_server.rs | - | - |
warn | SECURITY: vault_api_enabled is true but rate_limit_per_second is not set. The unauthenticated auth proxy at /v1/auth/* can be used as a DoS amplifier. Set rate_limit_per_second in the server config for production deployments. | src/start_kms_server.rs | - | - |
warn | SECURITY: vault_auth_verifier_accept_invalid_certs is TRUE — TLS certificate verification is DISABLED for Vault auth-verifier connections. Only use in dev/test. | src/start_kms_server.rs | - | - |
warn | Session: failed to read user_id from session: {e:?} | src/middlewares/session_auth.rs | e | - |
warn | SPIRE API internal error: {m} | src/routes/spire/error.rs | m | - |
warn | SPIRE auth proxy: rejected path traversal attempt: {path} | src/routes/spire/auth_proxy.rs | path | - |
warn | UI is enabled but ui_session_salt is not set. A random salt will be generated per process, which invalidates existing sessions on restart. Set a persistent salt for production use. | src/start_kms_server.rs | - | - |
warn | vault auth proxy: auth-verifier unreachable: {e} | src/routes/spire/auth_proxy.rs | e | - |
warn | vault auth proxy: failed to read auth-verifier response body: {e} | src/routes/spire/auth_proxy.rs | e | - |
warn | vault_api_enabled = true but vault_auth_verifier_url is not set — Vault-compatible API will NOT be registered. Set vault_auth_verifier_url in the server config. | src/start_kms_server.rs | - | - |
warn | {log_prefix}: validation failed: {e}; rejecting request | src/middlewares/spire_token.rs | log_prefix, e | - |
info | OIDC: discovered endpoints from {discovery_url} | src/start_kms_server.rs | discovery_url | - |
info | Vault-compatible API enabled: transit at {transit_scope_path}, PKI at {pki_scope_path}, auth proxy at /v1/auth | src/start_kms_server.rs | transit_scope_path, pki_scope_path | - |
debug | AuthVerifier Middleware: an authenticated user was already found; skipping. | src/middlewares/auth_verifier/middleware.rs | - | - |
debug | AuthVerifier Middleware: authenticated user `{}` | src/middlewares/auth_verifier/middleware.rs | - | - |
debug | AuthVerifier Middleware: authentication failed: {e:?} | src/middlewares/auth_verifier/middleware.rs | e | - |
debug | OIDC: authorization_endpoint={authorization_endpoint} | src/start_kms_server.rs | authorization_endpoint | - |
debug | OIDC: jwks_uri={jwks_uri} | src/start_kms_server.rs | jwks_uri | - |
debug | OIDC: token_endpoint={token_endpoint} | src/start_kms_server.rs | token_endpoint | - |
debug | Session: authenticated user '{user_id}' | src/middlewares/session_auth.rs | user_id | - |
debug | Session: request already authenticated, skipping | src/middlewares/session_auth.rs | - | - |
debug | SPIRE auth proxy → {target} | src/routes/spire/auth_proxy.rs | target | - |
debug | vault pki sign-intermediate: requested_validity_days={days} (from ttl='{ttl_str}') | src/routes/spire/pki.rs | days, ttl_str | - |
debug | vault pki: signed intermediate certificate uid={cert_uid} | src/routes/spire/pki.rs | cert_uid | - |
debug | vault pki: using CA private key uid={ca_private_key_uid} | src/routes/spire/pki.rs | ca_private_key_uid | - |
debug | vault transit: created EC key '{name}' type={} | src/routes/spire/transit.rs | name | - |
debug | vault transit: created ML-DSA-65 key '{name}' | src/routes/spire/transit.rs | name | - |
debug | vault transit: created RSA key '{name}' bits={bits} | src/routes/spire/transit.rs | name, bits | - |
debug | vault transit: deleted key '{name}' | src/routes/spire/transit.rs | name | - |
debug | {log_prefix}: non-ASCII X-Vault-Token header; rejecting | src/middlewares/spire_token.rs | log_prefix | - |
trace | force_refresh: cooldown active, skipping | src/middlewares/jwt/jwks.rs | - | - |
trace | POST vault transit keys/{}/config (no-op) | src/routes/spire/transit.rs | - | - |
trace | POST/PUT vault pki root/sign-intermediate | src/routes/spire/pki.rs | - | - |
trace | Session Authentication... | src/middlewares/session_auth.rs | - | - |
trace | Session: no user_id in session, passing through | src/middlewares/session_auth.rs | - | - |
trace | {log_prefix}: missing X-Vault-Token header | src/middlewares/spire_token.rs | log_prefix | - |
trace | {log_prefix}: no X-Vault-Token; deferring to native auth | src/middlewares/spire_token.rs | log_prefix | - |
trace | {} vault transit keys/{name} type={} | src/routes/spire/transit.rs | name | - |
trace | {} vault transit sign/{name}/{hash_alg_path} | src/routes/spire/transit.rs | name, hash_alg_path | - |
info | Starting Cosmian KMS server version {} | src/main.rs | - | - |
trace | ModifyAttribute: Extractable: {:?} | src/core/operations/attributes/modify.rs | - | - |
trace | ModifyAttribute: Sensitive: {:?} | src/core/operations/attributes/modify.rs | - | - |
trace | Set Attribute: Sensitive: {:?} | src/core/operations/attributes/set.rs | - | - |
warn | `privileged_users` is deprecated; please migrate to `[roles] crypto_officer_users` in kms.toml | src/config/params/server_params.rs | - | - |
warn | ceremony check DB error for user {user}: {e}; falling back to Operator role | src/core/operations/dispatch.rs | user, e | - |
warn | ceremony_secret loaded — ensure the KMS_CEREMONY_SECRET environment variable is used in production to avoid persisting the secret to disk. If loaded from a config file, ensure it has restrictive permissions (0600) and is not committed to version control. | src/config/params/server_params.rs | - | - |
warn | CreateSplitKey: partial failure — {} share(s) already stored but remaining shares could not be created. Manual cleanup required. | src/core/operations/create_split_key.rs | - | - |
trace | CreateSplitKey: overriding total_parts from {total_parts} to {n_co_i32} (matches crypto_officer_users count) | src/core/operations/create_split_key.rs | total_parts, n_co_i32 | - |
warn | CreateSplitKey: ceremony source key could not be destroyed after split — key material may still be accessible. Manual destruction required. | src/core/operations/create_split_key.rs | - | - |
error | CRYPTO_OFFICER_ACCESS: crypto officer bypassed ownership check | src/core/kms/permissions.rs | - | - |
error | CRYPTO_OFFICER_CEREMONY_ACTIVATED: Crypto Officer ceremony completed | src/core/operations/join_split_key.rs | - | - |
error | CRYPTO_OFFICER_DISABLED: Crypto Officer ceremony activation revoked | src/core/kms/permissions.rs | - | - |
warn | SECURITY: Crypto Officer is active in config-only mode (require_ceremony = false). Any user listed in `crypto_officer_users` is a permanent super-admin with no runtime activation gate. Consider enabling `crypto_officer_require_ceremony = true` in production deployments. | src/config/params/server_params.rs | - | - |
warn | SECURITY: Crypto Officer is configured but rate_limit_per_second is not set. The ceremony activation endpoint performs crypto operations on every request. Set rate_limit_per_second in the server config to protect against abuse in production deployments. | src/start_kms_server.rs | - | - |
debug | CreateSplitKey: resolved ceremony parameters | src/core/operations/create_split_key.rs | - | - |
info | POST /access/crypto_officer/disable | src/routes/access.rs | - | - |
info | JoinSplitKey: CO ceremony auto-activated via reconstructed key | src/core/operations/join_split_key.rs | - | - |
info | PEER_REVOCATION_CLEANUP: revoked victim GET access on caller's share | src/core/kms/permissions.rs | - | - |
debug | JoinSplitKey: shares reconstructed | src/core/operations/join_split_key.rs | - | - |
error | CreateSplitKey: ceremony source key destroyed after successful split | src/core/operations/create_split_key.rs | uid (source key UID), user, session_id | Audit — ceremony source key destroyed; split shares are now the only copies |
error | CreateSplitKey: split-key share stored | src/core/operations/create_split_key.rs | uid (share UID), part, total, source (source key UID), owner, user, session_id | Audit — ceremony share created; session_id correlates all shares from one CreateSplitKey call |
error | JoinSplitKey: reconstructed key stored | src/core/operations/join_split_key.rs | uid (reconstructed key UID), shares (count), user, session_id | Audit — key reconstructed from split-key shares |
error | JoinSplitKey: CO ceremony activation failed — rolling back reconstructed key from DB | src/core/operations/join_split_key.rs | uid (reconstructed key UID), user, session_id, error (activation error) | Audit — compensating delete triggered; activation failure made the ceremony invalid; key is being removed |
error | JoinSplitKey: CRITICAL — reconstructed key rollback failed; orphaned key remains in DB, manual cleanup required | src/core/operations/join_split_key.rs | uid (orphaned key UID), user, session_id, rollback_error (delete error) | CRITICAL audit — DB is in inconsistent state; manual deletion of the uid object is required; alert SIEM |
warn | `force_default_username = true` combined with `privileged_users` is deprecated and will become an error in a future release. All requests run under the same identity, making Crypto Officer dual-control meaningless. Please migrate to `[roles] crypto_officer_users` and remove `force_default_username`. | src/config/params/server_params.rs | - | - |
info | ceremony sealing key loaded from object store | src/core/kms/mod.rs | - | - |
warn | SigV4 failure: {sigv4_err} | src/routes/aws_xks/sigv4_middleware.rs | sigv4_err: SigV4 validation error detail (signature mismatch, expired timestamp, bad credentials, etc.) | Authentication failure — check client SigV4 credentials, clock skew (±5 min), and signed headers. |
info | AWS XKS: granted usage on {migrated} pre-existing key(s) to the reserved service identity `{AWS_XKS_SERVICE_USER}` | src/start_kms_server.rs | migrated, AWS_XKS_SERVICE_USER | - |
warn | [{idx}] CRL distribution point unreachable for '{:?}', skipping revocation check: {e} | src/core/operations/validate.rs | idx, e | - |
warn | CRL signature could not be verified against chain issuers; issuer: {crl_issuer:?}, path: {crl_path}. Continuing (trusted local delivery). | src/core/operations/validate.rs | crl_issuer, crl_path | - |
warn | CRL validation failed: {crl_err} | src/core/operations/validate.rs | crl_err | - |
info | GET /certificates/{}/crl | src/routes/crl.rs | - | - |
info | GET /public/certificates/{}/crl (unauthenticated) | src/routes/crl.rs | - | - |
debug | Auto-injecting CRL Distribution Point: {crl_url} | src/core/operations/certify/build_certificate.rs | crl_url | - |
debug | CRL cache hit: {uri} | src/core/operations/validate.rs | uri | - |
debug | CRL fetched: uri={uri} size={} | src/core/operations/validate.rs | uri | - |
debug | CRL generated successfully for issuer '{}': {} entries, validity {} days | src/core/operations/generate_crl.rs | - | - |
debug | CRL response received: uri={uri} status={} | src/core/operations/validate.rs | uri | - |
debug | Generating CRL for issuer certificate: {} | src/core/operations/generate_crl.rs | - | - |
error (audit) | CRYPTO_OFFICER_ACCESS: crypto officer generating CRL (find_all bypass) | src/core/operations/generate_crl.rs | user, issuer_id | Emitted every time a CO generates a CRL; always visible regardless of RUST_LOG. |
info | Auto-CRL: triggered CRL regeneration for issuer '{issuer_id}' after certificate revocation | src/core/operations/revoke.rs | issuer_id, user | Emitted on every successful auto-regen trigger. |
warn | Auto-CRL: CRL regeneration failed for issuer '{issuer_id}': {e} | src/core/operations/revoke.rs | issuer_id, e | Signing or DB error during auto-regen; Revoke still succeeds. |
trace | Found {} revoked certificate(s) for issuer '{}' | src/core/operations/generate_crl.rs | - | - |
trace | Skipping certificate '{}': cannot parse DER: {e} | src/core/operations/generate_crl.rs | e | - |
warn | Failed to load CRL from database for issuer '{issuer_id}': {e} | src/core/operations/generate_crl.rs | issuer_id, e | - |
warn | Failed to persist CRL to database for issuer '{issuer_certificate_id}': {e} | src/core/operations/generate_crl.rs | issuer_certificate_id, e | - |
warn | [crl-refresh-cron] CRL refresh failed for '{issuer_id}': {e} | src/cron.rs | issuer_id, e | - |
warn | [crl-refresh-cron] Failed to build runtime: {e} | src/cron.rs | e | - |
warn | [crl-refresh-cron] Failed to list CRL issuers from DB: {e} | src/cron.rs | e | - |
info | [crl-refresh-cron] Regenerating CRL for issuer '{issuer_id}' (expires within {overlap_hours}h) | src/cron.rs | issuer_id, overlap_hours | - |
debug | [crl-refresh-cron] Running scheduled CRL refresh check | src/cron.rs | - | - |
debug | [crl-refresh-cron] Shutdown signal received; stopping | src/cron.rs | - | - |
debug | [kms-init] Failed to read max CRL number from DB: {e}; using unix timestamp as CRL counter seed | src/core/kms/mod.rs | e | - |
info | GET /ocsp/ ({} bytes) | src/routes/ocsp/handler.rs | - | - |
info | POST /ocsp/ ({} bytes) | src/routes/ocsp/handler.rs | - | - |
debug | OCSP cache HIT | src/routes/ocsp/handler.rs | - | - |
debug | OCSP GET request path exceeds MAX_OCSP_GET_ENCODED_LEN | src/routes/ocsp/handler.rs | - | - |
warn | AWS XKS: skipping migration for key `{uid}` because its owner could not be determined (object missing) | src/start_kms_server.rs | uid | - |
warn | AWS XKS is enabled but `crypto_officer.users` is empty: no Crypto Officer is configured to monitor, rotate, revoke, or destroy XKS keys. AWS never triggers these operations on your behalf — configure a Crypto Officer identity backed by a real credential (TLS certificate CN / OIDC subject matching `default_username`) so XKS keys remain manageable. See crate/server/src/routes/aws_xks/README.md. | src/start_kms_server.rs | - | - |
error | AWS XKS: failed to spawn key access migration thread: {error} | src/start_kms_server.rs | error | - |
error | AWS XKS: failed to start key access migration runtime: {error} | src/start_kms_server.rs | error | - |
error | AWS XKS: pre-existing key access migration failed: {error} | src/start_kms_server.rs | error | - |
error | AuditFileStore: channel full, dropping audit event | src/core/audit/store.rs | - | Channel at capacity; event dropped, accounted for by an eviction sentinel on next successful write |
error | AuditFileStore: final sync failed: {e} | src/core/audit/writer.rs | e | fsync failure during graceful shutdown |
error | AuditFileStore: id counter overflow at i64::MAX — audit logging stopped. Rotate the log file and restart. | src/core/audit/writer.rs | - | id space exhausted; audit logging halts until the log file is rotated |
error | AuditFileStore: writer task has stopped, audit event dropped | src/core/audit/store.rs | - | Channel closed; enqueue silently drops the event |
debug | AuditFileStore: resuming at id={next_id}, prev_hash={} | src/core/audit/recovery.rs | next_id, prev_hash | prev_hash is truncated to its first 8 bytes (hex) |
debug | AuditFileStore: writer loop exited (channel closed) | src/core/audit/writer.rs | - | Graceful shutdown complete |
error | audit: event not queued — rejecting response (reject mode) | src/middlewares/audit/mod.rs | - | Audit failure in reject mode: single event failed to queue (channel full or closed). HTTP response is 503 ServiceUnavailable. |
error | audit: event(s) not queued — rejecting response (reject mode) | src/middlewares/audit/mod.rs | - | Audit failure in reject mode: batch request (one or more events) failed to queue. HTTP response is 503 ServiceUnavailable. |
error | AuditFileStore: audit log lock {} held by another instance ({e}) — buffering events until it is released | src/core/audit/file_sink.rs | e: lock acquisition error | Normal in HA deployments: another KMS instance holds the audit log lock. Events buffered (up to channel capacity) and file open will retry periodically. |
error | AuditFileStore: sealed corrupted audit log as {} (reason={}, sha256={sha256_hex}, size={size}, claimed_last_id={claimed_last_id:?}, failure_offset={failure_offset}) — starting a fresh chain | src/core/audit/recovery.rs | sha256_hex: SHA256 of sealed filesize: file size in bytesclaimed_last_id: last event ID if readablefailure_offset: byte offset where corruption detected | Security: Corrupted log sealed as forensic evidence with RFC3339 timestamp. New chain started at id=0 (audit:reanchor event). Offline verification: run ckms audit verify on the live log (or its containing directory) — it cross-checks the sealed file's SHA-256 through the live log's reanchor event; running it directly on the sealed file fails chain verification instead, since the sealed file is an intentionally broken chain. |
error | AuditFileStore: torn write recovered — discarded {bytes_discarded} byte(s) at offset {discard_offset} (process likely killed mid-write); resuming chain at id={next_id} | src/core/audit/recovery.rs | bytes_discarded: incomplete bytes droppeddiscard_offset: offset in filenext_id: resuming event ID | Process killed mid-write (crash/SIGKILL). Incomplete event discarded; hash chain preserved. |
debug | AuditFileStore: still waiting on audit log lock {} ({e}) | src/core/audit/file_sink.rs | e: lock acquisition error | Debug: subsequent retry attempt (not the first). Implies a preceding "audit log lock held by another instance" error. |
error | AuditFileStore: audit log {} stopped at its configured max_size_bytes cap ({len} bytes, cap {cap}) — audit writing is blocked until the log is safely remediated and the KMS is restarted | src/core/audit/file_sink.rs | len: actual file length in bytescap: configured max_size_bytes | First transition into the capped state only (logged once). A final audit:size-cap-reached event replaces the event that would reach the cap; later events are dropped according to --audit-failure-mode until the log is remediated and the KMS restarted. |
error | AuditFileStore: recovery task failed to run ({join_err}) — retrying | src/core/audit/file_sink.rs | join_err: task join error (tokio thread panic or cancellation) | Audit recovery background task crashed; will retry after backoff interval. Monitor frequency to detect systemic issues. |
error | AuditFileStore: cannot acquire audit log lock {} ({e}) — retrying | src/core/audit/file_sink.rs | e: lock acquisition error other than contention (EACCES, EROFS, directory-creation failure) | Deployment fault distinct from the benign "held by another instance" case; retried on the same interval. |
trace | Extractable: {:?} | src/core/operations/attributes/add.rs | - | - |
trace | Set Attribute: Extractable: {:?} | src/core/operations/attributes/set.rs | - | - |
warn | no email in JWT | src/middlewares/jwt/jwt_token_auth.rs | - | Emitted when a validated JWT has no email claim and --jwt-svid-auth is not enabled or sub is not a valid SPIFFE ID |
debug | JWT-SVID access granted to {sub}! | src/middlewares/jwt/jwt_token_auth.rs | sub: SPIFFE ID (URI) from JWT sub claim | Workload authenticated via SPIFFE JWT-SVID with full URI mapped to KMS UserId |
debug | DeriveKey asymmetric operation completed successfully | src/core/operations/derive_key.rs | - | Emitted after a non-FIPS X25519 ECDH DeriveKey request has validated both referenced keys, derived the shared secret, and persisted the resulting SecretData object. |
warn | [kms-init] Failed to seed kms.keys.active.count: {e} | src/core/kms/mod.rs | e | - |
warn | [metrics-cron] Failed to sync kms.keys.active.count: {} | src/cron.rs | - | - |
warn | JWK serialization failed uid={uid}: {e} | src/routes/jwks.rs | uid: unique identifier of the key object being published in the JWKS; e: the serde_json serialization error | Emitted when a typed Jwk fails to serialize to JSON; the affected key is skipped and omitted from the JWKS keys array rather than emitting an invalid null entry. |
warn | JWKS refresh failed while validating a JWT-SVID: {error:?} | src/middlewares/jwt/jwt_token_auth.rs | error: error detail | JWKS endpoint unreachable |
warn | JWT-SVID for {sub} rejected: missing or empty 'aud' claim | src/middlewares/jwt/jwt_token_auth.rs | sub: SPIFFE ID of the rejected SVID | Possible cross-service SVID replay attempt |
warn | {:?} {} 401 unauthorized: {error} | src/middlewares/jwt/jwt_token_auth.rs | error | - |
debug | CRL cache entry stale, refetching: {uri} | src/core/operations/validate.rs | uri | - |
debug | vault transit: key '{name}' already exists, not re-creating | src/routes/spire/transit.rs | name | - |
trace | import pgp_key: uid={} | src/core/operations/import.rs | - | - |
error | AuditFileStore: audit sink failed to resume ({e}) — audit logging is disabled for this process | src/core/audit/store.rs | e | Only reachable if the recovered log file's metadata cannot be stat'd at all (lock acquisition and recovery/open faults retry indefinitely and never reach here). The writer task exits and audit logging stays off for the rest of the process lifetime — it is not retried. |
error | AuditFileStore: failed to write recovery sentinel id={}: {e} — event dropped | src/core/audit/file_sink.rs | id: sentinel event IDe: I/O error | A torn-write-recovered or reanchor sentinel written during recovery (before the writer task exists) failed to persist; the chain does not advance past this id and the sentinel is dropped. |
debug | AuditFileStore: sink '{}' is at capacity — event dropped | src/core/audit/writer.rs | sink name (AuditSink::name()) | Throttled to at most once every 500ms while blocked events keep arriving after the sink reports is_write_capacity_exceeded() == true. |
error | AuditFileStore: cannot open or stat audit log {} ({e}) — retrying | src/core/audit/file_sink.rs | e | - |
error | AuditFileStore: recovery sentinel id counter overflow at i64::MAX | src/core/audit/file_sink.rs | - | - |
error | AuditFileStore: exhausted resync attempts at id={id} — event dropped | src/core/audit/writer.rs | id | - |
error | AuditFileStore: failed to write event id={id}: {e} — event dropped | src/core/audit/writer.rs | id, e | - |
error | AuditFileStore: sink rejected size-cap sentinel at id={id} | src/core/audit/writer.rs | id | - |
warn | Connected to the PostgreSQL audit backend; ignoring --audit-file-path ({}) since both were set | src/core/kms/mod.rs | - | - |
warn | PostgreSQL audit backend unavailable ({e}); --audit-file-path ({}) is set but is NOT used as a runtime fallback — startup aborts | src/core/kms/mod.rs | e | - |
error | Operation processing failed: {e} | src/core/operations/message.rs | e | - |
warn | EST simplereenroll rejected: {e} | src/routes/est/enroll.rs | e | - |
warn | SCEP request {} rejected (failInfo={}): {} | src/routes/scep/pki_operation.rs | - | - |
info | GET /.well-known/est/cacerts | src/routes/est/cacerts.rs | - | - |
info | GET /.well-known/est/csrattrs | src/routes/est/csrattrs.rs | - | - |
warn | Legacy OpenSSL provider unavailable ({e}); old PKCS#12/RC2 formats are unsupported on this build. All other algorithms (including PQC and Covercrypt) are unaffected. | src/openssl_providers.rs | e | - |
warn | Legacy OpenSSL provider unavailable ({e}); old PKCS#12/RC2 formats are unsupported in this test run. All other algorithms are unaffected. | src/openssl_providers.rs | e | - |
debug | decrypt request: {} | src/routes/aws_xks/encrypt_decrypt/decrypt_.rs | - | - |
debug | encrypt request: {} | src/routes/aws_xks/encrypt_decrypt/encrypt_.rs | - | - |
debug | get metadata request: {} | src/routes/aws_xks/key_metadata.rs | - | - |
debug | vault transit: 'exportable: true' requested for key '{name}' is ignored, transit keys are always created non-exportable | src/routes/spire/transit.rs | name | - |
debug | {log_prefix}: validated entity={} policies={:?} | src/middlewares/spire_token.rs | log_prefix | - |
trace | ignoring embedded key material in JWT headers (x5u: {:?}, x5c: {} cert(s), x5t: {:?}); the key is taken from the configured JWKS | src/middlewares/jwt/jwt_config.rs | - | - |
trace | valid_jwt headers: typ={:?} alg={:?} kid={:?} | src/middlewares/jwt/jwt_config.rs | - | - |
debug | ModifyAttribute: persisting attributes for {id} | src/core/operations/attributes/modify.rs | id | - |
debug | Object with unique identifier: {id} revoked | src/core/operations/revoke.rs | id | - |
debug | SetAttribute: implicitly enabling rotate_automatic for key '{id}' (RotateInterval > 0 with no explicit RotateAutomatic) | src/core/operations/attributes/set.rs | id | - |
trace | Certificate parent id is: {parent_id_str} | src/core/operations/export_get.rs | parent_id_str | - |
trace | Locate: filtering out HSM key {uid} — user {user} has no grants | src/core/operations/locate.rs | uid, user | - |
trace | Retrieved object for: {object} | src/core/operations/attributes/delete.rs | object | - |
trace | SetAttribute: clearing CKA_START_DATE / CKA_END_DATE on HSM key '{id}' (rotation disabled) | src/core/operations/attributes/set.rs | id | - |
trace | SetAttribute: writing CKA_LABEL '{label}' on HSM key '{id}' | src/core/operations/attributes/set.rs | label, id | - |
trace | SetAttribute: writing CKA_START_DATE={today} CKA_END_DATE={end_date} on HSM key '{id}' | src/core/operations/attributes/set.rs | today, end_date, id | - |
warn | SECURITY: no authentication method is configured: every request is served as the default user '{}'. Configure mTLS, JWT/OIDC, an API token or the Auth Verifier for production deployments. | src/start_kms_server.rs | - | - |
warn | SECURITY: no key_encryption_key is configured: objects are stored without server-side KEK wrapping. Configure a KEK for production deployments. | src/start_kms_server.rs | - | - |
warn | SECURITY: rate_limit_per_second is not set: request rate limiting is disabled. | src/start_kms_server.rs | - | - |
warn | Socket server: cannot set socket timeouts, dropping connection: {e} | src/socket_server.rs | e | - |
warn | Socket server: {MAX_SOCKET_CONNECTIONS} connections already active, dropping new connection | src/socket_server.rs | MAX_SOCKET_CONNECTIONS | - |
debug | Generated JWT for original KACLS | src/routes/google_cse/operations.rs | - | - |
warn | Session: rejecting reserved service identity from stored session user_id: {error} | src/middlewares/session_auth.rs | error | - |
warn | {log_prefix}: rejecting reserved service identity in SPIRE auth: {error} | src/middlewares/spire_token.rs | log_prefix, error | - |
error | enrollment audit: {operation} event could not be queued | src/routes/enrollment.rs | operation | Audit event lost; check the audit backend. |
error | enrollment: deactivating non-conforming certificate {uid}: {e} | src/routes/enrollment.rs | uid, e | Issued certificate failed the end-entity check and was deactivated; investigate the CA/template. |
warn | enrollment audit: {operation} refused for `{principal}` from {client}: {} | src/routes/enrollment.rs | operation, principal, client | - |
warn | enrollment: CA certificate not found: {uid} | src/routes/enrollment.rs | uid | - |
warn | EST simpleenroll refused: {client} is locked out | src/routes/est/enroll.rs | client | 10 failures lock the address out, 30 s doubling up to 1 h. |
warn | EST simpleenroll rejected: the client certificate was enrolled elsewhere | src/routes/est/enroll.rs | - | - |
warn | EST simpleenroll rejected: {e} | src/routes/est/enroll.rs | e | - |
warn | SCEP PKIOperation refused: {client} is locked out | src/routes/scep/pki_operation.rs | client | 10 failures lock the address out, 30 s doubling up to 1 h. |
warn | SCEP: refusing a pkiMessage from {client} with an invalid transactionID ({}) | src/routes/scep/pki_operation.rs | client | - |
warn | SCEP: unreadable pkiMessage from {client}: {e} | src/routes/scep/pki_operation.rs | client, e | - |
warn | SECURITY: EST/SCEP is enabled but rate_limit_per_second is not set. The enrollment endpoints are reachable before authentication; set rate_limit_per_second in the server configuration for production deployments (failed authentications are also locked out per client address). | src/config/params/server_params.rs | - | Set rate_limit_per_second in production. |
warn | SECURITY: SCEP is enabled without TLS. A network attacker can substitute the CA certificate returned by GetCACert and observe or replay requests. Enable TLS, or have devices verify the CA fingerprint out of band. | src/config/params/server_params.rs | - | Enable TLS or have devices pin the CA fingerprint. |
info | enrollment audit: {operation} succeeded for `{principal}` from {client}: certificate {uid} | src/routes/enrollment.rs | operation, principal, client, uid | - |
info | POST /.well-known/est/simpleenroll from {client} | src/routes/est/enroll.rs | client | - |
info | POST /.well-known/est/simplereenroll from {client} | src/routes/est/enroll.rs | client | - |
info | SCEP PKIOperation from {client}: messageType={} transactionID={} | src/routes/scep/pki_operation.rs | client | - |
debug | enrollment: issued certificate {uid} (serial {serial_hex}) from CA {ca_uid} | src/routes/enrollment.rs | uid, serial_hex, ca_uid | - |
trace | Certify: unique_identifier={:?}, request type={:?}, request value: {} bytes | src/core/operations/certify/certify_op.rs | - | - |
trace | RNGSeed: {} bytes | src/core/operations/rng_seed.rs | - | - |
warn | enrollment: CA `{ca_uid}` could not be used by `{ENROLLMENT_SERVICE_USER}`: {error}. The CA owner must grant it `certify` on the CA certificate and private key (and `decrypt` on the wrapping key if the CA key is wrapped, and `create` when Crypto Officers are configured). | src/routes/enrollment.rs | ca_uid, ENROLLMENT_SERVICE_USER, error | - |
error | SCEP: the enrollment CA `{ca_uid}` cannot be used: {e} | src/routes/scep/pki_operation.rs | ca_uid, e | Server-side detail only: the client gets a fixed HTTP 500 without CA identifiers. |
warn | enrollment: CA certificate not found: {ca_uid} | src/routes/enrollment.rs | ca_uid | - |
warn | enrollment: the CA private key {} is not Active | src/routes/enrollment.rs | key uid | Logged only; the enrollment error carries no UID. |
warn | SCEP request {} from {client} rejected: {reason} (messageType={message_type}) | src/routes/scep/pki_operation.rs | client, reason, message_type | Counts toward the enrollment lockout. |
warn | enrollment: refused by the KMIP algorithm policy: {e} | src/routes/enrollment.rs | e | - |
warn | enrollment: the CA private key {} is refused by the KMIP algorithm policy: {e} | src/routes/enrollment.rs | e | - |
cosmian_kms_server_database
Crate path: crate/server_database
RUST_LOG target: cosmian_kms_server_database
| Level | Message | File | Variables | Notes |
|---|---|---|---|---|
debug | Empty Redis database detected. Initializing a new database instance. | src/stores/redis/redis_with_findex.rs | - | - |
debug | Existing Redis database detected (version {version}). Using current database. | src/stores/redis/redis_with_findex.rs | version: version | - |
debug | Listed {} rows | src/stores/sql/mysql.rs | - | ×2 in this file |
debug | Owner = {} | src/stores/sql/mysql.rs | - | - |
debug | PG find query: {} | src/stores/sql/pgsql.rs | - | - |
debug | Uid = {} | src/stores/sql/mysql.rs | - | - |
trace | Created in DB: {uid} / {owner} | src/stores/sql/mysql.rs | uid — …owner — … | — |
trace | Deleted in DB: {uid} | src/stores/sql/mysql.rs | uid — … | — |
trace | find: tags: {tags:?} | src/stores/redis/redis_with_findex.rs | tags — … | — |
trace | find: uids before permissions: {:?} | src/stores/redis/redis_with_findex.rs | — | — |
trace | find: user must be owner | src/stores/redis/redis_with_findex.rs | — | — |
trace | Insert read access right in DB: {uid} / {userid} | src/stores/sql/mysql.rs | uid — …userid — … | — |
trace | Invalidating the cache for {} | src/core/unwrapped_cache.rs | — | — |
trace | Redis DB size: {count} | src/stores/redis/redis_with_findex.rs | count — … | — |
trace | Updated in DB: {uid} | src/stores/sql/mysql.rs | uid — … | ×2 in this file |
trace | Upserted in DB: {uid} | src/stores/sql/mysql.rs | uid — … | — |
debug | [redis-bootstrap] skipping key {key}: {e} | src/stores/redis/objects_db.rs | key, e | ×2 in this file |
debug | [redis-metrics] reconcile: live_objects={live_count}, non_destroyed_keys={key_count} | src/stores/redis/redis_with_findex.rs | live_count, key_count | — |
debug | [redis-metrics] bootstrapped {} live object(s) into `{}` | src/stores/redis/redis_with_findex.rs | - | - |
debug | [redis-metrics] bootstrapped {} non-destroyed key(s) into `{}` | src/stores/redis/redis_with_findex.rs | - | - |
debug | [redis-scan-rotation] skipping key {key}: {e} | src/stores/redis/objects_db.rs | key, e | - |
warn | PostgreSQL BEGIN failed — retrying | src/stores/sql/pgsql.rs | attempt, delay_ms, error | - |
warn | PostgreSQL COMMIT failed — retrying | src/stores/sql/pgsql.rs | attempt, delay_ms, error | - |
warn | PostgreSQL pool error — retrying | src/stores/sql/pgsql.rs | attempt, delay_ms, error | - |
warn | PostgreSQL retryable error — retrying | src/stores/sql/pgsql.rs | attempt, delay_ms, error | - |
warn | PostgreSQL transaction body failed — retrying | src/stores/sql/pgsql.rs | attempt, delay_ms, error | - |
debug | [redis-scan-all] skipping key {key}: {e} | src/stores/redis/objects_db.rs | key, e | - |
debug | PG find_all query: {} | src/stores/sql/pgsql.rs | - | - |
warn | wrapping_key_id backfill: skipping object that failed to deserialize | src/stores/sql/sqlite.rs | - | - |
warn | wrapping_key_id backfill: skipping object that failed to deserialize | src/stores/sql/pgsql.rs | - | - |
warn | wrapping_key_id backfill: skipping object {id} that failed to deserialize: {e} | src/stores/sql/mysql.rs | id, e | - |
debug | [redis-scan-wrapped] skipping key {key}: {e} | src/stores/redis/objects_db.rs | key, e | - |
debug | PostgreSQL error | src/error/db_error.rs | code: SQLSTATE codemessage: raw driver error message | Internal only — never surfaced via SqlError (which carries just the code) to avoid leaking table/constraint names to clients. |
debug | SQLite transient lock encountered, retrying in {backoff:?}: {e} | src/stores/sql/sqlite.rs | backoff: delay before the next retry attempte: the underlying "database is locked" error | Emitted while retrying a transient SQLite lock contention error; not an operator-actionable warning by itself, only relevant if retries are repeatedly exhausted. |
trace | find: {:?} | src/stores/sql/mysql.rs | - | - |
trace | find_all: {:?} | src/stores/sql/mysql.rs | - | - |
error | audit: dedicated advisory-lock session ended unexpectedly: {e} | src/stores/audit/pgsql.rs | e | - |
error | audit: instance_id={} sealed generation {sealed_generation} (reason={}, first_failure_id={}, evidence={evidence}) — starting generation {new_generation} | src/stores/audit/pgsql.rs | sealed_generation, evidence, new_generation | - |
error | audit: advisory lock for instance_id={instance_id} held by another writer — waiting up to {timeout:?} (e.g. a rolling update's outgoing instance) | src/stores/audit/pgsql.rs | instance_id, timeout | - |
warn | RotateNameCache: predicate invalidation failed ({e}); clearing cache | src/core/rotate_name_cache.rs | e | - |
warn | audit: PostgreSQL server certificate is not verified; use sslmode=verify-full&sslrootcert=<ca.pem> in --audit-postgres-url | src/stores/audit/pgsql.rs | - | - |
error | atomic: objects {uids:?} were committed but the Findex index could not be updated after {INDEX_WRITE_ATTEMPTS} attempts (index needs repair): {e} | src/stores/redis/redis_with_findex.rs | uids, INDEX_WRITE_ATTEMPTS, e | - |
warn | atomic: active-key counter not updated for {uids:?} (reconcile will fix): {e} | src/stores/redis/redis_with_findex.rs | uids, e | - |
warn | atomic: live-object counter not updated for {uids:?} (reconcile will fix): {e} | src/stores/redis/redis_with_findex.rs | uids, e | - |
cosmian_kms_crypto
Crate path: crate/crypto
RUST_LOG target: cosmian_kms_crypto
| Level | Message | File | Variables | Notes |
|---|---|---|---|---|
error | Error verifying ({:?}) signature: {:?}, data: {:?}, error: {err:?} | src/crypto/rsa/verify.rs | err: error detail | - |
error | Error verifying digest ({:?}) signature: {:?}, data: {:?}, error: {err:?} | src/crypto/rsa/verify.rs | err: error detail | ×2 in this file |
error | Error verifying raw ({:?}) signature: {:?}, data: {:?}, error: {err:?} | src/crypto/rsa/verify.rs | err: error detail | - |
warn | test_openssl_cli_compat: openssl CLI call failed, skipping test: {output:#?} | src/crypto/rsa/ckm_rsa_aes_key_wrap.rs | output: output | - |
warn | test_openssl_cli_compat: openssl CLI not found, skipping test | src/crypto/rsa/ckm_rsa_aes_key_wrap.rs | - | - |
warn | test_openssl_cli_compat: openssl CLI output is not valid UTF-8 | src/crypto/rsa/ckm_rsa_aes_key_wrap.rs | - | - |
info | ===> Wrapping asymmetric key with asymmetric key | src/crypto/wrap/tests.rs | - | - |
info | ===> Wrapping asymmetric key with symmetric key | src/crypto/wrap/tests.rs | - | - |
info | ===> Wrapping symmetric key with asymmetric key | src/crypto/wrap/tests.rs | - | - |
info | ===> Wrapping symmetric key with symmetric key | src/crypto/wrap/tests.rs | - | - |
info | value is: {:?} | src/openssl/x509_extensions.rs | - | ×2 in this file |
debug | attribute: {attribute:?}, encryption_hint: {encryption_hint:?} | src/crypto/cover_crypt/access_structure.rs | attribute: KMIP attribute (debug display)encryption_hint: encryption hint | - |
debug | create_dk_object: key len: {}, attributes: {attributes} | src/crypto/kem.rs | attributes: KMIP attribute (debug display)s | - |
debug | create_msk_object: key len: {}, attributes: {attributes} | src/crypto/cover_crypt/master_keys.rs | attributes: KMIP attribute (debug display)s | - |
debug | Decrypted data with user key {} of len (Plain/Enc): {}/{} | src/crypto/cover_crypt/decryption.rs | - | - |
debug | Encrypted data with auth data {:?} of len (Plain/Enc): {}/{} | src/crypto/cover_crypt/encryption.rs | - | - |
debug | RSA key pair generated: private key id: {private_key_uid} | src/crypto/rsa/operation.rs | private_key_uid: private key uid | - |
debug | RSA key pair generation: size in bits: {key_size_in_bits} | src/crypto/rsa/operation.rs | key_size_in_bits: RSA key size in bits | - |
debug | server: access_structure: {access_structure:?} | src/crypto/cover_crypt/master_keys.rs | access_structure: Covercrypt access structure | - |
debug | using GCM | src/crypto/wrap/wrap_key.rs | - | - |
debug | wrapping with CKM_RSA (v1.5) | src/crypto/wrap/wrap_key.rs | - | - |
debug | wrapping with CKM_RSA_AES_KEY_WRAP and hashing function: {hashing_fn} | src/crypto/wrap/wrap_key.rs | hashing_fn: hash function | - |
debug | wrapping with CKM_RSA_OAEP and hashing function: {hashing_fn} | src/crypto/wrap/wrap_key.rs | hashing_fn: hash function | - |
trace | Access Policy: {access_policy:?} | src/crypto/cover_crypt/user_key.rs | access_policy — … | — |
trace | authenticated_encryption_additional_data: {ad:?} | src/crypto/cover_crypt/encryption.rs | ad — … | — |
trace | bytes len: {}, bits: {} | src/crypto/rsa/operation.rs | — | ×2 in this file |
trace | ChaCha20 (pure) encryption: key_len={}, nonce_len={}, pt_len={} | src/crypto/symmetric/symmetric_ciphers.rs | — | — |
trace | Created user decryption key with access policy: {access_policy:?} | src/crypto/cover_crypt/user_key.rs | access_policy — … | — |
trace | decrypt: ad: {ad:?} | src/crypto/cover_crypt/decryption.rs | ad — … | — |
trace | Ed25519 | src/crypto/elliptic_curves/ecies/salsa_sealbox.rs | — | — |
trace | encrypted_bytes len: {} | src/crypto/cover_crypt/decryption.rs | — | — |
trace | encrypted_header parsed | src/crypto/cover_crypt/decryption.rs | — | — |
trace | encryption_policy: {ap:?} | src/crypto/cover_crypt/encryption.rs | ap — … | ×2 in this file |
trace | instantiate entering | src/crypto/cover_crypt/decryption.rs | — | — |
trace | Instantiated hybrid Covercrypt encipher for public key id: {public_key_uid} | src/crypto/cover_crypt/encryption.rs | public_key_uid — … | — |
trace | Key format type: convert Rsa<Public> openssl object | src/openssl/public_key.rs | — | — |
trace | Key format type: TransparentDSAPublicKey | src/openssl/public_key.rs | — | — |
trace | Key format type: TransparentRSAPublicKey | src/openssl/public_key.rs | — | — |
trace | key_wrapping_specification: {} | src/crypto/wrap/wrap_key.rs | — | — |
trace | nonce_len={}, tag_len={} | src/crypto/wrap/wrap_key.rs | — | — |
trace | output object: {output} | src/crypto/rsa/operation.rs | output — … | — |
trace | private key converted OK | src/crypto/elliptic_curves/operation.rs | — | — |
trace | public key converted OK | src/crypto/elliptic_curves/operation.rs | — | — |
trace | Refreshed user decryption key {usk:?} | src/crypto/cover_crypt/user_key.rs | usk — … | — |
trace | using RFC-3394 (AES Key Wrap, no padding) | src/crypto/wrap/wrap_key.rs | — | — |
trace | using RFC-5649 (AES Key Wrap with Padding) | src/crypto/wrap/wrap_key.rs | — | — |
trace | with object type: {:?} | src/crypto/wrap/wrap_key.rs | — | — |
trace | wrapping key: format={} | src/crypto/wrap/wrap_key.rs | — | — |
trace | X25519 | src/crypto/elliptic_curves/ecies/salsa_sealbox.rs | — | — |
trace | {} | src/openssl/public_key.rs | — | — |
warn | test_openssl_cli_compat: openssl version is not OpenSSL 3: {res}, skipping test | src/crypto/rsa/ckm_rsa_aes_key_wrap.rs | res | — |
info | \n\next: {:?} | src/openssl/x509_extensions.rs | — | ×2 in this file |
debug | Instantiated hybrid CoverCrypt decipher for user decryption key id: {user_decryption_key_uid} | src/crypto/cover_crypt/decryption.rs | user_decryption_key_uid | — |
debug | symmetric wrapping using {cryptographic_algorithm} and block_cipher_mode: {:?}, padding_method: {:?} | src/crypto/wrap/wrap_key.rs | cryptographic_algorithm | — |
trace | algorithm: {algorithm:?}, block_cipher_mode: {block_cipher_mode:?}, key_size: {key_size} | src/crypto/symmetric/symmetric_ciphers.rs | algorithm, block_cipher_mode, key_size | — |
trace | encrypt: sym_cipher: {sym_cipher:?}, key length: {}, nonce length: {}, aad length: {}, plaintext length: {}, padding_method: {padding_method:?} | src/crypto/symmetric/symmetric_ciphers.rs | sym_cipher, padding_method | — |
warn | ignored `basicConstraints` extension's value: {value} | src/openssl/x509_extensions.rs | value | - |
info | RFC 3394 is deprecated in favor of RFC 5649 and is supported only for legacy compatibility. Please consider using `BlockCipherMode::AESKeyWrapPadding` (RFC 5649) for new applications instead of `BlockCipherMode::NISTKeyWrap `. | src/crypto/symmetric/symmetric_ciphers.rs | - | ×2 in this file |
warn | Delegated OCSP responder certificate does not carry the `id-pkix-ocsp-nocheck` extension (OID 1.3.6.1.5.5.7.48.1.5, RFC 6960 §4.2.2.2.1). Relying parties may attempt to recursively check this certificate's own revocation status via CDP, AIA, or local policy instead. | src/openssl/ocsp.rs | - | - |
trace | bytes len: {}, bits: {}, curve_bits: {:?} | src/crypto/elliptic_curves/operation.rs | - | ×2 in this file |
cosmian_kmip
Crate path: crate/kmip
RUST_LOG target: cosmian_kmip
| Level | Message | File | Variables | Notes |
|---|---|---|---|---|
warn | Custom attribute name does not start with 'x-' or 'y-': {} | src/kmip_1_4/kmip_attributes.rs | - | - |
warn | Failed to deserialize KMIP 2.1 attribute: {} | src/kmip_1_4/kmip_attributes.rs | - | - |
warn | KMIP 2.1 does not support the KMIP 1 attribute {attribute:?} | src/kmip_1_4/kmip_attributes.rs | attribute: KMIP attribute (debug display) | ×9 in this file |
warn | Unexpected value type for y-unsupported-2_1-attribute: {:?} | src/kmip_1_4/kmip_attributes.rs | - | - |
debug | [serialize] writing tag: {} | src/ttlv/wire/ttlv_bytes_serializer.rs | - | - |
debug | Converting KMIP 2.1 QueryResponse to KMIP 1.4: {value} | src/kmip_1_4/kmip_operations.rs | value: value | - |
trace | ... => This is an Object => identifier: key: Object | src/ttlv/kmip_ttlv_deserializer/deserializer.rs | — | — |
trace | ... added a struct field: {key}, the parent struct is now: {:?} | src/ttlv/kmip_ttlv_serializer.rs | key — … | — |
trace | ... assuming deserialization of BigInteger: {:?} | src/ttlv/kmip_ttlv_deserializer/deserializer.rs | — | — |
trace | ... assuming deserialization of ByteString: {:?} | src/ttlv/kmip_ttlv_deserializer/deserializer.rs | — | — |
trace | ... coerced ShortUniqueIdentifier ByteString -> hex string: {} | src/ttlv/kmip_ttlv_deserializer/deserializer.rs | — | — |
trace | ... coerced {} Enumeration(code={}) -> string | src/ttlv/kmip_ttlv_deserializer/deserializer.rs | — | — |
trace | ... coerced {} Enumeration(name={}) -> string | src/ttlv/kmip_ttlv_deserializer/deserializer.rs | — | — |
trace | ... coerced {} Integer({}) -> string | src/ttlv/kmip_ttlv_deserializer/deserializer.rs | — | — |
trace | ... deserializing an adjacently tagged structure | src/ttlv/kmip_ttlv_deserializer/deserializer.rs | — | — |
trace | ... deserializing enum at root | src/ttlv/kmip_ttlv_deserializer/deserializer.rs | — | — |
trace | ... deserializing enum that is the only child of the current element | src/ttlv/kmip_ttlv_deserializer/deserializer.rs | — | — |
trace | ... deserializing transparent seq with tag: {tag} | src/ttlv/kmip_ttlv_deserializer/deserializer.rs | tag — … | — |
trace | ... detected VendorAttribute triple children; deserializing element itself as enum variant | src/ttlv/kmip_ttlv_deserializer/deserializer.rs | — | — |
trace | ... enum: index: {:#x} | src/ttlv/kmip_ttlv_deserializer/deserializer.rs | — | — |
trace | ... enum: name: {} | src/ttlv/kmip_ttlv_deserializer/deserializer.rs | — | — |
trace | ... identifier: key: {} | src/ttlv/kmip_ttlv_deserializer/deserializer.rs | — | — |
trace | ... Seq element added, the current parent value is: {:?} | src/ttlv/kmip_ttlv_serializer.rs | — | — |
trace | ... str: key: {} | src/ttlv/kmip_ttlv_deserializer/deserializer.rs | — | — |
trace | ... structure recognized as byte-like; concatenated len={} for tag {} | src/ttlv/kmip_ttlv_deserializer/deserializer.rs | — | — |
trace | ... structure: 1.4 Object | src/ttlv/kmip_ttlv_deserializer/deserializer.rs | — | — |
trace | ... structure: 2.1 Object | src/ttlv/kmip_ttlv_deserializer/deserializer.rs | — | — |
trace | ... structure: tag: {} | src/ttlv/kmip_ttlv_deserializer/deserializer.rs | — | — |
trace | ... tag: {} | src/ttlv/kmip_ttlv_deserializer/deserializer.rs | — | — |
trace | ... text string: value: {} | src/ttlv/kmip_ttlv_deserializer/deserializer.rs | — | — |
trace | ===> KeyMaterial: Deserializing Bytes String for key format type: {:?} | src/kmip_2_1/kmip_data_structures.rs | — | ×2 in this file |
trace | ===> KeyMaterial: Deserializing key format type: {f:?} as struct | src/kmip_1_4/kmip_data_structures.rs | f — … | — |
trace | ===> KeyMaterial: Deserializing Structure for key format type: {f:?} | src/kmip_2_1/kmip_data_structures.rs | f — … | — |
trace | ===> KeyMaterial: Deserializing {:?} key format type as seq | src/kmip_1_4/kmip_data_structures.rs | — | — |
trace | ==> Deserializing KeyBlock | src/kmip_1_4/kmip_data_structures.rs | — | — |
trace | ==> Deserializing KeyBlock | src/kmip_2_1/kmip_data_structures.rs | — | — |
trace | array_access: next_element_seed in seq: {}, current index: {}, elem at index: {:?} | src/ttlv/kmip_ttlv_deserializer/array_deserializer.rs | — | — |
trace | Checking usage mask authorization {:?} for flag: {:?} | src/kmip_2_1/kmip_attributes.rs | — | — |
trace | Converting KMIP 2.1 CreateKeyPairResponse to KMIP 1.4: {value} | src/kmip_1_4/kmip_operations.rs | value — … | — |
trace | Converting KMIP 2.1 CreateResponse to KMIP 1.4: {value} | src/kmip_1_4/kmip_operations.rs | value — … | — |
trace | Converting KMIP 2.1 DecryptResponse to KMIP 1.4: {value} | src/kmip_1_4/kmip_operations.rs | value — … | — |
trace | Converting KMIP 2.1 DestroyResponse to KMIP 1.4: {value} | src/kmip_1_4/kmip_operations.rs | value — … | — |
trace | Converting KMIP 2.1 EncryptResponse to KMIP 1.4: {value} | src/kmip_1_4/kmip_operations.rs | value — … | — |
trace | Converting KMIP 2.1 GetAttributesResponse to KMIP 1.4: {value} | src/kmip_1_4/kmip_operations.rs | value — … | — |
trace | Converting KMIP 2.1 GetResponse to KMIP 1.4: {value} | src/kmip_1_4/kmip_operations.rs | value — … | — |
trace | Converting KMIP 2.1 ImportResponse to KMIP 1.4: {value} | src/kmip_1_4/kmip_operations.rs | value — … | — |
trace | Converting KMIP 2.1 LocateResponse to KMIP 1.4: {value} | src/kmip_1_4/kmip_operations.rs | value — … | — |
trace | Converting KMIP 2.1 RegisterResponse to KMIP 1.4: {value} | src/kmip_1_4/kmip_operations.rs | value — … | — |
trace | Converting KMIP 2.1 SignResponse to KMIP 1.4: {value} | src/kmip_1_4/kmip_operations.rs | value — … | — |
trace | current struct: {}, num children: {}, next child {:?} | src/ttlv/kmip_ttlv_deserializer/structure_walker.rs | — | — |
trace | deserialize_any of enum variant: name: {} | src/ttlv/kmip_ttlv_deserializer/deserializer.rs | — | — |
trace | deserialize_any of enum variant: value: {} | src/ttlv/kmip_ttlv_deserializer/deserializer.rs | — | — |
trace | deserialize_any value of BigInt: {:?} | src/ttlv/kmip_ttlv_deserializer/deserializer.rs | — | — |
trace | deserialize_any value of Structure: {:?} | src/ttlv/kmip_ttlv_deserializer/deserializer.rs | — | — |
trace | deserialize_any: map access state: key, tag: {} | src/ttlv/kmip_ttlv_deserializer/deserializer.rs | — | — |
trace | deserialize_any: map access state: {:?}, index: {}, child: {:?} | src/ttlv/kmip_ttlv_deserializer/deserializer.rs | — | — |
trace | deserialize_any: state: {:?} | src/ttlv/kmip_ttlv_deserializer/kmip_big_int_deserializer.rs | — | — |
trace | deserialize_bool: state: {:?} | src/ttlv/kmip_ttlv_deserializer/deserializer.rs | — | — |
trace | deserialize_bytes: state: {:?} | src/ttlv/kmip_ttlv_deserializer/deserializer.rs | — | — |
trace | deserialize_bytes_buff: state: {:?} | src/ttlv/kmip_ttlv_deserializer/deserializer.rs | — | — |
trace | deserialize_char: state: {:?} | src/ttlv/kmip_ttlv_deserializer/deserializer.rs | — | — |
trace | deserialize_enum: name {name}, element: {:?} | src/ttlv/kmip_ttlv_deserializer/deserializer.rs | name — … | — |
trace | deserialize_f32: state: {:?} | src/ttlv/kmip_ttlv_deserializer/deserializer.rs | — | — |
trace | deserialize_f64: state: {:?} | src/ttlv/kmip_ttlv_deserializer/deserializer.rs | — | — |
trace | deserialize_i128: element: {:?} | src/ttlv/kmip_ttlv_deserializer/deserializer.rs | — | — |
trace | deserialize_i16 state: {:?} | src/ttlv/kmip_ttlv_deserializer/deserializer.rs | — | — |
trace | deserialize_i32: state: {:?} | src/ttlv/kmip_ttlv_deserializer/deserializer.rs | — | — |
trace | deserialize_i64: state: {:?} | src/ttlv/kmip_ttlv_deserializer/deserializer.rs | — | — |
trace | deserialize_identifier: map state: {:?}, element: {:?} | src/ttlv/kmip_ttlv_deserializer/deserializer.rs | — | — |
trace | deserialize_ignored_any: state: {:?} | src/ttlv/kmip_ttlv_deserializer/deserializer.rs | — | — |
trace | deserialize_map: calling Untagged Enum deserializer for: {:?} | src/ttlv/kmip_ttlv_deserializer/deserializer.rs | — | — |
trace | deserialize_new_type_struct with name: {name}, state: {:?} | src/ttlv/kmip_ttlv_deserializer/deserializer.rs | name — … | — |
trace | deserialize_option: state: {:?} | src/ttlv/kmip_ttlv_deserializer/deserializer.rs | — | — |
trace | deserialize_seq: child index: {}: {:?} | src/ttlv/kmip_ttlv_deserializer/deserializer.rs | — | — |
trace | deserialize_seq: state: {:?} | src/ttlv/kmip_ttlv_deserializer/kmip_big_int_deserializer.rs | — | — |
trace | deserialize_str: map state: {:?}, element tag: {} | src/ttlv/kmip_ttlv_deserializer/deserializer.rs | — | — |
trace | deserialize_string: state: {:?} | src/ttlv/kmip_ttlv_deserializer/deserializer.rs | — | — |
trace | deserialize_struct: name {name}, fields: {fields:?}, element: {:?} | src/ttlv/kmip_ttlv_deserializer/deserializer.rs | name — …fields — … | — |
trace | deserialize_tuple: child index: {}, current : {:?} | src/ttlv/kmip_ttlv_deserializer/deserializer.rs | — | — |
trace | deserialize_tuple: state: {:?} | src/ttlv/kmip_ttlv_deserializer/kmip_big_int_deserializer.rs | — | — |
trace | deserialize_tuple_struct: name: {name}, len: {len}, state: {:?} | src/ttlv/kmip_ttlv_deserializer/deserializer.rs | name — …len — … | — |
trace | deserialize_u16: state: {:?} | src/ttlv/kmip_ttlv_deserializer/deserializer.rs | — | — |
trace | deserialize_u32: state: {}: {:?} | src/ttlv/kmip_ttlv_deserializer/deserializer.rs | — | — |
trace | deserialize_u64: state: {}: {:?} | src/ttlv/kmip_ttlv_deserializer/deserializer.rs | — | — |
trace | deserialize_u8: state: {:?} | src/ttlv/kmip_ttlv_deserializer/deserializer.rs | — | — |
trace | deserialize_unit: state: {:?} | src/ttlv/kmip_ttlv_deserializer/deserializer.rs | — | — |
trace | deserialize_unit_struct with name: {name}, state: {:?} | src/ttlv/kmip_ttlv_deserializer/deserializer.rs | name — … | — |
trace | deserializing OffsetDateTime at tag: {}, value: {}, index: {} | src/ttlv/kmip_ttlv_deserializer/offset_date_time_deserializer.rs | — | — |
trace | element: {:?} | src/ttlv/kmip_ttlv_deserializer/enum_walker.rs | — | — |
trace | element: {:?} | src/ttlv/kmip_ttlv_deserializer/structure_walker.rs | — | — |
trace | Finished serializing byte sequence as ByteString, parent: {:?} | src/ttlv/kmip_ttlv_serializer.rs | — | — |
trace | Finished serializing the sequence, the parent is: {:?} | src/ttlv/kmip_ttlv_serializer.rs | — | — |
trace | from_ttlv: {s:?} | src/ttlv/kmip_ttlv_deserializer/deserializer.rs | s — … | — |
trace | Key: State ? {:?} | src/ttlv/kmip_ttlv_deserializer/adjacently_tagged_structure.rs | — | — |
trace | key_wrap_type: {key_wrap_type:?}, attributes: {attributes} | src/kmip_2_1/requests/import.rs | key_wrap_type — …attributes — … | — |
trace | MessageBatchItem operation: {operation:?} | src/kmip_1_4/kmip_messages.rs | operation — … | — |
trace | MessageBatchItem operation: {operation:?} | src/kmip_2_1/kmip_messages.rs | operation — … | — |
trace | MessageBatchItem request payload: {request_payload} | src/kmip_1_4/kmip_messages.rs | request_payload — … | — |
trace | MessageBatchItem request payload: {request_payload} | src/kmip_2_1/kmip_messages.rs | request_payload — … | — |
trace | MessageResponseBatchItem operation: {operation:?} | src/kmip_1_4/kmip_messages.rs | operation — … | — |
trace | MessageResponseBatchItem operation: {operation:?} | src/kmip_2_1/kmip_messages.rs | operation — … | — |
trace | MessageResponseBatchItem response payload: {response_payload} | src/kmip_1_4/kmip_messages.rs | response_payload — … | — |
trace | MessageResponseBatchItem response payload: {response_payload} | src/kmip_2_1/kmip_messages.rs | response_payload — … | — |
trace | newtype_variant_seed: child index: {}, at root: {}, current tag: {:?} | src/ttlv/kmip_ttlv_deserializer/enum_walker.rs | — | — |
trace | Not a BulkData | src/kmip_2_1/extra/bulk_data.rs | — | — |
trace | Object Visitor: visit_map: key: {key:?}, | src/kmip_1_4/kmip_objects.rs | key — … | — |
trace | Object Visitor: visit_map: key: {key:?}, | src/kmip_2_1/kmip_objects.rs | key — … | — |
trace | Seq Element: serializing a seq element with tag {}, stack is: {:?} | src/ttlv/kmip_ttlv_serializer.rs | — | — |
trace | seq_access: next_element_seed: state: {:?} | src/ttlv/kmip_ttlv_deserializer/kmip_big_int_deserializer.rs | — | — |
trace | serialize_map of len: {len:?}. Current: {:?} | src/ttlv/kmip_ttlv_serializer.rs | len — … | — |
trace | serialize_newtype_variant, name: {name}::{variant} (variant index: {variant_index}) | src/ttlv/kmip_ttlv_serializer.rs | name — …variant — …variant_index — … | — |
trace | serialize_seq of len: {len:?} in receiver: {:?} | src/ttlv/kmip_ttlv_serializer.rs | len — … | — |
trace | serialize_seq of len: {len:?} in receiver: {:?} (byte accumulation mode) | src/ttlv/kmip_ttlv_serializer.rs | len — … | — |
trace | serialize_struct named: {name} in parent: {:?} | src/ttlv/kmip_ttlv_serializer.rs | name — … | — |
trace | serialize_struct, no parent found, creating a new one with tag: {} | src/ttlv/kmip_ttlv_serializer.rs | — | — |
trace | serialize_tuple of len {len}. Current: {:?} | src/ttlv/kmip_ttlv_serializer.rs | len — … | — |
trace | serialize_tuple_struct {name} of len {len}. Current: {:?} | src/ttlv/kmip_ttlv_serializer.rs | name — …len — … | — |
trace | serialize_unit_variant, name: {name}::{variant}; variant_index: {variant_index} | src/ttlv/kmip_ttlv_serializer.rs | name — …variant — …variant_index — … | — |
trace | serializing a struct field with name: {key}, stack: {:?} | src/ttlv/kmip_ttlv_serializer.rs | key — … | — |
trace | struct_variant with fields: {fields:?}: state: {:?} | src/ttlv/kmip_ttlv_deserializer/enum_walker.rs | fields — … | — |
trace | Structure finalized, stack: {:?} | src/ttlv/kmip_ttlv_serializer.rs | — | — |
trace | tag: {:?}, content: {:?} | src/ttlv/kmip_ttlv_deserializer/adjacently_tagged_structure.rs | — | — |
trace | tuple_variant of len: {len}, child index: {}, current: {:?} | src/ttlv/kmip_ttlv_deserializer/enum_walker.rs | len — … | — |
trace | unique_identifier: {unique_identifier} | src/kmip_2_1/requests/import.rs | unique_identifier — … | — |
trace | unit_variant: child index: {}, current: {:?} | src/ttlv/kmip_ttlv_deserializer/enum_walker.rs | — | — |
trace | Untagged Enum map: next_value_seed: current tag: {:?}, at root: {} | src/ttlv/kmip_ttlv_deserializer/untagged_enum_walker.rs | — | — |
trace | Value: State ? {:?} | src/ttlv/kmip_ttlv_deserializer/adjacently_tagged_structure.rs | — | — |
trace | visit_f64: {} | src/ttlv/deserialize.rs | — | — |
trace | visit_i64: {} | src/ttlv/deserialize.rs | — | — |
trace | visit_map: Enumeration | src/ttlv/deserialize.rs | — | — |
trace | visit_str: {} | src/ttlv/deserialize.rs | — | — |
trace | visit_u64: {} | src/ttlv/deserialize.rs | — | — |
trace | ... replacing "Object" with: {name} | src/ttlv/kmip_ttlv_serializer.rs | name | |
trace | serialize_seq, no parent found. This is a direct vec![] serialization. Creating a new one with tag: {} | src/ttlv/kmip_ttlv_serializer.rs | — | — |
trace | serialize_struct_variant {name}::{variant} (variant index: {variant_index}) of len {len}. Current: {:?} | src/ttlv/kmip_ttlv_serializer.rs | name, variant, variant_index, len | — |
trace | serialize_tuple_variant {name}::{variant} (variant index: {variant_index}) of len {len}. Current: {:?} | src/ttlv/kmip_ttlv_serializer.rs | name, variant, variant_index, len | — |
trace | Untagged Enum map: next_key_seed: completed?: {}, at root: {}, index: {}, current tag: {:?} | src/ttlv/kmip_ttlv_deserializer/untagged_enum_walker.rs | — | — |
cosmian_kms_interfaces
Crate path: crate/interfaces
RUST_LOG target: cosmian_kms_interfaces
| Level | Message | File | Variables | Notes |
|---|---|---|---|---|
error | Failed to decode object_id {} | src/hsm/hsm_store.rs | - | Malformed object ID in PKCS#11 session. Key may have been created by a different client. |
debug | Created HSM AES Key of length {key_length} with id {uid} | src/hsm/hsm_store.rs | key_length: key lengthuid: KMIP object UID | - |
debug | HSM find: incompatible filter, skipping HSM search: {e} | src/hsm/hsm_store.rs | e: caught error | - |
debug | Is {owner} an HSM admin? {} | src/hsm/hsm_store.rs | owner: object owner identity | - |
debug | No researched_attributes provided. Defaulting to empty filter attributes | src/hsm/hsm_store.rs | - | - |
debug | sign: using algorithm {algorithm:?} for key {uid} | src/hsm/hsm_store.rs | algorithm: cryptographic algorithmuid: KMIP object UID | - |
debug | User '{}' is not an HSM admin; skipping HSM keys for ownership query | src/hsm/hsm_store.rs | - | - |
debug | Using default algorithm to decrypt | src/hsm/hsm_store.rs | - | - |
debug | Using default algorithm to encrypt | src/hsm/hsm_store.rs | - | - |
debug | {e} | src/hsm/hsm_store.rs | e: caught error | - |
trace | Found: {uid} | src/hsm/hsm_store.rs | uid — … | — |
trace | Getting metadata for: {:02X?} | src/hsm/hsm_store.rs | — | — |
warn | count_all_non_destroyed not implemented for this ObjectsStore backend — kms.objects.total will read 0 until a real implementation is provided | src/stores/objects_store.rs | — | — |
warn | count_non_destroyed_keys not implemented for this ObjectsStore backend — kms.keys.active.count will read 0 until a real implementation is provided | src/stores/objects_store.rs | — | — |
warn | HSM count_non_destroyed_keys: failed to list slots: {e} | src/hsm/hsm_store.rs | e | — |
warn | ModifyAttribute/SetAttribute on HSM key {uid}: attribute update accepted but not persisted to PKCS#11 slot (HSM does not support KMIP attribute storage) | src/hsm/hsm_store.rs | uid | — |
debug | encrypt: an RSA private key {uid} was specified. Trying to use public key {pk_uid} for encryption | src/hsm/hsm_store.rs | uid, pk_uid | — |
debug | HSM count_non_destroyed_keys: slot {slot_id} query failed: {e} | src/hsm/hsm_store.rs | slot_id, e | — |
debug | HSM key {uid} export failed ({e}); falling back to metadata-only stub for attribute operations | src/hsm/hsm_store.rs | uid, e | — |
debug | Creating {algorithm:?} keypair with uid: {uid} | src/hsm/hsm_store.rs | algorithm: KMIP CryptographicAlgorithm requested for the keypair (RSA, ECDSA, Ed25519, ...); uid: HSM-resident unique identifier the keypair will be stored under | Logged before delegating CreateKeyPair to the HSM; generalized from an RSA-only message to cover the EC/Ed25519 keypair creation support added in this change |
debug | signature_verify: using algorithm {algorithm:?} for key {uid} | src/hsm/hsm_store.rs | algorithm, uid | - |
debug | mac: using algorithm {algorithm:?} for key {uid} | src/hsm/hsm_store.rs | algorithm, uid | - |
debug | mac_verify: using algorithm {algorithm:?} for key {uid} | src/hsm/hsm_store.rs | algorithm, uid | - |
cosmian_kms_access
Crate path: crate/access
RUST_LOG target: cosmian_kms_access
No production log call-sites in this crate.
cosmian_kms_base_hsm
Crate path: crate/hsm/base_hsm
RUST_LOG target: cosmian_kms_base_hsm
| Level | Message | File | Variables | Notes |
|---|---|---|---|---|
warn | HSM library already initialized (CKR_CRYPTOKI_ALREADY_INITIALIZED); continuing | src/hsm_lib.rs | - | - |
warn | user already logged in, ignoring logging | src/slots.rs | - | - |
debug | Creating new session: {session_handle}. Logging in? {logging_in} | src/session/session_impl.rs | session_handle: session handlelogging_in: logging in | - |
debug | Found {} possible handles | src/session/session_impl.rs | - | - |
debug | Invalid object, skipping | src/kms_hsm.rs | - | - |
debug | Logging in session {session_handle} with password | src/slots.rs | session_handle: session handle | - |
debug | Opening a session on slot: {slot_id}. Read write? {read_write}. Logging in? {} | src/slots.rs | slot_id: PKCS#11 slot identifierread_write: read write | - |
debug | Performing multi round AES CBC decryption | src/session/session_impl.rs | - | - |
debug | Performing multi round AES CBC encryption | src/session/session_impl.rs | - | - |
debug | Retrieved HSM key type for key handle {key_handle}: {key_type:?} | src/session/session_impl.rs | key_handle: key handlekey_type: key type | - |
debug | Retrieving HSM key attributes for key handle: {key_handle} | src/session/session_impl.rs | key_handle: key handle | - |
debug | Reusing slot {slot_id} | src/base_hsm.rs | slot_id: PKCS#11 slot identifier | - |
debug | Using PKCS#11 library with {:?} | src/base_hsm.rs | - | - |
trace | Doing round with {round_length} bytes. {processed_length} of {total_length} done | src/session/session_impl.rs | round_length — …processed_length — …total_length — … | ×2 in this file |
trace | Found {object_count} objects | src/session/session_impl.rs | object_count — … | — |
debug | OAEP hash {hash} not supported: {e} | src/session/session_impl.rs | hash, e | - |
debug | Could not terminate the decryption operation after an error: {e} | src/session/session_impl.rs | e | - |
debug | Could not terminate the encryption operation after an error: {e} | src/session/session_impl.rs | e | - |
Domain: CLI (ckms)
cosmian_kms_cli_actions
Crate path: crate/clients/clap
RUST_LOG target: cosmian_kms_cli_actions
| Level | Message | File | Variables | Notes |
|---|---|---|---|---|
info | [{email}] - certificate ID used: {certificate_unique_identifier} | src/actions/google/key_pairs/create.rs | email: Google Workspace user emailcertificate_unique_identifier: KMS UID of the certificate | - |
info | [{email}] - Import PKCS12 file before using it in Google key pair generation | src/actions/google/key_pairs/create.rs | email: Google Workspace user email | - |
info | ModifyAttributes response for {effective_uid}: {attribute} | src/actions/attributes/modify.rs | effective_uid: resolved KMIP object UIDattribute: updated attribute name and value | - |
info | SetAttributes response for {unique_identifier}: {attribute} | src/actions/attributes/set.rs | unique_identifier: KMIP object UIDattribute: attribute name and value that was set | - |
debug | {decrypt_request} | src/actions/cover_crypt/decrypt.rs | decrypt_request: full Covercrypt decrypt request (debug display) | - |
debug | {encrypt_request} | src/actions/cover_crypt/encrypt.rs | encrypt_request: full Covercrypt encrypt request (debug display) | - |
debug | access_structure: {access_structure} | src/actions/cover_crypt/keys/create_key_pair.rs | access_structure: Covercrypt access structure (debug display) | - |
debug | Creating new leaf certificate with attributes: {attributes} | src/actions/google/key_pairs/create.rs | attributes: X.509 certificate attributes being submitted | - |
debug | GetAttributes response for {unique_identifier}: {attributes} | src/actions/attributes/get.rs | unique_identifier: KMIP object UIDattributes: structured attributes response | - |
debug | import certificate as {format_label} file | src/actions/certificates/import_certificate.rs | format_label: certificate format name (e.g. PEM, DER) | - |
debug | import certificate as PKCS12 file | src/actions/certificates/import_certificate.rs | - | - |
debug | import certificate chain as PEM file | src/actions/certificates/import_certificate.rs | - | - |
trace | {self} | src/actions/attributes/delete.rs | self — full delete action configuration (debug display) | — |
trace | {self} | src/actions/attributes/get.rs | self — full get-attributes action configuration (debug display) | — |
trace | {self} | src/actions/attributes/modify.rs | self — full modify action configuration (debug display) | — |
trace | {self} | src/actions/attributes/set.rs | self — full set-attributes action configuration (debug display) | — |
trace | {self} | src/actions/certificates/export_certificate.rs | self — full export action configuration (debug display) | — |
trace | {self} | src/actions/certificates/import_certificate.rs | self — full import action configuration (debug display) | — |
trace | {id} | src/actions/shared/get_key_uid.rs | id — resolved KMIP object UID | — |
trace | data_encryption_algorithm: {data_encryption_algorithm} | src/actions/symmetric/encrypt.rs | data_encryption_algorithm — selected symmetric encryption algorithm | — |
trace | Determine the certificate to use - either existing or newly created | src/actions/google/key_pairs/create.rs | — | — |
trace | import certificate as TTLV JSON file | src/actions/certificates/import_certificate.rs | — | — |
trace | response for {unique_identifier}: <none> | src/actions/attributes/delete.rs | unique_identifier — KMIP object UID (no attribute was present) | — |
trace | unwrap using server-side HSM crypto oracle for key: {key_id} | src/actions/shared/unwrap_key.rs | key_id — UID of the key being unwrapped via the HSM crypto oracle | — |
info | [{email}] - Generating new leaf certificate with extensions file: {:?} | src/actions/google/key_pairs/create.rs | email | — |
debug | GetAttributes response for {unique_identifier}: {} | src/actions/attributes/get.rs | unique_identifier | — |
debug | MoveFileExW(DELAY_UNTIL_REBOOT) failed for '{}'; leftover file is harmless. | src/actions/cng.rs | — | — |
trace | dek (len={}): {dek:?} | src/actions/symmetric/encrypt.rs | dek | — |
trace | dek length {} | src/actions/symmetric/decrypt.rs | — | ×2 in this file |
trace | encapsulation length {} | src/actions/symmetric/decrypt.rs | — | — |
trace | encryption algorithm {:?}, key id {:?}, ciphertext (len={}): {:?} | src/actions/symmetric/decrypt.rs | — | — |
trace | Leaf certificate attributes: {} | src/actions/certificates/import_certificate.rs | — | — |
trace | pkcs7_object: {:?} | src/actions/google/key_pairs/create.rs | — | — |
trace | response for {unique_identifier}: {} | src/actions/attributes/delete.rs | unique_identifier | — |
trace | wrapped_key_bytes: {:?} | src/actions/google/key_pairs/create.rs | — | — |
ckms
Crate path: crate/clients/ckms
RUST_LOG target: ckms
| Level | Message | File | Variables | Notes |
|---|---|---|---|---|
info | Starting KMS CLI | src/commands.rs | - | - |
info | Starting KMS CLI configuration wizard | src/commands.rs | - | - |
debug | Loading configuration from: {conf_path_buf} | src/config.rs | conf_path_buf: filesystem path of the configuration file being loaded | - |
trace | Configuration: {config} | src/commands.rs | config — full resolved CLI configuration (pretty debug display) | — |
info | Configuration saved at {} | src/commands.rs | — | — |
cosmian_kms_client
Crate path: crate/clients/client
RUST_LOG target: cosmian_kms_client
| Level | Message | File | Variables | Notes |
|---|---|---|---|---|
info | GET {server_url} | src/kms_rest_client.rs | server_url: full URL of the GET request being sent | ×2 in this file |
info | The decrypted file is available at {output_file} | src/file_utils.rs | output_file: path to the decrypted output file | ×2 in this file |
info | The encrypted file is available at {output_file} | src/file_utils.rs | output_file: path to the encrypted output file | ×2 in this file |
info | Using server URL: {} | src/http_client/client.rs | — | — |
trace | <==\n{} | src/kms_rest_client.rs | — | ×2 in this file |
trace | ==>\n{} | src/kms_rest_client.rs | — | ×2 in this file |
warn | Failed to set TLS 1.2 cipher list '{}' (using defaults): {} | src/http_client/tls.rs | — | — |
warn | Failed to set TLS 1.3 ciphersuites '{}' (using defaults): {} | src/http_client/tls.rs | — | — |
warn | Unknown TLS 1.2 IANA cipher suite '{}' (skipping) | src/http_client/tls.rs | — | — |
info | Using proxy: {:?} | src/http_client/client.rs | — | — |
debug | CONNECT tunnel established: {target_host}:{target_port} | src/http_client/proxy.rs | target_host, target_port | — |
debug | CONNECT tunnel: {proxy_addr} → {target_host}:{target_port} | src/http_client/proxy.rs | proxy_addr, target_host, target_port | — |
trace | Error response on {endpoint}: status={status}, body={text} | src/kms_rest_client.rs | endpoint, status, text | — |
warn | ckms config: `{}` is deprecated — rename it to `{}` in your ckms.toml to silence this warning. | src/http_client/client.rs | - | - |
debug | Connection error, retrying with backoff (is_connect): {e} | src/http_client/client.rs | e | - |
warn | Failed to load system CA bundle {bundle}: {e} | src/http_client/tls.rs | bundle, e | - |
cosmian_kms_client_utils
Crate path: crate/clients/client_utils
RUST_LOG target: cosmian_kms_client_utils
| Level | Message | File | Variables | Notes |
|---|---|---|---|---|
info | WARNING: the PEM file contains multiple objects. Only the private key will be imported. A corresponding public key will be generated automatically. | src/import_utils.rs | — | — |
Domain: PKCS#11
cosmian_pkcs11
Crate path: crate/clients/pkcs11/provider
RUST_LOG target: cosmian_pkcs11
| Level | Message | File | Variables | Notes |
|---|---|---|---|---|
error | Failed to parse EC P256 public key: {:?} | src/pkcs11_public_key.rs | - | HSM returned a malformed EC P256 key. Verify key generation parameters. |
error | Failed to parse RSA private key: {:?} | src/pkcs11_private_key.rs | - | - |
error | Failed to parse RSA public key: {:?} | src/pkcs11_public_key.rs | - | - |
error | Public key is not an EC P256 key | src/pkcs11_private_key.rs | - | - |
error | Public key is not an EC P256 key | src/pkcs11_public_key.rs | - | - |
error | Public key is not an RSA key | src/pkcs11_public_key.rs | - | - |
error | remote_sign failed for Pkcs11PrivateKey with remote_id {}: {e} | src/pkcs11_private_key.rs | e: caught error | Remote signing via PKCS#11 failed. Check KMS connectivity and key permissions. |
error | Unsupported cryptographic algorithm: {:?} | src/kms_object.rs | - | - |
error | Unsupported key algorithm: {:?} | src/kms_object.rs | - | - |
warn | create_private_key_from_id: {id} has type {:?} (expected PrivateKey), skipping | src/backend.rs | id: object ID | - |
warn | create_symmetric_key_from_id: {id} has type {:?} (expected SymmetricKey), skipping | src/backend.rs | id: object ID | - |
debug | decrypt: decrypt_ctx: {ctx:?} | src/backend.rs | ctx: ctx | - |
debug | encrypt: ctx: {ctx:?} | src/backend.rs | ctx: ctx | - |
debug | kms_encrypt_async: ciphertext: {} | src/kms_object.rs | - | - |
debug | kms_import_object_async: label: {label}, data (length): {} | src/kms_object.rs | label: label | - |
debug | Locate response: ids: {:?} | src/kms_object.rs | - | - |
debug | Located objects: tags: {tags:?}, type: {object_type:?} => {uniques_identifiers:?} | src/kms_object.rs | tags: KMIP tag setobject_type: KMIP object typeuniques_identifiers: uniques identifiers | - |
debug | remote_sign: remote_id: {remote_id}, algorithm: {algorithm:?} | src/backend.rs | remote_id: remote idalgorithm: cryptographic algorithm | - |
debug | vol1: {} | src/tests.rs | - | - |
trace | create_object: {label:?} | src/backend.rs | label — … | — |
trace | find_all_certificates | src/backend.rs | — | — |
trace | find_all_data_objects: entering | src/backend.rs | — | — |
trace | find_all_data_objects: found {} objects | src/backend.rs | — | — |
trace | find_all_objects: entering | src/backend.rs | — | — |
trace | find_all_objects: found {} keys | src/backend.rs | — | — |
trace | find_all_private_keys | src/backend.rs | — | — |
trace | find_all_public_keys | src/backend.rs | — | — |
trace | find_all_symmetric_keys | src/backend.rs | — | — |
trace | find_certificate | src/backend.rs | — | — |
trace | find_data_object: {:?} | src/backend.rs | — | — |
trace | find_private_key: {:?} | src/backend.rs | — | — |
trace | find_public_key: {:?} | src/backend.rs | — | — |
trace | find_symmetric_key: {:?} | src/backend.rs | — | — |
trace | Found {} objects | src/kms_object.rs | — | — |
trace | generate_key: {algorithm:?}-{key_length}, {label:?} | src/backend.rs | algorithm — …key_length — …label — … | — |
trace | get_kms_certificate_objects_async: found {} Certificate objects | src/kms_object.rs | — | — |
trace | get_kms_certificate_objects_async: no Certificate objects found for tags: {:?} | src/kms_object.rs | — | — |
trace | get_kms_objects_async: no objects found for tags: {:?} | src/kms_object.rs | — | — |
trace | get_kms_secret_data_objects_async: found {} SecretData objects | src/kms_object.rs | — | — |
trace | get_kms_secret_data_objects_async: no SecretData objects found for tags: {:?} | src/kms_object.rs | — | — |
warn | create_object_from_attributes: unsupported object type: {other}, skipping {id} | src/backend.rs | other, id | — |
warn | create_private_key_from_id: unsupported key/algorithm for PrivateKey {id}: {e}, skipping | src/backend.rs | id, e | — |
warn | create_private_key_object: unsupported key/algorithm for PrivateKey {id}: {e}, skipping | src/backend.rs | id, e | — |
warn | create_public_key_object: unsupported key/algorithm for PublicKey {id}: {e}, skipping | src/backend.rs | id, e | — |
warn | create_symmetric_key_from_id: unsupported key/algorithm for SymmetricKey {id}: {e}, skipping | src/backend.rs | id, e | — |
warn | create_symmetric_key_object: unsupported key/algorithm for SymmetricKey {id}: {e}, skipping | src/backend.rs | id, e | — |
warn | find_all_data_objects: failed to build DataObject for disk-encryption key: {e}, skipping | src/backend.rs | e | — |
warn | find_all_objects: failed to build DataObject for disk-encryption key: {e}, skipping | src/backend.rs | e | — |
trace | find_all_objects: total {} objects (including disk-encryption DataObjects) | src/backend.rs | — | — |
trace | get_kms_disk_encryption_data_objects_async: found {} SymmetricKey objects | src/kms_object.rs | — | — |
trace | get_kms_disk_encryption_data_objects_async: no SymmetricKey objects found for tag: {disk_encryption_tag} | src/kms_object.rs | disk_encryption_tag | — |
error | ensure_backend_registered: failed to instantiate base KMS client: {} | src/lib.rs | {}: caught error building the low-level KMS HTTP client | Renamed from C_GetFunctionList: failed to instantiate base KMS client: {}. PKCS#11 provider failed to create the KMS client while (re)registering the backend. Check server URL and auth in ckms.toml. |
error | ensure_backend_registered: failed to instantiate KMS client: {}. Check that ckms.toml exists alongside the DLL (C:\opt\oracle\extapi\64\pkcs11\ckms.toml), at ~/.cosmian/ckms.toml, or set CKMS_CONF to its path. | src/lib.rs | {}: caught error building the KMS client | Renamed from C_GetFunctionList: failed to instantiate KMS client: {}.... Same failure mode, now also reported from C_GetInterface's backend-registration path, not only C_GetFunctionList. |
error | ensure_backend_registered: failed to load ckms.toml: {}. Check that ckms.toml exists alongside the DLL (C:\opt\oracle\extapi\64\pkcs11\ckms.toml), at ~/.cosmian/ckms.toml, or set CKMS_CONF to its path. | src/lib.rs | {}: caught error reading/parsing ckms.toml | Renamed from C_GetFunctionList: failed to load ckms.toml: {}.... Configuration file missing or invalid; verify the search paths listed in the message. |
error | remote_verify failed for Pkcs11PublicKey with remote_id {}: {e} | src/pkcs11_public_key.rs | e | - |
debug | remote_verify: remote_id: {remote_id}, algorithm: {algorithm:?} | src/backend.rs | remote_id, algorithm | - |
warn | find_all_objects: failed to build Certificate object: {e}, skipping | src/backend.rs | e | - |
warn | find_all_objects: failed to fetch Certificate objects: {e}, skipping certificates | src/backend.rs | e | - |
warn | create_public_key_from_id: failed to build Pkcs11PublicKey for {id}: {e}, skipping | src/backend.rs | id, e | - |
warn | create_public_key_from_id: failed to export public key {id}: {e}, skipping | src/backend.rs | id, e | - |
debug | encrypt_message: ctx: {ctx:?} | src/backend.rs | ctx | - |
cosmian_pkcs11_module
Crate path: crate/clients/pkcs11/module
RUST_LOG target: cosmian_pkcs11_module
| Level | Message | File | Variables | Notes |
|---|---|---|---|---|
error | C_GetAttributeValue: error: {e}, session: {:?}, object: {:?}, type: {:?} | src/pkcs11.rs | e: caught error | - |
error | certificate: type_ unimplemented: {type_:?} | src/core/object.rs | type_: type | - |
error | Data object: type_ unimplemented: {type_:?} | src/core/object.rs | type_: type | - |
error | Failed to extract RSA key parameters: {e:?} | src/core/object.rs | e: caught error | - Could not read RSA key components from HSM object. Key may be non-exportable. |
error | Failed to parse RSA private key from PKCS#8 DER: {e:?} | src/core/object.rs | e: caught error | - HSM returned a malformed RSA PKCS#8 blob. Check HSM firmware and key type. |
error | pParameter incorrect: {} != {} | src/core/mechanism.rs | - | PKCS#11 mechanism parameter size mismatch. Client sent the wrong parameter struct. |
error | private_key: type_ unimplemented: {type_:?} | src/core/object.rs | type_: type | - |
error | profile: type_ unimplemented: {type_:?} | src/core/object.rs | type_: type | - |
error | public_key: type_ unimplemented: {type_:?} | src/core/object.rs | type_: type | - |
error | symmetric_key: type_ unimplemented: {type_:?} | src/core/object.rs | type_: type | - |
error | Unsupported hashAlg: {} | src/core/mechanism.rs | - | PKCS#11 hash algorithm not supported. Use SHA-256 or SHA-384. |
error | Unsupported mgf: {} | src/core/mechanism.rs | - | PKCS#11 MGF algorithm not supported. Use MGF1 with a supported hash. |
error | {}: {} | src/pkcs11.rs | - | Generic two-part error - inspect both values for the error type and detail. |
info | C_CloseAllSessions: slot: {:?} | src/pkcs11.rs | - | - |
info | C_CloseSession: session: {:?} | src/pkcs11.rs | - | - |
info | C_FindObjects: session: {:?}, no more objects to return | src/pkcs11.rs | - | - |
info | C_FindObjects: session: {:?}, returning {} object with handles {:?} | src/pkcs11.rs | - | - |
info | C_GetAttributeValue: session: {:?}, object: {:?} [handle: {}], type: {:?} | src/pkcs11.rs | - | - |
info | C_OpenSession: slot={slotID:?} flags={flags:?} session handle written | src/pkcs11.rs | slotID: slotIDflags: flags | - |
debug | C_DestroyObject: session: {hSession:?}, hObject: {hObject} | src/pkcs11.rs | hSession: hSessionhObject: hObject | - |
debug | CKO_DATA search: label_filter={:?}, store has {} DataObjects | src/sessions.rs | - | - |
debug | create_object: attributes: {attributes:?} | src/sessions.rs | attributes: KMIP attribute (debug display)s | - |
debug | create_object: created object with handle: {handle} | src/sessions.rs | handle: PKCS#11 object handle | - |
debug | destroy_object: handle: {handle} | src/sessions.rs | handle: PKCS#11 object handle | ×2 in this file |
debug | generate_key: generated key with handle: {handle} | src/sessions.rs | handle: PKCS#11 object handle | - |
debug | generate_key: generating key with mechanism: {:?} and attributes: {:?} | src/sessions.rs | - | - |
debug | load_find_context: display current store: {find_ctx} | src/sessions.rs | find_ctx: find ctx | - |
debug | load_find_context_by_class: added {} objects with handles: {:?} | src/sessions.rs | - | - |
debug | map_oracle_tde_security_to_mk: processing label: {label} | src/sessions.rs | label: label | - |
debug | Object: {}, attribute: {:?} => {:?} | src/core/object.rs | - | - |
debug | parse_mechanism: iv: {iv:?} | src/core/mechanism.rs | iv: iv | - |
debug | parse_mechanism: {mechanism:?} | src/core/mechanism.rs | mechanism: PKCS#11 mechanism | - |
debug | session: {h} found | src/sessions.rs | h: h | - |
debug | STORE: inserting new object with remote id: {id} and handle: {handle} | src/objects_store.rs | id: object IDhandle: PKCS#11 object handle | - |
debug | STORE: updating object with remote id: {id} and handle: {handle} | src/objects_store.rs | id: object IDhandle: PKCS#11 object handle | - |
trace | Attribute::try_from: attribute parsed: {:?} => {:?} | src/core/attribute.rs | — | — |
trace | Attribute::try_from: parsing attribute: {:?} | src/core/attribute.rs | — | — |
trace | Attribute::try_from: type: {attr_type:?} | src/core/attribute.rs | attr_type — … | — |
trace | Attribute::try_from: value: {val:?} | src/core/attribute.rs | val — … | — |
trace | Attributes::try_from: parsing single attribute: {attr:?} | src/core/attribute.rs | attr — … | — |
trace | C_FindObjects: session: {:?}, objects available: {:?} | src/pkcs11.rs | — | — |
trace | C_GetAttributeValue: session: {:?}, object: {:?} | src/pkcs11.rs | — | — |
trace | C_GetSessionInfo: session: {:?}, slot: {:?}, state: {:?}, flags: {:?} | src/pkcs11.rs | — | — |
trace | create_object: class: {class:?} | src/sessions.rs | class — … | — |
trace | create_object: Object not supported: {o} | src/sessions.rs | o — … | — |
trace | load_find_context succeeded | src/sessions.rs | — | — |
info | C_FindObjectsInit: session: {hSession:?}, load Objects Store context for attributes: {attributes:?} | src/pkcs11.rs | hSession, attributes | — |
debug | C_CreateObject: session: {hSession:?}, pTemplate: {pTemplate:?}, ulCount: {ulCount:?}, phObject: {phObject:?} | src/pkcs11.rs | hSession, pTemplate, ulCount, phObject | — |
debug | C_Decrypt: pEncryptedData: {pEncryptedData:?}, ulEncryptedDataLen: {ulEncryptedDataLen:?}, pData: {pData:?}, pulDataLen: {pulDataLen:?} | src/pkcs11.rs | pEncryptedData, ulEncryptedDataLen, pData, pulDataLen | — |
debug | C_Decrypt: session: {:?}, encrypted_data_len: {:?}, cleartext_len: {:?}, ciphertext: {:?} | src/pkcs11.rs | — | — |
debug | C_DecryptInit: session: {hSession:?}, hKey: {hKey:?}, mechanism: {mechanism:?}, object: {object:?} | src/pkcs11.rs | hSession, hKey, mechanism, object | — |
debug | C_Encrypt: pData: {pData:?}, ulDataLen: {ulDataLen:?}, pEncryptedData: {pEncryptedData:?}, pulEncryptedDataLen: {pulEncryptedDataLen:?} | src/pkcs11.rs | pData, ulDataLen, pEncryptedData, pulEncryptedDataLen | — |
debug | C_Encrypt: session: {:?}, plain_data_len: {:?}, ciphertext_len: {:?}, cleartext: {:?} | src/pkcs11.rs | — | — |
debug | C_EncryptInit: session: {hSession:?}, hKey: {hKey:?}, mechanism: {mechanism:?}, object: {object:?} | src/pkcs11.rs | hSession, hKey, mechanism, object | — |
debug | C_GenerateKey: session: {hSession:?}, pMechanism: {pMechanism:?}, pTemplate: {pTemplate:?}, ulCount: {ulCount:?}, phKey: {phKey:?} | src/pkcs11.rs | hSession, pMechanism, pTemplate, ulCount, phKey | — |
debug | load_find_context_by_class: loading for class: {search_class:?} and options: {search_options:?}, attributes: {attributes:?} | src/sessions.rs | search_class, search_options, attributes | — |
debug | load_find_context_by_class: search by id: {} -> handle: {} -> certificate: {}:{} | src/sessions.rs | — | — |
warn | load_find_context_by_class: no {search_class:?} object found for id {id} | src/sessions.rs | search_class, id | ×2 in this file |
debug | load_find_context_by_class: search by id: {} -> handle: {} -> object: {}:{} | src/sessions.rs | - | - |
debug | load_find_context_by_class: backend fallback — search by id: {} -> handle: {} -> object: {}:{} | src/sessions.rs | - | - |
error | CKM_AES_GCM pParameter incorrect size: {} != {} | src/core/mechanism.rs | actual size in bytes, expected CK_GCM_PARAMS size in bytes | Caller passed a mechanism parameter buffer of the wrong size for CKM_AES_GCM; request is rejected before any unaligned/OOB read. |
error | CKM_AES_GCM: unsupported ulTagBits {} (only {} is supported) | src/core/mechanism.rs | requested tag length in bits, only supported tag length in bits (128) | The module only implements the standard 128-bit GCM authentication tag; any other ulTagBits value is rejected. |
debug | parse_mechanism: CKM_AES_GCM iv_len: {}, aad_len: {} | src/core/mechanism.rs | IV length in bytes, AAD length in bytes | Diagnostic trace emitted after successfully parsing a CK_GCM_PARAMS mechanism parameter (read via read_unaligned for C-caller safety). No sensitive key material is logged. |
warn | CKO_DATA search: failed to refresh {remote_id} from KMS: {e}, keeping cached stub | src/sessions.rs | remote_id, e | - |
warn | CKO_DATA search: full fetch for {remote_id} returned no object, keeping cached stub | src/sessions.rs | remote_id | - |
warn | load_find_context_by_class: failed to refresh public key {} with full key material: {e}, using cached (metadata-only) object | src/sessions.rs | e | - |
debug | CKO_DATA match: remote_id={remote_id}, handle={handle} | src/sessions.rs | remote_id, handle | - |
error | CKM_RSA_PKCS_OAEP pParameter incorrect size: {} != {} | src/core/mechanism.rs | - | - |
error | CKM_RSA_PKCS_OAEP: unsupported hashAlg/mgf combination {hash_alg}/{mgf} (only SHA-256/MGF1-SHA256 is supported) | src/core/mechanism.rs | hash_alg, mgf | - |
warn | load_find_context: id {label_or_id} not found in store | src/sessions.rs | label_or_id | - |
debug | load_find_context: loading for label/id: {label_or_id:?} and attributes: {attributes:?} | src/sessions.rs | label_or_id, attributes | - |
debug | load_find_context: search by id: {label_or_id} -> handle: {} -> object: {}: {} | src/sessions.rs | label_or_id | - |
trace | Generated {len} random bytes | src/pkcs11.rs | len | - |
Domain: CNG (Windows)
cosmian_cng
Crate path: crate/clients/cng
RUST_LOG target: cosmian_cng
| Level | Message | File | Variables | Notes |
|---|---|---|---|---|
error | CNG KSP decrypt: {e} | src/provider.rs | e: caught error | Decryption via CNG failed. Check key state and CNG provider logs. |
error | CNG KSP delete_key: {e} | src/provider.rs | e: caught error | - |
error | CNG KSP encrypt: {e} | src/provider.rs | e: caught error | - |
error | CNG KSP enum_keys: {e} | src/provider.rs | e: caught error | - |
error | CNG KSP export_key private: {e} | src/provider.rs | e: caught error | - |
error | CNG KSP export_key: {e} | src/provider.rs | e: caught error | - |
error | CNG KSP finalize_key: {e} | src/provider.rs | e: caught error | - |
error | CNG KSP import_key attrs: {e} | src/provider.rs | e: caught error | - |
error | CNG KSP import_key backend: {e} | src/provider.rs | e: caught error | - |
error | CNG KSP import_key parse blob: {e} | src/provider.rs | e: caught error | - |
error | CNG KSP open_key attrs({name}): {e} | src/provider.rs | name: key or object namee: caught error | - |
error | CNG KSP open_key pub({name}): {e} | src/provider.rs | name: key or object namee: caught error | - |
error | CNG KSP open_key({name}): {e} | src/provider.rs | name: key or object namee: caught error | - |
error | CNG KSP open_provider: {e} | src/provider.rs | e: caught error | CNG provider DLL failed to load or initialise. Verify the DLL is registered. |
error | CNG KSP sign_hash: {e} | src/provider.rs | e: caught error | Signing via CNG failed. Key may be non-exportable or in an invalid state. |
error | CNG KSP verify_signature: {e} | src/provider.rs | e: caught error | - |
info | CNG KSP provider already registered; skipping BCryptRegisterProvider | src/registry.rs | - | - |
info | DLL was locked; old copy renamed to '{}' and scheduled for deletion on reboot. | src/registry.rs | - | - |
debug | BCryptAddContextFunction returned {status:#010x} (may already exist) | src/registry.rs | status: HTTP response status | - |
debug | BCryptRemoveContextFunctionProvider returned {status:#010x} | src/registry.rs | status: HTTP response status | - |
debug | CNG KSP GetKeyStorageInterface called | src/lib.rs | - | - |
debug | CNG KSP register: source dll={} | src/registry.rs | - | - |
debug | CNG KSP unregister | src/registry.rs | - | - |
debug | CNG KSP: create_ec_key_pair name={key_name} curve={curve:?} | src/backend.rs | key_name: CNG key namecurve: elliptic curve identifier | - |
debug | CNG KSP: create_rsa_key_pair name={key_name} bits={bit_length} | src/backend.rs | key_name: CNG key namebit_length: key size in bits | - |
debug | CNG KSP: decoded PEM to {} bytes DER | src/key.rs | - | - |
debug | CNG KSP: decrypt_data uid={uid} len={} | src/backend.rs | uid: KMIP object UID | - |
debug | CNG KSP: destroy_key uid={uid} | src/backend.rs | uid: KMIP object UID | - |
debug | CNG KSP: encrypt_data uid={uid} len={} | src/backend.rs | uid: KMIP object UID | - |
debug | CNG KSP: export_private_key_pkcs8 uid={uid} | src/backend.rs | uid: KMIP object UID | - |
debug | CNG KSP: export_public_key_spki uid={uid} | src/backend.rs | uid: KMIP object UID | - |
debug | CNG KSP: finalize import blob len={}, first_bytes={:?} | src/key.rs | - | - |
debug | CNG KSP: finalized key '{}' → priv={}, pub={} | src/key.rs | - | - |
debug | CNG KSP: import_rsa_private_key name={key_name} | src/backend.rs | key_name: CNG key name | - |
debug | CNG KSP: revoke_key uid={uid} | src/backend.rs | uid: KMIP object UID | - |
debug | CNG KSP: sign_hash uid={uid} hash_len={} | src/backend.rs | uid: KMIP object UID | - |
debug | CNG KSP: verify_signature uid={uid} hash_len={} sig_len={} | src/backend.rs | uid: KMIP object UID | - |
debug | Copying {} -> {} | src/registry.rs | - | - |
debug | MoveFileExW(DELAY_UNTIL_REBOOT) failed for '{}'; leftover file is harmless. | src/registry.rs | - | - |
trace | CNG KSP: list_cng_keys | src/backend.rs | — | — |
trace | CNG KSP: locate_key_by_name tag={tag} | src/backend.rs | tag — … | — |
trace | CNG KSP: locate_public_key_by_name tag={tag} | src/backend.rs | tag — … | — |
Domain: Web UI
The Web UI emits browser console messages via console.*. These are visible in the
browser developer tools (F12 → Console tab) and are not captured by RUST_LOG or
the OTLP pipeline.
Crate path: ui/src/
| Level | Message | File | Variables | Notes |
|---|---|---|---|---|
info | [KMS] vendor_id set to "{vendorId}" | App.tsx | vendorId: vendor identifier string received from the server | - |
error | Aggregate date error: | actions/Tokenize/TokenizeAggregateDate.tsx | — | — |
error | Aggregate number error: | actions/Tokenize/TokenizeAggregateNumber.tsx | — | — |
error | Certificate validation failed: | pages/LoginPage.tsx | — | — |
error | Error creating FPE key: | actions/FPE/FpeKeysCreate.tsx | — | — |
error | Error fetching create permission: | actions/Access/AccessObtained.tsx | — | — |
error | Error fetching CSE information: | actions/Keys/CseInfo.tsx | — | — |
error | Error fetching Get for ${uid}: | components/common/Locate.tsx | uid | ×3 in this file |
error | Error fetching HSM status: | actions/Objects/HsmStatus.tsx | — | — |
error | Error fetching privileged access: | actions/Access/AccessGrant.tsx | — | — |
error | Error fetching privileged access: | actions/Access/AccessRevoke.tsx | — | — |
error | Error getting attributes: | actions/Attributes/AttributeGet.tsx | — | — |
error | Error listing objects: | actions/Access/AccessObtained.tsx | — | — |
error | Error listing objects: | actions/Objects/ObjectsOwned.tsx | — | — |
error | Error loading certificate algorithms from WASM: | actions/Certificates/CertificateCertify.tsx | — | — |
error | Error loading EC algorithms from WASM: | actions/EC/ECKeysCreate.tsx | — | — |
error | Error loading hash algorithms from WASM: | actions/Symmetric/SymmetricHash.tsx | — | — |
error | Error loading PQC algorithms from WASM: | actions/PQC/PqcKeysCreate.tsx | — | — |
error | Error loading symmetric algorithms from WASM: | actions/Keys/SymKeysCreate.tsx | — | — |
error | Error parsing tags JSON: | actions/CloudProviders/AwsExportKeyMaterial.tsx | — | — |
error | Error parsing tags JSON: | utils/azureByok.ts | — | — |
error | Fallback Locate without KFT failed: | components/common/Locate.tsx | — | — |
error | FPE decrypt error: | actions/FPE/FpeDecrypt.tsx | — | — |
error | FPE encrypt error: | actions/FPE/FpeEncrypt.tsx | — | — |
error | Hash tokenize error: | actions/Tokenize/TokenizeHash.tsx | — | — |
error | Login error: | contexts/AuthContext.tsx | — | — |
error | Login error: | pages/LoginPage.tsx | — | — |
error | Noise tokenize error: | actions/Tokenize/TokenizeNoise.tsx | — | — |
error | Scale number error: | actions/Tokenize/TokenizeScaleNumber.tsx | — | — |
error | WASM init failed: | App.tsx | — | — |
error | Word mask error: | actions/Tokenize/TokenizeWordMask.tsx | — | — |
error | Word pattern mask error: | actions/Tokenize/TokenizeWordPatternMask.tsx | — | — |
error | Word tokenize error: | actions/Tokenize/TokenizeWordTokenize.tsx | — | — |
warn | [KMS] Could not query server vendor_id, using default: | App.tsx | — | — |
warn | State+KFT fallback Locate without KFT failed: | components/common/Locate.tsx | — | — |
warn | Symmetric google_cse key check failed: | actions/Keys/CseInfo.tsx | — | — |
debug | ECSign: signature length | actions/EC/ECSign.tsx | — | — |
debug | ECVerify: dataBuf len | actions/EC/ECVerify.tsx | — | — |
debug | RsaSign: signature length | actions/RSA/RsaSign.tsx | — | — |
debug | RsaVerify: dataBuf len | actions/RSA/RsaVerify.tsx | — | — |
error | Auth Verifier login failed: | pages/LoginPage.tsx | - | - |
error | Error loading OpenPGP algorithms from WASM: | actions/Pgp/PgpKeysCreate.tsx | - | - |
error | Error fetching Get for ${row.object_id}: | components/common/Locate.tsx | row.object_id: UID whose attributes could not be retrieved | The Locate row remains un-enriched and shows unavailable attributes. Check the browser network request and KMS response for this UID. |
Metrics & Traces (OTLP)
The KMS server can export traces and metering events to any OpenTelemetry collector that supports the OTLP protocol.
Deploying the monitoring stack: for a turnkey Docker Compose setup with Grafana, VictoriaMetrics, and a pre-configured OTel Collector, see Monitoring stack setup.
Audit log SIEM integration: for forwarding compliance audit events to a SIEM, use a file-tailing agent (Vector, Filebeat, Fluent Bit) reading
audit.jsonl. See SIEM integration.
Enabling OTLP
To enable OTLP export, set the collector URL via one of:
- the
otlpparameter in the TOML configuration file under[logging], - the
--otlpcommand line argument, - the
KMS_OTLP_URLenvironment variable.
KMS_OTLP_URL="http://localhost:4317"
By default, OTLP uses gRPC on port 4317 with TLS. For local development with a
plaintext HTTP collector, also set --otlp-allow-insecure:
[logging]
otlp = "http://localhost:4317"
otlp_allow_insecure = true
What is exported
Traces include:
- The server start configuration
- KMIP request spans (content adjusted by the log level)
- Access-rights management request spans
- Metering spans (when metering is enabled)
Metrics push every 30 seconds and cover every category below.
Enabling metering
Metering events are emitted as OTLP spans and converted to Prometheus metrics downstream. Enable with:
[logging]
enable_metering = true
| Setting | CLI flag | Env var |
|---|---|---|
| Metering | --enable-metering | (no env; use TOML) |
Metrics Reference
All metrics are pushed via OTLP/gRPC every 30 seconds to the configured collector.
No HTTP /metrics endpoint is exposed — metrics are always pushed, never scraped.
KMIP Operations
| Metric | Type | Description | Labels |
|---|---|---|---|
kms.kmip.operations.total | counter | Total KMIP operations executed | operation |
kms.kmip.operations.per_user.total | counter | Total KMIP operations per user | operation, user |
kms.kmip.operation.duration | histogram (s) | Duration of each KMIP operation | operation |
Users & Permissions
| Metric | Type | Description | Labels |
|---|---|---|---|
kms.active.users | up-down counter | Unique users who issued at least one request | — |
kms.permissions.granted.per_user.total | counter | Access rights granted, broken down by user | user, permission_type |
kms.permissions.granted.total | counter | Total access rights granted | — |
Database
| Metric | Type | Description | Labels |
|---|---|---|---|
kms.database.operations.total | counter | DB operations by type and result | operation, backend, outcome |
kms.database.operation.duration | histogram (s) | Wall-clock time of each DB call | operation, backend, outcome |
Label values:
backend:sqlite·postgresql·mysql·redisoutcome:success·error
HTTP
| Metric | Type | Description | Labels |
|---|---|---|---|
kms.http.requests.total | counter | Incoming HTTP requests | method, path, status |
kms.http.request.duration | histogram (s) | HTTP request latency | method, path, status |
path is normalised (e.g. /kmip/2_1, /google_cse/...) to avoid high cardinality from
object identifiers.
Server Health
| Metric | Type | Description | Labels |
|---|---|---|---|
kms.server.uptime | counter (monotonic, s) | Seconds elapsed since server start | — |
kms.server.start_time | up-down counter | Server start time as Unix timestamp (s) | — |
kms.active.connections | up-down counter | Current open HTTP connections | — |
kms.errors.total | counter | Errors categorised by type | error_type |
Objects & Keys
| Metric | Type | Description | Labels |
|---|---|---|---|
kms.objects.total | gauge | Total non-destroyed objects in the KMS | — |
kms.keys.active.count | gauge | Non-destroyed key objects (SymmetricKey, PrivateKey, PublicKey, SplitKey) across all states: PreActive, Active, Deactivated, Compromised | — |
Both metrics are refreshed every 30 s by the metrics cron task and seeded at server startup.
Cache
| Metric | Type | Description | Labels |
|---|---|---|---|
kms.cache.operations.total | counter | Unwrap-cache lookups | operation, result |
HSM
| Metric | Type | Description | Labels |
|---|---|---|---|
kms.hsm.operations.total | counter | HSM operations by type and model | operation, hsm_model |
Monitoring Stack — Setup Guide
This guide walks you through deploying the KMS observability stack step by step. For a full reference of OTLP options and metrics, see → Metrics & Traces (OTLP)
Table of contents
- Download
- Prerequisites
- Local mode — KMS included
- External mode — existing KMS
- Explore Grafana
- Proven integrations
- Troubleshooting
Architecture overview
sequenceDiagram
participant KMS as KMS Server
participant OTel as OTel Collector
participant VM as VictoriaMetrics
participant Grafana as Grafana
KMS->>OTel: gRPC OTLP metrics (port 4317)
Note over KMS,OTel: kms_* metric families pushed continuously
OTel->>VM: remote_write (Prometheus protocol, every 10s)
Grafana->>VM: PromQL queries (port 8428)
VM-->>Grafana: metric series
Note over KMS,OTel: KMS also exposes a Prometheus /metrics endpoint
The collector bridges KMS OTLP push to VictoriaMetrics remote-write. Grafana queries VictoriaMetrics directly — it never contacts the KMS server.
Download
The monitoring stack is distributed as a standalone archive containing the Docker Compose file, configuration templates, and helper scripts.
Download the archive from the KMS GitHub Releases page
(cosmian-kms-monitoring.zip), or use wget with the version you are deploying:
wget https://package.cosmian.com/kms/<version>/monitoring/cosmian-kms-monitoring.zip
unzip cosmian-kms-monitoring.zip
cd monitoring/
Replace <version> with the KMS version you are deploying (e.g. 5.28.0).
The list of available versions is at https://package.cosmian.com/kms/.
Alternatively, clone the KMS repository and navigate to the
monitoring/ directory.
Prerequisites
Before getting started, make sure the following tools are installed on your machine.
Required
-
Docker Engine ≥ 20.10 Compose profiles (
COMPOSE_PROFILES) require Docker Compose v2 and Docker Engine 20.10+. Verify your version:docker --version docker compose version -
Docker Compose V2 (included in Docker Desktop 3.4+) The stack uses the
docker composecommand (with a space), not the legacydocker-compose.
Local mode only
-
openssl— used bygenerate-demo-cert.shto generate the demo TLS certificate. Verify it is available:openssl versionOn macOS it is pre-installed. On Linux:
apt install opensslordnf install openssl.
External mode only
-
Your existing KMS must be configured to export telemetry via OTLP to the collector:
# gRPC (recommended) KMS_OTLP_URL=http://<collector-host>:4317 # or HTTP KMS_OTLP_URL=http://<collector-host>:4318
Ports availability
The following ports must be free on the host before starting the stack:
| Port | Service |
|---|---|
3000 | Grafana |
4317 | OTel Collector (gRPC) |
4318 | OTel Collector (HTTP) |
8428 | VictoriaMetrics |
9998 | KMS (local mode only) |
Local mode — KMS included
In this mode, the full stack starts together: KMS, OTel Collector, VictoriaMetrics, and Grafana. Use this mode for local development or to evaluate the stack end-to-end.
All files referenced below (docker-compose.yml, .env, generate-demo-cert.sh) are located in the
monitoring/ directory of the KMS repository. Navigate there first:
cd monitoring/
1. Configure .env
Open the .env file — this is the only file you need to edit.
Make sure the following values are set:
# ── KMS Mode / Docker profiles ───────────────────────────────────
COMPOSE_PROFILES=kms-local
KMS_MODE=local
# ── TLS certificate password (used by generate-demo-cert.sh) ─────
KMS_P12_PASSWORD=testpassword
# ── KMS topology metadata ────────────────────────────────────────
KMS_CLUSTER=cosmian-kms-local
# ── Metadata for metrics/traces ──────────────────────────────────
KMS_VERSION=latest
ENVIRONMENT=demo
# ── Grafana ──────────────────────────────────────────────────────
GRAFANA_ADMIN_USER=demo
GRAFANA_ADMIN_PASSWORD=demo
# ── Metrics retention (VictoriaMetrics, in months) ───────────────
METRICS_RETENTION_MONTHS=12
✏️ Screenshot placeholder —
.envfile open in editor,COMPOSE_PROFILESandKMS_MODEhighlighted.
2. Generate the demo TLS certificate
The KMS container requires a PKCS#12 certificate to serve its API over TLS.
The provided script generates a self-signed certificate valid for 10 years,
using the password defined in KMS_P12_PASSWORD:
bash generate-demo-cert.sh
Expected output:
Generating a 4096 bit RSA private key
.............................................++++
.............................................++++
.............................................++++
writing new private key to './certs/kms-demo.key'
-----
PKCS#12 demo certificate generated at: ./certs/kms.p12
Password: testpassword

⚠️ This certificate is for demo purposes only. Do not use it in production.
3. Start the stack
docker compose up -d
Docker will pull the required images and start all containers. On first run, this may take a minute depending on your network speed.

4. Verify the stack is healthy
docker compose ps
All containers should show Up or Up (healthy):
NAME STATUS
kms Up (healthy)
otel-collector Up
victoria-metrics Up
grafana Up (healthy)
You can also check the OTel Collector health endpoint:
curl http://localhost:13133
Expected response: {"status":"Server available"}

External mode — existing KMS
Use this mode when you already have a running KMS instance and only want to attach the observability stack to it.
All files referenced below are located in the monitoring/ directory of the KMS repository.
Navigate there first:
cd monitoring/
1. Configure .env
Only a few lines change compared to local mode:
-COMPOSE_PROFILES=kms-local
-KMS_MODE=local
+COMPOSE_PROFILES=
+KMS_MODE=external
-# KMS_P12_PASSWORD is not needed in external mode
-KMS_P12_PASSWORD=testpassword
KMS_CLUSTER=cosmian-kms-local
KMS_VERSION=latest
-ENVIRONMENT=demo
+ENVIRONMENT=production
GRAFANA_ADMIN_USER=demo
GRAFANA_ADMIN_PASSWORD=demo
METRICS_RETENTION_MONTHS=12

2. Point your KMS to the collector
On your existing KMS, enable OTLP export toward the collector host:
# via environment variable
KMS_OTLP_URL=http://<collector-host>:4317
# or via CLI argument
./cosmian_kms_server --otlp http://<collector-host>:4317 --enable-metering
If the KMS runs on the same machine as the stack, use
http://localhost:4317.
3. Start the stack (without KMS)
docker compose up -d
With COMPOSE_PROFILES left empty, Docker Compose will start only
OTel Collector, VictoriaMetrics, and Grafana — the KMS container is skipped.
4. Verify the stack is healthy
docker compose ps
Expected output (no kms container):
NAME STATUS
otel-collector Up
victoria-metrics Up
grafana Up (healthy)
Verify the collector is receiving data from your KMS:
# Check that otelcol_receiver_accepted_spans is incrementing
curl -s http://localhost:8888/metrics | grep otelcol_receiver_accepted_spans
Or

Explore Grafana
Once the stack is running, open Grafana in your browser:
http://localhost:3000
Login with:
| Field | Value |
|---|---|
| Username | value of GRAFANA_ADMIN_USER in .env (default: demo) |
| Password | value of GRAFANA_ADMIN_PASSWORD in .env (default: demo) |

Pre-provisioned dashboards are available under Dashboards → Browse:

After few seconds metrics will be available

Proven integrations
All tests use the product's official Docker image and fail if no evidence is found. These products consume KMS metrics, not audit events; see SIEM integration for audit event integrations.
| Product | Role | What is proven |
|---|---|---|
| OpenTelemetry Collector | Metrics pipeline | KMS gRPC OTLP push received; KMS metric lines confirmed on Prometheus endpoint (count varies by version) |
| VictoriaMetrics | Metrics backend | Receives KMS metrics from OTel Collector via remote_write |
| Grafana | Dashboarding | Full monitoring stack operational; /api/health returns database=ok |
Troubleshooting
Containers not starting
docker compose logs -f otel-collector
docker compose logs -f kms # local mode only
No data in Grafana dashboards
-
Confirm the OTel Collector is up:
curl http://localhost:13133 -
Confirm VictoriaMetrics is receiving data:
curl http://localhost:8428/health -
Check that your KMS is sending OTLP — look for incoming spans in collector logs:
docker compose logs otel-collector | grep "traces"
KMS container fails to start (local mode)
Verify the certificate was generated:
ls -la .certs/kms.p12
If missing, re-run:
bash generate-demo-cert.sh
Port conflict
If a port is already in use, identify the process:
# macOS / Linux
lsof -i :<port>
# Windows
netstat -ano | findstr :<port>
Then either stop the conflicting process or edit the port mapping in docker-compose.yml.
For a complete reference of all OTLP options, log levels, and pipeline internals, see → Metrics & Traces (OTLP)
Audit logging
The Eviden KMS server can record a cryptographically chained, tamper-evident audit trail of every KMIP operation, including authentication failures. Two backends are available: a local JSONL file, or a PostgreSQL database for a fleet of instances. See Audit events for the fields every event carries.
Audit logging is disabled by default: no backend is started until the feature is enabled.
Choosing a backend
| File backend | PostgreSQL backend | |
|---|---|---|
| Best for | A single instance, or one file per instance | A fleet of instances sharing one audit trail |
| If the backend is unreachable at startup | Starts anyway and buffers events | Refuses to start |
| If content is found corrupted at startup | Seals the old chain, starts a new one, keeps serving | Seals the old chain, starts a new one, keeps serving |
| Sealed-evidence check | Automatic, part of ckms audit verify | Manual, see PostgreSQL backend |
| Size cap | Yes, --audit-file-max-size-bytes | No |
The backend is chosen at configuration time, with no fallback between the two. See File backend or PostgreSQL backend for the configuration and behavior specific to each.
Configuration
Enabling the pipeline is shared by both backends; each backend then needs its own path or URL.
[audit]
enabled = true
With no other setting, the file backend starts at its default path,
<root-data-path>/audit.jsonl. See File backend to set a specific
path, or PostgreSQL backend for a shared database.
The file backend is designed for one writer per file. If you run multiple KMS instances (horizontal scaling, Kubernetes replicas), each one needs its own audit file: never point several instances at the same path on a shared volume. For a centrally consolidated, multi-writer-safe audit trail, use the PostgreSQL backend instead.
The settings below apply to whichever backend you use:
| CLI flag | Environment variable | Default | Description |
|---|---|---|---|
--audit-enable | KMS_AUDIT_ENABLE | false | Enable the audit pipeline. When false, no backend is started. |
--audit-channel-capacity | KMS_AUDIT_CHANNEL_CAPACITY | 4096 | Capacity of the in-memory queue between request handling and the backend writer. Raise this if you see channel full warnings under sustained load. |
--audit-trusted-proxy-cidrs | KMS_AUDIT_TRUSTED_PROXY_CIDRS | (empty) | Comma-separated CIDR blocks (e.g. 10.0.0.0/8,172.16.0.0/12) of reverse proxies/load balancers allowed to set client_ip via X-Forwarded-For. See Client IP and reverse proxies. |
--audit-failure-mode | KMS_AUDIT_FAILURE_MODE | continue | What to do when an event cannot be recorded. continue: log the error, keep serving. reject: return HTTP 503. See Audit failure mode. |
If you see AuditFileStore: channel full, dropping audit event in the server log, raise
--audit-channel-capacity. The dropped events are still accounted for: the next successful
write is preceded by an audit:eviction event recording how many were lost. See
Audit events.
Client IP and reverse proxies
By default (--audit-trusted-proxy-cidrs empty), client_ip in every audit event is always the
direct TCP peer address: the X-Forwarded-For header is ignored entirely.
If the KMS runs directly reachable by clients (no reverse proxy/load balancer in front), leave this unset: the TCP peer address is always the real client.
If the KMS runs behind a reverse proxy or load balancer, the direct TCP peer is always the
proxy, not the real client. Set --audit-trusted-proxy-cidrs to the proxy's IP/CIDR so the audit
middleware knows it can trust X-Forwarded-For coming from that address. Otherwise every audit
event records the proxy's IP instead of the real client's.
Never trust X-Forwarded-For unconditionally: any direct caller can set that header to an
arbitrary value, corrupting the forensic trail (e.g. framing another IP, or hiding its own).
Restricting trust to known proxy CIDRs prevents this while still letting a legitimate reverse
proxy forward the real client IP.
Audit failure mode
By default (continue) the KMS keeps serving even when an audit event cannot be recorded: the
event is dropped, an error is logged, and the request succeeds normally.
Set --audit-failure-mode reject to enforce strict auditability: if an event cannot be recorded
(the queue is full or the backend has stopped), the KMS returns HTTP 503 to the client
instead of the normal KMIP response. The KMIP operation has already executed at this point; the
503 signals that its outcome was not recorded.
When failure_mode = reject, a saturated event queue or a stopped backend will make every
subsequent KMIP request fail with 503 until the condition is resolved. Only use this mode
when unlogged operations are strictly unacceptable (e.g.
regulated environments requiring a complete audit trail).
Verifying the trail
# File backend
ckms audit verify --path /var/log/cosmian-kms/audit.jsonl
# PostgreSQL backend
ckms audit verify --audit-postgres-url postgresql://kms_audit:password@db-host:5432/kms_audit
Exit code 0 means the chain is intact; 1 means a broken link or a tampered event was found,
or, with the file backend, that sealed evidence is altered or missing. See
File backend or
PostgreSQL backend for the full set of
options and sample output.
Retention and monitoring
Retain audit data for the compliance window required by your framework, for example PCI-DSS Req. 10.7 (12 months) or HIPAA §164.312(b) (6 years). Restrict read access to the audit data to the KMS process user and auditors only: it contains usernames, client IPs, and operation details.
Monitor for the recovery events listed in Audit events and the
matching server log lines in the log reference. A torn write is routine
after an ungraceful restart; a seal-and-roll (audit:reanchor) is worth investigating.
For SIEM ingestion and CEF export, see SIEM integration.
File backend
The file backend writes a tamper-evident JSONL audit trail to a local file. It is the default backend and needs no external service.
Each KMS instance needs its own file. Never point two instances at the same path on a shared volume: only one of them ever holds the write lock, so the other's events are never recorded. For a single audit trail shared across a fleet of instances, use the PostgreSQL backend instead.
Each write is flushed to disk before the KMS moves on to the next request, so events survive an OS crash or a power failure.
Configuration
[audit]
enabled = true
[audit.file]
path = "/var/log/cosmian-kms/audit.jsonl"
When audit.file.path is omitted the file defaults to <root-data-path>/audit.jsonl.
| CLI flag | Environment variable | Default | Description |
|---|---|---|---|
--audit-file-path | KMS_AUDIT_FILE_PATH | <root-data-path>/audit.jsonl | Absolute path to the JSONL audit log file. Parent directories are created automatically on first write. |
--audit-file-max-size-bytes | KMS_AUDIT_FILE_MAX_SIZE_BYTES | (unlimited) | Stops all further writes once the file reaches this many bytes. Must be greater than 0 when set. |
These settings are specific to the file backend. For the settings shared with the PostgreSQL backend (channel capacity, failure mode, trusted proxies), see Audit logging.
--audit-file-max-size-bytes is a write-stop cap, not rotation or retention: the KMS never
deletes, truncates, or rolls the file on its own. Once the file reaches the cap, the event that
would cross it is replaced by a final audit:size-cap-reached event, later events are dropped
subject to --audit-failure-mode, and the condition does not clear itself: remediate the log and
restart the KMS. A value of 0 is rejected at startup.
To rotate the file, stop the KMS, move the file aside, and start it again: a new chain begins at
id = 0. The KMS never rotates the file on its own while running.
Startup and recovery
The KMS always starts and serves traffic immediately, whatever condition is found in the audit file. Verifying the whole file, and repairing it if needed, happens in the background; any event submitted in the meantime is queued and written once recovery completes. Recovery is routed by cause:
| Condition | What happens |
|---|---|
| No file, or empty file | Fresh chain starts at id = 0. |
| Mid-chain tamper | Any row other than the last fails its own hash check or its link to the previous row. Seal-and-roll (below) — caught by the unconditional whole-chain scan that runs on every boot, not just a tail check. |
| Last row is valid but missing its trailing newline | Resumes in place; the missing newline is repaired before the next event is appended. |
| Torn write | An incomplete trailing row, but the row before it (or genesis) is valid. The incomplete fragment is truncated away; an audit:torn-write-recovered event is appended recording the bytes discarded. The chain continues in place: no data loss beyond the incomplete row, which was never durably committed. |
| Tampered last row | Or structural garbage with no trustworthy fallback row. Seal-and-roll: the corrupted file is renamed aside as <name>.<UTC-timestamp>.<8-hex>.corrupt.<ext>, kept as forensic evidence and never modified or deleted by the KMS. A fresh chain starts at the original path with an audit:reanchor event as row 0. Its details field records the sealed file's name (sealed_file), sha256, size, claimed_last_id, failure_offset, and reason (see Reanchor reasons). |
A torn write is the common case after an ungraceful restart (OOM kill, pod eviction, power loss) and is expected to happen periodically at fleet scale; it does not indicate tampering. See Audit events for the exact fields each recovery event carries.
If another instance already holds the file's lock, the KMS still starts and serves traffic
immediately; events are buffered (up to --audit-channel-capacity) and flushed in order once the
lock becomes available.
If the path cannot be opened for a reason unrelated to file content (permissions, a read-only mount, a disk fault), the KMS treats it as a deployment fault, not corruption: it buffers events in the writer's channel while retrying, and resumes automatically once the fault is fixed, with no restart required.
Verifying a file or a directory
ckms audit verify --path /var/log/cosmian-kms/audit.jsonl
--path also accepts a directory, verifying every non-sealed *.jsonl file in it as its own
independent chain. Sealed *.corrupt.jsonl evidence files from past recoveries are not
independent chains; they are checked through the SHA-256 recorded in their live log's reanchor:
ckms audit verify --path /var/log/cosmian-kms/
Chain intact:
/var/log/cosmian-kms/audit.jsonl: chain OK: 42 events verified
Tampered file:
TAMPERED: /var/log/cosmian-kms/audit.jsonl event id=17 (line 18) has an invalid row_hash
For every audit:reanchor event, verify also confirms the sealed evidence file it references
still exists and its SHA-256 still matches the digest recorded in the event. This is what makes
deleting or altering sealed evidence after the fact detectable:
MISSING EVIDENCE: /var/log/cosmian-kms/audit.jsonl: reanchor event id=0 references sealed file
audit.20260814T140233Z.9f3ac1b2.corrupt.jsonl which no longer exists
Exit codes: 0 when the chain (and all sealed evidence) is intact, 1 when a broken link,
tampered event, or altered/missing sealed evidence is detected.
With --verbose, a summary line is printed for every event:
id=0 2026-05-06T20:31:15Z Create chain=ok
id=1 2026-05-06T20:31:15Z Encrypt chain=ok
...
See ckms audit for the full CLI reference.
Protecting the file
- Use an append-only filesystem or object store (e.g. S3 with Object Lock) for the audit file.
- Restrict read access to the KMS process user, authorized auditors, and collection services; the file contains usernames and operation details.
- Give collection services read-only access through their own service accounts.
- Retain audit files for the compliance window required by your framework. This includes sealed
*.corrupt.jsonlfiles left behind by a seal-and-roll recovery: they are forensic evidence, never deleted automatically, and need cleaning up as part of your retention process. - Monitor for the recovery events in Audit events and the matching server log lines in the log reference: they are the primary signal that a torn-write or seal-and-roll recovery happened.
PostgreSQL backend
Use the PostgreSQL backend for a centralized, multi-writer-safe audit trail across a fleet of KMS instances. Each instance still owns its own hash chain, scoped by an instance ID, but every chain lives in one shared, append-only database that every instance, and every auditor, can read.
Prerequisites
Requires PostgreSQL 11 or later: earlier versions are missing a hash function the KMS uses to key its per-instance advisory lock, and the server fails to start against them with a clear SQL error. We recommend PostgreSQL 14 or later, since older versions are no longer maintained upstream. Cosmian tests against and recommends PostgreSQL 18, the current release.
The audit database must be different from the main object-storage database (--database-url):
the server checks this at startup (comparing host, port, and database name) and refuses to start
otherwise. Sharing one database would let the KMS's own object-store role bypass the audit
database's append-only grants.
--audit-postgres-url supports the same sslmode/sslrootcert/sslcert/sslkey query
parameters as --database-url; see PostgreSQL TLS / mTLS.
The server logs a warning at startup when the URL does not verify the server certificate (the default
sslmode=prefer does not); use sslmode=verify-full with sslrootcert.
The KMS creates its table on first connection, with triggers that reject UPDATE, DELETE, and
TRUNCATE on it. The table owner and any superuser can still disable these triggers with
ALTER TABLE … DISABLE TRIGGER, so run the KMS with a role that does not own the table (see
below) and rely on the hash chain, verified by ckms audit verify, to detect tampering by a
privileged role. This runs again on every boot and self-heals an older table automatically.
For a hardened deployment, a database administrator can provision both tables separately and grant
the KMS role only SELECT and INSERT on kms_audit_events, plus SELECT, INSERT, and UPDATE on
kms_audit_control, with no DDL rights; see
the exact schema.
The KMS then skips schema creation and only checks that every required column is present and that
the four append-only triggers (kms_audit_no_update, kms_audit_no_delete,
kms_audit_no_truncate, kms_audit_no_insert_sealed) exist and are enabled; it refuses to start
otherwise. Grants are not checked and remain the administrator's responsibility.
Configuration
[audit]
enabled = true
[audit.postgres]
url = "postgresql://kms_audit:password@db-host:5432/kms_audit"
instance_id = "kms-eu-west-1a"
| CLI flag | Environment variable | Required | Description |
|---|---|---|---|
--audit-postgres-url | KMS_AUDIT_POSTGRES_URL | Yes | Connection URL for the audit database. |
--audit-instance-id | KMS_AUDIT_INSTANCE_ID | Yes | Identifies this instance's chain. See Choosing an instance ID. |
These settings are specific to the PostgreSQL backend. For the settings shared with the file backend (channel capacity, failure mode, trusted proxies), see Audit logging.
Setting --audit-postgres-url selects the PostgreSQL backend instead of the file backend, at
configuration time, with no fallback between the two. If --audit-file-path is also set, it is
never used: the KMS logs a warning and ignores it.
Choosing an instance ID
The instance ID must be stable across restarts and unique among every KMS instance sharing the
same database: 1 to 255 characters, with no default. A Kubernetes deployment should set it
explicitly, for example from the StatefulSet ordinal, rather than rely on an ephemeral pod
hostname.
The server enforces uniqueness with a session-level advisory lock keyed by the instance ID, held for as long as it runs. A second instance configured with the same ID fails to start.
Startup and recovery
The PostgreSQL backend verifies its chain before the KMS starts serving traffic, unlike the file backend, which always starts immediately and recovers in the background. The KMS refuses to start if the database is unreachable, if another instance already holds the instance ID's lock, or if the table cannot be created or validated.
Content corruption does not block startup. A stable instance ID owns a sequence of chain
generations, numbered from 0; only one generation accepts writes at a time, and older generations
are never modified again. On startup, the KMS verifies the latest generation. If a row is found
corrupted, that generation is sealed as-is and a fresh one starts with a row-0 audit:reanchor
event. The reason field classifies the cause (see
Reanchor reasons).
The reanchor event's details also record which generation was sealed and a digest of the
sealed generation's content:
{
"sealed_generation": 0,
"new_generation": 1,
"first_failure_id": 2,
"reason": "hash_mismatch",
"evidence": "v1:sha256:<64 hex chars>"
}
This is logged as an error; monitor for it the same way you would for a file-backend seal-and-roll (see Audit events and the log reference).
Verifying and exporting
ckms audit verify and ckms audit export accept --audit-postgres-url as an alternative to
--path. Omit --audit-instance-id to cover every instance in the database:
ckms audit verify --audit-postgres-url postgresql://kms_audit:password@db-host:5432/kms_audit
== instance_id: kms-eu-west-1a ==
instance_id=kms-eu-west-1a: chain OK: 128 events verified
== instance_id: kms-eu-west-1b ==
instance_id=kms-eu-west-1b: chain OK: 96 events verified
verify checks every row's hash and its link to the previous row, one generation at a time.
A failing generation or instance does not stop the rest from being checked: a generation sealed by
a recovery stays failed, so the report lists every failing generation together with the ones that
verified clean, and the command exits with code 1 if any failed.
It does not yet check a reanchor's recorded evidence digest against the sealed generation's
current content; reproduce that check manually (see below).
ckms audit export prints events in the shape described in Audit events,
plus instance_id and chain_generation. With --format cef it produces CEF,
identifying each event by its instance and generation. See ckms audit
for the full CLI reference.
Checking sealed evidence by hand
The evidence digest is a SHA-256 hash over a deterministic SQL projection of every row in the
sealed generation, in id order, plus a footer recording the generation number and row count.
Reproduce it directly against the database, without trusting the KMS's own hashing:
QUERY="SELECT 'v1' || '|' || encode(convert_to(instance_id, 'UTF8'), 'hex') || '|' ||
chain_generation || '|' || id || '|' ||
to_char(timestamp AT TIME ZONE 'UTC', 'YYYY-MM-DD\"T\"HH24:MI:SS.US\"Z\"') || '|' ||
encode(convert_to(operation, 'UTF8'), 'hex') || '|' ||
encode(convert_to(username, 'UTF8'), 'hex') || '|' ||
COALESCE(encode(convert_to(object_uid, 'UTF8'), 'hex'), '-') || '|' ||
COALESCE(encode(convert_to(algorithm, 'UTF8'), 'hex'), '-') || '|' ||
COALESCE(encode(convert_to(client_ip, 'UTF8'), 'hex'), '-') || '|' ||
encode(convert_to(result, 'UTF8'), 'hex') || '|' || duration_ms || '|' ||
COALESCE(request_id::text, '-') || '|' ||
COALESCE(encode(convert_to(details, 'UTF8'), 'hex'), '-') || '|' ||
encode(prev_hash, 'hex') || '|' || encode(row_hash, 'hex')
FROM kms_audit_events
WHERE instance_id = '<instance_id>' AND chain_generation = <sealed_generation>
ORDER BY id ASC"
{
psql "$KMS_AUDIT_POSTGRES_URL" -qtA -c "$QUERY"
printf 'v1|end|%s|%s\n' "<sealed_generation>" "<row_count>"
} | sha256sum
The resulting hex digest, prefixed with v1:sha256:, must match the evidence field recorded
in the corresponding audit:reanchor event.
Audit events
Every audit event has the same fields, whether it is an ordinary KMIP operation or one of the
system events described below. ckms audit export and ckms audit verify both read this shape.
Fields
| Field | Type | Nullable | Description |
|---|---|---|---|
id | integer | No | Monotonically increasing row counter, starting at 0 for each chain (for each chain generation with the PostgreSQL backend). |
timestamp | string (RFC 3339 / UTC) | No | Wall-clock time of the KMIP operation. |
operation | string | No | KMIP operation name, e.g. "Create", "Encrypt", "Destroy". Batch requests produce a +-joined name such as "Create+Encrypt". |
user | string | No | Authenticated username. "unauthenticated" when no identity was presented (e.g. 401 paths). "server" for a system event. |
object_uid | string or null | Yes | KMIP UniqueIdentifier of the object involved. null when unavailable (e.g. failed auth, batch, system event). |
algorithm | string or null | Yes | Cryptographic algorithm, e.g. "AES", "RSA". null when the operation carries no algorithm. |
client_ip | string or null | Yes | The direct TCP peer address, or the rightmost X-Forwarded-For entry that is not a trusted proxy when the request comes from a trusted proxy (the peer address when that entry is not a valid IP). See Client IP and reverse proxies. |
result | "Success" or {"Failure": "<reason>"} | No | Outcome of the operation. |
duration_ms | integer | No | Wall-clock duration of the operation in milliseconds. |
request_id | string (UUID) or null | Yes | Correlation ID across operations from the same request. null for system events. |
details | string or null | Yes | Structured JSON payload attached to a system event. null for ordinary KMIP events. See System events. |
prev_hash | string (64 hex chars) | No | SHA-256 of the previous row's canonical bytes. All-zeros for the first row (id = 0). |
row_hash | string (64 hex chars) | No | SHA-256 of this row's canonical bytes (including prev_hash). |
The PostgreSQL backend stores the user field in a username column. ckms audit export
from a PostgreSQL source adds two fields, instance_id and chain_generation, to every JSON
event; the stored event and its hashes are unchanged. Because id restarts in each generation
and instance, identify an event by (instance_id, chain_generation, id). See
SIEM integration.
Example event (file backend):
{
"id": 4,
"timestamp": "2026-05-06T20:31:42.321328507Z",
"operation": "Encrypt",
"user": "admin",
"object_uid": "417fe2de-827d-48d0-8d51-851bec315b76",
"algorithm": "AES",
"client_ip": "127.0.0.1",
"result": "Success",
"duration_ms": 1,
"request_id": "c1f728c0-85f2-498c-8f47-9759d57a2745",
"prev_hash": "e492c0f02860bc6c428259d44414651eda3aaaee2f48eb857144c940ac0fe909",
"row_hash": "699a2837830af4a26fe79aeb48509fc707507e514da5850d953366a14e730c38"
}
System events
The KMS appends these events for its own recovery and operational actions. They join the same
hash chain as ordinary KMIP events, with user set to "server".
| Event | Written when | result | details |
|---|---|---|---|
audit:eviction | One or more events were dropped because the writer's queue was full. | Failure, with the count of dropped events. | null |
audit:size-cap-reached | The file backend's --audit-file-max-size-bytes cap was reached. | Failure | null |
audit:torn-write-recovered | File backend only: an incomplete trailing row was found and discarded after an ungraceful restart. | Success | bytes_discarded and offset of the discarded fragment. |
audit:reanchor | The KMS started a fresh chain after finding the previous one corrupted (seal-and-roll). | Success | reason (see Reanchor reasons) plus backend-specific evidence fields, described in File backend and PostgreSQL backend. |
Reanchor reasons
Both backends classify the corruption that triggered a seal-and-roll with one of these values in
the reason field of the audit:reanchor event's details:
| Reason | Meaning |
|---|---|
hash_mismatch | A complete row whose own hash doesn't match its stored bytes. |
broken_link | A row that verifies on its own but doesn't chain to its predecessor. |
unparsable | A row or column doesn't decode as an audit event at all. |
id_overflow | A valid tail row at the maximum event ID: continuing in place would overflow. |
Hash chain
Every event includes a SHA-256 hash chain that makes tampering detectable offline.
The hash is computed over a canonical byte sequence of the event's fields, in this order:
prev_hash || id || timestamp || operation || user || object_uid || algorithm || client_ip || result || duration_ms || request_id || details
request_id and details are each included only when present, so events written before a field
was added still hash to the same bytes.
prev_hash of the first event (id = 0) is the 32-byte all-zeros sentinel.
Any modification to a field in any row, including reordering rows, deleting rows, or appending
forged rows, breaks at least one prev_hash → row_hash link and is detected by
ckms audit verify.
CEF export
The KMS can export audit events in the Common Event Format (CEF) — a text-based, vendor-neutral log format widely ingested by SIEM products (ArcSight, Splunk, IBM QRadar, Microsoft Sentinel, and others) without a custom parser.
CEF export is a serialization view of the tamper-evident audit trail (see Audit logging). The configured backend, either a JSONL file or a PostgreSQL audit database, remains the authoritative, hash-chain-verifiable record. CEF omits the hash-chain fields and cannot replace that record.
The KMS produces CEF version 0 (CEF:0) as defined by the
ArcSight CEF Implementation Standard, version 27
(OpenText/ArcSight, April 2024).
Format overview
Each audit event is serialized as a single line:
CEF:0|Cosmian|KMS|<version>|<operation>|<operation>|<severity>|<extensions>
Header fields
| Position | CEF field name | Value | Max length |
|---|---|---|---|
| 1 | CEF Version | Always 0 | — |
| 2 | deviceVendor | Cosmian | 63 |
| 3 | deviceProduct | KMS | 63 |
| 4 | deviceVersion | KMS version string (e.g. 5.25.0) | 31 |
| 5 | deviceEventClassId | KMIP operation name (e.g. Encrypt) | 1023 |
| 6 | name | Same as deviceEventClassId | 512 |
| 7 | agentSeverity | Integer 0–10 (see severity table below) | — |
Extension fields
All extension keys below are standard CEF v27 dictionary keys.
| CEF key | CEF v27 full name | Type | Description |
|---|---|---|---|
rt | deviceReceiptTime | DateTime | Event time as Unix epoch milliseconds. |
suser | sourceUserName | String | Authenticated username. |
src | sourceAddress | IP address | Client IP. Omitted when not available. |
outcome | eventOutcome | String | "Success" or "Failure". |
reason | reason | String | Failure reason. Omitted on success. |
act | deviceAction | String | KMIP operation name. |
cn1 | deviceCustomNumber1 | Long | Wall-clock operation duration in milliseconds. |
cn1Label | deviceCustomNumber1Label | String | Always "durationMs". |
cn2 | deviceCustomNumber2 | Long | PostgreSQL chain generation. Omitted for file exports. |
cn2Label | deviceCustomNumber2Label | String | "chainGeneration". Omitted for file exports. |
cs1 | deviceCustomString1 | String | KMIP UniqueIdentifier. Omitted when null. |
cs1Label | deviceCustomString1Label | String | Always "objectUID". |
cs2 | deviceCustomString2 | String | Cryptographic algorithm. Omitted when null. |
cs2Label | deviceCustomString2Label | String | Always "algorithm". |
externalId | externalId | String | File: event ID. PostgreSQL: <generation>:<id>. |
deviceExternalId | deviceExternalId | String | PostgreSQL instance ID. Omitted for file exports. |
devicePayloadId | devicePayloadId | String | Request correlation UUID. Omitted when absent. |
For PostgreSQL exports, use the pair deviceExternalId and externalId as the event identity.
Event IDs restart in each chain generation and are not unique across instances.
For file exports, supply the KMS instance identity through the collection agent's source tag.
Severity mapping
| Outcome | CEF severity | Meaning |
|---|---|---|
| Success | 5 | Medium |
| Authentication failure (401 / 403) | 7 | High |
| Other failure | 6 | Medium-High |
CEF severity follows the ArcSight scale: 0–3 = Low, 4–6 = Medium, 7–8 = High, 9–10 = Very-High.
Escaping rules
CEF uses special characters as delimiters. The serializer escapes them to prevent injection:
Header fields (pipe-delimited):
| Character | Escaped as |
|---|---|
\ | \\ |
| | | |
| newline | \n |
| carriage return | \r |
Extension values (key=value pairs):
| Character | Escaped as |
|---|---|
\ | \\ |
= | \= |
| newline | \n |
| carriage return | \r |
Pipe characters (
|) in extension values do not need escaping — they only delimit the header.
Example
Annotated CEF line for a successful Encrypt operation:
CEF:0|Cosmian|KMS|5.25.0|Encrypt|Encrypt|5|rt=1784574156704 suser=admin src=127.0.0.1 outcome=Success act=Encrypt cn1=12 cn1Label=durationMs cs1=359019d8-1543-4e2e-9d96-674dd64fcffc cs1Label=objectUID cs2=AES cs2Label=algorithm externalId=1 devicePayloadId=3618ade8-5db7-4635-9d05-5af6a7614d52
| Field | Value |
|---|---|
deviceVendor | Cosmian |
deviceProduct | KMS |
deviceVersion | 5.25.0 |
deviceEventClassId | Encrypt |
name | Encrypt |
agentSeverity | 5 (Medium — success) |
rt | 1784574156704 (epoch ms) |
suser | admin |
src | 127.0.0.1 |
outcome | Success |
act | Encrypt |
cn1 | 12 (ms) |
cs1 | 359019d8-1543-4e2e-9d96-674dd64fcffc |
cs2 | AES |
externalId | 1 |
devicePayloadId | 3618ade8-5db7-4635-9d05-5af6a7614d52 |
CLI usage
Export audit events as CEF using the ckms CLI (works offline, no running server needed):
File backend
# Export all events as CEF
ckms audit export --path /var/log/cosmian-kms/audit.jsonl --format cef
# Export with a specific KMS version in the header
ckms audit export --path /var/log/cosmian-kms/audit.jsonl \
--format cef --kms-version 5.25.0
# Export events since a given date
ckms audit export --path /var/log/cosmian-kms/audit.jsonl \
--format cef --since 2026-01-01T00:00:00Z
PostgreSQL backend
Set AUDIT_READ_URL to your audit database's connection URL using a
read-only collection role.
Export one KMS instance's events as CEF:
ckms audit export \
--audit-postgres-url "${AUDIT_READ_URL}" \
--audit-instance-id kms-eu-west-1a \
--format cef > kms-eu-west-1a.cef
Export every instance's events, retaining the source fields described above:
ckms audit export --audit-postgres-url "${AUDIT_READ_URL}" --format cef > fleet.cef
For the full CLI reference, see ckms audit.
Interoperability validation
The KMS CEF output is validated against jc (kellyjonbrazil/jc, MIT license), an independent CEF parser.
SIEM integration
The Eviden KMS produces audit events that can be ingested by any SIEM (Security Information and Event Management) system. This page describes the available integration models and provides configuration examples for common SIEM products.
For the CEF format itself (field mapping, severity rules, escaping, and specification reference), see CEF export.
Integration models
The KMS supports two integration models:
| Model | How it works | Format | Continuous? |
|---|---|---|---|
| File tailing | SIEM agent tails the JSONL audit file directly | JSON | Yes |
| CEF export | ckms audit export converts events to CEF on stdout | CEF v27 | Manual / scripted |
The audit trail itself is authoritative (see Audit logging); CEF is a serialization view and does not include the hash-chain fields (
prev_hash,row_hash).File tailing needs the file backend, since it reads the JSONL file directly. With the PostgreSQL backend, export events with
ckms audit export --audit-postgres-urlinstead, or query the database directly.For SIEM ingestion from the file backend, prefer file tailing: a dedicated agent reads the file from its last committed offset and forwards events with guaranteed delivery, surviving restarts without event loss.
Model 1 — File tailing
sequenceDiagram
participant KMS as KMS Server
participant File as audit.jsonl
participant Agent as SIEM Agent
participant SIEM as SIEM
KMS->>File: append JSON event (one line per operation)
loop tail -F
Agent->>File: read new lines
Agent->>SIEM: forward events (JSON / syslog)
end
Note over Agent: Tracks file offset
Note over Agent: No event loss on restart
Supported agents: Filebeat, Fluent Bit, Splunk Universal Forwarder, rsyslog imfile.
Model 2 — CEF export (ad hoc or scripted)
sequenceDiagram
participant Source as Audit storage
participant ckms as ckms audit export
participant Transport as Transport (shell / nc / logger)
participant Syslog as Syslog (rsyslog / SIEM listener)
Note over Source,Transport: Run on demand or via cron
ckms->>Source: read events (optional --since range)
ckms->>Transport: CEF lines on stdout
Transport->>Syslog: forward frames over wire (TCP RFC 6587 or UDP)
Note over Transport,Syslog: TCP uses RFC 6587 octet-counting framing
Note over Transport,Syslog: UDP uses RFC 5424 syslog datagrams
Supported targets: rsyslog, ArcSight, Splunk, nc listener.
PostgreSQL source attribution
PostgreSQL JSON exports include instance_id and chain_generation on every event.
Use (instance_id, chain_generation, id) as the event identity: row IDs restart in each generation.
These export fields leave the stored audit event and its hashes unchanged.
CEF exports identify the instance through deviceExternalId and the generation through cn2,
with cn2Label=chainGeneration.
The externalId value is <generation>:<id>.
Use deviceExternalId together with externalId when correlating or deduplicating events.
For separate delivery cursors or destinations, export one instance at a time.
Set AUDIT_READ_URL to the connection URL of a read-only role:
ckms audit export \
--audit-postgres-url "${AUDIT_READ_URL}" \
--audit-instance-id kms-eu-west-1a \
--format cef > kms-eu-west-1a.cef
File-backed events have no embedded instance ID; configure a source tag for each KMS in the collection agent.
File tailing (recommended for continuous ingestion)
A SIEM agent monitors the JSONL audit file and forwards events as they are written. No format conversion is needed, and delivery state is tracked by the agent. This model requires the file backend; with the PostgreSQL backend, use CEF export or query the database directly.
Splunk
Add to inputs.conf on the indexer or a Universal Forwarder:
[monitor:///var/log/cosmian-kms/audit.jsonl]
disabled = false
sourcetype = _json
index = kms_audit
Splunk's built-in _json sourcetype parses one JSON object per line as a searchable event.
Before enabling the monitor, validate field extraction against representative audit events
and ensure the kms_audit index exists with appropriate retention and access controls.
Datadog
Datadog's Agent can tail the JSONL file and parse each line as a JSON log event. Add to
datadog.yaml or a dedicated integration config:
logs:
- type: file
path: /var/log/cosmian-kms/audit.jsonl
service: cosmian-kms
source: json
Datadog automatically extracts top-level JSON fields as log attributes. You can then create
facets on operation, user, result, and build dashboards or monitors around KMS audit
activity.
Elasticsearch / OpenSearch
Ship the JSONL file via Filebeat 8.x with the filestream input and ndjson parser:
filebeat.inputs:
- type: filestream # replaces deprecated 'log' input in Filebeat 8.x
id: kms-audit
paths:
- /var/log/cosmian-kms/audit.jsonl
parsers:
- ndjson:
target: ""
overwrite_keys: true
add_error_key: false
prospector.scanner.check_interval: 1s
processors:
- drop_fields:
fields: ["message", "log", "host", "agent", "ecs", "input", "event"]
ignore_missing: true
output.elasticsearch:
hosts: ["http://elasticsearch:9200"]
index: "kms-audit"
pipeline: "kms-audit-normalize" # required — see ingest pipeline below
setup.template.enabled: false # use your own index mapping
setup.ilm.enabled: false # write to a plain index, not a data stream
The result field and the ingest pipeline
The result field is a Rust enum that serializes as either a plain string or an object:
{"result": "Success", ...}
{"result": {"Failure": "access denied"}, ...}
Elasticsearch cannot dynamically map a single field as both a keyword and an object — the
first event maps result as keyword, and every subsequent {"Failure": ...} event is
silently dropped with a mapping conflict error.
Create this ingest pipeline before starting Filebeat. It normalizes result into two
consistently typed fields:
curl -X PUT "http://elasticsearch:9200/_ingest/pipeline/kms-audit-normalize" \
-H "Content-Type: application/json" -d '{
"description": "Normalize KMS audit result field (polymorphic Rust enum)",
"processors": [{
"script": {
"lang": "painless",
"source": "def r = ctx[\"result\"]; if (r instanceof String) { ctx[\"result_status\"] = r; } else if (r instanceof Map && r.containsKey(\"Failure\")) { ctx[\"result_status\"] = \"Failure\"; ctx[\"result_error\"] = r[\"Failure\"]; } else { ctx[\"result_status\"] = \"Unknown\"; } ctx.remove(\"result\");"
}
}]
}'
After the pipeline runs, each indexed document has:
| Field | Type | Description |
|---|---|---|
result_status | keyword | Always "Success" or "Failure" |
result_error | text | Error message — present only on "Failure" events |
JSONL field reference for SIEM mapping
See Audit events for the canonical field list. Two SIEM-specific notes:
resultis polymorphic ("Success"or{"Failure": "..."}); normalize it with the ingest pipeline above intoresult_statusandresult_errorfor facets and alerts.prev_hashandrow_hashare tamper-evidence fields for offline chain verification; they carry no semantic meaning for SIEM correlation and can be excluded from indexing.
Generic file tailing (rsyslog, Filebeat, Fluent Bit)
Any log shipping agent that supports file tailing can forward the JSONL file. Configure the agent to:
- Monitor the audit file path (the default is
<root-data-path>/audit.jsonl; the examples on this page use/var/log/cosmian-kms/audit.jsonl) - Track file position (cursor) to avoid duplicate delivery
- Use a sourcetype or tag that your SIEM recognizes as JSON
CEF export (for SIEMs requiring CEF format)
The ckms audit export --format cef command converts events from either audit backend to
CEF v27 and prints them to stdout.
This is useful for:
- Verification — sending a sample of events to a CEF listener to confirm parsing
- Scripted pipelines — wrapping the export in a cron job or log rotation hook
- SIEMs that require CEF — ArcSight, QRadar, and others that expect CEF input
CEF over TCP syslog (rsyslog)
For reliable delivery, use TCP with RFC 6587 octet-counting framing instead of UDP. Any TCP syslog receiver (rsyslog, syslog-ng, Splunk TCP input) can ingest this format.
Example with rsyslog — add to /etc/rsyslog.conf or /etc/rsyslog.d/kms.conf:
module(load="imtcp")
input(type="imtcp" port="5514" Ruleset="kms_cef")
ruleset(name="kms_cef") {
action(type="omfile" file="/var/log/kms-cef.log" template="RSYSLOG_FileFormat")
}
Send CEF events with octet-counting framing:
#!/usr/bin/env bash
# Note: Requires Bash due to /dev/tcp network redirection and process substitution < <(...).
# Alternatively, nc <host> 5514 can be used as an alternative to /dev/tcp.
# Each frame: "<byte-count> <message>" (RFC 6587 octet counting)
# The message is a syslog PRI header + CEF line.
while IFS= read -r line; do
msg="<134>$(date '+%b %d %H:%M:%S') kms-audit: ${line}"
byte_count=$(LC_ALL=C printf '%s' "${msg}" | wc -c | tr -d ' ')
printf '%d %s' "${byte_count}" "${msg}" > /dev/tcp/<host>/5514
done < <(ckms audit export --format cef --path /var/log/cosmian-kms/audit.jsonl)
- TCP with octet-counting: reliable, ordered delivery — suitable for production
pipelines. Each frame carries its own length prefix (
<count> <message>). Note thatnc <host> 5514can be used as an alternative to/dev/tcpif running outside Bash. - UDP: no delivery guarantee — suitable only for ad hoc verification.
Ad hoc export to a CEF listener (UDP)
# Send today's events as CEF to a test listener on port 5514
ckms audit export --format cef \
--path /var/log/cosmian-kms/audit.jsonl \
--since "$(date -u +%Y-%m-%dT00:00:00Z)" \
| nc -u -w 1 <host> 5514
- UDP has no delivery guarantee: events can be silently dropped or reordered.
- Use a port ≥ 1024 (e.g.
5514): port 514 is privileged on Linux and usually occupied by the system syslog daemon. - No cursor state: each run re-exports from the beginning of the file (or from
--since). This is fine for verification and unsuitable for continuous delivery.
ArcSight / CEF-native SIEMs
ArcSight SmartConnectors natively ingest CEF over syslog. Configure the connector to accept CEF on a TCP or UDP port, then forward the KMS CEF export output to that port.
Refer to the ArcSight CEF Implementation Standard v27 for connector-specific configuration details.
Proven integrations
All tests use the product's official Docker image and fail if no evidence is found.
SIEM and log pipeline integrations
These products ingest KMS audit events (JSONL file or CEF syslog).
Tested against a live instance
| Product | Role | What is proven |
|---|---|---|
| rsyslog | Syslog receiver | CEF lines delivered over TCP (RFC 6587 octet-counting); all events received intact |
| Fluent Bit 4.0 | Log shipper | JSONL audit file tailed continuously; all events forwarded; required fields present |
| Filebeat 8.17 | Log shipper | Audit JSONL shipped to Elasticsearch; ingest pipeline normalizes result; all events indexed |
| Elasticsearch 8.17 | Log store / SIEM backend | Events indexed with correct field mapping for both Success and Failure outcomes |
Documented but not live-tested
The underlying transport is proven above; only the product-specific connector has not been exercised with a live container.
| Product | Integration model | Basis for confidence |
|---|---|---|
| Splunk (Universal Forwarder) | File tailing (inputs.conf) | Same JSONL format proven by Fluent Bit and Filebeat tests |
| Datadog | File tailing (datadog.yaml) | Same JSONL format; config example in this page |
| ArcSight / QRadar | CEF over TCP syslog | CEF format + TCP transport proven by rsyslog test; only destination endpoint differs |
| OpenSearch | File tailing or Filebeat | Elasticsearch-compatible API; Filebeat test uses the same ingest pipeline |
Access restriction
Give the collection service its own account with read-only access to the audit source. For file tailing, follow Protecting the file.
For PostgreSQL exports, grant a separate role SELECT on kms_audit_events and the connection and
schema access it needs. Grant it no write or DDL privileges, and keep its credentials separate from
the KMS writer's. See PostgreSQL backend for the
writer's permissions.
KMS User Interface
The KMS User Interface (UI) is a web-based application served from the KMS server, allowing users to perform key management operations easily.
Accessing the User Interface
Once the KMS server is running, open the following URL in your browser:
https://YOUR_KMS_URL/ui
Replace YOUR_KMS_URL with the actual KMS server address.
If the KMS is running behind a reverse proxy, set kms_public_url in the server configuration to the public-facing URL — this is required for the OIDC redirect flow to work correctly.
The UI bundle is served from the path configured by ui_index_html_folder (defaults to the built-in bundle shipped with the server).
Authentication Configuration
The UI automatically detects the authentication method configured on the KMS server and adapts its login flow accordingly:
- OIDC Authentication: The UI presents a LOGIN button that redirects to the identity provider. See Configuring OIDC Authentication below.
- Cosmian Authentication Server Login: The UI presents a username/password form (with an optional TOTP step) that authenticates directly against a Cosmian authentication server. See Configuring Cosmian Authentication Server Login below.
- Certificate Authentication: The UI presents an ACCESS KMS button. The browser negotiates the mTLS handshake and submits the client certificate automatically. If no valid certificate is available, the login page is shown again with an error. See Configuring Certificate Authentication below.
- No authentication configured: No login is required — the UI takes you directly to the key management interface. However, a warning banner is displayed:
To remove the warning "Authentication is disabled on this KMS server", configure an [authentication method like explained in the next sections](#authentication-configuration).
Configuring OIDC Authentication
To enable authentication via OIDC, configure the KMS UI with details from the selected OIDC compliant tenant.
1. Using the Configuration File (.toml)
Add the following section to your KMS configuration file:
[ui_config.ui_oidc_auth]
ui_oidc_client_id = "your_client_id"
ui_oidc_client_secret = "your_client_secret" # (optional)
ui_oidc_issuer_url = "https://your_oidc_issuer_url"
ui_oidc_logout_url = "https://your_oidc_logout_url"
If your KMS is accessible behind a proxy, also specify the public KMS URL in the generic section:
kms_public_url = "your_kms_public_url"
You may also need to register the following URIs in your Identity Provider (IdP) application settings:
- Allowed redirect/callback URI:
https://YOUR_KMS_URL/ui/callback - Application Login URI:
https://YOUR_KMS_URL/ui/login - Logout URI:
https://YOUR_KMS_URL/ui/login
2. Using Command-Line Arguments
--ui-oidc-client-id "your_client_id" \
--ui-oidc-client-secret "your_client_secret" \
--ui-oidc-issuer-url "https://your_oidc_issuer_url" \
--ui-oidc-logout-url "https://your_oidc_logout_url"
The UI login flow always uses PKCE (code_challenge_method=S256). The client secret is optional — see the PKCE Authentication guide for per-provider configuration instructions.
Configuring Certificate Authentication (mTLS)
When the KMS server is started with mutual TLS and a client CA (clients_ca_cert_file), the UI switches to certificate-based login. See Enabling TLS for server-side configuration.
The browser handles the mTLS handshake transparently: Chrome presents the client certificate during the TLS handshake and the KMS server extracts the Subject CN of the certificate and uses it as the KMS username. For example, a certificate with CN=alice identifies the user as alice for all access-control decisions.
Users who have no valid client certificate installed will see a "CERT identity verification failed" error on the login page.
Step 1 — Obtain your client certificate
The client certificate must be signed by the CA configured in clients_ca_cert_file on the server. Obtain it from your PKI or administrator. If you are using the KMS setup wizard, it generates a client.crt + client.key pair automatically.
Step 2 — Convert PEM to PKCS#12 (if needed)
Browsers import certificates as PKCS#12 (.p12) bundles. If you have separate PEM files, convert them:
openssl pkcs12 -export \
-certpbe PBE-SHA1-3DES -keypbe PBE-SHA1-3DES -macalg sha1 \
-in client.crt \
-inkey client.key \
-certfile ca.crt \
-out client.p12 \
-passout pass:your-password
OpenSSL 3.x generates PKCS#12 files with AES-256 ciphers by default. macOS
Security.framework (which Chrome on macOS uses) cannot import that format.
The -certpbe PBE-SHA1-3DES -keypbe PBE-SHA1-3DES -macalg sha1 flags select
the older 3DES format that macOS accepts.
If you already have a .p12 file generated by the KMS wizard (client.p12), skip this step — it is already in the correct format.
Step 3 — Install the certificate in the browser
- Open
chrome://settings/certificates(or Settings → Privacy and security → Security → Manage certificates). - Go to the Your certificates tab.
- Click Import, select
client.p12, and enter the password when prompted.
After installing or changing a client certificate, fully close and relaunch the browser. Browsers cache TLS session state and will not renegotiate with the new certificate until all windows are closed.
The Common Name (CN) of the client certificate becomes the KMS username. Make sure the CN matches the identity you want to use for access control. A wildcard CN (*) is explicitly rejected by the server.
Configuring Cosmian Authentication Server Login
When the KMS is deployed alongside a Cosmian authentication server ("AS"), the UI can offer a native username/password (with optional TOTP) login form that authenticates end users directly against it — the same capability as ckms login cosmian, exposed in the browser.
The AS's session token is validated by the KMS server and never forwarded to the browser: only the resulting user identity is kept in the KMS's own session cookie.
1. Using the Configuration File (.toml)
[cosmian_auth]
cosmian_auth_server_url = "https://your-auth-server:8443"
cosmian_auth_realm = "your_realm"
cosmian_auth_accept_invalid_certs = false # set true only for dev/test self-signed certs
Both cosmian_auth_server_url and cosmian_auth_realm must be set for the UI login form to appear — cosmian_auth_server_url alone only enables validation of bearer tokens already issued by the AS for direct API access.
2. Using Command-Line Arguments
--cosmian-auth-server-url "https://your-auth-server:8443" \
--cosmian-auth-realm "your_realm"
If the account requires a password change or has an expired password, the UI surfaces the Cosmian authentication server's message directly; the password must be changed through the Cosmian authentication server (or its own admin UI), not through the KMS.
UI Branding (post-install, no rebuild)
The KMS UI can be white‑labeled at runtime by editing the installed UI static files (no UI rebuild required).
What to change after install
The UI is served under /ui, from the UI dist directory on disk.
- Branding file:
/usr/local/cosmian/ui/dist/branding.json - Theme assets:
/usr/local/cosmian/ui/dist/themes/<theme>/...
All asset URLs in branding.json are URLs under /ui/... (for example: /ui/themes/example/example-logo-light.svg).
Post-install customization (deb/rpm)
When the KMS server is installed from Linux packages, branding can be customized after install by editing files directly in the UI dist folder (no UI rebuild required).
- Default UI dist path (Linux):
/usr/local/cosmian/ui/dist/ - Branding file:
/usr/local/cosmian/ui/dist/branding.json - Theme assets:
/usr/local/cosmian/ui/dist/themes/<theme>/...
The packaging scripts preserve these files across upgrades by backing them up and restoring them (upgrade-safe customization).
In this repo, theme assets are stored under ui/public/themes/ and the build step publishes them into ui/dist/themes/.
Switch to the example theme
Edit /usr/local/cosmian/ui/dist/branding.json and point the URLs to the example theme assets:
{
"title": "Example",
"faviconUrl": "/ui/themes/example/favicon-32x32.png",
"logoAlt": "Example",
"logoLightUrl": "/ui/themes/example/example-logo-light.svg",
"logoDarkUrl": "/ui/themes/example/example-logo-dark.svg",
"backgroundImageUrl": "/ui/themes/example/example-login-bg.jpg"
}
Restart the service (or clear browser cache) to see changes.
Start from the blank theme
The blank theme is a minimal starter template with placeholder assets — copy it as your starting point for a new white-label deployment:
# Copy the blank theme to the installed UI dist directory
cp -r /usr/local/cosmian/ui/dist/themes/blank /usr/local/cosmian/ui/dist/themes/acme
# Customise the copy
nano /usr/local/cosmian/ui/dist/themes/acme/branding.json
# Replace logo-light.svg, logo-dark.svg, favicon.svg, login-bg.svg with your assets
# Activate it by pointing branding.json to the new theme
cp /usr/local/cosmian/ui/dist/themes/acme/branding.json /usr/local/cosmian/ui/dist/branding.json
The blank theme ships the following placeholder files:
| File | Purpose |
|---|---|
branding.json | Full example with every supported field |
logo-light.svg | Logo for light-mode header (dark text) |
logo-dark.svg | Logo for dark-mode header (white text) |
favicon.svg | Browser tab icon |
login-bg.svg | Login page background (dark blue gradient) |
branding.json schema
Example:
{
"title": "Example",
"faviconUrl": "/ui/themes/example/favicon-32x32.png",
"logoAlt": "Example Key Management",
"logoLightUrl": "/ui/themes/example/example-logo-light.svg",
"logoDarkUrl": "/ui/themes/example/example-logo-dark.svg",
"loginTitle": "Example",
"loginSubtitle": "Welcome",
"backgroundImageUrl": "/ui/themes/example/example-login-bg.jpg",
"loginCardColor": "rgba(126,34,206,0.3)",
"menuTheme": "dark",
"tokens": {
"light": { "colorPrimary": "#0057ff", "colorText": "#111827" },
"dark": { "colorPrimary": "#7c3aed", "colorText": "#e5e7eb" }
}
}
Keys
title: Setsdocument.title.faviconUrl: URL for the page favicon.logoAlt: Used as the header label and<img alt>.logoLightUrl/logoDarkUrl: Header logo depending on light/dark mode.loginTitle/loginSubtitle: Login page texts.backgroundImageUrl: Login background image.loginCardColor: CSS background color of the card overlaid on the login background. Accepts any CSS color value (e.g."rgba(0,87,255,0.3)","#0057ff4d"). Defaults to"rgba(126,34,206,0.3)"(semi-transparent purple).menuTheme:"light"or"dark".tokens.light/tokens.dark: Ant Design theme token overrides.
Behavior and fallbacks
- If
/ui/branding.jsonis missing or invalid, the UI uses built-in defaults. - If a key is missing, the UI falls back to the default value.
Notes
- The UI fetches
branding.jsonon startup and applies title/favicon before React renders. branding.jsonis fetched with cache busting by default.
About branding.ts
The UI branding loader/helpers live in ui/src/branding.ts. It is a plain TypeScript module (no JSX), so it uses the .ts extension rather than .tsx.
Upgrade behavior
Linux packages are designed so you can customize UI files in place.
- On upgrade: package maintainer scripts back up UI dist content to
/var/lib/cosmian/ui/and restore it after installing the new version. - If you want to reset to package defaults: remove your customized
branding.jsonand/orthemes/<theme>/overrides, then reinstall or restore from a clean package.
Custom OpenSSL Build
The Eviden KMS dynamic package links against OpenSSL at runtime. You can redirect the service to a custom OpenSSL build — for example, a vendor-supplied or hardware-accelerated variant — without touching any Cosmian-owned files, by overriding the systemd service environment.
Static builds embed OpenSSL at compile time and cannot be redirected at runtime.
How it works
The KMS systemd unit (/lib/systemd/system/cosmian_kms.service) sets three environment variables that together control which OpenSSL is loaded:
| Variable | Default value (package install) | Purpose |
|---|---|---|
LD_LIBRARY_PATH | /usr/local/cosmian/lib | Directory searched first for libssl.so.3 / libcrypto.so.3 |
OPENSSL_CONF | /usr/local/cosmian/lib/ssl/openssl.cnf | OpenSSL configuration file |
OPENSSL_MODULES | /usr/local/cosmian/lib/ossl-modules | Directory containing provider modules (e.g. fips.so, legacy.so) |
Pointing all three at your custom OpenSSL installation is sufficient to make the service use it exclusively.
On startup the server logs the active OpenSSL version:
INFO cosmian_kms: [run] OpenSSL version: OpenSSL 3.X.Y DD Mon YYYY,
in OPENSSLDIR: "/usr/local/ssl", number: 30X000Y0
Overriding via systemd drop-in
1. Install your custom OpenSSL build
Place the libraries anywhere that is accessible to the cosmian_kms service
(i.e. not under /home/ — the systemd unit sets ProtectHome=yes).
Recommended locations: /opt/ or /usr/local/lib/.
Vendor CC/FIPS packages commonly ship with a nested usr/local/ tree inside
the archive. Copy the whole folder as-is:
sudo cp -r /path/to/openssl-<version>-linux-x86_64 /usr/local/lib/
Resulting layout:
/usr/local/lib/openssl-<version>-linux-x86_64/
usr/
local/
lib64/
libssl.so.3
libcrypto.so.3
ossl-modules/
fips.so
legacy.so
ssl/
openssl.cnf
fipsmodule.cnf
In the override.conf you then reference the nested usr/local/lib64/ path:
LD_LIBRARY_PATH=/usr/local/lib/openssl-<version>-linux-x86_64/usr/local/lib64
OPENSSL_MODULES=/usr/local/lib/openssl-<version>-linux-x86_64/usr/local/lib64/ossl-modules
If the archive extracts directly to lib64/ at the top level (no usr/local/
subdirectory), use a simpler install path such as /opt/openssl-custom/ and
reference lib64/ directly.
2. Create the systemd drop-in override
sudo systemctl edit cosmian_kms
This opens $EDITOR with a drop-in template saved at
/etc/systemd/system/cosmian_kms.service.d/override.conf.
Add the three environment variables, replacing the paths with those of your
installation:
[Service]
Environment="LD_LIBRARY_PATH=/opt/openssl-custom/lib"
Environment="OPENSSL_CONF=/opt/openssl-custom/ssl/openssl.cnf"
Environment="OPENSSL_MODULES=/opt/openssl-custom/lib/ossl-modules"
# Required when OIDC/JWKS auth is enabled: the default unit blocks outbound
# traffic to public IPs. See "Network firewall" below.
IPAddressAllow=any
3. Reload and restart
sudo systemctl daemon-reload
sudo systemctl restart cosmian_kms
4. Verify
sudo journalctl -u cosmian_kms --no-pager | grep "OpenSSL version"
The log line should reflect your custom build string.
Network firewall
The default systemd unit ships with IPAddressDeny=any and only allows
traffic to localhost and RFC-1918 private ranges:
IPAddressDeny=any
IPAddressAllow=localhost
IPAddressAllow=10.0.0.0/8
IPAddressAllow=172.16.0.0/12
IPAddressAllow=192.168.0.0/16
When jwt_auth_provider is configured, the KMS fetches JWKS keys from a
public OIDC endpoint (e.g. login.microsoftonline.com) at startup.
Because the endpoint's IP is not in the allowed list, the BPF firewall
silently drops the outbound SYN packets — the service hangs indefinitely
at the Refreshing JWKS log line and never starts listening.
Fix: allow outbound HTTPS in the drop-in
Add IPAddressAllow=any to the override.conf drop-in (taking precedence over
the IPAddressDeny=any in the unit):
[Service]
# … OpenSSL entries …
IPAddressAllow=any
If a stricter policy is preferred, add only the OIDC provider's IP ranges
instead of any. For Microsoft Entra ID / Azure AD (as of 2026), the range
is documented in the
Microsoft 365 IP address list.
If the custom OpenSSL was compiled with OPENSSLDIR=/usr/local/ssl (check
via openssl version -a), the FIPS provider looks for its configuration at
that path regardless of OPENSSL_CONF. Create the path and run
fipsinstall before starting the service:
sudo mkdir -p /usr/local/ssl
sudo env LD_LIBRARY_PATH=/opt/openssl-custom/lib64 \
/opt/openssl-custom/bin/openssl fipsinstall \
-module /opt/openssl-custom/lib64/ossl-modules/fips.so \
-out /usr/local/ssl/fipsmodule.cnf
# Create a minimal openssl.cnf at the compiled-in OPENSSLDIR
sudo tee /usr/local/ssl/openssl.cnf > /dev/null <<'EOF'
openssl_conf = openssl_init
config_diagnostics = 1
.include /usr/local/ssl/fipsmodule.cnf
[openssl_init]
providers = provider_sect
[provider_sect]
fips = fips_sect
default = default_sect
[default_sect]
activate = 1
EOF
Verify FIPS loads before restarting the service:
sudo env LD_LIBRARY_PATH=/opt/openssl-custom/lib64 \
OPENSSL_MODULES=/opt/openssl-custom/lib64/ossl-modules \
/opt/openssl-custom/bin/openssl list -providers
# Expected: both "default" and "fips" providers show status: active
Then reload and restart:
sudo systemctl daemon-reload
sudo systemctl restart cosmian_kms
The systemd unit sets ProtectHome=yes. Custom OpenSSL builds placed
under /home/… are inaccessible to the service. Install custom builds
under /opt/ or /usr/local/ so the service can load them.
Rollback
Remove the drop-in override file and restart the service to revert to the Cosmian-bundled OpenSSL:
sudo rm -f /etc/systemd/system/cosmian_kms.service.d/override.conf
sudo systemctl daemon-reload
sudo systemctl restart cosmian_kms
Notes
- ABI compatibility:
libssl.so.3/libcrypto.so.3must be ABI-compatible with OpenSSL 3.x (major version3). - Provider modules:
legacy.so(or any other provider) must be compiled against the same OpenSSL version as the libraries you are installing. - Package upgrades: a
deb/rpmupgrade does not touch the drop-in override file, so the custom OpenSSL remains active after an upgrade.
Secret backends
Store sensitive configuration values — database passwords, API keys, tokens — in an external secret manager instead of plain text in the KMS TOML config file.
How it works
sequenceDiagram
participant Operator
participant KMS Server
participant Secret Backend
Operator->>KMS Server: cosmian_kms --backend vault -c kms.toml
KMS Server->>KMS Server: Parse TOML, find secret:// URIs
KMS Server->>Secret Backend: Resolve each secret:// URI
Secret Backend-->>KMS Server: Return plaintext value
KMS Server->>KMS Server: Replace URIs with values, apply config
KMS Server->>Operator: Server ready
- In your
kms.toml, replace any sensitive value with asecret://...URI. - Start the KMS with
--backend <backend>(or setKMS_SECRET_BACKENDenv var). - At startup the KMS resolves every
secret://URI once, then applies the config normally.
The config file never contains actual secrets — only references.
Supported backends
| Backend | --backend | URI format | Required env vars |
|---|---|---|---|
| HashiCorp Vault | vault | secret://<mount>/<path>[#<field>] | VAULT_ADDR, VAULT_TOKEN |
| AWS SSM Parameter Store | aws-ssm | secret://<region>/<parameter-name> | AWS_ACCESS_KEY_ID, AWS_SECRET_ACCESS_KEY |
| Azure Key Vault | azure-kv | secret://<vault>/secrets/<name>[/<version>] | AZURE_TENANT_ID, AZURE_CLIENT_ID, AZURE_CLIENT_SECRET |
| Eviden KMS | cosmian-kms | secret://<host>[:<port>]/<object-id> | (optional) COSMIAN_KMS_SECRET_TOKEN |
HashiCorp Vault
Uses the KV-v2 secrets engine. The URI fragment #field selects a specific
key in the secret's JSON data; defaults to value if omitted.
1. Store a secret in Vault
vault kv put secret/kms/db password=my-db-password
2. Reference it in kms.toml
[db]
database_type = "postgresql"
postgres_url = "postgresql://kms:secret://secret/kms/db#password@db.internal:5432/kms"
Or for a standalone field:
[db]
database_type = "postgresql"
postgres_url = "secret://secret/kms/postgres-url#value"
3. Start the KMS
export VAULT_ADDR=http://vault.internal:8200
export VAULT_TOKEN=s.xxxxxxxx
cosmian_kms --backend vault -c /etc/cosmian/kms.toml
AWS SSM Parameter Store
Fetches a SecureString parameter. The leading / is prepended automatically — do not include it in the URI.
1. Store a secret in SSM
aws ssm put-parameter \
--name /kms/db-password \
--value "my-db-password" \
--type SecureString \
--region eu-west-1
2. Reference it in kms.toml
[db]
postgres_url = "secret://eu-west-1/kms/db-password"
3. Start the KMS
export AWS_ACCESS_KEY_ID=AKIA...
export AWS_SECRET_ACCESS_KEY=...
# Optional: export AWS_SESSION_TOKEN=...
cosmian_kms --backend aws-ssm -c /etc/cosmian/kms.toml
Azure Key Vault
Uses service-principal client credentials (OAuth2) to authenticate to Azure AD, then fetches the secret from the Key Vault REST API (v7.4).
1. Store a secret
az keyvault secret set \
--vault-name myvault \
--name db-password \
--value "my-db-password"
2. Reference it in kms.toml
[db]
postgres_url = "secret://myvault/secrets/db-password"
To pin a specific version:
postgres_url = "secret://myvault/secrets/db-password/abc123def456"
3. Start the KMS
export AZURE_TENANT_ID=...
export AZURE_CLIENT_ID=...
export AZURE_CLIENT_SECRET=...
cosmian_kms --backend azure-kv -c /etc/cosmian/kms.toml
Eviden KMS (self-referencing)
Use another Eviden KMS instance as the secret store. The secret must be stored as a SecretData or OpaqueObject whose raw bytes are the UTF-8 value.
This is useful for hierarchical deployments where a "vault KMS" holds credentials used by downstream KMS instances.
1. Import a secret into the vault KMS
ckms secret-data create --value "my-db-password" --type password
# → UniqueIdentifier: 550e8400-e29b-41d4-a716-446655440000
2. Reference it in kms.toml
[db]
postgres_url = "secret://vault-kms.internal:9998/550e8400-e29b-41d4-a716-446655440000"
For localhost (uses http automatically):
postgres_url = "secret://localhost:9998/550e8400-e29b-41d4-a716-446655440000"
3. Start the KMS
# Optional token if the vault KMS requires authentication:
export COSMIAN_KMS_SECRET_TOKEN=eyJhbGciOi...
# Accept self-signed certs (dev only):
export COSMIAN_KMS_INSECURE_CERTS=true
cosmian_kms --backend cosmian-kms -c /etc/cosmian/kms.toml
Security considerations
| Concern | Mitigation |
|---|---|
| Secret exposure in config files | Only secret:// references are stored on disk — never plaintext values. |
| Secret lifetime | URIs are resolved once at startup. Resolved values live only in process memory. |
| Backend credentials | Always inject via environment variables, never in the TOML file. |
| Network security | Use TLS for all backend communication. For Vault and Eviden KMS, ensure VAULT_ADDR uses https:// in production. |
| Rotation | Restart the KMS to pick up rotated secrets. There is no hot-reload. |
Only one --backend can be active at a time. All secret:// URIs
in the config must be resolvable by the selected backend.
FIPS 140-3
The Federal Information Processing Standard (FIPS) Publication 140-3, Security Requirements for Cryptographic Modules, is a US government standard that specifies the security requirements for cryptographic modules protecting sensitive information.
When compiled in FIPS mode, the Eviden KMS uses only cryptographic primitives that are compliant with the standards of the National Institute of Standards and Technology (NIST) and uses implementations of an NIST FIPS 140-3 compliant cryptographic module: the OpenSSL FIPS provider.
The OpenSSL FIPS provider is certified under
Eviden produces pre-built Debian based Linux packages and docker containers of the KMS (on gcr.io).
By default, the Eviden KMS is built with FIPS compliance enabled.
Alternatively, you can enable all cryptographic mechanisms by building from source, using the --features non-fips flag:
cargo build --release --features non-fips
Cryptographic Algorithms
The Eviden server supports a large, and growing, list of cryptographic algorithms. This page lists the supported algorithms, their details and their reference in various standards. FIPS compliant algorithms are also listed with the corresponding NIST standard.
Keys and certificates for all the listed algorithms can be generated, imported, exported, wrapped, unwrapped... using the Eviden KMS server API or KMS CLI
Should you require a specific algorithm or standard to be supported, please directly open a ticket or pull request on the Github repository.
Key-wrapping schemes
The Eviden server supports key-wrapping via the Import(unwrapping) and Export (wrapping) kmip operations.
The (un)wrapping key identifier may be that of a key or a certificate.
In the latter case, the public key (or the associated private key for unwrapping, if any) will be retrieved and used.
The supported key-wrapping algorithms are:
| Algorithm | Wrap Key Type | FIPS mode | Description |
|---|---|---|---|
| AES-KW | Symmetric key wrapping | NIST SP 800-38F | Symmetric key-wrapping without padding as defined in RFC3394. |
| AES-KWP | Symmetric key wrapping | NIST SP 800-38F | Symmetric key-wrapping with padding as defined in RFC5649. |
| CKM_RSA_PKCS | RSA PKCS#1 v1.5 | Not anymore | RSA WITH PKCS#1 v1.5 padding - removed by NIST approved algorithms for key wrapping in FIPS 140-3 |
| CKM_RSA_PKCS_OAEP | RSA key wrapping | NIST 800-56B rev. 2 | RSA OAEP with NIST approved hashing functions for RSA key size 2048, 3072 or 4096 bits. |
| CKM_RSA_AES_KEY_WRAP | RSA-AES hybrid key wrapping | NIST SP 800-38F | RSA OAEP with NIST approved hashing functions and AES-KWP for RSA key size 2048, 3072 or 4096 bits. |
| Salsa Sealed Box | X25519, Ed25519 and Salsa20 Poly1305 | No | ECIES compatible with libsodium Sealed Boxes. |
| ECIES | P-256, P-384, P-521 | No | ECIES with a NIST curve: P-256 uses SHAKE128 + AES-128-GCM; P-384 and P-521 use SHAKE256 + AES-256-GCM. |
Any encryption scheme below can be used for key-wrapping as well.
Encryption schemes
Encryption is supported via the Encrypt and Decrypt kmip operations.
For bulk operations (i.e. encrypting/decrypting multiple data with the same key),
please refer to KMIP Messages that allow combining multiple operations in a
single request.
Encryption can be performed using a key or a certificate. Decryption can be performed using a key.
The supported encryption algorithms are:
| Algorithm | Encryption Key Type | FIPS mode | Description |
|---|---|---|---|
| Covercrypt | Covercrypt | No | A fast post-quantum attribute based scheme: Covercrypt. |
| AES GCM | Symmetric authenticated encryption with additional data | NIST FIPS 197 | The NIST standardized symmetric encryption in FIPS 197. |
| AES XTS | Symmetric, not authenticated | NIST SP 800-38E | Used in disk encryption. Requires 2 keys (e.g. a double-sized key) |
| AES GCM-SIV | Symmetric, authenticated, synthetic IV | No | Used for deterministic encryption and encryption of very large data sets. |
| FPE FF1 | Symmetric, format-preserving encryption | No | NIST SP 800-38G FF1 format-preserving encryption for text, integers, and floating-point values through KMIP Encrypt/Decrypt. |
| ChaCha20-Poly1305 | Symmetric authenticated encryption with additional data | No | A popular symmetric encryption algorithm standardized in RFC-8439 |
| CKM_RSA_PKCS | RSA PKCS#1 v1.5 | Not anymore | RSA WITH PKCS#1 v1.5 padding - removed by NIST approved algorithms for encryption in FIPS 140-3 |
| CKM_RSA_PKCS_OAEP | RSA encryption with OAEP padding | NIST 800-56B rev. 2 | RSA OAEP with NIST approved hashing functions for RSA key size 2048, 3072 or 4096 bits. |
| Salsa Sealed Box | X25519, Ed25519 and Salsa20 Poly1305 | No | ECIES compatible with libsodium Sealed Boxes. |
| ECIES | P-256, P-384, P-521 | No | ECIES with a NIST curve: P-256 uses SHAKE128 + AES-128-GCM; P-384 and P-521 use SHAKE256 + AES-256-GCM. |
Algorithms Details
Covercrypt
Covercrypt is a new post-quantum cryptographic algorithm, being standardized at ETSI that allows creating ciphertexts for a set of attributes and issuing user keys with access policies over these attributes. User keys are traceable with a unique fingerprint.
AES GCM
AES is described in NIST FIPS 197. In Eviden KMS it is used as a data encryption mechanism (DEM) with the Galois Counter Mode of operation (GCM) with a 96 bits nonce, a 128 bits tag with and key sizes of 128, 192 or 256 bits.
FPE FF1
Eviden KMS supports NIST SP 800-38G FF1
format-preserving encryption in non-FIPS mode through the KMIP Encrypt and Decrypt
operations when the Cryptographic Algorithm is set to FPE_FF1.
The server supports three data shapes:
- text values, using the alphabet name or a custom alphabet in
AuthenticatedEncryptionAdditionalData - integer values, using JSON metadata such as
{"type":"integer","alphabet":"numeric"} - floating-point values, using JSON metadata such as
{"type":"float"}
The tweak is supplied through IVCounterNonce. The CLI exposes the same flow via ckms fpe
commands: ckms fpe keys create, ckms fpe encrypt, and ckms fpe decrypt.
ChaCha20-Poly1305
ChaCha20-Poly1305 is a symmetric authenticated encryption algorithm that is described in RFC-8439. The algorithm is not standardized by NIST but is a popular secure alternative to AES-GCM and is used in the same way, in particular by Google.
AES-KWP
Allows to symmetrically wrap keys using RFC5649 which is also standardized as PKCS#11 CKM_AES_KEY_WRAP_PAD and described in NIST SP 800-38F.
CKM_RSA_PKCS
A.k.a PKCS #1 v1.5 RSA as specified in PKCS#11 v2.40.
The algorithm is not recommended by NIST for encryption or key wrapping in FIPS 140-3. It is still supported for signature operations.
The maximum plaintext length is k-11 where k is the length in octets of the RSA modulus
The output length is the same as the modulus length.
CKM_RSA_PKCS_OAEP
A.k.a PKCS #1 RSA OAEP as specified in PKCS#11 v2.40. This scheme is part of the NIST 800-56B rev. 2 recommendation available at section 7.2.2.
The maximum plaintext length is k-2-2*hLen where
kis the length in octets of the RSA modulushLenis the length in octets of the hash function output
The output length is the same as the modulus length.
The default hash function is SHA-256 but any NIST approved hash functions can be used for the OAEP scheme as listed in
- NIST FIPS 180-4: SHA-1, SHA-224, SHA-256, SHA-384, SHA-512
- NIST FIPS 202: SHA3-224, SHA3-256, SHA3-384, SHA3-512
Set the corresponding name of the hash function in the Cryptographic Parameters when performing a
KMIP operation.
To request this algorithm using the KMIP Encrypt/Decrypt operation, or key-wrapping as part of
the Import/Export
operations, specify the id/tags of an RSA key and set the Cryptographic Algorithm to RSA.
CKM_RSA_AES_KEY_WRAP
A PKCS#11 key wrapping mechanism that is supported by most HSMs.
The scheme asymmetrically wrap keys as described here and allows wrapping keys of any size using using a hybrid RSA/AES scheme.
Since old similar wrapping methods based on RSA used naive RSA encryption and could present some flaws, it aims at a generally more secure method to wrap keys:
- Receive data of the form
c|wkwhere|is the concatenation operator. Distinguishcandwk, respectively the encryptedkekand the wrapped key. First decrypt the key-encryption-keykekusing RSA-OAEP, then proceed to unwrap the key by decryptingm = dec(wk, kek)using AES-KWP as specified in RFC5649.
The algorithm can be used with any NIST approved hash function described above; set the
corresponding value in the Cryptographic Parameters when performing a KMIP operation.
To request this algorithm using key-wrapping as part of the Import/Export operations, specify the
id/tags of an RSA key as the wrapping key and set the Cryptographic Algorithm to RSA and
the Padding Method to None in the Key Wrapping Specification.
In the Eviden KMIP routing logic, the padding method discriminates between the three RSA wrapping schemes:
| Padding Method | Algorithm selected |
|---|---|
None | CKM_RSA_AES_KEY_WRAP (this scheme) |
OAEP | CKM_RSA_PKCS_OAEP |
PKCS1v15 | CKM_RSA_PKCS (non-FIPS only) |
PaddingMethod::None does not mean unpadded RSA. It is the signal to route toward the
hybrid RSA/AES wrapping scheme. The RSA OAEP padding is still applied internally — the field
merely selects which wrapping scheme to invoke.
The following JSON TTLV snippet shows the CryptographicParameters to embed in a
KeyWrappingSpecification on an Export or Import request:
{
"tag": "CryptographicParameters",
"type": "Structure",
"value": [
{
"tag": "CryptographicAlgorithm",
"type": "Enumeration",
"value": "RSA"
},
{
"tag": "PaddingMethod",
"type": "Enumeration",
"value": "None"
},
{
"tag": "HashingAlgorithm",
"type": "Enumeration",
"value": "SHA256"
}
]
}
This algorithm is compatible with the one used in Google KMS.
RSA OAEP AES 128 GCM
CKM_RSA_AES_KEY_WRAP can only be used for key wrapping and not for encryption. This scheme adds authentication by using AES 128 in Galois Counter Mode (GCM). Combined with RSA OAEP to encapsulate the AES key, this scheme is compatible with NIST SP 800-38F.
To request this algorithm using the KMIP Encrypt/Decrypt operation, specify the id/tags of an RSA
key and set the Cryptographic Algorithm to AES.
Salsa sealed box
An ECIES scheme that uses X25519 and XSalsa20-Poly1305 and is compatible with libsodium Sealed Boxes.
An Ed25519 key can be used; it will be automatically converted to X25519 first.
Ecies with NIST Curves
Although there is no specific FIPS standard for hybrid encryption, the ECIES encryption scheme is based on FIPS compliant cryptographic primitives only and uses the same algorithm as the Salsa Sealed Boxes. It supports the NIST P curves starting at P-256, and uses AES-128-GCM and SHAKE128 for curves with security strength $s \leq 128$ bits:
P-256
and AES-256-GCM and SHAKE256 for curves with security strength $s > 128$ bits:
P-384P-521
PQC Hybridized KEM
The Eviden KMS supports Post-Quantum Cryptography (PQC) hybridized Key Encapsulation Mechanisms (KEM) via the cosmian_cover_crypt crate. This crate provides a configurable KEM framework that can operate in pure classical, pure post-quantum, or hybrid mode by combining a pre-quantum KEM with a post-quantum KEM through a KEM combiner (using SHA-256).
The available pre-quantum KEMs are:
- P-256 — ECDH-based KEM on the NIST P-256 curve (via OpenSSL).
- Curve25519 — ECDH-based KEM on Curve25519.
The available post-quantum KEMs are:
- ML-KEM-512 — NIST FIPS 203 lattice-based KEM at security level 1.
- ML-KEM-768 — NIST FIPS 203 lattice-based KEM at security level 3.
The hybridized combinations pair one classical and one post-quantum KEM:
| Hybrid variant | Pre-quantum | Post-quantum | Approximate security |
|---|---|---|---|
| ML-KEM-512 + P-256 | P-256 | ML-KEM-512 | ~128 bits |
| ML-KEM-768 + P-256 | P-256 | ML-KEM-768 | ~192 bits |
| ML-KEM-512 + Curve25519 | Curve25519 | ML-KEM-512 | ~128 bits |
| ML-KEM-768 + Curve25519 | Curve25519 | ML-KEM-768 | ~192 bits |
The hybrid approach ensures that security is maintained even if one of the two underlying KEMs is broken: the combined shared secret remains secure as long as at least one component KEM is secure.
Key generation, encapsulation and decapsulation are exposed via the KMS CLI under
ckms pqc (non-FIPS builds only) using algorithm names ml-kem-512-p256, ml-kem-768-p256,
ml-kem-512-curve25519, and ml-kem-768-curve25519.
OpenSSL Native PQC Algorithms
Starting with OpenSSL 3.5, the Eviden KMS also provides direct support for OpenSSL-native Post-Quantum Cryptography algorithms standardized by NIST in August 2024. These algorithms are available in non-FIPS builds only.
ML-KEM — Key Encapsulation Mechanism (NIST FIPS 203)
ML-KEM (Module-Lattice-Based Key-Encapsulation Mechanism) is a lattice-based KEM standardized in NIST FIPS 203. It supersedes the CRYSTALS-Kyber candidate from the NIST PQC competition.
| Variant | Security level | Approximate security |
|---|---|---|
| ML-KEM-512 | NIST L1 | ~128 bits |
| ML-KEM-768 | NIST L3 | ~192 bits |
| ML-KEM-1024 | NIST L5 | ~256 bits |
Key generation, encapsulation, and decapsulation are exposed via the KMS CLI under ckms pqc ml-kem.
OpenSSL Hybrid KEM
OpenSSL also provides hybrid combinations that pair a classical elliptic-curve Diffie-Hellman key exchange with ML-KEM, following the IETF draft for hybrid key exchange in TLS 1.3.
| Variant | Classical component | Post-quantum component | Approximate security |
|---|---|---|---|
| X25519MLKEM768 | X25519 | ML-KEM-768 | ~192 bits |
| X448MLKEM1024 | X448 | ML-KEM-1024 | ~256 bits |
Key generation, encapsulation, and decapsulation for these hybrid variants are also exposed via
ckms pqc ml-kem.
ML-DSA — Lattice-Based Digital Signature (NIST FIPS 204)
ML-DSA (Module-Lattice-Based Digital Signature Algorithm) is a lattice-based signature scheme standardized in NIST FIPS 204. It supersedes the CRYSTALS-Dilithium candidate.
| Variant | Security level | Approximate security |
|---|---|---|
| ML-DSA-44 | NIST L2 | ~128 bits |
| ML-DSA-65 | NIST L3 | ~192 bits |
| ML-DSA-87 | NIST L5 | ~256 bits |
Key generation, signing, and verification are exposed via the KMS CLI under ckms pqc ml-dsa.
SLH-DSA — Hash-Based Digital Signature (NIST FIPS 205)
SLH-DSA (Stateless Hash-Based Digital Signature Algorithm) is a hash-based signature scheme standardized in NIST FIPS 205. It supersedes the SPHINCS+ candidate and is the only standardized PQC signature scheme not based on lattices.
Variants follow the naming convention SLH-DSA-<hash>-<level><speed> where:
<hash>is eitherSHA2orSHAKE<level>is128,192, or256(security level in bits)<speed>iss(small signature, slower signing) orf(fast signing, larger signature)
| Variant | Hash | Security | Signature size | Signing speed |
|---|---|---|---|---|
| SLH-DSA-SHA2-128s | SHA2 | ~128 bit | Small | Slow |
| SLH-DSA-SHA2-128f | SHA2 | ~128 bit | Large | Fast |
| SLH-DSA-SHA2-192s | SHA2 | ~192 bit | Small | Slow |
| SLH-DSA-SHA2-192f | SHA2 | ~192 bit | Large | Fast |
| SLH-DSA-SHA2-256s | SHA2 | ~256 bit | Small | Slow |
| SLH-DSA-SHA2-256f | SHA2 | ~256 bit | Large | Fast |
| SLH-DSA-SHAKE-128s | SHAKE | ~128 bit | Small | Slow |
| SLH-DSA-SHAKE-128f | SHAKE | ~128 bit | Large | Fast |
| SLH-DSA-SHAKE-192s | SHAKE | ~192 bit | Small | Slow |
| SLH-DSA-SHAKE-192f | SHAKE | ~192 bit | Large | Fast |
| SLH-DSA-SHAKE-256s | SHAKE | ~256 bit | Small | Slow |
| SLH-DSA-SHAKE-256f | SHAKE | ~256 bit | Large | Fast |
Key generation, signing, and verification are exposed via the KMS CLI under ckms pqc slh-dsa.
Signature schemes
Digital signature signing and verification are supported via both the Certify operation (for certificate signing) and the Sign operation (for direct data signing).
The Certify operation is used to create a certificate either by signing a certificate request, or building it from an existing public key.
The Sign operation is used to perform digital signature operations on provided data using a private key. This operation supports:
- Signing raw data (the operation will hash the data using the specified or default hash algorithm)
- Signing pre-hashed data (digested data) for cases where the client has already computed the hash
| Algorithm | Signature Key Type | FIPS mode | Description |
|---|---|---|---|
| RSASSA-PSS | RSA-2048, RSA-3072, RSA-4096 | Yes | RSA signatures using PKCS#1 PSS padding with approved hash functions (SHA-256, SHA-384, SHA-512). |
| ECDSA | P-256, P-384, P-521 | Restricted to curves P-256, P-384 and P-521. | See FIPS-186.5 and NIST.SP.800-186 - Section 3.1.2 table 2. |
| ECDSA | secp256k1 | No | ECDSA on the secp256k1 curve (RFC 6979 deterministic). Non-FIPS only. |
| EdDSA | Ed25519, Ed448 | Yes | See FIPS-186.5. |
| ML-DSA | ML-DSA-44, ML-DSA-65, ML-DSA-87 | No (non-FIPS only) | Lattice-based signatures. NIST FIPS 204. Supersedes CRYSTALS-Dilithium. |
| SLH-DSA | SLH-DSA-SHA2/SHAKE-128/192/256-s/f (12 variants) | No (non-FIPS only) | Hash-based signatures. NIST FIPS 205. Supersedes SPHINCS+. |
Digital Signature Operations
RSASSA-PSSperforms digital signatures using RSA keys with PSS padding and NIST-approved hash functions.ECDSAperforms digital signatures on elliptic curvesP-256,P-384,P-521(FIPS), andsecp256k1(non-FIPS only). Note:X25519andX448are Diffie-Hellman exchange curves and are not used for ECDSA signatures.EdDSAperforms digital signatures on Edwards curvesEd25519andEd448.
Key derivation (KMIP DeriveKey)
The KMS exposes the KMIP DeriveKey operation, which derives a new symmetric key or secret data
from an existing key material. Two methods are supported:
| Method | Hash algorithms | FIPS mode | Notes |
|---|---|---|---|
| PBKDF2 | SHA-{1,224,256,384,512} | Yes | Default: SHA-256, 600 000 iterations (OWASP). Salt is mandatory. |
| HKDF | SHA-{1,224,256,384,512} | Yes | Default: SHA-256. Salt is optional; info (context) is optional. |
Both derivation methods are implemented via OpenSSL.
Password-based key derivation
The randomness of cryptographic keys is essential for the security of cryptographic applications. Sometimes, passwords may be the only input required from the users who are eligible to access the data. Due to the low entropy and possibly poor randomness of those passwords, they are not suitable to be used directly as cryptographic keys. The KMS addresses this problem by providing methods to derive a password into a secure cryptographic key.
In normal mode, passwords are derived using Argon2 hash algorithm with a random 128-bit salt.
Argon2 has the property of being computationally intensive making it significantly harder to crack
by brute force only.
In FIPS mode, passwords are derived using FIPS compliant PBKDF2_HMAC with SHA512 and recommended
210,000 iterations
by OWASP
which follows FIPS recommendations as well. An additional random 128-bit salt is used.
Hash functions
The Eviden server supports the following hashing algorithms:
FIPS 180-4 (SHA-2 family):
- SHA-224
- SHA-256
- SHA-384
- SHA-512
NIST FIPS 202 (SHA-3 family):
- SHA3-224
- SHA3-256
- SHA3-384
- SHA3-512
References
-
NIST.FIPS.140-3, Implementation Guidance for FIPS 140-3 and the Cryptographic Module Validation Program, August 1, 2023
- General information and pointers to other NIST documents concerning the FIPS standard.
-
NIST.SP.800-186, Recommendations for Discrete Logarithm-based Cryptography: Elliptic Curve Domain Parameters, February 2023
- Recommended curves for specific usage (ECDH, ECDSA, EdDSA, ...) and associated security strength. Describes each curves parameters in details.
-
NIST.SP.800-38F, Recommendation for Block Cipher Modes of Operation: Methods for Key Wrapping, December 2012
- Description of symmetric key wrapping using AES-KW and AES-KWP. Approving RFC 5649.
-
NIST.FIPS.800-132, Recommendation for Password-Based Key Derivation, December 2010
- Description of low-entropy data derivation into secure master key.
-
NIST.SP.800-56Cr2, Recommendation for Key-Derivation Methods in Key-Establishment Schemes, August 2020
- Description of high-entropy data derivation into secure master key.
-
NIST.SP.800-131Ar2, Transitioning the Use of Cryptographic Algorithms and Key Lengths, March 2019
- Key length specification for different domain parameters, algorithms and cryptographic schemes.
-
NIST.SP.800-56Ar3, Recommendation for Pair-Wise Key-Establishment Schemes Using Discrete Logarithm Cryptography, April 2018
- General information on discrete logarithm parameters.
-
NIST.SP.800-56Br2, Recommendation for Pair-Wise Key Establishment Using Integer Factorization Cryptography, March 2019
- Information regarding RSA primitive specifications: key length, encryption, decryption and padding to use.
-
NIST.FIPS.180-4, Secure Hash Standard (SHS), August 2015
- Specification regarding SHA family of hash functions.
-
NIST.FIPS.202, SHA-3 Standard: Permutation-Based Hash and Extendable-Output Functions, August 2015
- Specification for SHA3.
-
NIST.FIPS.186-5, Digital Signature Standard (DSS), February 3, 2023
- Information on ECDSA, EdDSA and key generation.
-
NIST.FIPS.203, Module-Lattice-Based Key-Encapsulation Mechanism Standard, August 13, 2024
- Specification for ML-KEM (supersedes CRYSTALS-Kyber). Key encapsulation at security levels 1, 3, and 5.
-
NIST.FIPS.204, Module-Lattice-Based Digital Signature Standard, August 13, 2024
- Specification for ML-DSA (supersedes CRYSTALS-Dilithium). Lattice-based digital signatures at security levels 2, 3, and 5.
-
NIST.FIPS.205, Stateless Hash-Based Digital Signature Standard, August 13, 2024
- Specification for SLH-DSA (supersedes SPHINCS+). Hash-based digital signatures using SHA2 or SHAKE, 12 parameter sets.
-
NIST.FIPS.800-135r1, Recommendation for Existing Application-Specific Key Derivation Functions, December 2011
-
OpenSSL FIPS 140-2 Security Policy, 26 January 2023
- OpenSSL official documentation
Random Number Generation and PQC Entropy: Status and Limits
This page covers every random byte the server produces, then post-quantum (PQC) entropy specifically:
- What
KmsRngis and What usesKmsRng: the single random number generator behind keys, nonces/IVs, serials and secret tokens, for all algorithms. - From How PQC key generation uses
KmsRngonwards: how ML-KEM, ML-DSA, SLH-DSA and hybrid KEM key generation draw entropy, and what NIST Entropy Source Validation (ESV) would require.
This page describes how Eviden KMS sources randomness today. It does not claim that Eviden KMS holds
a NIST Entropy Source Validation (ESV) certificate, or that post-quantum (PQC) key generation meets
NIST SP 800-90B/C or FIPS 140-3 entropy requirements. While ML-KEM and ML-DSA now draw seeds from KmsRng,
KmsRng itself is backed by OpenSSL's operating-system-seeded DRBG without an ESV certificate. Furthermore,
SLH-DSA and hybrid KEM do not draw seeds from KmsRng (see How PQC key generation uses KmsRng and Why hybrid KEM cannot benefit from KmsRng PQC ESV properties).
Summary
| Question | Answer |
|---|---|
| Is there a single RNG abstraction in the server? | Yes for key material, nonces/IVs and secret tokens: KmsRng. KmsRng::new() is free (zero-sized), so the server shares one instance while the CLI, database layer and PKCS#11 module construct it locally. Documented exceptions (OpenSSL-internal keygen, the SCEP CMS content key/IV drawn inside OpenSSL, Covercrypt, uuid::Uuid::new_v4 identifiers, the oauth2 PKCE/CSRF helpers of cosmian_kms_client) are listed in Random generators outside KmsRng; a workspace clippy.toml bans every other entropy source |
What does KmsRng use underneath? | OpenSSL's DRBG hierarchy through RAND_priv_bytes_ex (values that stay secret) and RAND_bytes_ex (values that leave the server in clear), each requesting 256-bit security strength; no lock, no state of its own |
Do ML-KEM and ML-DSA key generation use KmsRng? | Yes. When rng is provided, 64-byte (ML-KEM) and 32-byte (ML-DSA) seeds are drawn from KmsRng and injected into OpenSSL |
Do SLH-DSA and hybrid KEM key generation use KmsRng? | No. SLH-DSA seed parameter is testing-only in OpenSSL; hybrid KEM composite keygen does not expose a seed parameter |
| Is the entropy source ESV-validated? | Not claimed. Entropy comes from the operating system through OpenSSL, and no ESV certificate is referenced |
| Is PQC key generation routed to a FIPS provider? | No. PQC algorithms are available in non-FIPS builds only |
| Can a customer-supplied OpenSSL build satisfy ESV/FIPS 140-3 for PQC today? | No. No CMVP-validated FIPS 140-3 module — OpenSSL's own or any third-party rebuild — currently includes ML-KEM, ML-DSA, or SLH-DSA |
| Can upgrading the vendored OpenSSL version alone close the gap? | No. FIPS/ESV certification is bound to one exact validated build via a CMVP certificate number; newer source code is never itself validated |
| Does a future FIPS-140-3-validated OpenSSL version automatically mean its entropy source is ESV-certified? | No. FIPS 140-3 module validation and Entropy Source Validation (ESV) are independent CMVP programs; OpenSSL's FIPS provider places the entropy source outside its module boundary regardless of version |
| What is the governing NIST standard for KEM (ML-KEM / hybrid-KEM) entropy specifically? | NIST SP 800-227 (Sept 2025): RS4 requires SP 800-90A/B/C-approved random bits; RS2 requires following FIPS 140-3 guidance. Neither is met — see What SP 800-227 requires that is not implemented in source code |
Background
NIST's most specific and current entropy-compliance reference for PQC key establishment is NIST SP 800-227, Recommendations for Key-Encapsulation Mechanisms (September 2025), which applies to ML-KEM and any KEM, including the hybrid KEMs used here. Its Section 1.3 lists five CMVP-testable shall requirements (RS1–RS5); three bear directly on entropy and FIPS compliance:
- RS2 (§3.1): "KEM implementations shall follow the guidelines given in FIPS 140-3 and associated implementation guidance."
- RS4 (§3.1): "Random bits shall be generated using approved techniques, as described in the latest revisions of SP 800-90A, SP 800-90B, and SP 800-90C."
- RS5 (§3.2): "Except for random seeds and data that can be easily computed from public information, all intermediate values used in any given KEM algorithm (i.e., KeyGen, Encaps, and Decaps) shall be destroyed before the algorithm terminates."
SP 800-227 does not cover ML-DSA or SLH-DSA — those are digital signature schemes (FIPS 204, FIPS 205), not KEMs; their key-generation entropy remains governed by the general SP 800-133r2 and FIPS 140-3 IG D.H–D.K guidance listed below. CMVP's companion testing guidance for KEMs is FIPS 140-3 Implementation Guidance Annex D.S, "Key Encapsulation Mechanisms" (see References). See What SP 800-227 requires that is not implemented in source code for the concrete gap analysis.
The broader standards landscape:
| Standard | Scope |
|---|---|
| NIST SP 800-227 | Recommendations for Key-Encapsulation Mechanisms — ML-KEM and hybrid-KEM entropy/FIPS requirements |
| NIST SP 800-90A | Deterministic random bit generators (DRBG) |
| NIST SP 800-90B | Entropy source testing and validation |
| NIST SP 800-90C | RBG constructions |
| NIST SP 800-133r2 | Cryptographic key generation (§4: keys come from an approved RBG instantiated at a sufficient security strength) |
| FIPS 140-3 Implementation Guidance | Entropy source requirements for modules (Annex D.S covers KEMs specifically) |
The algorithms concerned are ML-KEM (FIPS 203), ML-DSA (FIPS 204), SLH-DSA (FIPS 205) and the hybrid KEMs X25519-ML-KEM-768 and X448-ML-KEM-1024.
What KmsRng is
KmsRng (crate/crypto/src/crypto/rng/mod.rs) is a zero-sized, stateless, thread-safe wrapper around
OpenSSL's DRBG hierarchy (AES-256 CTR-DRBG). The server shares one Arc<KmsRng> (KMS.rng); other
crates construct KmsRng::new() locally at no cost.
| Method | OpenSSL call | DRBG | Use for | Notes |
|---|---|---|---|---|
fill_bytes, random_vec | RAND_priv_bytes_ex(…, 256) | Private | Values that stay secret: keys, seeds, KEKs, split-key shares, tokens | random_vec returns a Zeroizing<Vec<u8>> |
fill_public_bytes | RAND_bytes_ex(…, 256) | Public | Values that leave the server in clear: nonces, IVs, certificate serials, KMIP RNGRetrieve, PKCS#11 C_GenerateRandom | Private-DRBG output is never observable. OpenSSL keeps the two instances apart so that a compromise of the public one does not affect the secrecy of private values (RAND_bytes(3)); defence in depth, since CTR-DRBG output does not reveal its state |
seeded_csrng | RAND_priv_bytes_ex(…, 256) for a 32-byte seed | Private (seed only) | Third-party APIs that need an infallible rand_core RNG: OpenPGP (pgp crate), ECIES SalsaSealBox, test fixtures | ChaCha12 stream bounded by the 256-bit seed. Its state equals the seed, so it is overwritten when dropped |
reseed | RAND_add(seed, len, 0.0) | Primary | KMIP RNGSeed | Additional input of an immediate reseed from the operating system (crypto/rand/rand_meth.c); per SP 800-90A r1 §8.7.2 it cannot lower the DRBG's security strength and is credited with zero bits of entropy. RAND_add returns void: a failed reseed is not reported to the caller, but a DRBG whose entropy source fails refuses later generate calls. Cost about 0.6 µs, plus about 3 µs on the next generate call (FIPS build, Apple M-series), so RNGSeed has no rate limit of its own |
flowchart LR
OS["Operating system<br/>entropy source"] --> P
subgraph OpenSSL["OpenSSL DRBG hierarchy (AES-256 CTR-DRBG)"]
P["Primary DRBG"] --> PRIV["Private DRBG<br/>(per thread)"]
P --> PUB["Public DRBG<br/>(per thread)"]
end
PRIV -- "256-bit request" --> FB["fill_bytes / random_vec<br/>keys, seeds, KEKs, tokens"]
PRIV -- "32-byte seed" --> CS["seeded_csrng<br/>ChaCha12, wiped on drop"]
CS --> TP["OpenPGP<br/>ECIES SalsaSealBox"]
PUB -- "256-bit request" --> FP["fill_public_bytes<br/>nonces, IVs, serials,<br/>RNGRetrieve, C_GenerateRandom"]
RS["reseed<br/>KMIP RNGSeed"] -- "additional input" --> P
Every generate call requests 256 bits of security strength (SP 800-133r2 §4; SP 800-90A r1 §9.3.1 makes the DRBG return an error if it cannot provide it), so a weaker DRBG fails closed instead of silently serving lower-strength bits.
Which provider serves the DRBG
KmsRng claims nothing about FIPS unless the DRBG is actually served by the FIPS provider. A FIPS-mode
build's generated openssl.cnf previously activated the default provider next to fips
([default_sect] activate = 1), and the DRBG behind RAND_bytes was then the default provider's, not the
validated module's. crate/crypto/build.rs no longer activates it, and the integration test
crate/crypto/tests/fips_rng_provider.rs asserts that the primary, public and private DRBGs report provider
fips with strength ≥ 256. The Nix build's openssl.cnf (nix/openssl.nix) configures only fips and base; this
was not re-verified at run time here.
Random generators outside KmsRng
KmsRng is the sole production path for key material, nonces/IVs and secret tokens, except for the
documented exceptions below. Third-party APIs that
demand an infallible rand_core generator (OpenPGP through the pgp crate, ECIES SalsaSealBox through
cosmian_crypto_core) are fed by a ChaCha12 stream seeded with 256 bits drawn from KmsRng
(KmsRng::seeded_csrng); the workspace clippy.toml bans every other entropy source that workspace code can
call directly (OpenSSL rand_bytes, BigNum random generation, rand::rng, thread_rng, OsRng, getrandom,
from_entropy, ...) without any inline exception, test fixtures included. Clippy cannot see the draws a
dependency makes internally; those are the exceptions below.
Documented exceptions:
- RSA / EC / EdDSA key generation, SLH-DSA and hybrid KEM composite keygen: OpenSSL generates these
atomically from its own default DRBG (the same hierarchy
KmsRngcalls into, served by the FIPS provider in FIPS builds; asserted bycrate/crypto/tests/fips_rng_provider.rs). - Covercrypt:
Covercrypt::setup()incosmian_cover_crypt16.0.0 locks an internalrngfield and has no constructor parameter or setter that accepts an external RNG (verified in the vendored source,src/abe/api.rs). It is the same category as hybrid-KEM composite keygen. - SCEP CMS envelope content key and IV:
CmsContentInfo::encrypt(crypto/src/openssl/scep_cms.rs) lets OpenSSL draw the AES content-encryption key (RAND_priv_bytes_ex) and IV (RAND_bytes_ex) itself, from the same DRBG hierarchy but at requested strength 0, so it does not fail closed on a DRBG weaker than 256 bits.CMS_encryptexposes no way to supply the key or IV. uuid::Uuid::new_v4identifiers (object unique identifiers, enrollment request IDs):uuiddraws from the operating system throughgetrandom, bypassing OpenSSL. They are identifiers, not secrets.oauth2PKCE verifier and CSRF state incosmian_kms_client, which does not depend oncosmian_kms_crypto.- PKCS#11
C_GenerateRandomon the server (KMIPPKCS11operation passthrough) is not implemented and returnsCKR_FUNCTION_NOT_SUPPORTED: it fails closed.
What uses KmsRng
| Consumer | Location |
|---|---|
| Symmetric key generation | core/kms/other_kms_methods.rs |
SecretData seed generation | core/kms/other_kms_methods.rs |
Symmetric nonces/IVs and keys (random_nonce, random_key) | crypto/symmetric/symmetric_ciphers.rs; core/operations/encrypt.rs; CLI actions/symmetric/ |
Key wrapping (AES-GCM nonce, CKM_RSA_AES_KEY_WRAP KEK, ECIES) | crypto/wrap/wrap_key.rs, crypto/rsa/ckm_rsa_aes_key_wrap.rs, crypto/elliptic_curves/ecies/ |
| Certificate serial numbers | core/operations/certify/build_certificate.rs |
| Split keys | core/operations/create_split_key.rs, crypto/split_key/mod.rs |
OpenPGP key generation, encryption, signing (seed of the pgp PRG) | crypto/openpgp/mod.rs |
| JOSE CEK/IV; AWS XKS IV | routes/jose/, routes/aws_xks/encrypt_decrypt/encrypt_.rs |
| UI login PKCE verifier, CSRF token, nonce; ephemeral session cookie key | routes/ui_auth.rs, start_kms_server.rs |
| Redis object nonces; ceremony-record nonces | server_database/src/stores/redis/objects_db.rs, server_database/src/ceremony_keys.rs |
PKCS#11 C_GenerateRandom, provider-generated symmetric key bytes | clients/pkcs11/module (Backend::generate_random), clients/pkcs11/provider |
KMIP RNGRetrieve | core/operations/rng_retrieve.rs |
KMIP RNGSeed | core/operations/rng_seed.rs (calls reseed) |
| HSM-session AES-GCM nonces and AES-CBC IVs | hsm/base_hsm/src/session/session_impl.rs |
How PQC key generation uses KmsRng
PQC key generation functions accept an optional &KmsRng (create_ml_kem_key_pair, create_ml_dsa_key_pair,
create_slh_dsa_key_pair, create_hybrid_kem_key_pair), and the server passes kms.rng from CreateKeyPair,
key-pair rekeying, and certificate generation:
- ML-KEM (FIPS 203): When
rngis provided, a 64-byte seed ($d, z$) is drawn viagenerate_pqc_seed(rng, 64)and injected into OpenSSL'sEVP_PKEY_CTXvia the"seed"parameter (OSSL_PKEY_PARAM_ML_KEM_SEED). OpenSSL generates the key pair deterministically from this seed per FIPS 203 §7.1. - ML-DSA (FIPS 204): When
rngis provided, a 32-byte seed ($\xi$) is drawn viagenerate_pqc_seed(rng, 32)and injected into OpenSSL'sEVP_PKEY_CTXvia the"seed"parameter (OSSL_PKEY_PARAM_ML_DSA_SEED). OpenSSL generates the key pair deterministically from this seed per FIPS 204 §6.1. - SLH-DSA (FIPS 205): OpenSSL's SLH-DSA implementation supports a
"seed"parameter, but its man pageEVP_PKEY-SLH-DSA(7)explicitly states that this parameter is strictly for testing and CAVP/KAT validation. Consequently, production SLH-DSA keys are generated unseeded viaEVP_PKEY_Q_keygen, drawing directly from OpenSSL's DRBG. - Hybrid KEM: Neither X25519-ML-KEM-768 nor X448-ML-KEM-1024 accepts a seed parameter (see details below).
flowchart TD
A["Symmetric keys, serials,<br/>split keys, RNGRetrieve"]
B["KmsRng<br/>RAND_priv_bytes_ex / RAND_bytes_ex"]
C["PQC key generation<br/>ML-KEM, ML-DSA"]
D["PQC key generation<br/>SLH-DSA, Hybrid KEM"]
E["OpenSSL EVP_PKEY_CTX<br/>set_params seed"]
F["OpenSSL EVP_PKEY_Q_keygen<br/>unseeded"]
G["OpenSSL default DRBG<br/>seeded from the OS"]
A --> B
B --> G
C -- "with KmsRng" --> B
B -- "64B or 32B seed" --> E
E --> G
D --> F
F --> G
Why hybrid KEM cannot benefit from KmsRng PQC ESV properties
OpenSSL 3.6.2 implements hybrid KEMs (X25519MLKEM768 and X448MLKEM1024) via composite key management in
providers/implementations/keymgmt/mlx_kmgmt.c.
A hybrid KEM key consists of two sub-keys:
- A classical curve key (X25519 or X448).
- An ML-KEM key (ML-KEM-768 or ML-KEM-1024).
In mlx_kmgmt.c, the parameter list for key generation (mlx_gen_set_params_list) only accepts property queries:
static const OSSL_PARAM mlx_gen_set_params_list[] = {
OSSL_PARAM_utf8_string(OSSL_PKEY_PARAM_PROPERTIES, NULL, 0),
OSSL_PARAM_END
};
Unlike pure ML-KEM (ml_kem_kmgmt.c) and pure ML-DSA (ml_dsa_kmgmt.c), mlx_kmgmt.c has no "seed" parameter decoder or implementation.
During hybrid key generation (mlx_kem_gen), OpenSSL creates both the classical and post-quantum component keys atomically in one operation,
drawing entropy entirely from its internal default DRBG.
Because OpenSSL exposes no API to inject an external seed into composite key generation:
- Hybrid KEMs cannot draw seed entropy from
KmsRng. - Even if
KmsRngwere backed by an ESV-validated entropy source, hybrid KEM keys generated by OpenSSL 3.6 would not inherit those ESV properties. - Hybrid KEM key generation must rely strictly on OpenSSL's internal DRBG.
generate_pqc_seed (pqc/mod.rs) returns rng.random_vec(len) in a Zeroizing buffer, and is now directly called by pqc_keygen when generating ML-KEM and ML-DSA keys with a provided KmsRng.
What is not claimed
- An ESV certificate, or an SP 800-90B entropy assessment, for the entropy source.
- That
KmsRngconfers FIPS 140-3 validation or independent entropy guarantees beyond the underlying OS DRBG. - Conformance to FIPS 140-3 IG 9.3.A, D.J, D.K or D.O, or any other CMVP requirement.
- That SLH-DSA or hybrid KEM keys are seeded via
KmsRng.
Tests
The behaviour that exists today is covered by unit tests. They check that output is non-zero, that consecutive outputs differ, and that zeroizing buffers work. They do not demonstrate entropy quality.
cargo test -p cosmian_kms_crypto --lib --features non-fips rng
cargo test -p cosmian_kms_crypto --lib --features non-fips pqc
Work completed and remaining requirements
Completed in Eviden KMS
- Seed injection for ML-KEM and ML-DSA:
pqc_keygen_seededdraws 64 bytes (ML-KEM) or 32 bytes (ML-DSA) fromKmsRngand passes it viaOSSL_PARAMtoEVP_PKEY_generate. - Safe OpenSSL Migration (Issue #894): Replaced raw BIO serialization (
evp_pkey_to_pkcs8_der,evp_pkey_to_spki_der) and raw buffer extraction with safe nativeopenssl::pkey::PKeymethods.
Remaining to reach ESV / CMVP validation
- Entropy Source Validation (ESV): a NIST ESV certificate for the actual noise source on each deployment platform. This is always a separate, platform-specific submission — it is never satisfied by an OpenSSL version or build, because the OpenSSL FIPS provider's own Security Policy places the entropy source "outside the Module boundary" (see Path to NIST ESV / FIPS 140-3 entropy compliance below).
- A CMVP-validated, PQC-inclusive FIPS provider: as of this writing, no OpenSSL FIPS provider release has a published CMVP certificate that includes ML-KEM, ML-DSA, or SLH-DSA. The newest validated OpenSSL FIPS provider (NIST CMVP Certificate #4985) is version 3.1.2, which predates OpenSSL's PQC support (OpenSSL 3.5+).
- Callers that actually request a FIPS provider for PQC, once one exists: the PQC keygen functions accept
an optional property query such as
fips=yes(and check thefips-indicator), but every production caller passesNone, andpqc(crate/crypto/src/crypto/mod.rs) is gated entirely behind thenon-fipsCargo feature and compiles out of FIPS-mode builds. Both would need to change before any validated FIPS provider — OpenSSL's own or a customer's — could be consulted for PQC key generation. Not scheduled; no validated provider to target yet. - Upstream Hybrid KEM Seeding: contributing or awaiting OpenSSL support for composite keygen seeding if hybrid KEMs are ever to use external entropy sources.
Path to NIST ESV / FIPS 140-3 Entropy Compliance for PQC
The governing standard for KEM entropy: NIST SP 800-227
NIST SP 800-227, Recommendations for Key-Encapsulation Mechanisms (final, September 2025; PDF: https://nvlpubs.nist.gov/nistpubs/SpecialPublications/NIST.SP.800-227.pdf) is the NIST publication written specifically to fill the compliance gap FIPS 203 itself flagged at publication: "NIST will specify both the particulars of the ML-KEM scheme and the general properties of KEMs in FIPS 203 and SP 800-227, respectively" (FIPS 203 Initial Public Draft). It is the authoritative, current reference for "PQC entropy compliance" as it applies to key establishment (ML-KEM and PQ/T hybrid KEMs).
Section 1.3 lists its full set of CMVP-testable requirements, verbatim:
- RS1 (§3.1): "KEM implementations shall comply with a specific NIST FIPS or SP that specifies the algorithms of the relevant KEM. For example, a conforming implementation of ML-KEM shall comply with FIPS 203."
- RS2 (§3.1): "KEM implementations shall follow the guidelines given in FIPS 140-3 and associated implementation guidance."
- RS3 (§3.1): "KEM implementations shall use approved components with security strengths that meet or exceed the required strength for each KEM parameter set."
- RS4 (§3.1): "Random bits shall be generated using approved techniques, as described in the latest revisions of SP 800-90A, SP 800-90B, and SP 800-90C."
- RS5 (§3.2): "Except for random seeds and data that can be easily computed from public information, all intermediate values used in any given KEM algorithm (i.e., KeyGen, Encaps, and Decaps) shall be destroyed before the algorithm terminates."
Scope: SP 800-227 covers KEMs only — ML-KEM and PQ/T hybrid KEMs (its §4.6, "Multi-Algorithm KEMs and PQ/T Hybrids," covers exactly the X25519-ML-KEM-768 / X448-ML-KEM-1024 construction used in this codebase). It does not cover ML-DSA or SLH-DSA, which are digital signature schemes, not KEMs.
CMVP's companion testing guidance is FIPS 140-3 Implementation Guidance Annex D, section D.S, "Key Encapsulation Mechanisms" (current IG, page 223 of https://csrc.nist.gov/CSRC/media/Projects/cryptographic-module-validation-program/documents/fips%20140-3/FIPS%20140-3%20IG.pdf), positioned in the same Annex D family as IG D.J "Entropy Estimation and Compliance with SP 800-90B" and IG D.K "Interpretation of SP 800-90B Requirements" (both already referenced above under What is not claimed). D.S is CMVP's KEM-specific testing annex; its detailed resolution text is not reproduced here.
What SP 800-227 requires that is not implemented in source code
Mapping each entropy/FIPS-relevant requirement to Eviden KMS's current code:
- RS2 — not met.
pqc(crate/crypto/src/crypto/mod.rslines 25-26) is gated entirely behind#[cfg(feature = "non-fips")]and is absent from every FIPS-mode build. RS2 cannot be attempted in Eviden's default build configuration because the PQC code does not exist in that build at all. - RS4 — not met, two independent gaps:
KmsRng(crate/crypto/src/crypto/rng/mod.rs) draws from OpenSSL'sRAND_byteswith no SP 800-90B ESV-validated entropy source backing it (its own doc comment states this explicitly).- Library support exists; deliberately not wired to callers.
pqc_keygen_seeded,pqc_keygenandpqc_keygen_raw(crate/crypto/src/crypto/pqc/mod.rs) accept an optional OpenSSL property query (e.g."fips=yes") and seeded keygen checks thefips-indicator, failing closed. Every production caller passesNone, so the default provider is always selected. This is intentional, not an oversight: the only CMVP-validated OpenSSL FIPS provider (3.1.2, Certificate #4985) contains no ML-KEM, ML-DSA or SLH-DSA, so passing"fips=yes"today would make every PQC key generation fail. The caller change is blocked on a validated PQC-capable FIPS provider existing, not on engineering work in this repository.
- RS5 — already met for Eviden's own code; not applicable beyond it.
generate_pqc_seed(crate/crypto/src/crypto/pqc/mod.rs) returns aZeroizing<Vec<u8>>, so the seed Eviden generates and hands to OpenSSL is destroyed on drop. The additional intermediate values RS5 covers (matrixA, NTT state, polynomial coefficients computed inside ML-KEMKeyGen/Encaps/Decaps) are produced and destroyed entirely inside OpenSSL's own implementation, outside Eviden's code; their RS5 compliance is a property of OpenSSL's own eventual CMVP submission, not something this codebase can satisfy or violate. - RS1, RS3 — already met as a byproduct of using OpenSSL's unmodified FIPS-203/204-conformant implementations with standard parameter sets; no code gap.
What should change in source code, concretely:
- Done in the library; not wired to callers.
pqc_keygen_seeded,pqc_keygenandpqc_keygen_raw(crate/crypto/src/crypto/pqc/mod.rs) now take an optional OpenSSL property query (for example"fips=yes"), and seeded keygen verifies the provider'sfips-indicator, failing closed. This closes gap RS4-2 at library level. What remains is a server-side configuration or caller that supplies a non-null query. It does not by itself achieve RS4 compliance (the entropy-source half, RS4-1, remains unmet — see item 3), and it has no effect until a qualifying provider exists (none does, per the existing "Can upgrading the vendored OpenSSL version alone close the gap?" section of this page). - Remove the
#[cfg(feature = "non-fips")]gate onpub mod pqc;(crate/crypto/src/crypto/mod.rslines 25-26) so PQC key generation compiles in FIPS-mode builds — a prerequisite for item 1 to ever take effect, and for RS2 to be attempted at all, in a FIPS-mode build. This is already tracked as item 3 of the page's existing "Remaining to reach ESV / CMVP validation" list; this plan does not duplicate that list, only cross-references it. - No source-code change can close RS4-1. An SP 800-90B-compliant entropy source is a CMVP-lab-tested property of specific deployment hardware/OS, obtained via the ESV submission process described in What an ESV certificate requires below — not a code change. State this explicitly rather than implying it is an engineering backlog item.
- No source-code change can close hybrid-KEM RS4 compliance. OpenSSL 3.6's
mlx_kmgmt.cexposes no seed-parameter decoder for composite keygen (documented in the existing Why hybrid KEM cannot benefit from KmsRng PQC ESV properties section of this page); this requires upstream OpenSSL work, already tracked as item 4 of "Remaining to reach ESV / CMVP validation."
What an ESV certificate requires
An Entropy Source Validation (ESV) certificate (NIST SP 800-90B) is issued by CMVP after an NVLAP-accredited Cryptographic and Security Testing Laboratory (CSTL) assesses the actual noise source — not the DRBG, and not OpenSSL — that feeds the FIPS module's random bit generator. Concretely, this requires:
- An entropy source description and a raw-noise-sample dataset (per SP 800-90B §3.1.3) submitted to a CSTL,
which runs the SP 800-90B min-entropy estimation suite (
ea_iid/ea_non_iid) and health tests. - CMVP issuance of an ESV certificate number for that specific noise source and conditioning component, on the specific hardware/OS platform tested.
- A FIPS 140-3 module Security Policy that references the ESV certificate number in its "Entropy Sources" table, establishing the chain from noise source to DRBG seed to Approved algorithm output.
Crucially, the OpenSSL FIPS Provider's own Security Policy places the entropy source outside the module
boundary: "The Module relies on the use of a [SP 800-90B] compliant entropy source outside the Module
boundary. The calling application is responsible for use of an [SP 800-90B] compliant entropy source..."
(OpenSSL FIPS Provider 3.1.2, FIPS 140-3 Non-Proprietary Security Policy, NIST CMVP Certificate #4985, §2.8
"RBG and Entropy"). No OpenSSL version — vendored by Eviden, upgraded, or customer-supplied — carries an ESV
certificate of its own; the entropy source is always a separate, platform-specific validation tied to the
actual OS/hardware RNG that RAND_bytes draws from on the deployed machine.
Can a customer's own OpenSSL build close the gap?
Only under conditions none of which are met today, and only partially:
- Mechanically,
crate/crypto/build.rsalready supports substituting a pre-built OpenSSL: if theOPENSSL_DIRenvironment variable points at a directory containingssl/openssl.cnfandlib/ossl-modules, the build script skips compiling its own OpenSSL and links against that directory instead (crate/crypto/build.rslines 61-72). A customer could point this at their own OpenSSL installation. - However, swapping the OpenSSL build alone does not confer FIPS/ESV compliance unless all of the following
additionally hold, none of which exist today:
- The customer's OpenSSL build must itself be an exact, unmodified copy of a CMVP-validated FIPS 140-3 module (matching the "Tested Module Identification" in a published Security Policy by name, version, and integrity-test digest). As of this research, the newest CMVP-validated "OpenSSL FIPS Provider" module is version 3.1.2 (NIST CMVP Certificate #4985, Security Policy dated July 2025), which predates PQC support — OpenSSL's ML-KEM/ML-DSA/SLH-DSA implementations landed in OpenSSL 3.5, after this validated module's source baseline. No published CMVP certificate for any OpenSSL FIPS provider version ≥3.5 exists as of this research.
- That validated module's own Security Policy must itself reference an ESV certificate for the entropy source on the customer's specific deployment hardware/OS (per the previous section, OpenSSL's own policy explicitly does not — this would have to be the customer's own, separate CMVP submission binding their specific hardware RNG).
- Eviden KMS's code must actually request the FIPS provider for PQC operations. The PQC keygen functions
(
crate/crypto/src/crypto/pqc/mod.rs) now accept an optional OpenSSL property query (for examplefips=yes) and, for seeded ML-KEM/ML-DSA keygen, verify thefips-indicatorresult, failing closed. But every production caller passesNone, andpqcis gated entirely behind#[cfg(feature = "non-fips")](crate/crypto/src/crypto/mod.rs) so it compiles out of FIPS-mode builds. A validated customer OpenSSL build would therefore still not be consulted for PQC key generation without a caller and a build change.
- Vendors do take the OpenSSL FIPS provider source, patch/rebuild it, and submit it for their own CMVP
certificate under their own name (e.g., "Philips FIPS Provider based on the OpenSSL FIPS Provider",
CMVP Certificate #5224; a Progress Software "LoadMaster FIPS Object Module based on the OpenSSL FIPS
Provider" certificate) — this is an explicitly supported path per OpenSSL's own
README-FIPS.md("3rd-Party Vendor Builds"). A customer or Eviden could pursue the same path for a PQC-inclusive FIPS provider, but this is a multi-month CMVP submission process, not something achieved by merely "bringing a build." - Separately, at least one third party (wolfSSL's
wolfProvider) already holds FIPS 140-3 validated ML-KEM (FIPS 203) and ML-DSA (FIPS 204) implementations (wolfCrypt), usable as a drop-in OpenSSL provider. Using that provider instead of OpenSSL's own PQC implementation is a materially different integration (a new provider dependency, not an OpenSSL version/build swap) and is out of scope for this analysis.
Conclusion: a customer's own OpenSSL build cannot close the gap today. It could in principle, in
combination with (a) a CMVP-validated, PQC-inclusive FIPS provider build, (b) an ESV certificate for that
customer's specific entropy source, and (c) Eviden KMS callers that actually pass a fips=yes property query
(the library-level support exists, but no server code path or configuration supplies it yet) — (a) and (b)
do not exist today, and (c) is only partially in place.
Can upgrading the vendored OpenSSL version alone close the gap?
No. Per OpenSSL's own README-FIPS.md: "A cryptographic module is only FIPS validated after it has gone
through the complex FIPS 140 validation process... it is not possible to validate every minor release of
OpenSSL, ... If you need a FIPS validated module then you must ONLY generate a FIPS provider using OpenSSL
versions that have valid FIPS certificates." The same document explicitly warns, using OpenSSL 3.6.0 as the
example: "Note that the OpenSSL 3.6.0 FIPS provider has not been validated so it must not be used for FIPS
purposes." FIPS/ESV certification is bound to one specific, tested binary via a CMVP certificate number
published in a Security Policy — never to "the latest source code." Bumping OPENSSL_MAIN_VERSION /
OPENSSL_MAIN_TARBALL / OPENSSL_MAIN_SHA256 in crate/crypto/build.rs (lines 15-19) to a newer OpenSSL
release (even one whose source includes FIPS-indicator-tagged ML-KEM/ML-DSA/SLH-DSA, as OpenSSL 3.5+ does per
docs.openssl.org/3.5/man7/OSSL_PROVIDER-FIPS) does not grant FIPS validation or an ESV certificate; it only
makes the option of building a FIPS provider with that source available once that specific version is
independently validated by CMVP, which has not happened for any OpenSSL release ≥3.5 as of this research.
Does FIPS validation of an OpenSSL version imply ESV-certified entropy?
No — this is a common but incorrect inference, and this page corrects it explicitly: FIPS 140-3 module validation and Entropy Source Validation (ESV) are two independent CMVP programs with separate certificate numbers. A future OpenSSL FIPS provider release (version >3.5, potentially including ML-KEM/ML-DSA/SLH-DSA) obtaining a FIPS 140-3 certificate would say nothing on its own about its entropy source's ESV status, because:
- Every OpenSSL FIPS Provider Security Policy examined (the only one currently validated, NIST CMVP Certificate #4985, version 3.1.2) places the entropy source outside the module's cryptographic boundary: "The Module relies on the use of a [SP800-90B] compliant entropy source outside the Module boundary. The calling application is responsible for use of an [SP800-90B] compliant entropy source..." (§2.8). This is an architectural property of how the OpenSSL FIPS provider is designed (entropy supplied via callback from the calling application), not something that changes when new algorithms (PQC or otherwise) are added to the Approved Algorithms table. A future validated 3.5+ release would be expected to follow the same pattern unless OpenSSL explicitly changes the provider's entropy architecture.
- The default entropy source OpenSSL's FIPS provider is built against is
os(the operating system RNG) perREADME-FIPS.md, which is not itself ESV-certified by that validation. The only documented path to an ESV-referenced entropy claim is theenable-fips-jitterbuild option (OpenSSL ≥3.5), and even then only "unless an entropy assessment [ESV] and validation through the [CMVP] are additionally conducted" — i.e., a separate ESV submission specific to that jitter-entropy build, independent of the main FIPS 140-3 module validation. As of this research, no OpenSSL release — at any version — has a published Security Policy that references an ESV certificate.
Corrected assertion: a future OpenSSL version (>3.5) becoming FIPS 140-3 validated would only establish that its Approved Algorithms (potentially including ML-KEM/ML-DSA/SLH-DSA) are CMVP-certified. It would not, by itself, establish an ESV-certified entropy source. Eviden KMS could only claim ESV-certified entropy for a given OpenSSL build if that build's own published FIPS 140-3 Security Policy explicitly names an ESV certificate number in its RBG/Entropy section — a fact that must be checked per-release, never assumed from the FIPS validation status or the version number alone.
Default build: FIPS provider pinned to the validated OpenSSL 3.1.2
Independent of PQC, Eviden's default "FIPS mode" build (the non-fips Cargo feature absent) must load a FIPS
provider built from a version holding a CMVP certificate. The only two CMVP-validated OpenSSL FIPS Provider
certificates found are Certificate #4985 (version 3.1.2, Active, FIPS 140-3) and Certificate #4282 (versions
3.0.8/3.0.9, Historical, FIPS 140-2). Neither covers OpenSSL 3.6.2, and OpenSSL's own README-FIPS.md
states that a FIPS provider must ONLY be generated from a version holding a valid FIPS certificate.
crate/crypto/build.rs therefore builds two separate OpenSSL trees in FIPS mode:
- the main library, OpenSSL 3.6.2, configured without
enable-fips, which is what Eviden links against; - the FIPS provider, built from the validated OpenSSL 3.1.2 source (
OPENSSL_FIPS_*constants, SHA-256 pinned), whosefips.{so,dylib},openssl.cnfandfipsmodule.cnfare copied into the main prefix and loaded at runtime.
This matches the Nix build (nix/common.nix: "Always link against OpenSSL 3.6.2; the FIPS provider (3.1.2) is
loaded at runtime"). Building from the validated source is necessary but not sufficient for a validated
claim: the module must also be built and operated as the Security Policy describes (operating environment,
unmodified source, integrity check), which this page does not assert.
See also
References
- FIPS 203: Module-Lattice-Based Key-Encapsulation Mechanism Standard
- FIPS 204: Module-Lattice-Based Digital Signature Standard
- FIPS 205: Stateless Hash-Based Digital Signature Standard
- NIST SP 800-90A, SP 800-90B, SP 800-90C: Random bit generation
- NIST SP 800-133r2: Recommendation for Cryptographic Key Generation
- OpenSSL
README-FIPS.md: https://github.com/openssl/openssl/blob/master/README-FIPS.md - NIST CMVP Certificate #4985 — OpenSSL FIPS Provider 3.1.2, FIPS 140-3 Non-Proprietary Security Policy (July 2025): https://csrc.nist.gov/CSRC/media/projects/cryptographic-module-validation-program/documents/security-policies/140sp4985.pdf
OSSL_PROVIDER-FIPS(OpenSSL 3.5 manual page): https://docs.openssl.org/3.5/man7/OSSL_PROVIDER-FIPS- NIST SP 800-227, Recommendations for Key-Encapsulation Mechanisms (September 2025): https://csrc.nist.gov/pubs/sp/800/227/final
KMIP algorithm policy (server-side)
The cosmian_kms_server crate can enforce a KMIP algorithm policy at request entry points (and on retrieved keys).
The policy selector is kmip.policy_id.
You can also set it via:
- CLI:
--kmip-policy-id(case-insensitive) - Env var:
KMS_POLICY_ID
Accepted values (case-insensitive):
DEFAULT: enforce the built-in conservative allowlists.CUSTOM: enforce the allowlists you provide under[kmip.allowlists](use with caution).
Enabling the default policy
If kmip.policy_id is unset, the KMIP policy layer is disabled.
To explicitly select the built-in default policy, set kmip.policy_id = "DEFAULT" in kms.toml (or pass it on the command line):
[kmip]
policy_id = "DEFAULT"
CLI:
cosmian_kms --kmip-policy-id DEFAULT
Env var:
export KMS_POLICY_ID=DEFAULT
Policies to use with caution
CUSTOM: enforces the allowlists under[kmip.allowlists]. Misconfiguration can unintentionally allow weak choices or, conversely, deny most operations (e.g., if you set an empty list[]).
Notes:
- When
kmip.policy_id = "DEFAULT", any[kmip.allowlists]values in the configuration file are ignored (the server uses the built-in defaults). - When
kmip.policy_id = "CUSTOM"and an allowlist key is omitted, that parameter is not restricted by an allowlist.
What the DEFAULT policy enforces
The DEFAULT policy is a conservative (ANSSI/NIST/FIPS-aligned) allowlist.
It constrains KMIP requests by validating their declared cryptographic parameters and, when applicable, the characteristics of the referenced keys.
In particular, it allowlists:
- Cryptographic algorithms (all builds):
AES,RSA,ECDSA,ECDH,EC,HMACSHA256,HMACSHA384,HMACSHA512 - Cryptographic algorithms (non-FIPS builds only):
ChaCha20Poly1305,Ed25519,SHAKE128,SHAKE256,ConfigurableKEM,MLKEM_512,MLKEM_768,MLKEM_1024 - Hash functions:
SHA256,SHA384,SHA512,SHA3256,SHA3384,SHA3512 - Signature algorithms:
SHA256WithRSAEncryption,SHA384WithRSAEncryption,SHA512WithRSAEncryption,RSASSAPSS,ECDSAWithSHA256,ECDSAWithSHA384,ECDSAWithSHA512 - Curves:
P256,P384,P521,CURVE25519,CURVE448 - Block cipher modes:
GCM,CCM,XTS,NISTKeyWrap,AESKeyWrapPadding,GCMSIV - Padding methods:
OAEP,PSS,PKCS5 - MGF hashes:
SHA256,SHA384,SHA512 - Mask generators:
MGF1
It also enforces key-size constraints:
- RSA key sizes:
3072,4096(in addition to baseline structural constraints) - AES key sizes:
128,192,256
Baseline constraints (independent from the allowlists):
- RSA keys smaller than 2048 bits are always rejected when the policy layer is enabled.
Custom allowlists (CUSTOM)
When kmip.policy_id = "CUSTOM", the policy layer uses the allowlists under [kmip.allowlists].
All allowlists follow these semantics:
- omitted key: no allowlist restriction for that parameter
- empty list
[]: deny everything for that parameter - non-empty list: allow only listed values
Allowlists are config-file only (there are no per-allowlist CLI flags).
Allowlist keys
[kmip.allowlists] supports:
algorithms: KMIPCryptographicAlgorithm(e.g."AES","RSA")hashes: KMIPHashingAlgorithm(e.g."SHA256")signature_algorithms: KMIPDigitalSignatureAlgorithm(e.g."RSASSAPSS")curves: KMIPRecommendedCurve(e.g."P256","CURVE25519")block_cipher_modes: KMIPBlockCipherMode(e.g."GCM")padding_methods: KMIPPaddingMethod(e.g."OAEP","PSS","PKCS1v15","PKCS5")rsa_key_sizes: RSA key sizes in bits (strings):"2048","3072","4096"aes_key_sizes: AES key sizes in bits (strings):"128","192","256", and optionally"512"for some AES-XTS client encodingsmgf_hashes: KMIPHashingAlgorithmfor MGF1 (e.g."SHA256")mask_generators: KMIPMaskGenerator(e.g."MGF1")
Values are matched case-insensitively against the KMIP enum display names.
Example: AES-GCM only
[kmip]
policy_id = "CUSTOM"
[kmip.allowlists]
algorithms = ["AES"]
block_cipher_modes = ["GCM"]
aes_key_sizes = ["256"]
Example: RSA-OAEP with RSA-3072+
[kmip]
policy_id = "CUSTOM"
[kmip.allowlists]
algorithms = ["RSA"]
padding_methods = ["OAEP"]
hashes = ["SHA256", "SHA384", "SHA512"]
mask_generators = ["MGF1"]
mgf_hashes = ["SHA256", "SHA384", "SHA512"]
rsa_key_sizes = ["3072", "4096"]
Zeroization
Secret keys and plaintexts are considered highly sensitive information and to securely erase from
memory or storage Eviden KMS implements data zeroization.
The term zeroization originates from the process of setting all relevant bits to zero, effectively
rendering the data unreadable and unrecoverable.
This practice is essential to prevent unwanted memory residue of critical data,
especially in scenarios where the confidentiality and integrity of data are paramount.
This is particularly crucial in environments where multiple users or processes access the same resources, but this does not prevent in any way an attacker reading from live memory as the latter may not be encrypted.
It is good to notice that in the source code, only keys and plaintexts represented as byte arrays
are being zeroized using the zeroize crate.
Regarding OpenSSL PKey types, they are being zeroized by OpenSSL itself, which is triggered on
drop by Rust.
EVP_PKEYs are dropped with EVP_PKEY_free, which should use the appropriate cipher-internal freeing function, which in turn should cleanse all private data unless there is a bug in the underlying OpenSSL library [...]. source
Regulatory Compliance
Eviden KMS thus adheres to relevant industry standards and regulatory requirements concerning data security and privacy such as the Rust guidelines from ANSSI. The use of zeroization aligns with this standard, demonstrating our commitment to safeguarding sensitive information and meeting the necessary compliance obligations.
Software Bill of Materials (SBOM)
A Software Bill of Materials (SBOM) is a formal record of all components, libraries, and dependencies used to build a software artifact — analogous to an ingredient list for software. Eviden KMS ships SBOMs for every release to support:
- Supply chain security: identify exactly which packages and versions are included in each build.
- Vulnerability management: cross-reference components against CVE databases to detect known vulnerabilities before they reach production.
- License compliance: audit open-source licenses across the full dependency tree.
- Regulatory requirements: satisfy NTIA, CISA, and EU CRA SBOM mandates for critical software.
Artifacts
SBOMs are generated from Nix build outputs, providing a complete and reproducible view of runtime dependencies. They are available for all build variants:
| Artifact | Variants | Location |
|---|---|---|
| KMS server | fips / non-fips × static / dynamic | sbom/server/<variant>/<link>/ |
ckms CLI | fips / non-fips × static / dynamic | sbom/ckms/<variant>/<link>/ |
| OpenSSL 3.1.2 (FIPS derivation) | — | sbom/openssl_3_1_2/ |
| OpenSSL 3.6.0 (non-FIPS derivation) | — | sbom/openssl_3_6_0/ |
Each output directory contains:
| File | Format | Purpose |
|---|---|---|
bom.cdx.json | CycloneDX 1.5 JSON | Import into SBOM platforms (e.g., Dependency-Track) |
bom.spdx.json | SPDX 2.3 JSON | License compliance and SPDX tooling |
sbom.csv | CSV | Tabular component inventory |
vulns.csv | CSV | Deduplicated vulnerability rows (CVE/OSV/Grype/Vulnix) |
graph.png | PNG | Visual dependency graph |
meta.json | JSON | Build metadata (variant, link, counts, timestamps) |
The default FIPS static server SBOM is at
sbom/server/fips/static/bom.cdx.json.
Vulnerability scanning
Vulnerability data is produced by vulnxscan, which aggregates three sources:
- Grype — scans against NVD, GitHub Security Advisories, and other databases.
- Vulnix — scans against the NixOS security tracker with Nix-specific package context.
- OSV — queries the OSV database for additional coverage.
Duplicate CVE rows (e.g. CVE-2026-0915, UBUNTU-CVE-2026-0915, DEBIAN-CVE-2026-0915) are
collapsed to a single entry by nix/scripts/dedup_cves.py before the file is committed.
Regenerating the SBOM
Re-run after any change to Cargo.lock or the package version:
# All combinations (server + ckms + OpenSSL derivations)
mise run sbom:generate
# Server only — one specific combination
mise run sbom:generate --target server --variant fips --link static
# OpenSSL 3.6.0 derivation only
mise run sbom:generate --target openssl_3_6_0
See the SBOM artifact directory for the full regeneration guide and usage
examples (Dependency-Track upload, jq queries, vulnerability review).
Standards & references
- CycloneDX specification
- SPDX specification — ISO/IEC 5962:2021
- NTIA SBOM guidance
- CISA SBOM resources
- sbomnix toolchain
Cryptography Bill of Materials (CBOM)
A Cryptography Bill of Materials (CBOM) is a formal inventory of all cryptographic assets used in a software system — algorithms, key types, parameters, and the libraries that implement them. It follows the CycloneDX 1.6 standard and is designed to support:
- Crypto-agility audits: identify which algorithms are in use and where, to plan migration when standards change (e.g. deprecation of RSA-2048 or SHA-1).
- Post-quantum readiness: track which operations still rely on classical algorithms vulnerable to quantum attacks.
- Compliance reporting: demonstrate that only approved algorithms are in use for FIPS or other regulatory frameworks.
- Supply chain security: record implementing libraries (e.g. OpenSSL, RustCrypto) with their versions alongside the algorithms they provide.
CBOM artifact
The Eviden KMS CBOM is generated from the actual source code and Cargo.lock, ensuring it
reflects the running codebase rather than a manual registry.
| File | Format | Description |
|---|---|---|
cbom/cbom.cdx.json | CycloneDX 1.6 JSON | Full cryptographic asset inventory |
The CBOM covers:
- All symmetric and asymmetric algorithms (AES-GCM, ChaCha20-Poly1305, RSA, ECDSA, EdDSA, …)
- Post-quantum algorithms (ML-KEM, ML-DSA, SLH-DSA, Covercrypt)
- Key derivation functions (PBKDF2, HKDF, Argon2)
- Hash functions (SHA-2, SHA-3)
- Key encapsulation and wrapping schemes
- The implementing Rust crates (RustCrypto, OpenSSL, Eviden) with versions from
Cargo.lock - FIPS compliance status per algorithm
Regenerating the CBOM
Re-run the generator after any algorithm or dependency change:
python3 .mise/scripts/sbom/generate_cbom.py --output cbom/cbom.cdx.json
The script:
- Runs
cargo metadata --features non-fipsto read implementing-library versions fromCargo.lock. - Scans Rust source files under
crate/to confirm each algorithm is actively referenced. - Emits a CycloneDX 1.6 CBOM JSON document.
Only the algorithm catalogue inside the script requires manual maintenance when a new algorithm is added or removed; library versions and source-scan results are refreshed automatically.
Importing into SBOM platforms
The CBOM uses the same CycloneDX format as the SBOM, so it can be imported into any CycloneDX-compatible platform such as Dependency-Track:
curl -X POST "https://dtrack.example.com/api/v1/bom" \
-H "X-Api-Key: ${API_KEY}" \
-H "Content-Type: multipart/form-data" \
-F "project=${PROJECT_UUID}" \
-F "bom=@cbom/cbom.cdx.json"
Standards & references
- CycloneDX CBOM specification
- NIST Post-Quantum Cryptography standards
- CISA Post-Quantum Cryptography initiative
Eviden KMS — OWASP Security Audit Plan & Report
Document type: Security Audit Plan & Report Template
Standard: OWASP Top 10 (2021) + OWASP ASVS v4.0 (selective)
Repository: Eviden/kms — branch develop
Workspace root: crate/ (Rust workspace) + ui/ (React/TypeScript)
Audit date: 2026-08-18 (re-run with remediation verification: 2026-04-14)
Auditor(s): GitHub Copilot (automated static analysis)
Status: ⚠️ Incomplete — 2 check(s) FAILED (audit.sh ran 2026-08-18)
Tools available during this audit
| Tool | Version | Status | Notes |
|---|---|---|---|
cargo-audit | 0.22.1 | ✅ Available | Advisory DB scan |
cargo-deny | 0.19.0 | ✅ Available | Policy check (bans, licenses, advisories, sources) |
cargo-outdated | 0.17.0 | ✅ Available | Outdated dep detection |
cargo-geiger | 0.13.0 | ⚠️ Installed — partial | Fails on virtual workspace manifest with bug |
semgrep | — | ❌ Not installed | Static pattern matching — install per §1 |
gitleaks / trufflehog3 | — | ❌ Not installed | Secret scanning — install per §1 |
cargo-geiger 0.13.0fails witherror: No such file or directory — crate/cli/src/lib.rswhen invoked against this virtual workspace. This is a known upstream bug. The A06 section below uses manualgrep -r "unsafe"counts as a validated substitute.
Table of Contents
- Eviden KMS — OWASP Security Audit Plan & Report
- Tools available during this audit
- Table of Contents
- 1. Tool Installation
- 2. A01 – Broken Access Control
- 3. A02 – Cryptographic Failures
- 4. A03 – Injection
- 5. A04 – Insecure Design
- 6. A05 – Security Misconfiguration
- 7. A06 – Vulnerable and Outdated Components
- 8. A07 – Identification and Authentication Failures
- 9. A08 – Software and Data Integrity Failures
- 10. A09 – Security Logging and Monitoring Failures
- 11. A10 – Server-Side Request Forgery (SSRF)
- 12. EXT-0 – KMS Own Authorization System
- 13. EXT-1 – Cryptographic Key Lifecycle & Zeroization
- 14. EXT-2 – Denial of Service / Resource Exhaustion
- 15. Remediation Priority Matrix
- 16. Report Sign-off
1. Tool Installation
Install every tool before starting the audit. Run all commands from the workspace root.
1.1 Rust security toolchain
# Audit Rust dependencies for known CVEs (RustSec Advisory DB)
cargo install cargo-audit
# Policy-based dependency checking (licenses, bans, advisories)
# cargo-deny is already configured: deny.toml exists at workspace root
cargo install cargo-deny
# Count and locate `unsafe` blocks across the workspace
cargo install cargo-geiger
# Find outdated dependencies
cargo install cargo-outdated
# Verify tool versions
cargo audit --version
cargo deny --version
cargo geiger --version
cargo outdated --version
1.2 Secrets scanning
# Option A: gitleaks (scan git history + working tree for accidentally committed secrets)
curl -sSfL \
https://github.com/gitleaks/gitleaks/releases/latest/download/gitleaks_linux_amd64.tar.gz \
| tar xz && sudo mv gitleaks /usr/local/bin/
gitleaks version
# Option B: trufflehog (entropy-based secret detection)
pip3 install truffleHog3
trufflehog3 --version
1.3 SAST — Semgrep
# Install semgrep
pip3 install semgrep
semgrep --version
# Verify the Rust and OWASP rulesets are reachable (requires internet)
semgrep --config p/rust --test 2>/dev/null || true
semgrep --config p/owasp-top-ten --test 2>/dev/null || true
semgrep --config p/secrets --test 2>/dev/null || true
1.4 Readiness check
echo "=== Tool readiness ===" && \
cargo audit --version && \
cargo deny --version && \
cargo geiger --version && \
cargo outdated --version && \
semgrep --version && \
(gitleaks version 2>/dev/null || trufflehog3 --version 2>/dev/null || \
echo "WARNING: no secrets scanner found")
2. A01 – Broken Access Control
OWASP description: Restrictions on what authenticated users are allowed to do are not properly enforced. Attackers can exploit these flaws to access unauthorized functionality and/or data.
2.1 Scope
| Area | Key files |
|---|---|
| Auth middleware stack | crate/server/src/middlewares/ensure_auth.rs |
| KMIP route handler | crate/server/src/routes/kmip.rs |
| Access grant / revoke endpoints | crate/server/src/routes/access.rs |
| Unauthenticated public endpoints | crate/server/src/routes/health.rs, root_redirect.rs |
| Server app builder (middleware order) | crate/server/src/start_kms_server.rs |
| Enterprise route auth | crate/server/src/routes/aws_xks/, azure_ekm/, google_cse/, ms_dke/ |
2.2 Investigation Steps
# Step 1 — Enumerate all HTTP routes; identify routes registered WITHOUT
# the standard auth middleware chain
grep -rn \
"web::resource\|web::route\|web::scope\|#\[get\]\|#\[post\]\|#\[put\]\|#\[delete\]" \
crate/server/src/routes/ --include="*.rs"
# Step 2 — Inspect the full middleware assembly order
# Auth wrappers MUST be registered before route handlers
grep -n "App::new\|\.wrap\|\.configure\|\.service" \
crate/server/src/start_kms_server.rs
# Step 3 — Confirm which middleware types protect which routes
grep -rn "EnsureAuth\|JwtMiddleware\|ApiTokenMiddleware\|TlsAuthMiddleware" \
crate/server/src/ --include="*.rs"
# Step 4 — Look for any explicit auth skip or bypass condition
grep -rn "skip\|bypass\|no_auth\|#\[cfg(feature.*insecure" \
crate/server/src/middlewares/ --include="*.rs"
# Step 5 — Horizontal privilege escalation: can a user access another user's objects
# without an explicit grant? Inspect owner check in retrieve_object_for_operation
grep -n "owner\|user_has_permission\|is_object_owned_by" \
crate/server/src/core/retrieve_object_utils.rs
# Step 6 — Semgrep: path traversal and broken access control patterns
semgrep --config p/owasp-top-ten \
crate/server/src/routes/ --lang rust 2>/dev/null \
| grep -i "access\|path\|traversal" || true
2.3 Findings
Status: ⚠️ Review needed
Files inspected:
crate/server/src/start_kms_server.rscrate/server/src/middlewares/ensure_auth.rs,tls_auth.rs,api_token/,jwt/crate/server/src/routes/health.rs,access.rs,kmip.rscrate/server/src/core/retrieve_object_utils.rs
| ID | File:Line | Severity | Description |
|---|---|---|---|
| A01-1 | start_kms_server.rs:776,795,806,901,962 | Medium | Cors::permissive() applied to all scopes including the main KMIP endpoint. This allows cross-origin requests from any domain, enabling browser-based cross-site attacks against the KMIP API. |
| A01-2 | routes/health.rs:47 | Info | /health is a public (unauthenticated) endpoint that calls kms.get_user(&req) and logs the result. On an unconfigured server the default username is logged on every health probe. Not a direct vulnerability but reveals configuration state. |
| A01-3 | middlewares/ensure_auth.rs:128 | Info | EnsureAuth correctly skips itself when the request is already authenticated (comment confirms intent). No bypass risk. |
Recommended fix:
- A01-1: Replace
Cors::permissive()with an explicit allowlist (Cors::default().allowed_origin(…)) for all scopes. For KMIP, restrict to known client origins or require mTLS instead of relying on CORS. - A01-2: Move the
get_userlog line behind anif tracing::enabled!(Level::DEBUG)guard, or remove it from public endpoints.
OWASP description: Failures related to cryptography (data at rest, data in transit, key management, algorithm choices) that often lead to exposure of sensitive data.
3. A02 – Cryptographic Failures
3.1 Scope
| Area | Key files |
|---|---|
| Crypto primitives | crate/crypto/src/ (all subdirectories) |
| Key export enforcement | crate/server/src/core/operations/export_get.rs |
| Key wrapping / unwrapping | crate/server/src/core/wrapping/wrap.rs, unwrap.rs |
| Key storage format | crate/kmip/src/ — EncryptedKeyBlock, KeyMaterial types |
| OpenSSL build & hash | crate/crypto/build.rs |
| TLS configuration | crate/server/src/config/command_line/tls_config.rs |
3.2 Investigation Steps
# Step 1 — Search for hardcoded keys, zero IVs, or predictable nonces
grep -rn "\[0u8; 16\]\|\[0u8; 32\]\|\[0u8; 12\]\|nonce.*=.*\[0\|iv.*=.*\[0" \
crate/crypto/src/ --include="*.rs"
# Step 2 — Deprecated / weak algorithms (ECB mode, DES, RC4, MD5, SHA-1)
grep -rni "ecb\|des\b\|rc4\|md5\|sha1\b\|sha-1\|rc2\|md4" \
crate/ --include="*.rs" | grep -v "//\|#\[doc\|test_" | head -30
# Step 3 — Sensitive key export: verify the sensitive flag blocks unprotected export
grep -n "sensitive\|key_wrapping_specification\|Sensitive\|is_sensitive" \
crate/server/src/core/operations/export_get.rs
# Step 4 — Non-FIPS algorithm use must be gated behind the non-fips feature flag
grep -rn "#\[cfg(feature.*non.fips\|cfg.*non_fips" \
crate/crypto/src/ --include="*.rs" | head -20
# Cross-check: algorithms that appear outside a cfg gate
grep -rni "Covercrypt\|AES.XTS\|chacha\|xchacha\|kyber\|dilithium" \
crate/crypto/src/ --include="*.rs" | grep -v "#\[cfg" | head -15
# Step 5 — In-memory cache for unwrapped key material: check zeroization on eviction
grep -n "cache\|HashMap\|DashMap\|insert\|remove\|evict\|zeroize\|Zeroizing" \
crate/server/src/core/wrapping/wrap.rs
# Step 6 — OpenSSL download: verify SHA-256 check is non-bypassable
grep -A5 -B5 "sha256\|checksum\|expected\|download\|verify" crate/crypto/build.rs
# Step 7 — Semgrep crypto-specific rules
semgrep --config p/rust crate/crypto/src/ --lang rust 2>/dev/null \
| grep -i "crypto\|cipher\|hash\|random\|seed" || true
3.3 Findings
Status: ⚠️ Review needed
Files inspected:
crate/crypto/src/crypto/symmetric/symmetric_ciphers.rscrate/crypto/src/crypto/elliptic_curves/ecies/standard_curves.rscrate/server/src/core/operations/export_get.rscrate/server/src/core/wrapping/wrap.rscrate/crypto/build.rscrate/clients/clap/src/actions/mac.rs,actions/aws/byok/export_key_material.rs
| ID | File:Line | Severity | Description |
|---|---|---|---|
| A02-1 | symmetric_ciphers.rs:429,784 | Info | Zero-initialised buffers (vec![0; nonce_size], [0_u8; 16]) are overwritten immediately by rand_bytes() or by structured counter/nonce construction (ChaCha20). No actual hardcoded IVs. |
| A02-2 | mac.rs:17,31,47 / export_key_material.rs:92,106 | Low | SHA-1 is exposed as a user-selectable MAC/hash algorithm and used in AWS BYOK RSA-OAEP wrapping. SHA-1 is weak for MAC and PKCS#1 v1.5 is weak for key wrapping. These paths are not gated behind #[cfg(feature = "non-fips")] in the CLI actions layer even though FIPS forbids SHA-1. |
| A02-3 | standard_curves.rs:31 | Info | let mut iv = vec![0; iv_size] in ECIES — filled by OpenSSL rand_bytes. Safe; zero is a temporary placeholder. |
| A02-4 | export_get.rs:77 | ✅ | sensitive=true objects are correctly blocked from export unless key_wrapping_specification is present. Per KMIP BL-M-12-21. |
| A02-5 | wrap.rs:118–121 | Medium | Unwrapped key objects are stored in an in-memory DashMap/HashMap cache with no TTL or eviction policy visible in wrap.rs. Cached plaintext key material persists indefinitely in process heap, increasing the window for cold-boot / process-dump attacks. |
| A02-6 | build.rs:234,274–275 | ✅ | verify_hash() enforces SHA-256 check on the OpenSSL tarball. Non-empty sha256 param is required. Supply-chain integrity protected. |
Recommended fix:
- A02-2: Gate SHA-1 MAC and RSA-OAEP-SHA1 behind
#[cfg(feature = "non-fips")]or emit a deprecation warning when selected. Replace with SHA-256 defaults. - A02-5: Add a TTL (e.g. 60 s) or LRU eviction to the unwrapped-object cache. Call
zeroize()on cache values before removal.
OWASP description: Injection flaws occur when untrusted data is sent to an interpreter as part of a command or query (SQL, LDAP, OS shell, TTLV, XML).
4. A03 – Injection
4.1 Scope
| Area | Key files |
|---|---|
| Dynamic SQL query builder | crate/server_database/src/stores/sql/locate_query.rs |
| SQL backends | crate/server_database/src/stores/sql/sqlite.rs, pgsql.rs, mysql.rs |
| TTLV binary parser | crate/kmip/src/ttlv/wire/ttlv_bytes_deserializer.rs |
| TTLV XML parser | crate/kmip/src/ttlv/xml/parser.rs, deserializer.rs |
| JSON → TTLV entry point | crate/server/src/routes/kmip.rs — from_ttlv() call |
| CLI file path arguments | crate/clients/clap/src/actions/ |
4.2 Investigation Steps
# Step 1 — SQL injection: flag any dynamic SQL built with format! or string concatenation
grep -rn \
'format!.*SELECT\|format!.*INSERT\|format!.*UPDATE\|format!.*DELETE\|"SELECT.*{}' \
crate/server_database/src/ --include="*.rs"
# Step 2 — Verify parameterized query usage throughout the SQL backends
grep -n "bind\|execute\|query_as\|fetch" \
crate/server_database/src/stores/sql/locate_query.rs | head -30
# Step 3 — TTLV binary parser: length field checked before allocation?
grep -n "len\|size\|capacity\|Vec::with_capacity\|read_exact\|take\|limit" \
crate/kmip/src/ttlv/wire/ttlv_bytes_deserializer.rs
# Step 4 — Recursion depth guard in TTLV struct parser
grep -rn "depth\|recursion\|stack\|max_depth\|fn from_ttlv\|fn parse" \
crate/kmip/src/ttlv/ --include="*.rs"
# Step 5 — OS shell injection: any std::process::Command with user-supplied data?
grep -rn "Command::new\|std::process\|exec\|popen" \
crate/clients/ crate/server/ --include="*.rs"
# Step 6 — Tag / object-group injection: these are stored as strings — verify binding
grep -n "tag\|Tag\|object_group\|ObjectGroup" \
crate/server_database/src/stores/sql/locate_query.rs | head -20
# Step 7 — Semgrep injection ruleset
semgrep --config p/owasp-top-ten crate/ --lang rust 2>/dev/null \
| grep -i "inject\|sql\|command\|exec" || true
4.3 Findings
Status: ⚠️ Review needed
Files inspected:
crate/server_database/src/stores/sql/locate_query.rscrate/kmip/src/ttlv/wire/ttlv_bytes_deserializer.rscrate/kmip/src/ttlv/wire/ttlv_bytes_serializer.rscrate/server/src/core/operations/locate.rscrate/server/src/routes/kmip.rscrate/server/benchmarks/bench.rs(CLI-only)
| ID | File:Line | Severity | Description |
|---|---|---|---|
| A03-1 | stores/sql/locate_query.rs (all) | ✅ | All SQL queries use bind-parameter style (sqlx::query!, placeholder ? / $N). No string concatenation into SQL statements. No SQL injection. |
| A03-2 | ttlv_bytes_deserializer.rs:56 | High | read_ttlv() is purely recursive with no depth counter and no maximum depth check. A malicious deeply-nested TTLV binary can exhaust the call stack (stack overflow / uncontrolled recursion). An unauthenticated TTLV POST triggers this code path before any authentication (parsed at HTTP handler level). |
| A03-3 | routes/kmip.rs (XML path) | Medium | The TTLV XML parser (ttlv_xml_deserializer.rs) has a depth counter but the loop contains no max_depth enforcement — deep XML nesting proceeds without limit. |
| A03-4 | bench.rs:2815 | Info | CLI benchmark code builds a gnuplot script embedding the op operation name variable inline. This is benchmark CLI code, not reachable from the server. No server-side command injection. |
| A03-5 | All server routes | ✅ | No OS std::process::Command::new() / shell_exec calls found in production server code. |
Recommended fix:
- A03-2: Add a
depth: u32parameter toread_ttlv()and return an error whendepth > MAX_TTLV_DEPTH(suggested: 64). Example:fn read_ttlv(reader: &mut impl Read, depth: u32) -> Result<Ttlv> { if depth > 64 { return Err(...) } ... read_ttlv(reader, depth + 1) ... } - A03-3: Add
const MAX_XML_DEPTH: usize = 64;and fail whendepth >= MAX_XML_DEPTH.
5. A04 – Insecure Design
OWASP description: Missing or ineffective control design. Unlike misconfiguration, this is a structural flaw that cannot be fixed by correct configuration alone.
5.1 Scope
| Area | Key files |
|---|---|
| KMIP operation dispatcher | crate/server/src/core/operations/dispatch.rs |
| Actix-web app builder | crate/server/src/start_kms_server.rs |
| Server configuration | crate/server/src/config/ |
| KMIP lifecycle state machine | crate/kmip/src/ — object state types |
| Rate limiting | crate/server/src/middlewares/ |
5.2 Investigation Steps
# Step 1 — Max request body size: Actix default is 256 KB; look for an explicit override
grep -n "LimitPayloadSize\|max_payload_size\|PayloadConfig\|content_length\|max_body" \
crate/server/src/start_kms_server.rs crate/server/src/routes/kmip.rs
# Step 2 — Rate limiting middleware
grep -rn "RateLimiter\|rate_limit\|throttle\|governor\|leaky_bucket\|token_bucket" \
crate/server/src/ --include="*.rs"
# Step 3 — KMIP state machine: transitions must follow spec
# (PreActive → Active → Deactivated → Destroyed; no skipping)
grep -rn "Deactivated\|PreActive\|Compromised\|Destroyed\|state.*transition\|update_state" \
crate/server/src/core/operations/ --include="*.rs"
# Step 4 — Bulk operations: can one request mutate thousands of objects?
grep -rn "Locate\|for.*objects\|batch\|BulkRequest\|RequestBatchItem" \
crate/server/src/core/operations/ --include="*.rs" | head -20
# Step 5 — Locate result set: is it bounded / paginated?
grep -rn "limit\|offset\|pagination\|page_size\|LIMIT\|OFFSET\|max_items" \
crate/server_database/src/ --include="*.rs"
# Step 6 — SecretData / Opaque objects: are there constraints on size or type?
grep -rn "SecretData\|Opaque\|OpaqueData\|CertificateRequest" \
crate/server/src/core/operations/ --include="*.rs"
5.3 Findings
Status: ❌ Vulnerability found
Files inspected:
crate/server/src/start_kms_server.rscrate/server/src/core/operations/locate.rscrate/server_database/src/stores/sql/locate_query.rscrate/server/src/middlewares/
| ID | File:Line | Severity | Description |
|---|---|---|---|
| A04-1 | start_kms_server.rs:767-768 | High | HTTP request body limit is set to 10 GB: PayloadConfig::new(10_000_000_000) and JsonConfig::default().limit(10_000_000_000). Any unauthenticated or authenticated client can send a 10 GB request body, potentially exhausting server RAM and causing out-of-memory termination. |
| A04-2 | All server middlewares | High | No rate-limiting middleware is registered anywhere in the Actix-web application. There is no throttling on KMIP operations, API token verification, or UI login. An attacker can issue unlimited requests per second, allowing brute-force of API tokens and CPU/memory exhaustion. |
| A04-3 | operations/locate.rs:96-101 | Medium | The MaximumItems field in a Locate request is fully client-controlled and optional. When absent, the server returns all matching objects. There is no server-side cap on the result set size. A client owning or co-owning a large number of objects can trigger a very large response. |
| A04-4 | operations/dispatch.rs | ✅ | KMIP state machine transitions (PreActive→Active→Deactivated→Destroyed) are enforced via activate.rs, revoke.rs, destroy.rs. Invalid transitions are rejected with ItemNotFound or state-error. |
| A04-5 | operations/locate.rs + batch_items.rs | ✅ | Batch request item limit: the KMIP spec allows batch requests; each item is individually dispatched and access-controlled. No uncontrolled bulk mutation discovered beyond the Locate unbounded-result issue. |
Recommended fix:
- A04-1: Reduce
PayloadConfigandJsonConfiglimits to a realistic maximum (e.g. 64 MB for KMIP bodies, 1 MB for JSON config). UsePayloadConfig::new(64 * 1024 * 1024). - A04-2: Add a rate-limiting middleware using
actix-governorortower-governor. Apply globally plus a stricter limit on authentication endpoints. - A04-3: Add a server-side cap: if
MaximumItemsis absent or exceeds a configuredmax_locate_items(default 1 000), clamp the SQLLIMITto that value.
6. A05 – Security Misconfiguration
OWASP description: The most commonly seen issue, resulting from insecure default configurations, missing hardening, verbose error messages, or open cloud storage.
6.1 Scope
| Area | Key files |
|---|---|
| All server CLI flags & defaults | crate/server/src/config/command_line/ (all files) |
| TLS settings | crate/server/src/config/command_line/tls_config.rs |
| UI authentication & CORS | crate/server/src/routes/ui_auth.rs |
| OpenSSL provider init | crate/server/src/openssl_providers.rs |
| Error response format | crate/server/src/routes/kmip.rs — error handling |
6.2 Investigation Steps
# Step 1 — Enumerate all default values for security-sensitive flags
grep -n "default_value\|default.*=\s*\"\|fn default()" \
crate/server/src/config/command_line/clap_config.rs | head -50
# Step 2 — TLS: minimum protocol version and cipher suite defaults
grep -rn "TLSv1\|tls_cipher\|cipher_suite\|TlsVersion\|min_protocol\|SSLv" \
crate/server/src/config/ --include="*.rs"
grep -n "tls_p12\|tls_cert\|tls_key\|tls_chain\|clients_ca" \
crate/server/src/config/command_line/tls_config.rs
# Step 3 — CORS: look for wildcard origins or missing CORS restrictions
grep -rn "Cors\|allow_origin\|AllowedOrigin\|allow_any_origin" \
crate/server/src/ --include="*.rs"
# Step 4 — Error messages: do they expose stack traces or internal paths?
grep -rn "backtrace\|debug_info\|internal_err\|unwrap()\|expect(" \
crate/server/src/routes/ --include="*.rs" | head -20
# Step 5 — Dangerous feature flags that weaken security
grep -rn "insecure\|skip.*expir\|no.verify\|allow_self_signed" \
crate/server/src/ --include="*.rs" | grep -v "#\[cfg\|cfg(feature\|//.*insecure"
# Step 6 — Environment variable names that carry secrets: verify none are logged
grep -rn 'KMS_.*PASSWORD\|KMS_.*SECRET\|KMS_.*KEY\|KMS_.*TOKEN' \
crate/server/src/ --include="*.rs"
# Step 7 — Secrets scanner: detect hardcoded credentials
semgrep --config p/secrets crate/ --lang rust 2>/dev/null | head -30 || true
gitleaks detect --source . --no-git 2>/dev/null | head -30 || true
6.3 Findings
Status: ⚠️ Review needed
Files inspected:
crate/server/src/start_kms_server.rscrate/server/src/config/command_line/tls_config.rscrate/server/src/openssl_providers.rsdeny.toml
| ID | File:Line | Severity | Description |
|---|---|---|---|
| A05-1 | start_kms_server.rs:776,795,806,901,962 | Medium | Cors::permissive() applied on every scope: main KMIP, UI, Google CSE, MS DKE, AWS XKS. Sets Access-Control-Allow-Origin: *, allowing any browser origin to reach the KMIP endpoint cross-origin. |
| A05-2 | config/command_line/tls_config.rs | Low | TLS minimum version is not explicitly configured in code. Relies on OpenSSL 3.6.2 default (TLS 1.2+). Should be made explicit. |
| A05-3 | middlewares/jwt/jwt_config.rs:10,155 | Medium | The insecure feature completely disables all JWT validation (signature, expiry, audience). No compile-time guard prevents this feature from reaching production. If accidentally included in a production build, any token is accepted. |
| A05-4 | deny.toml | Low | RUSTSEC-2026-0097 is allow-listed in the cargo deny policy. Should be resolved by upgrading rand instead of permanently suppressing the advisory. |
| A05-5 | All routes | ✅ | Error responses use KMIP error codes; no stack traces or file paths exposed in HTTP responses. |
Recommended fix:
- A05-1: Replace
Cors::permissive()withCors::default().allowed_origin("https://your-kms-domain.example.com")or configure allowed origins from server config. - A05-3: Add
#[cfg(all(not(test), feature = "insecure"))] compile_error!("insecure feature must not be enabled in production");near the top ofjwt_config.rs.
7. A06 – Vulnerable and Outdated Components
OWASP description: Components run with the same privileges as the application. If a vulnerable component is exploited it can cause serious data loss or server takeover.
7.1 Scope
| Area | Files |
|---|---|
| Workspace dependencies | Cargo.toml (root) + all crate/*/Cargo.toml |
| Deny policy | deny.toml |
| OpenSSL build + hash | crate/crypto/build.rs |
| UI dependencies | ui/package.json, ui/pnpm-lock.yaml |
| Git history | .git/ |
7.2 Investigation Steps
# Step 1 — Scan Rust dependencies for known CVEs (RustSec Advisory DB)
cargo audit
# Step 2 — Policy-based check: licenses, banned crates, advisories, duplicates
cargo deny check
# Step 3 — List outdated crates vs latest on crates.io
cargo outdated --workspace
# Step 4 — Count unsafe code per crate (establish risk baseline)
cargo geiger --workspace 2>/dev/null | tail -50
# Step 5 — Verify OpenSSL source is pinned and SHA-256-verified in build script
grep -A5 -B5 "openssl.*version\|OPENSSL_VERSION\|sha256\|expected_hash\|verify" \
crate/crypto/build.rs | head -30
# Step 6 — UI dependency audit
cd ui && pnpm audit 2>/dev/null || npm audit 2>/dev/null; cd ..
# Step 7 — Git-sourced Rust deps (bypass crates.io auditing)
grep -rn "git = \|branch = \|rev = " Cargo.toml crate/*/Cargo.toml
# Step 8 — Scan full git history for accidentally committed secrets
gitleaks detect --source . 2>/dev/null | head -30 || \
trufflehog3 --no-entropy . 2>/dev/null | head -30 || \
echo "Run a secrets scanner manually"
7.3 Findings
Status: ⚠️ Review needed
Files inspected: Cargo.toml (workspace), deny.toml, crate/crypto/build.rs
cargo audit output (2026-04-13):
Warning: 2 vulnerabilities found!
crate: rand version: 0.8.5 advisory: RUSTSEC-2026-0097 (allow-listed)
crate: rand version: 0.9.2 advisory: RUSTSEC-2026-0097 (allow-listed)
cargo deny check: passes with warnings (advisory allow-listed in deny.toml)
| ID | File:Line | Severity | Description |
|---|---|---|---|
| A06-1 | Cargo.toml (workspace) | Medium | RUSTSEC-2026-0097 affects rand 0.8.5 and rand 0.9.2 — two separate version trees coexisting in the dependency graph. Advisory covers unseeded PRNG panic under unusual usage. Suppressed rather than resolved. |
| A06-2 | Cargo.toml (workspace) | Low | 20+ duplicate crate versions: base64 (×3: 0.13, 0.21, 0.22), hashbrown (×4: 0.12–0.15), rand (×2), opentelemetry (×2), time (×3), etc. Increases supply-chain surface and binary size. |
| A06-3 | crate/crypto/build.rs:234,274 | ✅ | OpenSSL 3.6.2 tarball is SHA-256-verified (verify_hash()) before extraction. Version pinned by constant. Supply-chain integrity protected. |
| A06-4 | All Cargo.toml files | ✅ | No git = sourced Rust dependencies. All deps come from crates.io. |
| A06-5 | ui/pnpm-lock.yaml | Info | UI npm/pnpm audit was not run during this automated pass. Manual pnpm audit --audit-level moderate recommended. |
| A06-6 | Workspace (crate/clients/wasm/Cargo.toml) | Low | cargo outdated shows cosmian_kms_client_wasm requires getrandom with the js feature, but the installed version (0.4.2) no longer exposes that feature. This causes cargo outdated to fail for the WASM crate. The WASM build may silently use a mismatched getrandom version in non-browser target builds. |
| A06-7 | workspace (geiger scan) | Info | cargo-geiger 0.13.0 fails on this virtual workspace with a known upstream bug. Manual grep -r "unsafe " shows: crate/server/src/ (5 files, 22 uses — all OpenSSL FFI + FIPS env setup), crate/crypto/src/ (5 files, 35 uses — OpenSSL/PQC FFI), crate/server_database/src/ (0), crate/kmip/src/ (0), crate/access/src/ (0). PKCS#11 module/provider and HSM loaders contain additional unsafe as expected for C FFI. No unexpected unsafe blocks were found in core server logic. |
Recommended fix:
- A06-1: Upgrade
randto the version that resolves RUSTSEC-2026-0097. Runcargo update -p randand verify withcargo audit. - A06-2: Dedup by aligning version requirements across crates using
[patch]or resolving transitive dependency mismatches. Track withcargo deny check duplicates. - A06-5: Add
cd ui && pnpm audit --audit-level moderateto CI pipeline. - A06-6: Align
getrandomversion incrate/clients/wasm/Cargo.tomlto a version that still exposes thejsfeature gate, or remove the feature if no longer applicable. - A06-7 (geiger): Upgrade
cargo-geigerwhen a version supporting Rust 2024 virtual workspaces is available.
8. A07 – Identification and Authentication Failures
OWASP description: Incorrectly implemented authentication and session management allow attackers to compromise passwords, keys, or session tokens, or to assume other users' identities.
8.1 Scope
| Area | Key files |
|---|---|
| JWT middleware | crate/server/src/middlewares/jwt/jwt_middleware.rs, jwt_token_auth.rs, jwt_config.rs |
| JWKS manager | crate/server/src/middlewares/jwt/jwks.rs |
| API token auth | crate/server/src/middlewares/api_token/api_token_auth.rs, api_token_middleware.rs |
| TLS client cert auth | crate/server/src/middlewares/tls_auth.rs |
| AWS SigV4 auth | crate/server/src/routes/aws_xks/sigv4_middleware.rs |
| Auth fallback | crate/server/src/middlewares/ensure_auth.rs |
insecure feature gate | Everywhere gated by #[cfg(feature = "insecure")] |
8.2 Investigation Steps
# Step 1 — JWT algorithm restriction: must be RS256/ES256; reject HS256 and "none"
grep -rn "Algorithm\|alg\|Validation\|decode\|jsonwebtoken\|DecodingKey" \
crate/server/src/middlewares/jwt/ --include="*.rs"
# Step 2 — Token expiration enforcement (insecure feature relaxes this)
grep -rn "exp\|expir\|validate_exp\|insecure\|leeway" \
crate/server/src/middlewares/jwt/ --include="*.rs"
# Step 3 — JWKS fetch URL: must be HTTPS-only; no plain HTTP fallback
grep -n "http://\|reqwest\|fetch_jwks\|jwks_uri\|jwks_url\|url" \
crate/server/src/middlewares/jwt/jwks.rs
# Step 4 — API token comparison: must be constant-time to prevent timing attacks
grep -n "==\|compare\|ConstantTimeEq\|constant_time\|subtle\|ct_eq" \
crate/server/src/middlewares/api_token/api_token_auth.rs
# Step 5 — TLS cert auth: CN alone is insufficient; check if full DN or SAN is used
grep -n "CommonName\|CN\|SubjectAltName\|SAN\|subject\|peer_cert\|peer_certificate" \
crate/server/src/middlewares/tls_auth.rs
# Step 6 — Session fixation in UI auth: cookie must be HttpOnly, Secure, SameSite=Lax (OIDC requires Lax, not Strict)
grep -rn "actix.session\|Session\|cookie\|HttpOnly\|Secure\|SameSite" \
crate/server/src/routes/ui_auth.rs crate/server/src/middlewares/ --include="*.rs"
# Step 7 — Brute-force protection: lookout for rate limiting on auth endpoints
grep -rn "rate_limit\|lockout\|backoff\|attempt\|max_fail" \
crate/server/src/middlewares/ --include="*.rs"
# Step 8 — Semgrep auth patterns
semgrep --config p/owasp-top-ten \
crate/server/src/middlewares/ --lang rust 2>/dev/null || true
8.3 Findings
Status: ⚠️ Review needed
Files inspected:
crate/server/src/middlewares/jwt/jwt_config.rscrate/server/src/middlewares/api_token/api_token_auth.rscrate/server/src/middlewares/tls_auth.rscrate/server/src/start_kms_server.rs- All
crate/server/src/middlewares/files
| ID | File:Line | Severity | Description |
|---|---|---|---|
| A07-1 | jwt_config.rs:170 | High | Validation::new(header.alg) — JWT validation algorithm is taken directly from the alg field of the incoming token header without any allowlist. An attacker who obtains a valid kid could craft a token with alg: HS256 and use the RSA public key as the HMAC secret (algorithm confusion / "none" alg attack vector). The jsonwebtoken crate's Validation::new initialises with the given algorithm but does NOT restrict to it unless algorithms is explicitly set. |
| A07-2 | api_token_auth.rs:126 | Medium | API token comparison uses client_token == api_token.as_str() — standard == operator, which is not timing-safe. Timing differences can reveal whether the token length matches or prefix bytes are correct. A high-volume attacker on a low-latency network could exploit this to brute-force API tokens. |
| A07-3 | tls_auth.rs:147 | Low | TLS client certificate identity uses CN (Common Name) only, not SAN (Subject Alternative Name). Wildcard CNs (*) are explicitly rejected (correct). Modern TLS stacks prefer SAN; CN-only auth may fail on strict clients. |
| A07-4 | start_kms_server.rs:759 | Low | Session cookie SameSite is set to None (cross-site allowed). SameSite::Strict or Lax would protect against CSRF for browser-initiated requests. |
| A07-5 | jwt_config.rs:10,155 | Medium | The insecure feature disables all JWT validation including signature and expiration. Must not appear in production builds (see also A05-3). |
| A07-6 | All endpoints | High | No brute-force protection or account lockout on any authentication endpoint (JWT, API token, TLS). Combined with A04-2 (no rate limiting), this allows unlimited credential-guessing attempts. |
Recommended fix:
- A07-1: After calling
Validation::new(alg), immediately setvalidation.algorithms = vec AND add a check thatalgis in an explicit server-side allowlist (e.g.[RS256, RS384, RS512, ES256, ES384]). Reject tokens withalg: none,alg: HS256against asymmetric keys. - A07-2: Replace
client_token == api_token.as_str()with a constant-time comparison: usesubtle::ConstantTimeEqorring::constant_time::verify_slices_are_equal(). - A07-4: Change
SameSite::NonetoSameSite::Strictunless cross-site embedding of the KMS UI is required.
9. A08 – Software and Data Integrity Failures
OWASP description: Code and infrastructure that does not protect against integrity violations, including insecure deserialization, CI/CD pipeline attacks, and unsigned updates.
9.1 Scope
| Area | Key files |
|---|---|
| OpenSSL download + verify | crate/crypto/build.rs |
| Imported object validation | crate/server/src/core/operations/import.rs |
| KMIP deserializer | crate/kmip/src/ttlv/ |
| Cargo lock and git deps | Cargo.lock, Cargo.toml |
| CI pipeline scripts | .github/workflows/, .mise/scripts/ |
| Nix vendor hashes | nix/expected-hashes/ |
9.2 Investigation Steps
# Step 1 — OpenSSL build: SHA-256 check must be present and non-bypassable
grep -A5 -B5 "sha256\|checksum\|expected\|download\|verify" crate/crypto/build.rs
# Step 2 — Imported keys: are cryptographic properties validated on import?
# (RSA modulus size, EC curve OID, key material length)
grep -n "validate\|check\|verify\|length\|CryptographicLength\|Algorithm\|curve" \
crate/server/src/core/operations/import.rs | head -30
# Step 3 — KMIP deserialization: unknown fields rejected (not silently ignored)?
grep -rn "deny_unknown_fields\|flatten\|#\[serde\|untagged\|tag" \
crate/kmip/src/ --include="*.rs" | head -20
# Step 4 — Git-sourced or path-sourced Rust deps (integrity not guaranteed by crates.io)
grep -rn "git =\|path =\|branch =\|rev =" Cargo.toml crate/*/Cargo.toml
# Step 5 — CI scripts: unauthenticated downloads or pipe-to-shell patterns
grep -rn "curl.*sh\|wget.*sh\|pip install\|npm install" \
.mise/scripts/ .github/workflows/ 2>/dev/null \
| grep -v "^#\|#.*curl" | head -20
# Step 6 — Nix vendor hashes: all four variants must be present and non-trivial
ls -la nix/expected-hashes/
grep -v "^sha256-AAAA" nix/expected-hashes/*.sha256 2>/dev/null | head -10
9.3 Findings
Status: ⚠️ Review needed
Files inspected:
crate/server/src/middlewares/ensure_auth.rscrate/kmip/src/crate/server/src/core/operations/import_export.rsdeny.toml
| ID | File:Line | Severity | Description |
|---|---|---|---|
| A08-1 | crate/kmip/src/kmip_0/kmip_operations.rs (all structs) | Low | KMIP request/response structs do not use #[serde(deny_unknown_fields)]. Unknown fields in incoming KMIP JSON/XML are silently ignored rather than rejected. An attacker can add arbitrary fields to requests without triggering any error; this makes protocol-level fuzzing harder to detect. |
| A08-2 | start_kms_server.rs:737 | Medium | The UI session signing key is derived from the server URL. If the server is deployed with the default or a predictable URL (e.g. http://localhost:9998), the session key is predictable, allowing cookie forgery. The fallback salt "cosmian_kms_default_ui_session_key_v1" in build_session_key() makes this exploitable when no explicit key is configured. |
| A08-3 | crate/crypto/build.rs:234,274 | ✅ | OpenSSL tarball SHA-256 is verified before build. Prevents tampered source from being compiled in. |
| A08-4 | All Cargo.toml files | ✅ | No git = sourced deps. All Rust crates come from crates.io with version pinning. |
| A08-5 | crate/server/src/core/operations/import.rs | ✅ | CRL validation is performed on certificate import. Key parameter validation relies on OpenSSL's own enforcement (key size, curve OID, etc.), which is appropriate. |
Recommended fix:
- A08-1: Add
#[serde(deny_unknown_fields)]to all top-level KMIP request structs where spec compliance is required, or at minimum log a warning when unknown fields are encountered. - A08-2: Generate and persist a random 32-byte session key on first startup (saving it to the DB or a config file), and require it to be explicitly set in production. Remove the predictable URL-derived default.
10. A09 – Security Logging and Monitoring Failures
OWASP description: Insufficient logging and monitoring allows attackers to maintain persistence, pivot, and tamper with or exfiltrate data undetected.
10.1 Scope
| Area | Key files |
|---|---|
| KMIP request tracing | crate/server/src/routes/kmip.rs, routes/access.rs |
| Configuration secret logging | crate/server/src/config/command_line/ (all files) |
| Auth failure logging | crate/server/src/middlewares/ |
| Privileged operation audit events | crate/server/src/core/operations/export_get.rs, destroy.rs, revoke.rs |
| Error response content | crate/server/src/routes/ |
10.2 Investigation Steps
# Step 1 — Secrets in config log output: DB URLs, TLS passwords, API tokens
grep -rn "tracing::\|info!\|warn!\|error!\|debug!\|trace!" \
crate/server/src/config/ --include="*.rs" \
| grep -i "password\|secret\|token\|key\|credential\|url\|connection"
# Step 2 — Auth middleware: failure messages must NOT include the raw token value
grep -rn "info!\|warn!\|error!\|debug!" \
crate/server/src/middlewares/ --include="*.rs" \
| grep -i "token\|bearer\|api.key\|password\|secret"
# Step 3 — Privileged operations logged with user identity?
# (Export, Destroy, Revoke are high-value audit events)
grep -n "tracing\|info!\|warn!\|error!" \
crate/server/src/core/operations/export_get.rs \
crate/server/src/core/operations/destroy.rs \
crate/server/src/core/operations/revoke.rs 2>/dev/null | head -40
# Step 4 — Failed auth events: are 401/403 responses logged?
grep -rn "401\|403\|Unauthorized\|Forbidden\|warn!\|error!" \
crate/server/src/middlewares/ --include="*.rs" \
| grep -i "auth\|denied\|failed\|reject"
# Step 5 — Log injection: user-controlled strings inserted into tracing macros
# without sanitization allow log-forging via embedded newlines
grep -rn 'info!.*user\|debug!.*uid\|trace!.*tag\|warn!.*{.*}' \
crate/server/src/core/operations/ --include="*.rs" | head -20
# Step 6 — Coverage: all KMIP operations should have an instrumentation span
grep -rn "span!\|instrument\|#\[tracing::instrument\]" \
crate/server/src/core/operations/ --include="*.rs" | wc -l
echo "Total operation files:"
ls crate/server/src/core/operations/*.rs 2>/dev/null | wc -l
10.3 Findings
Status: ❌ Vulnerability found
Files inspected:
crate/server/src/config/command_line/db.rscrate/server/src/config/command_line/tls_config.rscrate/server/src/middlewares/jwt/jwks.rscrate/server/src/routes/ui_auth.rs
| ID | File:Line | Severity | Description |
|---|---|---|---|
| A09-1 | config/command_line/db.rs:160,168 | High | The Display impl for MainDBConfig prints PostgreSQL and MySQL database_url completely unmasked. A URL like postgresql://kms_user:secretpassword@host/kms_db is logged verbatim at server startup. Any log aggregation system (Splunk, ELK, CloudWatch) will store the database password in plaintext. Redis correctly masks the password as [****]. |
| A09-2 | config/command_line/tls_config.rs:81 | Medium | TLS P12 password is masked via .replace('.', "*") — this only replaces dot characters with asterisks. A password like my_pass is logged unchanged; my.pass becomes my*pass. The masking is ineffective for most passwords. |
| A09-3 | middlewares/jwt/jwt_token_auth.rs:115 | Low | JWT authentication failures (invalid signature, expired token) are logged only at DEBUG level. These are security-relevant events that should be logged at WARN or ERROR to ensure they appear in production monitoring dashboards. |
| A09-4 | core/operations/ (decrypt.rs, locate.rs, sign.rs) | Low | User-controlled strings (uid, user) are embedded in tracing macro log calls without sanitization. An attacker can inject newline characters into a UID field to insert fake log records. |
| A09-5 | core/operations/export_get.rs, destroy.rs | ✅ | Export and Destroy operations are logged with both uid and user at INFO level. Privileged operation audit trail is present. |
| A09-6 | routes/ui_auth.rs | ✅ | ui_oidc_client_secret is masked as **** in Display output. OIDC secret does not leak into logs. |
Recommended fix:
- A09-1: Critical — Mask the password component in database URLs before logging. Parse the URL, replace the password with
[****], then log. Example: use theurlcrate to parse and rebuild. Fix theDisplayimpl forMainDBConfig::PostgreSQLandMainDBConfig::MySQL. - A09-2: Fix the P12 password masking to replace all characters:
.repeat("*", password.len())or simply log"[****]"as a constant. - A09-3: Change JWT auth failure tracing to
tracing::warn!and include the source IP address. - A09-4: Sanitize or percent-encode
uidanduserstrings before embedding them in log calls. Consider usingtracingstructured fields (uid = %uid) and ensuring the log formatter strips control characters.
11. A10 – Server-Side Request Forgery (SSRF)
OWASP description: SSRF flaws occur when a web application fetches a remote resource without validating the user-supplied URL, allowing an attacker to coerce outbound requests to unexpected destinations (cloud metadata endpoints, internal services, etc.).
11.1 Scope
| Area | Key files |
|---|---|
| JWKS URL fetch | crate/server/src/middlewares/jwt/jwks.rs |
| Google CSE callbacks | crate/server/src/routes/google_cse/ |
| AWS XKS outbound calls | crate/server/src/routes/aws_xks/ |
| Azure EKM connections | crate/server/src/routes/azure_ekm/ |
| HTTP client construction | crate/clients/client/src/ |
11.2 Investigation Steps
# Step 1 — Enumerate all outbound HTTP client instantiations
grep -rn "reqwest::Client\|reqwest::get\|Client::new\|ClientBuilder\|hyper::Client" \
crate/ --include="*.rs" | grep -v "test\|#\[cfg(test"
# Step 2 — JWKS URL: validated / allowlisted, or taken verbatim from config?
grep -n "jwks_uri\|jwks_url\|fetch\|get\|url\|https\|http" \
crate/server/src/middlewares/jwt/jwks.rs
# Step 3 — User-controlled URL fields in KMIP extensions or attributes
# (an attacker could embed a URL in a KMIP extension field)
grep -rn "url\|http\|endpoint\|callback\|webhook" \
crate/server/src/core/operations/ --include="*.rs" \
| grep -i "user\|request\|input\|attribute\|extension"
# Step 4 — Google CSE: user-controlled redirect or callback URLs?
grep -rn "redirect\|callback\|url\|uri" \
crate/server/src/routes/google_cse/ --include="*.rs"
# Step 5 — HTTP client redirect policy: SSRF via 301 redirect chain
grep -rn "redirect\|follow_redirect\|redirect_policy\|max_redirect" \
crate/ --include="*.rs"
# Step 6 — Outbound URL allowlists
grep -rn "allowlist\|whitelist\|allowed_url\|valid_host\|parse.*url\|Url::parse" \
crate/ --include="*.rs" | grep -v test | head -15
11.3 Findings
Status: ⚠️ Review needed
Files inspected:
crate/server/src/middlewares/jwt/jwks.rscrate/server/src/routes/ui_auth.rscrate/clients/client/src/http_client/tls.rscrate/clients/ckms/src/config.rs- All
crate/server/src/routes/URL-consuming code
| ID | File:Line | Severity | Description |
|---|---|---|---|
| A10-1 | clients/ckms/src/config.rs:115 | Medium | accept_invalid_certs: true is hardcoded in the CLI's KmsClientConfig::default(). This disables outbound TLS certificate validation for CLI-to-KMS connections. While the CLI is not server-side code, cosmian_kms_client is also used in integration tests and potentially in embedded contexts where this default silently bypasses TLS chain validation. |
| A10-2 | middlewares/jwt/jwks.rs | Low | reqwest::Client::new() is used for JWKS endpoint fetching. By default reqwest follows HTTP redirects. The JWKS URL comes from admin configuration (jwt_issuer_uri), not from user input at request time. If an admin passes an internal URL as the JWKS issuer, the server could fetch internal endpoints (low-risk SSRF). No redirect allowlist or redirect::none() is applied. |
| A10-3 | routes/ui_auth.rs | Low | Same pattern: reqwest::Client::new() used for OAuth token exchange, following redirects without restriction. |
| A10-4 | All server routes | ✅ | No user-controlled URL parameters are used for server-side HTTP fetches at request time. JWKS/OIDC URLs come from static admin configuration only. The SSRF surface is limited to the initial server startup configuration. |
| A10-5 | routes/aws_xks/, routes/azure_ekm/, routes/google_cse/ | ✅ | Enterprise routes do not make outbound requests based on incoming request data. |
Recommended fix:
- A10-1: Change CLI default to
accept_invalid_certs: false. Provide an explicit--insecureflag orCOSMIAN_KMS_NO_VERIFY_CERT=trueenv var that must be explicitly set. - A10-2 / A10-3: Build the
reqwestclient with.redirect(reqwest::redirect::Policy::none())or restrict to a maximum of 1 redirect, and add a URL scheme allowlist (onlyhttps://).
12. EXT-0 – KMS Own Authorization System
OWASP ASVS V4 (Access Control) The KMS implements a custom, multi-layer authorization model that sits on top of KMIP. This section audits the full call chain from HTTP request to permission decision, covering privilege escalation paths, bypass mechanisms, and delegation controls.
12.1 Architecture
Every KMIP operation follows this authorization chain:
HTTP request
└─ TlsAuthMiddleware | JwtMiddleware | ApiTokenMiddleware
└─ EnsureAuthMiddleware (fallback: uses default_username)
└─ routes/kmip.rs → kms.get_user(&req)
│ ↑ force_default_username=true → ALL identities silently discarded
└─ dispatch(kms, ttlv, user) → operation handler
└─ retrieve_object_for_operation(uid, op, kms, user)
└─ user_has_permission(user, owm, op, kms)
├─ SHORTCUT user == owm.owner() → true (owner bypass)
├─ IMPLICIT ops.contains(Get) → ALL ops allowed
└─ DB query list_user_operations_on_object(uid, user)
├─ SQL: WHERE object_id = uid AND user_id = user
└─ UNION object_id = "*" AND user_id = user
Key design decisions with security implications:
| Mechanism | Location | Risk if abused |
|---|---|---|
| Owner bypass | user_has_permission() | Ownership must be immutable post-creation |
Get → all operations | user_has_permission() | Anyone with Get can Encrypt/Decrypt/Sign/Export |
Wildcard "*" stores Create perm | DB schema | User with Create on "*" can create unlimited objects |
force_default_username=true | kms.get_user() | Discards all user identities — complete authorization bypass |
crypto_officer_users list | clap_config.rs | Members bypass Create/Import permission checks |
EnsureAuth fallback | ensure_auth.rs | Default single-user mode if no auth is configured |
12.2 Scope
| Area | Key files |
|---|---|
| Core permission gate | crate/server/src/core/retrieve_object_utils.rs |
| KMS identity resolution & delegation | crate/server/src/core/kms/permissions.rs |
| Permission data types | crate/access/src/access.rs |
| SQL permission queries | crate/server_database/src/stores/sql/ — permissions table |
| Redis permission store | crate/server_database/src/stores/redis/permissions.rs |
Privilege config (force_default_username, crypto_officer_users) | crate/server/src/config/command_line/clap_config.rs |
| Create / Import authorization | crate/server/src/core/operations/create.rs, import.rs, register.rs |
| Delegation controls | crate/server/src/core/kms/permissions.rs — grant_access(), revoke_access() |
12.3 Investigation Steps
# Step 1 — Map every bypass mechanism and their activation conditions
grep -n "force_default_username\|crypto_officer_users\|default_username" \
crate/server/src/config/command_line/clap_config.rs \
crate/server/src/core/kms/permissions.rs
# Step 2 — Owner bypass: trace user_has_permission() — verify the owner check
# cannot be spoofed (e.g. owners set at Create time, never updated)
grep -n "owner\|is_object_owned_by\|user.*==.*owner\|owner.*==" \
crate/server/src/core/retrieve_object_utils.rs \
crate/server/src/core/kms/permissions.rs
# Step 3 — "Get implies all operations": find the implicit grant and verify scope
grep -n "KmipOperation::Get\|contains.*Get\|implies\|all.*ops" \
crate/server/src/core/retrieve_object_utils.rs
# Step 4 — Wildcard "*" permission for Create: only crypto_officer_users may grant it
grep -n '"\\*"\|wildcard\|Create\|privileged\|grant_access\|is_create' \
crate/server/src/core/kms/permissions.rs \
crate/server/src/core/operations/create.rs \
crate/server/src/core/operations/import.rs
# Step 5 — Non-owner grant delegation: is_object_owned_by() enforced in grant_access()?
grep -A10 "fn grant_access" crate/server/src/core/kms/permissions.rs | head -20
# Step 6 — Self-grant prevention: a caller must not grant themselves extra permissions
grep -n "user_id.*owner\|owner.*user_id\|grant.*self\|access.user_id" \
crate/server/src/core/kms/permissions.rs
# Step 7 — KMIP lifecycle state filter: Destroyed / Compromised block operations
grep -n "Destroyed\|Compromised\|PreActive\|Deactivated\|state.*check\|filter.*state" \
crate/server/src/core/retrieve_object_utils.rs
# Step 8 — Public endpoints: verify /health, /version, /server-info leak no data
grep -rn "health\|version\|server.info\|configure\|service\|wrap" \
crate/server/src/start_kms_server.rs | head -30
# Read actual health and version handler to confirm response content
cat crate/server/src/routes/health.rs 2>/dev/null | head -60
# Step 9 — Enterprise routes: verify AWS/Azure/Google/DKE routes cannot call
# standard KMIP operations using their own auth as a bypass
grep -rn "dispatch\|kms\.\|KMS\b" \
crate/server/src/routes/aws_xks/ \
crate/server/src/routes/azure_ekm/ \
crate/server/src/routes/google_cse/ \
crate/server/src/routes/ms_dke/ --include="*.rs" | head -30
# Step 10 — Redis PermTriple: concurrent grant + revoke atomicity
grep -n "PermTriple\|insert\|delete\|transaction\|atomic\|pipeline\|multi" \
crate/server_database/src/stores/redis/permissions.rs | head -20
# Step 11 — EnsureAuth: confirm it is a last-resort fallback, not a global bypass
cat crate/server/src/middlewares/ensure_auth.rs
12.4 Checklist
-
force_default_username=truecannot be set via any unauthenticated endpoint or environment variable injection -
crypto_officer_userslist is logged at startup so admins can detect unauthorized changes -
Get→ all-operations implicit grant is intentional, documented, and cannot cross user boundaries -
A non-owner holding
Getpermission cannot callgrant_access()to escalate other users -
A user cannot grant
Createpermission to themselves or others unless they are incrypto_officer_users -
/health,/version,/server-inforeturn no object metadata, user identities, or internal state - Enterprise routes (XKS, EKM, CSE, DKE) authenticate independently and cannot reach standard KMIP key material without passing the full KMIP auth chain
-
KMIP lifecycle transitions from
CompromisedorDestroyedare irreversible and enforced at DB level -
Redis
PermTripleupdates are atomic (no TOCTOU between concurrent grant and revoke requests)
12.5 Findings
Status: ⚠️ Review needed
Files inspected:
crate/server/src/core/retrieve_object_utils.rscrate/server/src/core/kms/permissions.rscrate/server/src/config/command_line/clap_config.rs(forforce_default_username)
| ID | File:Line | Severity | Description |
|---|---|---|---|
| EXT0-1 | retrieve_object_utils.rs:191 | Medium | permissions.contains(&KmipOperation::Get) is used as the universal "has some access" check. Any user with Get permission on an object is treated as having permission for ALL operations on it (Encrypt, Decrypt, Sign, Verify, GetAttributes, etc.). This is an intentional design decision but undocumented as a security policy. It makes permission grants broader than the receiver may expect. |
| EXT0-2 | core/kms/permissions.rs:23–100 | ✅ | grant_access() correctly enforces: (1) only the owner can grant, (2) Create can only be granted by privileged users to non-privileged users, (3) self-grant is prevented. Logic is sound. |
| EXT0-3 | config/command_line/clap_config.rs | ✅ | force_default_username defaults to false. When false, the authenticated user's identity is used. No anonymous or identity-collapse by default. |
| EXT0-4 | config/command_line/clap_config.rs | ✅ | crypto_officer_users defaults to None (empty list). Privilege escalation via config is absent by default. |
| EXT0-5 | core/kms/permissions.rs — wildcard "*" | ✅ | The "*" wildcard Create permission is documented and guarded: only crypto_officer_users can grant Create, and it cannot be granted to another privileged user. Correct. |
Recommended fix:
- EXT0-1: Document the
Get-implies-all-operations policy explicitly in the KMIP operation access control spec and in operator documentation. Consider adding a fine-grained per-operation permission check (separateEncrypt,Decrypt,Signpermissions) for objects where the Get permission holder should not have crypto access. This is a design-level decision.
13. EXT-1 – Cryptographic Key Lifecycle & Zeroization
OWASP ASVS V6 (Stored Cryptography) Sensitive cryptographic material (private keys, AES keys, shared secrets) must be zeroized from memory immediately after use. Residual key material in heap memory enables cold-boot and process-dump attacks.
13.1 Scope
| Area | Key files |
|---|---|
| Key wrapping cache | crate/server/src/core/wrapping/wrap.rs |
| Key unwrap paths | crate/server/src/core/wrapping/unwrap.rs |
| PKCS#11 key objects | crate/clients/pkcs11/provider/src/kms_object.rs |
| Crypto operations | crate/crypto/src/ |
| KMIP key material types | crate/kmip/src/ — KeyMaterial, EncryptedKeyBlock |
13.2 Investigation Steps
# Step 1 — Baseline: count all zeroize usages in the workspace
grep -rn "zeroize\|Zeroizing\|ZeroizeOnDrop\|SecretBox" \
crate/ --include="*.rs" | wc -l
# Step 2 — Find Vec<u8> likely holding key material WITHOUT Zeroizing<> wrapper
# Focus on operations that touch raw key bytes
grep -rn "Vec<u8>\|Box<\[u8\]>\|key_bytes\|key_material\|private_key\|secret_key" \
crate/server/src/core/operations/ --include="*.rs" \
| grep -v "Zeroizing\|zeroize\|#\[derive.*Zeroize\|//\|test_" | head -30
# Step 3 — Wrapping cache lifecycle: entries must be zeroized on eviction and drop
grep -n "cache\|remove\|evict\|drop\|DashMap\|HashMap\|clear\|Zeroizing" \
crate/server/src/core/wrapping/wrap.rs
# Step 4 — KMIP type zeroization: KeyMaterial and EncryptedKeyBlock implement Zeroize?
grep -rn "impl Zeroize\|impl Drop\|#\[derive.*Zeroize\|ZeroizeOnDrop" \
crate/kmip/src/ --include="*.rs"
# Step 5 — Key bytes in error messages (could surface in logs)
grep -rn 'format!.*\bkey\b\|error!.*\bkey\b\|warn!.*\bkey\b' \
crate/server/src/core/operations/ --include="*.rs" | head -15
# Step 6 — PKCS#11 provider: key material lifecycle before drop
grep -n "Zeroizing\|zeroize\|drop\|key_value\|private\|CK_BYTE" \
crate/clients/pkcs11/provider/src/kms_object.rs | head -30
# Step 7 — Unsafe block inventory (potential for bypassing Drop guarantees)
cargo geiger --workspace --output-format Ratio 2>/dev/null | head -30
13.3 Findings
Status: ⚠️ Review needed
Files inspected:
crate/server/src/core/operations/derive_key.rscrate/server/src/core/wrapping/wrap.rscrate/crypto/src/crypto/symmetric/symmetric_ciphers.rscrate/server/src/core/operations/mac.rs
| ID | File:Line | Severity | Description |
|---|---|---|---|
| EXT1-1 | operations/derive_key.rs:397,421 | Medium | derive_key() returns Vec<u8> for the wrapped/derived key material. The caller stores this in a ByteString which is not Zeroizing. If the derived key is sensitive (a root key, a DEK), it remains in heap memory as plaintext until the allocator reuses that memory. 96 other files in the codebase correctly use Zeroizing<Vec<u8>>. |
| EXT1-2 | core/wrapping/wrap.rs (unwrap cache) | Medium | The DashMap/HashMap used as the unwrapping cache stores unwrapped (plaintext) key objects in process RAM. No TTL, no max-size, no explicit zeroization on eviction is visible in wrap.rs. A memory dump of the server process exposes all recently unwrapped keys. |
| EXT1-3 | crypto/src/crypto/ (96 files) | ✅ | Broad use of Zeroizing<T> and ZeroizeOnDrop trait implementations throughout the crypto layer. Key material in bytes_set_de.rs:137 is wrapped in ZeroizeOnDrop. Good coverage. |
| EXT1-4 | operations/mac.rs:22 | ✅ | HMAC output (Vec<u8>) is not secret key material; does not require zeroization. The HMAC key is a borrowed slice — caller is responsible for its lifecycle. No issue in the MAC module itself. |
Recommended fix:
- EXT1-1: Change the
derive_keyreturn type toZeroizing<Vec<u8>>(or wrap the result before returning). PropagateZeroizingthroughByteStringusage if that type supports it. - EXT1-2: Add a TTL-based eviction (e.g. 60 seconds) or use
mlock/Zeroizingwrappers on cache values. On eviction, callzeroize()before dropping. Consider using a dedicated memory-safe cache likesecrecy::Secret<T>for cached key objects.
14. EXT-2 – Denial of Service / Resource Exhaustion
OWASP ASVS V12 / CWE-400 All user-controlled resource consumption must be bounded: request body size, TTLV nesting depth, database result set cardinality, and concurrent connection count.
14.1 Scope
| Area | Key files |
|---|---|
| Actix-web payload limit | crate/server/src/start_kms_server.rs |
| TTLV binary parser depth | crate/kmip/src/ttlv/wire/ttlv_bytes_deserializer.rs |
| TTLV XML parser depth | crate/kmip/src/ttlv/xml/parser.rs |
| Locate result pagination | crate/server_database/src/ |
| Batch request handling | crate/server/src/core/operations/dispatch.rs |
| Rate limiting | crate/server/src/middlewares/ |
14.2 Investigation Steps
# Step 1 — HTTP body size limit (Actix default is 256 KB)
grep -n "LimitPayloadSize\|max_payload_size\|PayloadConfig\|max_body\|content_length" \
crate/server/src/start_kms_server.rs crate/server/src/routes/kmip.rs
# Step 2 — TTLV binary recursion depth guard before recursive call
grep -n "depth\|recursion\|max_depth\|stack\|recursive\|fn parse\|fn decode\|fn from_ttlv" \
crate/kmip/src/ttlv/wire/ttlv_bytes_deserializer.rs
# Step 3 — TTLV XML: entity expansion (billion laughs), XXE, recursive entities
grep -n "expand_entities\|entity\|xml_parse\|XmlParser\|depth\|recursive\|ENTITY" \
crate/kmip/src/ttlv/xml/parser.rs
# Step 4 — Locate result set: is it bounded by max_items or a database LIMIT?
grep -n "Locate\|limit\|max_results\|LIMIT\|pagination\|fetch_all\|count\|MaxItems" \
crate/server/src/core/operations/locate.rs 2>/dev/null
grep -n "SELECT\|LIMIT\|offset\|page" \
crate/server_database/src/stores/sql/locate_query.rs | head -20
# Step 5 — KMIP batch requests: unbounded RequestBatchItem count?
grep -n "RequestBatchItem\|batch_items\|iter\|for.*batch\|MaximumResponseSize" \
crate/server/src/core/operations/dispatch.rs | head -20
# Step 6 — Rate limiting on KMIP endpoint
grep -rn "RateLimiter\|Governor\|leaky\|throttle\|rate\|max_conn" \
crate/server/src/middlewares/ --include="*.rs"
# Step 7 — Allocation without bound (Semgrep TTLV parser)
semgrep --config p/rust \
crate/kmip/src/ttlv/ --lang rust 2>/dev/null \
| grep -i "alloc\|capacity\|len\|size\|vec" || true
14.3 Findings
Status: ❌ Vulnerability found
Files inspected:
crate/server/src/start_kms_server.rscrate/kmip/src/ttlv/wire/ttlv_bytes_deserializer.rscrate/kmip/src/ttlv/xml/parser.rscrate/server/src/core/operations/locate.rs
| ID | File:Line | Severity | Description |
|---|---|---|---|
| EXT2-1 | start_kms_server.rs:767-768 | High | HTTP request body limit is 10_000_000_000 bytes (10 GB) — same as A04-1. Any client can send a 10 GB payload, exhausting server RAM and causing OOM / process crash. No pre-read size check. |
| EXT2-2 | ttlv_bytes_deserializer.rs:56 | High | read_ttlv() recurses without a depth counter. A crafted deeply-nested TTLV binary blob (e.g. 100 000 levels of nested Structure items) will overflow the stack and crash the process (stack overflow). This code path is reached before authentication. |
| EXT2-3 | ttlv/xml/parser.rs:196 | Medium | The TTLV XML parser has a depth counter variable but the parse loop contains no maximum depth enforcement — the counter is incremented but never checked against a limit. Deep XML nesting can cause the same stack overflow as the binary parser. |
| EXT2-4 | operations/locate.rs:96-101 | Medium | MaximumItems in a Locate request is optional and fully client-controlled. When absent, all matching objects are returned. A user who owns many objects (or to whom many are shared) can trigger a very large DB query and large response, consuming CPU, DB, and network resources. |
| EXT2-5 | All middlewares | High | No rate limiting (see A04-2). Without request rate limits, all DoS vectors listed above are amplifiable by a single unauthenticated client flooding the server. |
Recommended fix:
- EXT2-2 / EXT2-3: Add depth tracking to both parsers with
const MAX_TTLV_DEPTH: usize = 64and early-return errors when exceeded. This is the highest priority fix as it is reachable before authentication. - EXT2-1: Reduce payload limit to a realistic maximum (32–64 MB). See A04-1 fix.
- EXT2-4: Cap
MaximumItemsserver-side: if absent or > configuredmax_locate_items(default 1 000), clamp the SQL LIMIT tomax_locate_items. - EXT2-5: Implement rate limiting (see A04-2 fix).
15. Remediation Priority Matrix
All confirmed findings from sections 2–14, ordered by severity.
| ID | Section | File:Line | Severity | CVSS (est.) | Status | Assigned to | Due |
|---|---|---|---|---|---|---|---|
| A03-2 / EXT2-2 | A03 Injection / EXT-2 DoS | ttlv_bytes_deserializer.rs:56 | High | 7.5 | ✅ Fixed | 2026-04-14 | |
| A04-1 / EXT2-1 | A04 Insecure Design / EXT-2 DoS | start_kms_server.rs:767-768 | High | 7.5 | ✅ Fixed | 2026-04-14 | |
| A04-2 / EXT2-5 | A04 Insecure Design / EXT-2 DoS | All server middlewares | High | 7.5 | ✅ Fixed | 2026-04-14 | |
| A07-1 | A07 Auth Failures | jwt_config.rs:170 | High | 8.1 | ✅ Fixed | 2026-04-14 | |
| A07-6 | A07 Auth Failures | All auth endpoints | High | 7.3 | ✅ Fixed | 2026-04-14 | |
| A09-1 | A09 Logging | config/command_line/db.rs:160,168 | High | 7.2 | ✅ Fixed | 2026-04-14 | |
| A02-3 / EXT1-2 | A02 Crypto / EXT-1 Zeroization | core/wrapping/wrap.rs | Medium | 5.5 | Open | ||
| A03-3 / EXT2-3 | A03 Injection / EXT-2 DoS | ttlv/xml/parser.rs:196 | Medium | 5.9 | ✅ Fixed | 2026-04-14 | |
| A04-3 / EXT2-4 | A04 Insecure Design / EXT-2 DoS | operations/locate.rs:96-101 | Medium | 5.3 | ✅ Fixed | 2026-04-14 | |
| A05-1 / A01-1 | A05 Misconfiguration / A01 Access | start_kms_server.rs:776–962 | Medium | 5.4 | ✅ Fixed | 2026-04-14 | |
| A05-3 / A07-5 | A05 Misconfiguration / A07 Auth | jwt_config.rs:10,155 | Medium | 5.0 | ⚠️ Mitigated | 2026-04-14 | |
| A07-2 | A07 Auth Failures | api_token_auth.rs:126 | Medium | 5.9 | ✅ Fixed | 2026-04-14 | |
| A08-2 | A08 Integrity | start_kms_server.rs:737 | Medium | 4.3 | ✅ Fixed | 2026-04-14 | |
| A09-2 | A09 Logging | config/command_line/tls_config.rs:81 | Medium | 4.0 | ✅ Fixed | 2026-04-14 | |
| A10-1 | A10 SSRF | clients/ckms/src/config.rs:115 | Medium | 4.8 | ⚠️ Mitigated | 2026-04-14 | |
| EXT1-1 | EXT-1 Zeroization | operations/derive_key.rs:397,421 | Medium | 4.0 | ✅ Fixed | 2026-04-14 | |
| A02-2 | A02 Crypto | actions/mac.rs:17 | Low | 3.1 | Open | ||
| A06-1 | A06 Components | Cargo.toml (rand advisory) | Low | 3.7 | Open | ||
| A06-2 | A06 Components | Cargo.toml (dup crates) | Low | 2.0 | Open | ||
| A07-3 | A07 Auth Failures | tls_auth.rs:147 | Low | 2.0 | Open | ||
| A07-4 | A07 Auth Failures | start_kms_server.rs:759 | Low | 2.6 | ✅ Fixed | 2026-04-14 | |
| A08-1 | A08 Integrity | KMIP structs | Low | 2.0 | Open | ||
| A09-3 | A09 Logging | jwt_token_auth.rs:115 | Low | 2.0 | ✅ Fixed | 2026-04-14 | |
| A09-4 | A09 Logging | core/operations/ | Low | 2.0 | Open | ||
| A10-2 / A10-3 | A10 SSRF | jwks.rs, ui_auth.rs | Low | 2.3 | ✅ Fixed | 2026-04-14 | |
| EXT0-1 | EXT-0 Authorization | retrieve_object_utils.rs:191 | Low | 3.1 | Open | ||
| A02-1 | A02 Crypto | symmetric_ciphers.rs:429,784 | Info | N/A | Closed (FP) | ||
| A01-2 | A01 Access | routes/health.rs:47 | Info | N/A | Open |
Severity definitions (CVSS 3.1 base score ranges)
| Severity | CVSS score | Response SLA |
|---|---|---|
| Critical | 9.0 – 10.0 | Fix before next release; block merge |
| High | 7.0 – 8.9 | Fix within 1 sprint |
| Medium | 4.0 – 6.9 | Fix within 3 sprints |
| Low | 0.1 – 3.9 | Schedule in backlog |
| Info | N/A | Document / accept risk |
16. Report Sign-off
| Role | Name | Signature | Date |
|---|---|---|---|
| Lead auditor | GitHub Copilot (automated) | — | 2026-04-13 |
| Security reviewer | (human review pending) | ||
| Engineering lead | (human review pending) |
Automated audit completed: 2026-04-13 Next audit scheduled: Quarterly, or on every major dependency or KMIP spec change.
Review frequency: Quarterly, or on every major dependency update / KMIP spec change.
Summary statistics
| Severity | Count |
|---|---|
| High | 6 |
| Medium | 10 |
| Low | 10 |
| Info / FP | 3 |
| Total | 29 |
No Critical (CVSS ≥ 9.0) findings were identified. The most urgent items are the TTLV recursion depth limit (stack-overflow DoS reachable before auth), 10 GB payload limit (memory exhaustion), missing rate limiting, JWT algorithm confusion (authentication bypass potential), and database credential leak in logs.
Cosmian KMS — Multi-Framework Security Audit
Audit date: 2026-08-18T08:47:56Z
Frameworks: NIST CSF 2.0 / SSDF (SP 800-218) · CIS Controls v8 · ISO/IEC 27034 · OSSTMM
Repository: kms — branch feat/split_key
Commit: a02a3ebbe
Automated Audit Checks
| Status | Check |
|---|---|
| ⚠️ WARN | gitleaks not installed — skipping secret scan |
| ✅ PASS | unsafe block count: 345 (< 350 threshold; mostly FFI wrappers) |
| ⚠️ WARN | cargo audit: advisories found — run 'cargo audit' for details (non-blocking for warnings) |
| ✅ PASS | cargo deny: no banned dependencies or features |
| ✅ PASS | deny.toml bans serde_json unbounded_depth feature |
| ✅ PASS | Structured logging (OTLP/rolling) configuration found |
| ✅ PASS | Safe default bind address (127.0.0.1 / localhost) found in codebase |
| ✅ PASS | JWKS HTTPS guard (validate_jwks_uris_are_https or equivalent) present in codebase |
| ✅ PASS | DB URL password masking (**** placeholder) found |
| ✅ PASS | TLS P12 password masking found |
| ✅ PASS | JWKS HTTP client disables redirect following (SSRF guard) in jwks.rs |
| ✅ PASS | No wildcard CORS origin found in default server configuration |
| ✅ PASS | TTLV/XML recursion depth limit constant found in codebase |
| ✅ PASS | JWT algorithm allowlist found in codebase |
| ✅ PASS | No legacy TLS 1.0/1.1 configuration detected |
| ✅ PASS | Files with panic!() (non-test): 16 (< 20 threshold) |
| ⚠️ WARN | Hard-coded privileged usernames found in config source — verify intent |
| ✅ PASS | Zeroize/Secrecy usage found for sensitive key material |
| ⚠️ WARN | unwrap() count (non-test): 1808 — review each call site |
| ✅ PASS | Access-control module (/Users/manu/Cosmian/core/cli_alt3/kms/crate/access) exists |
| ⚠️ WARN | semgrep not installed — skipping static analysis (run: pip install semgrep) |
Summary
- ✅ Passed: 16
- ⚠️ Warnings: 5
- ❌ Failed: 0
AUDIT PASSED WITH WARNINGS — 5 item(s) require review.
Report auto-generated by .mise/scripts/audit/multi_framework.sh on 2026-08-18T08:47:56Z
KMS Performance Comparison
Versions: v5.28.0
Generated: 2026-10-09
Benchmark Environment
| Field | Value |
|---|---|
| Date | 2026-10-08 00:43:34 UTC |
| HSM backend | None (Software) |
| Command | mise run bench:load |
| Build | release / non-fips |
| Database | SQLite (temporary, single benchmark run) |
| CPU | Intel(R) Core(TM) i9-14900T @ 1,435 MHz |
| CPU cores | 24 physical / 32 logical (HT) |
| RAM | 31.1 GB |
| OS | Ubuntu 24.04.5 LTS |
| Kernel | 6.8.0-146-generic |
Load test parameters
| Parameter | Value |
|---|---|
| Mode | all |
| Protocols | all |
| Measurement window | 20 s per concurrency level |
| Concurrency levels | 1,2,4,8,16 |
| Warm-up | 5 s |
| Cooldown between levels | 2 s |
CPU detail (lscpu)
Architecture: x86_64
CPU op-mode(s): 32-bit, 64-bit
Address sizes: 46 bits physical, 48 bits virtual
Byte Order: Little Endian
CPU(s): 32
On-line CPU(s) list: 0-31
Vendor ID: GenuineIntel
Model name: Intel(R) Core(TM) i9-14900T
CPU family: 6
Model: 183
Thread(s) per core: 2
Core(s) per socket: 24
Socket(s): 1
Stepping: 1
CPU(s) scaling MHz: 22%
CPU max MHz: 5500,0000
CPU min MHz: 800,0000
BogoMIPS: 2227,20
Flags: fpu vme de pse tsc msr pae mce cx8 apic sep mtrr pge mca cmov pat pse36 clflush dts acpi mmx fxsr sse sse2 ss ht tm pbe syscall nx pdpe1gb rdtscp lm constant_tsc art arch_perfmon pebs bts rep_good nopl xtopology nonstop_tsc cpuid aperfmperf tsc_known_freq pni pclmulqdq dtes64 monitor ds_cpl vmx smx est tm2 ssse3 sdbg fma cx16 xtpr pdcm pcid sse4_1 sse4_2 x2apic movbe popcnt tsc_deadline_timer aes xsave avx f16c rdrand lahf_lm abm 3dnowprefetch cpuid_fault epb ssbd ibrs ibpb stibp ibrs_enhanced tpr_shadow flexpriority ept vpid ept_ad fsgsbase tsc_adjust bmi1 avx2 smep bmi2 erms invpcid rdseed adx smap clflushopt clwb intel_pt sha_ni xsaveopt xsavec xgetbv1 xsaves split_lock_detect user_shstk avx_vnni dtherm ida arat pln pts hwp hwp_notify hwp_act_window hwp_epp hwp_pkg_req hfi vnmi umip pku ospke waitpkg gfni vaes vpclmulqdq tme rdpid movdiri movdir64b fsrm md_clear serialize pconfig arch_lbr ibt flush_l1d arch_capabilities ibpb_exit_to_user
Virtualization: VT-x
L1d cache: 896 KiB (24 instances)
L1i cache: 1,3 MiB (24 instances)
L2 cache: 32 MiB (12 instances)
L3 cache: 36 MiB (1 instance)
NUMA node(s): 1
NUMA node0 CPU(s): 0-31
Vulnerability Gather data sampling: Not affected
Vulnerability Indirect target selection: Not affected
Vulnerability Itlb multihit: Not affected
Vulnerability L1tf: Not affected
Vulnerability Mds: Not affected
Vulnerability Meltdown: Not affected
Vulnerability Mmio stale data: Not affected
Vulnerability Reg file data sampling: Mitigation; Clear Register File
Vulnerability Retbleed: Not affected
Vulnerability Spec rstack overflow: Not affected
Vulnerability Spec store bypass: Mitigation; Speculative Store Bypass disabled via prctl
Vulnerability Spectre v1: Mitigation; usercopy/swapgs barriers and __user pointer sanitization
Vulnerability Spectre v2: Mitigation; Enhanced / Automatic IBRS; IBPB conditional; PBRSB-eIBRS SW sequence; BHI BHI_DIS_S
Vulnerability Srbds: Not affected
Vulnerability Tsa: Not affected
Vulnerability Tsx async abort: Not affected
Vulnerability Vmscape: Mitigation; IBPB before exit to userspace
Architecture
graph TB
subgraph cli["Local: ckms CLI"]
ckms["<b>ckms load</b><br/>(concurrent load driver)"]
end
subgraph srv["KMS Server"]
kmip["KMIP 2.1<br/>(HTTP/TLS)"]
crypto["Software Crypto<br/>(OpenSSL 3.6.2)"]
db["Key Storage<br/>(SQLite/PostgreSQL)"]
end
ckms -->|HTTP/TLS| kmip
kmip --> crypto
crypto --> db
style ckms fill:#4A90E2
style kmip fill:#7ED321
style crypto fill:#F5A623
style db fill:#BD10E0
Components:
- ckms: Configurable concurrent load generator (ops/sec sweep)
- KMIP Endpoint: Protocol handler for request/response marshaling
- Software Crypto: AES-GCM, RSA-PKCS, ECDSA-P256, EdDSA-Ed25519 via OpenSSL 3.6.2
- Key Storage: Key material persistence (SQLite or PostgreSQL)
Protocols
The KMS server was exercised over three distinct wire protocols. Each benchmark column is labelled with the protocol name it used.
| Protocol | Transport | Encoding | Endpoint | Description |
|---|---|---|---|---|
| ttlv-json | HTTP/1.1 | KMIP 2.1 JSON-TTLV | POST /kmip/2_1 | Primary interoperability protocol — any KMIP 2.1 compliant client can use it |
| ttlv-bytes | HTTP/1.1 | KMIP 2.1 binary TTLV | POST /kmip | Binary wire format; eliminates JSON parsing overhead — typically 10–30 % faster |
| jose | HTTP/1.1 | JWE / JWS (JOSE) | POST /v1/crypto/ | REST API for OAuth2/OIDC workloads that prefer JWA algorithm identifiers over KMIP |
KMIP TTLV (Tag-Type-Length-Value) is the native encoding of the KMIP 2.1 standard (OASIS KMIP Spec v2.1, §9.1). The JSON variant wraps every field in a {"tag": …, "type": …, "value": …} JSON object and base64-encodes binary values. The binary variant uses a compact 8-byte fixed header (3-byte tag, 1-byte type, 4-byte length) per value, removing JSON tokenisation, base64, and UTF-8 overhead entirely.
JOSE (JSON Object Signing and Encryption, RFC 7516 / RFC 7515) exposes KMS key material through /v1/crypto/ REST endpoints. It is used by cloud integrations (Google CSE, Microsoft DKE, Azure EKM) and any workload that speaks JWA algorithm identifiers (A256GCM, RS256, ES384 …) rather than KMIP semantics.
Benchmark Methodology
Plaintext / payload sizes
All encrypt/decrypt benchmarks use a fixed-size random payload. Sizes represent a realistic key-wrapping or small-message encryption workload without introducing significant data-transfer overhead on a loopback connection.
| Algorithm / category | Plaintext size | Notes |
|---|---|---|
| AES-GCM (128 / 192 / 256-bit key) | 64 bytes | FIPS 140-3 |
| AES-GCM-SIV (128 / 256-bit key) | 64 bytes | Non-FIPS |
| AES-XTS (128 / 256-bit AES = 256 / 512-bit key) | 64 bytes | FIPS 140-3; requires 16-byte IV |
| ChaCha20-Poly1305 (256-bit key) | 64 bytes | Non-FIPS |
| ECIES — P-256 / P-384 / P-521 | 64 bytes | Non-FIPS; EC public-key encryption |
| Salsa Sealed Box (X25519) | 64 bytes | Non-FIPS |
| Covercrypt (attribute-based encryption) | 64 bytes | Non-FIPS |
JOSE JWE — dir + AES-GCM (A128GCM / A192GCM / A256GCM) | 64 bytes | Symmetric (direct key agreement) |
| JOSE JWE — RSA-OAEP + AES-GCM (2048 / 4096-bit) | 64 bytes | Asymmetric (RSA-OAEP CEK wrapping) |
| RSA-OAEP (2048 / 3072 / 4096-bit) | 32 bytes | Limited by RSA block size |
| RSA-PKCS#1 v1.5 (2048 / 3072 / 4096-bit) | 32 bytes | Non-FIPS |
| RSA-AES Key Wrap — KWP (2048 / 3072 / 4096-bit) | 32 bytes | FIPS 140-3 |
| Sign / Verify — all algorithms | 32 bytes | Message is hashed internally |
| JOSE JWS / MAC | 32 bytes |
Load test (mise run bench:load)
The load test sweeps a configurable list of concurrency levels. At each level N concurrent async tasks send pre-serialised requests in tight loops for a fixed measurement window (default: 20 s), preceded by a warm-up phase (default: 5 s) that is excluded from measurements. Pre-serialisation happens once at setup time and the same bytes are reused on every iteration, isolating server-side KMS latency from client-side encoding overhead. Recorded metrics per (protocol, operation, concurrency) triple:
- Throughput — requests per second (req/s)
- p50 / p95 / p99 — round-trip latency percentiles (ms)
Criterion micro-benchmarks (ckms bench)
Criterion (Rust, v0.5) measures the round-trip latency of a single request from the ckms client library through the KMS server and back over a loopback TCP connection. The server is started once and kept alive across all benchmarks in the suite.
The reported value is the mean ± 95 % confidence interval over a configurable number of samples (preset quick: 3 s warm-up + 5 s measurement per benchmark).
Infrastructure note: Both test types use a local SQLite backend (temporary, discarded after the run). This isolates pure cryptographic and KMIP serialisation overhead from database I/O. Throughput figures will differ on a production deployment backed by PostgreSQL or Redis-Findex.
Load Tests
encrypt/aes-gcm
| Concurrency | ttlv-json (req/s) | ttlv-bytes (req/s) | jose (req/s) |
|---|---|---|---|
| 1 | 2,953 | 3,881 | 23,798 |
| 2 | 5,327 | 6,928 | 40,920 |
| 4 | 9,080 | 10,936 | 66,398 |
| 8 | 13,091 | 16,007 | 84,753 |
| 16 | 18,328 | 21,956 | 105,014 |
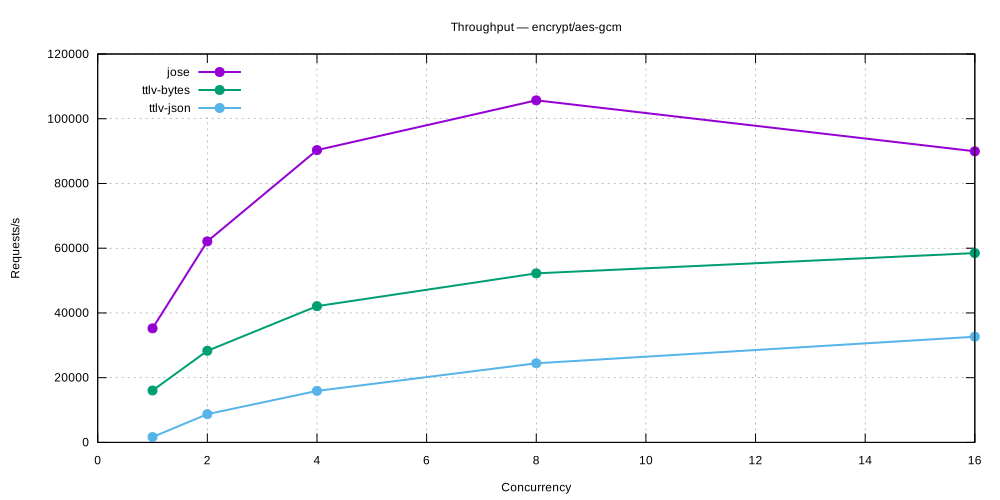
sign-verify/ecdsa-p256
| Concurrency | ttlv-json (req/s) | ttlv-bytes (req/s) | jose (req/s) |
|---|---|---|---|
| 1 | 2,127 | 2,347 | 2,497 |
| 2 | 3,864 | 4,187 | 4,528 |
| 4 | 6,487 | 6,860 | 7,385 |
| 8 | 10,181 | 10,280 | 11,040 |
| 16 | 14,630 | 14,685 | 15,736 |
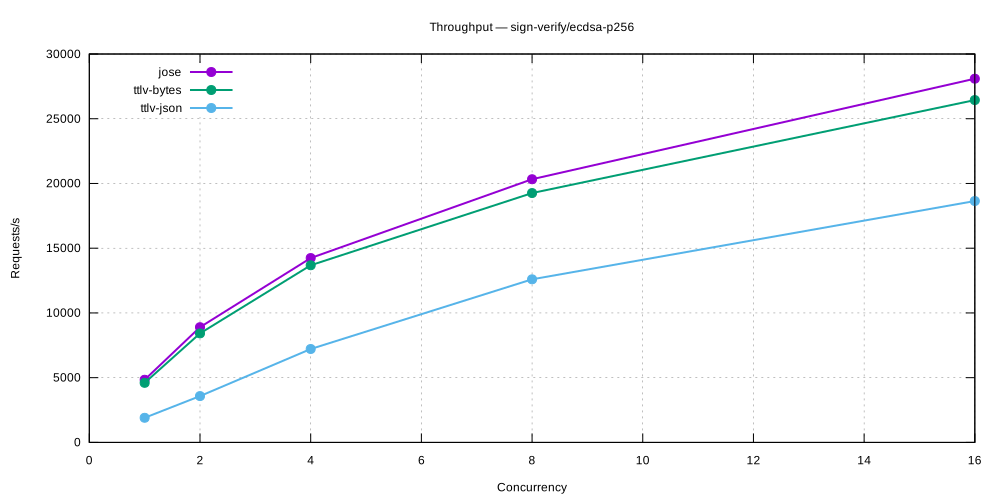
sign-verify/eddsa-ed25519
| Concurrency | ttlv-json (req/s) | ttlv-bytes (req/s) | jose (req/s) |
|---|---|---|---|
| 1 | 10,184 | 10,953 | 14,522 |
| 2 | 17,411 | 17,131 | 25,489 |
| 4 | 30,464 | 30,526 | 40,361 |
| 8 | 44,048 | 42,809 | 56,244 |
| 16 | 60,962 | 58,908 | 77,952 |
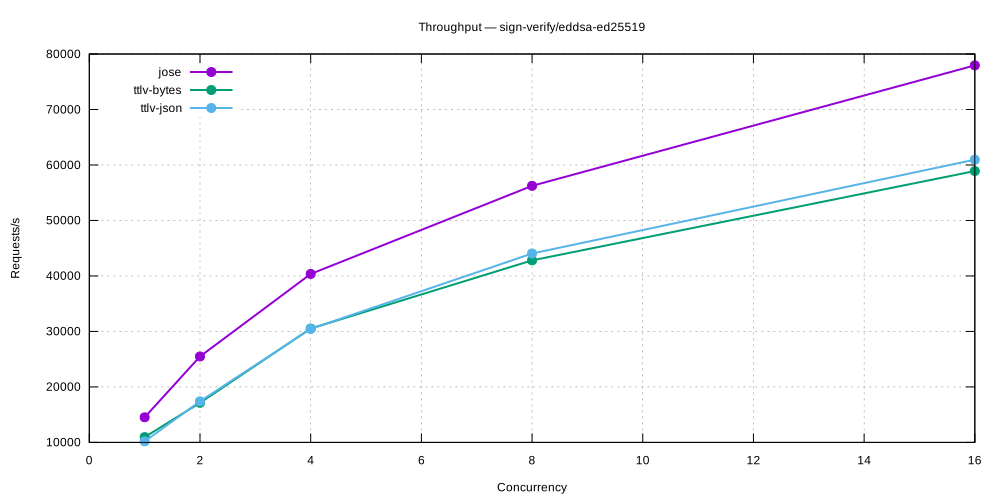
sign-verify/ecdsa-secp256k1
| Concurrency | ttlv-json (req/s) | ttlv-bytes (req/s) |
|---|---|---|
| 1 | 2,669 | 2,625 |
| 2 | 4,635 | 4,757 |
| 4 | 7,836 | 7,714 |
| 8 | 11,067 | 11,058 |
| 16 | 15,048 | 14,972 |
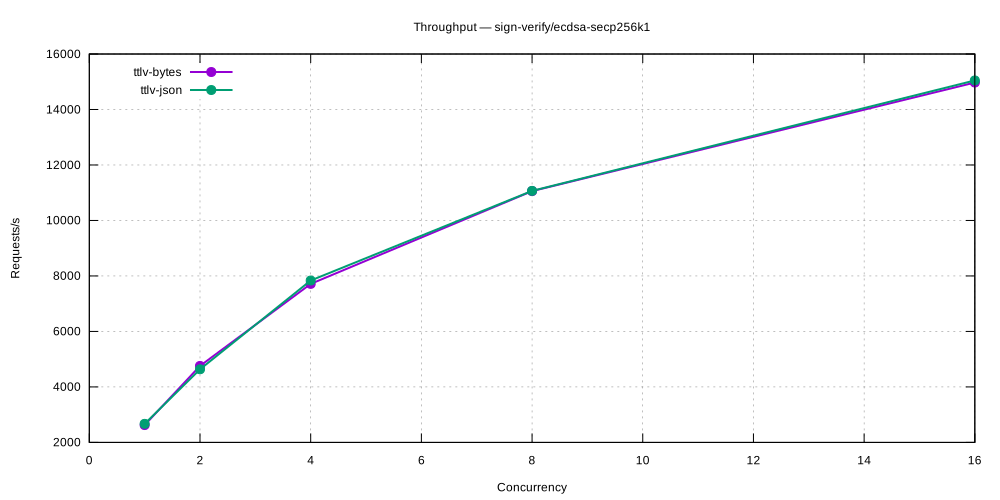
key-creation/aes-sym
| Concurrency | ttlv-json (req/s) |
|---|---|
| 1 | 2,869 |
| 2 | 2,802 |
| 4 | 3,914 |
| 8 | 3,141 |
| 16 | 3,674 |
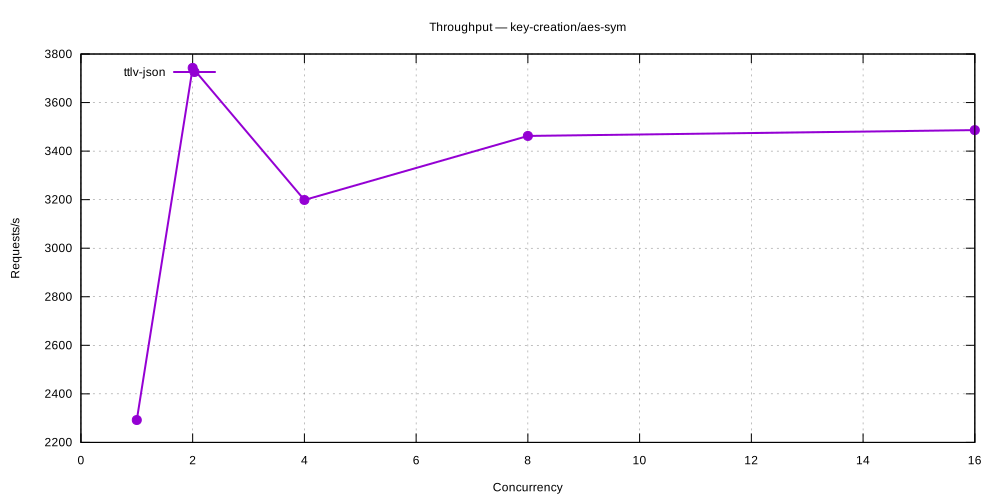
batch/aes-gcm-10
| Concurrency | ttlv-json (req/s) |
|---|---|
| 1 | 353 |
| 2 | 661 |
| 4 | 1,047 |
| 8 | 1,586 |
| 16 | 2,159 |
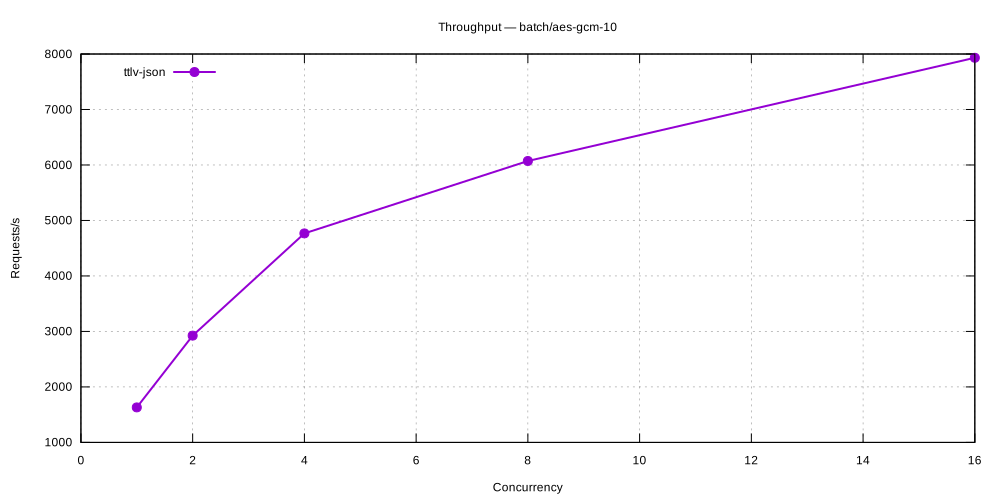
Criterion Benchmarks
Symmetric Encryption
| Benchmark | ttlv-json | ttlv-bytes | jose |
|---|---|---|---|
| aes-gcm-siv/decrypt/128 | 64.5 µs | 70.6 µs | — |
| aes-gcm-siv/decrypt/256 | 73.7 µs | 65.2 µs | — |
| aes-gcm-siv/encrypt/128 | 63.3 µs | 71.9 µs | — |
| aes-gcm-siv/encrypt/256 | 68.3 µs | 67.6 µs | — |
| aes-gcm/decrypt/128 | 65.9 µs | 76.8 µs | 34.3 µs |
| aes-gcm/decrypt/192 | 65.9 µs | 69.3 µs | 35.7 µs |
| aes-gcm/decrypt/256 | 66.8 µs | 73.5 µs | 36.4 µs |
| aes-gcm/encrypt/128 | 65.5 µs | 73.3 µs | 40.5 µs |
| aes-gcm/encrypt/192 | 63.9 µs | 119.2 µs | 35.5 µs |
| aes-gcm/encrypt/256 | 69.9 µs | 64.6 µs | 35.3 µs |
| aes-xts/decrypt/128 | 59.8 µs | 60.3 µs | — |
| aes-xts/decrypt/256 | 59.0 µs | 59.4 µs | — |
| aes-xts/encrypt/128 | 71.4 µs | 67.9 µs | — |
| aes-xts/encrypt/256 | 78.6 µs | 69.2 µs | — |
| chacha20-poly1305/decrypt/256 | 62.9 µs | 70.7 µs | — |
| chacha20-poly1305/encrypt/256 | 63.5 µs | 64.7 µs | — |
| salsa-sealed-box/decrypt | 132.5 µs | 183.1 µs | — |
| salsa-sealed-box/encrypt | 142.9 µs | 176.9 µs | — |
Asymmetric Encryption
| Benchmark | ttlv-json | ttlv-bytes | jose |
|---|---|---|---|
| covercrypt/decrypt | 11.88 ms | 11.64 ms | — |
| covercrypt/encrypt | 5.21 ms | 4.95 ms | — |
| ecies/decrypt/P-256 | 134.3 µs | 138.1 µs | — |
| ecies/decrypt/P-384 | 1.30 ms | 955.1 µs | — |
| ecies/decrypt/P-521 | 2.23 ms | 2.34 ms | — |
| ecies/encrypt/P-256 | 184.7 µs | 176.7 µs | — |
| ecies/encrypt/P-384 | 1.53 ms | 1.03 ms | — |
| ecies/encrypt/P-521 | 2.32 ms | 2.97 ms | — |
| rsa-aes-kwp/decrypt/4096 | 165.57 ms | 167.22 ms | — |
| rsa-aes-kwp/encrypt/4096 | 174.7 µs | 159.4 µs | — |
| rsa-oaep/decrypt/2048 | — | — | 22.70 ms |
| rsa-oaep/decrypt/4096 | 167.38 ms | 167.01 ms | 165.10 ms |
| rsa-oaep/encrypt/2048 | — | — | 125.5 µs |
| rsa-oaep/encrypt/4096 | 196.0 µs | 165.2 µs | 183.2 µs |
| rsa-pkcs1v15/decrypt/4096 | 164.97 ms | 166.02 ms | — |
| rsa-pkcs1v15/encrypt/4096 | 167.9 µs | 161.2 µs | — |
Key Encapsulation (KEM)
| Benchmark | ttlv-json | ttlv-bytes |
|---|---|---|
| configurable/decapsulate/ML-KEM-512 | 135.2 µs | 125.7 µs |
| configurable/decapsulate/ML-KEM-512/P-256 | 149.4 µs | 117.1 µs |
| configurable/decapsulate/ML-KEM-768 | 148.7 µs | 136.7 µs |
| configurable/decapsulate/ML-KEM-768/P-256 | 157.5 µs | 155.9 µs |
| configurable/encapsulate/ML-KEM-512 | 169.6 µs | 181.5 µs |
| configurable/encapsulate/ML-KEM-512/P-256 | 332.3 µs | 328.8 µs |
| configurable/encapsulate/ML-KEM-768 | 284.0 µs | 216.4 µs |
| configurable/encapsulate/ML-KEM-768/P-256 | 374.3 µs | 445.0 µs |
| pqc/decapsulate/ML-KEM-1024 | 211.3 µs | 199.9 µs |
| pqc/decapsulate/ML-KEM-512 | 159.3 µs | 127.3 µs |
| pqc/decapsulate/ML-KEM-768 | 182.9 µs | 163.6 µs |
| pqc/decapsulate/X25519MLKEM768 | 242.0 µs | 227.4 µs |
| pqc/encapsulate/ML-KEM-1024 | 181.4 µs | 143.1 µs |
| pqc/encapsulate/ML-KEM-512 | 121.4 µs | 125.9 µs |
| pqc/encapsulate/ML-KEM-768 | 159.6 µs | 122.0 µs |
| pqc/encapsulate/X25519MLKEM768 | 180.0 µs | 177.4 µs |
Key Creation
| Benchmark | ttlv-json |
|---|---|
| EC/ES256 | — |
| EC/ES384 | — |
| RSA/2048 | — |
| aes-gcm/oct/128 | — |
| aes-gcm/oct/256 | — |
| covercrypt/master-keypair | 21.63 ms |
| ec/ed25519 | 420.2 µs |
| ec/ed448 | 540.1 µs |
| ec/p256 | 419.5 µs |
| ec/p384 | 895.3 µs |
| ec/p521 | 1.37 ms |
| ec/secp256k1 | 518.8 µs |
| kem/ML-KEM-512 | 805.6 µs |
| kem/ML-KEM-512/P-256 | 775.9 µs |
| kem/ML-KEM-512/X25519 | 1.75 ms |
| kem/ML-KEM-768 | 967.7 µs |
| kem/ML-KEM-768/P-256 | 635.7 µs |
| kem/ML-KEM-768/X25519 | 2.23 ms |
| pqc/ML-DSA-44 | 646.5 µs |
| pqc/ML-DSA-65 | 636.9 µs |
| pqc/ML-DSA-87 | 901.0 µs |
| pqc/ML-KEM-1024 | 569.6 µs |
| pqc/ML-KEM-512 | 603.7 µs |
| pqc/ML-KEM-768 | 1.21 ms |
| pqc/X25519MLKEM768 | 621.9 µs |
| pqc/X448MLKEM1024 | 598.7 µs |
| rsa/rsa-4096 | 408.93 ms |
| symmetric/aes-128 | 229.1 µs |
| symmetric/aes-192 | 213.4 µs |
| symmetric/aes-256 | 513.0 µs |
| symmetric/chacha20-256 | 235.8 µs |
Sign / Verify
| Benchmark | ttlv-json | ttlv-bytes | jose |
|---|---|---|---|
| ecdsa-p256/sign | 434.4 µs | 426.4 µs | 416.2 µs |
| ecdsa-p256/verify | 180.3 µs | 220.3 µs | 121.6 µs |
| ecdsa-p384/sign | 1.11 ms | 1.27 ms | 952.1 µs |
| ecdsa-p384/verify | 675.3 µs | 576.8 µs | 556.4 µs |
| ecdsa-p521/sign | 2.23 ms | 2.36 ms | — |
| ecdsa-p521/verify | 1.23 ms | 1.14 ms | — |
| ecdsa-secp256k1/sign | 422.8 µs | 379.4 µs | — |
| ecdsa-secp256k1/verify | 362.4 µs | 374.8 µs | — |
| eddsa-ed25519/sign | 102.9 µs | 109.9 µs | 85.5 µs |
| eddsa-ed25519/verify | 159.3 µs | 175.2 µs | 133.5 µs |
| eddsa-ed448/sign | 279.6 µs | 274.7 µs | — |
| eddsa-ed448/verify | 226.7 µs | 214.5 µs | — |
| ml-dsa/sign/44 | 518.2 µs | 499.9 µs | — |
| ml-dsa/sign/65 | 774.7 µs | 741.1 µs | — |
| ml-dsa/sign/87 | 932.5 µs | 997.1 µs | — |
| ml-dsa/verify/44 | 339.3 µs | 297.4 µs | — |
| ml-dsa/verify/65 | 422.5 µs | 395.9 µs | — |
| ml-dsa/verify/87 | 547.1 µs | 507.2 µs | — |
| rsa-pkcs1v15/sign | — | — | 23.34 ms |
| rsa-pkcs1v15/verify | — | — | 81.2 µs |
| rsa-pss/sign | — | — | 23.66 ms |
| rsa-pss/sign/4096 | 166.36 ms | 166.95 ms | — |
| rsa-pss/verify | — | — | 117.5 µs |
| rsa-pss/verify/4096 | 190.0 µs | 181.0 µs | — |
| slh-dsa/sign/SHA2-128f | 9.65 ms | 9.67 ms | — |
| slh-dsa/sign/SHA2-256f | 34.79 ms | 38.00 ms | — |
| slh-dsa/sign/SHAKE-128f | 25.19 ms | 24.63 ms | — |
| slh-dsa/sign/SHAKE-256f | 79.82 ms | 81.92 ms | — |
| slh-dsa/verify/SHA2-128f | 1.65 ms | 1.56 ms | — |
| slh-dsa/verify/SHA2-256f | 3.82 ms | 3.42 ms | — |
| slh-dsa/verify/SHAKE-128f | 2.55 ms | 2.36 ms | — |
| slh-dsa/verify/SHAKE-256f | 5.16 ms | — | — |
KMS Performance Comparison
Versions: v5.28.0
Generated: 2026-10-09
Benchmark Environment
| Field | Value |
|---|---|
| Date | 2026-10-07 23:12:31 UTC |
| HSM backend | SoftHSM2 |
| Command | mise run bench:hsm --hsm-model softhsm2 |
| Build | release / non-fips |
| HTTP workers (Actix-web) | 32 |
| Database | SQLite (temporary, single benchmark run) |
| CPU | Intel(R) Core(TM) i9-14900T @ 800 MHz |
| CPU cores | 24 physical / 32 logical (HT) |
| RAM | 31.1 GB |
| OS | Ubuntu 24.04.5 LTS |
| Kernel | 6.8.0-146-generic |
Load test parameters
| Parameter | Value |
|---|---|
| Mode | all |
| Protocols | all |
| Measurement window | 20 s per concurrency level |
| Concurrency levels | 1,2,4,8,16 |
| Warm-up | 5 s |
| Cooldown between levels | 2 s |
CPU detail (lscpu)
Architecture: x86_64
CPU op-mode(s): 32-bit, 64-bit
Address sizes: 46 bits physical, 48 bits virtual
Byte Order: Little Endian
CPU(s): 32
On-line CPU(s) list: 0-31
Vendor ID: GenuineIntel
Model name: Intel(R) Core(TM) i9-14900T
CPU family: 6
Model: 183
Thread(s) per core: 2
Core(s) per socket: 24
Socket(s): 1
Stepping: 1
CPU(s) scaling MHz: 30%
CPU max MHz: 5500,0000
CPU min MHz: 800,0000
BogoMIPS: 2227,20
Flags: fpu vme de pse tsc msr pae mce cx8 apic sep mtrr pge mca cmov pat pse36 clflush dts acpi mmx fxsr sse sse2 ss ht tm pbe syscall nx pdpe1gb rdtscp lm constant_tsc art arch_perfmon pebs bts rep_good nopl xtopology nonstop_tsc cpuid aperfmperf tsc_known_freq pni pclmulqdq dtes64 monitor ds_cpl vmx smx est tm2 ssse3 sdbg fma cx16 xtpr pdcm pcid sse4_1 sse4_2 x2apic movbe popcnt tsc_deadline_timer aes xsave avx f16c rdrand lahf_lm abm 3dnowprefetch cpuid_fault epb ssbd ibrs ibpb stibp ibrs_enhanced tpr_shadow flexpriority ept vpid ept_ad fsgsbase tsc_adjust bmi1 avx2 smep bmi2 erms invpcid rdseed adx smap clflushopt clwb intel_pt sha_ni xsaveopt xsavec xgetbv1 xsaves split_lock_detect user_shstk avx_vnni dtherm ida arat pln pts hwp hwp_notify hwp_act_window hwp_epp hwp_pkg_req hfi vnmi umip pku ospke waitpkg gfni vaes vpclmulqdq tme rdpid movdiri movdir64b fsrm md_clear serialize pconfig arch_lbr ibt flush_l1d arch_capabilities ibpb_exit_to_user
Virtualization: VT-x
L1d cache: 896 KiB (24 instances)
L1i cache: 1,3 MiB (24 instances)
L2 cache: 32 MiB (12 instances)
L3 cache: 36 MiB (1 instance)
NUMA node(s): 1
NUMA node0 CPU(s): 0-31
Vulnerability Gather data sampling: Not affected
Vulnerability Indirect target selection: Not affected
Vulnerability Itlb multihit: Not affected
Vulnerability L1tf: Not affected
Vulnerability Mds: Not affected
Vulnerability Meltdown: Not affected
Vulnerability Mmio stale data: Not affected
Vulnerability Reg file data sampling: Mitigation; Clear Register File
Vulnerability Retbleed: Not affected
Vulnerability Spec rstack overflow: Not affected
Vulnerability Spec store bypass: Mitigation; Speculative Store Bypass disabled via prctl
Vulnerability Spectre v1: Mitigation; usercopy/swapgs barriers and __user pointer sanitization
Vulnerability Spectre v2: Mitigation; Enhanced / Automatic IBRS; IBPB conditional; PBRSB-eIBRS SW sequence; BHI BHI_DIS_S
Vulnerability Srbds: Not affected
Vulnerability Tsa: Not affected
Vulnerability Tsx async abort: Not affected
Vulnerability Vmscape: Mitigation; IBPB before exit to userspace
Architecture
graph TB
subgraph cli["Local: ckms CLI"]
ckms["<b>ckms load</b>"]
end
subgraph srv["Local KMS Server + SoftHSM2"]
kmip["KMIP 2.1<br/>(HTTP)"]
crypto["Software Crypto"]
kek["KEK<br/>(HSM-resident)"]
end
subgraph hsm["SoftHSM2"]
pkcs11["PKCS#11 Slot"]
kek_material["KEK Material"]
end
db["Key Storage<br/>(wrapped)"]
ckms -->|HTTP| kmip
kmip --> crypto
crypto -->|unwrap| kek
kek -->|C_Decrypt| pkcs11
pkcs11 --> kek_material
crypto --> db
style ckms fill:#4A90E2
style kmip fill:#7ED321
style crypto fill:#F5A623
style kek fill:#FF6B6B
style pkcs11 fill:#BD10E0
Components:
- ckms: Concurrent load generator
- KMIP Endpoint: HTTP protocol handler
- Software Crypto: Handles data encryption/decryption with unwrapped keys
- KEK: SoftHSM2-resident Key Encryption Key (used to wrap/unwrap data keys)
- PKCS#11 Slot: SoftHSM2 backend for KEK unwrap operations
- Key Storage: Database of wrapped keys
Protocols
HSM-backed KEK, software crypto. The root key-encryption-key (KEK) used to wrap every benchmarked key is HSM-resident (SoftHSM2); only its unwrap touches the HSM. Encrypt/Sign themselves still execute in KMS software (OpenSSL), same as the plain software baseline — this report isolates the cost of HSM-backed key wrapping. For benchmarks where the cryptographic operation itself executes ON the HSM, see the dedicated HSM-delegated-crypto report.
The KMS server was exercised over three distinct wire protocols. Each benchmark column is labelled with the protocol name it used.
| Protocol | Transport | Encoding | Endpoint | Description |
|---|---|---|---|---|
| ttlv-json | HTTP/1.1 | KMIP 2.1 JSON-TTLV | POST /kmip/2_1 | Primary interoperability protocol — any KMIP 2.1 compliant client can use it |
| ttlv-bytes | HTTP/1.1 | KMIP 2.1 binary TTLV | POST /kmip | Binary wire format; eliminates JSON parsing overhead — typically 10–30 % faster |
| jose | HTTP/1.1 | JWE / JWS (JOSE) | POST /v1/crypto/ | REST API for OAuth2/OIDC workloads that prefer JWA algorithm identifiers over KMIP |
KMIP TTLV (Tag-Type-Length-Value) is the native encoding of the KMIP 2.1 standard (OASIS KMIP Spec v2.1, §9.1). The JSON variant wraps every field in a {"tag": …, "type": …, "value": …} JSON object and base64-encodes binary values. The binary variant uses a compact 8-byte fixed header (3-byte tag, 1-byte type, 4-byte length) per value, removing JSON tokenisation, base64, and UTF-8 overhead entirely.
JOSE (JSON Object Signing and Encryption, RFC 7516 / RFC 7515) exposes KMS key material through /v1/crypto/ REST endpoints. It is used by cloud integrations (Google CSE, Microsoft DKE, Azure EKM) and any workload that speaks JWA algorithm identifiers (A256GCM, RS256, ES384 …) rather than KMIP semantics.
Benchmark Methodology
HSM-backed KEK. The server is started with a SoftHSM2-registered
key_encryption_key(KEK): every benchmarked software key is wrapped by this HSM-resident KEK at rest, and unwrapped via a PKCS#11 round-trip on each use. All other methodology below (payload sizes, load-test/criterion procedure) is identical to the plain software baseline — the only difference is this extra HSM unwrap step per operation.
Plaintext / payload sizes
All encrypt/decrypt benchmarks use a fixed-size random payload. Sizes represent a realistic key-wrapping or small-message encryption workload without introducing significant data-transfer overhead on a loopback connection.
| Algorithm / category | Plaintext size | Notes |
|---|---|---|
| AES-GCM (128 / 192 / 256-bit key) | 64 bytes | FIPS 140-3 |
| AES-GCM-SIV (128 / 256-bit key) | 64 bytes | Non-FIPS |
| AES-XTS (128 / 256-bit AES = 256 / 512-bit key) | 64 bytes | FIPS 140-3; requires 16-byte IV |
| ChaCha20-Poly1305 (256-bit key) | 64 bytes | Non-FIPS |
| ECIES — P-256 / P-384 / P-521 | 64 bytes | Non-FIPS; EC public-key encryption |
| Salsa Sealed Box (X25519) | 64 bytes | Non-FIPS |
| Covercrypt (attribute-based encryption) | 64 bytes | Non-FIPS |
JOSE JWE — dir + AES-GCM (A128GCM / A192GCM / A256GCM) | 64 bytes | Symmetric (direct key agreement) |
| JOSE JWE — RSA-OAEP + AES-GCM (2048 / 4096-bit) | 64 bytes | Asymmetric (RSA-OAEP CEK wrapping) |
| RSA-OAEP (2048 / 3072 / 4096-bit) | 32 bytes | Limited by RSA block size |
| RSA-PKCS#1 v1.5 (2048 / 3072 / 4096-bit) | 32 bytes | Non-FIPS |
| RSA-AES Key Wrap — KWP (2048 / 3072 / 4096-bit) | 32 bytes | FIPS 140-3 |
| Sign / Verify — all algorithms | 32 bytes | Message is hashed internally |
| JOSE JWS / MAC | 32 bytes |
Load test (mise run bench:hsm --hsm-model softhsm2)
The load test sweeps a configurable list of concurrency levels. At each level N concurrent async tasks send pre-serialised requests in tight loops for a fixed measurement window (default: 20 s), preceded by a warm-up phase (default: 5 s) that is excluded from measurements. Pre-serialisation happens once at setup time and the same bytes are reused on every iteration, isolating server-side KMS latency from client-side encoding overhead. Recorded metrics per (protocol, operation, concurrency) triple:
- Throughput — requests per second (req/s)
- p50 / p95 / p99 — round-trip latency percentiles (ms)
Criterion micro-benchmarks (ckms bench)
Criterion (Rust, v0.5) measures the round-trip latency of a single request from the ckms client library through the KMS server and back over a loopback TCP connection. The server is started once and kept alive across all benchmarks in the suite.
The reported value is the mean ± 95 % confidence interval over a configurable number of samples (preset quick: 3 s warm-up + 5 s measurement per benchmark).
Infrastructure note: Both test types use a local SQLite backend (temporary, discarded after the run). This isolates pure cryptographic and KMIP serialisation overhead from database I/O. Throughput figures will differ on a production deployment backed by PostgreSQL or Redis-Findex.
Load Tests
encrypt/aes-gcm
| Concurrency | ttlv-json (req/s) | ttlv-bytes (req/s) | jose (req/s) |
|---|---|---|---|
| 1 | 3,060 | 3,706 | 18,623 |
| 2 | 5,488 | 6,638 | 32,797 |
| 4 | 8,880 | 10,559 | 52,361 |
| 8 | 12,734 | 15,138 | 61,798 |
| 16 | 17,673 | 21,016 | 74,310 |
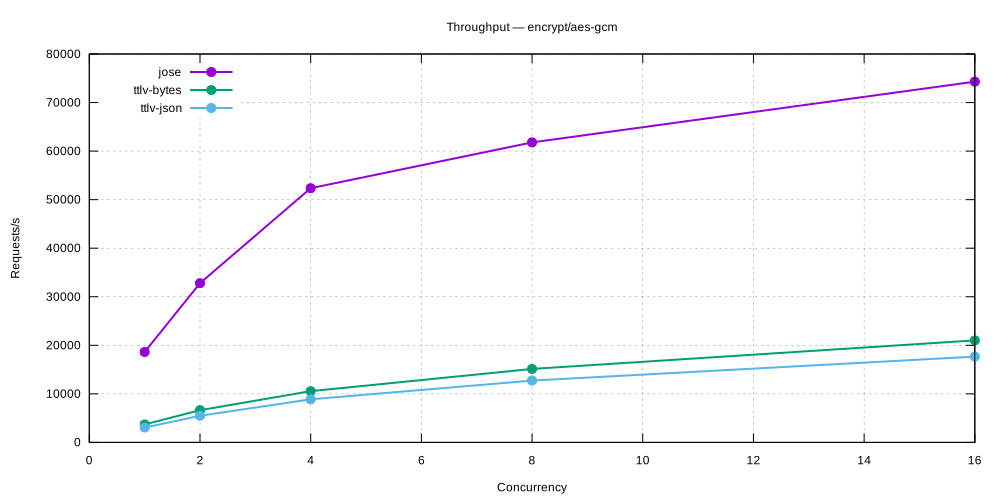
sign-verify/ecdsa-p256
| Concurrency | ttlv-json (req/s) | ttlv-bytes (req/s) | jose (req/s) |
|---|---|---|---|
| 1 | 2,220 | 2,285 | 1,698 |
| 2 | 4,003 | 3,735 | 3,035 |
| 4 | 6,470 | 6,547 | 5,118 |
| 8 | 9,622 | 9,830 | 9,432 |
| 16 | 14,050 | 14,097 | 14,269 |
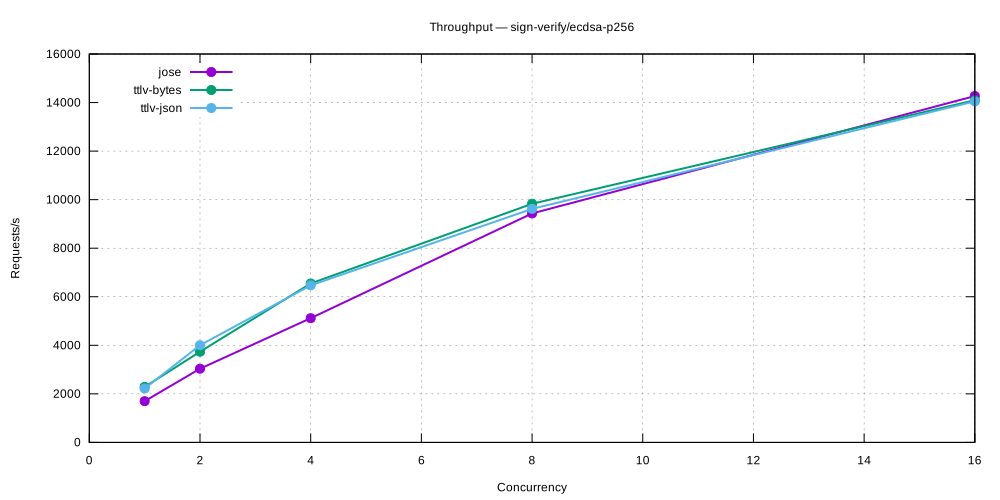
sign-verify/eddsa-ed25519
| Concurrency | ttlv-json (req/s) | ttlv-bytes (req/s) | jose (req/s) |
|---|---|---|---|
| 1 | 9,927 | 9,376 | 11,594 |
| 2 | 16,658 | 16,013 | 21,141 |
| 4 | 27,274 | 26,804 | 34,107 |
| 8 | 38,446 | 37,456 | 46,756 |
| 16 | 53,122 | 51,765 | 65,793 |
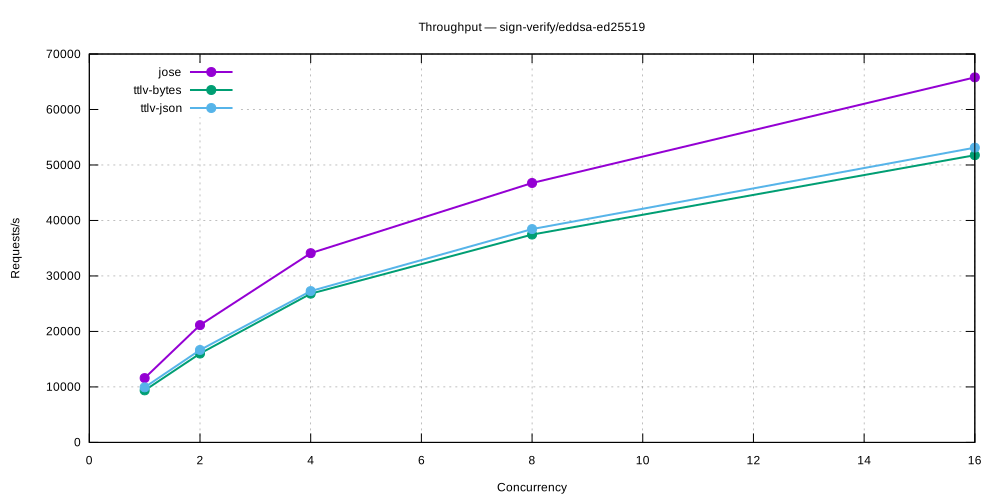
sign-verify/ecdsa-secp256k1
| Concurrency | ttlv-json (req/s) | ttlv-bytes (req/s) |
|---|---|---|
| 1 | 2,562 | 2,521 |
| 2 | 4,515 | 4,548 |
| 4 | 7,243 | 7,078 |
| 8 | 10,506 | 10,431 |
| 16 | 14,365 | 14,263 |
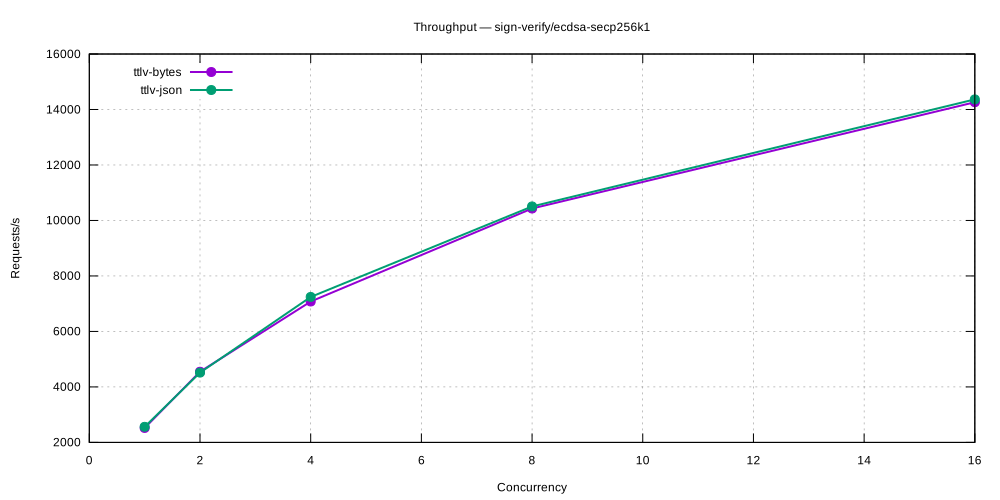
key-creation/aes-sym
| Concurrency | ttlv-json (req/s) |
|---|---|
| 1 | 3,034 |
| 2 | 1,590 |
| 4 | 2,762 |
| 8 | 4,197 |
| 16 | 3,822 |
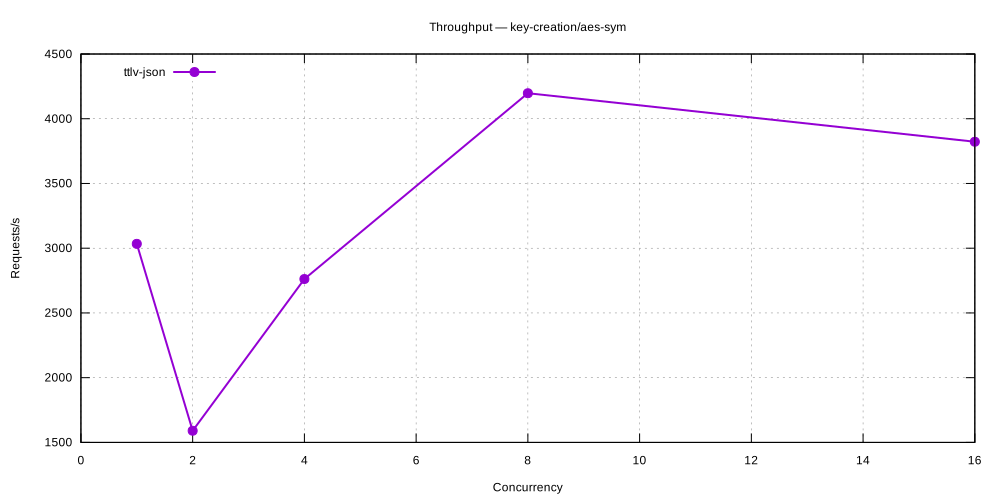
batch/aes-gcm-10
| Concurrency | ttlv-json (req/s) |
|---|---|
| 1 | 348 |
| 2 | 670 |
| 4 | 1,012 |
| 8 | 1,568 |
| 16 | 2,140 |
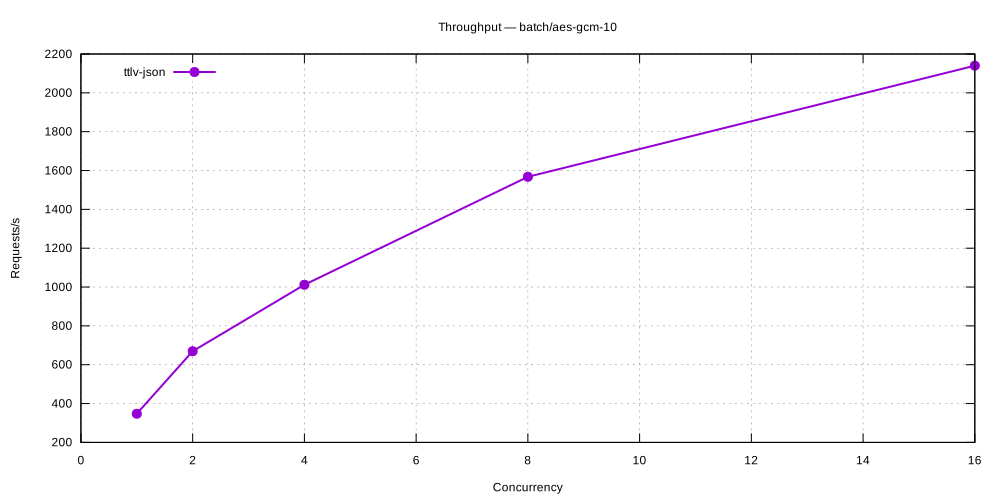
Criterion Benchmarks
Symmetric Encryption
| Benchmark | ttlv-json | ttlv-bytes | jose |
|---|---|---|---|
| aes-gcm-siv/decrypt/128 | 92.0 µs | 128.3 µs | — |
| aes-gcm-siv/decrypt/256 | 95.5 µs | 99.7 µs | — |
| aes-gcm-siv/encrypt/128 | 77.0 µs | 98.0 µs | — |
| aes-gcm-siv/encrypt/256 | 72.2 µs | 82.5 µs | — |
| aes-gcm/decrypt/128 | 83.0 µs | 87.5 µs | 45.7 µs |
| aes-gcm/decrypt/192 | 92.8 µs | 81.2 µs | 46.7 µs |
| aes-gcm/decrypt/256 | 83.1 µs | 88.9 µs | 45.1 µs |
| aes-gcm/encrypt/128 | 78.7 µs | 85.8 µs | 52.4 µs |
| aes-gcm/encrypt/192 | 81.7 µs | 90.7 µs | 44.7 µs |
| aes-gcm/encrypt/256 | 78.2 µs | 98.3 µs | 47.2 µs |
| aes-xts/decrypt/128 | 71.5 µs | 103.6 µs | — |
| aes-xts/decrypt/256 | 86.7 µs | 70.7 µs | — |
| aes-xts/encrypt/128 | 83.3 µs | 89.9 µs | — |
| aes-xts/encrypt/256 | 81.3 µs | 94.6 µs | — |
| chacha20-poly1305/decrypt/256 | 77.7 µs | 92.2 µs | — |
| chacha20-poly1305/encrypt/256 | 87.8 µs | 97.1 µs | — |
| salsa-sealed-box/decrypt | 163.5 µs | 166.5 µs | — |
| salsa-sealed-box/encrypt | 858.2 µs | 274.0 µs | — |
Asymmetric Encryption
| Benchmark | ttlv-json | ttlv-bytes |
|---|---|---|
| ecies/decrypt/P-256 | 156.6 µs | 331.7 µs |
| ecies/decrypt/P-384 | 970.6 µs | 1.14 ms |
| ecies/decrypt/P-521 | 2.63 ms | 2.11 ms |
| ecies/encrypt/P-256 | 395.2 µs | 307.8 µs |
| ecies/encrypt/P-384 | 1.33 ms | 1.30 ms |
| ecies/encrypt/P-521 | 2.79 ms | 2.22 ms |
| rsa-aes-kwp/decrypt/4096 | 171.16 ms | 168.47 ms |
| rsa-aes-kwp/encrypt/4096 | 349.0 µs | 543.7 µs |
| rsa-oaep/decrypt/4096 | 172.20 ms | 167.59 ms |
| rsa-oaep/encrypt/4096 | 593.1 µs | 283.7 µs |
| rsa-pkcs1v15/decrypt/4096 | 166.78 ms | 165.15 ms |
| rsa-pkcs1v15/encrypt/4096 | 992.7 µs | 286.5 µs |
Key Encapsulation (KEM)
| Benchmark | ttlv-json | ttlv-bytes |
|---|---|---|
| pqc/decapsulate/ML-KEM-1024 | 269.7 µs | 259.8 µs |
| pqc/decapsulate/ML-KEM-512 | 174.1 µs | 160.9 µs |
| pqc/decapsulate/ML-KEM-768 | 210.4 µs | 200.0 µs |
| pqc/encapsulate/ML-KEM-1024 | 626.6 µs | 539.8 µs |
| pqc/encapsulate/ML-KEM-512 | 318.2 µs | 613.6 µs |
| pqc/encapsulate/ML-KEM-768 | 419.8 µs | 382.0 µs |
Key Creation
| Benchmark | ttlv-json |
|---|---|
| EC/ES256 | — |
| EC/ES384 | — |
| RSA/2048 | — |
| aes-gcm/oct/128 | — |
| aes-gcm/oct/256 | — |
| ec/ed25519 | 568.8 µs |
| ec/ed448 | 783.6 µs |
| ec/p256 | 701.3 µs |
| ec/p384 | 1.16 ms |
| ec/p521 | 1.70 ms |
| ec/secp256k1 | 826.7 µs |
| pqc/ML-DSA-44 | 1.95 ms |
| pqc/ML-DSA-65 | 1.74 ms |
| pqc/ML-DSA-87 | 2.42 ms |
| pqc/ML-KEM-1024 | 1.26 ms |
| pqc/ML-KEM-512 | 1.41 ms |
| pqc/ML-KEM-768 | 1.41 ms |
| pqc/SLH-DSA-SHA2-128f | 2.05 ms |
| pqc/SLH-DSA-SHA2-256f | 2.61 ms |
| rsa/rsa-4096 | 326.01 ms |
| symmetric/aes-128 | 576.5 µs |
| symmetric/aes-192 | 433.0 µs |
| symmetric/aes-256 | 287.6 µs |
| symmetric/chacha20-256 | 678.3 µs |
Sign / Verify
| Benchmark | ttlv-json | ttlv-bytes | jose |
|---|---|---|---|
| ecdsa-p256/sign | 472.9 µs | 532.9 µs | 432.7 µs |
| ecdsa-p256/verify | 343.1 µs | 343.8 µs | 246.3 µs |
| ecdsa-p384/sign | 988.1 µs | 1.01 ms | 980.2 µs |
| ecdsa-p384/verify | 814.1 µs | 696.1 µs | 665.0 µs |
| ecdsa-p521/sign | 2.32 ms | 2.19 ms | — |
| ecdsa-p521/verify | 1.45 ms | 1.24 ms | — |
| ecdsa-secp256k1/sign | 423.9 µs | 425.7 µs | — |
| ecdsa-secp256k1/verify | 498.6 µs | 488.7 µs | — |
| eddsa-ed25519/sign | 129.4 µs | 115.9 µs | 127.6 µs |
| eddsa-ed25519/verify | 494.4 µs | 369.7 µs | 392.1 µs |
| eddsa-ed448/sign | 296.3 µs | 301.6 µs | — |
| eddsa-ed448/verify | 335.1 µs | 405.1 µs | — |
| ml-dsa/sign/44 | 614.6 µs | 732.5 µs | — |
| ml-dsa/sign/65 | 835.6 µs | 764.9 µs | — |
| ml-dsa/sign/87 | 1.03 ms | 922.3 µs | — |
| ml-dsa/verify/44 | 451.8 µs | 483.2 µs | — |
| ml-dsa/verify/65 | 708.7 µs | 565.5 µs | — |
| ml-dsa/verify/87 | 740.3 µs | 652.6 µs | — |
| rsa-pkcs1v15/sign | — | — | 25.33 ms |
| rsa-pkcs1v15/verify | — | — | 855.0 µs |
| rsa-pss/sign | — | — | 24.51 ms |
| rsa-pss/sign/4096 | 166.55 ms | 181.63 ms | — |
| rsa-pss/verify | — | — | 633.5 µs |
| rsa-pss/verify/4096 | 459.7 µs | 414.8 µs | — |
| slh-dsa/sign/SHA2-128f | 9.76 ms | 9.45 ms | — |
| slh-dsa/sign/SHA2-256f | 35.65 ms | 34.78 ms | — |
| slh-dsa/sign/SHAKE-128f | 25.54 ms | 24.70 ms | — |
| slh-dsa/sign/SHAKE-256f | 85.35 ms | 80.85 ms | — |
| slh-dsa/verify/SHA2-128f | 1.90 ms | 1.70 ms | — |
| slh-dsa/verify/SHA2-256f | 4.07 ms | 3.76 ms | — |
| slh-dsa/verify/SHAKE-128f | 2.87 ms | 2.69 ms | — |
| slh-dsa/verify/SHAKE-256f | 5.87 ms | 4.98 ms | — |
KMS Performance Comparison
Versions: v5.28.0
Generated: 2026-10-09
Benchmark Environment
| Field | Value |
|---|---|
| Date | 2026-10-07 23:46:16 UTC |
| HSM backend | SoftHSM2 |
| Command | mise run bench:hsm --delegated --hsm-model softhsm2 |
| Build | release / non-fips |
| HTTP workers (Actix-web) | 32 |
| Database | SQLite (temporary, single benchmark run) |
| CPU | Intel(R) Core(TM) i9-14900T @ 5,100 MHz |
| CPU cores | 24 physical / 32 logical (HT) |
| RAM | 31.1 GB |
| OS | Ubuntu 24.04.5 LTS |
| Kernel | 6.8.0-146-generic |
Load test parameters
| Parameter | Value |
|---|---|
| Mode | all |
| Protocols | all |
| Measurement window | 20 s per concurrency level |
| Concurrency levels | 1,2,4,8,16 |
| Warm-up | 5 s |
| Cooldown between levels | 2 s |
CPU detail (lscpu)
Architecture: x86_64
CPU op-mode(s): 32-bit, 64-bit
Address sizes: 46 bits physical, 48 bits virtual
Byte Order: Little Endian
CPU(s): 32
On-line CPU(s) list: 0-31
Vendor ID: GenuineIntel
Model name: Intel(R) Core(TM) i9-14900T
CPU family: 6
Model: 183
Thread(s) per core: 2
Core(s) per socket: 24
Socket(s): 1
Stepping: 1
CPU(s) scaling MHz: 29%
CPU max MHz: 5500,0000
CPU min MHz: 800,0000
BogoMIPS: 2227,20
Flags: fpu vme de pse tsc msr pae mce cx8 apic sep mtrr pge mca cmov pat pse36 clflush dts acpi mmx fxsr sse sse2 ss ht tm pbe syscall nx pdpe1gb rdtscp lm constant_tsc art arch_perfmon pebs bts rep_good nopl xtopology nonstop_tsc cpuid aperfmperf tsc_known_freq pni pclmulqdq dtes64 monitor ds_cpl vmx smx est tm2 ssse3 sdbg fma cx16 xtpr pdcm pcid sse4_1 sse4_2 x2apic movbe popcnt tsc_deadline_timer aes xsave avx f16c rdrand lahf_lm abm 3dnowprefetch cpuid_fault epb ssbd ibrs ibpb stibp ibrs_enhanced tpr_shadow flexpriority ept vpid ept_ad fsgsbase tsc_adjust bmi1 avx2 smep bmi2 erms invpcid rdseed adx smap clflushopt clwb intel_pt sha_ni xsaveopt xsavec xgetbv1 xsaves split_lock_detect user_shstk avx_vnni dtherm ida arat pln pts hwp hwp_notify hwp_act_window hwp_epp hwp_pkg_req hfi vnmi umip pku ospke waitpkg gfni vaes vpclmulqdq tme rdpid movdiri movdir64b fsrm md_clear serialize pconfig arch_lbr ibt flush_l1d arch_capabilities ibpb_exit_to_user
Virtualization: VT-x
L1d cache: 896 KiB (24 instances)
L1i cache: 1,3 MiB (24 instances)
L2 cache: 32 MiB (12 instances)
L3 cache: 36 MiB (1 instance)
NUMA node(s): 1
NUMA node0 CPU(s): 0-31
Vulnerability Gather data sampling: Not affected
Vulnerability Indirect target selection: Not affected
Vulnerability Itlb multihit: Not affected
Vulnerability L1tf: Not affected
Vulnerability Mds: Not affected
Vulnerability Meltdown: Not affected
Vulnerability Mmio stale data: Not affected
Vulnerability Reg file data sampling: Mitigation; Clear Register File
Vulnerability Retbleed: Not affected
Vulnerability Spec rstack overflow: Not affected
Vulnerability Spec store bypass: Mitigation; Speculative Store Bypass disabled via prctl
Vulnerability Spectre v1: Mitigation; usercopy/swapgs barriers and __user pointer sanitization
Vulnerability Spectre v2: Mitigation; Enhanced / Automatic IBRS; IBPB conditional; PBRSB-eIBRS SW sequence; BHI BHI_DIS_S
Vulnerability Srbds: Not affected
Vulnerability Tsa: Not affected
Vulnerability Tsx async abort: Not affected
Vulnerability Vmscape: Mitigation; IBPB before exit to userspace
Architecture
graph TB
subgraph cli["Local: ckms CLI"]
ckms["<b>ckms bench --hsm</b>"]
end
subgraph srv["Local KMS Server"]
kmip["KMIP 2.1<br/>(HTTP)"]
oracle["CryptoOracle<br/>(HSM Router)"]
end
subgraph hsm["SoftHSM2"]
pkcs11["PKCS#11 Slot"]
hsm_keys["RSA<br/>ECDSA<br/>EdDSA<br/>AES<br/>(HSM-resident)"]
end
ckms -->|HTTP| kmip
kmip --> oracle
oracle -->|C_Sign/C_Encrypt/C_GenerateKey| pkcs11
pkcs11 --> hsm_keys
style ckms fill:#4A90E2
style kmip fill:#7ED321
style oracle fill:#FF6B6B
style pkcs11 fill:#BD10E0
Components:
- ckms: Concurrent load generator (
mise run bench:hsm --delegated --hsm-model softhsm2) - KMIP Endpoint: HTTP protocol handler
- CryptoOracle: Routes crypto ops directly to SoftHSM2 (no software fallback)
- PKCS#11 Slot: SoftHSM2 engine for C_Sign/C_Encrypt/C_GenerateKey operations
- HSM-Resident Keys: Keys generated on and never leave hardware
Protocols
This report benchmarks cryptographic operations delegated to an HSM (SoftHSM2) via the KMS CryptoOracle, exercised over a single wire protocol: ttlv-json.
| Protocol | Transport | Encoding | Endpoint | Description |
|---|---|---|---|---|
| ttlv-json | HTTP/1.1 | KMIP 2.1 JSON-TTLV | POST /kmip/2_1 | Primary interoperability protocol — any KMIP 2.1 compliant client can use it |
KMIP TTLV (Tag-Type-Length-Value) is the native encoding of the KMIP 2.1 standard (OASIS KMIP Spec v2.1, §9.1). The JSON variant wraps every field in a {"tag": …, "type": …, "value": …} JSON object and base64-encodes binary values.
ttlv-bytes is not benchmarked here. Measuring it would require running it either against the same HSM-resident key/token as the ttlv-json sweep (strictly after it completes) or on a fresh token started specifically for that purpose. The former was tried first and rejected: cumulative SoftHSM2 token load from the preceding ttlv-json sweep contaminated every ttlv-bytes measurement, making ttlv-json appear faster than ttlv-bytes in every single operation — the opposite of the software baseline (where ttlv-bytes is consistently faster, as expected, since it skips JSON parsing). Rather than publish numbers that are measurement artefacts of test ordering, ttlv-bytes is omitted from this report until the harness can measure both protocols under equivalent conditions (e.g. independent tokens per protocol).
JOSE is not benchmarked here. The JOSE REST key-creation endpoint (POST /v1/crypto/keys) has no parameter to request a caller-chosen kid, and HSM-resident key delegation requires the client to choose the hsm::<slot>::<uuid> unique identifier up front (the HSM has no server-assigned ID scheme) — so an HSM-resident key cannot be created through the JOSE endpoints at all.
Benchmark Methodology
HSM delegation model
Every operation in this report is executed against an hsm::<slot>::<uuid> unique identifier. The KMS server routes both key generation (Create/CreateKeyPair) and cryptographic operations (Encrypt/Sign) for such keys to the HSM's CryptoOracle (PKCS#11) on SoftHSM2 instead of executing them in KMS software — the benchmarked latency/throughput is therefore dominated by the PKCS#11 round-trip to the HSM, not by in-process OpenSSL.
HSM Backend: SoftHSM2 (software PKCS#11 simulator). A hardware HSM will exhibit different absolute numbers bound by hardware crypto acceleration and transport latency.
Algorithm coverage and SoftHSM2 constraints
Operations benchmarked in this scenario:
| Category | Algorithms covered | Notes |
|---|---|---|
| Encrypt | AES-GCM, AES-CBC, RSA-OAEP, RSA-PKCS1v15 | 2048-bit RSA, 256-bit AES |
| Sign | RSA-PSS, RSA-PKCS1v15 (SHA1/256/384/512) | 2048-bit RSA |
| Sign | ECDSA P-256 | Prehashed message digest |
| Sign | EdDSA Ed25519 / Ed448 | Non-FIPS pure un-hashed CKM_EDDSA |
| Key creation | AES-256, RSA-2048 | Dynamic unique identifiers per iteration |
Payload sizes
All encrypt benchmarks use a 64-byte fixed-size random payload (128 bytes for AES-CBC/PKCS1v15, which pad to a whole block); all sign benchmarks use a 32-byte fixed-size message (or, for prehashed ECDSA, a 32-byte SHA-256 digest of that same message).
SoftHSM2 per-token degradation (key creation only)
Concurrent/cumulative key generation against a single SoftHSM2 token progressively degrades that token in simulators. Key-creation concurrency is capped and mode isolation is applied.
Why ttlv-json only (no ttlv-bytes)
An earlier version of this report benchmarked both ttlv-json and ttlv-bytes for every HSM-delegated operation, sharing one HSM-resident key between the two protocol variants and measuring ttlv-json's full concurrency sweep before ttlv-bytes's. Every single result inverted the expected direction — ttlv-json appeared faster than ttlv-bytes, the opposite of the software baseline (where binary TTLV is consistently faster, since it skips JSON parsing). This report therefore benchmarks ttlv-json only, until the harness can measure both protocols under equivalent conditions.
Load test (mise run bench:hsm --delegated --hsm-model softhsm2)
The load test sweeps a configurable list of concurrency levels. At each level N concurrent async tasks send pre-serialised requests in tight loops for a fixed measurement window (default: 20 s), preceded by a warm-up phase (default: 5 s) that is excluded from measurements. Pre-serialisation happens once at setup time and the same bytes are reused on every iteration, isolating server-side (and HSM-side) latency from client-side encoding overhead. Recorded metrics per (protocol, operation, concurrency) triple:
- Throughput — requests per second (req/s)
- p50 / p95 / p99 — round-trip latency percentiles (ms)
Criterion micro-benchmarks (ckms bench --hsm)
Criterion (Rust, v0.5) measures the round-trip latency of a single request from the ckms client library through the KMS server (and onward to the HSM) and back over a loopback TCP connection. The reported value is the mean ± 95 % confidence interval over a configurable number of samples.
Infrastructure note: The load test and criterion benchmarks both use a local SQLite backend (temporary, discarded after the run) for the KMS server metadata store — key material resides on SoftHSM2.
Load Tests
hsm/key-creation/aes-256
| Concurrency | ttlv-json (req/s) |
|---|---|
| 1 | 52 |
| 2 | 39 |
| 4 | 27 |
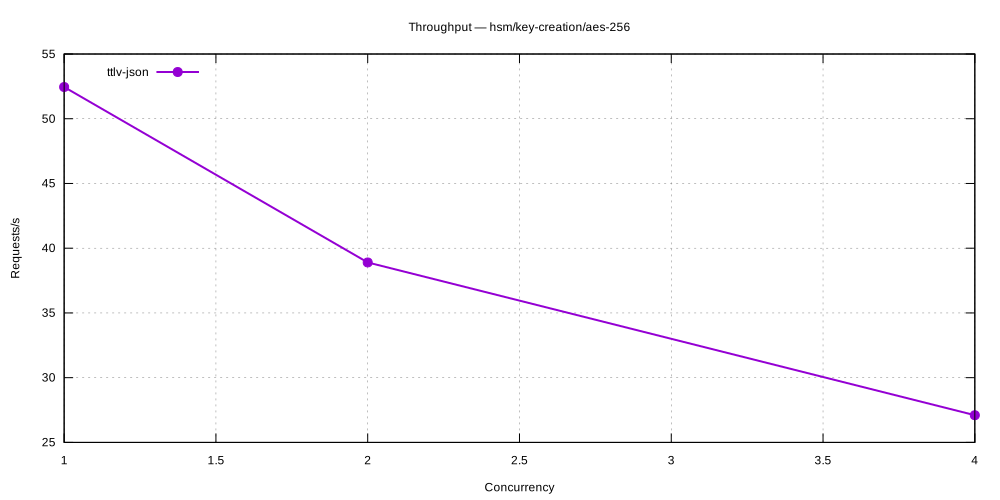
hsm/key-creation/rsa-2048
| Concurrency | ttlv-json (req/s) |
|---|---|
| 1 | 4 |
| 2 | 7 |
| 4 | 7 |
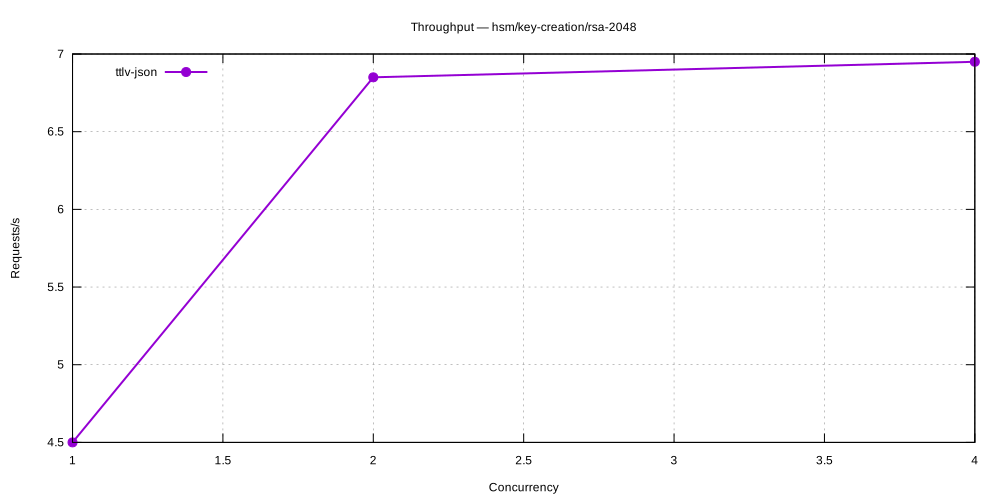
hsm/encrypt/aes-gcm
| Concurrency | ttlv-json (req/s) |
|---|---|
| 1 | 2,884 |
| 2 | 5,027 |
| 4 | 8,090 |
| 8 | 11,183 |
| 16 | 15,367 |
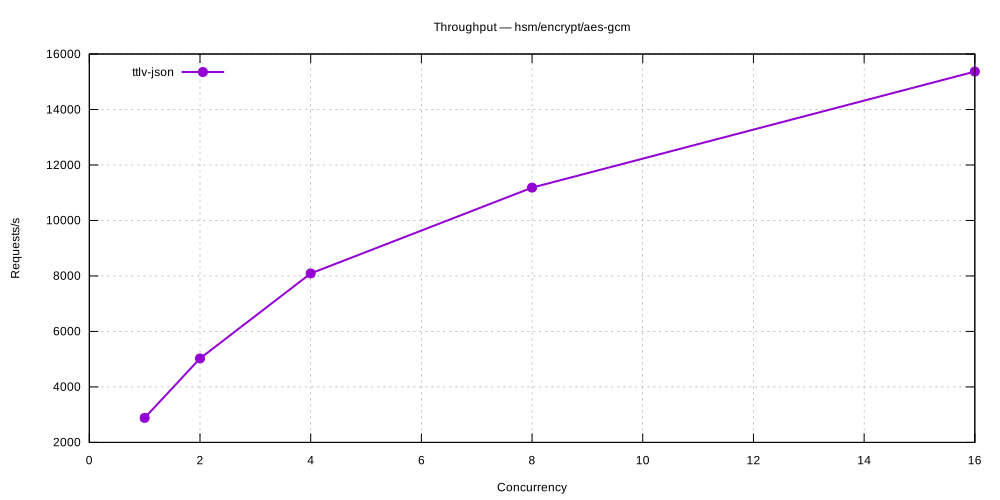
hsm/encrypt/rsa-oaep
| Concurrency | ttlv-json (req/s) |
|---|---|
| 1 | 11,700 |
| 2 | 18,975 |
| 4 | 27,420 |
| 8 | 35,552 |
| 16 | 41,365 |
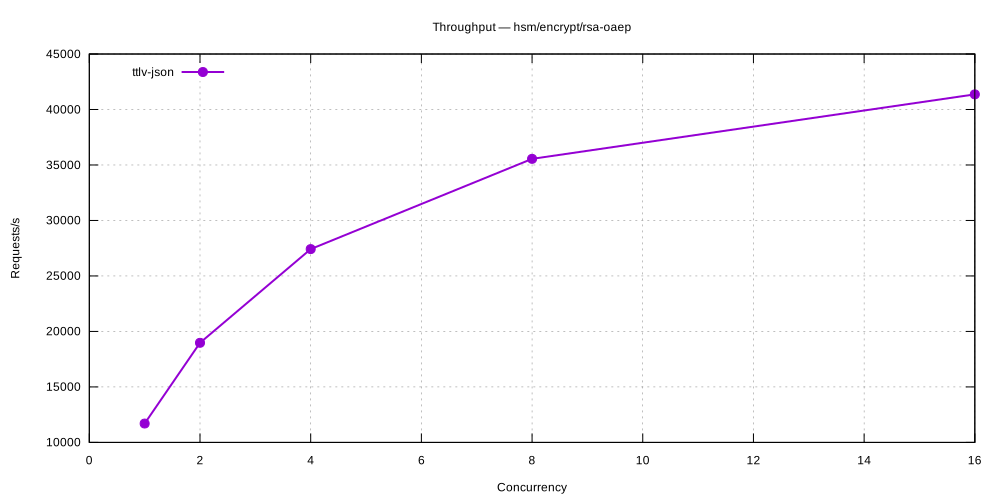
hsm/encrypt/rsa-oaep-sha1
| Concurrency | ttlv-json (req/s) |
|---|---|
| 1 | 9,567 |
| 2 | 15,680 |
| 4 | 23,744 |
| 8 | 33,058 |
| 16 | 39,172 |
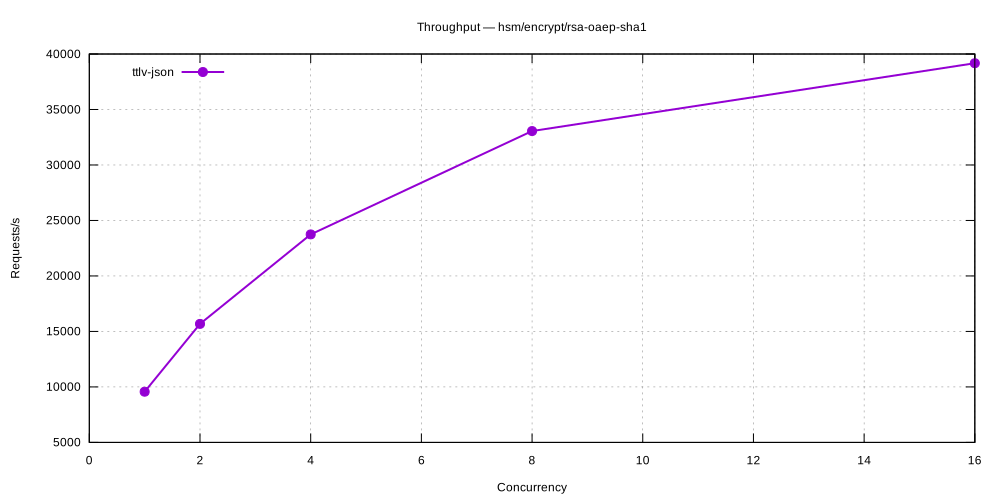
hsm/encrypt/rsa-pkcs1v15
| Concurrency | ttlv-json (req/s) |
|---|---|
| 1 | 7,157 |
| 2 | 12,633 |
| 4 | 18,195 |
| 8 | 23,990 |
| 16 | 24,487 |
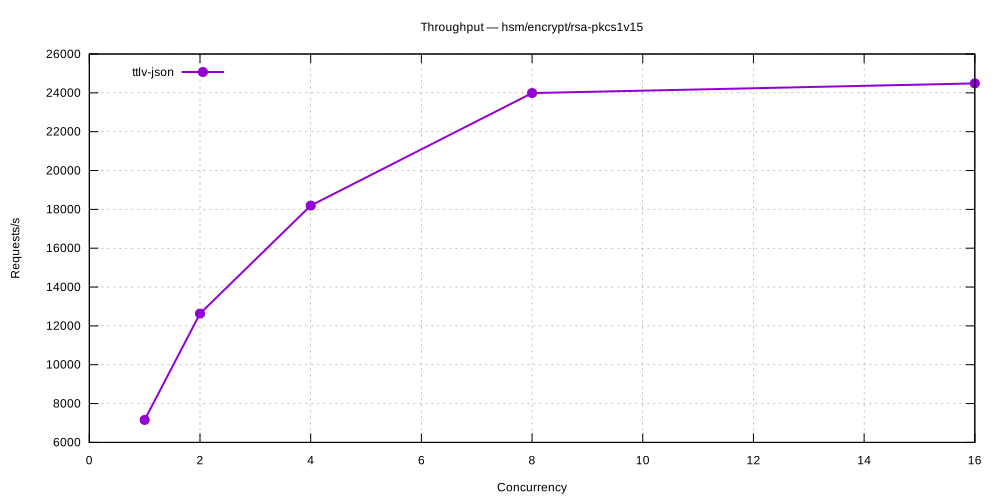
hsm/encrypt/aes-cbc
| Concurrency | ttlv-json (req/s) |
|---|---|
| 1 | 2,267 |
| 2 | 4,266 |
| 4 | 6,689 |
| 8 | 9,376 |
| 16 | 13,995 |
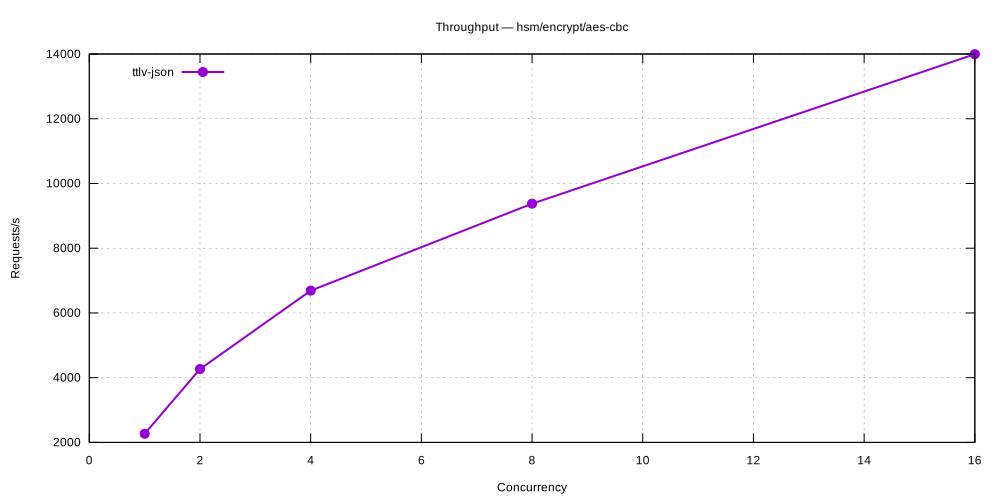
hsm/sign-verify/rsa-pss
| Concurrency | ttlv-json (req/s) |
|---|---|
| 1 | 1,179 |
| 2 | 2,516 |
| 4 | 3,862 |
| 8 | 5,825 |
| 16 | 7,167 |
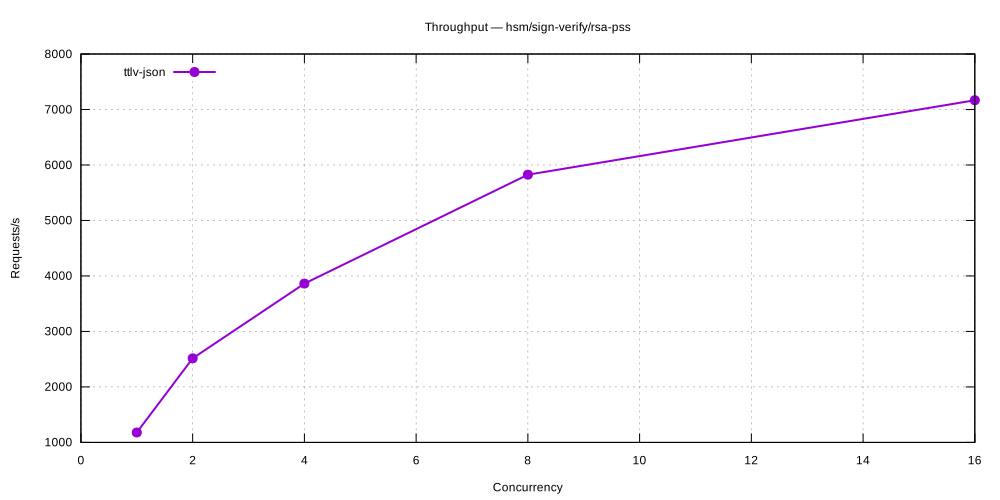
hsm/sign-verify/rsa-pkcs1v15-sha1
| Concurrency | ttlv-json (req/s) |
|---|---|
| 1 | 1,466 |
| 2 | 2,570 |
| 4 | 4,092 |
| 8 | 5,934 |
| 16 | 7,137 |
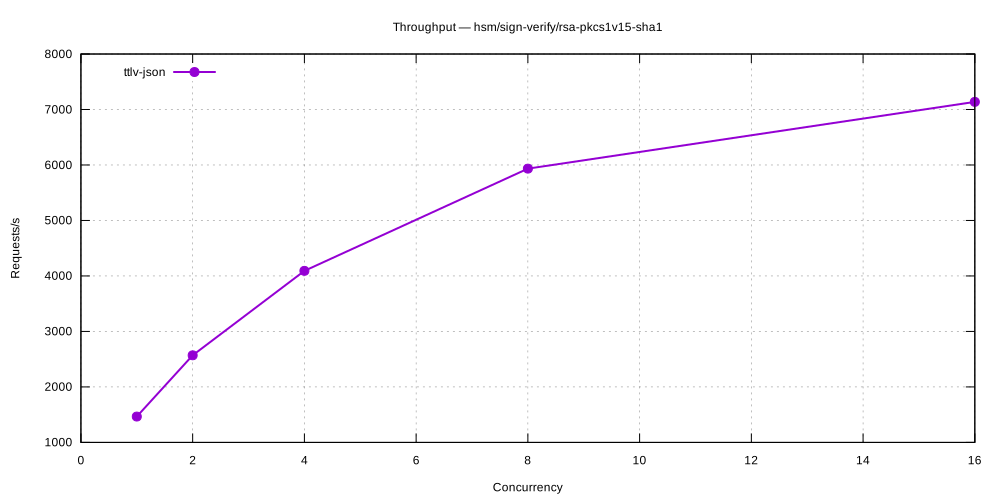
hsm/sign-verify/rsa-pkcs1v15-sha256
| Concurrency | ttlv-json (req/s) |
|---|---|
| 1 | 1,447 |
| 2 | 2,560 |
| 4 | 3,938 |
| 8 | 5,647 |
| 16 | 7,189 |
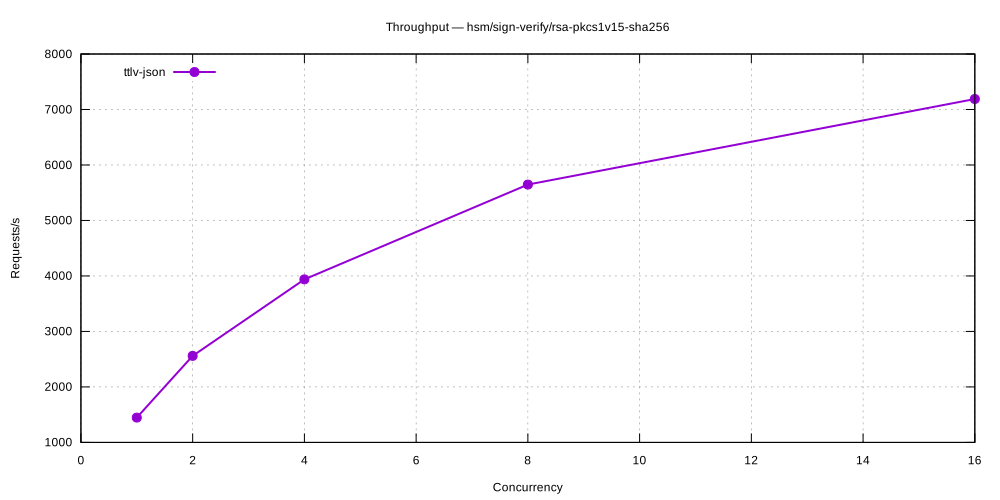
hsm/sign-verify/rsa-pkcs1v15-sha384
| Concurrency | ttlv-json (req/s) |
|---|---|
| 1 | 1,435 |
| 2 | 2,357 |
| 4 | 4,099 |
| 8 | 5,814 |
| 16 | 7,150 |
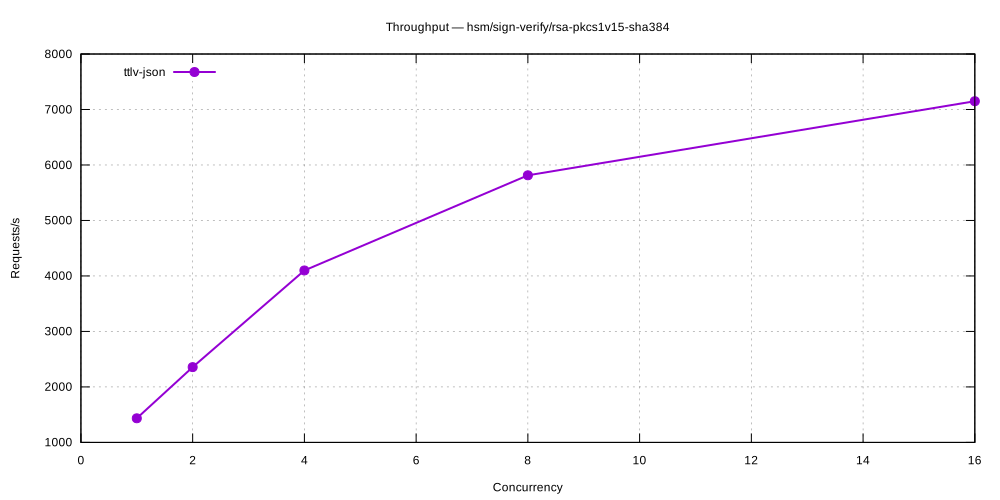
hsm/sign-verify/rsa-pkcs1v15-sha512
| Concurrency | ttlv-json (req/s) |
|---|---|
| 1 | 1,451 |
| 2 | 2,548 |
| 4 | 3,986 |
| 8 | 5,834 |
| 16 | 7,182 |
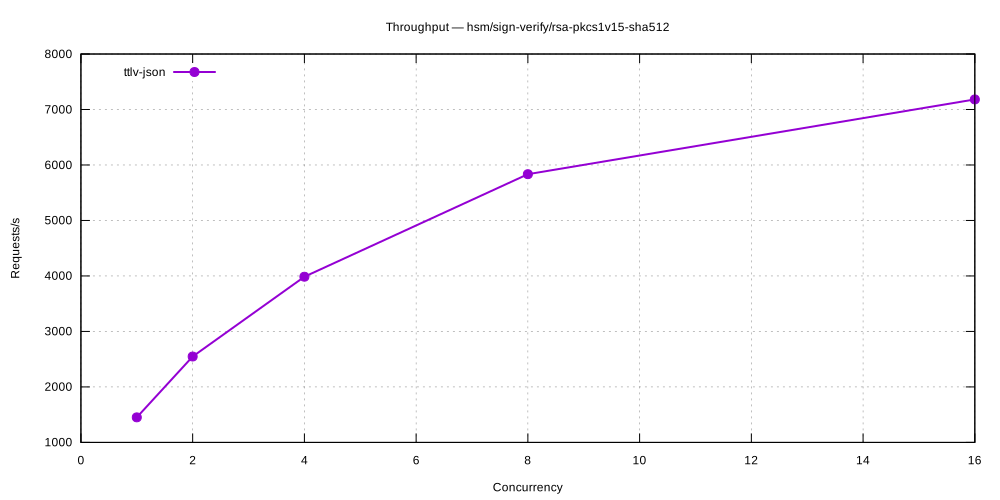
hsm/sign-verify/ecdsa-p256
| Concurrency | ttlv-json (req/s) |
|---|---|
| 1 | 9,675 |
| 2 | 15,183 |
| 4 | 24,738 |
| 8 | 27,712 |
| 16 | 26,177 |
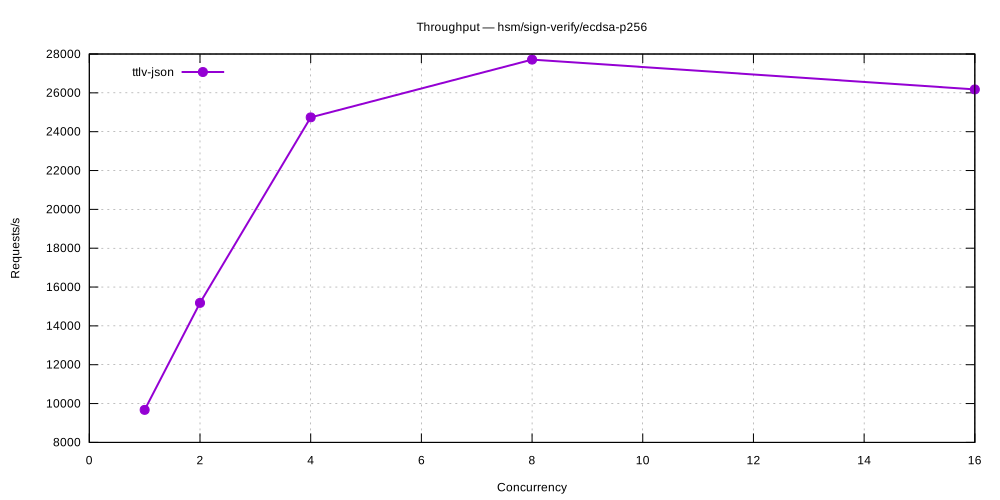
hsm/sign-verify/eddsa-ed25519
| Concurrency | ttlv-json (req/s) |
|---|---|
| 1 | 7,907 |
| 2 | 11,608 |
| 4 | 20,267 |
| 8 | 25,155 |
| 16 | 17,193 |
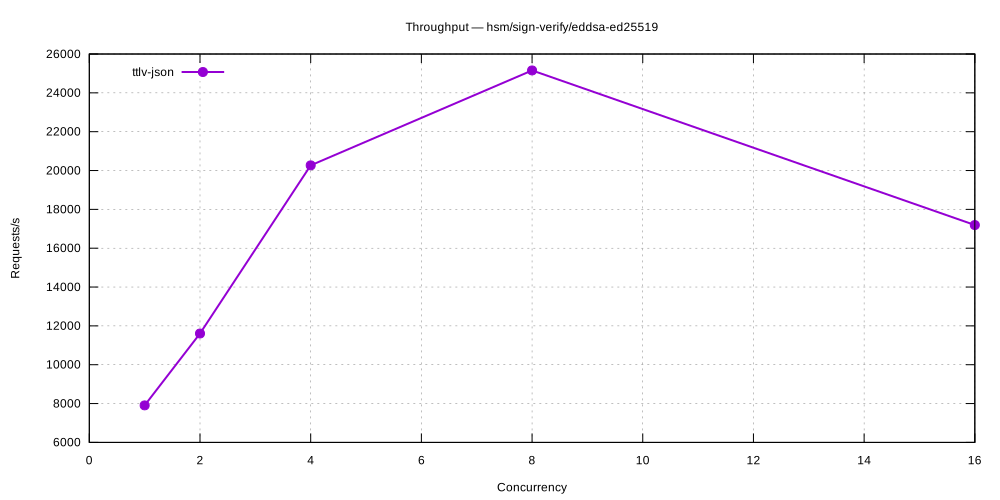
hsm/sign-verify/eddsa-ed448
| Concurrency | ttlv-json (req/s) |
|---|---|
| 1 | 3,100 |
| 2 | 5,191 |
| 4 | 8,925 |
| 8 | 12,208 |
| 16 | 16,277 |
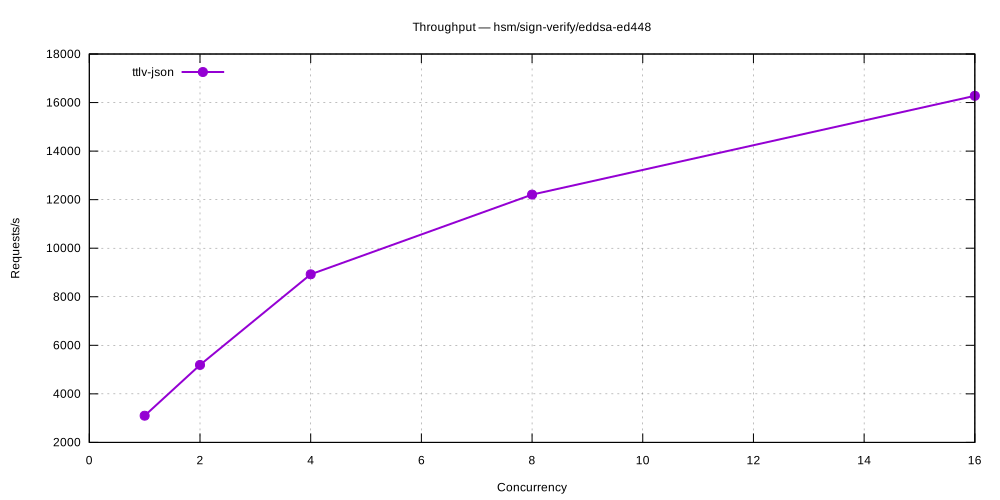
Criterion Benchmarks
Symmetric Encryption
| Benchmark | ttlv-json |
|---|---|
| hsm-aes-cbc/encrypt/256 | 126.9 µs |
| hsm-aes-gcm/encrypt/256 | 101.9 µs |
Asymmetric Encryption
| Benchmark | ttlv-json |
|---|---|
| hsm-rsa-oaep-sha1/encrypt/2048 | 173.6 µs |
| hsm-rsa-oaep/encrypt/2048 | 98.3 µs |
| hsm-rsa-pkcs1v15/encrypt/2048 | 189.0 µs |
Key Creation
| Benchmark | ttlv-json |
|---|---|
| hsm-aes-256/create | 71.22 ms |
| hsm-ec-p256/create | 207.55 ms |
| hsm-ed25519/create | 208.09 ms |
| hsm-ed448/create | 207.59 ms |
| hsm-rsa-2048/create | 273.44 ms |
Sign / Verify
| Benchmark | ttlv-json |
|---|---|
| hsm-ecdsa-p256/sign | 183.9 µs |
| hsm-ecdsa-p384/sign | 750.1 µs |
| hsm-eddsa-ed25519/sign | 142.9 µs |
| hsm-eddsa-ed448/sign | 377.2 µs |
| hsm-rsa-pkcs1v15-sha1/sign/2048 | 805.4 µs |
| hsm-rsa-pkcs1v15-sha256/sign/2048 | 797.5 µs |
| hsm-rsa-pkcs1v15-sha384/sign/2048 | 768.5 µs |
| hsm-rsa-pkcs1v15-sha512/sign/2048 | 735.7 µs |
| hsm-rsa-pss/sign/2048 | 800.4 µs |
KMS Performance Comparison
Versions: v5.28.0
Generated: 2026-10-09
Benchmark Environment
| Field | Value |
|---|---|
| Date | 2026-10-07 21:33:38 UTC |
| HSM backend | None (Software) |
| Command | mise run bench:pkcs11 |
| Build | bench / non-fips |
| Database | SQLite (temporary, single benchmark run) |
| CPU | Intel(R) Core(TM) i9-14900T @ 800 MHz |
| CPU cores | 24 physical / 32 logical (HT) |
| RAM | 31.1 GB |
| OS | Ubuntu 24.04.5 LTS |
| Kernel | 6.8.0-146-generic |
Load test parameters
| Parameter | Value |
|---|---|
| Mode | all |
| Protocols | pkcs11 |
| Measurement window | 20 s per concurrency level |
| Concurrency levels | 1,2,4,8,16 |
| Warm-up | 5 s |
| Cooldown between levels | 2 s |
CPU detail (lscpu)
Architecture: x86_64
CPU op-mode(s): 32-bit, 64-bit
Address sizes: 46 bits physical, 48 bits virtual
Byte Order: Little Endian
CPU(s): 32
On-line CPU(s) list: 0-31
Vendor ID: GenuineIntel
Model name: Intel(R) Core(TM) i9-14900T
CPU family: 6
Model: 183
Thread(s) per core: 2
Core(s) per socket: 24
Socket(s): 1
Stepping: 1
CPU(s) scaling MHz: 38%
CPU max MHz: 5500,0000
CPU min MHz: 800,0000
BogoMIPS: 2227,20
Flags: fpu vme de pse tsc msr pae mce cx8 apic sep mtrr pge mca cmov pat pse36 clflush dts acpi mmx fxsr sse sse2 ss ht tm pbe syscall nx pdpe1gb rdtscp lm constant_tsc art arch_perfmon pebs bts rep_good nopl xtopology nonstop_tsc cpuid aperfmperf tsc_known_freq pni pclmulqdq dtes64 monitor ds_cpl vmx smx est tm2 ssse3 sdbg fma cx16 xtpr pdcm pcid sse4_1 sse4_2 x2apic movbe popcnt tsc_deadline_timer aes xsave avx f16c rdrand lahf_lm abm 3dnowprefetch cpuid_fault epb ssbd ibrs ibpb stibp ibrs_enhanced tpr_shadow flexpriority ept vpid ept_ad fsgsbase tsc_adjust bmi1 avx2 smep bmi2 erms invpcid rdseed adx smap clflushopt clwb intel_pt sha_ni xsaveopt xsavec xgetbv1 xsaves split_lock_detect user_shstk avx_vnni dtherm ida arat pln pts hwp hwp_notify hwp_act_window hwp_epp hwp_pkg_req hfi vnmi umip pku ospke waitpkg gfni vaes vpclmulqdq tme rdpid movdiri movdir64b fsrm md_clear serialize pconfig arch_lbr ibt flush_l1d arch_capabilities ibpb_exit_to_user
Virtualization: VT-x
L1d cache: 896 KiB (24 instances)
L1i cache: 1,3 MiB (24 instances)
L2 cache: 32 MiB (12 instances)
L3 cache: 36 MiB (1 instance)
NUMA node(s): 1
NUMA node0 CPU(s): 0-31
Vulnerability Gather data sampling: Not affected
Vulnerability Indirect target selection: Not affected
Vulnerability Itlb multihit: Not affected
Vulnerability L1tf: Not affected
Vulnerability Mds: Not affected
Vulnerability Meltdown: Not affected
Vulnerability Mmio stale data: Not affected
Vulnerability Reg file data sampling: Mitigation; Clear Register File
Vulnerability Retbleed: Not affected
Vulnerability Spec rstack overflow: Not affected
Vulnerability Spec store bypass: Mitigation; Speculative Store Bypass disabled via prctl
Vulnerability Spectre v1: Mitigation; usercopy/swapgs barriers and __user pointer sanitization
Vulnerability Spectre v2: Mitigation; Enhanced / Automatic IBRS; IBPB conditional; PBRSB-eIBRS SW sequence; BHI BHI_DIS_S
Vulnerability Srbds: Not affected
Vulnerability Tsa: Not affected
Vulnerability Tsx async abort: Not affected
Vulnerability Vmscape: Mitigation; IBPB before exit to userspace
Architecture
graph TB
subgraph cli["Local Machine"]
ckms["<b>ckms pkcs11 bench</b>"]
lib["<b>cosmian_pkcs11.so</b><br/>(PKCS#11 Provider)"]
end
subgraph srv["KMS Server"]
kmip["KMIP 2.1<br/>(HTTP/TLS)"]
crypto["Software Crypto<br/>(OpenSSL 3.6.2)"]
end
subgraph hsm["SoftHSM2"]
slot["PKCS#11 Slot"]
keys["Test Keys"]
end
ckms -->|C_Initialize/C_Sign| lib
lib -->|HTTP| kmip
lib -->|PKCS#11| slot
kmip --> crypto
slot --> keys
style ckms fill:#4A90E2
style lib fill:#FF6B6B
style kmip fill:#7ED321
style crypto fill:#F5A623
style slot fill:#BD10E0
Components:
- ckms: PKCS#11 load test generator
- cosmian_pkcs11.so: Bridge between PKCS#11 callers and KMIP server
- KMIP Endpoint: Server-side request/response marshaling
- Software Crypto: AES/RSA/ECDSA operations via OpenSSL
- PKCS#11 Slot: HSM backend for key storage
Protocols
The caller-facing protocol benchmarked here is the cosmian_pkcs11 provider's real PKCS#11 v3.1 Cryptoki C ABI: the benchmark dlopen()s the built shared library (libcosmian_pkcs11.{so,dylib}) and resolves its standard interface through C_GetInterface — the same call path v3-aware PKCS#11 consumers (Oracle TDE, OpenSSH, disk-encryption tools) use. For remote Sign, the provider wraps the KMIP operation in a KMIP 2.1 RequestMessage, serializes binary TTLV, and sends application/octet-stream to POST /kmip; the binary TTLV response is fully deserialized before C_SignMessage returns.
| Interface | Transport | Description |
|---|---|---|
| PKCS#11 (Cryptoki v3.1) | C_GetInterface + C ABI | C_Initialize, C_OpenSession, C_EncryptInit/C_Encrypt, C_DecryptInit/C_Decrypt, C_MessageSignInit/C_SignMessage, C_VerifyInit/C_Verify, C_GenerateKey |
| Provider → KMS Sign | KMIP 2.1 binary TTLV over HTTP | POST /kmip, application/octet-stream |
Benchmark Methodology
Real Cryptoki C ABI, one session per worker
The benchmark subcommand ckms pkcs11 bench (driven by mise run bench:pkcs11) dlopen()s the built cosmian_pkcs11 shared library, resolves the v3.1 function table through C_GetInterface, and calls it directly — the same code path a real PKCS#11 consumer application uses, as opposed to mise bench:load, which drives the KMIP REST API directly through the ckms client library.
By default each worker thread owns a dedicated C_OpenSession handle. The provider looks the handle up in its session map and serializes only access to that individual session with a per-session lock, so unrelated worker sessions can progress independently. --shared-session is an opt-in comparison mode that reproduces the former single-session contention model; it is not the default methodology.
For the Ed25519 Sign path measured in this report, C_MessageSignInit runs once during setup and each C_SignMessage crosses the synchronous PKCS#11 boundary, builds a KMIP 2.1 RequestMessage, serializes it as binary TTLV, sends it to the /kmip octet-stream endpoint, and parses the binary TTLV response before copying the signature into the caller-owned buffer.
Independent operations
Unlike the software/HSM reports where requests may be bundled, this report measures each Cryptoki operation independently:
- Encryption/Decryption:
C_EncryptInit/C_EncryptandC_DecryptInit/C_Decryptagainst pre-generated ciphertext - Sign:
C_SignInit/C_Sign(orC_MessageSignInit/C_SignMessagefor Ed25519) crossing the synchronous PKCS#11 boundary - Verify:
C_VerifyInit/C_Verifyimplemented and benchmarked through the real Cryptoki function table - Key Creation: symmetric
C_GenerateKeywith immediateC_DestroyObjectper iteration
Load test (mise run bench:pkcs11)
The load test sweeps a configurable list of concurrency levels, mirroring mise bench:load's own sweep mechanics exactly: at each level N concurrent OS threads call the target Cryptoki function in a tight loop for a fixed measurement window (default: 20 s), preceded by a warm-up phase (default: 5 s) that is excluded from measurements, followed by a cooldown (default: 2 s) before the next level.
Recorded metrics per (operation, concurrency) pair:
- Throughput — Cryptoki calls per second
- p50 / p95 / p99 — per-call latency percentiles (ms)
Infrastructure note: The benchmark server uses a local SQLite backend (temporary, discarded after the run). Throughput figures will differ on a production deployment backed by PostgreSQL or Redis-Findex.
Load Tests
encrypt/aes-cbc
| Concurrency | pkcs11 (req/s) |
|---|---|
| 1 | 1,164 |
| 2 | 1,498 |
| 4 | 1,788 |
| 8 | 4,163 |
| 16 | 6,444 |
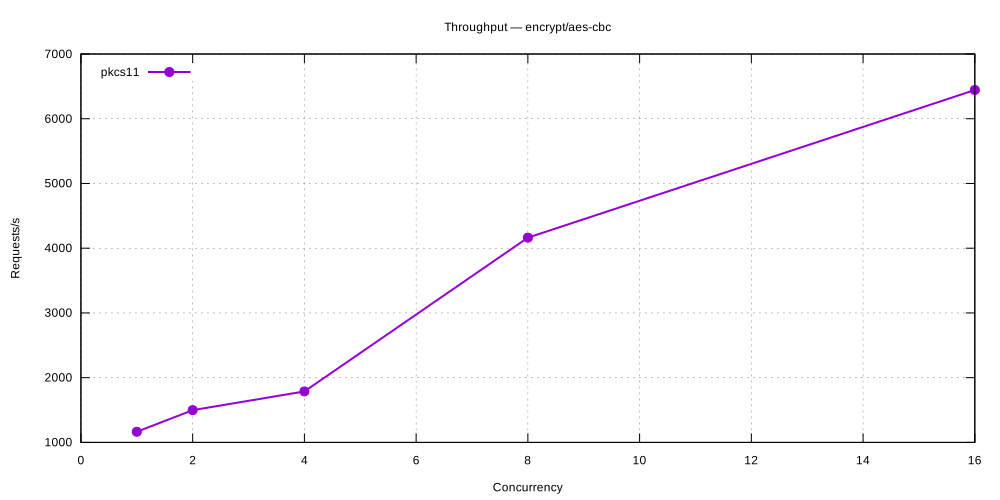
encrypt/aes-gcm
| Concurrency | pkcs11 (req/s) |
|---|---|
| 1 | 1,132 |
| 2 | 1,614 |
| 4 | 1,439 |
| 8 | 4,450 |
| 16 | 6,437 |
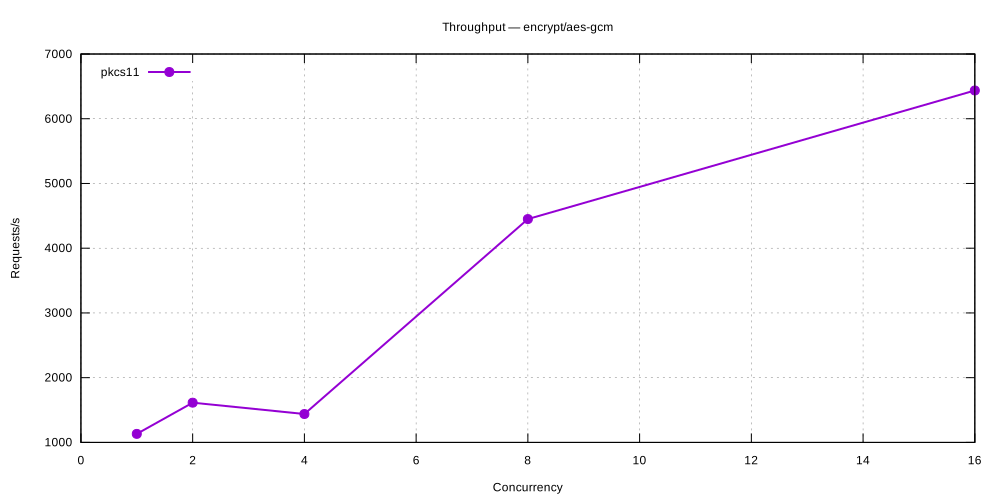
encrypt/rsa-pkcs
| Concurrency | pkcs11 (req/s) |
|---|---|
| 1 | 4,656 |
| 2 | 2,381 |
| 4 | 2,678 |
| 8 | 17,514 |
| 16 | 22,873 |
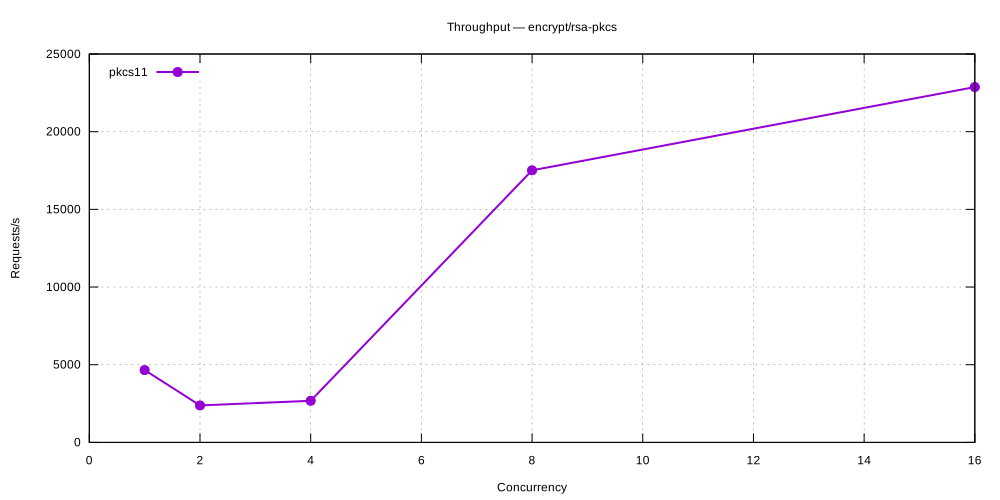
encrypt/rsa-oaep
| Concurrency | pkcs11 (req/s) |
|---|---|
| 1 | 4,521 |
| 2 | 2,361 |
| 4 | 2,723 |
| 8 | 16,981 |
| 16 | 22,047 |
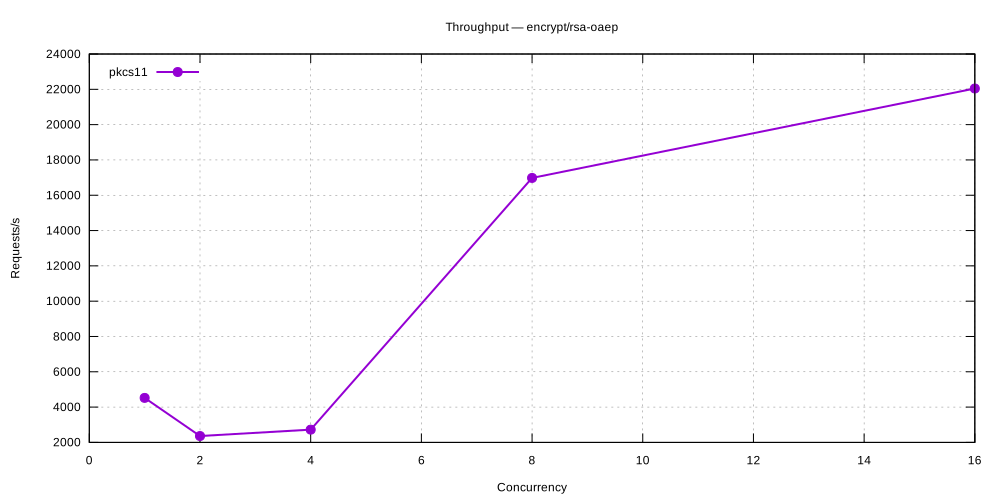
decrypt/aes-cbc
| Concurrency | pkcs11 (req/s) |
|---|---|
| 1 | 2,364 |
| 2 | 2,925 |
| 4 | 3,522 |
| 8 | 8,450 |
| 16 | 13,073 |
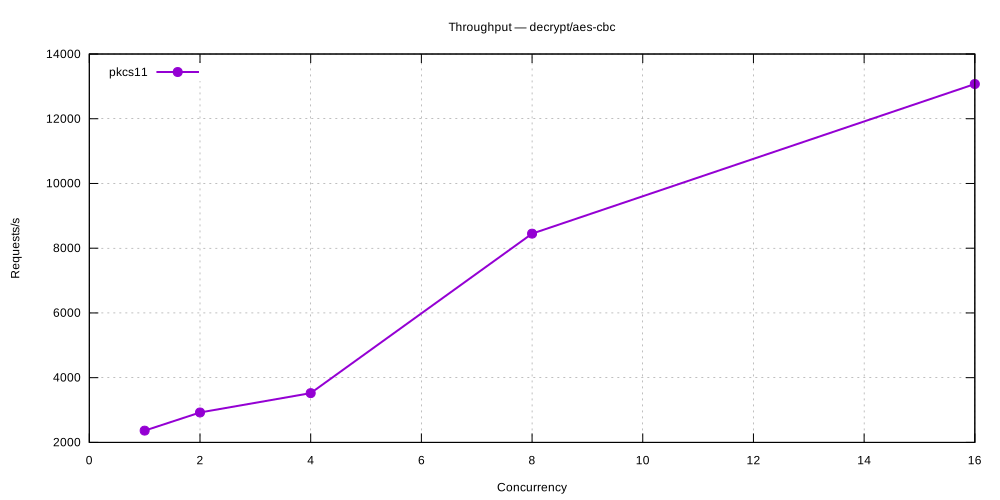
decrypt/aes-gcm
| Concurrency | pkcs11 (req/s) |
|---|---|
| 1 | 2,313 |
| 2 | 3,144 |
| 4 | 3,233 |
| 8 | 8,633 |
| 16 | 12,771 |
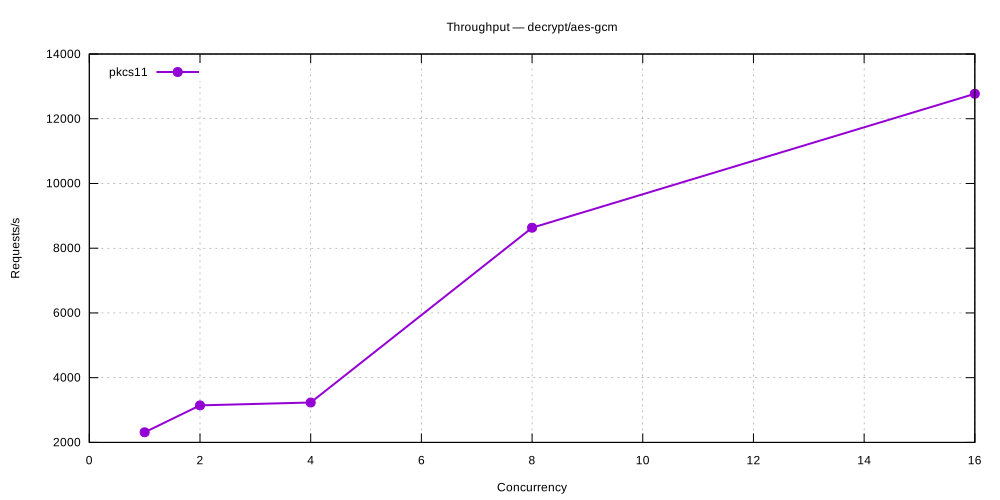
decrypt/rsa-pkcs
| Concurrency | pkcs11 (req/s) |
|---|---|
| 1 | 42 |
| 2 | 75 |
| 4 | 128 |
| 8 | 189 |
| 16 | 225 |
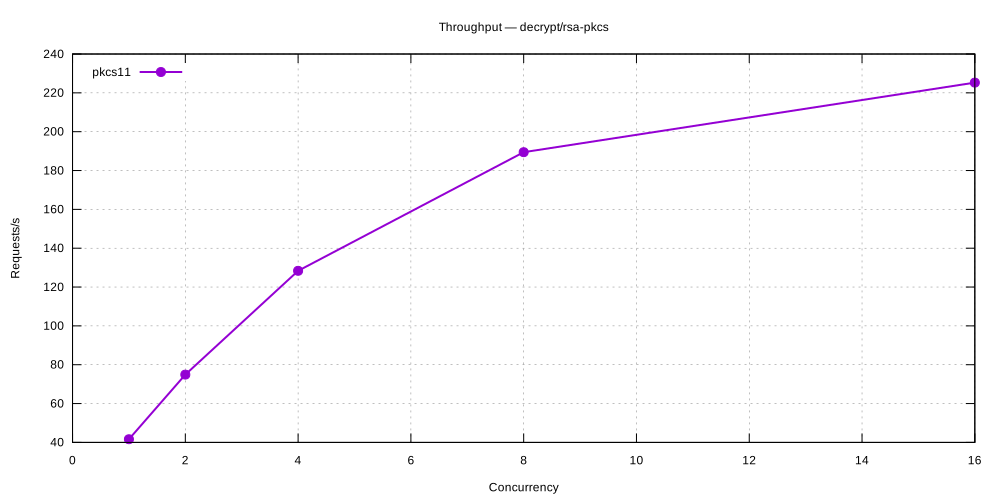
decrypt/rsa-oaep
| Concurrency | pkcs11 (req/s) |
|---|---|
| 1 | 41 |
| 2 | 75 |
| 4 | 128 |
| 8 | 185 |
| 16 | 223 |
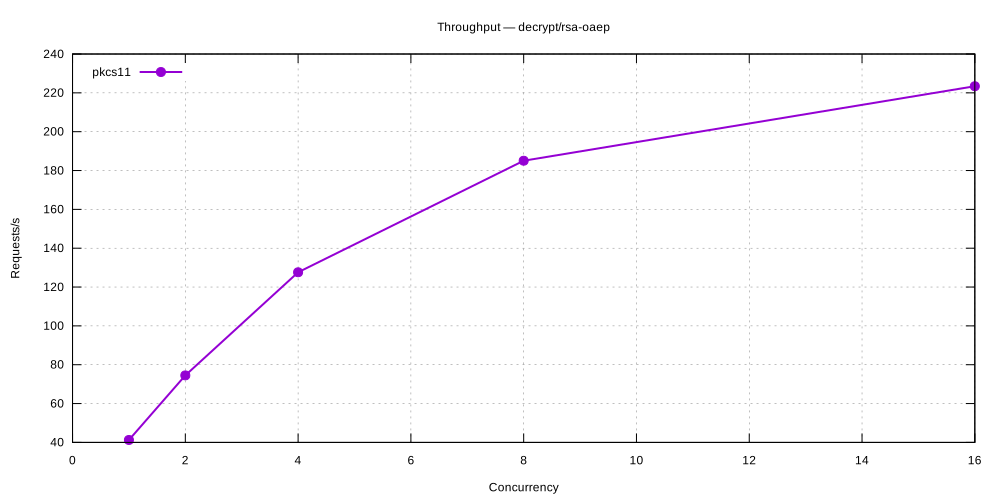
sign/rsa-pkcs-sha256
| Concurrency | pkcs11 (req/s) |
|---|---|
| 1 | 42 |
| 2 | 72 |
| 4 | 125 |
| 8 | 184 |
| 16 | 218 |
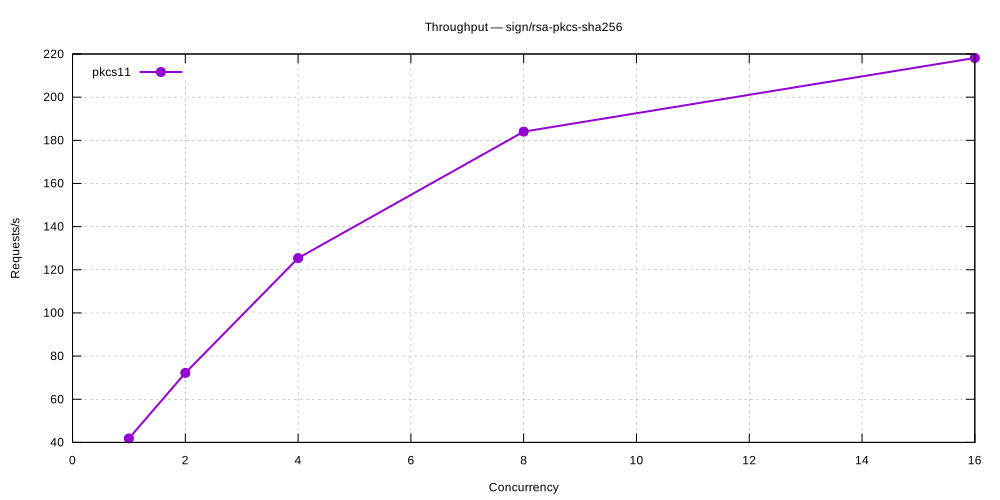
sign/rsa-pss-sha256
| Concurrency | pkcs11 (req/s) |
|---|---|
| 1 | 41 |
| 2 | 67 |
| 4 | 126 |
| 8 | 182 |
| 16 | 217 |
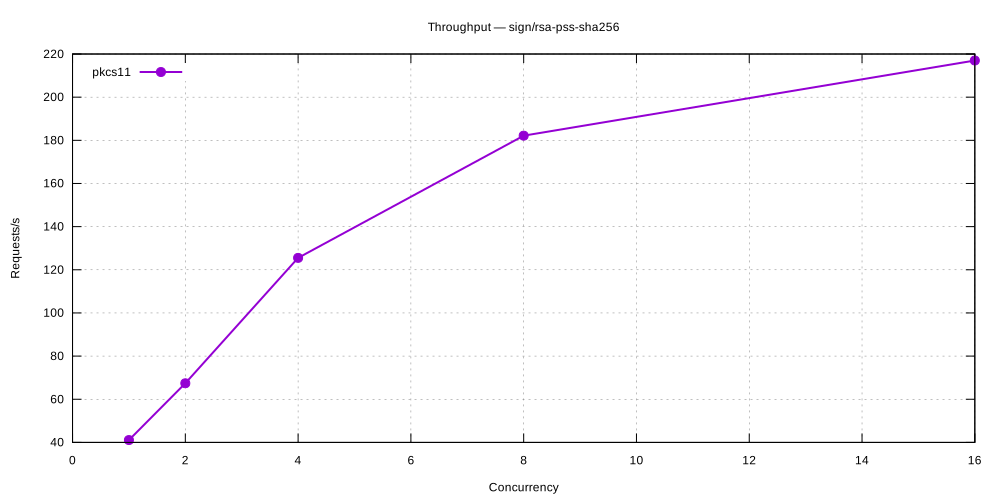
sign/ecdsa-p256
| Concurrency | pkcs11 (req/s) |
|---|---|
| 1 | 3,816 |
| 2 | 5,996 |
| 4 | 3,377 |
| 8 | 14,483 |
| 16 | 21,077 |
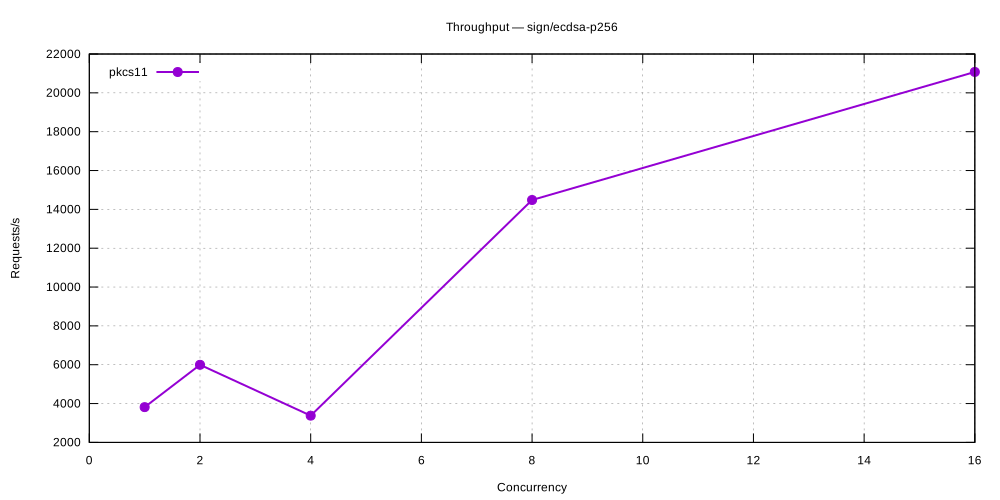
sign/ecdsa-p384
| Concurrency | pkcs11 (req/s) |
|---|---|
| 1 | 983 |
| 2 | 1,629 |
| 4 | 2,259 |
| 8 | 3,621 |
| 16 | 5,697 |
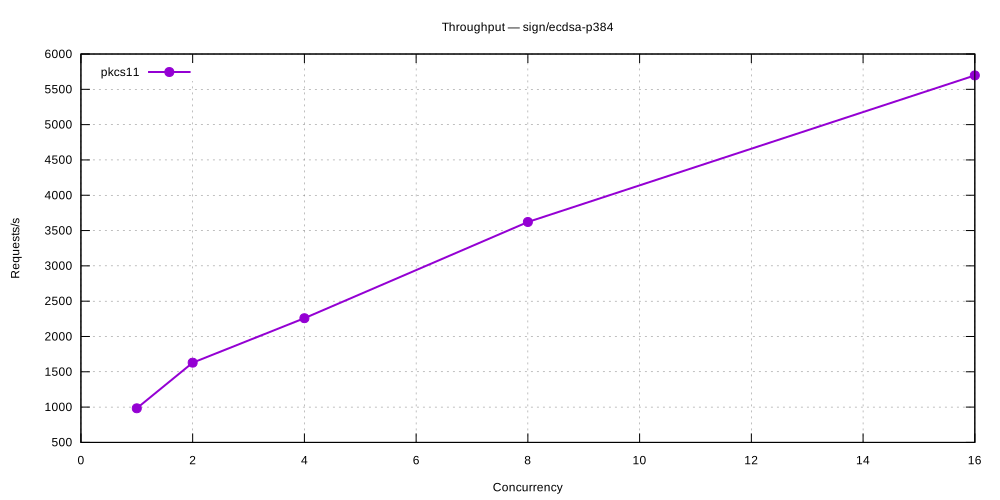
sign/ecdsa-secp256k1
| Concurrency | pkcs11 (req/s) |
|---|---|
| 1 | 2,514 |
| 2 | 4,117 |
| 4 | 3,234 |
| 8 | 9,205 |
| 16 | 14,112 |
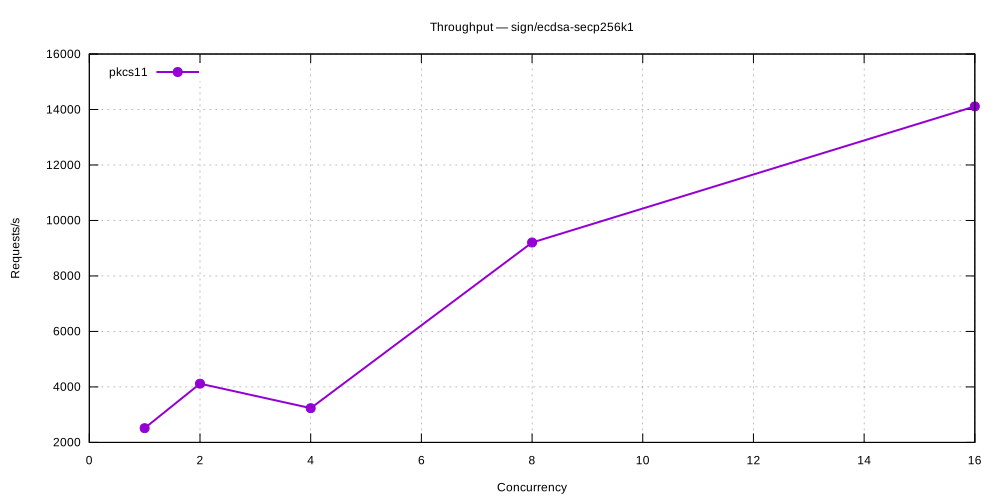
sign/eddsa-ed25519
| Concurrency | pkcs11 (req/s) |
|---|---|
| 1 | 8,832 |
| 2 | 11,159 |
| 4 | 5,312 |
| 8 | 31,750 |
| 16 | 43,367 |
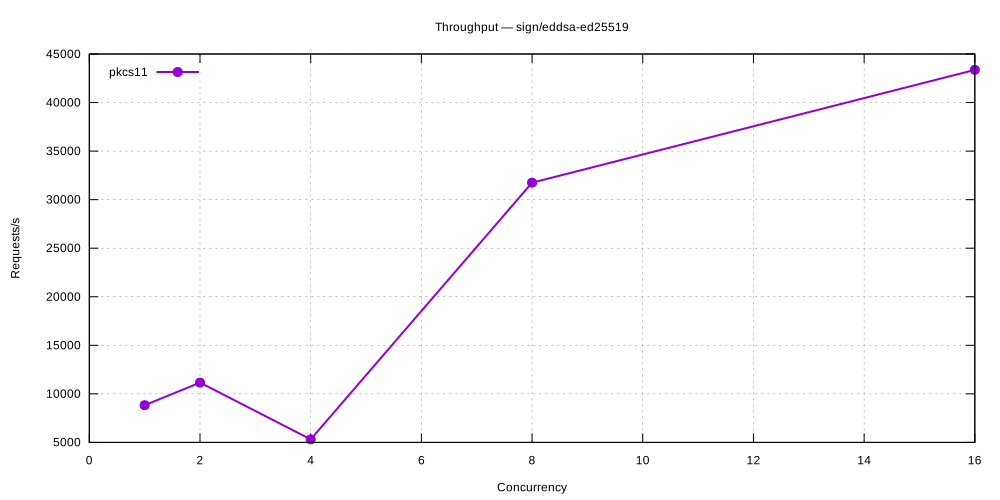
verify/rsa-pkcs-sha256
| Concurrency | pkcs11 (req/s) |
|---|---|
| 1 | 9,713 |
| 2 | 5,928 |
| 4 | 5,519 |
| 8 | 34,986 |
| 16 | 45,735 |
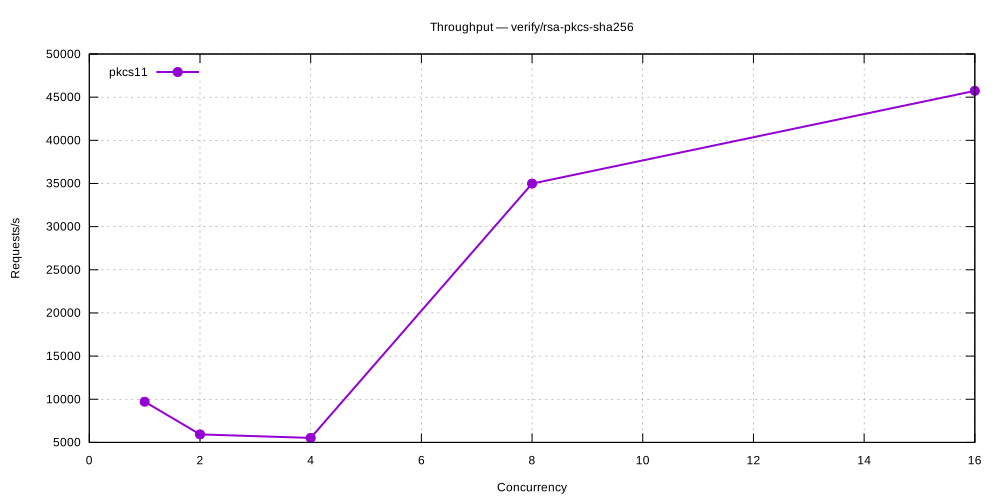
verify/rsa-pss-sha256
| Concurrency | pkcs11 (req/s) |
|---|---|
| 1 | 9,066 |
| 2 | 6,041 |
| 4 | 5,977 |
| 8 | 32,932 |
| 16 | 43,216 |
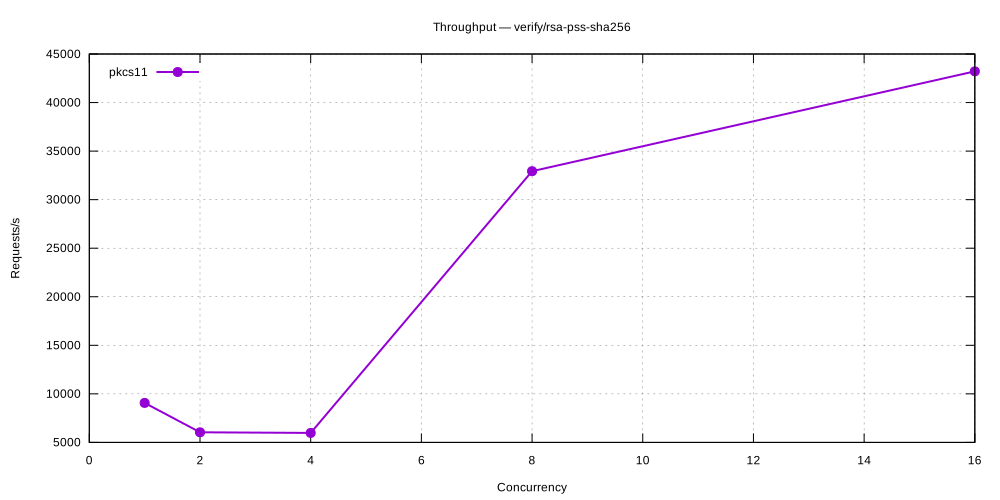
verify/ecdsa-p256
| Concurrency | pkcs11 (req/s) |
|---|---|
| 1 | 3,839 |
| 2 | 4,796 |
| 4 | 2,641 |
| 8 | 13,641 |
| 16 | 20,837 |
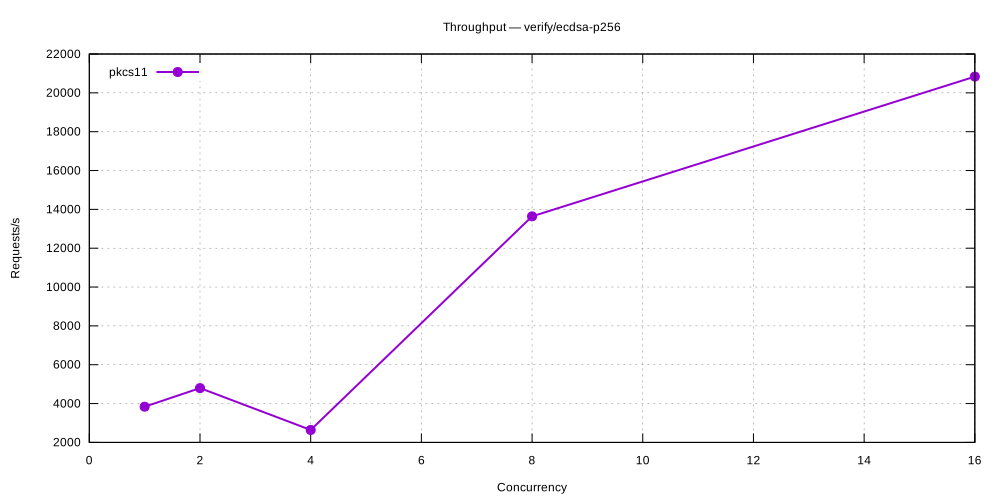
verify/ecdsa-p384
| Concurrency | pkcs11 (req/s) |
|---|---|
| 1 | 1,725 |
| 2 | 2,915 |
| 4 | 2,241 |
| 8 | 7,383 |
| 16 | 10,307 |
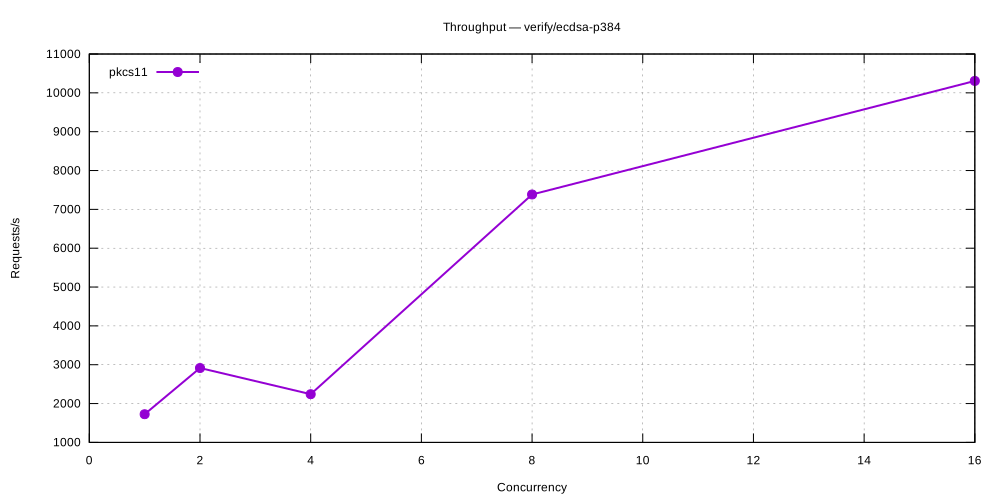
verify/ecdsa-secp256k1
| Concurrency | pkcs11 (req/s) |
|---|---|
| 1 | 5,711 |
| 2 | 5,469 |
| 4 | 3,044 |
| 8 | 20,059 |
| 16 | 28,242 |
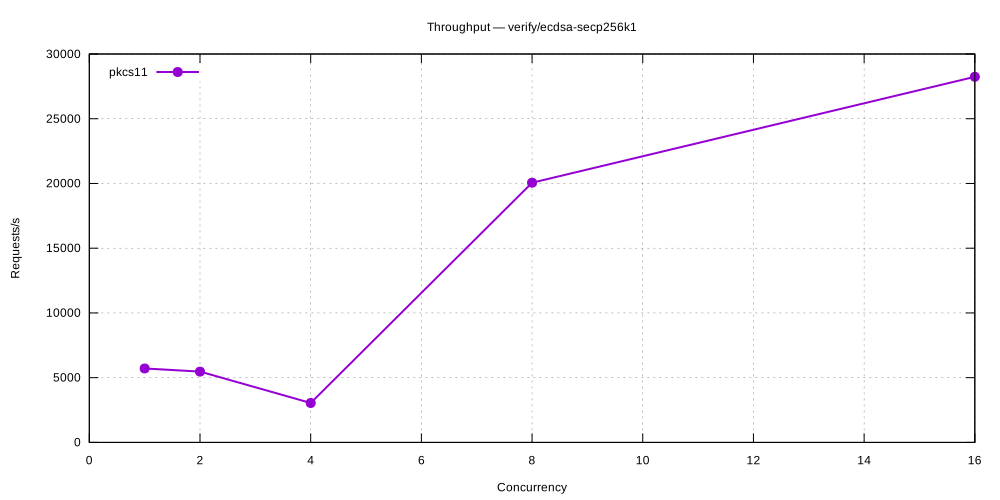
verify/eddsa-ed25519
| Concurrency | pkcs11 (req/s) |
|---|---|
| 1 | 7,392 |
| 2 | 6,057 |
| 4 | 4,666 |
| 8 | 31,497 |
| 16 | 41,930 |
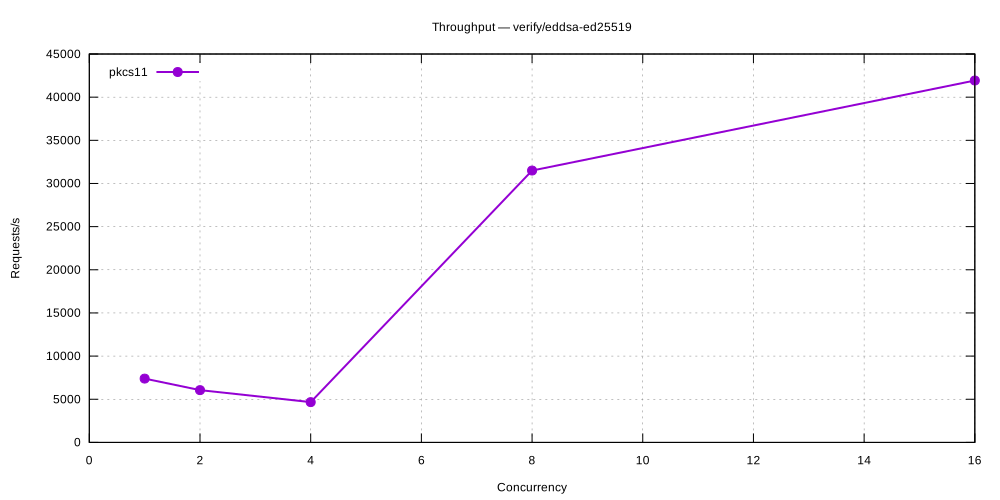
key-creation/aes
| Concurrency | pkcs11 (req/s) |
|---|---|
| 1 | 734 |
| 2 | 702 |
| 4 | 382 |
| 8 | 416 |
| 16 | 458 |
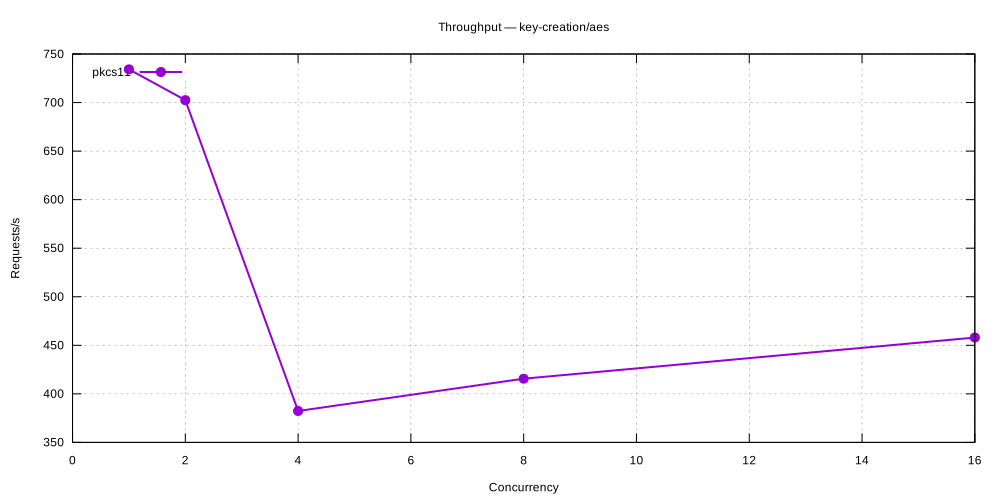
batch/aes-cbc
| Concurrency | pkcs11 (req/s) |
|---|---|
| 1 | 117 |
| 2 | 155 |
| 4 | 141 |
| 8 | 442 |
| 16 | 647 |
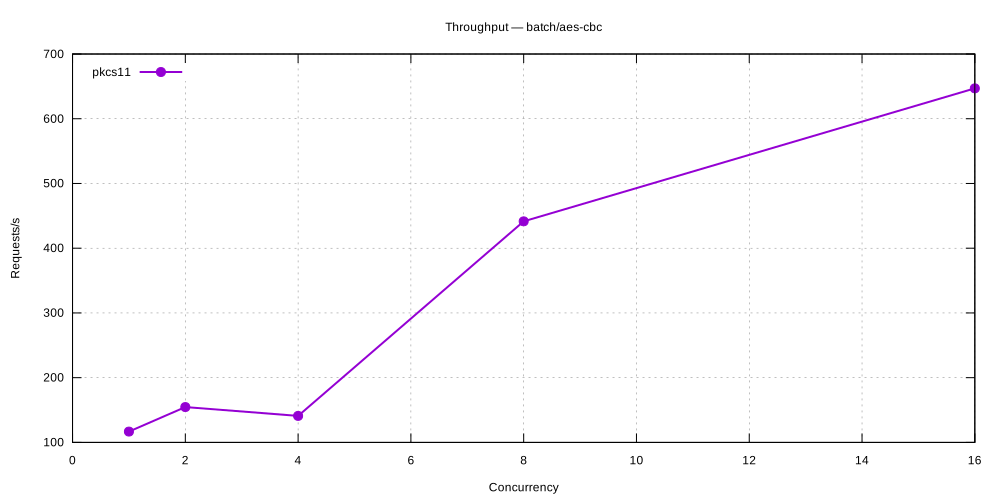
Criterion Benchmarks
Symmetric Encryption
| Benchmark | pkcs11 |
|---|---|
| aes-cbc | 845.5 µs |
| aes-gcm | 803.0 µs |
Asymmetric Encryption
| Benchmark | pkcs11 |
|---|---|
| rsa-oaep | 287.3 µs |
| rsa-pkcs | 238.1 µs |
Sign / Verify
| Benchmark | pkcs11 |
|---|---|
| ecdsa-p256/sign | 259.3 µs |
| ecdsa-p256/verify | 289.6 µs |
| ecdsa-p384/sign | 965.6 µs |
| ecdsa-p384/verify | 496.7 µs |
| ecdsa-secp256k1/sign | 378.3 µs |
| ecdsa-secp256k1/verify | 153.3 µs |
| eddsa-ed25519/sign | 118.5 µs |
| eddsa-ed25519/verify | 167.7 µs |
| rsa-pkcs-sha256/sign | 24.32 ms |
| rsa-pkcs-sha256/verify | 129.2 µs |
| rsa-pss-sha256/sign | 23.03 ms |
| rsa-pss-sha256/verify | 102.0 µs |
KMS Performance Comparison
Versions: v5.28.0
Generated: 2026-10-09
Benchmark Environment
| Field | Value |
|---|---|
| Date | 2026-10-07 22:25:18 UTC |
| HSM backend | SoftHSM2 |
| Command | mise run bench:pkcs11 --delegated --hsm-model softhsm2 |
| Build | bench / non-fips |
| Database | SQLite (temporary, single benchmark run) |
| CPU | Intel(R) Core(TM) i9-14900T @ 857 MHz |
| CPU cores | 24 physical / 32 logical (HT) |
| RAM | 31.1 GB |
| OS | Ubuntu 24.04.5 LTS |
| Kernel | 6.8.0-146-generic |
Load test parameters
| Parameter | Value |
|---|---|
| Mode | all |
| Protocols | pkcs11 |
| Measurement window | 20 s per concurrency level |
| Concurrency levels | 1,2,4,8,16 |
| Warm-up | 5 s |
| Cooldown between levels | 2 s |
CPU detail (lscpu)
Architecture: x86_64
CPU op-mode(s): 32-bit, 64-bit
Address sizes: 46 bits physical, 48 bits virtual
Byte Order: Little Endian
CPU(s): 32
On-line CPU(s) list: 0-31
Vendor ID: GenuineIntel
Model name: Intel(R) Core(TM) i9-14900T
CPU family: 6
Model: 183
Thread(s) per core: 2
Core(s) per socket: 24
Socket(s): 1
Stepping: 1
CPU(s) scaling MHz: 22%
CPU max MHz: 5500,0000
CPU min MHz: 800,0000
BogoMIPS: 2227,20
Flags: fpu vme de pse tsc msr pae mce cx8 apic sep mtrr pge mca cmov pat pse36 clflush dts acpi mmx fxsr sse sse2 ss ht tm pbe syscall nx pdpe1gb rdtscp lm constant_tsc art arch_perfmon pebs bts rep_good nopl xtopology nonstop_tsc cpuid aperfmperf tsc_known_freq pni pclmulqdq dtes64 monitor ds_cpl vmx smx est tm2 ssse3 sdbg fma cx16 xtpr pdcm pcid sse4_1 sse4_2 x2apic movbe popcnt tsc_deadline_timer aes xsave avx f16c rdrand lahf_lm abm 3dnowprefetch cpuid_fault epb ssbd ibrs ibpb stibp ibrs_enhanced tpr_shadow flexpriority ept vpid ept_ad fsgsbase tsc_adjust bmi1 avx2 smep bmi2 erms invpcid rdseed adx smap clflushopt clwb intel_pt sha_ni xsaveopt xsavec xgetbv1 xsaves split_lock_detect user_shstk avx_vnni dtherm ida arat pln pts hwp hwp_notify hwp_act_window hwp_epp hwp_pkg_req hfi vnmi umip pku ospke waitpkg gfni vaes vpclmulqdq tme rdpid movdiri movdir64b fsrm md_clear serialize pconfig arch_lbr ibt flush_l1d arch_capabilities ibpb_exit_to_user
Virtualization: VT-x
L1d cache: 896 KiB (24 instances)
L1i cache: 1,3 MiB (24 instances)
L2 cache: 32 MiB (12 instances)
L3 cache: 36 MiB (1 instance)
NUMA node(s): 1
NUMA node0 CPU(s): 0-31
Vulnerability Gather data sampling: Not affected
Vulnerability Indirect target selection: Not affected
Vulnerability Itlb multihit: Not affected
Vulnerability L1tf: Not affected
Vulnerability Mds: Not affected
Vulnerability Meltdown: Not affected
Vulnerability Mmio stale data: Not affected
Vulnerability Reg file data sampling: Mitigation; Clear Register File
Vulnerability Retbleed: Not affected
Vulnerability Spec rstack overflow: Not affected
Vulnerability Spec store bypass: Mitigation; Speculative Store Bypass disabled via prctl
Vulnerability Spectre v1: Mitigation; usercopy/swapgs barriers and __user pointer sanitization
Vulnerability Spectre v2: Mitigation; Enhanced / Automatic IBRS; IBPB conditional; PBRSB-eIBRS SW sequence; BHI BHI_DIS_S
Vulnerability Srbds: Not affected
Vulnerability Tsa: Not affected
Vulnerability Tsx async abort: Not affected
Vulnerability Vmscape: Mitigation; IBPB before exit to userspace
Architecture
graph TB
subgraph cli["Local Machine"]
ckms["<b>ckms pkcs11 bench</b>"]
lib["<b>cosmian_pkcs11.so</b>"]
end
subgraph srv["KMS Server"]
kmip["KMIP 2.1"]
oracle["CryptoOracle"]
end
subgraph hsm["SoftHSM2"]
slot["PKCS#11 Slot"]
keys["ECDSA<br/>RSA<br/>EdDSA<br/>AES<br/>(Resident)"]
end
ckms -->|C_Sign/C_Verify/C_Encrypt/C_Decrypt/C_GenerateKey| lib
lib -->|HTTP| kmip
kmip --> oracle
oracle -->|PKCS#11| slot
slot --> keys
style ckms fill:#4A90E2
style lib fill:#FF6B6B
style kmip fill:#7ED321
style oracle fill:#F5A623
style slot fill:#BD10E0
Components:
- ckms: PKCS#11 load test driver (
mise run bench:pkcs11 --delegated --hsm-model softhsm2) - cosmian_pkcs11.so: PKCS#11 provider bridge
- KMIP Endpoint: Server-side protocol handler
- CryptoOracle: Routes operations to HSM-resident keys (C_Sign/C_Verify/C_Encrypt/C_Decrypt/C_GenerateKey on SoftHSM2)
- PKCS#11 Slot: SoftHSM2 backend for key storage and cryptographic ops
Protocols
The caller-facing protocol benchmarked here is the cosmian_pkcs11 provider's real PKCS#11 v3.1 Cryptoki C ABI: the benchmark dlopen()s the built shared library (libcosmian_pkcs11.{so,dylib}) and resolves its standard interface through C_GetInterface — the same call path v3-aware PKCS#11 consumers (Oracle TDE, OpenSSH, disk-encryption tools) use. For remote Sign, the provider wraps the KMIP operation in a KMIP 2.1 RequestMessage, serializes binary TTLV, and sends application/octet-stream to POST /kmip; the binary TTLV response is fully deserialized before C_SignMessage returns.
This delegated variant provisions hsm::<slot>::... keys. After the provider sends each KMIP request, KMS routes the key to its CryptoOracle; the cryptographic operation executes through the server-side SoftHSM2 PKCS#11 backend rather than software crypto.
| Interface | Transport | Description |
|---|---|---|
| PKCS#11 (Cryptoki v3.1) | C_GetInterface + C ABI | C_Initialize, C_OpenSession, C_EncryptInit/C_Encrypt, C_DecryptInit/C_Decrypt, C_MessageSignInit/C_SignMessage, C_VerifyInit/C_Verify, C_GenerateKey |
| Provider → KMS Sign | KMIP 2.1 binary TTLV over HTTP | POST /kmip, application/octet-stream |
| KMS → HSM | PKCS#11 via CryptoOracle | HSM-resident key generation and cryptographic operations |
Benchmark Methodology
Real Cryptoki C ABI, one session per worker
The benchmark subcommand ckms pkcs11 bench (driven by mise run bench:pkcs11 --delegated --hsm-model softhsm2) dlopen()s the built cosmian_pkcs11 shared library, resolves the v3.1 function table through C_GetInterface, and calls it directly — the same code path a real PKCS#11 consumer application uses, as opposed to mise bench:load, which drives the KMIP REST API directly through the ckms client library.
By default each worker thread owns a dedicated C_OpenSession handle. The provider looks the handle up in its session map and serializes only access to that individual session with a per-session lock, so unrelated worker sessions can progress independently. --shared-session is an opt-in comparison mode that reproduces the former single-session contention model; it is not the default methodology.
For the Ed25519 Sign path measured in this report, C_MessageSignInit runs once during setup and each C_SignMessage crosses the synchronous PKCS#11 boundary, builds a KMIP 2.1 RequestMessage, serializes it as binary TTLV, sends it to the /kmip octet-stream endpoint, and parses the binary TTLV response before copying the signature into the caller-owned buffer.
HSM-resident key execution
With --delegated, provisioning assigns hsm::<slot>::... UIDs and persists discovery tags in a versioned PKCS#11 CKA_LABEL envelope while retaining the raw key ID in CKA_ID. The provider locates those tagged keys through KMS, while operations are executed by the KMS CryptoOracle on the SoftHSM2 backend. For full test suites on simulator tokens, submodes run against separate fresh tokens so cumulative key generation does not contaminate later measurements.
Independent operations
Unlike the software/HSM reports where requests may be bundled, this report measures each Cryptoki operation independently:
- Encryption/Decryption:
C_EncryptInit/C_EncryptandC_DecryptInit/C_Decryptagainst pre-generated ciphertext - Sign:
C_SignInit/C_Sign(orC_MessageSignInit/C_SignMessagefor Ed25519) crossing the synchronous PKCS#11 boundary - Verify:
C_VerifyInit/C_Verifyimplemented and benchmarked through the real Cryptoki function table - Key Creation: symmetric
C_GenerateKeywith immediateC_DestroyObjectper iteration
Load test (mise run bench:pkcs11 --delegated --hsm-model softhsm2)
The load test sweeps a configurable list of concurrency levels, mirroring mise bench:load's own sweep mechanics exactly: at each level N concurrent OS threads call the target Cryptoki function in a tight loop for a fixed measurement window (default: 20 s), preceded by a warm-up phase (default: 5 s) that is excluded from measurements, followed by a cooldown (default: 2 s) before the next level.
Recorded metrics per (operation, concurrency) pair:
- Throughput — Cryptoki calls per second
- p50 / p95 / p99 — per-call latency percentiles (ms)
Infrastructure note: The benchmark server uses a local SQLite backend (temporary, discarded after the run). Throughput figures will differ on a production deployment backed by PostgreSQL or Redis-Findex.
Load Tests
key-creation/aes
| Concurrency | pkcs11 (req/s) |
|---|---|
| 1 | 654 |
| 2 | 633 |
| 4 | 653 |
| 8 | 638 |
| 16 | 612 |
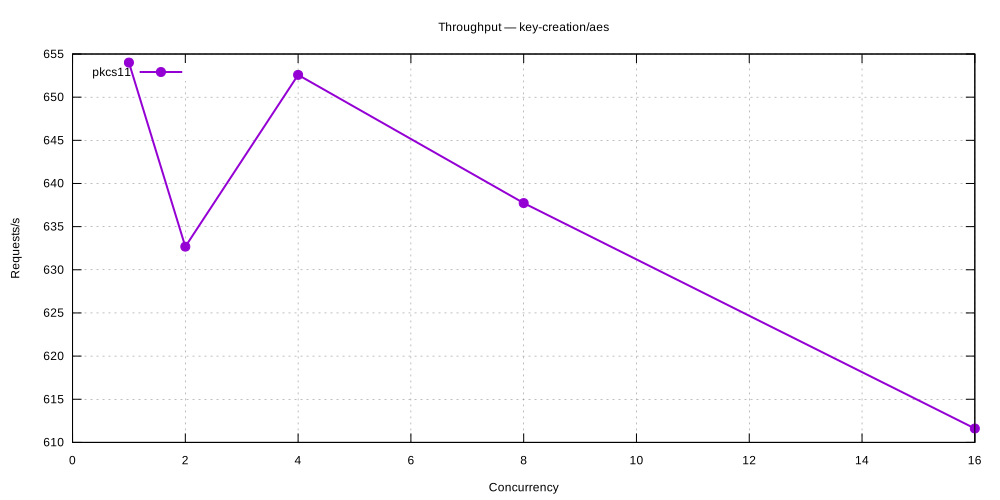
encrypt/aes-cbc
| Concurrency | pkcs11 (req/s) |
|---|---|
| 1 | 884 |
| 2 | 836 |
| 4 | 930 |
| 8 | 4,007 |
| 16 | 5,574 |
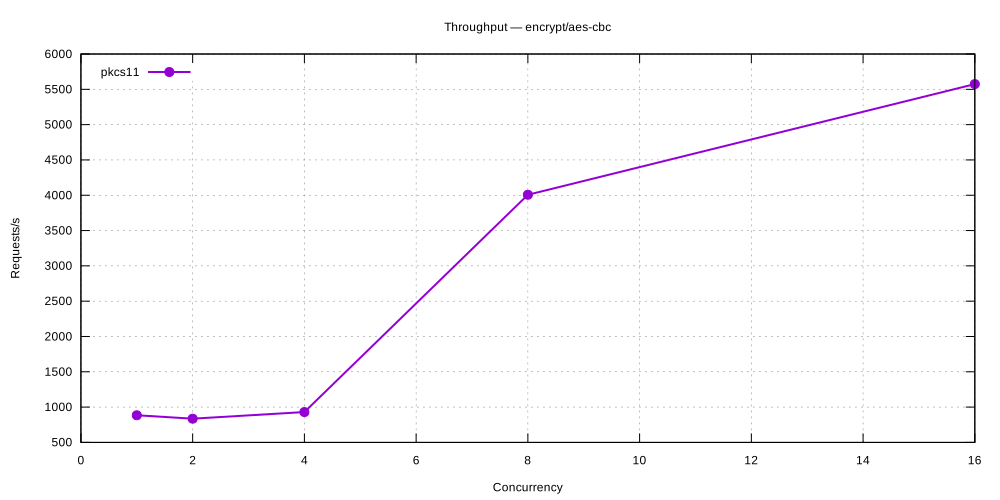
encrypt/aes-gcm
| Concurrency | pkcs11 (req/s) |
|---|---|
| 1 | 1,719 |
| 2 | 1,750 |
| 4 | 1,914 |
| 8 | 8,249 |
| 16 | 11,168 |
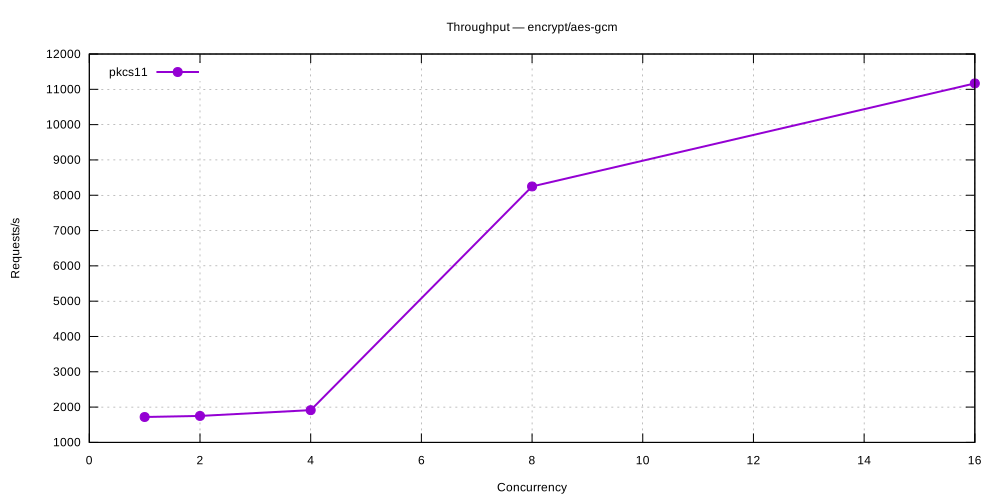
encrypt/rsa-pkcs
| Concurrency | pkcs11 (req/s) |
|---|---|
| 1 | 3,242 |
| 2 | 1,909 |
| 4 | 2,718 |
| 8 | 15,020 |
| 16 | 5,794 |
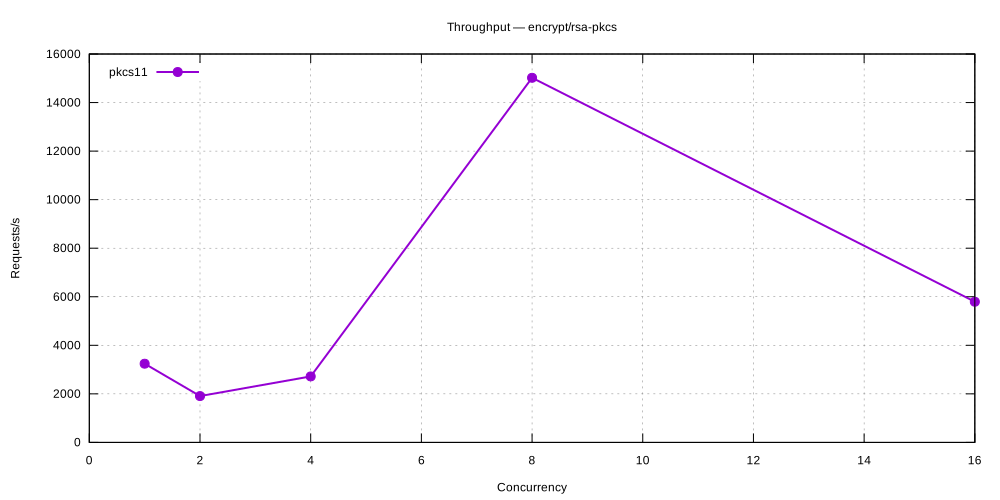
decrypt/aes-cbc
| Concurrency | pkcs11 (req/s) |
|---|---|
| 1 | 1,738 |
| 2 | 1,624 |
| 4 | 1,776 |
| 8 | 8,389 |
| 16 | 11,036 |
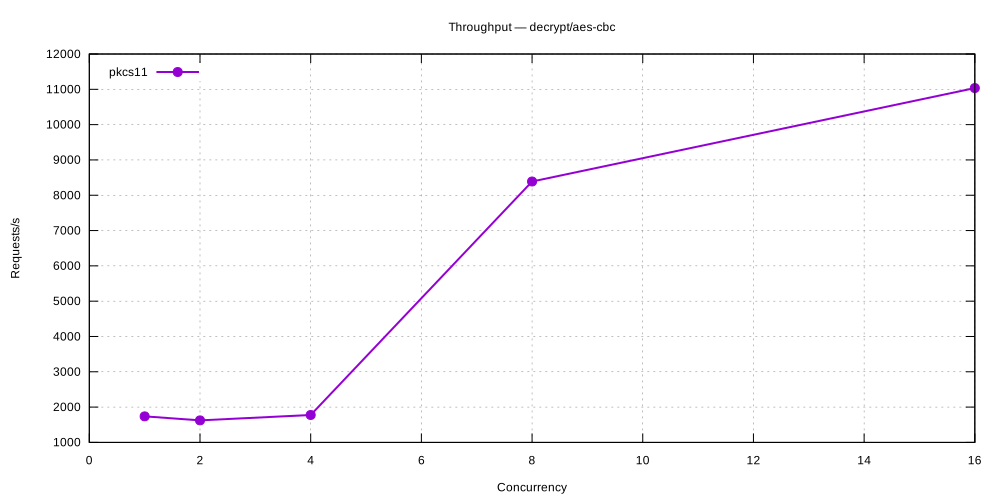
decrypt/aes-gcm
| Concurrency | pkcs11 (req/s) |
|---|---|
| 1 | 1,986 |
| 2 | 1,757 |
| 4 | 2,275 |
| 8 | 8,064 |
| 16 | 11,223 |
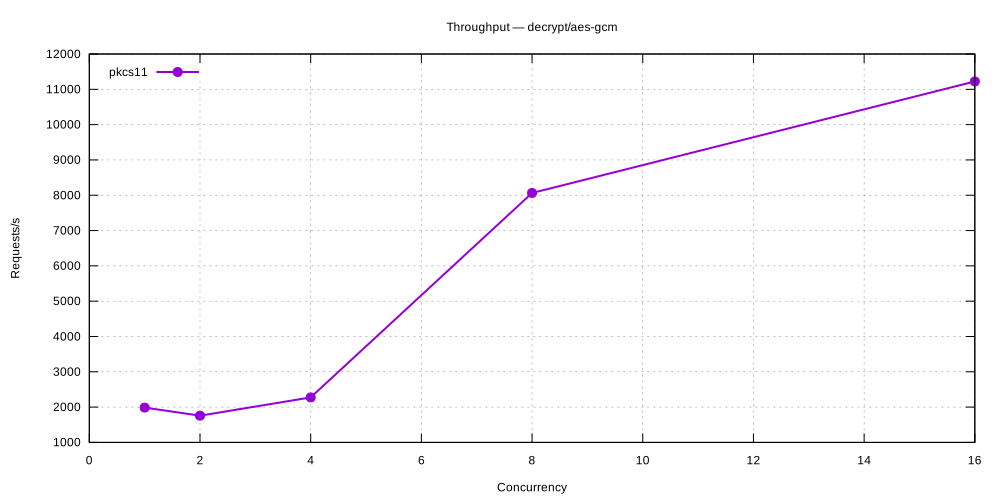
decrypt/rsa-pkcs
| Concurrency | pkcs11 (req/s) |
|---|---|
| 1 | 1,396 |
| 2 | 2,406 |
| 4 | 3,707 |
| 8 | 5,385 |
| 16 | 6,791 |
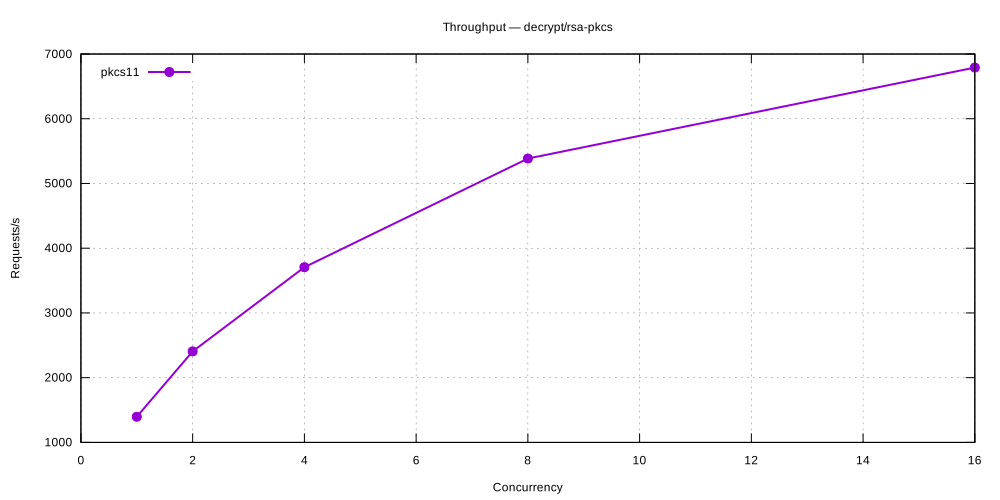
sign/rsa-pkcs-sha256
| Concurrency | pkcs11 (req/s) |
|---|---|
| 1 | 1,364 |
| 2 | 2,303 |
| 4 | 3,590 |
| 8 | 5,081 |
| 16 | 6,549 |
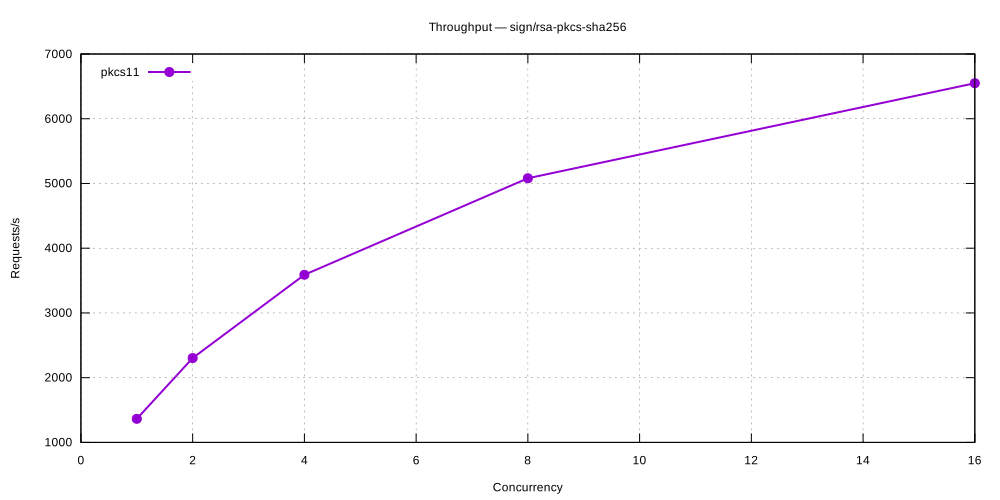
sign/rsa-pss-sha256
| Concurrency | pkcs11 (req/s) |
|---|---|
| 1 | 1,306 |
| 2 | 2,247 |
| 4 | 3,549 |
| 8 | 4,945 |
| 16 | 6,490 |
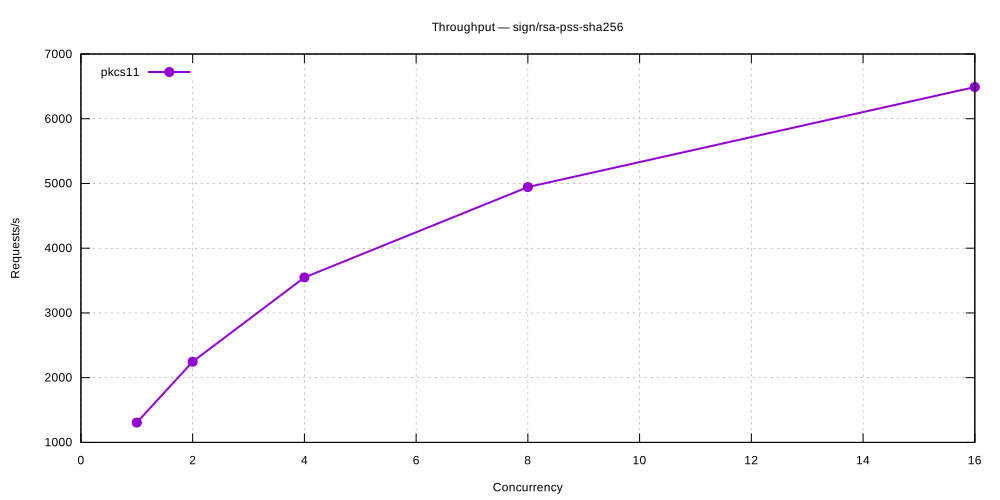
sign/ecdsa-p256
| Concurrency | pkcs11 (req/s) |
|---|---|
| 1 | 7,623 |
| 2 | 4,322 |
| 4 | 4,635 |
| 8 | 25,908 |
| 16 | 9,536 |
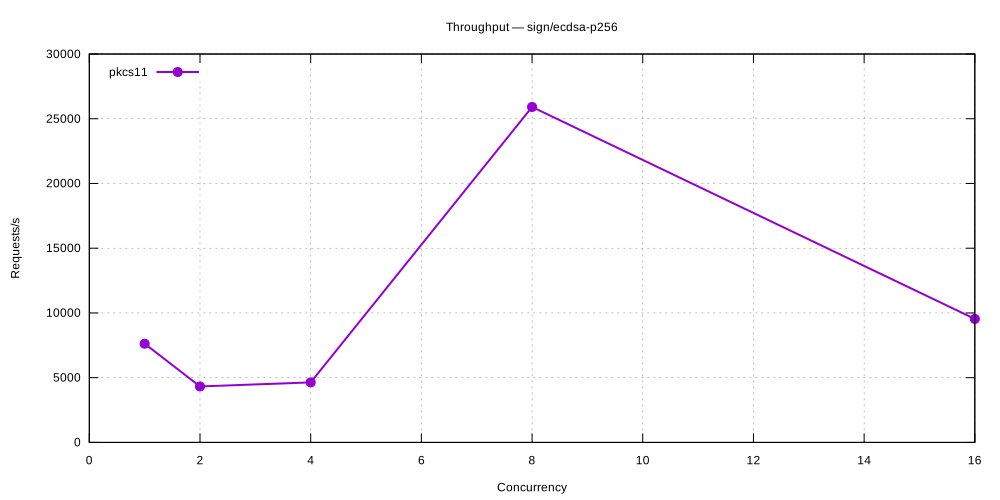
sign/ecdsa-p384
| Concurrency | pkcs11 (req/s) |
|---|---|
| 1 | 1,769 |
| 2 | 2,905 |
| 4 | 4,443 |
| 8 | 6,447 |
| 16 | 9,202 |
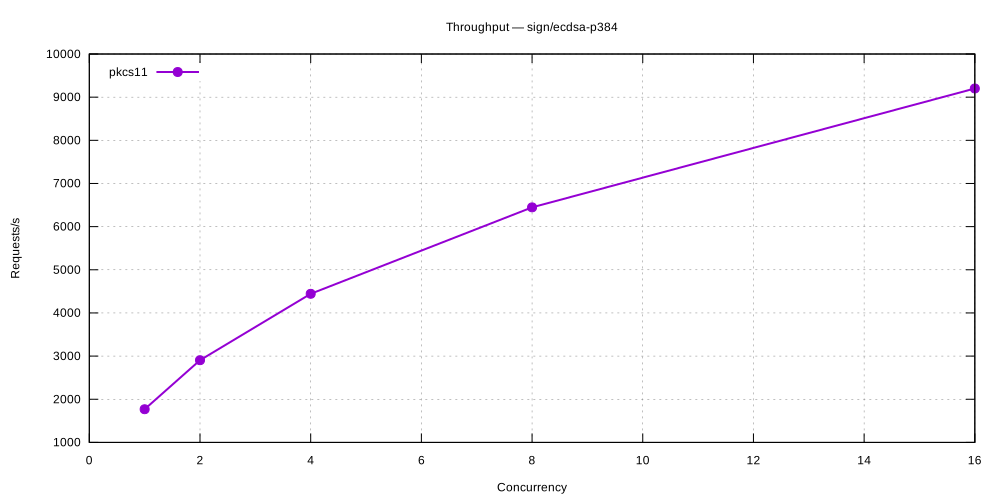
sign/ecdsa-secp256k1
| Concurrency | pkcs11 (req/s) |
|---|---|
| 1 | 2,929 |
| 2 | 4,657 |
| 4 | 6,844 |
| 8 | 10,156 |
| 16 | 14,206 |
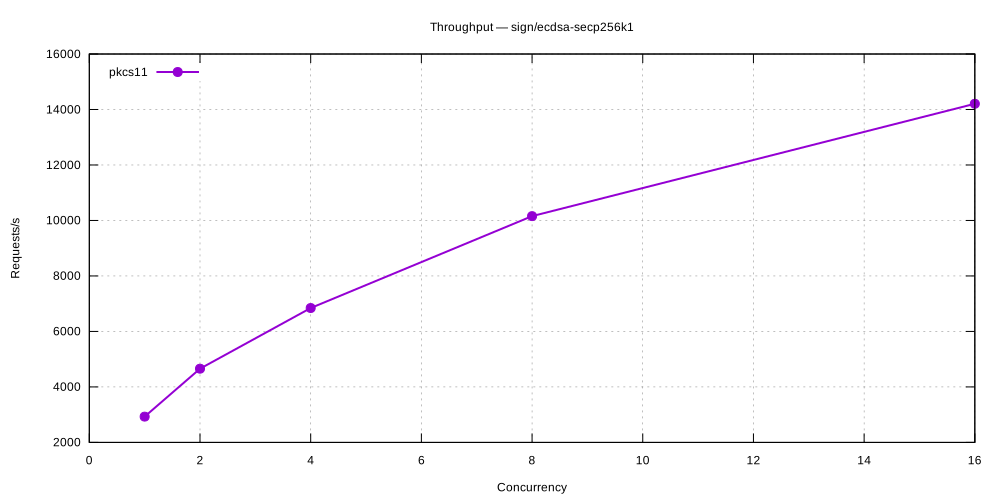
sign/eddsa-ed25519
| Concurrency | pkcs11 (req/s) |
|---|---|
| 1 | 5,679 |
| 2 | 4,375 |
| 4 | 5,433 |
| 8 | 23,428 |
| 16 | 9,627 |
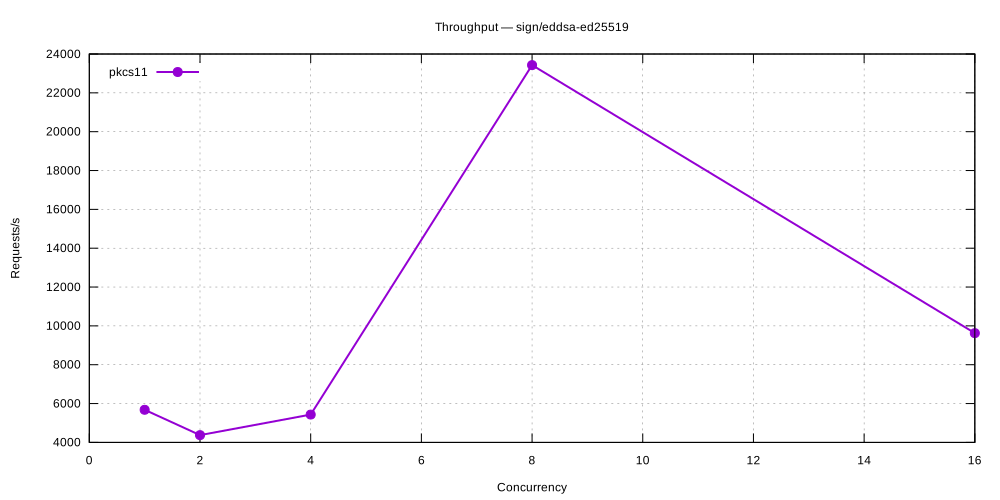
verify/rsa-pkcs-sha256
| Concurrency | pkcs11 (req/s) |
|---|---|
| 1 | 9,420 |
| 2 | 5,523 |
| 4 | 6,142 |
| 8 | 32,265 |
| 16 | 19,487 |
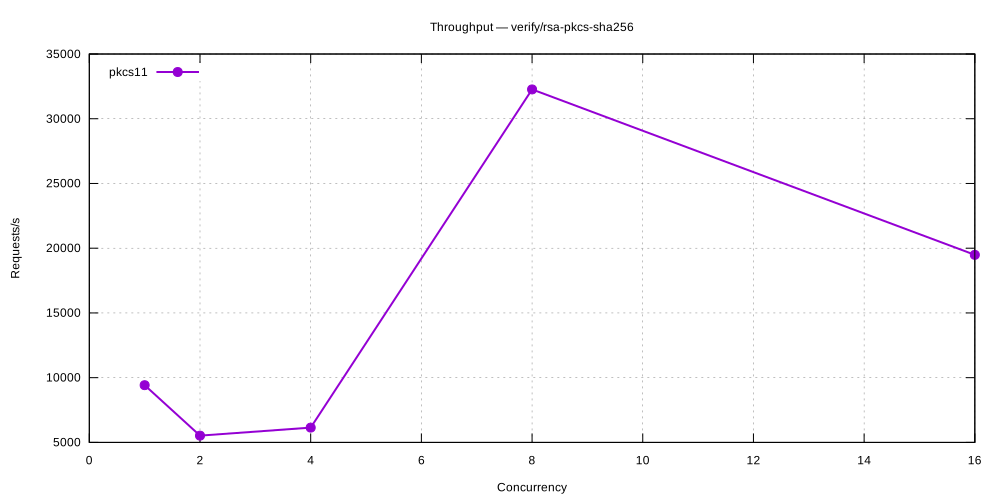
verify/rsa-pss-sha256
| Concurrency | pkcs11 (req/s) |
|---|---|
| 1 | 8,921 |
| 2 | 5,254 |
| 4 | 5,572 |
| 8 | 31,241 |
| 16 | 12,455 |
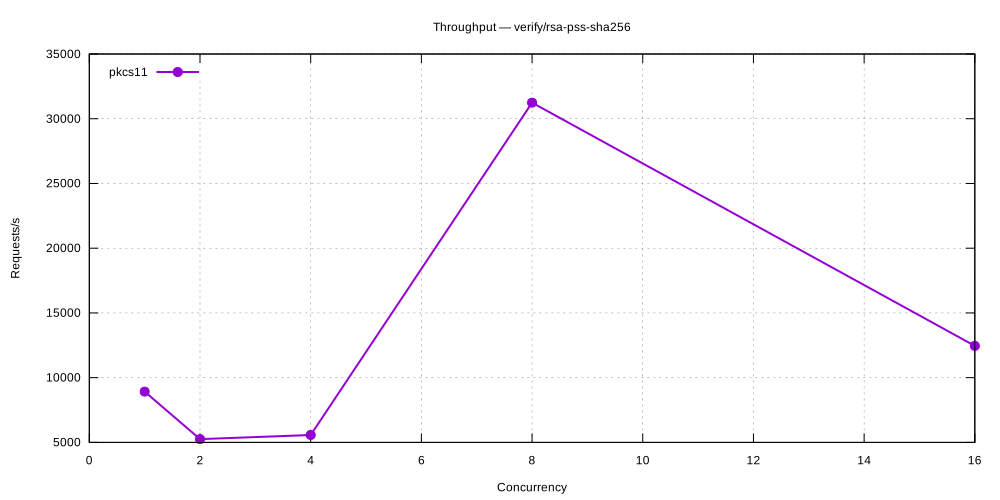
verify/ecdsa-p256
| Concurrency | pkcs11 (req/s) |
|---|---|
| 1 | 6,489 |
| 2 | 8,413 |
| 4 | 11,917 |
| 8 | 14,400 |
| 16 | 6,203 |
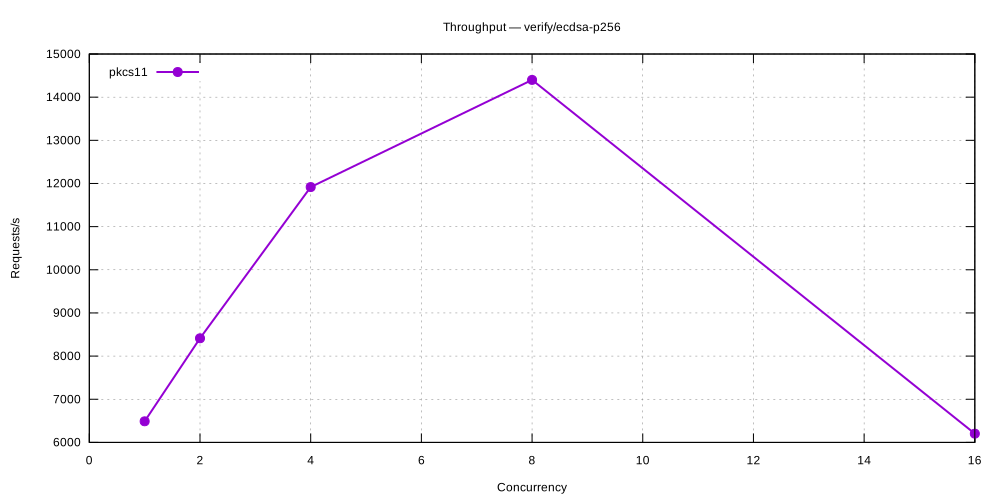
verify/ecdsa-p384
| Concurrency | pkcs11 (req/s) |
|---|---|
| 1 | 1,880 |
| 2 | 3,329 |
| 4 | 5,115 |
| 8 | 7,159 |
| 16 | 9,211 |
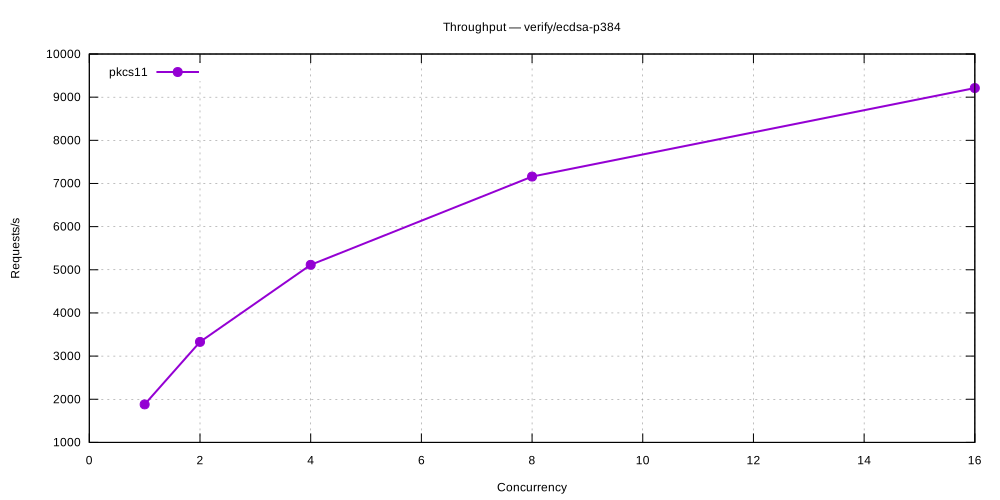
verify/ecdsa-secp256k1
| Concurrency | pkcs11 (req/s) |
|---|---|
| 1 | 3,024 |
| 2 | 4,892 |
| 4 | 7,201 |
| 8 | 9,758 |
| 16 | 10,362 |
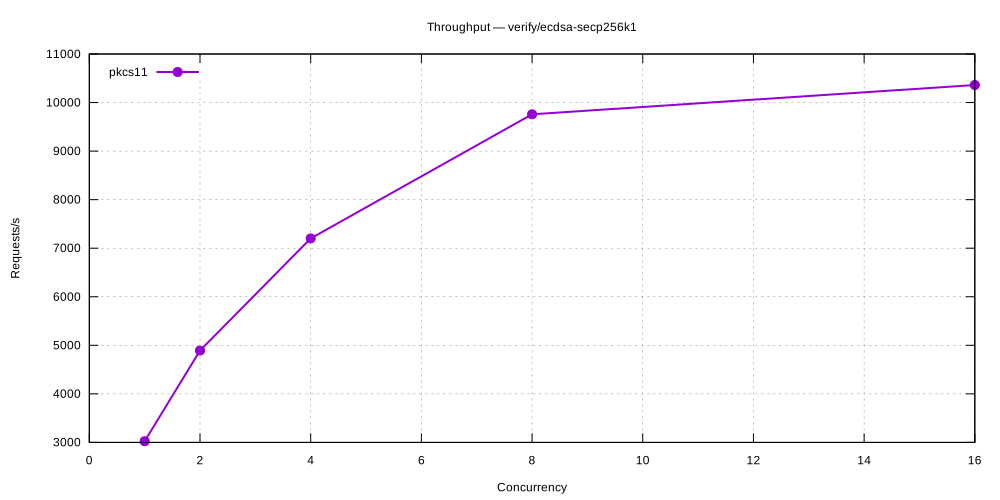
verify/eddsa-ed25519
| Concurrency | pkcs11 (req/s) |
|---|---|
| 1 | 7,302 |
| 2 | 9,826 |
| 4 | 16,512 |
| 8 | 22,053 |
| 16 | 9,731 |
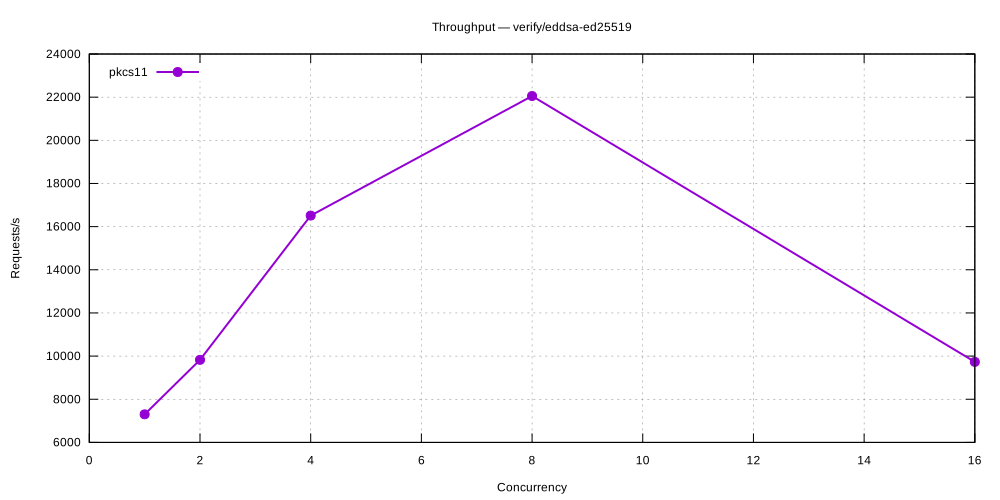
Criterion Benchmarks
Symmetric Encryption
| Benchmark | pkcs11 |
|---|---|
| aes-cbc | 1.48 ms |
| aes-gcm | 498.8 µs |
Asymmetric Encryption
| Benchmark | pkcs11 |
|---|---|
| rsa-pkcs | 281.1 µs |
Sign / Verify
| Benchmark | pkcs11 |
|---|---|
| ecdsa-p256/sign | 159.8 µs |
| ecdsa-p256/verify | 206.4 µs |
| ecdsa-p384/sign | 905.1 µs |
| ecdsa-p384/verify | 621.7 µs |
| ecdsa-secp256k1/sign | 328.3 µs |
| ecdsa-secp256k1/verify | 320.6 µs |
| eddsa-ed25519/sign | 127.0 µs |
| eddsa-ed25519/verify | 123.7 µs |
| rsa-pkcs-sha256/sign | 818.1 µs |
| rsa-pkcs-sha256/verify | 210.6 µs |
| rsa-pss-sha256/sign | 957.7 µs |
| rsa-pss-sha256/verify | 158.2 µs |
CPU Scaling & Flamegraph Analysis
This page documents the multi-CPU scaling characteristics of the Eviden KMS and explains how to reproduce the results and generate flamegraphs yourself.
Why this matters
A KMS deployed in production must handle concurrent cryptographic requests from many clients at the same time. To justify a multi-core deployment (and to rule out serialisation bottlenecks such as global mutexes or single-threaded database queues), we measure:
- Throughput scaling – how req/s grows as the number of actix-web worker threads increases from 1 → 2 → 4 → 8.
- CPU hotspot profile – a flamegraph confirming that the dominant cost is the cryptographic operation itself, not infrastructure overhead (routing, serialisation, database, locks).
Methodology
Server worker count
The KMS exposes a --server-workers N / KMS_SERVER_WORKERS configuration option that pins
the number of actix-web OS threads. Setting it explicitly makes the bench deterministic regardless
of the host's logical CPU count.
# kms.toml – leave unset to default to one thread per logical CPU
# server_workers = 8
Benchmark design
The http_throughput Criterion bench (located at
crate/test_kms_server/benches/http_throughput.rs) exercises three representative KMIP operations:
| Operation | Why chosen |
|---|---|
| AES-256-GCM encrypt | Lightweight, high-frequency – reveals OS-thread dispatch overhead |
| RSA-2048 OAEP decrypt | CPU-heavy asymmetric – shows scaling of the OpenSSL thread pool |
| ECDSA P-256 sign | CPU-heavy, short messages – reveals lock contention on key material |
For each worker count in {1, 2, 4, 8}:
- A fresh in-process KMS is started with
server_workers = Nand SQLite on/dev/shm(tmpfs). - Cryptographic keys are pre-created (not timed).
- 16 concurrent
reqwestHTTP tasks are dispatched per Criterion iteration viaiter_custom + join_all, so the server is always saturated. - Criterion reports wall-clock throughput in elements/s (= concurrent requests per second).
Flamegraph generation
Flamegraphs are recorded with
cargo-flamegraph (Linux perf back-end) and
rendered to PNG with rsvg-convert (part of
librsvg2-bin). They are generated for all three operations above at 1, 2, 4, and 8 workers.
Why
rsvg-convertand notconvert/ImageMagick? ImageMagick delegates SVG rasterisation torsvg-convertinternally; if that binary is missing,convertsilently falls back to a blank canvas, producing fully-black PNGs. Always invokersvg-convertdirectly.
To reproduce locally (Linux only, requires perf and rsvg-convert):
# Install cargo-flamegraph and rsvg-convert once
cargo install flamegraph --locked
sudo apt-get install -y librsvg2-bin
# Allow perf for unprivileged processes (revert after benchmarking)
echo -1 | sudo tee /proc/sys/kernel/perf_event_paranoid
echo 0 | sudo tee /proc/sys/kernel/kptr_restrict
# Build and profile – SVG lands next to this file
CARGO_PROFILE_BENCH_DEBUG=true \
cargo flamegraph \
--bench http_throughput \
-p test_kms_server \
--features non-fips \
--output documentation/docs/benchmarks/flamegraph/ecdsa_sign/w8/ecdsa_sign_w8.svg \
-- \
--bench \
"ecdsa_sign/w8" \
--profile-time 15
# Render the interactive SVG to a static PNG for the docs page
rsvg-convert --output documentation/docs/benchmarks/flamegraph/ecdsa_sign/w8/ecdsa_sign_w8.png \
documentation/docs/benchmarks/flamegraph/ecdsa_sign/w8/ecdsa_sign_w8.svg
Running the throughput benchmark
# Non-FIPS mode (all three operations)
cargo bench --bench http_throughput -p test_kms_server --features non-fips
# FIPS mode
cargo bench --bench http_throughput -p test_kms_server
Criterion writes an HTML report to target/criterion/kms_bench/ (also copied to flamegraph/ here).
Interpreting the results
What near-linear scaling looks like
If the KMS scales well, throughput doubles when the worker count doubles:
| Workers | Expected throughput (relative) |
|---|---|
| 1 | 1× baseline |
| 2 | ~1.9× |
| 4 | ~3.6× |
| 8 | ~6–7× (NUMA / HT effects) |
Sub-linear but monotonically increasing throughput is normal and expected:
- HTTP keep-alive and connection pooling overhead does not scale perfectly.
- SQLite WAL mode serialises writes but allows concurrent reads.
- OpenSSL's FIPS provider has per-context locking.
Flat or decreasing throughput would indicate a bottleneck worth investigating.
Reading a flamegraph
A flamegraph shows where CPU time is spent, stacked by call depth.
- Wide frames at the top = the dominant cost; you want to see
openssl/ring/cosmian_kms_cryptohere. - Wide frames in the middle = infrastructure cost;
actix-rt,tokio,serde_json,sqlxare expected but should be narrow compared to crypto. - Wide frames at the bottom = system calls;
syscall,epoll_waitwidth grows with I/O wait (not CPU saturation).
If std::sync::Mutex or parking_lot::Mutex frames appear wide, that signals lock contention
and is a regression signal worth investigating.
CI integration
The flamegraph.yml GitHub Actions workflow runs:
- On demand via
workflow_dispatch(configurable worker counts and profile time). - Weekly (Monday 03:00 UTC) against the default branch.
- On pull requests that touch
http_config.rs,start_kms_server.rs, or the bench itself.
Artifacts uploaded per run:
| Artifact | Contents |
|---|---|
criterion-http-throughput-<run_id> | Criterion HTML report with throughput charts |
flamegraph-svgs-<run_id> | SVG flamegraphs per worker count |
http-throughput-output-<run_id> | Raw bench output (bencher format) |
Results
Generated: 2026-07-02 09:27:46 UTC KMS version: 5.24.0 (commit: a099a06e1) Variant: non-fips
Machine Info
Architecture: x86_64
CPU op-mode(s): 32-bit, 64-bit
Address sizes: 46 bits physical, 48 bits virtual
Byte Order: Little Endian
CPU(s): 32
On-line CPU(s) list: 0-31
Vendor ID: GenuineIntel
Model name: Intel(R) Core(TM) i9-14900T
CPU family: 6
Model: 183
Thread(s) per core: 2
Core(s) per socket: 24
Socket(s): 1
Stepping: 1
CPU(s) scaling MHz: 32%
CPU max MHz: 5500,0000
CPU min MHz: 800,0000
BogoMIPS: 2227,20
Flags: fpu vme de pse tsc msr pae mce cx8 apic sep mtrr pge mca cmov pat pse36 clflush dts acpi mmx fxsr sse sse2 ss ht tm pbe syscall nx pdpe1gb rdtscp lm constant_tsc art arch_perfmon pebs bts rep_good nopl xtopology nonstop_tsc cpuid aperfmperf tsc_known_freq pni pclmulqdq dtes64 monitor ds_cpl vmx smx est tm2 ssse3 sdbg fma cx16 xtpr pdcm pcid sse4_1 sse4_2 x2apic movbe popcnt tsc_deadline_timer aes xsave avx f16c rdrand lahf_lm abm 3dnowprefetch cpuid_fault epb ssbd ibrs ibpb stibp ibrs_enhanced tpr_shadow flexpriority ept vpid ept_ad fsgsbase tsc_adjust bmi1 avx2 smep bmi2 erms invpcid rdseed adx smap clflushopt clwb intel_pt sha_ni xsaveopt xsavec xgetbv1 xsaves split_lock_detect user_shstk avx_vnni dtherm ida arat pln pts hwp hwp_notify hwp_act_window hwp_epp hwp_pkg_req hfi vnmi umip pku ospke waitpkg gfni vaes vpclmulqdq tme rdpid movdiri movdir64b fsrm md_clear serialize pconfig arch_lbr ibt flush_l1d arch_capabilities ibpb_exit_to_user
Virtualization: VT-x
L1d cache: 896 KiB (24 instances)
L1i cache: 1,3 MiB (24 instances)
L2 cache: 32 MiB (12 instances)
L3 cache: 36 MiB (1 instance)
NUMA node(s): 1
NUMA node0 CPU(s): 0-31
Vulnerability Gather data sampling: Not affected
Vulnerability Indirect target selection: Not affected
Vulnerability Itlb multihit: Not affected
Vulnerability L1tf: Not affected
Vulnerability Mds: Not affected
Vulnerability Meltdown: Not affected
Vulnerability Mmio stale data: Not affected
Vulnerability Reg file data sampling: Mitigation; Clear Register File
Vulnerability Retbleed: Not affected
Vulnerability Spec rstack overflow: Not affected
Vulnerability Spec store bypass: Mitigation; Speculative Store Bypass disabled via prctl
Vulnerability Spectre v1: Mitigation; usercopy/swapgs barriers and __user pointer sanitization
Vulnerability Spectre v2: Mitigation; Enhanced / Automatic IBRS; IBPB conditional; PBRSB-eIBRS SW sequence; BHI BHI_DIS_S
Vulnerability Srbds: Not affected
Vulnerability Tsa: Not affected
Vulnerability Tsx async abort: Not affected
Vulnerability Vmscape: Mitigation; IBPB before exit to userspace
/proc/cpuinfo (first core)
processor : 0
vendor_id : GenuineIntel
cpu family : 6
model : 183
model name : Intel(R) Core(TM) i9-14900T
stepping : 1
microcode : 0x133
cpu MHz : 3453.279
cache size : 36864 KB
physical id : 0
siblings : 32
core id : 0
cpu cores : 24
apicid : 0
initial apicid : 0
fpu : yes
fpu_exception : yes
cpuid level : 32
wp : yes
flags : fpu vme de pse tsc msr pae mce cx8 apic sep mtrr pge mca cmov pat pse36 clflush dts acpi mmx fxsr sse sse2 ss ht tm pbe syscall nx pdpe1gb rdtscp lm constant_tsc art arch_perfmon pebs bts rep_good nopl xtopology nonstop_tsc cpuid aperfmperf tsc_known_freq pni pclmulqdq dtes64 monitor ds_cpl vmx smx est tm2 ssse3 sdbg fma cx16 xtpr pdcm pcid sse4_1 sse4_2 x2apic movbe popcnt tsc_deadline_timer aes xsave avx f16c rdrand lahf_lm abm 3dnowprefetch cpuid_fault epb ssbd ibrs ibpb stibp ibrs_enhanced tpr_shadow flexpriority ept vpid ept_ad fsgsbase tsc_adjust bmi1 avx2 smep bmi2 erms invpcid rdseed adx smap clflushopt clwb intel_pt sha_ni xsaveopt xsavec xgetbv1 xsaves split_lock_detect user_shstk avx_vnni dtherm ida arat pln pts hwp hwp_notify hwp_act_window hwp_epp hwp_pkg_req hfi vnmi umip pku ospke waitpkg gfni vaes vpclmulqdq tme rdpid movdiri movdir64b fsrm md_clear serialize pconfig arch_lbr ibt flush_l1d arch_capabilities ibpb_exit_to_user
vmx flags : vnmi preemption_timer posted_intr invvpid ept_x_only ept_ad ept_1gb flexpriority apicv tsc_offset vtpr mtf vapic ept vpid unrestricted_guest vapic_reg vid ple shadow_vmcs ept_mode_based_exec tsc_scaling usr_wait_pause
bugs : spectre_v1 spectre_v2 spec_store_bypass swapgs eibrs_pbrsb rfds bhi vmscape
bogomips : 2227.20
clflush size : 64
cache_alignment : 64
address sizes : 46 bits physical, 48 bits virtual
power management:
processor : 1
vendor_id : GenuineIntel
cpu family : 6
model : 183
model name : Intel(R) Core(TM) i9-14900T
stepping : 1
microcode : 0x133
cpu MHz : 800.000
cache size : 36864 KB
physical id : 0
siblings : 32
core id : 0
cpu cores : 24
apicid : 1
initial apicid : 1
fpu : yes
fpu_exception : yes
cpuid level : 32
wp : yes
flags : fpu vme de pse tsc msr pae mce cx8 apic sep mtrr pge mca cmov pat pse36 clflush dts acpi mmx fxsr sse sse2 ss ht tm pbe syscall nx pdpe1gb rdtscp lm constant_tsc art arch_perfmon pebs bts rep_good nopl xtopology nonstop_tsc cpuid aperfmperf tsc_known_freq pni pclmulqdq dtes64 monitor ds_cpl vmx smx est tm2 ssse3 sdbg fma cx16 xtpr pdcm pcid sse4_1 sse4_2 x2apic movbe popcnt tsc_deadline_timer aes xsave avx f16c rdrand lahf_lm abm 3dnowprefetch cpuid_fault epb ssbd ibrs ibpb stibp ibrs_enhanced tpr_shadow flexpriority ept vpid ept_ad fsgsbase tsc_adjust bmi1 avx2 smep bmi2 erms invpcid rdseed adx smap clflushopt clwb intel_pt sha_ni xsaveopt xsavec xgetbv1 xsaves split_lock_detect user_shstk avx_vnni dtherm ida arat pln pts hwp hwp_notify hwp_act_window hwp_epp hwp_pkg_req hfi vnmi umip pku ospke waitpkg gfni vaes vpclmulqdq tme rdpid movdiri movdir64b fsrm md_clear serialize pconfig arch_lbr ibt flush_l1d arch_capabilities ibpb_exit_to_user
vmx flags : vnmi preemption_timer posted_intr invvpid ept_x_only ept_ad ept_1gb flexpriority apicv tsc_offset vtpr mtf vapic ept vpid unrestricted_guest vapic_reg vid ple shadow_vmcs ept_mode_based_exec tsc_scaling usr_wait_pause
bugs : spectre_v1 spectre_v2 spec_store_bypass swapgs eibrs_pbrsb rfds bhi vmscape
bogomips : 2227.20
clflush size : 64
cache_alignment : 64
address sizes : 46 bits physical, 48 bits virtual
power management:
Throughput Results
Benchmark: http_throughput Criterion bench, 16 concurrent tasks per iteration,
worker sweep: 1 2 4 8.
| Benchmark | ~req/s |
|---|---|
| kms_bench/aes_gcm_enc/w1 | 60964 |
| kms_bench/rsa_oaep_dec/w1 | 39 |
| kms_bench/ecdsa_sign/w1 | 4962 |
| kms_bench/aes_gcm_enc/w2 | 34604 |
| kms_bench/rsa_oaep_dec/w2 | 74 |
| kms_bench/ecdsa_sign/w2 | 7575 |
| kms_bench/aes_gcm_enc/w4 | 23583 |
| kms_bench/rsa_oaep_dec/w4 | 126 |
| kms_bench/ecdsa_sign/w4 | 8273 |
| kms_bench/aes_gcm_enc/w8 | 82561 |
| kms_bench/rsa_oaep_dec/w8 | 153 |
| kms_bench/ecdsa_sign/w8 | 13805 |
How to Reproduce
# Full run (throughput + flamegraphs for the default worker sweep)
mise bench:flamegraph
# Throughput only (no perf/flamegraph)
mise bench:flamegraph --skip-flamegraph
# Flamegraph for 8 workers only (skip throughput bench)
mise bench:flamegraph --workers 8 --skip-throughput
# Choose variant
mise bench:flamegraph --variant non-fips
Flamegraphs
Generated by cargo-flamegraph / Linux perf during a 15-second profiling window,
for each operation and worker count. Click a PNG's caption link to open the interactive SVG
(zoom, search) in a browser.
aes_gcm_enc
Flamegraphs not yet regenerated. Criterion throughput data is available in the Criterion report. Run
mise bench:flamegraphto populate flamegraphs here.
rsa_oaep_dec
Flamegraphs not yet regenerated. Criterion throughput data is available in the Criterion report. Run
mise bench:flamegraphto populate flamegraphs here.
ecdsa_sign
1 worker(s)
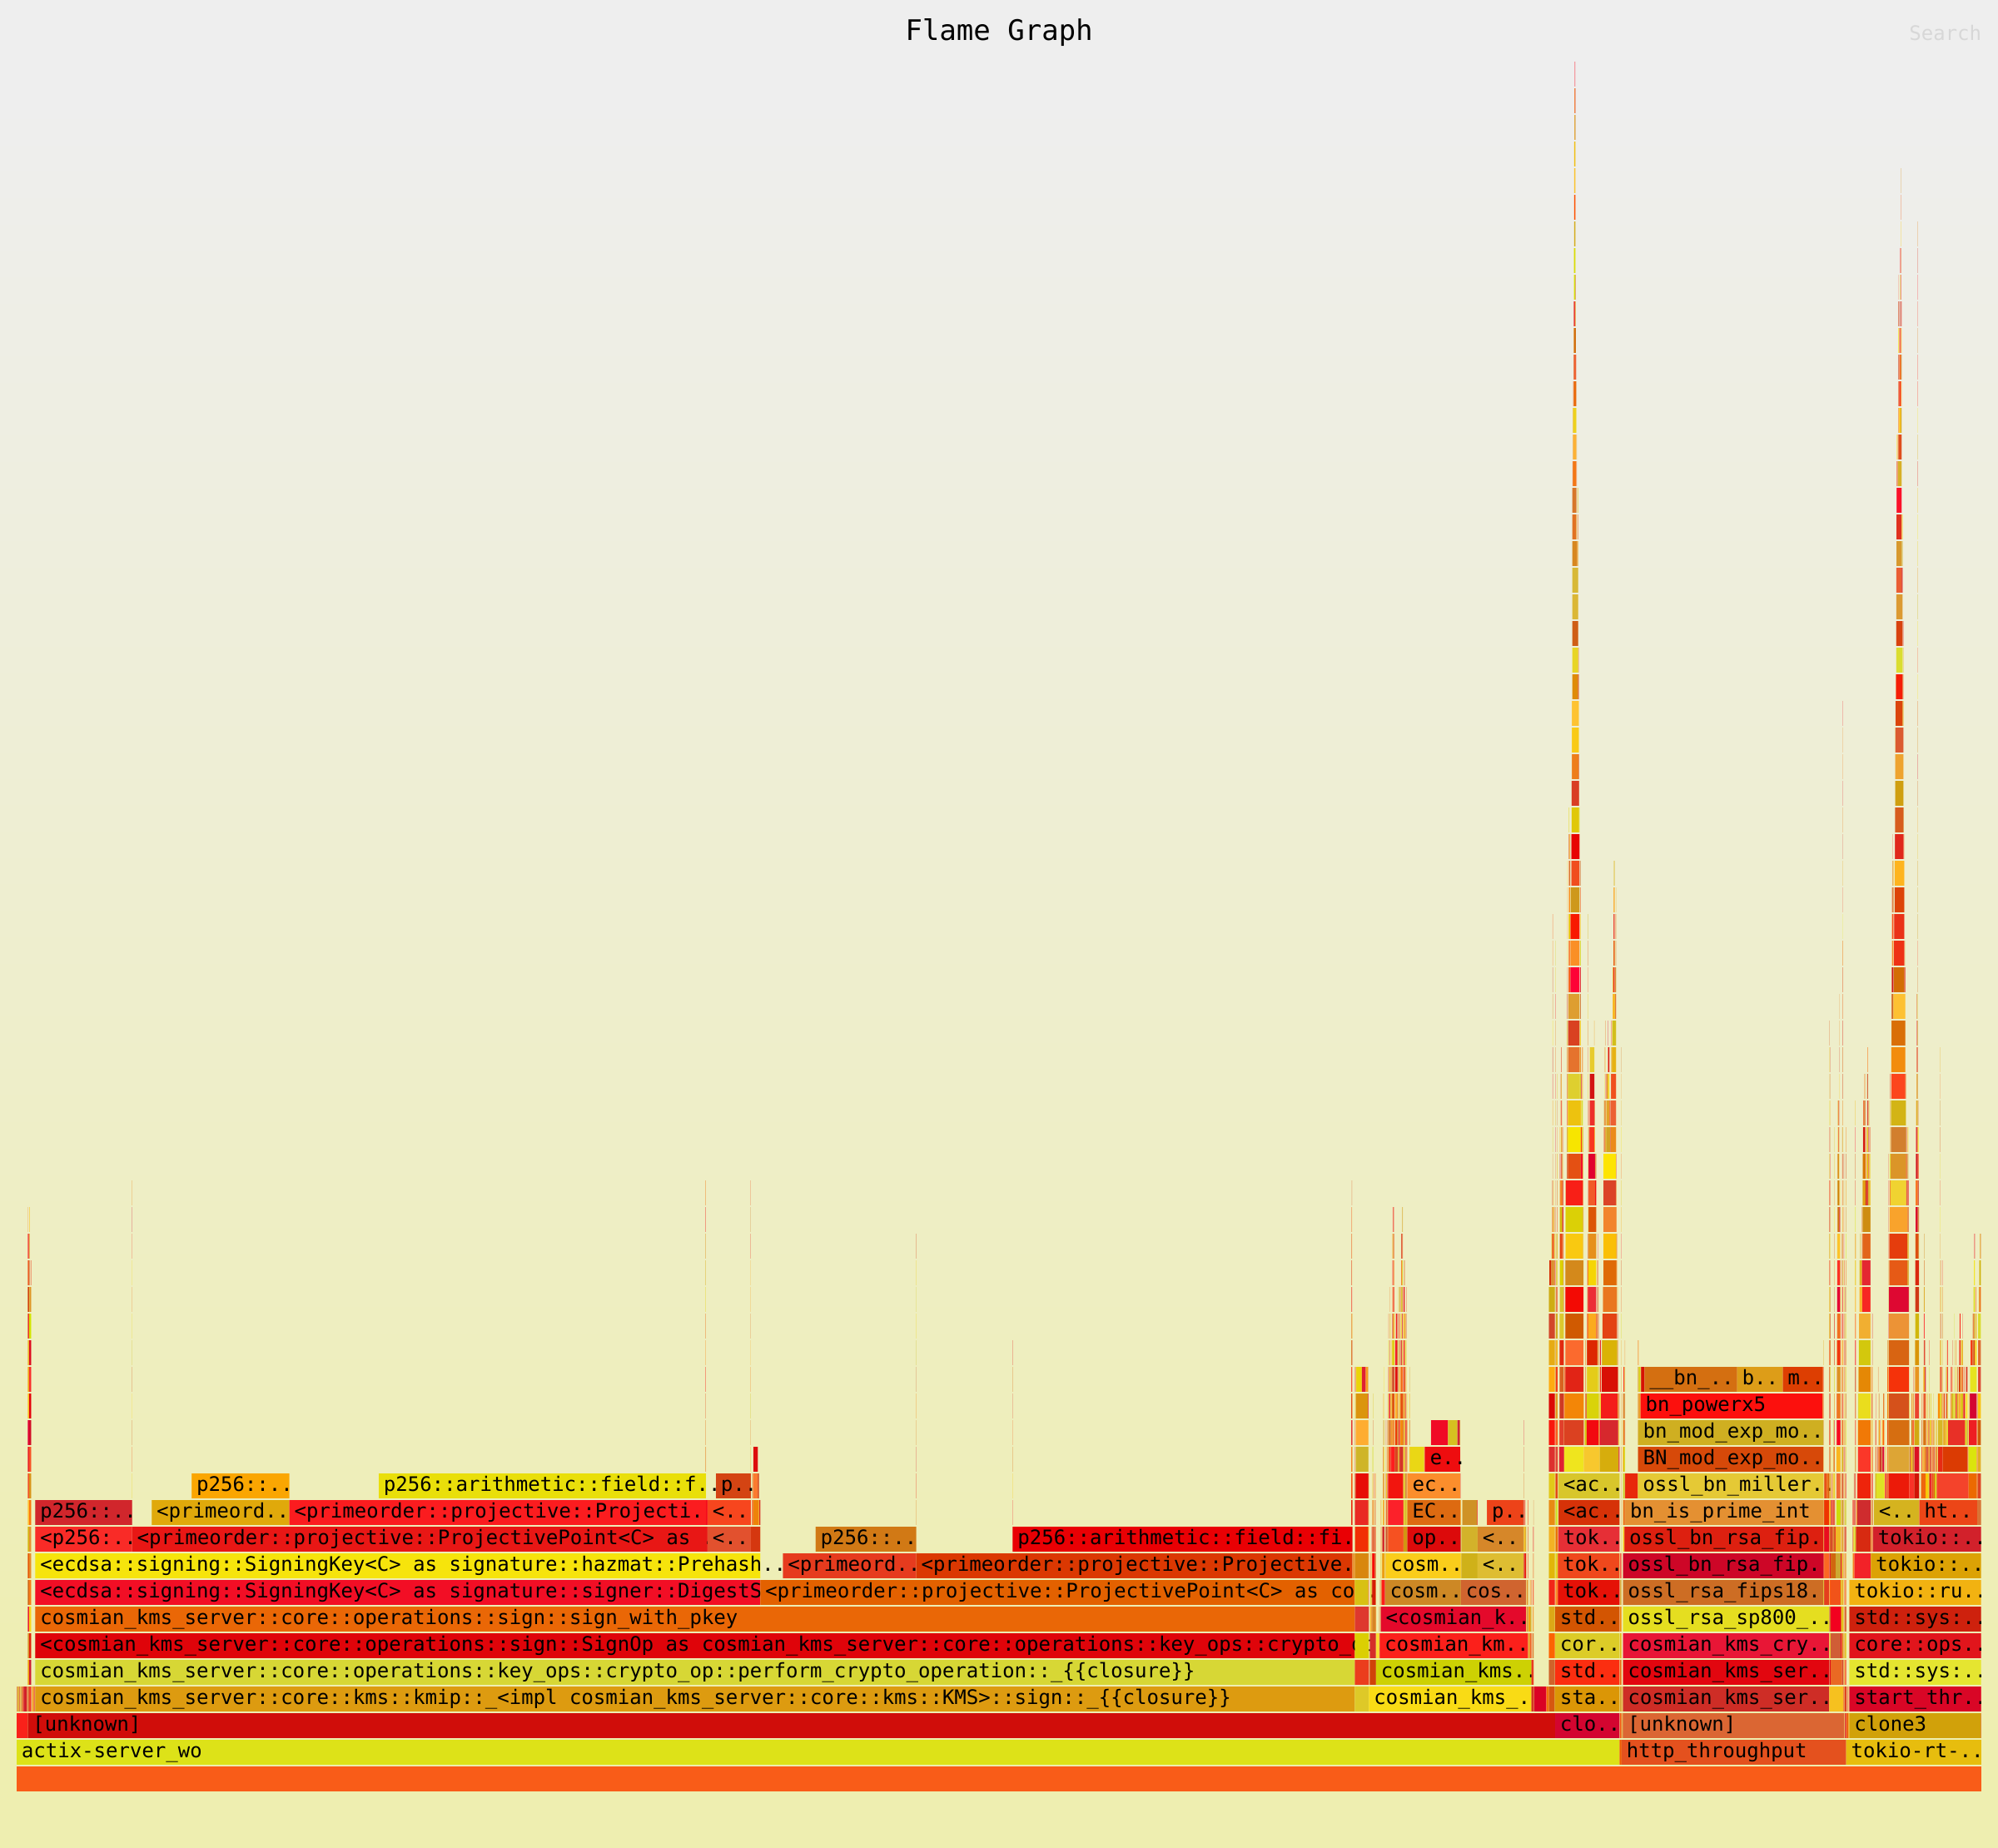
2 worker(s)
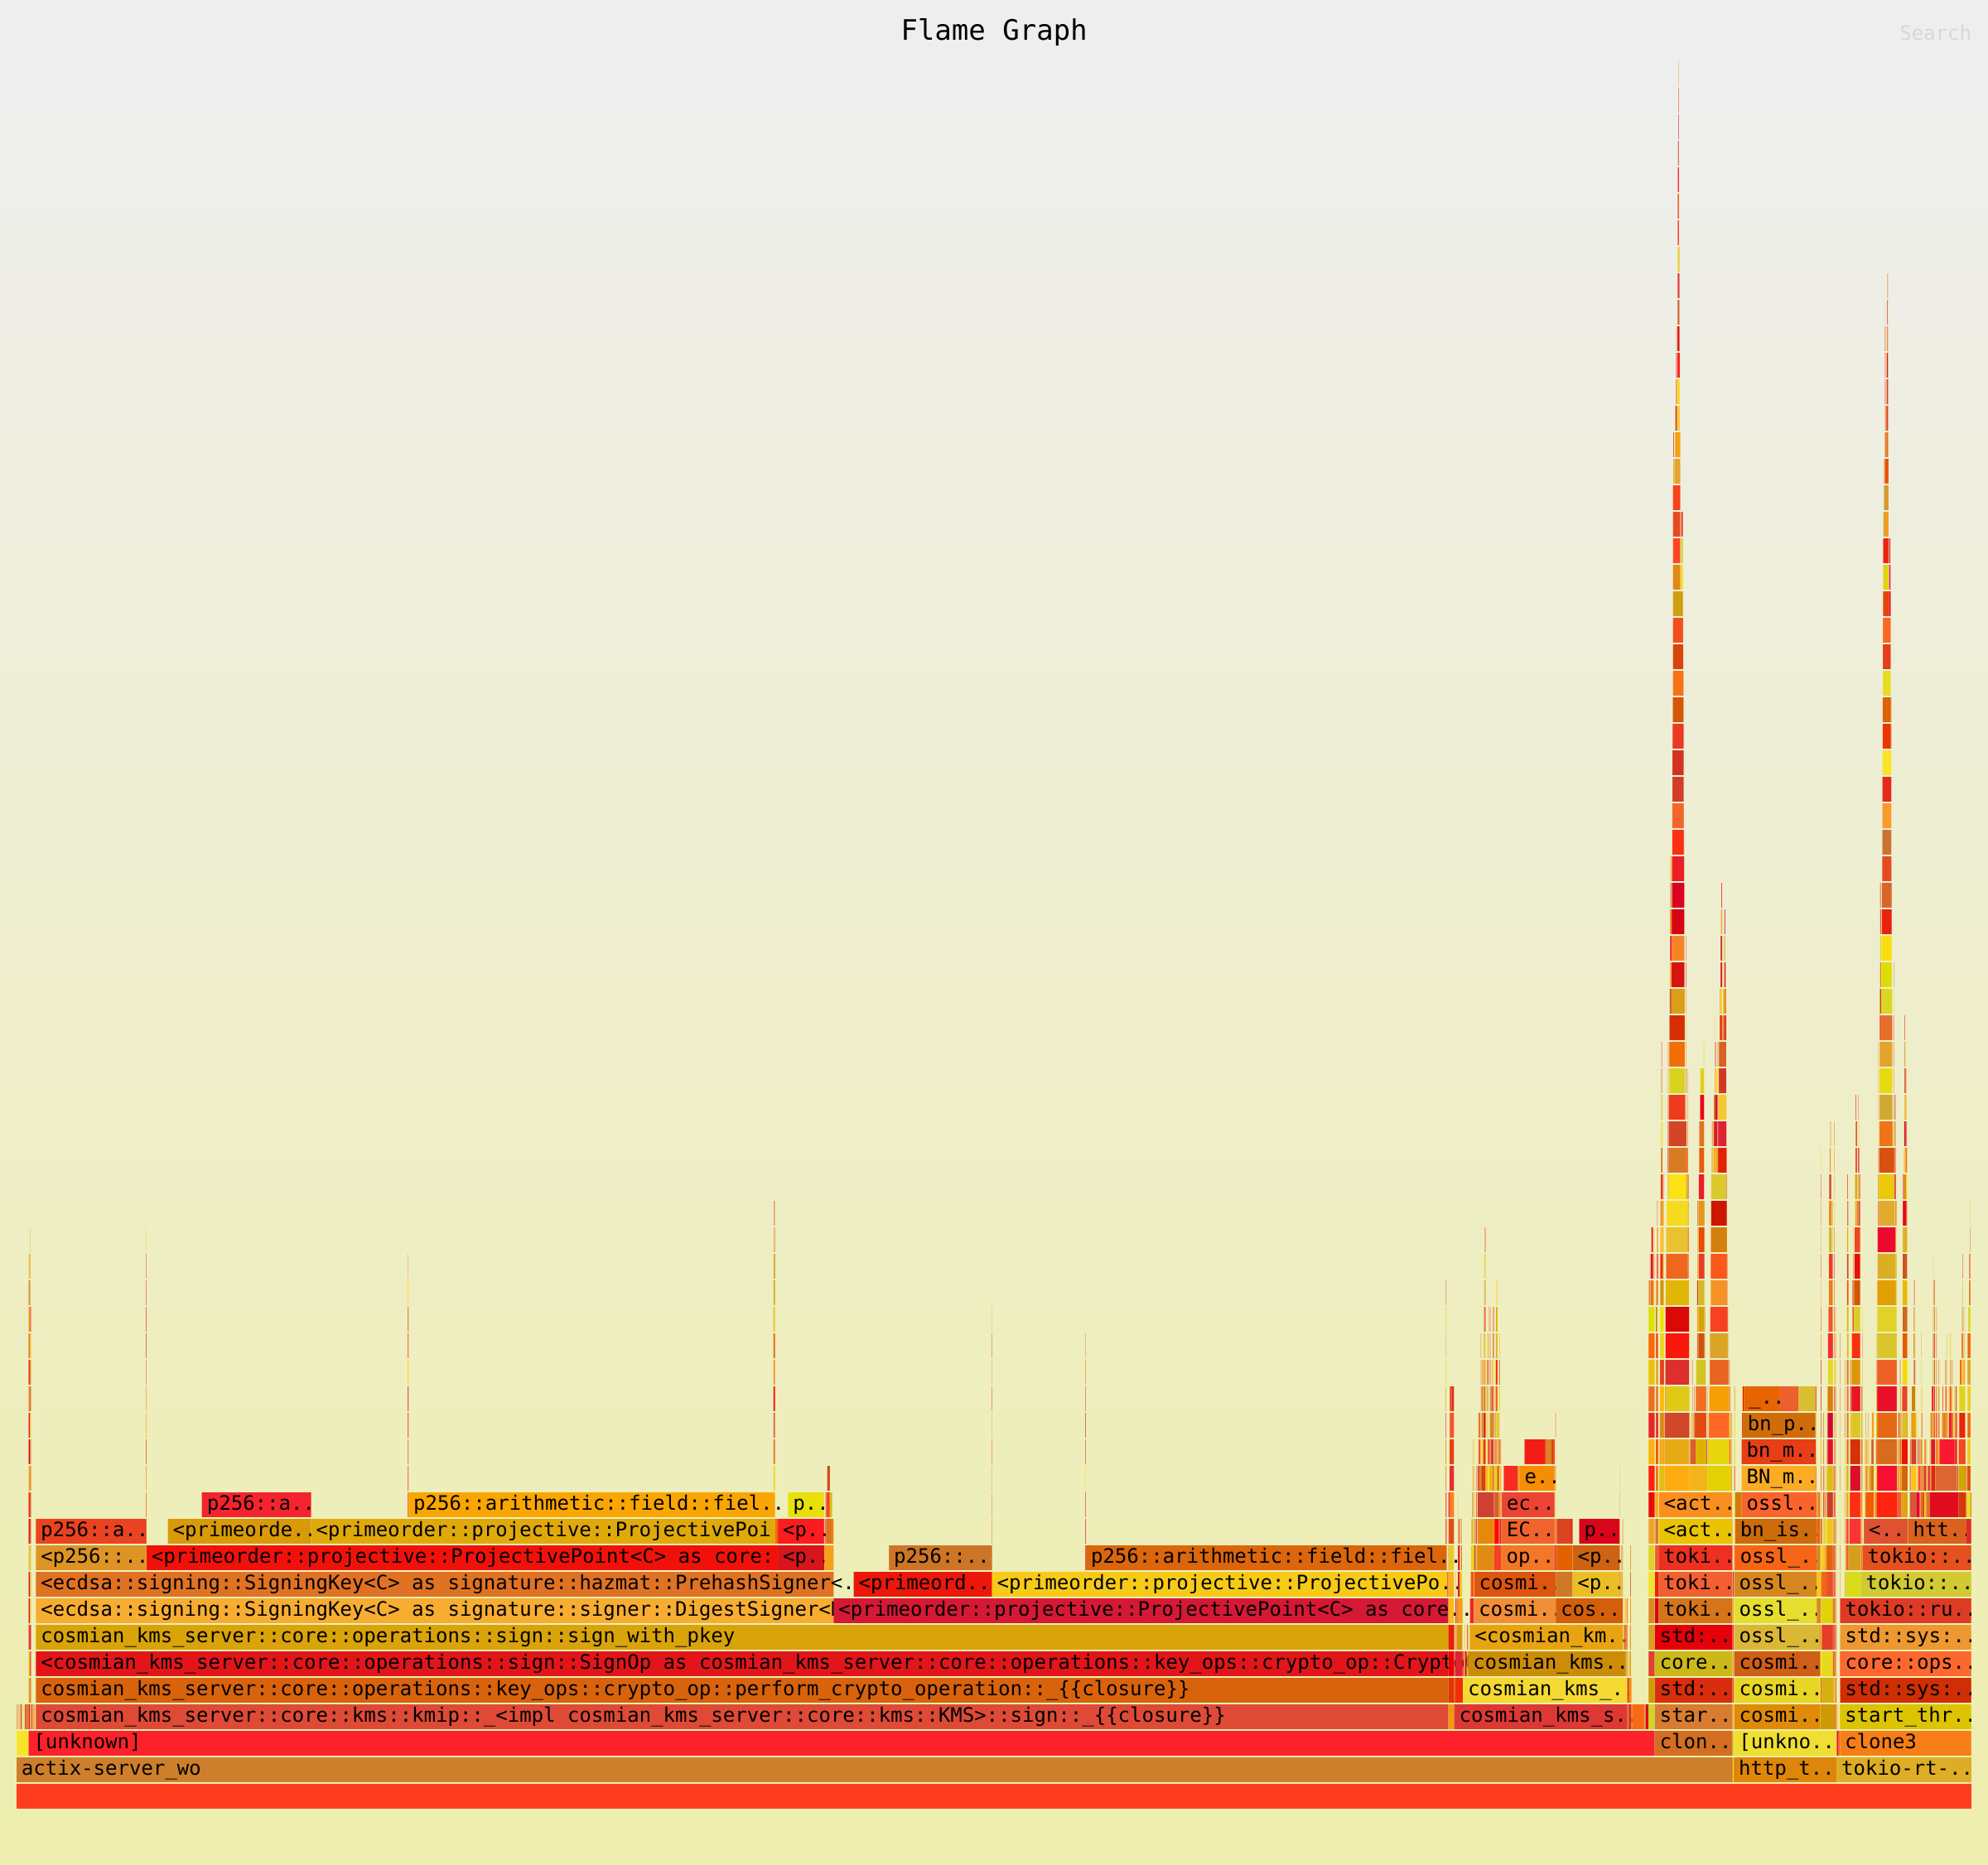
4 worker(s)
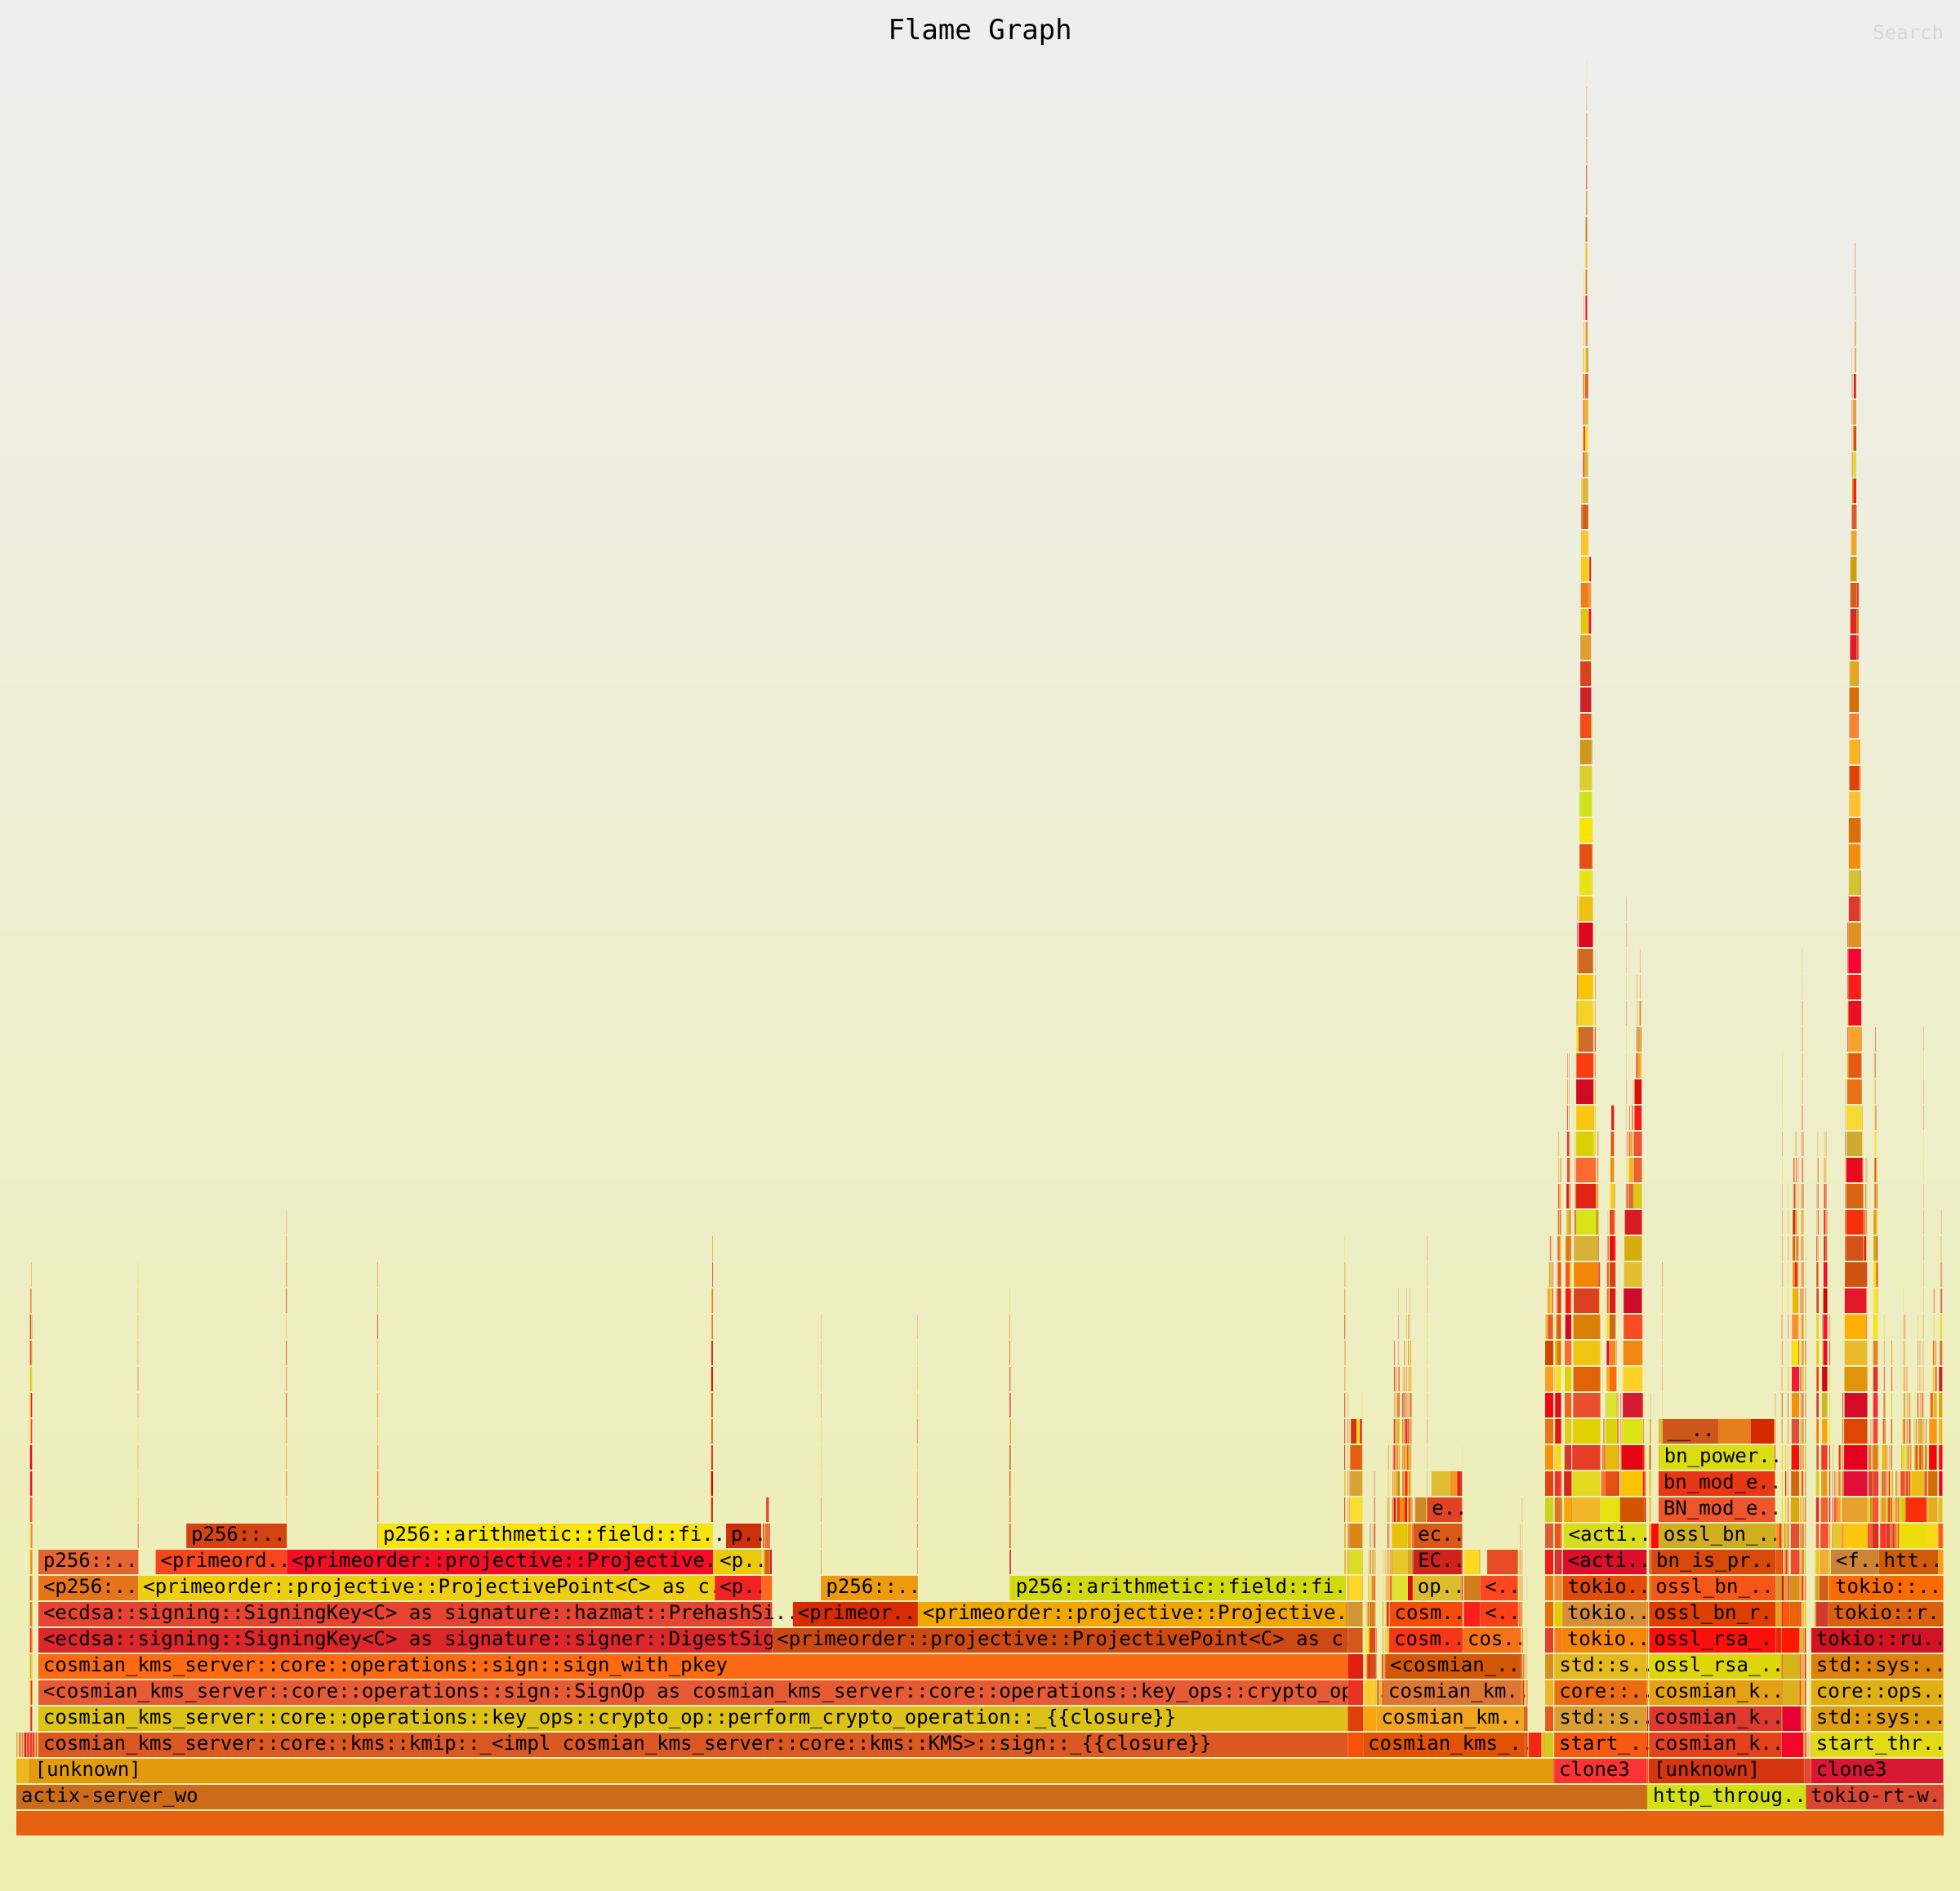
8 worker(s)
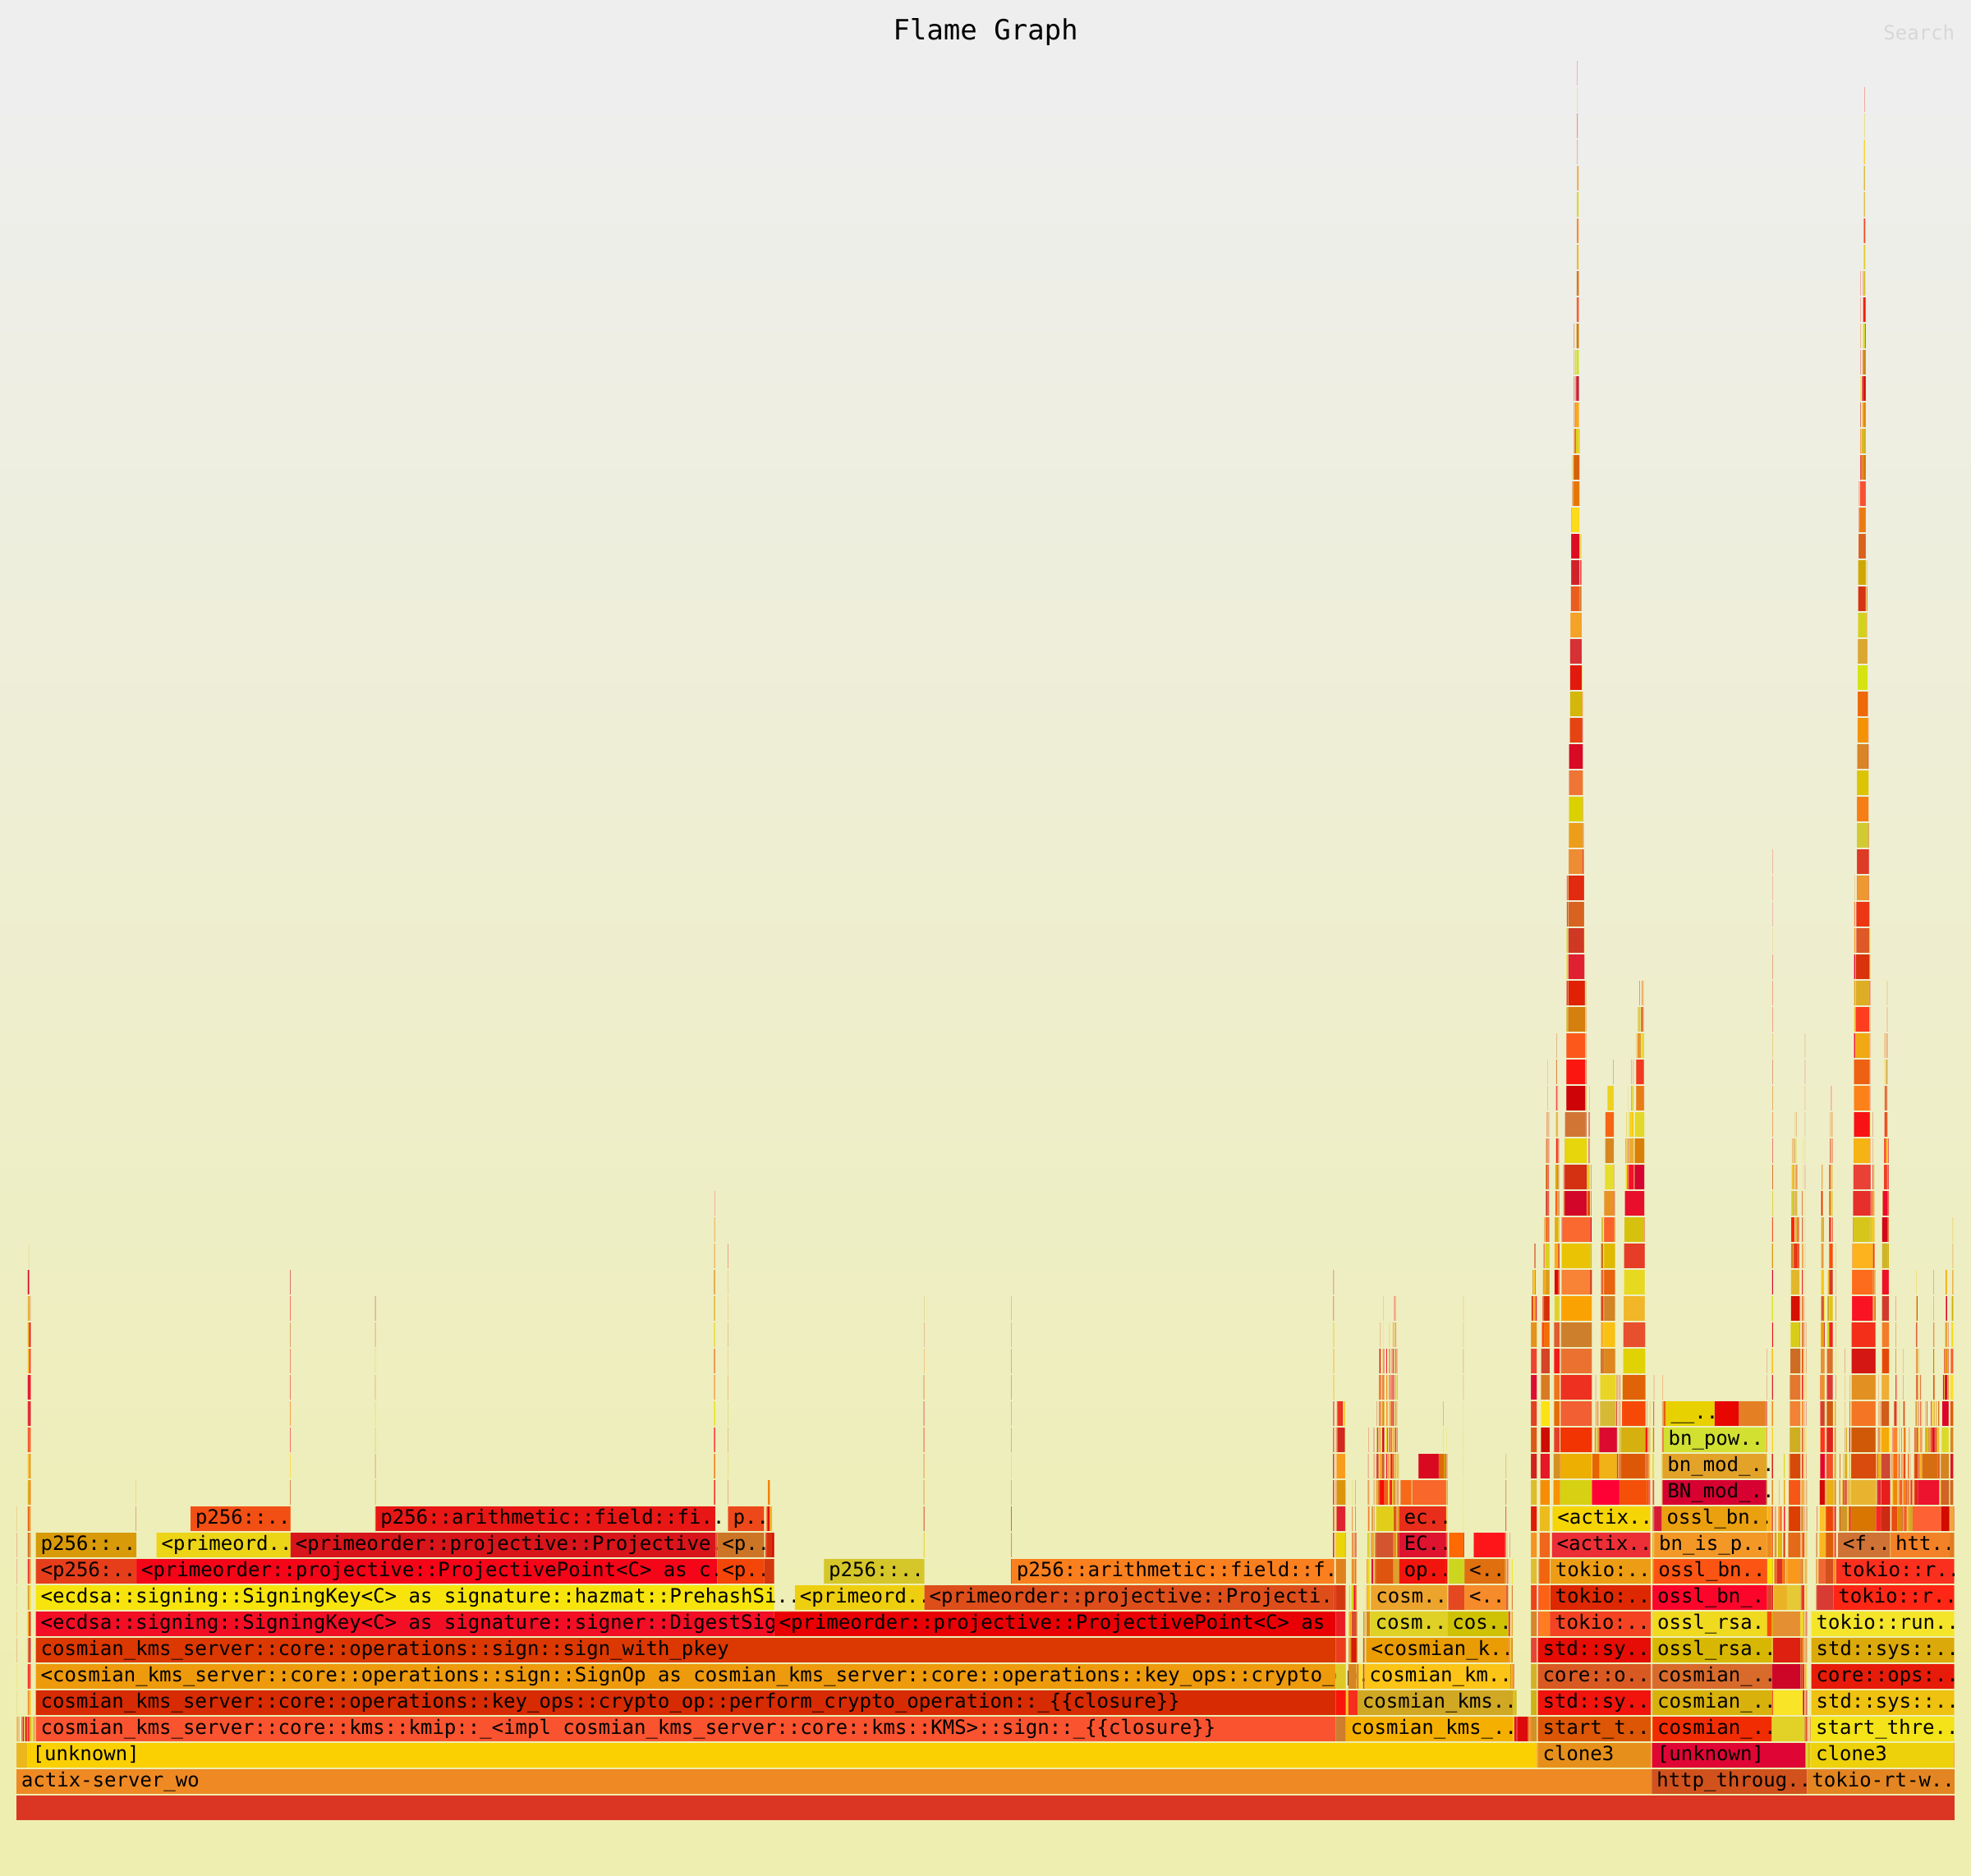
Criterion Report
The full interactive Criterion HTML report is in flamegraph/.
It is structured in four levels:
| Path | Contents |
|---|---|
flamegraph/report/ | Group overview — all 3 operations × 4 worker counts |
flamegraph/<operation>/report/ | Per-operation summary — throughput curve across worker counts |
flamegraph/<operation>/<workers>/report/ | Individual benchmark — timing distribution, regression analysis |
flamegraph/<operation>/<workers>/ | Flamegraph SVG + PNG — CPU hotspot profile for this operation at this concurrency |
Each <operation>/<workers>/ directory contains:
base//new/— Criterion raw measurement data (JSON)report/— Criterion HTML report (timing distribution, regression analysis)*.svg/*.png— flamegraph (generated bycargo-flamegraph)
PKCS#11 Performance Testing with p11perftest
p11perftest is a vendor-neutral PKCS#11 benchmarking utility (Mastercard, v3.16.0+) that measures cryptographic operation performance directly at the Cryptoki C API level. This page documents the command syntax for running p11perftest against each HSM backend supported by Eviden KMS.
Prerequisites
p11perftestbinary installed and in$PATH(from vendor orapt install opensc-pkcs11family)- HSM library installed at the path specified in
documentation/docs/hsm_support/<backend>.md - Token initialized with at least one slot and corresponding PIN
- Network access to HSM (for remote HSMs: AWS CloudHSM, GCP Cloud HSM, Proteccio)
Command Format
p11perftest accepts library path, slot, and password either as command-line flags or environment variables:
# Via flags:
p11perftest -l /lib/libnethsm.so -s 4 -p <password> --coverage ecdsa --keysizes ecnistp256 --threads 64 --iterations 200
# Via environment variables (cleaner for shells with secrets):
export PKCS11LIB=/lib/libnethsm.so
export PKCS11SLOT=4
export PKCS11PASSWORD=<password>
p11perftest --coverage ecdsa --keysizes ecnistp256 --threads 64 --iterations 200
Common Flags
| Flag | Env Var | Purpose |
|---|---|---|
--library, -l | PKCS11LIB | Path to PKCS#11 library |
--slot, -s | PKCS11SLOT | Slot index (numeric, backend-specific) |
--password, -p | PKCS11PASSWORD | Slot password/PIN |
--threads, -t | — | Number of concurrent threads (default: 1) |
--iterations, -i | — | Iterations per test (default: 200) |
--skip | — | Skip N iterations before recording (for warmup) |
--coverage, -c | — | Test cases: ecdsa, rsa, aes, hmac, des |
--keysizes, -k | — | Key sizes/curves: ecnistp256, ecnistp384, rsa2048, aes128, etc. |
--json, -j | — | Output JSON |
--jsonfile, -o | — | Write JSON to file |
Per-Backend Commands
SoftHSMv2
Library path: /usr/lib/softhsm/libsofthsm2.so
Slot convention: Numeric (0-based)
Credentials: PIN (default 000000 if initialized with softhsm2-util)
p11perftest \
-l /usr/lib/softhsm/libsofthsm2.so \
-s 0 \
-p 000000 \
-t 1 \
-i 200
Multi-threaded sweep (1 and 4 concurrent threads):
p11perftest \
-l /usr/lib/softhsm/libsofthsm2.so \
-s 0 \
-p 000000 \
-t 1 \
-i 200 \
-j -o softhsm2_t1.json
p11perftest \
-l /usr/lib/softhsm/libsofthsm2.so \
-s 0 \
-p 000000 \
-t 4 \
-i 200 \
-j -o softhsm2_t4.json
AWS CloudHSM
Library path: /opt/cloudhsm/lib/libcloudhsm_pkcs11.so
Slot convention: Numeric; determined by cloudhsm-client configuration
Credentials: Customer CA certificate + HSM credentials (setup per AWS documentation)
Configuration required: Verify slot via aws-cloudhsm CLI or p11tool before running benchmarks.
p11perftest \
-l /opt/cloudhsm/lib/libcloudhsm_pkcs11.so \
-s <result> \
-p <result> \
-t 1 \
-i 200
Note: Exact slot and PIN depend on AWS CloudHSM customer account setup. See AWS CloudHSM PKCS#11 documentation.
GCP Cloud HSM
Library path: /usr/lib/x86_64-linux-gnu/libkmsp11.so (default; may vary by installation)
Slot convention: Numeric; mapped to GCP Cloud KMS key resources
Credentials: PKCS11_KMS_APIKEY environment variable (GCP service account JSON key path)
export PKCS11_KMS_APIKEY="/path/to/service-account-key.json"
p11perftest \
-l /usr/lib/x86_64-linux-gnu/libkmsp11.so \
-s <result> \
-p <result> \
-t 1 \
-i 200
Note: Slot and PIN mapping to GCP KMS resources is library-specific. Consult Google Cloud KMS PKCS#11 provider documentation.
Trustway Proteccio
Library path: /lib/libnethsm.so
Slot convention: Numeric (configured in /etc/proteccio/proteccio.rc)
Credentials: Slot password set at HSM initialization
export PKCS11LIB=/lib/libnethsm.so
export PKCS11SLOT=4
export PKCS11PASSWORD=<hsm_slot_password>
# Single thread (latency baseline)
p11perftest --coverage ecdsa --keysizes ecnistp256 --threads 1 --iterations 200 --skip 10 -j -o proteccio_t1.json
# 4 threads (low concurrency)
p11perftest --coverage ecdsa --keysizes ecnistp256 --threads 4 --iterations 200 --skip 10 -j -o proteccio_t4.json
# 64 threads (high concurrency; diagnose session pool limits)
p11perftest --coverage ecdsa --keysizes ecnistp256 --threads 64 --iterations 200 --skip 10 -j -o proteccio_t64.json
Utimaco
Library path: /lib/libcs_pkcs11_R3.so
Environment variable: CS_PKCS11_R3_CF (points to Utimaco configuration)
Slot convention: Numeric
Credentials: PIN set at token initialization
export CS_PKCS11_R3_CF=/path/to/utimaco.conf
p11perftest \
-l /lib/libcs_pkcs11_R3.so \
-s <result> \
-p <result> \
-t 1 \
-i 200
Note: Exact slot and PIN are deployment-specific. See Utimaco SDK documentation for token initialization.
Crypt2Pay
Library path: /lib/libpkcs11c2p.so
Slot convention: Numeric (1-based); verify with p11tool before benchmarking
Credentials: PIN configured at device initialization
p11perftest \
-l /lib/libpkcs11c2p.so \
-s <result> \
-p <result> \
-t 1 \
-i 200
Note: Consult Crypt2Pay device manual for slot enumeration and PIN setup.
Kryoptic
Library path: Set via KRYOPTIC_PKCS11_LIB environment variable (default: libkryoptic_pkcs11.so)
Configuration: TOML file pointed to by KRYOPTIC_CONF
Slot convention: Numeric; defined in TOML config
Credentials: Software token (no physical HSM PIN required)
export KRYOPTIC_PKCS11_LIB=/path/to/libkryoptic_pkcs11.so
export KRYOPTIC_CONF=/path/to/kryoptic.toml
p11perftest \
-l "${KRYOPTIC_PKCS11_LIB}" \
-s <result> \
-p <result> \
-t 1 \
-i 200
Note: Kryoptic is a software PKCS#11 token; see Kryoptic documentation for TOML configuration.
SmartCard-HSM
Library path: <result>
Slot convention:
Note: SmartCard-HSM support is documented in Eviden KMS but p11perftest command sourcing is unverified. Consult OpenSC project for SmartCard-HSM PKCS#11 library paths and initialization.
Common Flags Reference
| Flag | Default | Purpose |
|---|---|---|
-l, --library | PKCS11LIB env var | Path to PKCS#11 shared library |
-s, --slot | PKCS11SLOT env var | Slot index |
-p, --password | PKCS11PASSWORD env var | Token PIN/password |
-t, --threads | 1 | Concurrent threads |
-i, --iterations | 200 | Iterations per test |
-c, --coverage | rsa,rsapss,ecdsa,ecdh,hmac,des,aes,xorder,rand,find,jwe,oaep,oaepenc,oaepunw | Test operations |
-k, --keysizes | rsa2048,rsa3072,rsa4096,ecnistp256,ecnistp384,ecnistp521,hmac160,hmac256,hmac512,des128,des192,aes128,aes192,aes256 | Key sizes/curves |
-j, --json | — | Output JSON |
-o, --jsonfile | — | Write JSON to file |
-f, --flavour | generic | Implementation flavour: generic, luna, utimaco, entrust, marvell |
Notes
- Unverified backends (marked
<result>): AWS CloudHSM, GCP Cloud HSM, Utimaco, Crypt2Pay, Kryoptic (TOML config), SmartCard-HSM. Exact slot and PIN values are deployment-specific; consult vendor documentation andp11toolintrospection before running benchmarks. - SoftHSMv2 and Proteccio commands are sourced from tested library paths in
documentation/docs/hsm_support/*.md. - For remote HSMs, ensure network connectivity and TLS certificates are correctly configured per vendor docs before running p11perftest.
Cosmian Command Line Interface (CLI)
KMS CLI is the Command Line Interface to drive KMS.
KMS CLI provides a powerful interface to manage and secure your cryptographic keys and secrets using the Cosmian Key Management System KMS. The KMS offers a high-performance, scalable solution with unique features such as confidential execution in zero-trust environments, compliance with KMIP 2.1, and support for various cryptographic algorithms and protocols.
Beyond the CLI interface, Cosmian also provides a PKCS#11 library (libcosmian_pkcs11.so) that enables seamless integration with existing cryptographic infrastructure. This library acts as a bridge between applications requiring PKCS#11 interfaces and the Eviden KMS, providing:
- Database Encryption Support: Integration with Oracle Database Transparent Data Encryption (TDE) for automatic encryption of data at rest, either through Oracle Key Vault or direct HSM communication
- Disk Encryption Support: Compatible with popular disk encryption solutions including VeraCrypt, LUKS, and Cryhod for protecting data on storage devices
The PKCS#11 library enables organizations to leverage Cosmian's advanced cryptographic capabilities while maintaining compatibility with their existing security infrastructure and workflows.
By leveraging KMS CLI, users can seamlessly integrate advanced cryptographic functionalities and secure search capabilities into their applications, enhancing data security and privacy.
Please download the latest versions for your Operating System from the Cosmian public packages repository See below for installation instructions.
Installation
Download package and install it:
sudo apt update && sudo apt install -y wget
wget https://package.cosmian.com/kms/5.28.0/deb/amd64/non-fips/static/cosmian-kms-cli-non-fips-static-openssl_5.28.0_amd64.deb
sudo apt install ./cosmian-kms-cli-non-fips-static-openssl_5.28.0_amd64.deb
ckms --version
Configuration
To communicate with the KMS, the client ckms reads a TOML configuration file at
~/.cosmian/ckms.toml (or the path set by CKMS_CONF).
The fastest way to create or update this file is the built-in interactive wizard:
ckms configure
The wizard prompts for the KMS server URL, the authentication method (access token,
client certificate in PEM or PKCS#12 format, or both), and optional proxy settings,
then writes the result to ~/.cosmian/ckms.toml.
For a full description of all authentication methods and the manual configuration format, see the CLI authentication guide.
Usage
Command Line Interface used to manage the Cosmian KMS server.
If any assistance is needed, please either visit the Cosmian technical documentation at https://docs.cosmian.com
or contact the Cosmian support team on Discord https://discord.com/invite/7kPMNtHpnz
Usage: ckms [OPTIONS] <COMMAND>
Commands:
audit Inspect and verify the tamper-evident KMS audit log
access-rights Manage the users' access rights to the cryptographic objects
attributes Get/Set/Delete/Modify the KMIP object attributes
azure Support for Azure specific interactions
aws Support for AWS specific interactions
bench Run benchmarks using criterion for statistical analysis.
cc Manage Covercrypt keys and policies. Rotate attributes. Encrypt and decrypt data
fpe Manage FPE keys and perform FPE encryption/decryption through KMIP Encrypt/Decrypt
pqc Manage post-quantum keys (ML-KEM, ML-DSA, Hybrid KEM, SLH-DSA). Encapsulate, decapsulate, sign, and verify
pgp Create, import, export and use `OpenPGP` keys (non-FIPS builds only)
tokenize Anonymization utilities: hash, noise, word masking, pattern masking, aggregation, and scaling
certificates Manage certificates. Create, import, destroy and revoke. Encrypt and decrypt data
cng Manage the Windows CNG Key Storage Provider (KSP)
derive-key Derive a new key from an existing key
ec Manage elliptic curve keys. Encrypt and decrypt data using ECIES
google Manage google elements. Handle key pairs and identities from Gmail API
locate Locate cryptographic objects inside the KMS
login Login to the KMS server identity provider.
logout Logout from the Identity Provider
hash Hash arbitrary data.
mac MAC utilities: compute or verify a MAC value.
rng RNG utilities: retrieve random bytes or seed RNG
server Server-related commands
rsa Manage RSA keys. Encrypt and decrypt data using RSA keys
opaque-object Create, import, export, revoke and destroy Opaque Objects
pkcs11 Verify PKCS#11 shared library integration
secret-data Create, import, export and destroy secret data
sym Manage symmetric keys. Encrypt and decrypt data
vault Vault-compatible `AppRole` identity management
markdown Regenerate the CLI documentation in Markdown format
configure Configure the KMS CLI (create ckms.toml)
help Print this message or the help of the given subcommand(s)
Options:
-c, --conf-path <CONF_PATH>
Configuration file location
This is an alternative to the env variable `CKMS_CONF_PATH`. Takes precedence over `CKMS_CONF_PATH` env variable.
[env: CKMS_CONF_PATH=]
--url <URL>
The URL of the KMS
[env: KMS_DEFAULT_URL=]
--print-json
Output the KMS JSON KMIP request and response. This is useful to understand JSON POST requests and responses required to programmatically call the KMS on the `/kmip/2_1` endpoint
--accept-invalid-certs
Allow to connect using a self-signed cert or untrusted cert chain
`accept_invalid_certs` is useful if the CLI needs to connect to an HTTPS KMS server running an invalid or insecure SSL certificate
-H, --header <NAME: VALUE>
Add a custom HTTP header to every request sent to the KMS server.
The header must be specified in `"Name: Value"` format, matching the
curl `-H` / `--header` convention. This option may be repeated to add
multiple headers.
The environment variable `CLI_HEADER` may also be used; separate
multiple headers with a newline character.
Example: `--header "cf-access-token: <token>"`
[env: CLI_HEADER=]
--proxy-url <PROXY_URL>
The proxy URL:
- e.g., `https://secure.example` for an HTTP proxy
- e.g., `socks5://192.168.1.1:9000` for a SOCKS proxy
[env: CLI_PROXY_URL=]
--proxy-basic-auth-username <PROXY_BASIC_AUTH_USERNAME>
Set the Proxy-Authorization header username using Basic auth.
[env: CLI_PROXY_BASIC_AUTH_USERNAME=]
--proxy-basic-auth-password <PROXY_BASIC_AUTH_PASSWORD>
Set the Proxy-Authorization header password using Basic auth.
[env: CLI_PROXY_BASIC_AUTH_PASSWORD=]
--proxy-custom-auth-header <PROXY_CUSTOM_AUTH_HEADER>
Set the Proxy-Authorization header to a specified value.
[env: CLI_PROXY_CUSTOM_AUTH_HEADER=]
--proxy-exclusion-list <PROXY_EXCLUSION_LIST>
The No Proxy exclusion list to this Proxy
[env: CLI_PROXY_NO_PROXY=]
-h, --help
Print help (see a summary with '-h')
-V, --version
Print version
Web UI
The KMS server ships with a built-in browser-based client that covers the same operations as the ckms CLI. It is available at:
https://YOUR_KMS_URL/ui
No installation is required — the UI is served directly by the KMS server.
Authentication is handled automatically: the UI detects the server's configured method and adapts its login flow accordingly:
- OIDC / JWT: a LOGIN button redirects to the identity provider.
- mTLS (client certificate): the browser negotiates the TLS handshake using a certificate installed in the system or browser store. No extra configuration is needed on the client side.
- No authentication: direct access, with a warning banner indicating that the server is unsecured.
For server-side configuration and browser certificate installation steps, see the KMS User Interface configuration guide.
Installation
Download package and install it:
sudo apt update && sudo apt install -y wget
wget https://package.cosmian.com/kms/5.28.0/deb/amd64/non-fips/static/cosmian-kms-cli-non-fips-static-openssl_5.28.0_amd64.deb
sudo apt install ./cosmian-kms-cli-non-fips-static-openssl_5.28.0_amd64.deb
ckms --version
CLI Authentication
This guide explains how to configure authentication for the KMS CLI when connecting to the KMS.
Configuration File
The CLI reads its configuration from a TOML file:
- Default location:
~/.cosmian/ckms.toml - Alternative location: Set the
CKMS_CONFenvironment variable
A basic configuration file is created automatically on first use:
[http_config]
server_url = "http://0.0.0.0:9998"
Authentication Methods
The CLI supports multiple authentication methods for the KMS:
| Method | Configuration Elements | Use Case |
|---|---|---|
| None (Default) | Only server_url | Development environments |
| Access Token | access_token | Simple API token authentication |
| TLS Client Certificate (PEM) | tls_client_pem_cert_path, tls_client_pem_key_path | Certificate-based auth — FIPS-compatible |
| TLS Client Certificate (PKCS#12) | tls_client_pkcs12_path, tls_client_pkcs12_password | Certificate-based auth — non-FIPS only |
| OAuth2/OIDC | oauth2_conf section | SSO with identity providers |
| Database Secret | database_secret | Encrypted database access |
Authenticating Using a Bearer / Access Token
When the KMS server is configured with JWT/OIDC authentication, the CLI can authenticate using a static bearer token (e.g., a short-lived JWT obtained from your identity provider) set directly in the configuration file.
[http_config]
server_url = "https://kms.example.com:9998"
# JWT bearer token sent in the Authorization: Bearer <token> header.
# Obtain from your identity provider (Google, Azure AD, Keycloak, …) or
# from ckms login after configuring the oauth2_conf section.
access_token = "<JWT_BEARER_TOKEN>"
See
test_data/configs/client/jwt.tomlfor a full example combiningaccess_token,oauth2_conf, anddatabase_secret.
When the server enforces an API token (a symmetric key registered server-side via
api_token_id), set the same value as access_token in the CLI config — the CLI
sends it as a bearer token and the server validates it against the registered key ID.
Authenticating Using TLS Client Certificates
When the KMS server is configured with mutual TLS (mTLS), ckms must present a client
certificate. Two formats are supported.
PEM format (FIPS-compatible, recommended)
Provide the certificate and private key as separate PEM files (.crt/.pem and .key/.pem).
This format works in both FIPS and non-FIPS builds.
[http_config]
server_url = "https://kms.example.com:9998"
accept_invalid_certs = false
# Path to the client certificate in PEM format (.crt or .pem).
# The file may contain a single leaf certificate or a full chain (leaf + intermediates).
tls_client_pem_cert_path = "/path/to/client.crt"
# Path to the client private key in PEM format (.key or .pem).
# Supported formats: PKCS#8 (-----BEGIN PRIVATE KEY-----) and traditional RSA/EC.
tls_client_pem_key_path = "/path/to/client.key"
Full example:
test_data/configs/client/pem_cert_auth.toml
Combined with a bearer token (multi-factor authentication):
[http_config]
server_url = "https://kms.example.com:9998"
accept_invalid_certs = false
tls_client_pem_cert_path = "/path/to/client.crt"
tls_client_pem_key_path = "/path/to/client.key"
# JWT bearer token sent in the Authorization: Bearer <token> header.
# Obtain from your identity provider (Google, Azure AD, Keycloak, …).
access_token = "<JWT_BEARER_TOKEN>"
Full example:
test_data/configs/client/pem_cert_and_token_auth.toml
PKCS#12 format (non-FIPS only)
Provide the certificate and private key bundled in a single PKCS#12 file (.p12).
[http_config]
server_url = "https://kms.example.com:9998"
accept_invalid_certs = false
# Path to the PKCS#12 bundle containing the client certificate and private key.
tls_client_pkcs12_path = "/path/to/client.p12"
# Password to decrypt the PKCS#12 bundle.
# Leave absent or set to "" if the bundle has no password.
tls_client_pkcs12_password = "changeit"
Full example:
test_data/configs/client/pkcs12_cert_auth.toml
Using the ckms configure wizard
Run ckms configure and choose the certificate format from the interactive menu:
Authentication method
None
Bearer token
> Client certificate (PEM) ← FIPS-compatible, recommended
Client certificate (PKCS#12) ← non-FIPS only
Both (PEM cert + token)
Both (PKCS#12 cert + token)
The wizard prompts for the certificate and key paths (PEM) or the bundle path and password (PKCS#12) and writes the result to the active configuration profile.
The KMS server authenticates the user using the Common Name (CN) field of the client
certificate's subject (e.g. CN=john.doe@example.com becomes the username).
Converting a PKCS#12 bundle to PEM
# Extract the certificate
openssl pkcs12 -in client.p12 -clcerts -nokeys -out client.crt
# Extract the private key (enter the PKCS#12 password when prompted)
openssl pkcs12 -in client.p12 -nocerts -nodes -out client.key
Common Configuration Options
Each product has its own http_config section with these options:
| Option | Description | Required |
|---|---|---|
server_url | URL of the server | Yes |
accept_invalid_certs | Accept self-signed certificates (set to "true") | No |
verified_cert | PEM certificate for pinning | No |
For KMS, you can also configure Gmail API access for S/MIME operations - see the S/MIME Gmail service account configuration.
Quick Configuration Examples
KMS with No Authentication
[http_config]
server_url = "http://127.0.0.1:9998"
OAuth2/OIDC Authentication
Basic Configuration
To authenticate using OAuth2/OIDC:
- Configure the
oauth2_confsection in your TOML file - Run
ckms loginto initiate authentication - Use
ckms logoutto clear the token
The oauth2_conf section requires:
[http_config.oauth2_conf]
client_id = "your-client-id" # Required
authorize_url = "https://idp.example.com/authorize" # Required
token_url = "https://idp.example.com/token" # Required
scopes = ["openid", "email"] # Recommended
client_secret = "your-client-secret" # Optional with PKCE
PKCE Authentication (Recommended)
PKCE (Proof Key for Code Exchange) enhances security by eliminating the need for client secrets. To use PKCE:
- Configure OAuth2 in your TOML file but omit the
client_secretfield - Ensure your identity provider supports PKCE
[http_config.oauth2_conf]
client_id = "your-client-id"
authorize_url = "https://idp.example.com/authorize"
token_url = "https://idp.example.com/token"
scopes = ["openid", "email"]
# No client_secret needed with PKCE
PKCE is recommended for:
- CLI tools
- Desktop applications
- Mobile applications
- Any client that cannot securely store secrets
Provider-Specific Examples
Microsoft Entra ID (Azure AD) with PKCE
[http_config.oauth2_conf]
client_id = "f052524e-7518-40e7-2579-219c0b48b125"
authorize_url = "https://login.microsoftonline.com/612da4de-35c0-42de-ba56-174c4e562c96/oauth2/authorize"
token_url = "https://login.microsoftonline.com/612da4de-35c0-42de-f3c6-174b69062c96/oauth2/token"
scopes = ["email", "openid"]
# No client_secret needed with PKCE
Important: In Entra ID, configure the redirect URL (http://localhost:17899/authorization) as Native/Desktop application type.
Auth0 with PKCE
[http_config.oauth2_conf]
client_id = "OUfH4FuzDAW99Ck3R4Rb7ROziOZEalIH"
authorize_url = "https://acme.eu.auth0.com/authorize"
token_url = "https://acme.eu.auth0.com/oauth/token"
scopes = ["email", "openid"]
# No client_secret needed with PKCE
Important: In Auth0, configure the application as Native and ensure the redirect URL is allowed.
Google with Traditional OAuth2
[http_config.oauth2_conf]
client_id = "99999999-abababababababababab.apps.googleusercontent.com"
client_secret = "your-client-secret" # Optional with PKCE
authorize_url = "https://accounts.google.com/o/oauth2/v2/auth"
token_url = "https://oauth2.googleapis.com/token"
scopes = ["openid", "email"]
Authentication Flow
When running ckms login:
- The CLI generates a URL to open in your browser
- You authenticate with your identity provider
- The browser redirects to a local endpoint (http://localhost:17899/authorization)
- The CLI captures the token and saves it in your configuration file
Corporate Network / Forward Proxy
When the KMS CLI is used inside a corporate network, the system HTTP proxy may intercept
outbound connections and block non-standard ports (e.g., 9998) or internal hostnames.
This typically manifests as a TunnelUnsuccessful connection error.
Note on
--proxy-exclusion-list: this CLI flag is silently ignored unless--proxy-urlis also provided. Without--proxy-url,proxy_exclusion_listis dropped and the Windows system proxy operates unconstrained. Use theckms.tomlconfiguration or environment variables for a persistent solution.
Option 1 — Environment variable (no config change needed)
Set NO_PROXY before running the CLI:
# Linux / macOS
export NO_PROXY="kms-host"
ckms kms locate
# Windows (PowerShell)
$env:NO_PROXY = "kms-host"
cosmian.exe kms locate
Option 2 — CLI flags (one-off, requires --proxy-url)
--proxy-exclusion-list only takes effect when --proxy-url is also supplied:
cosmian.exe \
--proxy-url="http://corp-proxy.example.com:8080" \
--proxy-exclusion-list="kms-host" \
kms locate
Equivalent environment variables (persist for the shell session):
export CLI_PROXY_URL="http://corp-proxy.example.com:8080"
export CLI_PROXY_NO_PROXY="kms-host,127.0.0.1,localhost"
Option 3 — ckms.toml (persistent, recommended)
Edit ~/.cosmian/ckms.toml (Windows: %USERPROFILE%\.cosmian\ckms.toml):
[http_config]
server_url = "https://kms-host:9998"
[http_config.proxy_params]
# URL of the corporate proxy (on Windows: netsh winhttp show proxy)
url = "http://corp-proxy.example.com:8080"
# Optional: Basic auth credentials for the proxy
# basic_auth_username = "DOMAIN\\username"
# basic_auth_password = "password"
# Hosts to bypass — add your KMS hostname here
exclusion_list = ["kms-host", "kms-host:9998", "127.0.0.1", "localhost"]
For a proxy requiring a custom Proxy-Authorization header:
[http_config.proxy_params]
url = "http://corp-proxy.example.com:8080"
custom_auth_header = "Bearer <proxy-token>"
exclusion_list = ["kms-host"]
Troubleshooting
- Authentication Failures: Verify client ID and URLs are correct
- PKCE Issues: Ensure your identity provider supports PKCE and has it enabled
- Redirect Errors: Check that your identity provider allows the redirect URL
- Missing Email Claim: Verify your identity provider includes the email claim in tokens
For more details about PKCE authentication, see the PKCE Authentication Guide.
Configuration file
The CLI looks for its configuration file in the following order:
- The path in the
CKMS_CONFenvironment variable (if set). ~/.cosmian/ckms.toml(user-level default)./etc/cosmian/ckms.toml(system-wide fallback).- If none of the above exists, all options must be passed as command-line arguments.
Run ckms configure to create or update the file interactively.
Minimal example
[http_config]
server_url = "http://0.0.0.0:9998"
TLS client authentication
With a PKCS#12 bundle
[http_config]
server_url = "https://kms.example.com"
ssl_client_pkcs12_path = "/path/to/client.p12"
ssl_client_pkcs12_password = "password"
With PEM certificate and key
[http_config]
server_url = "https://kms.example.com"
ssl_client_pem_cert_path = "/path/to/client.crt"
ssl_client_pem_key_path = "/path/to/client.key"
Pinning a server certificate (instead of the system CA)
[http_config]
server_url = "https://kms.example.com"
# PEM-encoded certificate expected from the server
verified_cert = "-----BEGIN CERTIFICATE-----\n...\n-----END CERTIFICATE-----"
Accepting invalid server certificates (testing only)
[http_config]
server_url = "https://kms.example.com"
accept_invalid_certs = true
Custom HTTP headers
Some deployments place the KMS server behind a zero-trust proxy (e.g. Cloudflare
Zero Trust) that requires an extra HTTP header on every request. Use the
custom_headers field — or the --header / -H CLI flag — to pass
arbitrary headers in "Name: Value" format.
Via the configuration file
[http_config]
server_url = "https://kms.example.com"
# One or more headers in "Name: Value" format
custom_headers = [
"cf-access-token: <your-cloudflare-access-token>",
"X-Custom-Header: my-value",
]
Via the command line or environment variable
The --header (short: -H) flag mirrors curl's convention and can be
repeated for multiple headers:
# Single header
ckms --header "cf-access-token: <token>" server-version
# Multiple headers
ckms -H "cf-access-token: <token>" -H "X-Env: production" sym keys create
Set CLI_HEADER in the environment to apply headers without repeating the flag.
Multiple headers must be newline-separated:
export CLI_HEADER=$'cf-access-token: <token>\nX-Env: production'
ckms sym keys create
CLI flags merge with any custom_headers already present in ckms.toml.
Forward proxy
Route all KMS traffic through an HTTP or SOCKS proxy using
[http_config.proxy_params] in the configuration file, or via CLI flags /
environment variables.
Via the configuration file
[http_config]
server_url = "https://kms.example.com"
[http_config.proxy_params]
url = "http://proxy.corp:3128"
# Optional: exclude hosts from the proxy
exclusion_list = ["127.0.0.1", "*.internal"]
# Optional: proxy credentials — choose one of the two forms below.
# Form 1 – HTTP Basic auth
basic_auth_username = "proxyuser"
basic_auth_password = "proxypass"
# Form 2 – arbitrary Proxy-Authorization header value
# custom_auth_header = "Bearer <token>"
Via the command line
| Flag | Environment variable | Description |
|---|---|---|
--proxy-url <URL> | CLI_PROXY_URL | Proxy URL (http://, https://, socks5://) |
--proxy-basic-auth-username | CLI_PROXY_BASIC_AUTH_USERNAME | Basic-auth username |
--proxy-basic-auth-password | CLI_PROXY_BASIC_AUTH_PASSWORD | Basic-auth password |
--proxy-custom-auth-header | CLI_PROXY_CUSTOM_AUTH_HEADER | Full Proxy-Authorization header value |
--proxy-exclusion-list <HOST> | CLI_PROXY_NO_PROXY | Hosts to bypass (repeatable) |
ckms --proxy-url http://proxy.corp:3128 \
--proxy-basic-auth-username proxyuser \
--proxy-basic-auth-password proxypass \
sym keys create
Combining a proxy with custom headers
Proxy settings and custom headers are independent and can be used together:
ckms --proxy-url http://proxy.corp:3128 \
--header "cf-access-token: <token>" \
--header "X-Tenant: acme" \
sym keys create
Or fully in ckms.toml:
[http_config]
server_url = "https://kms.example.com"
custom_headers = ["cf-access-token: <token>", "X-Tenant: acme"]
[http_config.proxy_params]
url = "http://proxy.corp:3128"
OpenID Connect / OAuth2 authentication
KMS can be configured with OpenID Connect (OIDC) authentication. In that case, KMS CLI must use the oauth2_conf field to authenticate to the server.
[http_config]
server_url = "http://0.0.0.0:9998"
access_token = "eyJhbGciOiJSUz...jsFgROjPY84GRMmvpYZfyaJbDDql3A"
[http_config.oauth2_conf]
client_id = "99999999-abababababababababab.apps.googleusercontent.com"
client_secret = "XXX"
authorize_url = "https://accounts.google.com/o/oauth2/v2/auth"
token_url = "https://oauth2.googleapis.com/token"
scopes = ["openid", "email"]
Advanced options
| Key | Type | Default | Description |
|---|---|---|---|
http_config.cipher_suites | string | (platform default) | Colon-separated list of TLS cipher suites, e.g. "TLS_AES_256_GCM_SHA384:TLS_AES_128_GCM_SHA256". |
print_json | bool | false | Print the raw KMIP JSON request and response for every operation. |
# Print raw KMIP JSON (useful for debugging)
print_json = true
[http_config]
server_url = "https://kms.example.com"
cipher_suites = "TLS_AES_256_GCM_SHA384:TLS_AES_128_GCM_SHA256"
S/MIME Gmail service account configuration for KMS server
Google Workspace can delegate encryption/decryption of Gmail (and other services such as Drive, Meet, Calendar) to an external Key Management System (KMS). In that case, the KMS can be used to encrypt and decrypt the S/MIME elements (identities, key pairs) and store them securely.
When using S/MIME, the gmail_api_conf field should be set in the configuration file to provide the necessary information about the configured service account to interact with Gmail API, and handle identities and keypairs easily from the KMS.
[http_config]
server_url = "http://0.0.0.0:9998"
access_token = "eyJhbGciOiJSUz...jsFgROjPY84GRMmvpYZfyaJbDDql3A"
[http_config.oauth2_conf]
client_id = "99999999-abababababababababab.apps.googleusercontent.com"
client_secret = "XXX"
authorize_url = "https://accounts.google.com/o/oauth2/v2/auth"
token_url = "https://oauth2.googleapis.com/token"
scopes = ["openid", "email"]
[gmail_api_conf]
type = "service_account"
project_id = "project_id"
private_key_id = "abc123abc123abc123abc123abc123abc123"
private_key = "-----BEGIN PRIVATE KEY-----...-----END PRIVATE KEY-----"
client_email = "xxx@yyyy.iam.gserviceaccount.com"
client_id = "12345678901234567890"
auth_uri = "https://accounts.google.com/o/oauth2/auth"
token_uri = "https://oauth2.googleapis.com/token"
auth_provider_x509_cert_url = "https://www.googleapis.com/oauth2/v1/certs"
client_x509_cert_url = "https://www.googleapis.com/robot/v1/metadata/x509/xxx%40yyyy.iam.gserviceaccount.com"
universe_domain = "googleapis.com"
Usage
Command Line Interface used to manage the Cosmian KMS server.
If any assistance is needed, please either visit the Cosmian technical documentation at https://docs.cosmian.com
or contact the Cosmian support team on Discord https://discord.com/invite/7kPMNtHpnz
Usage: ckms [OPTIONS] <COMMAND>
Commands:
audit Inspect and verify the tamper-evident KMS audit log
access-rights Manage the users' access rights to the cryptographic objects
attributes Get/Set/Delete/Modify the KMIP object attributes
azure Support for Azure specific interactions
aws Support for AWS specific interactions
bench Run benchmarks using criterion for statistical analysis.
cc Manage Covercrypt keys and policies. Rotate attributes. Encrypt and decrypt data
fpe Manage FPE keys and perform FPE encryption/decryption through KMIP Encrypt/Decrypt
pqc Manage post-quantum keys (ML-KEM, ML-DSA, Hybrid KEM, SLH-DSA). Encapsulate, decapsulate, sign, and verify
pgp Create, import, export and use `OpenPGP` keys (non-FIPS builds only)
tokenize Anonymization utilities: hash, noise, word masking, pattern masking, aggregation, and scaling
certificates Manage certificates. Create, import, destroy and revoke. Encrypt and decrypt data
cng Manage the Windows CNG Key Storage Provider (KSP)
derive-key Derive a new key from an existing key
ec Manage elliptic curve keys. Encrypt and decrypt data using ECIES
google Manage google elements. Handle key pairs and identities from Gmail API
locate Locate cryptographic objects inside the KMS
login Login to the KMS server identity provider.
logout Logout from the Identity Provider
hash Hash arbitrary data.
mac MAC utilities: compute or verify a MAC value.
rng RNG utilities: retrieve random bytes or seed RNG
server Server-related commands
rsa Manage RSA keys. Encrypt and decrypt data using RSA keys
opaque-object Create, import, export, revoke and destroy Opaque Objects
pkcs11 Verify PKCS#11 shared library integration
secret-data Create, import, export and destroy secret data
sym Manage symmetric keys. Encrypt and decrypt data
vault Vault-compatible `AppRole` identity management
markdown Regenerate the CLI documentation in Markdown format
configure Configure the KMS CLI (create ckms.toml)
help Print this message or the help of the given subcommand(s)
Options:
-c, --conf-path <CONF_PATH>
Configuration file location
This is an alternative to the env variable `CKMS_CONF_PATH`. Takes precedence over `CKMS_CONF_PATH` env variable.
[env: CKMS_CONF_PATH=]
--url <URL>
The URL of the KMS
[env: KMS_DEFAULT_URL=]
--print-json
Output the KMS JSON KMIP request and response. This is useful to understand JSON POST requests and responses required to programmatically call the KMS on the `/kmip/2_1` endpoint
--accept-invalid-certs
Allow to connect using a self-signed cert or untrusted cert chain
`accept_invalid_certs` is useful if the CLI needs to connect to an HTTPS KMS server running an invalid or insecure SSL certificate
-H, --header <NAME: VALUE>
Add a custom HTTP header to every request sent to the KMS server.
The header must be specified in `"Name: Value"` format, matching the
curl `-H` / `--header` convention. This option may be repeated to add
multiple headers.
The environment variable `CLI_HEADER` may also be used; separate
multiple headers with a newline character.
Example: `--header "cf-access-token: <token>"`
[env: CLI_HEADER=]
--proxy-url <PROXY_URL>
The proxy URL:
- e.g., `https://secure.example` for an HTTP proxy
- e.g., `socks5://192.168.1.1:9000` for a SOCKS proxy
[env: CLI_PROXY_URL=]
--proxy-basic-auth-username <PROXY_BASIC_AUTH_USERNAME>
Set the Proxy-Authorization header username using Basic auth.
[env: CLI_PROXY_BASIC_AUTH_USERNAME=]
--proxy-basic-auth-password <PROXY_BASIC_AUTH_PASSWORD>
Set the Proxy-Authorization header password using Basic auth.
[env: CLI_PROXY_BASIC_AUTH_PASSWORD=]
--proxy-custom-auth-header <PROXY_CUSTOM_AUTH_HEADER>
Set the Proxy-Authorization header to a specified value.
[env: CLI_PROXY_CUSTOM_AUTH_HEADER=]
--proxy-exclusion-list <PROXY_EXCLUSION_LIST>
The No Proxy exclusion list to this Proxy
[env: CLI_PROXY_NO_PROXY=]
-h, --help
Print help (see a summary with '-h')
-V, --version
Print version
ckms audit
Inspect and verify the KMS audit trail, reading directly from its storage backend: the
JSONL file or a PostgreSQL database. No running KMS server is required.
Choosing the audit source
export and verify read from exactly one source: a JSONL file (--path) or a PostgreSQL
database (--audit-postgres-url). The two are mutually exclusive.
With none of --path, --audit-postgres-url or --audit-instance-id, the source comes from
KMS_AUDIT_POSTGRES_URL or KMS_AUDIT_FILE_PATH; PostgreSQL wins if both are set. Any of the three
options turns this fallback off, so --audit-instance-id always needs the URL on the command line.
On a KMS host, KMS_AUDIT_POSTGRES_URL holds the writer's credentials. Pass a
read-only role with --audit-postgres-url instead.
# Verify every instance in the database
ckms audit verify --audit-postgres-url "${AUDIT_READ_URL}"
# Verify a single instance
ckms audit verify --audit-postgres-url "${AUDIT_READ_URL}" --audit-instance-id kms-eu-west-1a
# Verify an exported file
ckms audit verify --path /backup/audit.jsonl
Usage
ckms audit <subcommand>
Subcommands
export Export events from the audit log in JSON or CEF format.
verify Verify the SHA-256 hash chain of the audit log.
ckms audit export
Export events from the audit log to stdout. Supports JSON (default) and CEF output.
Usage
ckms audit export --path <FILE> [options]
Arguments
--path [-p] <FILE> Path to the JSONL audit log file. Alternative to --audit-postgres-url —
exactly one is required.
--audit-postgres-url <URL> PostgreSQL connection URL for the audit database, as an
alternative to --path.
--audit-instance-id <ID> With --audit-postgres-url, restricts the export to a single KMS
instance's chain. Omit to export every instance present in the database. An ID with no events
in the database is an error, not an empty export.
--since <RFC3339> Export only events whose timestamp is greater than or equal to this value.
The value must be an RFC 3339 timestamp, e.g. 2026-05-01T00:00:00Z.
--format <FORMAT> Output format. One of json (default) or cef.
--kms-version <STRING> KMS version string to embed in the CEF device version header.
Defaults to the ckms binary's own version. Useful when merging exports from multiple nodes.
Output formats
json — Emits one JSON object per line on stdout (JSONL).
File exports retain the stored JSONL schema.
PostgreSQL exports add instance_id and chain_generation alongside the unchanged audit event fields.
cef — Emits one CEF line per event on stdout, per the ArcSight CEF Implementation
Standard v27:
CEF:0|Cosmian|KMS|<version>|<operation>|<operation>|<severity>|rt=<epoch_ms> suser=<user> ...
PostgreSQL CEF exports include deviceExternalId (instance ID) and cn2 (chain generation),
with cn2Label=chainGeneration.
Their externalId is <generation>:<id>; identify an event by the pair deviceExternalId and externalId.
File CEF exports retain the numeric event ID in externalId and have no instance metadata.
See CEF export for the full field mapping and severity rules.
Examples
Export all events as JSONL:
ckms audit export --path /var/log/cosmian-kms/audit.jsonl > events.jsonl
Export events since a given date as CEF, piped to a SIEM:
ckms audit export \
--path /var/log/cosmian-kms/audit.jsonl \
--format cef \
--since "2026-05-01T00:00:00Z" \
| nc splunk-host 5514
Export a single instance's events from a PostgreSQL audit database:
ckms audit export \
--audit-postgres-url postgresql://kms_audit:password@db-host:5432/kms_audit \
--audit-instance-id kms-eu-west-1a
ckms audit verify
Verify the SHA-256 hash chain of the audit trail — a JSONL file (or directory of files), or
every instance's chain in a PostgreSQL audit database.
Checks that:
- Each event's
row_hashmatches a freshly computed hash of its fields. - Each event's
prev_hashmatches therow_hashof the previous event (or is all-zeros for the first event). - (File source only) every
audit:reanchorevent's sealed evidence file still exists next to the log and its SHA-256 still matches the digest recorded in the event. This is what makes deleting or altering sealed evidence after the fact detectable. ThePostgreSQLbackend also seals a corrupted chain and starts a fresh one with its ownaudit:reanchorevent, but this command does not yet check its recorded evidence digest against the sealed generation; see PostgreSQL backend for the manual check.
Exits with code 0 when every chain is intact, or 1 when a broken link, tampered event,
altered/missing sealed-evidence file, or an unknown --audit-instance-id (no events found) is
detected.
With --audit-postgres-url, broken chains and row-decoding errors do not stop later generations or instances.
The final error lists each failing generation and names the generations that verified clean.
Connection or query failures still abort the run.
Usage
ckms audit verify --path <FILE|DIRECTORY> [options]
ckms audit verify --audit-postgres-url <URL> [--audit-instance-id <ID>] [options]
Arguments
--path [-p] <FILE|DIRECTORY> Path to a JSONL audit log file, or a directory containing one or
more. A directory is scanned for every non-sealed *.jsonl file, each verified as its own
independent chain. Sealed *.corrupt.jsonl evidence files are intentionally not verified
as chains — their corruption is why they were sealed — but are SHA-256 checked through the live
log's audit:reanchor record. Alternative to --audit-postgres-url — exactly one is required.
--audit-postgres-url <URL> PostgreSQL connection URL for the audit database, as an
alternative to --path. Verifies every instance's chain in the database, each as its own
independent chain, unless --audit-instance-id restricts it to one. See
Choosing the audit source.
--audit-instance-id <ID> With --audit-postgres-url, restricts verification to a single KMS
instance's chain.
--verbose Print a summary line for every event even when the chain is valid.
Default: false.
Exit codes
| Code | Meaning |
|---|---|
0 | All events (and, for reanchor events, all sealed evidence) verified — intact. |
1 | A tampered/broken link, or missing/altered sealed evidence, was detected. |
Output examples
Chain intact:
/var/log/cosmian-kms/audit.jsonl: chain OK: 42 events verified
Tampered file:
TAMPERED: /var/log/cosmian-kms/audit.jsonl event id=17 (line 18) has an invalid row_hash
Missing sealed evidence (a seal-and-roll recovery's corrupted file was deleted or moved):
MISSING EVIDENCE: /var/log/cosmian-kms/audit.jsonl: reanchor event id=0 references sealed file
audit.20260814T140233Z.9f3ac1b2.corrupt.jsonl which no longer exists
PostgreSQL source (one section per instance in the database):
ckms audit verify --audit-postgres-url postgresql://kms_audit:password@db-host:5432/kms_audit
== instance_id: kms-eu-west-1a ==
instance_id=kms-eu-west-1a: chain OK: 128 events verified
== instance_id: kms-eu-west-1b ==
instance_id=kms-eu-west-1b: chain OK: 96 events verified
Verbose mode:
id=0 2026-05-06T20:31:15Z Create chain=ok
id=1 2026-05-06T20:31:15Z Encrypt chain=ok
...
Examples
Verify a log file and fail CI if the chain is broken:
ckms audit verify --path /var/log/cosmian-kms/audit.jsonl
Verify every live JSONL chain in a directory; sealed evidence is checked through its reanchor:
ckms audit verify --path /var/log/cosmian-kms/
Verbose verification for debugging:
ckms audit verify --path audit.jsonl --verbose
KMS Authorizing users with access objects
When authentication is enabled, each KMS object requires explicit authorization from its owner to be accessed or used by others. The KMS CLI then allows to manage the access rights of users to cryptographic objects stored in the KMS.
Granting an access right
An owner of an object grants an access right to a specific user for a given operation on a given object.
The supported KMIP operations are: get, export, encrypt, decrypt, import, revoke, destroy.
➜ ckms access grant --help
Grant another user an access right to an object.
This command can only be called by the owner of the object.
The right is granted for one of the supported KMIP operations: create, get, encrypt, decrypt, import, revoke, locate, rekey, destroy
Usage: ckms access grant <USER> <OBJECT_UID> <OPERATION>
Arguments:
<USER>
The user identifier to allow
<OBJECT_UID>
The object unique identifier stored in the KMS
<OPERATION>
The KMIP operation to allow
Options:
-h, --help
Print help (see a summary with '-h')
Revoking an access right
An owner of an object can revoke an access right to a specific user for a given operation on a given object at any time.
➜ ckms access revoke --help
Revoke another user access right to an object.
This command can only be called by the owner of the object.
Usage: ckms access revoke <USER> <OBJECT_UID> <OPERATION>
Arguments:
<USER>
The user to revoke access to
<OBJECT_UID>
The object unique identifier stored in the KMS
<OPERATION>
The operation to revoke (create, get, encrypt, decrypt, import, revoke, locate, rekey, destroy)
Options:
-h, --help
Print help (see a summary with '-h')
Listing an object access rights
The owner of an object can list all the access rights that have been granted to another object.
➜ ckms access list --help
List the access rights granted on an object to other users.
This command can only be called by the owner of the object. Returns a list of users and the operations they have been granted access to.
Usage: ckms access list <OBJECT_UID>
Arguments:
<OBJECT_UID>
The object unique identifier
Options:
-h, --help
Print help (see a summary with '-h')
Listing the objects owned by a user
A user can list all the objects it owns (i.e. the objects it created using either the Create, CreateKeyPair,
or Import KMIP operations).
➜ ckms access owned --help
List the objects owned by the calling user.
Owners of objects can perform any operation on these objects and can grant access rights on any of these operations to any other user.
Usage: ckms access owned
Options:
-h, --help
Print help (see a summary with '-h')
Listing the access rights obtained by a user
A user can list all the access rights that have been granted to it by object owners.
➜ ckms access obtained --help
List the access rights obtained by the calling user
Returns a list of objects, their state, their owner and the accesses rights granted on the object
Usage: ckms access obtained
Options:
-h, --help
Print help (see a summary with '-h')
S/MIME Gmail service account configuration
When using S/MIME, the gmail_api_conf field should be set in the configuration file to provide
the necessary information about the configured service account to interact with Gmail API, and
handle
identities and keypairs easily from the ckms.
This configuration is mandatory for ckms google subcommands.
The gmail_api_conf field is a TOML object with the following fields:
typeproject_idprivate_key_idprivate_keyclient_emailclient_idauth_uritoken_uriauth_provider_x509_cert_urlclient_x509_cert_urluniverse_domain
I can be retrieved directly from a TOML file downloaded from Google interface when creating and configuring the service account (following Google documentation).
Example:
[http_config]
server_url = "http://127.0.0.1:9998"
[gmail_api_conf]
type = "service_account"
project_id = "project_id"
private_key_id = "abc123abc123abc123abc123abc123abc123"
private_key = "-----BEGIN PRIVATE KEY-----\n...\n-----END PRIVATE KEY-----\n"
client_email = "xxx@yyyy.iam.gserviceaccount.com"
client_id = "12345678901234567890"
auth_uri = "https://accounts.google.com/o/oauth2/auth"
token_uri = "https://oauth2.googleapis.com/token"
auth_provider_x509_cert_url = "https://www.googleapis.com/oauth2/v1/certs"
client_x509_cert_url = "https://www.googleapis.com/robot/v1/metadata/x509/xxx%40yyyy.iam.gserviceaccount.com"
universe_domain = "googleapis.com"
Eviden VM
Eviden VM offers:
- a hardened pre-configured Linux distribution (based on Ubuntu 22.04 or RHEL 9) with LUKS disk encryption designed for confidential computing machines.
- a seamless, unique experience across all confidential hardware (Intel TDX, AMD SEV-SNP, soon NVIDIA H100) and cloud providers (AWS, Azure, GCP)
- an extended verifiability of the hardware, OS, and binaries running on the VM.
Specifically, the Eviden VM provides the following features:
- Confidentiality: the whole environment runs in a Trusted Execution Environment (TEE) with encrypted memory on top of encrypted storage.
- Verifiability: the user can verify the integrity of the hardware, OS, and executables at any time and compare them against a reference snapshot
- Genericity: compatible with AMD SEV-SNP, Intel TDX, and TPM or vTPM. Works identically on all cloud providers.
- No code modification: no third-party library or any change to applications
- Simplicity: manual configuration is reduced to the bare minimum. A Linux administrator enjoys the same experience as that of a standard VM.
Use cases
Eviden VM is used in these two scenarios:
- Quickly migrate an on-premise application to the public cloud without modifications while running it with the same level of confidentiality, e.g., migrating an HR application to the cloud.
- offer confidential SaaS services to your customers/users, protecting their privacy against the cloud provider and any extra-territorial law, e.g., offering confidential AI/Gen. AI in the public cloud.

Eviden VM is designed to secure your application against passive (honest-but-curious) and active (malicious) cloud provider staff member
Extended Verifiability
Eviden VM provides memory and disk encryption on a hardened system and extends the hardware remote attestation supplied by Intel and AMD to the verifiability of the operating system, as well as the binary files or other files marked as verifiable on the system. A user can quickly check the integrity of the whole system (no hardware change, no OS change, known binaries running or having run) before sending sensitive data for processing.
To do this, Eviden VM builds on the following components:
- Trusted Execution Environment (TEE) such as AMD SEV-SNP or Intel TDX for memory encryption
- Trusted Platform Module (TPM) or vTPM (virtual TPM) to store secrets and attest the content of some memory region
- Integrity Measurement Architecture (IMA), a Linux kernel module used to maintain a measurement log of all executables
To securely tie these components together, Eviden VM image contains the following software:
cosmian_vm_agent: an agent running in the confidential VM to forward attestations, collaterals (e.g. root certificates) and measurement logcosmian_fstoolto ease the generation of LUKS container with the secret key stored in the TPM/vTPM (automount on reboot)
Our client CLI cosmian_vm can be used to interact with cosmian_vm_agent and verify the trustworthiness of a specific instance launched with Eviden VM as base image.
Eviden VM image construction process can be found in this repository: https://github.com/Cosmian/cosmian_vm/packer
Usage
Setup flow
An Eviden VM is instantiated from a cloud provider marketplace on top of a confidential computing machine. Once the system administrator has installed the application and its dependencies, a snapshot of the VM is taken. Integrity checks can then be performed on the running VM to verify the running code, OS, and hardware.

Snapshot of the system
The snapshot of the system is a crucial step performed by cosmian_vm_agent to produce a JSON file with:
- TEE policy
- TPM policy
- List of measured files and their hash digests
It's a one-time process that is done before you decide to freeze the instance and expect no more modification.
The content will be compared against TEE attestation, TPM/vTPM attestation and IMA measurement log to verify the trustworthiness of the remote instance.
Verification of the remote instance
The verification process of the Eviden VM is performed using client CLI cosmian_vm, which will check:
- IMA (Integrity Measurement Architecture) measurement log with the list of executable and configuration file's hash digest, to be compared against the snapshot
- TPM (Trusted Platform Module) attestation of the IMA measurement log
- TEE (Trusted Execution Environment) attestation to ensure the instance is running on secure hardware with encrypted memory
The verification is successful if files in IMA measurement log and snapshot have the same hash digests, TPM or vTPM correctly attested the IMA measurement log content and finally if TEE attestation is valid.

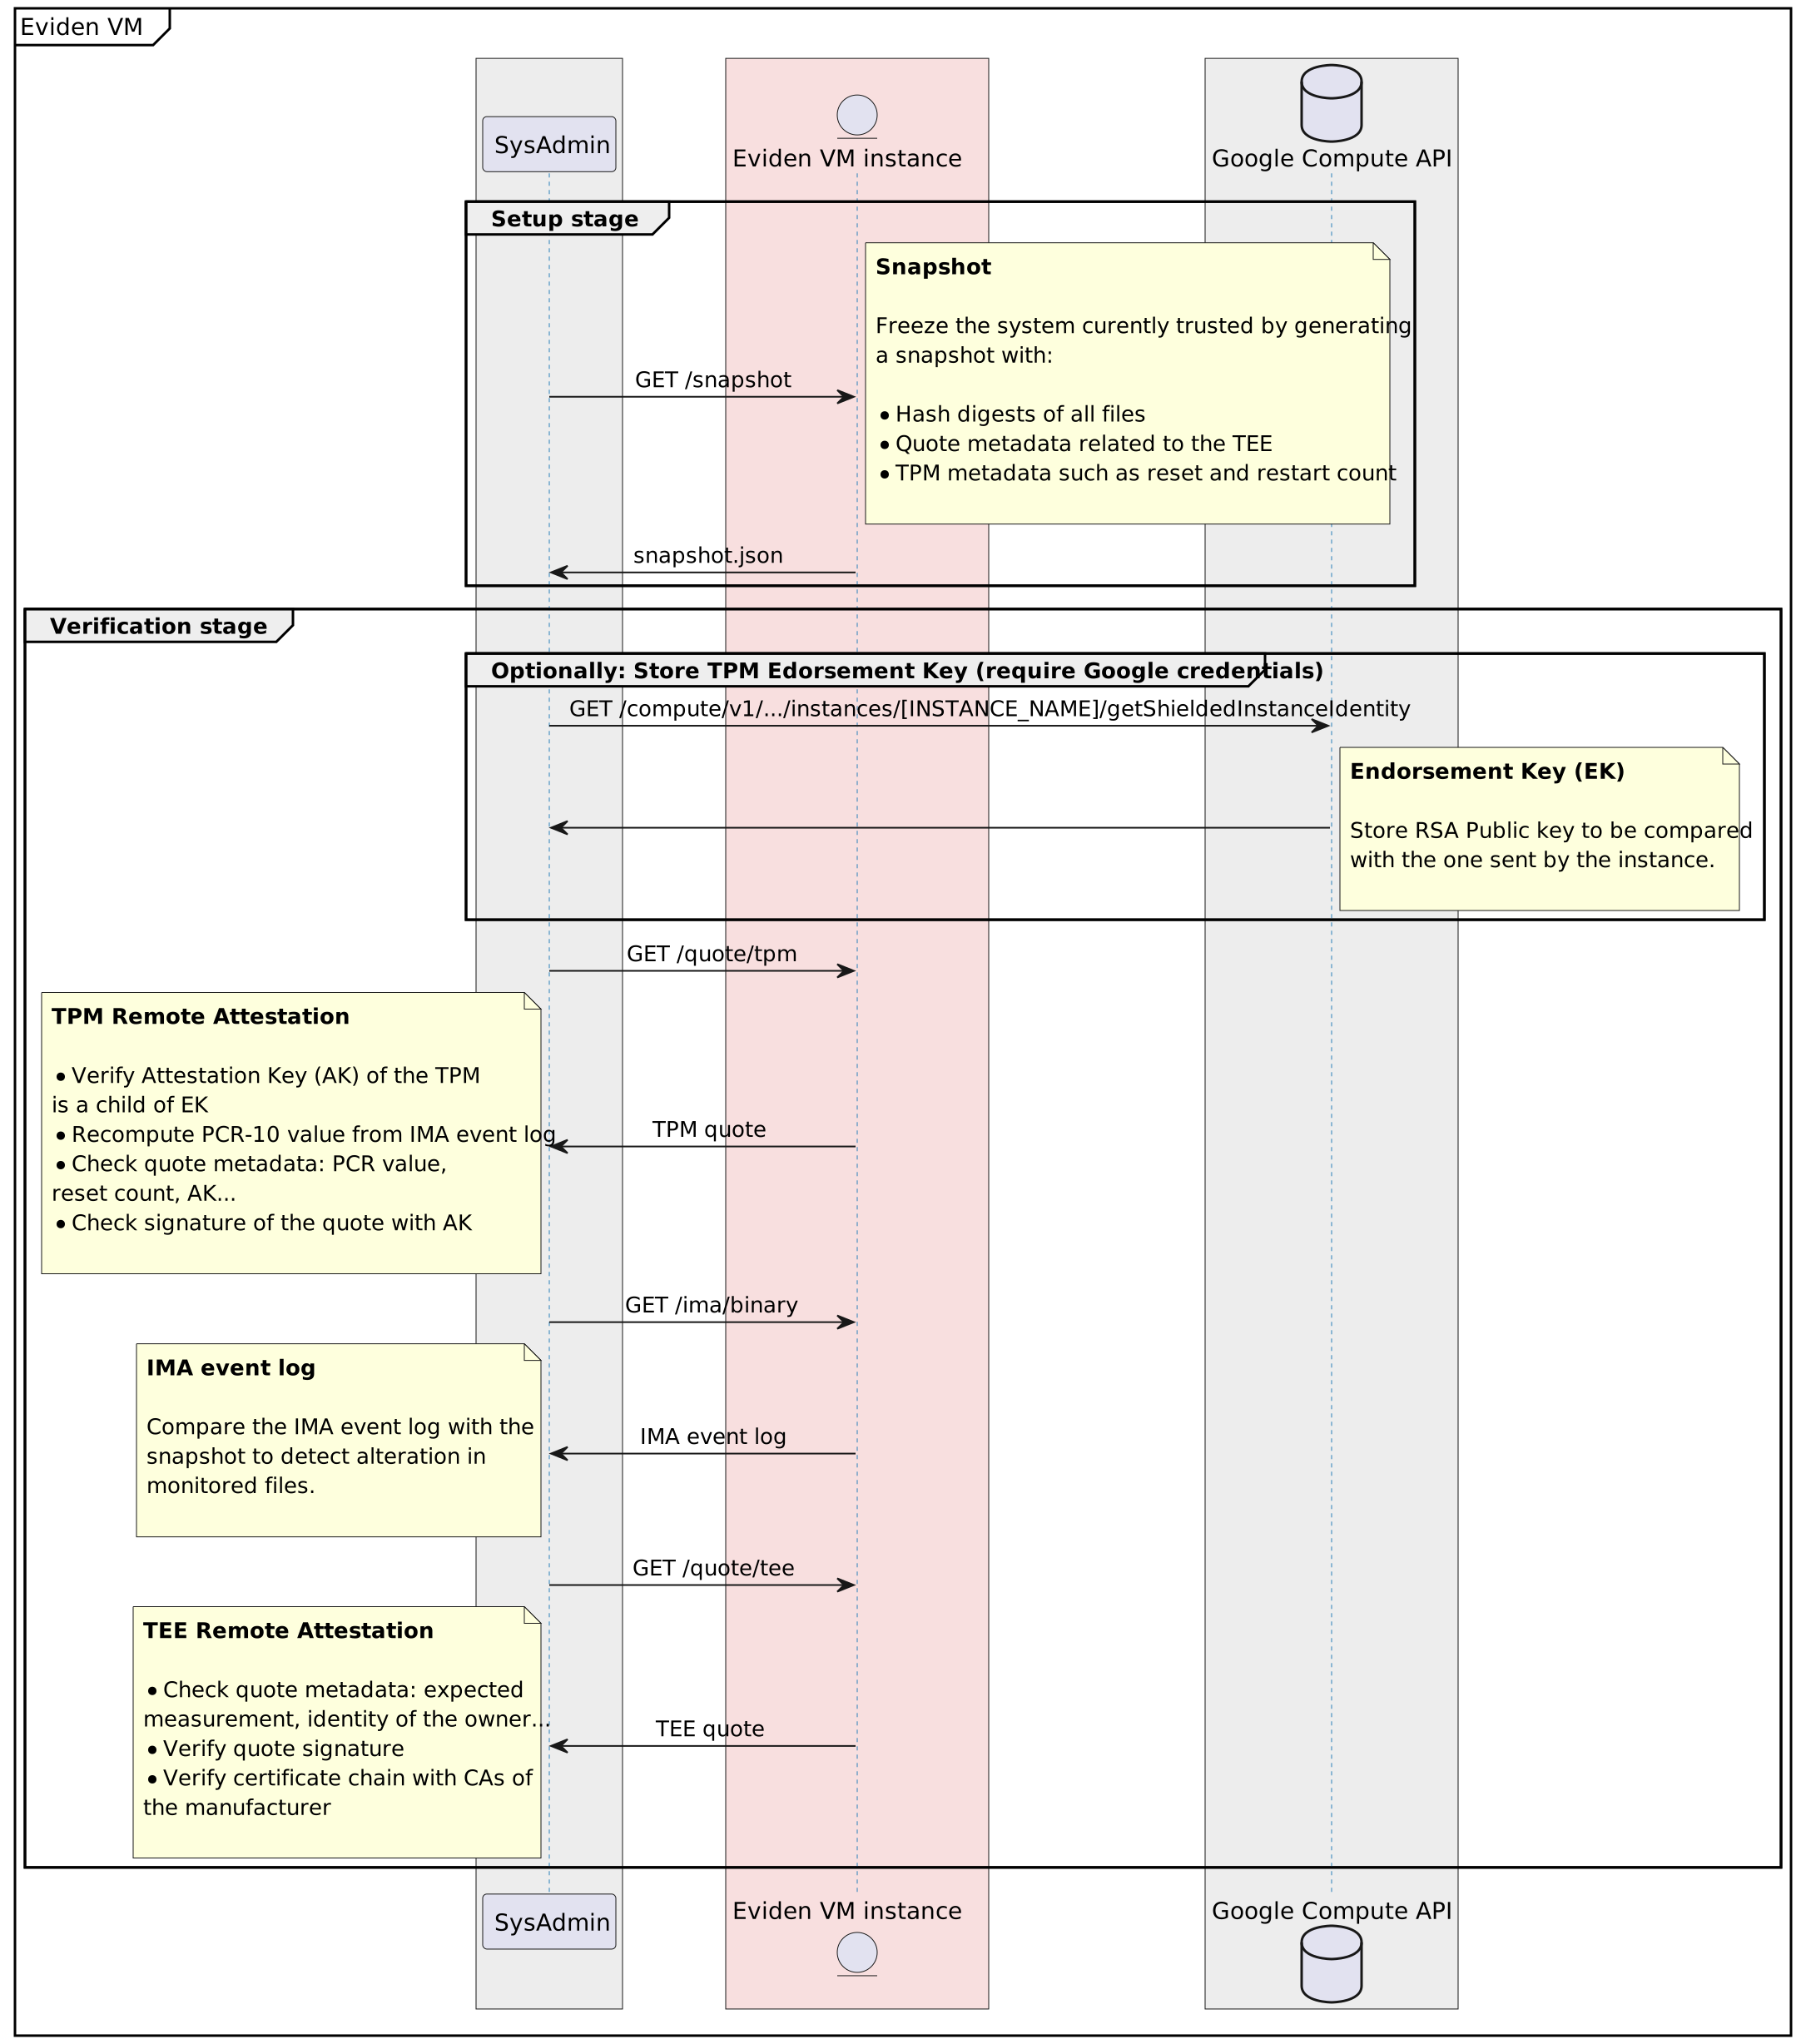
Cloud providers support
Eviden VM already supports AMD SEV-SNP and Intel TDX but it might depend on the cloud provider.
AWS images
| Official image | OS image | OS version | Kernel version | Eviden base image | |
|---|---|---|---|---|---|
| AWS - AMD SEV | ubuntu/images/hvm-ssd-gp3/ubuntu-noble-24.04-amd64-server-v20251212 | Ubuntu | 24.04 | 6.17.0-1007-aws | base-image-X-Y-Z-ubuntu-sev |
| AWS - AMD SEV | RHEL-9.4.0_HVM-20250519-x86_64-0-Hourly2-GP3 | Redhat | 9.4 | 5.14.0-427.37.1.el9_4.x86_64 | base-image-X-Y-Z-ubuntu-sev |
Azure images
| Official image | OS image | OS version | Kernel version | Eviden base image | Version | |
|---|---|---|---|---|---|---|
| Azure - Intel TDX | Canonical-ubuntu-24_04-lts-cvm | Ubuntu | 24.04 | 6.8.0-1020-azure | base-image-ubuntu-tdx | X.Y.Z |
| Azure - AMD SEV | Canonical-ubuntu-24_04-lts-cvm | Ubuntu | 24.04 | 6.17.0-1010-azure-fde | base-image-ubuntu-sev | X.Y.Z |
| Azure - Intel TDX | Redhat-rhel-cvm-9_4_cvm | Redhat | 9.4 | 5.14.0-427.37.1.el9_4.x86_64 | base-image-rhel-tdx | X.Y.Z |
| Azure - AMD SEV | Redhat-rhel-cvm-9_4_cvm | Redhat | 9.4 | 5.14.0-427.37.1.el9_4.x86_64 | base-image-rhel-sev | X.Y.Z |
GCP images
| Official image | OS image | OS version | Kernel version | Eviden base image | |
|---|---|---|---|---|---|
| GCP - Intel TDX | ubuntu-2404-noble-amd64-v20260225 | Ubuntu | 24.04 | 6.17.0-1008-gcp | base-image-X-Y-Z-ubuntu-tdx |
| GCP - AMD SEV | ubuntu-2404-noble-amd64-v20260807 | Ubuntu | 24.04 | 6.17.0-1018-gcp | base-image-X-Y-Z-ubuntu-sev |
| GCP - AMD SEV | rhel-9-v20251016 | Redhat | 9.6 | 5.14.0-570.52.1.el9_6.x86_64 | base-image-X-Y-Z-rhel-sev |
| GCP - Intel TDX | rhel-9-v20251016 | Redhat | 9.6 | 5.14.0-570.52.1.el9_6.x86_64 | base-image-X-Y-Z-rhel-tdx |
Marketplace Image content
The Eviden VM image built on the marketplaces of GCP, Azure, or AWS contains four primary executables:
-
cosmian_vm_agentis designed to be deployed on the Eviden VM. It serves on demand the collaterals used to verify the trustworthiness of the Eviden VM, such as the IMA file, the TEE quote, or the TPM quote -
cosmian_fstoolis designed to generate a LUKS container and enroll the TPM to be automatically started on reboot -
cosmian_vmis a CLI designed to be used on your host. It queries thecosmian_vm_agentto get the collaterals used to verify the integrity/trustworthiness of the Eviden VM
This image:
- contains the fully configured IMA
- contains the fully configured SELinux
- disables the auto-update (to avoid any modification of the Eviden VM after having snapshotted it)
- contains the fully configured
cosmian_vm_agent
This is an abstract of the updated file tree:
.
├── etc
│ ├── apt
│ │ └── apt.conf.d
│ │ └── 10periodic
│ ├── cosmian_vm
│ │ └── agent.toml
│ ├── default
│ │ └── grub
│ ├── ima
│ │ └── ima-policy
│ └── systemd
│ └── system
│ ├── cosmian_vm_agent.service
│ └── mount_luks.service
├── root
│ ├── mount_luks.sh
├── usr
│ └── local
| └── bin
│ ├── cosmian_fstool
│ └── cosmian_vm_agent
└── var
└── lib
└── cosmian_vm
├── container <--- LUKS container
├── tmp
└── data <--- LUKS container mounted
├── cert.pem
└── cert.key
Getting started
First, read detailed information about Eviden VM or about Eviden VM Agent and related software tools functioning.
As a reminder, the Eviden VM's goal is to verify Confidential VM trustworthiness and integrity at anytime. This verification runs on the operating system where one or more applications have been installed.
First, a snapshot is generated, freezing the state of the system and all executable files.
Then, at anytime, a remote verification of the VM can be done using the Eviden VM CLI tool (cosmian_vm).

The Eviden VM can be deployed on virtual machines that supports AMD SEV-SNP or Intel TDX technologies.
The following steps help to deploy a Eviden VM instance on any supported cloud provider.
The Eviden VM contains a set of software to ensure trustworthiness of the executable environment of the VM.
Then, the deployment flow is the following:
- instantiate a Eviden Confidential VM,
- connect on this VM and install everything required for your application to run correctly,
- create for once a VM snapshot remotely using Cosmian VM CLI,
- verify at anytime the integrity of the VM
Instantiate Eviden VM on your favorite cloud provider 🚚
Go the Eviden marketplace webpage of the chosen cloud provider:
- Eviden VM/KMS/AI on AWS Marketplace
- Eviden VM/KMS/AI on Azure Marketplace
- Eviden VM/KMS/AI on GCP Marketplace
Select an OS, set an external IP and continue until the Eviden VM instance is spawned.
Here's the list of instance types by cloud provider
| Cloud provider | Azure | GCP | AWS |
|---|---|---|---|
| AMD | SNP | SNP | SNP |
| Standard_DCas_v5 | n2d-standard | M6a | |
| Standard_DCads_v5 | C6a | ||
| R6a | |||
| Intel | TDX | TDX | TDX |
| DCes_v5-series | c3-standard | Not available | |
| ECesv5-series | |||
| (preview) |
Customize your VM 👩🔧
Connect to the spawned Eviden VM using SSH and install whatever is required for application and services to run (installing software and dependencies, setting-up configurations and services etc.).
For example, deploy an app and setup it as a Linux service.
Snapshot the VM remotely
Once the VM is configured as needed, Eviden VM Agent can do a snapshot of the VM containing fingerprint of the executables and metadata related to TEE and TPM.
Install the Eviden VM CLI on your local machine
Install the Eviden VM CLI on a local machine
Download the binary and allow it to be executed:
sudo apt update && sudo apt install -y wget
wget https://package.cosmian.com/cosmian_vm/1.3.21/ubuntu-22.04/cosmian-vm_1.3.21-1_amd64.deb
sudo apt install ./cosmian-vm_1.3.21-1_amd64.deb
cosmian_vm --version
Generate a snapshot of the Eviden VM:
cosmian_vm --url https://${COSMIAN_VM_IP_ADDR}:5555 --allow-insecure-tls snapshot
Verify the VM snapshot
Take a look at the global flow to fully understand the whole verification process of a Eviden VM.
Previous downloaded snapshot is stored as cosmian_vm.snapshot file (see the previous step).
- At anytime, the Eviden VM integrity can be verified by running:
cosmian_vm --url https://${COSMIAN_VM_IP_ADDR}:5555 --allow-insecure-tls \
verify --snapshot cosmian_vm.snapshot
When the agent starts (see step Snapshot the VM) self-signed certificate is created to enable HTTPS out of the box.
The self-signed certificate can be replaced by a certificate signed by a trusted authority such as Let's Encrypt (see certbot for certificate generation).
Deploy your application as a service
The benefit of setting the deployed app as a service is that Eviden VM Agent is able to:
- handle the lifetime cycle of the app (start, stop, restart)
- deploy safely (in encrypted folder) the config file
Setup the systemd service
Connect to the Eviden VM instance through SSH to perform this setup.
-
write a service file (here compatible with
systemctl)[Unit] Description=My App Requires=multi-user.target After=multi-user.target mount_luks.service cosmian_vm_agent.service [Service] Type=simple User=root ExecStart=/usr/local/bin/my_app Restart=on-failure RestartSec=3s Environment="MY_APP_CONF=/var/lib/cosmian_vm/data/app/app.conf" [Install] WantedBy=multi-user.target
Any provided config file will be renamed to `app.conf` and will be stored as filepath `/var/lib/cosmian_vm/data/app/app.conf`, so the app `my_app` may know the location of configuration file.
Here the env variable `MY_APP_CONF` is used to forward this information to `my_app`.
- register the new service to
systemctl
Copy the my_app.service file into /etc/systemd/system/my_app.service and enable this service (without starting it, Cosmian VM Agent that will be responsible of starting it)
sudo systemctl enable my_app
sudo systemctl daemon-reload
Note: my_app and my_app_svc are indicative naming and can be changed, but don't forget to update the Eviden VM Agent config file (/etc/cosmian_vm/agent.toml) as well.
Configure the remote app safely
On the local machine, write the config file of the app, and then use the Eviden VM CLI to remotely configure the app.
-
write the app config file
[my_cfg] key = "value" secret = "a98jfdol"The format (TOML, JSON, INI...) of this config file depends on the app but the Eviden VM CLI doesn't care, as the config file is treated as a blob of bytes.
-
send the configuration using
cosmian_vmCLIcosmian_vm --url https://app.company.com app init -c my_app.tomlThe app conf is written in the encrypted folder.
Eviden VM Agent start/restart automatically the app after writing the config file when
initis called.
Control the remote app as a service
The cosmian_vm CLI also contains two subcommands designed to drive your application running inside the Cosmian VM.
It could be relevant if the personnel in charge of the application doesn't have the rights to connect to the Cosmian VM through SSH for instance.
If your Eviden VM is reachable over Internet, be aware that anyone can control your application. Out of the box the access to the cosmian_vm_agent endpoints is not authenticated.
Before going any further, you need to add a paragraph app inside the Cosmian VM configuration file, as follow:
[agent]
host = "0.0.0.0"
port = 5555
ssl_certificate = "data/cosmianvm.cosmian.dev/cert.pem"
ssl_private_key = "data/cosmianvm.cosmian.dev/key.pem"
tpm_device = "/dev/tpmrm0"
[app]
service_type = "systemd"
service_name = "my_app"
app_storage = "data/app"
The service_type could be standalone, systemd or supervisor and defines the way to start/stop the application.
The service_name field defines the name of the service or the binary to start/stop.
The app_storage field defines the root path where the application will store its data. If it's a relative path, the root path will be located inside /var/lib/cosmian_vm/. If you put it in the subfolder data, this directory is therefore encrypted and protected from the cloud provider.
Only the data/app/ part is customizable in the Cosmian VM Agent config file (/etc/cosmian_vm/agent.toml), but it remains relative to /var/lib/cosmian_vm/.
Keep in mind that /var/lib/cosmian_vm/data is the mount point of the encrypted folder.
Anything outside this folder is NOT encrypted!
Let's imagine, the application is installed in the Cosmian VM but not configured and started. Then, you can provide a configuration file (containing secrets for instance) and start it using:
cosmian_vm --url https://app.company.com app init --conf app.json
Also, if needed, the application can be restarted using:
cosmian_vm --url https://app.company.com app restart
The configuration file can be anything the application expects. Here, a json file. It will be sent to the cosmian_vm_agent and stored in the LUKS container in /var/lib/cosmian_vm/data/app/app.conf.
If you call again init the previous configuration file is overwritten.
Advanced settings
Eviden VM logs
The logs of Cosmian VM are written in journalctl and can be accessed via journalctl -exu cosmian_vm_agent.
Temporary folder
Cosmian VM also contains an encrypted RAMFS in /var/lib/cosmian_vm/tmp.
The data stored inside is volatile and will be deleted when rebooting the VM. The size of this directory is 500MB.
Data protection on the filesystem
Out of the box, Cosmian VM filesystem is not entirely protected against the cloud provider.
However, there are two ways to store securely sensitive data:
- LUKS container
- RAMFS
Encrypted folder
At the first start of cosmian_vm_agent, a LUKS container is created at /var/lib/cosmian_vm/container (size=500MB).
This container is mounted into /var/lib/cosmian_vm/data. This directory can be used to store any sensitive data (ie: to store TLS certificate).
The password of the LUKS container is stored inside the LUKS itself, and can be used to migrate the container to another VM for example.
With Cosmian VM the LUKS is enrolled on the current TPM therefore the password won't be asked again, even at reboot.
To change the size of the container, create it again:
cosmian_fstool --size 100GB --location /data/container
Define your own container size and save the container to an additional disk for back-up (/data/container in this example).
A prompt will invite you to set the password. Save this password as it could be useful if you want to migrate the container to another VM.
If you need to manage the container (extend its size, revoke the password, etc.), you can use cryptsetup.
The fields ssl_certificate and ssl_private_key could be relative paths. In that case, this is always relative to /var/lib/cosmian_vm/.
Add measurement of scripts and configuration files
When using Cosmian VM with RHEL distribution, SELinux is enabled and configured in enforced mode.
The SELinux module named cosmiand is present in Cosmian VM with 4 custom labels measured by Integrity Measurement Architecture (IMA):
cosmiand_exec_tfor Cosmian VM related binaries which will transition tocosmiand_tcosmiand_tfor daemons when the binary file is labeled withcosmian_exec_tcosmiand_script_tfor any script file such as Python, Perl or shell scriptscosmiand_conf_tfor Cosmian VM configuration files
Because IMA only tracks binaries loaded in memory, cosmiand_script_t and cosmiand_conf_t allow to label specific files read by interpreters or applications.
It will ensure that these files are not modified after the snapshot.
To label a new file, use semanage and restorecon commands:
# change SELinux context (always use absolute path)
semanage fcontext -a -t cosmiand_script_t "$(realpath my_script.py)"
# restore default context to apply the change (always use absolute path)
restorecon -v "$(realpath my_script.py)"
then you can see the new context with:
$ ls -Z
system_u:object_r:cosmiand_script_t:s0 my_script.py
See RHEL SELinux documentation for more details and advanced usage of SELinux.
Cosmian VM Agent lifecycle
Cosmian VM Agent can be started/restarted/stopped.
Start the agent:
systemctl start cosmian_vm_agent
Restart the agent
systemctl restart cosmian_vm_agent
Stop the agent
systemctl stop cosmian_vm_agent
Configure Cosmian VM Agent
Cosmian VM Agent relies on a configuration file located at /etc/cosmian_vm/agent.toml.
A minimal configuration file is:
[agent]
host = "127.0.0.1"
port = 5555
ssl_certificate = "data/cert.pem"
ssl_private_key = "data/key.pem"
tpm_device = "/dev/tpmrm0"
By default, cosmian_vm_agent uses the port 5555 on localhost.
Configure HTTPS with your own domain
On a fresh install, cosmian_vm_agent uses a self-signed certificate generated at the start of the service and set the CommonName of the certificate to the value of the machine hostname.
Therefore when using the CLI, --allow-insecure-tls must be added to ignore SSL errors (due to self-signed cert). This is not a good practice in production.
To enable HTTPS with trusted certs:
-
Edit your DNS registry to point to that VM
-
Create a trusted certificate using the method of your choice (Let's encrypt for instance)
-
Edit the
nginxconfiguration file to point to the location of the TLS certificate and private key:server { ... ssl_certificate /var/lib/cosmian_vm/data/cert.pem; ssl_certificate_key /var/lib/cosmian_vm/data/key.pem; } -
Edit the
cosmian_vm_agentconfiguration file to point to the location of the TLS certificate and private key:[agent] ... ssl_certificate = "data/cert.pem" ssl_private_key = "data/key.pem" -
Restart both services
sudo systemctl restart nginx sudo systemctl restart cosmian_vm_agent
Configure HTTPS with another certs
This configuration example sets the certificate from another application running in Cosmian VM:
[agent]
host = "0.0.0.0"
port = 5555
ssl_certificate = "/etc/letsencrypt/live/app.company.com/fullchain.pem"
ssl_private_key = "/etc/letsencrypt/live/app.company.com/privkey.pem"
tpm_device = "/dev/tpmrm0"
Note: in this case, fullchain.pem and privkey.pem are not located in the LUKS (under /var/lib/cosmian_vm/data/) so they are stored in cleartext on the disk hence potentially accessible by the Cloud Provider.
If you want to store these certificate securely, move them into the LUKS and change the location in the agent.toml file (don't forget to do the same for Nginx if applicable) like this:
[agent]
...
ssl_certificate = "data/fullchain.pem" # equivalent to /var/lib/cosmian_vm/data/fullchain.pem
ssl_private_key = "data/privkey.pem" # equivalent to /var/lib/cosmian_vm/data/privkey.pem
By setting a relative path, the agent will complete the path using the default mounted path for the LUKS, which is /var/lib/cosmian_vm/data (read here for more information about LUKS setup).
Snapshot deep dive
Take a snapshot of the remote system
cosmian_vm --url https://app.company.com snapshot
The snapshot is performed by cosmian_vm_agent to produce a single file with the trusted state of the machine at the current time.
This file is returned to the Cosmian VM CLI when using the subcommand snapshot.
The snapshot file is a JSON file containing:
- IMA measurement log at the current time
- List of all measured files and their corresponding hash (
sha256by default) - TEE metadata
- TPM metadata
Here is a sample:
{
"tee_policy":{
"Sev":{
"measurement":"73797518025d1d20e09efdf10e383cd0115e00562109b04ec577b5bd5d2ddab12f1f9ee22758f50a121355cf5aac6507",
"report_data":"00000000000000000000000000000000000000000000000000000000000000000000000000000000000000000000000000000000000000000000000000000000",
"family_id":"00000000000000000000000000000000",
"image_id":"00000000000000000000000000000000",
"guest_svn":0,
"id_key_digest":"000000000000000000000000000000000000000000000000000000000000000000000000000000000000000000000000",
"author_key_digest":"000000000000000000000000000000000000000000000000000000000000000000000000000000000000000000000000",
"policy":196608,
"report_id":"b6db1e43f868a4823f708df92942a0448750fc5c37f7a724bc49292ffd111e1a",
"report_id_ma":"ffffffffffffffffffffffffffffffffffffffffffffffffffffffffffffffff"
}
},
"tpm_policy":{
"reset_count":15,
"restart_count":0
},
"filehashes":[
["/snap/google-cloud-cli/187/platform/gsutil/third_party/mock/mock/__pycache__/__init__.cpython-39.pyc", "f708df92942a044875[...]abc"],
...
]
}
Verification with multiple domains
Typically, the verification is done using the CLI as follow:
cosmian_vm --url https://app.company.com verify \
--snapshot cosmian_vm.snapshot
When verifying a Cosmian VM you can also check that the TLS certificate of your services installed inside this VM are the one used when querying the Cosmian VM Agent during the verification.
The goal is to verify your services currently running inside this Cosmian VM.
To do so, use --application as many times as needed:
cosmian_vm --url https://app.company.com verify \
--snapshot cosmian_vm.snapshot \
--application service1.company.com:3655 \
--application service2.company.com
Verification failure after reboot
Due to the IMA design, the VM cannot be trusted after a reboot. Indeed the IMA is reset at each restart.
Cosmian VM uses the TPM to detect a VM reboot: if the reset counter differs from the one captured during the snapshot, the verification fails.
If this reboot is trusted (for instance it has been made by the system administrator), you just need to ask for a new snapshot.
If the reboot occurs without the system administrator consent, the VM should be investigated to detect any malicious modification.
Cosmian VM diff with a Ubuntu/RHEL base image
The modifications are related to the installation and the configuration of Cosmian VM software stack. All the changes are performed using Packer and can be found in Cosmian VM Github page.
Cosmian VM image:
- contains the fully configured IMA
- contains the fully configured SELinux (RHEL only)
- disables the auto-update (see Disabled auto-update)
- contains the fully configured
cosmian_vm_agent
This is an abstract of the updated file tree:
.
├── etc
│ ├── apt
│ │ └── apt.conf.d
│ │ └── 10periodic
│ ├── cosmian_vm
│ │ └── agent.toml
│ ├── default
│ │ └── grub
│ ├── ima
│ │ └── ima-policy
│ └── systemd
│ └── system
│ └── cosmian_vm_agent.service
├── usr
│ └── local
│ └── bin
│ ├── cosmian_fstool
│ └── cosmian_vm_agent
└── var
└── lib
└── cosmian_vm
├── container <--- LUKS container
├── tmp
└── data <--- LUKS container mounted
├── cert.pem
└── cert.key
Disabled auto-update
The verification performed by the Cosmian VM relies on the fact that once the snapshot has been made, the VM content shouldn't be altered. If any modification is detected, the VM is considered compromised.
An auto-update processing alters the VM and makes the comparison with the snapshot impossible.
You shall update the Eviden VM manually and create a new snapshot afterwards.
Use a proxy in front of the Cosmian VM Agent
Although it's technically possible to configure an HTTPS proxy in front of the Cosmian VM Agent, it will prevent you from proceeding the verification through the CLI if you configure the proxy as an SSL forward.
Indeed, the TLS certificate configured in the Cosmian VM Agent is a part of the exchange with the TEE. To avoid any malicious software to send fake collaterals, the TLS certificate used to get these collaterals should be the same as the one configured in the Cosmian VM Agent. This certificate should stay inside the Cosmian VM.
If you use a proxy, the TLS tunnel, from the CLI to the agent, uses the certificate of the proxy and not the certificate of the agent. The verification will therefore fail, being not able to determine if it's a malicious or healthy behavior.
However, if you use a proxy as an SSL passthrough, it will work like a charm.
Here is an example with HAProxy:
[...]
defaults
mode tcp
option tcplog
[...]
# Entrypoint of the ha_proxy listen on 443
frontend https-in
# Do not decrypt ssl yet
bind *:443
tcp-request inspect-delay 60s
tcp-request content accept if { req_ssl_hello_type 1 }
use_backend 8d14ff4ac2d452c3.cosmian.io if { req_ssl_sni -i 8d14ff4ac2d452c3.cosmian.io }
# No default backend: return an error as fallback
backend 8d14ff4ac2d452c3.cosmian.io
server haproxy-app 162.19.91.151:27283 check
Other resources:
Azure instantiation
Step by step guide
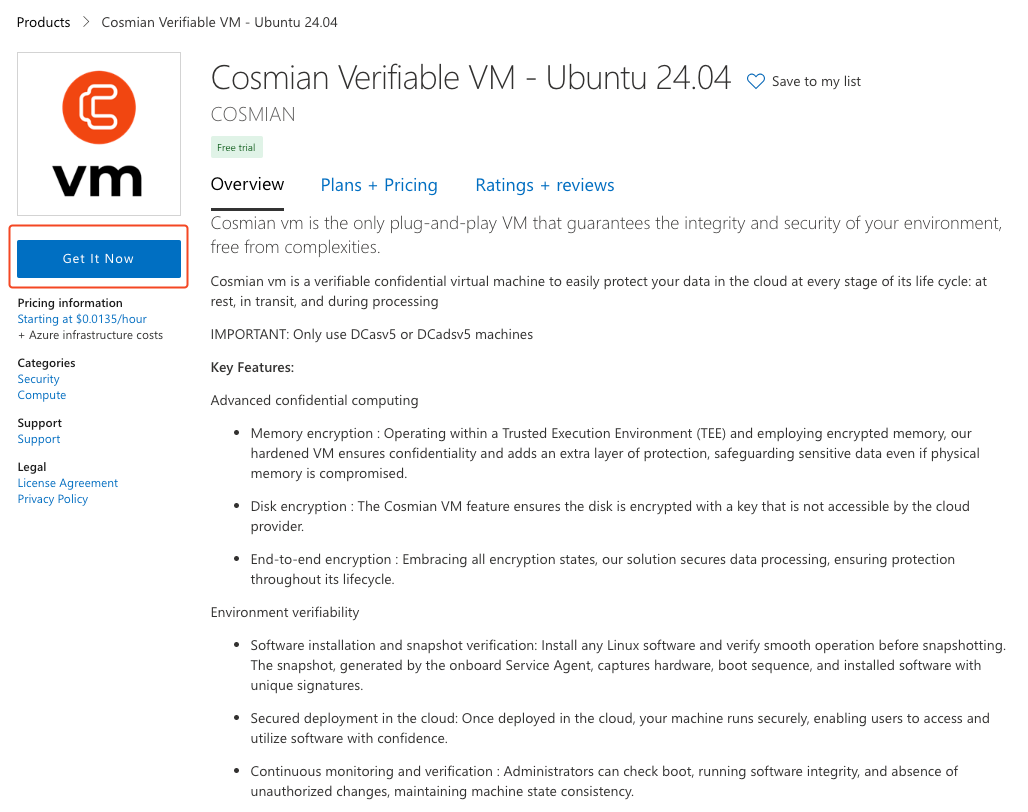
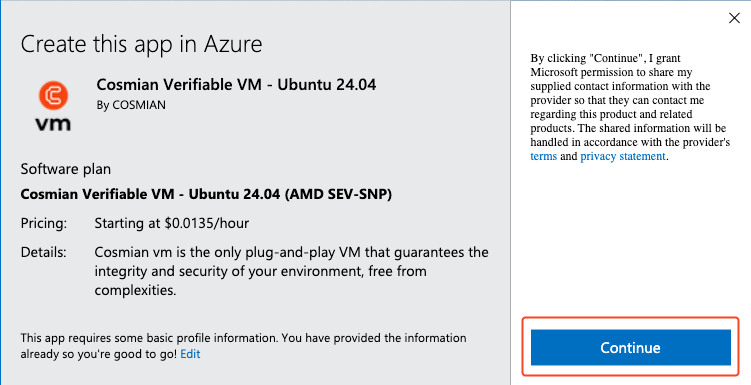
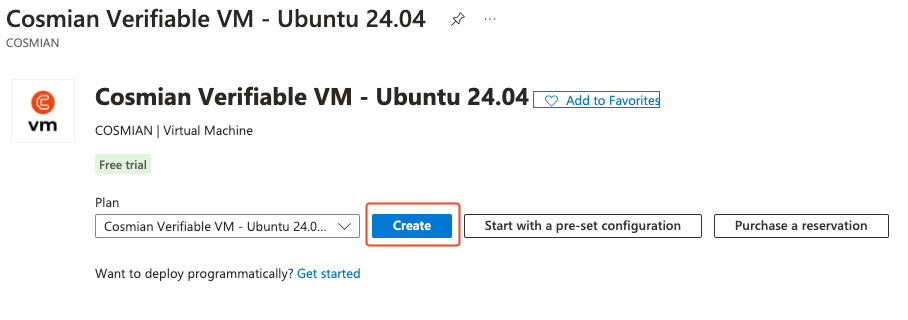
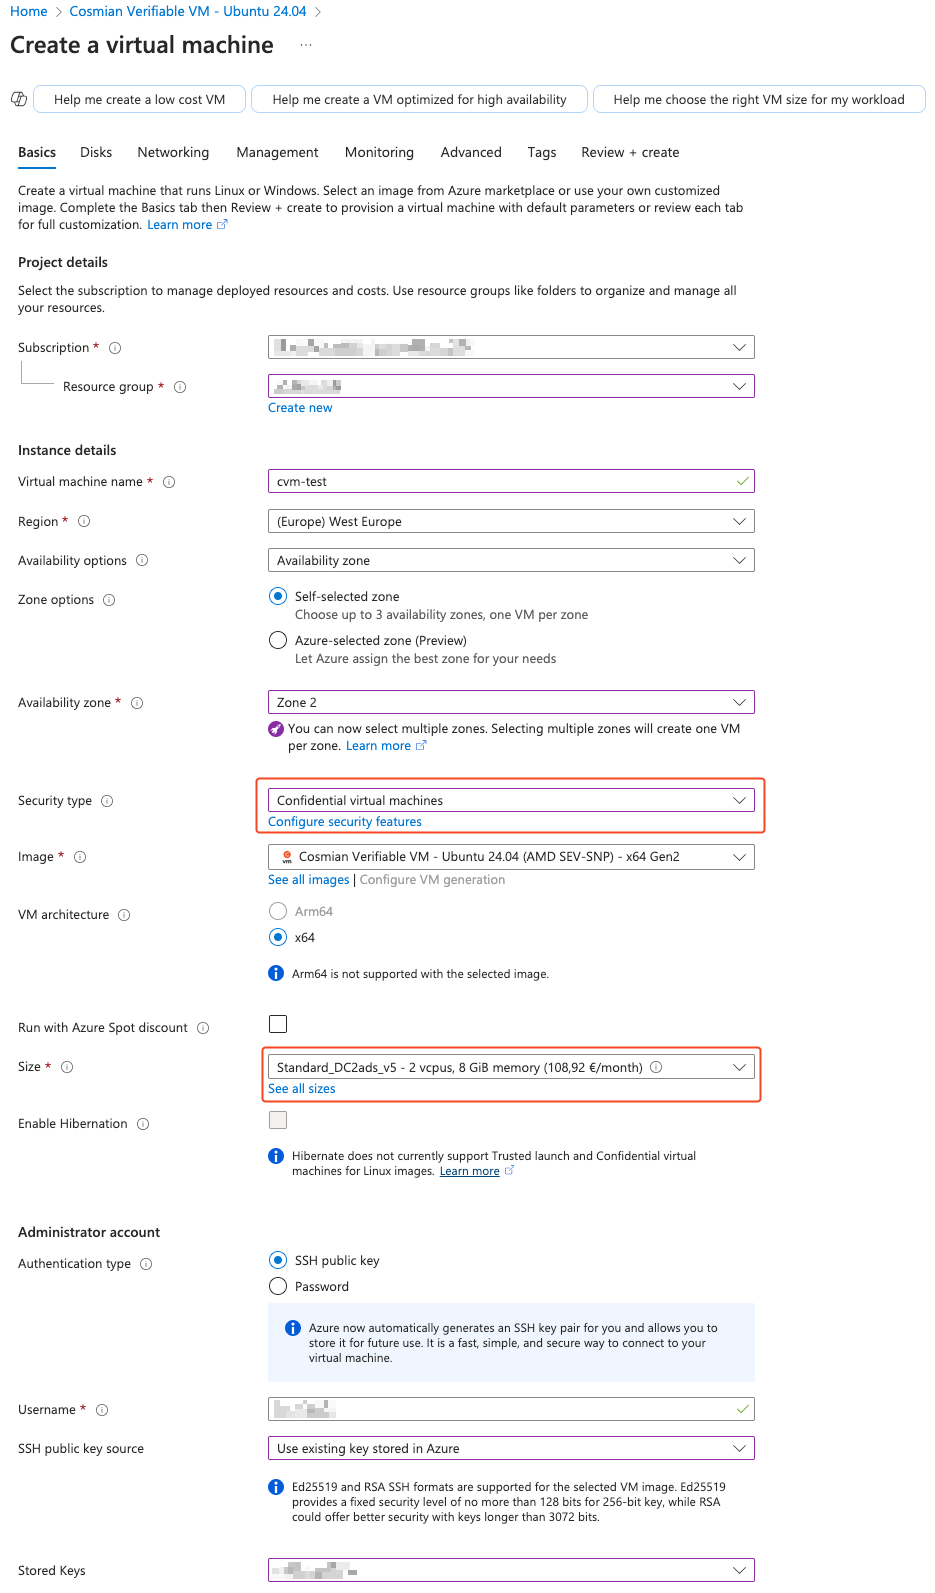
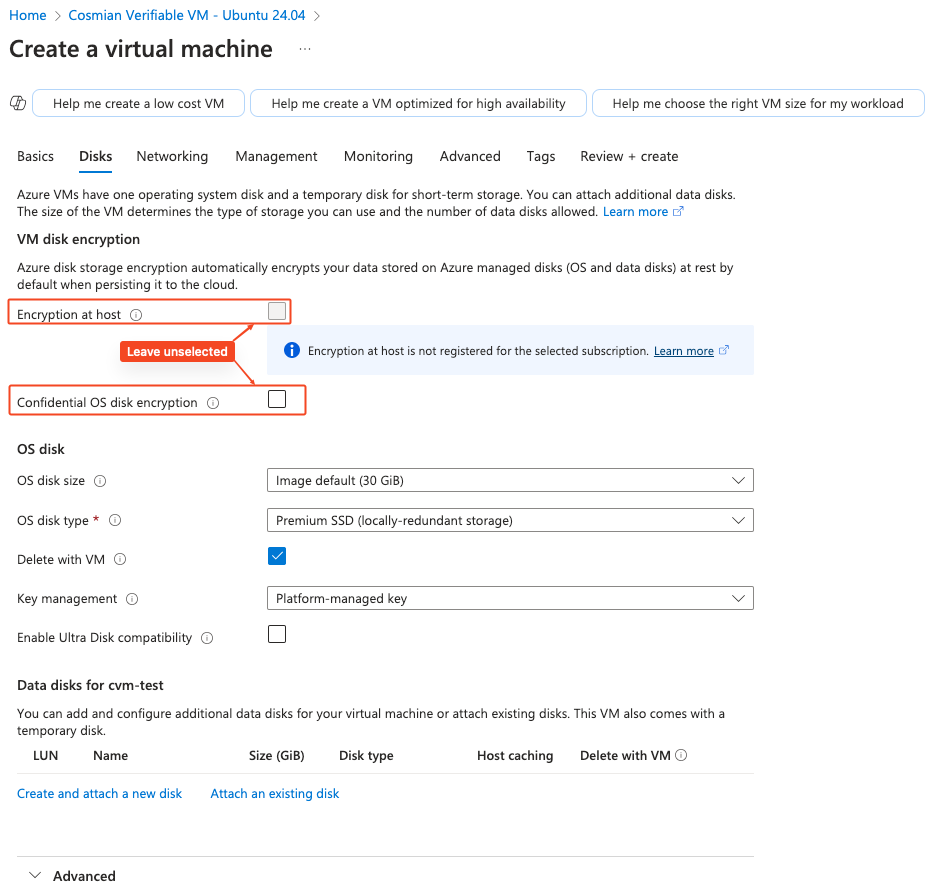
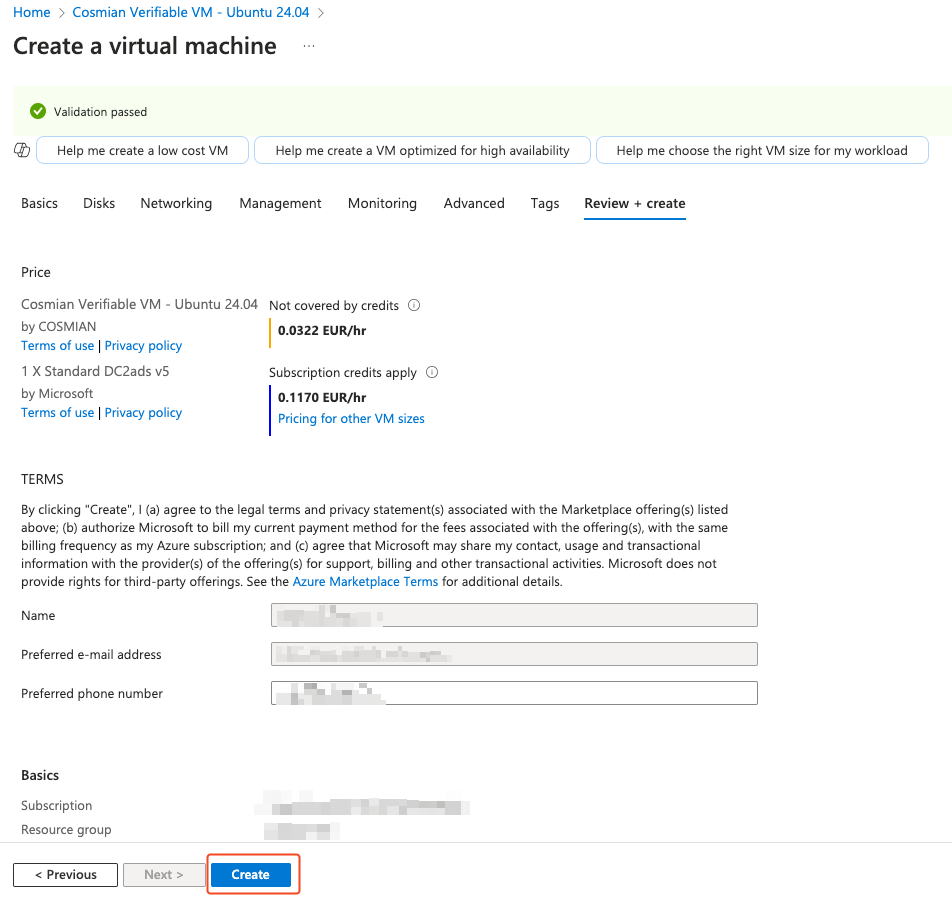
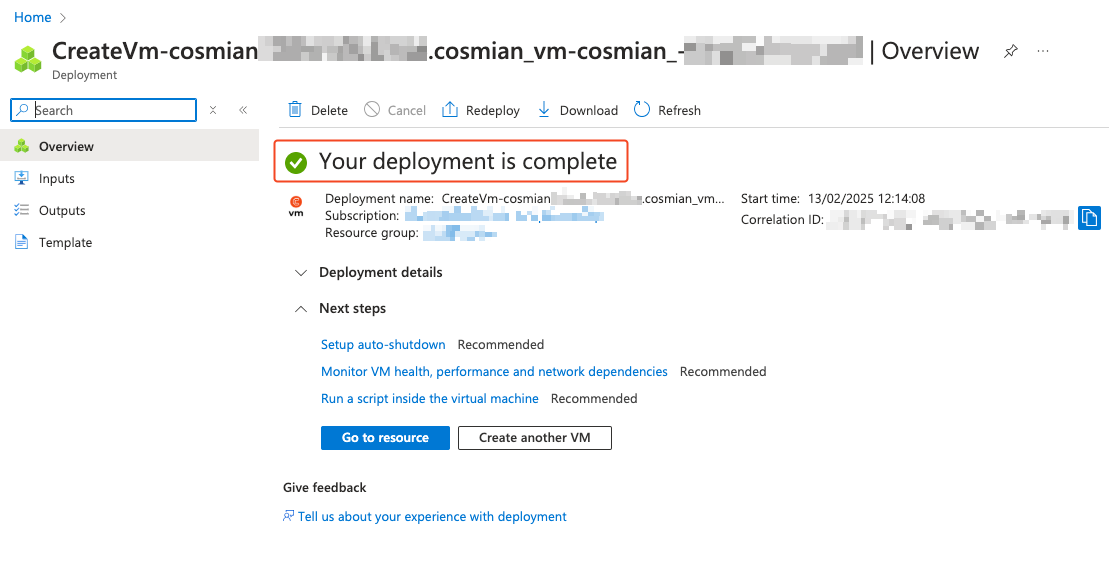
AWS instantiation
Step by step guide

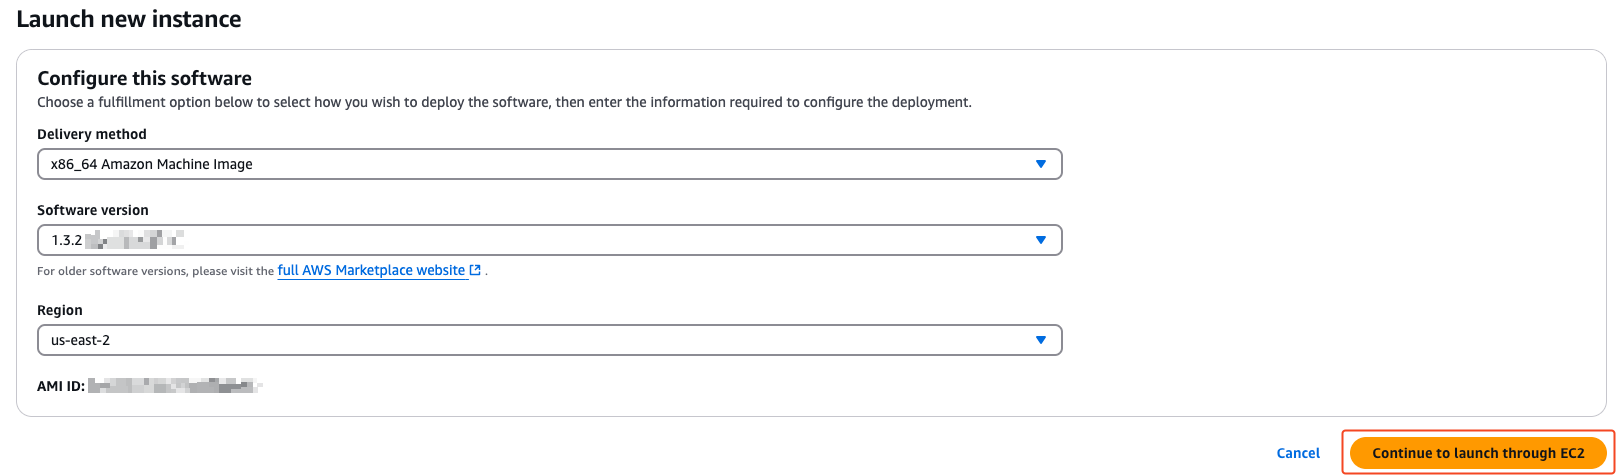
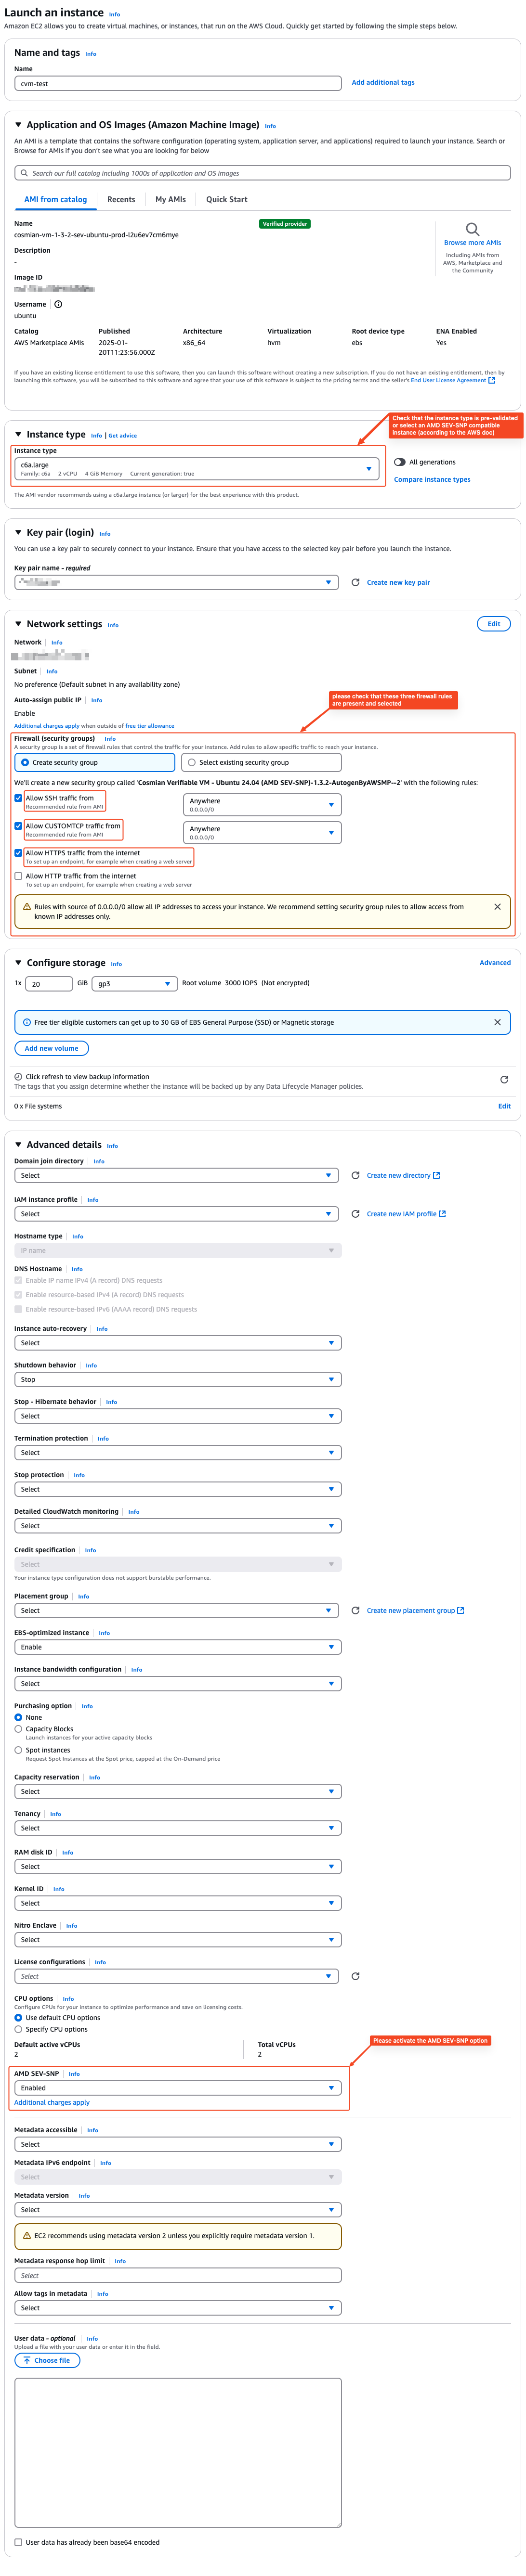
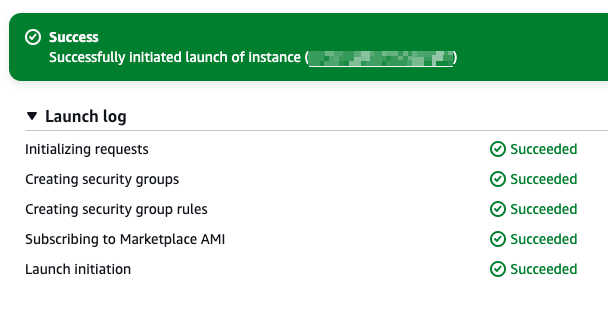
GCP instantiation
Step by step guide
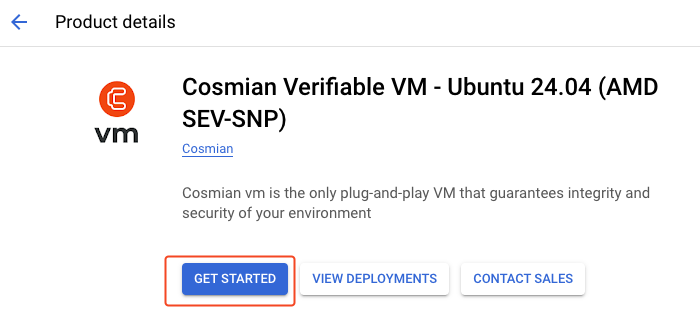
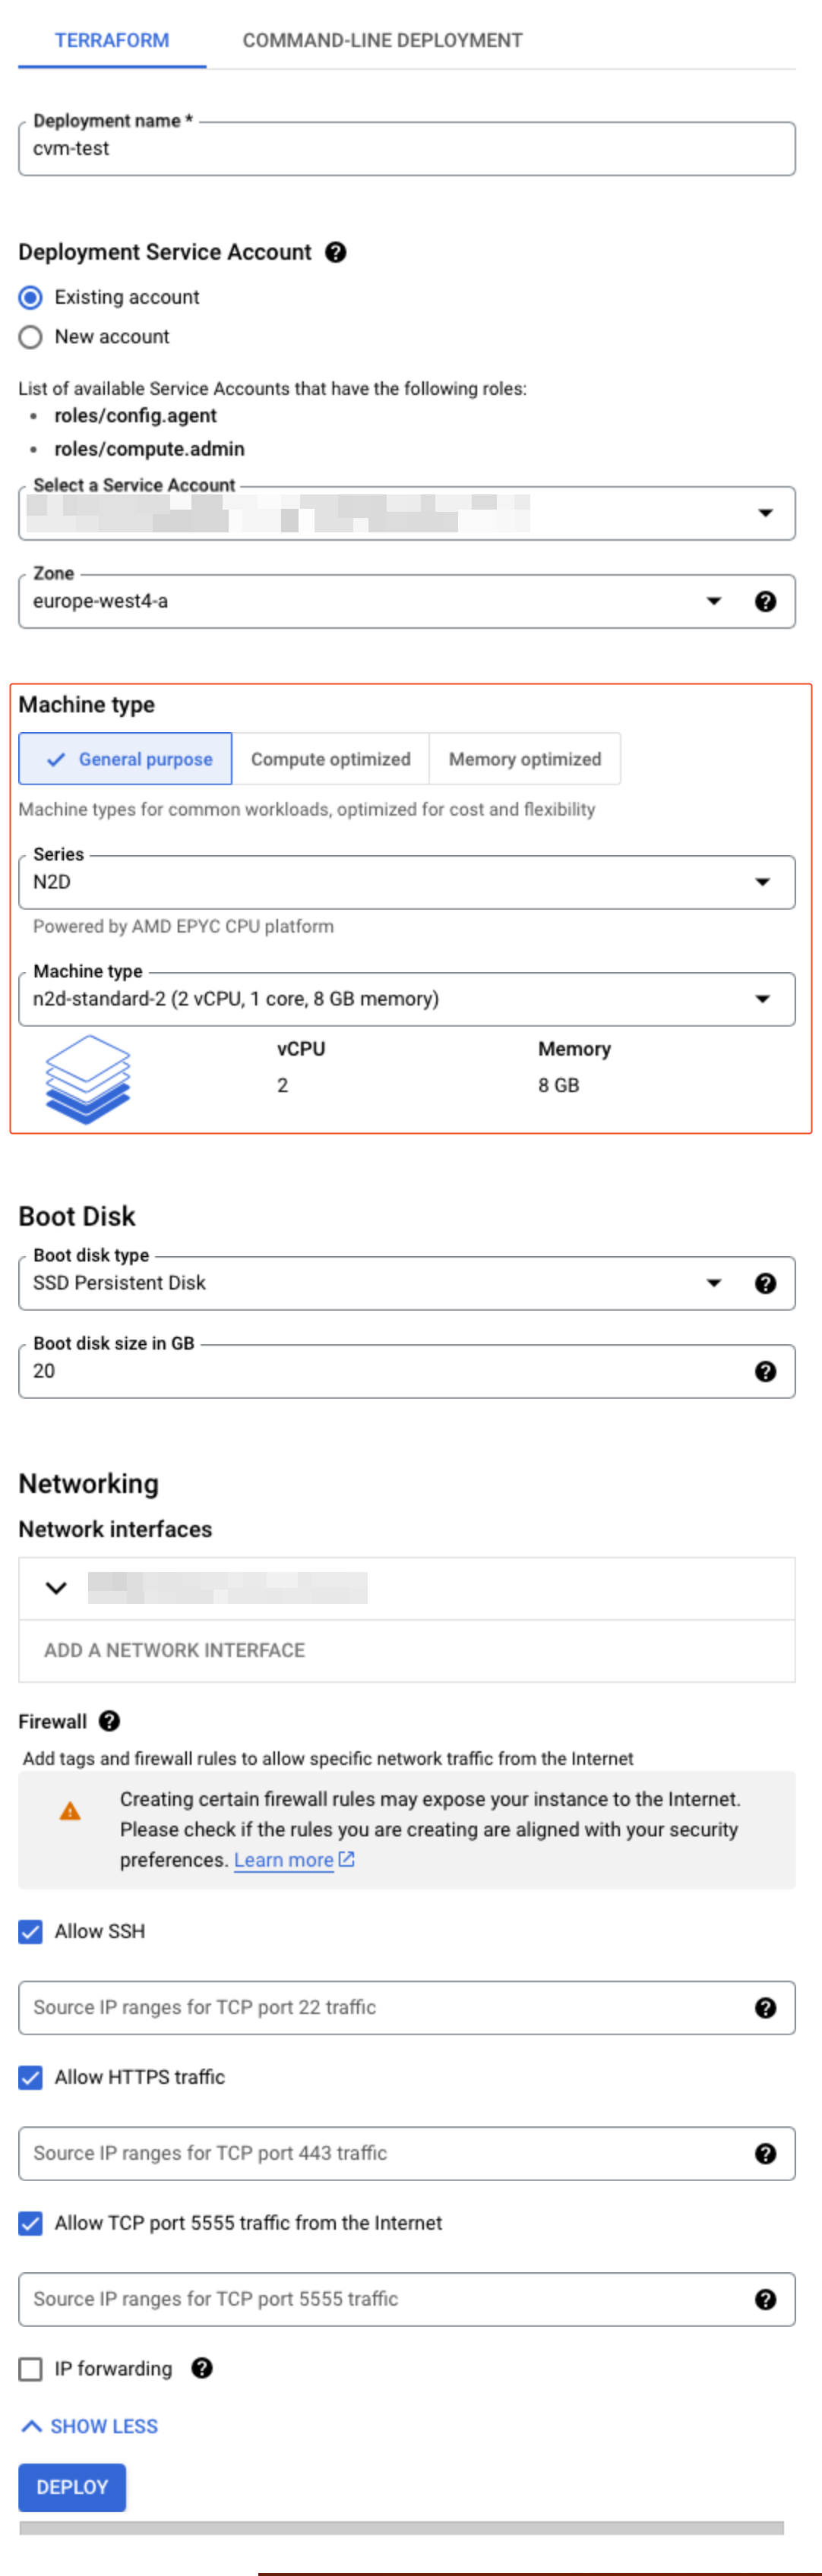
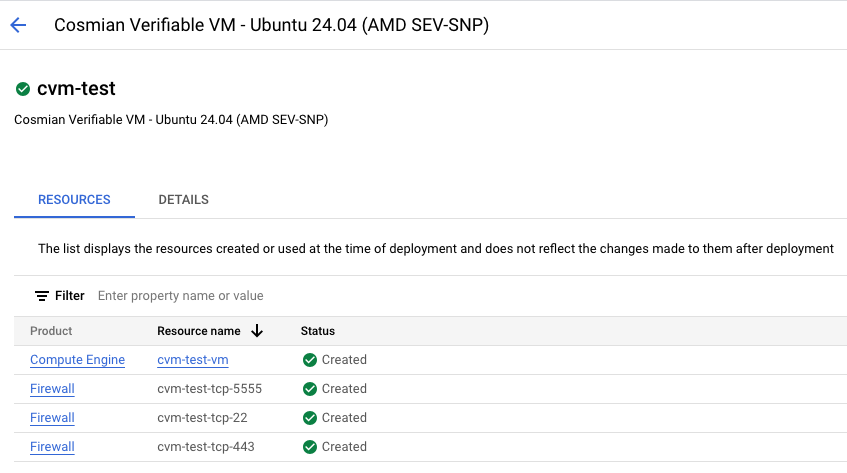
Eviden AI
Eviden AI aims to perform query over an AI runner (summary, translation, query, RAG) in a secured workflow.
Deploy Eviden VM AI
Follow the instructions from the deployment guide.
Hardware optimization
When running on Intel Xeon processors, the application can leverage AMX (Advanced Matrix Extensions) to significantly enhance performance, especially for matrix-intensive operations commonly found in machine learning workloads. To enable this feature, simply start the application with the "use_amx" key to true from your config file.
{
"use_amx": true, // Optional - default set to false
}
HuggingFace authentication
To use certain Hugging Face models—such as the one required by the Translation endpoint—you must provide a Hugging Face access token. This token should be configured in the application's configuration file.
{
"hf_token": "hf_token", // Mandatory (used for translation models)
}
Usage
Eviden AI Runner exposes endpoints which can be fetched:
Summarize text
Summary is made using "facebook/bart-large-cnn" model.
- Endpoint:
/summarize - Method: POST
- Description: get the summary of a given text, using the configured model
- Request:
- Headers: 'Content-Type: multipart/form-data'
- Body:
doc- text to summarize, using model configured on summary config section
- Response:
{
"summary": "summarized text..."
}
- Example:
curl 'http://0.0.0.0:5000/summarize' \
--form 'doc="Il était une fois, dans un royaume couvert de vert émeraude et voilé dans les secrets murmurants des arbres anciens, vivait une princesse nommée Elara.."'
Translate text
Translation is made using one of the "Helsinki-NLP/opus-mt" models.
-
Endpoint:
/translate -
Method: POST
-
Description: get the translation of a given text, using model configured on translation config section
-
Request:
- Headers: 'Content-Type: multipart/form-data'
- Body:
doc- text to translatesrc_lang- source languagetgt_lang- targeted language
-
Response:
{ "translation": "translated text..." } -
Example:
curl 'http://0.0.0.0:5000/translate' \ --form 'doc="Il était une fois, dans un royaume couvert de vert émeraude et voilé dans les secrets murmurants des arbres anciens, vivait une princesse nommée Elara.."' --form 'src_lang=fr' --form 'tgt_lang=en'
Predict using text as context
-
Endpoint:
/context_predict -
Method: POST
-
Description: get prediction from a model using current text as a context
-
Request:
- Headers: 'Content-Type: multipart/form-data'
- Body:
context- text to use as context for predictionquery- query to answer
-
Example:
curl 'http://0.0.0.0:5000/context_predict' \ --form 'query="Who is Elara?"' --form 'context="Elara is a girl living in a forest..."' -
Response: The response contains the answer to the query, from given context.
{ "result": ["Elara is the sovereign of the mystical forests of Eldoria"] }
Predict using RAG
-
Endpoint:
/rag_predict -
Method: POST
-
Description: get prediction from a model using RAG and configured documentary basis
-
Request:
- Headers: 'Content-Type: multipart/form-data'
- Body:
db- documentary basis to use for predictionquery- query to answer
-
Example:
curl 'http://0.0.0.0:5000/rag_predict' \ --form 'query="Who is Esmeralda?"' --form 'db="literature"' -
Response: The response contains the answer to the query, from given context.
{ "result": ["a street dancer"] }
You can list available documentary basis and their uploaded references from current configuration using:
-
Endpoint:
/documentary_bases -
Method: GET
-
Example:
curl 'http://0.0.0.0:5000/documentary_bases' -
Response:
{ "documentary_bases": { "literature": [ "NDame de Paris" ], "science": [] } }
Manage references
You can add an .epub document, .docx document or a PDF to the vector DB of the given RAG associated to a database, using:
-
Endpoint:
/add_reference -
Method: POST
-
Request:
- File sent on multipart
- Body:
db- database to insert referencereference- reference to insert
-
Example:
curl -F "file=@/data/doc.pdf" --form 'db="literature"' --form 'reference="crypto"' http://0.0.0.0:5000/add_reference -
Response:
File successfully processed
So far, only epub, pdf and docx files can be handled.
You can remove a reference to the vector DB of the given RAG associated to a database, using:
-
Endpoint:
/delete_reference -
Method: DELETE
-
Request:
- Body:
db- database to remove reference fromreference- reference to delete
- Body:
-
Example:
curl --form 'db="Literature"' --form 'reference="NDame de Paris"' http://0.0.0.0:5000/delete_reference -
Response:
Reference successfully removed
Authentication
If your AI Runner is configured to handle authentication, in order to make requests to Eviden VM AI, users must be authentificated using your Identity Provider application (setup previously for Client-Side encryption). It should be a Single Page or Web application type.
Deploy AI Runner
An Eviden VM with a pre-installed API to serve language models for summarization and translation tasks.
This instance can be deployed on virtual machines that supports AMD SEV-SNP or Intel TDX technologies.
Please first read the guide about how to setup an Eviden VM.
The following steps can help one to deploy its own instance on each available cloud provider.
Please first read the guide about how to setup an Eviden VM.
Deploy Eviden VM AI on a cloud provider
Go the Eviden marketplace webpage of the chosen cloud provider.
Select an OS and continue until the Eviden VM AI instance is spawned.
Here's the list of instance types by cloud provider
| Cloud provider | Azure | GCP | AWS |
|---|---|---|---|
| AMD | SNP | SNP | SNP |
| Standard_DCas_v5 | n2d-standard | M6a | |
| Standard_DCads_v5 | C6a | ||
| R6a | |||
| Intel | TDX | TDX | TDX |
| DCes_v5-series | c3-standard | Not available | |
| ECesv5-series | |||
| (preview) |
The Eviden VM AI Runner contains:
- a ready-to-go Nginx setup (listening on port
443and locally on port5001) - a AI Runner service which is ready but not started yet (needs a valid configuration to start)
- the Eviden VM software stack. As reminder, Eviden VM Agent is listening on port
5555.
At the first start of the VM, Eviden AI Runner is not configured by default. Indeed AI Runner configuration can potentially contain secrets that need to be protected. That is why the configuration MUST be sent remotely and securely to the VM using the Eviden VM CLI see app init.
Service
Systemd is used to initialize and run the AI runner and the Eviden VM agent.
See the running services with the following command:
systemctl status cosmian_ai_runner
systemctl status cosmian_vm_agent
You can read as well full logs using:
journalctl -u cosmian_ai_runner
journalctl -u cosmian_vm_agent
Configure the AI Runner
As explained previously, it is safe to provide secrets (such as passwords) in the configuration file because this file is going to be stored in the encrypted folder (LUKS) of the Eviden AI Runner.
{
"use_amx": false, // Optional - default set to false
"hf_token": "hf_token", // Mandatory (used for translation models)
}
Use Eviden VM CLI to send securely the new AI Runner configuration
Eviden VM CLI has to be installed on the client machine (Ubuntu, RHEL or via Docker). Please follow the installation instructions.
Deploy the configuration and starts the Eviden AI Runner
cosmian_vm --url https://${COSMIAN_VM_IP_ADDR}:5555 \
--allow-insecure-tls \
app init -c config.json
This command will send via an encrypted tunnel the configuration that will be written in the remotely path /var/lib/cosmian_vm/data/app.conf which is contained in an encrypted container (LUKS).
Hardware optimization
When running on Intel Xeon processors, the application can leverage AMX (Advanced Matrix Extensions) to significantly enhance performance, especially for matrix-intensive operations commonly found in machine learning workloads. To enable this feature, simply start the application with the "use_amx" key to true from your config file.
{
"use_amx": true, // Optional - default set to false
}
Check the connection with the AI Runner
curl --insecure https://${COSMIAN_VM_IP_ADDR}/health
When the agent starts (see Snapshot the VM) self-signed certificate is created to enable HTTPS out of the box.
These certificates must be replaced by trusted ones using tools like cosmian_certtool or Linux tools (certbot with Let's Encrypt for instance).
Snapshot the VM
Once the VM is configured as needed, Eviden VM Agent can do a snapshot of the VM containing fingerprint of the executables and metadata related to TEE and TPM.
The agent creates an encrypted folder (LUKS container) to store sensitive information, creates self-signed certificate for Nginx and starts a snapshot.
Wait for the agent to initialize the LUKS and generate the certificates. This is automatically at boot.
Verify the Eviden VM AI Runner integrity
Verifying trustworthiness of the Eviden VM AI Runner is exactly the same process as verifying the Eviden VM itself.
Note that when using Eviden VM AI Runner with RHEL distribution, Python files related to the AI runner are measured and checked during the verification. See SELinux in Eviden VM.
Eviden Enclave
Eviden Enclave allows to quickly deploy confidential Python web applications with the following security features:
- Code runs in a Trusted Execution Environment (TEE) and is encrypted with your key.
- Secure channel is established directly and uniquely with your code running inside the TEE.
- The integrity of the code loaded in TEE's memory is verifiable through a remote attestation process.
- Everyone interacting with your application can verify that your code runs in a TEE thanks to a Transport Layer Security (TLS) extension called Remote Attestation TLS (RA-TLS).
Use Cases
Two common use cases of Eviden Enclave are:
- Offer confidential AI/ML SaaS services to your customers while guaranteeing their data cannot be accessed by you or by the cloud provider.
- Deploy confidential code, models, and/or data in a Zero-Trust environment, where you have zero control over the infrastructure and its administration. For instance, an AI company deploying a fine-tuned model in a customer's infrastructure wants to keep the code and model secrets.
Security guarantees
Eviden Enclave protects data and metadata against system administrators with root access and the underlying cloud provider who owns the hardware infrastructure.
Then, privileged users or anyone with physical access to the host machine:
- Cannot alter the integrity of data and code in the protected area of the TEE.
- Cannot access your application's unique TLS server key generated inside the TEE or decrypt the TLS session.
- Cannot decrypt your encrypted code or access the secret key.
- Cannot access the persistent storage of your application tied to the TEE and the fingerprint of your application.
These assumptions remain valid as long as the TEE hardware, namely Intel SGX, and its software stack known as the Trusted Computing Base (TCB) are not subject to severe vulnerabilities.
Cloud provider availability
As of August 2024, Microsoft Azure, Alibaba Cloud and OVH Cloud offer Intel SGX processors with SGX2 capability. Microsoft Azure and Alibaba Cloud provide VM-based instances with the SGX driver loaded while OVH Cloud provides dedicated servers with Intel SGX processors.
Bare Metal requirements
Eviden Enclave requires Intel Xeon 4th or 5th-gen processors with SGX2. To find all the compatible Intel processors, see Intel Processors supporting Intel SGX.
Workflow
The following diagram illustrates the scenario with two roles:
- The SGX operator who is the administrator of the SGX machine and the one going to run the confidential code
- The code provider who writes the Python code and sends it encrypted to the SGX operator
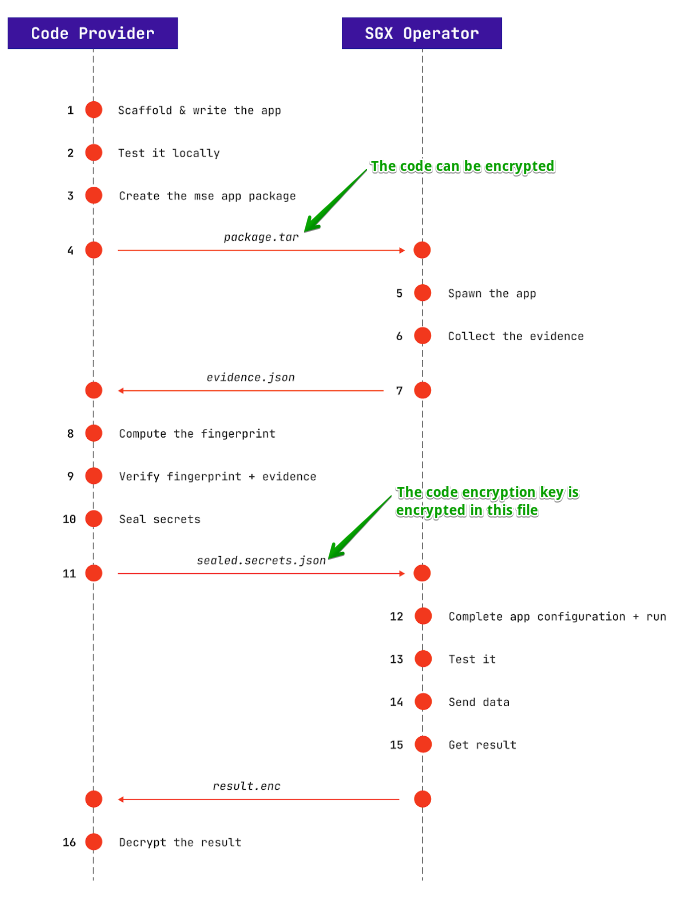
- The Python code must be an ASGI application using Python web framework such as Flask or FastAPI. It can be optionally encrypted with a random key using the Eviden Enclave CLI with
--encryptargument. - Since the code is encrypted under a key you only know, the code can be transmitted through any channel, even insecure.
- Using the CLI, The SGX Operator loads the encrypted code in a new Eviden Enclave. It outputs an
evidence.jsonfile, which should be returned to the code provider. - The code provider verifies the evidence file using the CLI. It ensures that the correct code is loaded in a fresh new Eviden Enclave and has not been tampered with. This process, called the remote attestation, also verifies if the TEE is genuine and will tell you if there are known vulnerabilities on the remote server's Trusted Computing Base. The file also contains a public key whose corresponding private key is only known to your Eviden Enclave and cannot be recovered by the SGX Operator.
- Using the unique enclave's public key tied to your code, the code provider encrypts a
secrets.jsonfile that contains the code decryption key and any other secrets specific to your application. - The enclave can now decrypt the code inside Intel SGX encrypted memory and run it.
The provider can send data to the application's endpoints over a secure RA-TLS channel directly with the enclave.
Security
Intel SGX and Gramine
Intel Software Guard eXtensions (SGX) offers hardware-based memory encryption that isolates specific application code and data in memory. Intel SGX allows user-level code to allocate private regions of memory, called enclaves, which are designed to be protected from processes running at higher privilege levels.
Because working with Intel SGX requires low-level C programming with the Intel SDK, we use Gramine, a lightweight guest OS designed to run a single Linux application with minimal host requirements and no modification. It is the foundation of Eviden Enclave which allows us to expose a Python confidential web application in the cloud.
Code encryption
Before sending the Python code of your Eviden Enclave, each file is encrypted with XSalsa20-Poly1305 using a random symmetric key. The symmetric key is provisioned when you are confident that your code is running in the enclave by checking the remote attestation.
Remote attestation
A very important aspect of Intel SGX (and more generally Trusted Execution Environments) is attestation. This is a mechanism for a remote user to verify that the application runs on a real hardware in an up-to-date hardware and software with the expected initial state. In other words, remote attestation provides the assurance to the user that the remotely executing SGX enclave is trusted and that the correct code is executed.
To process the remote attestation, an SGX quote is required as a proof of trustworthiness. It's a structure which contains, among others, interesting fields for the end user:
MRENCLAVE, SHA-256 hash digest of the memory footprint during the execution of the codeMRSIGNER, SHA-256 hash digest of Eviden's enclave signer public key- Debug flag, which must not be set in production
- Intel's certification chain and signature to attest the quote
Verification of trustworthiness is done using intel-sgx-ra.
The SGX quote is embedded in the TLS certificate generated by all Eviden Enclave in a protocol called RA-TLS.
RA-TLS
To ease the transport of the quote without modifying TLS, the quote is directly embedded in a specific X509 extension of the TLS certificate.
In addition, a SHA-256 hash digest of the certificate public key is included in the REPORTDATA field of the quote to link the quote to the certificate (i.e. the certificate has been generated in the code corresponding to MRENCLAVE).
It allows to fetch the certificate before using the API provided by the application in Eviden Enclave and check first that it runs in an up-to-date SGX enclave with the correct code (by checking MRENCLAVE).
Then you can add the certificate as CA in your HTTPS client to be sure that you will always interact with the same microservice you checked.
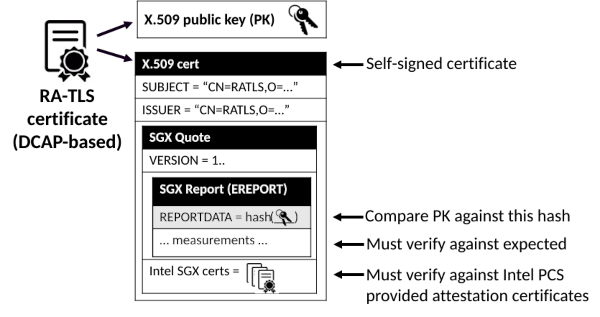
┌────────────────────────────────┐
│ Server │
│ │
│ ┌────────────────────────────┐ │
│ │ Intel SGX │ │
│ │ ┌────────────────────────┐ │ │
│ │ │ Code │ │ │
│ │ │ │ │ │
┌──────────┐ │ │ │ ┌────────────────────┐ │ │ │
│ │ RA-TLS Channel │ │ │ │ │ │ │ │
│ Client ├─────────────────────────┼─┼─┼─┤ TLS Private key │ │ │ │
│ │ │ │ │ │ │ │ │ │
└──────────┘ │ │ │ └────────────────────┘ │ │ │
│ │ │ ┌────────────────────┐ │ │ │
│ │ │ │ │ │ │ │
│ │ │ │ RA-TLS Certificate │ │ │ │
│ │ │ │ │ │ │ │
│ │ │ └────────────────────┘ │ │ │
│ │ └────────────────────────┘ │ │
│ └────────────────────────────┘ │
└────────────────────────────────┘
Direct encryption to your enclave
When you can't communicate on the RA-TLS channel (proxy or third party sending data to your enclave), it is still possible to encrypt the payload for your enclave in a programmatic way.
The REPORTDATA field of the SGX quote included in the RA-TLS certificated is 64 bytes field structured as follow:
SHA-256(certificate's public key) || Curve25519 enclave's public key
The purpose of the Curve25519 enclave's public key is to encrypt data for your enclave anonymously using NaCl seal boxes.
On the enclave's code side, it's then possible to decrypt using the private key only available inside the enclave in /key/enclave.key file.
We recommend to use our cryptographic library cenclave-lib-crypto which is already available in your Eviden Enclave but any library compatible with NaCl should work.
Server Installation
In order to launch and use SGX enclaves, you will need to install some Intel's software: Intel Platform SoftWare (PSW), Trusted RunTime System (TRTS), Untrusted RunTime System (URTS) and a compatible Linux kernel >= 6.0 which includes the Intel SGX driver and the support of EDMM. In addition, Eviden Enclave heavily uses the library OS Gramine for isolation but also to provide the best experience for Python developers with no need for third party libraries.
Host requirements
Recommended configuration:
- Ubuntu 22.04 or Ubuntu 24.04
- Linux Kernel >= 6.0
- Docker >= 27.0
Ansible deployment
A simple Ansible script for Microsoft Azure can be found in Eviden Enclave repository. Contact us for a more complex Ansible script for On Premise infrastructure.
Getting Started
To launch your first Eviden Enclave, follow this tutorial in your favorite terminal. Note that you first need to setup your Intel SGX machine based on the Server Installation section.
Install the Eviden Enclave CLI
The Eviden Enclave CLI requires at least Python 3.8 and OpenSSL 1.1.1 series. It is recommended to use pyenv to manage different Python interpreters if needed.
$ pip3 install cenclave
$ cenclave --help
usage: cenclave [-h] [--version]
{encrypt,decrypt,evidence,scaffold,list,logs,package,restart,run,status,seal,unseal,spawn,stop,test,localtest,verify}
...
Cosmian Enclave CLI - 1.0.0
options:
-h, --help show this help message and exit
--version version of cenclave CLI
commands:
{encrypt,decrypt,evidence,scaffold,list,logs,package,restart,run,status,seal,unseal,spawn,stop,test,localtest,verify}
encrypt encrypt a file using Fernet symmetric encryption
decrypt decrypt a file using Fernet symmetric encryption
evidence collect the evidences to verify on offline mode the application and the enclave
scaffold create a new boilerplate web application
list list the running containers
logs print container logs
package generate a package containing the container image and the code to run with
Cosmian Enclave
restart restart a web application
run finalise the configuration of the application docker and run the application
code
status print the container status
seal seal file using NaCl's Seal Box.Recipient is either raw X25519 public key or
extracted from RA-TLS certificate with enclave's public key in REPORT_DATA field
of SGX quote
unseal unseal file using NaCl's Seal Box
spawn spawn container with specified web app
stop stop and optionally remove a running container
test Test a deployed web app
localtest test locally a web app without SGX
verify verify the trustworthiness of a running Cosmian Enclave web application and get
the RA-TLS certificate
Before deploying the app, verify that Docker service is up and your current user is part of docker group.
See Manage Docker as a non-root user.
Scaffold your app
$ cenclave scaffold example
$ tree -a example
example
├── Dockerfile
├── README.md
├── config.toml
├── secrets.json
├── secrets_to_seal.json
├── src
│ ├── .cenclaveignore
│ └── app.py
└── tests
├── conftest.py
└── test_app.py
3 directories, 9 files
The Dockerfile should be based on cenclave-image-base image and include all the dependencies required to run your application.
The file app.py is a basic Hello World Flask application.
Adapt by addind your own Python code in this boilerplate.
from http import HTTPStatus
from flask import Flask, Response
app = Flask(__name__)
@app.get("/health")
def health_check():
"""Health check of the application."""
return Response(response="OK", status=HTTPStatus.OK)
@app.route('/')
def hello():
"""Get a simple example."""
return "Hello world"
# other endpoints
# ...
The configuration to run your application is done in a TOML file config.toml which will be used by the CLI:
name = "example"
python_application = "app:app"
healthcheck_endpoint = "/health"
tests_cmd = "pytest"
tests_requirements = [
"intel-sgx-ra",
"pytest",
]
The project tree also contains a test directory to test your application locally and remotely. It might help to debug and detect runtime errors before running your code in an Eviden Enclave.
See Eviden Enclave examples for proof-of-concept of confidential web applications.
Test your app, your docker and your configuration
$ cenclave localtest --code example/src/ \
--dockerfile example/Dockerfile \
--config example/config.toml \
--test example/tests/
or more concisely with default arguments:
cenclave localtest --project example
Testing your code before sending it to the SGX operator is recommended. Note that any error will require to restart the deployment flow from scratch.
Create the application package with the code and the docker image
This command generates a tarball named package_<app_name>_<timestamp>.tar which can be send to to the SGX operator:
$ cenclave package --code example/src/ \
--dockerfile example/Dockerfile \
--config example/config.toml \
--test example/tests/ \
--output code_provider/
or more concisely with default arguments:
$ cenclave package --project example \
--output code_provider/
Add --encrypt argument if you want to encrypt your code.
Spawn the application docker image
The spawn command will run a new Eviden enclave with your code loaded but it will stay in an intermediate state called the configuration server.
Configuration server is waiting additional information such as the decryption key of the code or any other secrets needed by your application.
$ cenclave spawn --host 0.0.0.0 \
--port 9999 \
--size 4096 \
--package code_provider/package_<app_name>_<timestamp>.tar \
--output sgx_operator/ \
--san <EXTERNAL_IP_ADDR | DOMAIN_NAME | localhost>
app_name
host: usually 127.0.0.1 or 0.0.0.0port: port used by your applicationsize: memory size (in MB) of the enclave to spawn (must be a power of 2 greater than 1024)package: the application package containing the Docker images and the codeoutput: directory to write the evidence JSON filesan: Subject Alternative Name to use for routing with SSL pass-through (either domain name, external IP address or localhost)
The output file sgx_operator/evidence.json contains cryptographic proofs related to the enclave and be shared with anyone to interact with your enclave.
It will be used by the code provider to verify the running app.
Collect the evidences to verify the application
cenclave evidence --output sgx_operator/ app_name
This command collects cryptographic proofs related to the enclave and serialize them in a JSON file evidence.json.
You can choose another PCCS by specifying the --pccs parameter, by default it will determine the PCCS URL by parsing the aesmd service configuration
file: /etc/sgx_default_qcnl.conf.
The file sgx_operator/evidence.json can be shared to any user of your application to allow them to do the remote attestation of your service.
Check the trustworthiness of the application
The trustworthiness is established by using 2 inputs:
- the full code package (tarball file)
- evidences captured from the running enclave (JSON file)
$ cenclave verify --package code_provider/package_<app_name>_<timestamp>.tar \
--evidence sgx_operator/evidence.json \
--output /tmp
If the verification succeeds, the RA-TLS certificate is written as a file named ratls.pem, and you can now seal the
code's secret key to share it with the SGX operator.
Seal your secrets for your Eviden Enclave
Using the unique enclave's public key tied to your code, it's possible to seal secrets which can only be decrypted by a specific Eviden Enclave.
The output of seal command is an encrypted file which can be sent to the SGX operator to start your application.
$ cenclave seal --input example/secrets_to_seal.json \
--receiver-enclave /tmp/ratls.pem \
--output code_provider/secrets_to_seal.json.seal
Finalize the configuration and run the application
$ cenclave run --sealed-secrets code_provider/secrets_to_seal.json.seal \
--secrets example/secrets.json \
app_name
If the command is successful, your application now running normally using a RA-TLS certificate.
Test the deployed application
$ cenclave test --test sgx_operator/tests/ \
--config sgx_operator/config.toml \
app_name
This command helps to check that the application is executed properly as the code provider expects.
Example of encryption on the application side
If your are using the example from cenclave scaffold command, there are endpoints to show how to encrypt the body of an HTTP response with a key provided with sealed secrets at the start of your application.
The JSON file secrets_to_seal.json has been sent sealed to the enclave.
The JSON value corresponding to JSON key result_sk inserted in secrets_to_seal.json will be used to encrypt the response.
Remember that seal secrets can only be decrypted by the specific Eviden Enclave used as receiver.
First collect the encrypted result:
curl --cacert /tmp/ratls.pem https://<IP_ADDR>:9999/result/sealed_secrets > result.enc
and decrypt the result with key.bin which contains the raw bytes of result_sk key (not encoded in Base64 such as in secrets_to_seal.json):
$ cenclave decrypt --input result.enc
--key key.bin \
--output code_provider/result.plain
$ cat code_provider/result.plain
message using result_sk from SEALED_SECRETS
The decrypt command only supports Fernet algorithm.
This is a toy example and we advise to use proper encryption methods such as AES256-GCM or XChacha20-Poly1305.
Develop
One of the advantages of using Eviden Enclave to protect your application and data in the cloud, is that if you have already developed a Python web application then it does not need to be modified.
Just write a configuration TOML file and run the deploy subcommand.
In the following sections, we give good practices and some security considerations you need to know before deploying your application in production.
Using a third-party service with secrets
Before sending the Python code of your microservice, each file is encrypted except: requirements.txt.
This code is supposed to be sharable to any user, as your convenience, in order to check the trustworthiness of your app. As a matter of fact, do not write any secret into your code. For example: passwords or keys to connect to a third-party service like a remote storage or a database.
If you need such secrets to run your code, write them in a secrets.json file. Please see the example below.
This file will be sent to the enclave after the latter has been verified during the app deployment.
Note that this file is not encrypted and can be read by the SGX operator.
Your application will then be able to read it to retrieve the secrets it needs.
Example of a secrets.json file:
{
"login": "username",
"password": "azerty"
}
Which is used by this application code example:
import os
import json
from pathlib import Path
from flask import Flask
app = Flask(__name__)
@app.route('/whoami')
def whoami():
"""A simple example manipulating secrets."""
secrets = json.loads(Path(os.getenv("SECRETS_PATH")).read_text())
return secrets["login"]
If your application requires some secrets to be hidden from the SGX operator, write those secrets in another file, for example secrets_to_seal.json.
Then you can seal this secrets_to_seal.json file with the cenclave seal command.
This command encrypts the secrets.json file using the trusted RA-TLS certificate.
This certificate embeds the public key of the enclave, ensuring that only the enclave is able to decrypt the sealed secrets.json file.
Specific filepath available in Eviden Enclave
Find below a small example to show how to use paths in your Eviden Enclave:
import os
from http import HTTPStatus
from pathlib import Path
from datetime import datetime
from flask import Flask, Response
app = Flask(__name__)
# define a global variable from env variables
WORKFILE: Path = Path(os.getenv("HOME")) / "date.txt"
@app.post('/')
def write_date():
"""A simple example of file writing."""
# transparently encrypt the file which can't be read on the host
WORKFILE.write_text(str(datetime.now()))
return Response(status=HTTPStatus.OK)
@app.route('/')
def read_date():
"""A simple example of file reading."""
if not WORKFILE.exists():
return Response(response="You should write before read",
status=HTTPStatus.NOT_FOUND)
# transparently decrypt the file with a key specific to your Eviden Enclave
txt = WORKFILE.read_text()
WORKFILE.unlink()
return txt
Your application owns a dedicated storage up to 10GB. The following directories are all encrypted on the host and can only be decrypted by your Eviden Enclave:
| Env | Path | Encrypted (1) | Persistent (2) | Comments |
|---|---|---|---|---|
$HOME | /root | ✔️ | ✖️ | home directory to save anything such as cache or configuration files |
$SECRETS_PATH | $HOME/.cache/cenclave/secrets.json | ✔️ | ✖️ | application secrets file for infrastructure credentials (database, or network access, then known by the SGX operator) |
$SEALED_SECRETS_PATH | $HOME/.cache/cenclave/sealed_secrets.json | ✔️ | ✖️ | application secrets sealed for your specific enclave (content only readable in your enclave) |
$TMP_PATH | /tmp | ✔️ | ✖️ | temporary folder for your application (only readable in your enclave) |
$MODULE_PATH | /app | ✔️ | ✖️ | folder with the decrypted application code (only readable in your enclave) |
Note that writing operations in $HOME are about 2.5 times slower than in a $TMP_PATH.
However the max file size you can allocate in $TMP_PATH is hardware_memory / 4 and the number of files has no limit as long as the sum of
their size is lower than the size still available.
Choose wisely the file location based on your own application constraints.
(1) Only the enclave containing this version of your code can decrypt this directory. Another enclave or even another version of your application won't be able to read it
(2) The content will be removed when the application is stopped
.cenclaveignore file
You can edit .cenclaveignore file in your code directory.
This file is read by the CLI when deploying an app and avoid packaging some files if not needed.
The syntax is the same as .gitignore.
A default .cenclaveignore is generated by the cenclave scaffold command.
Memory size
When you declare the memory size through the field hardware in config.toml, note that a part of this memory is used by the system itself.
All the libraries needed to run your application will be loaded in the enclave memory.
Therefore, the effective memory size available for your application is approximately: hardware_memory - libraries_size.
When running the Docker container locally, you can use the option --memory to estimate the memory size of your application.
See GitHub repository cenclave-image-base for more details.
Limitations
Please find below limitations that you need to consider to be able to run smoothly your application in Eviden Enclave:
- Fork are not allowed for performance issues to avoid bad user experience, creating new enclaves is slow.
- Some application are using a lot of memory and when working with enclaves the memory is limited and must be used with care. Consider using a comfortable amount of EPC memory and RAM regarding your application.
List
List running Eviden Enclave's applications:
cenclave list
Logs
Application stdout/stderr logs:
cenclave logs [-f] <app_name>
Restart
Restart your application if needed:
cenclave restart <app_name>
Status
Status of a specific application:
cenclave status <app_name>
The status can be in the following states:
initializing: the configuration server or the application server is startingwaiting secret keys: waiting for the secret key to decrypt the code and/or secrets for your applicationrunning: the web app is currently runningon_error: the application has stopped with an error, seecenclave logsto inspect the error
Stop
Stop a running application as follow:
cenclave stop [--remove] <app_name>
If you stop an app without the parameter --remove, you can restart it later by recovering the last app state.
However you can't spawn a new app on the same port and with the same name if you don't remove it.
Findex server
Findex is a high-performance, open-source, server application written in Rust that provides a REST API to index and search encrypted data.
What is Findex?
Findex is a cryptographic protocol designed to make search queries on an untrusted cloud server securely. Findex is concurrent and database-independent, allowing large database indexes to be outsourced securely without compromising usability.

Findex aims to solve the following problem:
Findex has been published as a scientific paper in the IACR ePrint archive: https://eprint.iacr.org/2024/1541.
What is Findex server?
Findex server is a high-performance, open-source server application written in Rust that implements the Findex protocol and offers a REST API to store encrypted indexes and perform search queries on them. Findex Server mainly is an authentication layer and therefore all data-critical manipulations are performed by a database.
The server is designed to be used in conjunction with the Eviden CLI, a command-line interface that allows users to interact with the server.
Threat Model
The threat model for Findex assumes that the cloud server is untrusted and may attempt to infer information from the encrypted indexes and search queries. However, the server is considered honest-but-curious, meaning it will follow the protocol correctly but will try to learn as much as possible from the data it processes. Findex is designed to protect against such adversaries by ensuring that no useful information about the plaintext data and the minimum of information is leaked during search queries.
Basically, the server does not know how are encrypted the indexes nor the datasets they contain. It can only perform search queries on the encrypted indexes and return the results to the client.
Quick Start
For server side: Findex server.
For client side: Eviden CLI.
Findex server
Client-Side Encryption
Client-side encryption is a crucial aspect of the Findex protocol, ensuring that data remains secure even when stored on an untrusted server. In this model, all encryption and decryption operations are performed on the client side, meaning that the server only ever sees encrypted data and cannot infer any useful information from it.
architecture-beta
service user(disk)[Client side encryption]
group untrusted(cloud)[Cloud]
service server(server)[Findex Server] in untrusted
service db(database)[Database] in untrusted
service kms(server)[KMS] in untrusted
service db2(database)[Keys] in untrusted
user:R -- L:server
server:R <--> L:db
user:R -- L:kms
kms:R <--> L:db2
How It Works
-
Data Encryption: Before sending any data to the Findex server, the client encrypts the data using a secure encryption algorithm. This ensures that the plaintext data is never exposed to the server.
-
Index Encryption: Similarly, the indexes used for search queries are also encrypted on the client side. This prevents the server from learning anything about the content of the indexes.
-
Search Queries: When performing a search query, the client encrypts the search keyword and sends the encrypted query to the server. The server processes the query on the encrypted indexes and returns the encrypted results to the client.
-
Data Decryption: Upon receiving the encrypted results from the server, the client decrypts the data to obtain the plaintext results.
Benefits
- Data Privacy: Since the server only handles encrypted data, it cannot access the plaintext information, ensuring data privacy.
- Security: Client-side encryption protects against potential data breaches on the server, as the encrypted data would be useless to an attacker without the decryption keys.
- Control: Users retain full control over their encryption keys and can manage their own security policies.
- Database Independence: Findex server is designed to work with any database, as the encryption and decryption operations are performed independently of the underlying storage mechanism. It relies on state-of-the-art solutions like Redis and can therefore provide a strong data-persistence insurance. An identified issue in the existing SSE literature is that all schemes rely on ad-hoc server implementations, which increases the probability of bugs, crashes and data-loss. In comparison, Findex Server is "just" a glorified Redis, which is good.
By leveraging client-side encryption, Findex ensures that sensitive data remains secure and private, even when stored and processed on an untrusted server.
The Findex server, written in Rust and using the Actix-web framework, is a REST-API server used to store encrypted indexes and perform search queries on them. It is designed to be used in conjunction with the Eviden CLI, which is a command-line interface that allows users to interact with the server.
Features
The server offers a REST API with the following functionalities:
Quick start
Multiple options are available to run the Findex server, including using Docker, pre-built binaries, or building from source.
No authentication is configured for quick start. This is not recommended for production use.
The quickest way to get started with Findex server is to use the Docker image.
To run the server binary on http://localhost:6668 that stores its data
in a Redis server, run the following command:
docker compose -f docker-compose-quick-start.yml up
where docker-compose-quick-start.yml is the following:
services:
redis:
container_name: redis
image: redis:latest
ports:
- 6379:6379
findex-server:
container_name: findex-server
image: ghcr.io/cosmian/findex-server:latest
ports:
- 6668:6668
environment:
FINDEX_SERVER_DATABASE_TYPE: redis
FINDEX_SERVER_DATABASE_URL: redis://redis:6379
FINDEX_SERVER_CLEAR_DATABASE: true
Configuration
Please refer to the configuration documentation for more information on how to configure the Findex server.
Usage
Eviden Findex server
Usage: cosmian_findex_server [OPTIONS]
Options:
--database-type <DATABASE_TYPE>
The database type of the Findex server
- redis: Redis database. The Redis url must be provided [env: FINDEX_SERVER_DATABASE_TYPE=] [default: redis] [possible values: redis]
--database-url <DATABASE_URL>
The url of the database [env: FINDEX_SERVER_DATABASE_URL=] [default: redis://localhost:6379]
--clear-database
Clear the database on start.
WARNING: This will delete ALL the data in the database [env: FINDEX_SERVER_CLEAR_DATABASE=]
--port <PORT>
The Findex server port [env: FINDEX_SERVER_PORT=] [default: 6668]
--hostname <HOSTNAME>
The Findex server hostname [env: FINDEX_SERVER_HOSTNAME=] [default: 0.0.0.0]
--https-p12-file <HTTPS_P12_FILE>
The Findex server optional PKCS#12 Certificates and Key file. If provided, this will start the server in HTTPS mode [env: FINDEX_SERVER_HTTPS_P12_FILE=]
--https-p12-password <HTTPS_P12_PASSWORD>
The password to open the PKCS#12 Certificates and Key file [env: FINDEX_SERVER_HTTPS_P12_PASSWORD=]
--authority-cert-file <AUTHORITY_CERT_FILE>
The server optional authority X509 certificate in PEM format used to validate the client certificate presented for authentication. If provided, this will require clients to present a certificate signed by this authority for authentication. The server must run in TLS mode for this to be used [env: FINDEX_SERVER_AUTHORITY_CERT_FILE=]
--jwt-issuer-uri <JWT_ISSUER_URI>...
The issuer URI of the JWT token [env: FINDEX_SERVER_JWT_ISSUER_URI=]
--jwks-uri <JWKS_URI>...
The JWKS (Json Web Key Set) URI of the JWT token [env: FINDEX_SERVER_JWKS_URI=]
--jwt-audience <JWT_AUDIENCE>...
The audience of the JWT token [env: FINDEX_SERVER_JST_AUDIENCE=]
--default-username <DEFAULT_USERNAME>
The default username to use when no authentication method is provided [env: FINDEX_SERVER_DEFAULT_USERNAME=] [default: admin]
--force-default-username
When an authentication method is provided, perform the authentication but always use the default username instead of the one provided by the authentication method [env: FINDEX_SERVER_FORCE_DEFAULT_USERNAME=]
-h, --help
Print help (see more with '--help')
-V, --version
Print version
Configuration file
By default, the server expects to find:
- a TOML configuration file in
/etc/cosmian/findex_server.toml. - or an environment variable
COSMIAN_FINDEX_SERVER_CONFthat contains the path to the configuration file. - otherwise, the server will parse the arguments passed in command line.
Example without authentication
default_username = "admin"
force_default_username = false
[db]
database_type = "Redis"
database_url = "redis://localhost:6379"
clear_database = false
[http]
port = 6668
hostname = "0.0.0.0"
Example with X509 authentication
default_username = "admin"
force_default_username = false
[db]
database_type = "Redis"
database_url = "redis://localhost:6379"
clear_database = true
[http]
port = 6660
hostname = "0.0.0.0"
https_p12_file = "/etc/cosmian/certificates/server/findex.server.acme.com.p12"
https_p12_password = "password"
authority_cert_file = "/etc/cosmian/certificates/server/ca.crt"
Example with OpenID authentication
default_username = "admin"
force_default_username = false
[db]
database_type = "Redis"
database_url = "redis://localhost:6379"
clear_database = false
[http]
port = 6668
hostname = "0.0.0.0"
[auth]
jwt_issuer_uri = "eyJhbGciOiJSUzI1NiIsInR5cCI...ydoDOsmYhWTEgf5w"
User Authentication
The application supports two methods of user authentication:
- Open ID Connect with JWT access tokens
- PKCS12 certificates with mutual authentication (client ↔ server)
OpenID with JWT Access Token
In that case, the Findex server delegates the authentication process to an external OAuth2 server. In fine, the server issues a JWT Access Token that is used to authenticate the user with the Findex server.
The Findex server must be run with the following arguments: For example with Google OAuth2:
docker run -p 6668:6668 --name findex-server ghcr.io/cosmian/findex-server:latest \
--jwt-issuer-uri=https://accounts.google.com \
--jwks-uri=https://www.googleapis.com/oauth2/v3/certs \
--jwt-audience=cosmian_findex_server
The authentication Flow can be summarized as follows:
-
Client Requests Authorization:
The client application initiates an authorization request. This is done via an OAuth 2.0 Authorization Code Flow. The client redirects the user to the Authorization Server (e.g., Google, GitHub, or a custom server) that has to be owned by the client.
-
User Authenticates:
The user authenticates with their credentials (e.g., username/password, social login). The Authorization Server verifies the user's identity.
-
Access Token Issuance (JWT)
The Authorization Server issues an Access Token in the form of a JWT. The token contains:
- Header: Token type (JWT) and signing algorithm (e.g., RS256).
- Payload (Claims): User information, permissions, expiration time (exp), issuer (iss), audience (aud), etc.
- Signature: Ensures the integrity and authenticity of the token.
-
Client Accesses Protected Resources
The client includes the JWT in the Authorization header of HTTP requests to the Resource Server:
Authorization: Bearer <JWT Access Token> -
Token Validation
The Resource Server validates the JWT by:
- Verifying the signature (using a public key if signed with RS256).
- Checking standard claims (e.g., exp, iss, aud) for validity.
- Decoding the payload to extract user information and permissions.
-
Access Granted or Denied
If the JWT is valid, the Resource Server allows access to the requested resources based on the user's claims. If invalid (e.g., expired, tampered), the request is denied with an HTTP 401 Unauthorized error.
sequenceDiagram actor User participant AuthServer as Authorization Server participant ResourceServer as Resource Server User->>AuthServer: Authorization Request AuthServer->>User: Redirect to Login User->>AuthServer: User Credentials AuthServer->>User: JWT Access Token User->>ResourceServer: Request with JWT ResourceServer->>ResourceServer: Validate JWT ResourceServer->>User: Access Granted/Denied
JWT is a compact, URL-safe means of representing claims to be transferred between two parties. The claims in a JWT are encoded as a JSON object that is used as the payload of a JSON Web Signature (JWS) structure or as the plaintext of a JSON Web Encryption (JWE) structure. This enables the claims to be digitally signed or integrity protected with a Message Authentication Code (MAC) and/or encrypted.
Eviden CLI Configuration
Eviden CLI is helpful to authenticate with the Findex server using OpenID Connect. The CLI has to be installed locally and configured with the Findex server URL and OAuth2 configuration.
The Eviden CLI realizes this authentication flow using this simple command:
cosmian findex-server login
By using this default configuration ~/.cosmian/cosmian.toml:
[kms_config]
print_json = false
[kms_config.http_config]
server_url = "http://127.0.0.1:9998"
[findex_config.http_config]
server_url = "https://<FINDEX-SERVER-URL>/"
[findex_config.http_config.oauth2_conf]
client_id = "99999999-abababababababababab.apps.googleusercontent.com"
client_secret = "XXX"
authorize_url = "https://accounts.google.com/o/oauth2/v2/auth"
token_url = "https://oauth2.googleapis.com/token"
scopes = ["openid", "email"]
X509 certificates authentication
In that case, the Findex server uses PKCS12 certificates to authenticate the user. The server requires the client to present a certificate signed by a trusted authority known by itself. The server also presents its own certificate to the client, which the client must verify.
The Findex server must be run with the following arguments: For example with Google OAuth2:
docker run -p 6668:6668 --name findex-server ghcr.io/cosmian/findex-server:latest \
--https-p12-file=server/certificate.p12 \
--https-p12-password=complex_password \
--authority-cert-file=server/ca.crt
User access authorization
Once authenticated, users must have an authorization to an Index ID.
What is an Index ID?
An Index ID allows the partitioning of indexed data: behind an Index ID, there are:
- encrypted indexes
- and the encrypted version of the data that has been indexed.
This Index ID can be shared between users, with a specific permission. Users can also own multiple Index IDs.
Invocation of any method exposed in the API is conditioned by the validation and compatibility of the claimed permissions.
Permissions
sequenceDiagram autonumber actor User participant F as Findex server User->>F: User authentication User->>F: User create an Index ID F->>User: Index ID with admin permission User->>F: User set/revoke permission to another user
There are 3 permissions:
readerwriteradmin
The mechanism is pretty simple:
When a user creates a new Index ID, he becomes the admin of this index. He can then set other index users the role of reader, writer or admin.
Every server endpoint is protected by this authorization mechanism: the server checks the user's role before allowing access to the endpoint.
Permission format in database
Currently, there is an entry for each user in database. In the case of a key-value database, the key is the user ID (its email) and the value is a list of tuples (permission, index_id) where permission is 1 byte and index_id is an UUID of 16 bytes.
Example
| Key | Value |
|---|---|
user@gmail.com | (0,d9eee59c-f9df-4edd-97bc-ba5952ce63af) | (1,5b044b87-bced-424c-9dac-f25550c88c20) |
Endpoints
| Endpoint | Description |
|---|---|
/create/index | Create an Index ID |
/permission/set/{user_id}/{permission}/{index_id} | Set a permission to a user for a specific index |
/permission/list/{user_id} | List permissions of a user |
/permission/revoke/{user_id}/{index_id} | Revoke a user's permission for a specific index |
Encrypted database
From the server's perspective, only encrypted data is received and stored as-is. The server does not know how the data is encrypted and cannot decrypt it.
The requirements database is a key-value store where the keys are unique identifiers (UIDs) and the values are the encrypted indexes or datasets.
In this scenario, the user is responsible for encrypting the data before sending it to the server. For example, a KEM/DEM encryption scheme can be used. KEM stands for Key Encapsulation Mechanism and DEM for Data Encapsulation Mechanism. A few words, the data is encrypted with a Data Encryption Key (DEK) and the DEK is encrypted with a Key Encryption Key (KEK) and sent along with the encrypted data.
User requires a Key Management System to encrypt the Data Encryption Key (DEK).
How to securely index new data?
An example of KEM-DEM encryption scheme is the crypto-system RFC-5649 + AES-256-GCM.
sequenceDiagram
autonumber
actor U as User
participant K as Key Management System
participant F as Findex server
U->>K: User requests a Key Encryption Key (KEK)
K->>U: Send an ID of the KEK
U->>U: Generate an ephemeral Data Encryption Key (DEK)
U->>K: Encrypt the DEK with the KEK (RFC5649)
K->>U: Send the encrypted DEK (encapsulation)
loop Read and encrypt locally the dataset
U-->U: Read line by line the dataset
U-->U: For each line, an unique identifier (UID) is generated
U-->U: Each line is encrypted with the DEK (AES-256-GCM)
end
U->>F: Send all encrypted lines (and encapsulation) and corresponding UIDs to a given Index ID
loop Index and encrypt locally the dataset
U->>U: Index plaintext line by keywords resulting encrypted indexes
end
U->>F: Send encrypted indexes
How to securely search indexed data?
sequenceDiagram
autonumber
actor U as User
participant F as Findex server
participant K as Key Management System
U->>F: User does a search query by keywords
F->>U: If data has been indexed with the given keywords, sends dataset UIDs
U->>F: User requests the values of the dataset UIDs
F->>U: Sends the encrypted values of the dataset UIDs
loop Read the encrypted values
U->>U: For each value, get the encrypted DEK (encapsulation)
U->>K: Decrypt the DEK with the KEK
K->>U: Send the decrypted DEK
U->>U: Decrypt each value with the DEK
end
Store and retrieve encrypted indexes as Findex requirements
The server presents the following endpoints:
| Endpoint | Description |
|---|---|
/indexes/{index_id}/batch_read | retrieve encrypted indexes |
/indexes/{index_id}/guarded_write | insert encrypted indexes |
And consequently, the Findex REST client implementation implements the client side of the communication with the server.
Furthermore, the encryption is done by the client before sending the data to the server.
Database structure
In a key-value database (like Redis), indexes are stored as follows:
| Key | Value |
|---|---|
| index_id || id | Findex encrypted index |
Concerning the format of encrypted indexes, please read the Findex github.
Store and retrieve the encrypted version of the data that has been indexed
Findex server stores as it is the encrypted version of the data that has been indexed. The server presents the following endpoints:
| Endpoint | Description |
|---|---|
/datasets/{index_id}/datasets_add_entries | insert new encrypted entries |
/datasets/{index_id}/datasets_del_entries | delete encrypted entries |
/datasets/{index_id}/datasets_get_entries | get encrypted entries |
The encryption is done by the client before sending the data to the server.
Database structure
In a key-value database (like Redis), dataset entries are stored as follows:
| Key | Value |
|---|---|
| dataset entry id | encrypted dataset entry |
Using the Eviden CLI
The Eviden CLI allows to interact both with the KMS server and Findex server. Then you can realize the following operations illustrated in encrypted database.
As prerequisites, you need to have:
- the Eviden CLI installed on your machine. You can download the latest version of the Eviden CLI from the Cosmian package website.
- a running KMS server: follow the instructions in the quick start guide.
- a running Findex server: follow the instructions in the quick start guide.
Depending on the authentication of these 2 servers, the configuration will have to be adapted. Refer to the configuration documentation for more information.
As a summary, below are described the steps:
- to encrypt and store a dataset while indexing it.
- to search a keyword and decrypt the corresponding result.
Encrypt and store a dataset while indexing it
The following steps allow to encrypt a data using a KEM-DEM crypto-system where:
- the Data Encryption Key (DEK) is encrypted with a KMS server (with RFC-5649 wrapping key standard) using a Key Encryption Key (KEK)
- the encrypted DEK is stored with the data encrypted using AES-256-GCM.
Generate the Key Encryption Key:
cosmian kms sym keys create
The symmetric key was successfully generated.
Unique identifier: 55629c83-5184-4e54-9839-9b686a6f2850
Generate the Seed Key that will be used to encrypt locally the indexes:
cosmian kms sym keys create
The symmetric key was successfully generated.
Unique identifier: fbf2a111-ae11-4231-9985-c0e3b140caeb
Then create a dedicated index id where all data will be stored:
cosmian findex-server permissions create
[admin] New admin permission successfully created on index: 13348510-75cd-436e-a9ff-60de66cac0d0
Then encrypt and index the following small dataset:
city,region,country,population
Southborough,MA,United States,9686
Northbridge,MA,United States,14061
Westborough,MA,United States,29313
Marlborough,MA,United States,38334
Springfield,MA,United States,152227
Springfield,MO,United States,150443
Springfield,NJ,United States,14976
Springfield,OH,United States,64325
Springfield,OR,United States,56032
Concord,NH,United States,42605
Using this command:
cosmian findex-server encrypt-and-index --seed-key-id fbf2a111-ae11-4231-9985-c0e3b140caeb --index-id 13348510-75cd-436e-a9ff-60de66cac0d0 --csv test_data/datasets/smallpop.csv --kek-id 55629c83-5184-4e54-9839-9b686a6f2850
Data behind those UUIDS were encrypted and indexed: UUID: 7059592d-9cd7-46d6-9e4d-b26436430942
UUID: d9eee59c-f9df-4edd-97bc-ba5952ce63af
UUID: 5b044b87-bced-424c-9dac-f25550c88c20
UUID: 863f39c5-bd6f-4685-97a2-07de8aa67c41
UUID: 90d05319-15c7-4c39-8176-85057c915b7b
UUID: dfe699ab-493d-49fc-b19c-9918376b2aa5
UUID: 61fcac44-0e91-470c-95f5-496f1b67389a
UUID: c6ab6f96-bba5-478b-be7f-2526e5b82e41
UUID: 3329fe2a-06c5-4904-aba7-4a9faf0e0876
UUID: f556fd71-7ef1-46ca-bf0f-30d92c055b44
Search a keyword
To search a keyword, find the corresponding UUIDs, get the values of these UUIDs and decrypt them (if any match is found), just proceed as follow:
cosmian findex-server search-and-decrypt --seed-key-id fbf2a111-ae11-4231-9985-c0e3b140caeb --index-id 13348510-75cd-436e-a9ff-60de66cac0d0 --kek-id 55629c83-5184-4e54-9839-9b686a6f2850 --keyword Southborough
Decrypted record: SouthboroughMAUnited States9686
Configuration
Please refer to the configuration documentation for more information on how to configure the Eviden CLI.
Authentication Verifier Documentation
The Authentication Verifier handles many authentication methods while providing a simple and consistent interface for API servers to validate client sessions.
Introduction
The Authentication Verifier's primary role is to provide login mechanisms that issue a session cookie, which external Auth API servers then use to validate each incoming request.
The server manages client authentication in isolated realms. The following authentication methods are currently implemented:
- Username and password (HTTP Basic Auth, Argon2id-hashed passwords)
- OAuth2, OpenID Connect: JWT bearer token (RS256 / ES256, JWKS-based)
- Client certificate (mTLS, EC P-256)
- Two-factor authentication using TOTP (RFC 6238)
- SAML 2.0 single sign-on — browser login at the realm's enterprise identity provider (optional
samlbuild feature) - AppRole — machine-to-machine credentials;
role_id+secret_idexchange for an opaque app token - Kubernetes service-account — Kubernetes SA JWTs for workloads running inside a cluster
- Token self-service — lookup, renew, and revoke app tokens (all machine auth methods)
The following methods are planned for future implementation:
- Authentication using OpenID4 Verifiable Proofs (Decentralized Identity)
- Passwordless authentication (WebAuthn, Hardware Tokens)
- Two-factor authentication using WebAuthn, Hardware Tokens, or OOB (SMS/Email)
Once a client is authenticated, the server issues a session cookie which is returned to the client. This cookie is then used by the client to authenticate subsequent requests to an API server. The API server validates the session cookie with the Authentication Verifier to ensure the client is authenticated.
Note on Users vs Clients:
Adminrecords (super admins and realm admins) are simply authenticated clients that also hold aAdminrecord granting them server-administration privileges. Every admin must still log in through the normal/loginendpoint — there is no separate admin login path. AAdminrecord has no special meaning outside the Authentication Verifier's own administration APIs.
Authentication Flow
sequenceDiagram
participant Client
participant AuthServer
participant API
participant Service
Client->>AuthServer: 1. Authenticate (credentials)
AuthServer->>AuthServer: 2. Validate Credentials
AuthServer->>Client: 3. Session Cookie
Client->>API: 4. API Request + Session Cookie
API->>AuthServer: 5. Validate Session
AuthServer->>API: 6. Session Valid
API->>Service: 7. Call Service
Service->>API: 8. Service Response
API->>Client: 9. Response
Flow Description:
- Client authenticates with one of the supported methods (username/password, JWT bearer, or client certificate)
- Authentication server validates the provided credentials
- Upon successful validation, session cookie is issued to the client
- Client makes API request, including the session cookie
- API server validates the session with Authentication Verifier
- Authentication server confirms session is valid
- API server calls the requested service
- Service returns response to API server
- API server returns final response to client
Cross-Scheme Session Lookup and Forced Logout
Once a session has been validated on the Authentication Verifier, the API can use that session to query all active sessions belonging to the same client identity — regardless of which authentication scheme was used to create them. This enables scenarios such as enforcing a single active session, detecting concurrent logins from unexpected locations, or explicitly logging a client out from all other devices and methods.
The POST /sessions/realms/{realm}/clients endpoint accepts a list of AuthenticatedClientScheme entries — each combining a username with one of the supported authentication schemes (up, jwt, cc, f2, dc). It returns the matching session IDs across all those schemes. The API can then call DELETE /sessions with any subset of those IDs to selectively revoke them.
sequenceDiagram
autonumber
participant C as Client
participant API as Your API
participant EA as Authentication Verifier
participant SS as Session Store
C->>API: GET /api/resource<br/>Cookie: _ea_=<encrypted_jwt>
note over API: CookieAuthSameServer middleware<br/>validates cookie → ClientClaims{username, auth_scheme}
API->>EA: POST /sessions/realms/{realm}/clients<br/>[{username, auth_scheme: "up"},<br/> {username, auth_scheme: "cc"},<br/> {username, auth_scheme: "jwt"}]
note over EA: Query session store for all sessions<br/>matching any of the provided schemes
EA->>SS: get_sessions_for_clients(realm, schemes)
SS-->>EA: [session_id_A, session_id_B, session_id_C, …]
EA-->>API: {"session_ids": ["session_id_A", "session_id_B", …]}
note over API: API decides which sessions to keep<br/>(e.g. keep the current one, revoke all others)
API->>EA: DELETE /sessions<br/>{"session_ids": ["session_id_B", "session_id_C"]}
note over EA: Immediately invalidates the listed sessions
EA->>SS: delete_sessions([session_id_B, session_id_C])
SS-->>EA: OK
EA-->>API: 200 OK
API-->>C: 200 OK {"data": …}
note over C: Other sessions (other devices / schemes)<br/>are now invalidated — those clients<br/>will receive 401 on their next request
Typical use cases:
- Single active session enforcement — after a successful login, revoke all other sessions for the same user to prevent concurrent access.
- Security event response — if anomalous activity is detected, revoke all sessions for a user across every authentication scheme in one call.
- Account takeover mitigation — when a password or certificate change is detected, force re-authentication everywhere by revoking all existing sessions.
Application Programming Interfaces (APIs)
The Authentication Verifier exposes a RESTful API.
The API is separated into 3 sections:
- the realm management API, open to super admins,
- the admin management API, open to realm admins,
- and the authentication API, open to all clients.
Administrator clients authenticate against the special _ realm. The API endpoint to authenticate is /login?realm={realm}.
Terminology
| Term | Definition |
|---|---|
| Client | Any entity that authenticates against /login and receives a session cookie: a human via browser, the Auth CLI, a machine/service account, etc. Represented in the code as AuthenticatedClient / ClientClaims. |
| Admin | An Admin database record representing an administrator account. Every Admin has a realms list that determines what it may administer. An Admin is always either a super admin or a realm admin — there are no non-admin Admin records. |
| Super Admin | An Admin whose realms list contains "_" (the ADMIN_REALM). Can administer every realm and every other Admin record. |
| Realm Admin | An Admin whose realms list contains one or more specific realm IDs (but not "_"). Can only administer the explicitly listed realms and the Admin records that belong exclusively to those realms. |
| UserPass | A credential record in the userpass table that stores an Argon2id-hashed password for a given username and realm. Referenced by Admin.userpass (a foreign key by username). |
| Realm | An isolated authentication domain with its own encryption key, session settings, and allowed authentication methods. The _ realm is the administrative realm. |
| Session | A server-side record created on successful login, identified by a session_id and encrypted into the _ea_ cookie. Scoped to the realm the client logged into. |
Documentation Index
| Document | Description |
|---|---|
| Installation | Deploy the Authentication Verifier as a service: obtain the binary, TLS certificates, configuration file, first-admin bootstrap, running (foreground / systemd), and verification. |
| Getting Started | First-run walkthrough: bootstrap, creating your first realm and user, verifying the setup. |
| Server Configuration | Complete reference for the auth_verifier.toml configuration file: TLS, database backends, session store, proxy, stale-session cleanup, and JWT signing keys. |
| Authentication Flows | Sequence diagrams for every authentication method: username/password, JWT bearer, mTLS, TOTP, AppRole, Kubernetes service-account, and token self-service. Includes session lifecycle, endpoint reference tables, and a request-authentication decision flowchart. |
| API Reference | Full HTTP endpoint reference: every route, request/response body schemas, status codes, and authentication requirements. |
| Client Library | How to use the auth_client crate in an API server: session validation, realm management, admin and credential management, TOTP management. |
| Session Management | Session lifecycle, validation strategies (cookie decryption, session endpoint, direct store query), session actions, stale-session cleanup. |
| Two-Factor Authentication | TOTP implementation: module architecture, data model, enrollment flow (POST /realms/{realm}/totp/generate + POST /realms/{realm}/totp/verify), login-flow integration (TotpRequired step), disable endpoint (DELETE /realms/{realm}/totp/{username}), per-realm configuration (algorithm and time step), code path walkthrough, and security considerations. |
| SAML 2.0 Single Sign-On | Enterprise single sign-on through the realm's SAML identity provider: build and SP signing key prerequisites, realm settings, IdP onboarding (SP metadata), the login flow, identity mapping, the security checks applied to every response, certificate rotation and troubleshooting. |
| Authorization and Administration | The two-tier super admin / realm admin model, the exclusive-ownership rule, endpoint authorization matrix, how to bootstrap the first admin, how to create realm admins, and known caveats. |
| AppRole, Kubernetes & Token Authentication | AppRole and Kubernetes service-account authentication, token self-service, database schema, and integration with the Cosmian KMS SPIRE crypto engines. |
Installation
This guide covers deploying the Authentication Verifier as a running service: obtaining the binary, provisioning TLS certificates, writing a configuration file, bootstrapping the initial administrator, and running and verifying the server.
Once the server is up, follow Getting Started for the
first-run walkthrough (creating your first realm and client credential), and see
Server Configuration for the full auth_verifier.toml
reference.
1. Prerequisites
| Requirement | Notes |
|---|---|
| Rust toolchain | The version pinned in rust-toolchain.toml (currently 1.94.1). Only needed to build from source. |
| OpenSSL / LibreSSL | Any modern version — used to generate TLS certificates. |
| Database (optional) | Defaults to SQLite (a local file). PostgreSQL, MySQL, or Redis (session store only) are supported for production. |
2. Obtain the Binary
The Authentication Verifier is distributed as source. Build the release binary from the workspace root:
cargo build --release --bin auth_verifier
The binary is produced at target/release/auth_verifier. Copy it to a stable
location, for example:
sudo install -m 0755 target/release/auth_verifier /usr/local/bin/auth_verifier
3. Provide TLS Certificates
The server requires TLS — all three PEM files (server_private_key,
server_certificate, server_ca_chain) must be present at startup.
Key requirement: the certificate key must be EC P-256 (
prime256v1). The same EC key is reused to sign session JWTs (the JWKS the API servers validate against); the JWKS builder requires P-256. If you use a P-384/P-521 TLS key, provide a dedicated P-256 key pair under[session_jwt_params](see Server Configuration).
For a development/test deployment, generate a self-signed EC P-256 chain:
# Root CA
openssl genpkey -algorithm EC -pkeyopt ec_paramgen_curve:prime256v1 -out ca.key.pem
openssl req -new -x509 -days 3650 -key ca.key.pem -out ca.cert.pem \
-subj "/CN=Auth CA" \
-addext "basicConstraints=CA:TRUE" \
-addext "keyUsage=digitalSignature,cRLSign,keyCertSign"
# Server certificate — SANs MUST cover every hostname/IP clients use to reach it
openssl genpkey -algorithm EC -pkeyopt ec_paramgen_curve:prime256v1 -out server.key.pem
openssl req -new -key server.key.pem -out server.csr \
-subj "/CN=auth.example.com" \
-addext "subjectAltName=DNS:auth.example.com,DNS:localhost,IP:127.0.0.1"
openssl x509 -req -sha256 -in server.csr -CA ca.cert.pem -CAkey ca.key.pem \
-CAcreateserial -out server.cert.pem -days 365 \
-extfile <(echo "subjectAltName=DNS:auth.example.com,DNS:localhost,IP:127.0.0.1")
For production, use certificates issued by a trusted CA or your internal PKI.
Make sure the certificate SANs include the exact host any client — including a
Cosmian KMS configured with vault_auth_verifier_url — uses to connect.
4. Write the Configuration File
Create auth_verifier.toml. A minimal production-oriented configuration:
host_name = "0.0.0.0"
host_port = 8443
[tls_params]
server_private_key = "/etc/cosmian/auth-verifier/certs/server.key.pem"
server_certificate = "/etc/cosmian/auth-verifier/certs/server.cert.pem"
server_ca_chain = "/etc/cosmian/auth-verifier/certs/ca.cert.pem"
# Use a PERSISTENT database. AppRole role_ids/secret_ids and sessions are stored
# here and MUST survive restarts — never use "sqlite::memory:" outside tests.
[database_params]
backend = "sqlite"
connection_url = "sqlite:///var/lib/cosmian/auth_verifier.db"
auto_init_schema = true
See Server Configuration for every option (PostgreSQL/ MySQL backends, a dedicated Redis session store, forward proxy, stale-session cleanup, and dedicated JWT signing keys).
5. Bootstrap the First Administrator
On its first startup — when the admin realm (_) has no administrator yet —
the server automatically creates a super-admin account:
| Field | Value |
|---|---|
| Realm | _ (the admin realm) |
| Username | admin |
| Initial password | change_me |
change_password | true — the password must be changed on first login |
Security: the initial credentials are well-known. Log in immediately after the first start and change the password (the
change_passwordflag forces a reset on first login). Restrict network access to the admin API (/login,/admins/*,/auth/approle/*, …) to trusted operators.
6. Run the Server
The binary takes the configuration file path as its first argument (defaulting to
./auth_verifier.toml):
auth_verifier /etc/cosmian/auth-verifier/auth_verifier.toml
Log verbosity is controlled by the RUST_LOG environment variable (it is not
a configuration-file field):
RUST_LOG="info,auth_verifier=debug" \
auth_verifier /etc/cosmian/auth-verifier/auth_verifier.toml
Run as a systemd service
Create /etc/systemd/system/auth-verifier.service:
[Unit]
Description=Cosmian auth-verifier
After=network-online.target
Wants=network-online.target
[Service]
Type=simple
ExecStart=/usr/local/bin/auth_verifier /etc/cosmian/auth-verifier/auth_verifier.toml
Environment=RUST_LOG=info,auth_verifier=info
Restart=on-failure
User=cosmian
Group=cosmian
# Harden: the process only needs its config, certs, and data directory.
StateDirectory=cosmian
WorkingDirectory=/var/lib/cosmian
[Install]
WantedBy=multi-user.target
Then enable and start it:
sudo systemctl daemon-reload
sudo systemctl enable --now auth-verifier
sudo systemctl status auth-verifier
The Authentication Verifier can also run as a container; mount the config, certificates, and a persistent volume for the database, and publish port
8443.
7. Verify
# Health/version endpoint (requires the CA cert for TLS verification)
curl --cacert ca.cert.pem https://auth.example.com:8443/public/version
# Admin login — returns HTTP 200, {"next_step": "...", "session_id": "..."}
# and sets the "_ea_" session cookie in cookies.txt
curl --cacert ca.cert.pem -c cookies.txt \
-X POST "https://auth.example.com:8443/login?realm=_" \
-u "admin:change_me"
Next steps
- Getting Started — first-run walkthrough: create your first
realm and client credential, verify with
curland theauth_clientcrate. - Server Configuration — full
auth_verifier.tomlreference. - AppRole, Kubernetes & Token Authentication — machine-to-machine auth used by the Cosmian KMS SPIRE integration.
- SPIRE / SPIFFE integration — to run the Authentication Verifier as the authentication backend behind a Cosmian KMS for SPIRE, see the KMS documentation's Integrations → SPIRE / SPIFFE page.
Getting Started
This guide walks through deploying the Authentication Verifier from scratch: compiling the binary, writing a configuration file, bootstrapping the first administrator, and verifying the setup using curl and the auth_client crate.
Prerequisites
| Requirement | Version |
|---|---|
| Rust toolchain | ≥ 1.91.0 (see rust-toolchain.toml) |
| OpenSSL / LibreSSL | Any modern version (for key generation) |
| PostgreSQL / MySQL / Redis | Optional — defaults to SQLite |
1. Build the Binary
From the workspace root:
cargo build --release --bin auth_verifier
The binary is placed at target/release/auth_verifier.
2. Generate TLS Certificates
The server requires a TLS certificate at startup. For a development setup, generate self-signed EC P-256 certificates:
# Generate CA key and self-signed CA certificate
openssl genpkey -algorithm EC -pkeyopt ec_paramgen_curve:prime256v1 -out ca.key.pem
openssl req -new -x509 -days 3650 -key ca.key.pem -out ca.cert.pem \
-subj "/CN=My Auth CA" \
-addext "basicConstraints=CA:TRUE" \
-addext "keyUsage=digitalSignature,cRLSign,keyCertSign"
# Generate server key
openssl genpkey -algorithm EC -pkeyopt ec_paramgen_curve:prime256v1 -out server.key.pem
# Generate server certificate signed by the CA
openssl req -new -key server.key.pem -out server.csr \
-subj "/CN=localhost" -addext "subjectAltName=IP:127.0.0.1,DNS:localhost"
openssl x509 -req -sha256 -in server.csr -CA ca.cert.pem -CAkey ca.key.pem \
-CAcreateserial -out server.cert.pem -days 365 \
-extfile <(echo "subjectAltName=IP:127.0.0.1,DNS:localhost")
For production, use certificates issued by a trusted CA or an internal PKI.
3. Write the Configuration File
Create auth_verifier.toml:
host_name = "0.0.0.0"
host_port = 8443
[tls_params]
server_private_key = "server.key.pem"
server_certificate = "server.cert.pem"
server_ca_chain = "ca.cert.pem"
[database_params]
backend = "sqlite"
connection_url = "sqlite://auth_verifier.db"
See server_configuration.md for the full configuration reference.
4. Bootstrap the First Super Admin
On the first startup, set these environment variables to create the initial super admin:
export APP_REALM_ADMIN_USERNAME="admin"
export APP_REALM_ADMIN_INITIAL_PASSWORD="change_me"
./target/release/auth_verifier auth_verifier.toml
The server hashes the password with Argon2id and stores it. Remove or unset these variables before any subsequent restarts — they are silently ignored if the admin already exists.
Security: Never commit
APP_REALM_ADMIN_INITIAL_PASSWORDto source control. Rotate the password immediately after bootstrapping.
5. Verify the Server Is Running
# Verify the server answers (requires the CA cert for TLS verification)
curl --cacert ca.cert.pem https://localhost:8443/public/version
# → "0.1.2"
6. Log In as Super Admin
curl --cacert ca.cert.pem \
-X POST "https://localhost:8443/login?realm=_" \
-u "admin:change_me" \
-c cookies.txt \
-v
A successful response returns HTTP 200 with:
{
"next_step": "Authenticated",
"session_id": "550e8400-e29b-41d4-a716-446655440000"
}
and sets the _ea_ session cookie (stored in cookies.txt).
7. Create Your First Realm
With the admin session cookie:
curl --cacert ca.cert.pem \
-X POST "https://localhost:8443/admins/realms" \
-b cookies.txt \
-H "Content-Type: application/json" \
-d '{
"id": "my-service",
"auth_params": {
"username_password_params": {
"allow_expired_passwords": false
}
},
"session_max_age_seconds": 3600,
"session_max_stale_age_seconds": 1800
}'
8. Create a Client Credential
# Create a username/password credential for "alice" in "my-service"
curl --cacert ca.cert.pem \
-X POST "https://localhost:8443/realms/my-service/userpass" \
-b cookies.txt \
-H "Content-Type: application/json" \
-d '{
"realm": "my-service",
"username": "alice",
"password": [115,101,99,114,101,116],
"change_password": false
}'
The
passwordfield is a JSON byte array of the UTF-8 encoded plaintext password. The server hashes it with Argon2id.
9. Authenticate as a Client
curl --cacert ca.cert.pem \
-X POST "https://localhost:8443/login?realm=my-service" \
-u "alice:secret" \
-c client_cookies.txt
# → {"next_step":"Authenticated","session_id":"…"}
10. Validate the Session from Your API Server
In your API server code, use the auth_client crate:
#![allow(unused)] fn main() { use auth_client::{AuthClient, AuthClientScheme}; let client = AuthClient::new( "https://localhost:8443", &std::fs::read_to_string("ca.cert.pem")?, AuthClientScheme::None, )?; // session_id is extracted from the incoming _ea_ cookie let session = client.get_session(session_id).await?; match session { None => { /* session not found or expired — return 401 */ } Some(s) => println!("Request from {} in realm {}", s.username, s.realm_id), } }
See client_library.md for the full API server integration guide.
Next Steps
| Goal | Document |
|---|---|
| Configure PostgreSQL / Redis backends | Server Configuration |
| Set up JWT / OAuth2 authentication | Authentication Flows |
| Set up mTLS client certificates | Authentication Flows |
| Enable TOTP two-factor authentication | Two-Factor Authentication |
| Set up AppRole / Kubernetes machine auth | AppRole, Kubernetes & Token Authentication |
| Understand session handling | Session Management |
| Set up realm admins | Authorization and Administration |
| Use the full client library | Client Library |
Server Configuration Reference
The Authentication Verifier is configured entirely through a TOML file. Start the server with:
# Default: reads ./auth_verifier.toml from the current working directory
auth_verifier
# Explicit path
auth_verifier /path/to/auth_verifier.toml
All file paths in the configuration are resolved relative to the current working directory at startup, unless they are absolute paths.
A fully commented sample configuration is provided in auth_verifier.toml at the root of the authentication_server crate directory.
Table of Contents
- Server Configuration Reference
- Table of Contents
- Network Binding
- TLS Configuration
- Session JWT Keys
- SAML Service Provider Key
- Primary Database
- Session Store
- Stale Session Collector
- Forward Proxy
- API Documentation (Swagger UI)
- Bootstrap Environment Variables
- Complete Example — Production (PostgreSQL + Redis)
- Complete Example — Development (SQLite in-memory)
- Realm Authentication Parameters
Network Binding
# The hostname or IP address the server binds to.
# Use "0.0.0.0" to listen on all interfaces,
# or an explicit IP to bind to a single interface.
host_name = "0.0.0.0" # REQUIRED
# The TCP port the server listens on. The server only serves TLS.
host_port = 8443 # REQUIRED
| Key | Type | Required | Default |
|---|---|---|---|
host_name | String | Yes | — |
host_port | u16 | Yes | — |
Development shortcut
# When set, every unauthenticated request is treated as if it came from
# this username. Enables testing without credentials.
# NEVER use in production.
default_username = "dev_user"
| Key | Type | Required | Default |
|---|---|---|---|
default_username | String | No | null |
TLS Configuration
The [tls_params] section is required. The server listens on TLS only.
[tls_params]
# Path to the server private key in PKCS#8 PEM format.
# Must be an EC (P-256 recommended) or RSA key.
server_private_key = "certificates/server.key.pem" # REQUIRED
# Path to the server TLS certificate (or certificate chain) in PEM format.
# When using an intermediate CA, concatenate the leaf and intermediate
# certificates in this file (leaf first).
server_certificate = "certificates/server.cert.pem" # REQUIRED
# Path to the CA certificate chain used by clients to verify this server.
# This is the trust anchor distributed to API servers and client tools.
server_ca_chain = "certificates/ca.cert.pem" # REQUIRED
# Optional: path to a separate CA chain for verifying *client* certificates
# in mTLS authentication flows. When omitted, server_ca_chain is used.
# client_ca_cert_chain = "certificates/client-ca.chain.pem"
# Optional: colon-separated list of cipher suites.
# When omitted, the TLS backend's default list is used.
# Recommended TLS 1.3 suite (ANSSI-compliant):
# tls_cipher_suites = "TLS_AES_256_GCM_SHA384:TLS_AES_128_GCM_SHA256:TLS_CHACHA20_POLY1305_SHA256"
| Key | Type | Required | Default |
|---|---|---|---|
server_private_key | String (path) | Yes | — |
server_certificate | String (path) | Yes | — |
server_ca_chain | String (path) | Yes | — |
client_ca_cert_chain | String (path) | No | Same as server_ca_chain |
tls_cipher_suites | String | No | TLS backend defaults |
Generating certificates
See getting_started.md for commands to generate self-signed development certificates.
For production, use certificates issued by a trusted CA (Let's Encrypt, an internal PKI, etc.).
Session JWT Keys
By default, the server reuses the TLS private key to sign session JWTs. You can specify a dedicated EC key pair to keep TLS and session-signing keys separate (recommended for production):
[session_jwt_params]
# Path to the EC private key PEM file used to sign session JWTs (ES256).
jwt_ec_private_key = "certificates/jwt.key.pem"
# Path to the corresponding EC public key PEM file used to verify session JWTs.
jwt_ec_public_key = "certificates/jwt.pub.pem"
| Key | Type | Required | Default |
|---|---|---|---|
jwt_ec_private_key | String (path) | Yes (if section present) | — |
jwt_ec_public_key | String (path) | Yes (if section present) | — |
Generate a dedicated JWT key pair:
openssl genpkey -algorithm EC -pkeyopt ec_paramgen_curve:prime256v1 -out jwt.key.pem
openssl ec -in jwt.key.pem -pubout -out jwt.pub.pem
SAML Service Provider Key
Required for SAML 2.0 single sign-on, and only accepted by servers built with the
saml feature (a server without it refuses to start when this section is present). One RSA
key signs the AuthnRequests of every SAML realm; its certificate is published in the SP
metadata that IdPs import. When the section is absent, the /saml routes don't exist and
realms can't enable SAML.
[saml_sp_params]
# Path to the RSA private key PEM file (at least 2048 bits).
saml_rsa_private_key = "/etc/cosmian/saml-sp.key.pem"
# Path to the X.509 certificate PEM file matching the key; self-signed is fine.
saml_certificate = "/etc/cosmian/saml-sp.cert.pem"
| Key | Type | Required | Default |
|---|---|---|---|
saml_rsa_private_key | String (path) | Yes (if section present) | — |
saml_certificate | String (path) | Yes (if section present) | — |
The server stops at startup if a file is unreadable, the key isn't RSA or is shorter than 2048 bits, or the certificate doesn't match the key. Generate a pair:
openssl req -x509 -newkey rsa:3072 -sha256 -days 1095 -nodes \
-subj "/CN=auth.example.com SAML SP" \
-keyout saml-sp.key.pem -out saml-sp.cert.pem
Primary Database
The [database_params] section configures the store for users, realms, and credentials.
When omitted, the server creates an SQLite file named auth_verifier.db in the working directory.
[database_params]
# Database backend: "sqlite" | "postgresql" | "mysql"
backend = "postgresql"
# Connection URL.
# SQLite: sqlite://relative/path.db
# sqlite:///absolute/path.db
# sqlite::memory: (in-memory; all data lost on restart)
# PostgreSQL: postgresql://user:password@host:5432/dbname
# postgresql://user:password@/run/postgresql/dbname (Unix socket)
# MySQL: mysql://user:password@host:3306/dbname
connection_url = "postgresql://auth:secret@db.example.com:5432/auth_auth"
# Maximum number of pooled connections (default: 10).
max_connections = 20
# Minimum number of idle connections kept in the pool (default: 0).
min_connections = 2
# Seconds before a connection attempt is aborted (default: 30).
connect_timeout_secs = 10
# Seconds before an idle connection is closed (default: 600).
idle_timeout_secs = 300
# When true (default), the database schema is created / migrated at startup.
# Set to false when migrations are managed externally (e.g., Flyway, Liquibase);
# SAML builds then also need the SAML tables (see the SAML guide).
auto_init_schema = true
| Key | Type | Required | Default |
|---|---|---|---|
backend | "sqlite" | "postgresql" | "mysql" | No | "sqlite" |
connection_url | String | No | "sqlite://auth_verifier.db" |
max_connections | u32 | No | 10 |
min_connections | u32 | No | 0 |
connect_timeout_secs | u64 | No | 30 |
idle_timeout_secs | u64 | No | 600 |
auto_init_schema | bool | No | true |
Redis
Redis is supported as a session store backend (see Session Store) but not as the primary database for users, realms, and credentials. The primary database must be SQLite, PostgreSQL, or MySQL.
Session Store
The session store holds active session tokens. By default it shares the primary database. For high-throughput deployments, use a dedicated Redis instance:
[sessions_store_params]
# Backend: "sqlite" | "postgresql" | "mysql" | "redis"
backend = "redis"
# Redis connection URL
connection_url = "redis://localhost:6379"
# Maximum connections in the pool (default: 10).
max_connections = 50
| Key | Type | Required | Default |
|---|---|---|---|
backend | "sqlite" | "postgresql" | "mysql" | "redis" | No | Same as database_params |
connection_url | String | No | Same as database_params |
max_connections | u32 | No | 10 |
min_connections | u32 | No | 0 |
connect_timeout_secs | u64 | No | 30 |
idle_timeout_secs | u64 | No | 600 |
auto_init_schema | bool | No | true |
Redis note: Redis cleans up expired sessions automatically via TTL. The stale-session collector is not needed when using Redis.
Stale Session Collector
A background task that periodically purges expired sessions from the session store. Only relevant for SQL-backed session stores; Redis handles expiry automatically via TTL.
[stale_session_collector_config]
# How often (in seconds) the cleanup task runs.
# Default: 60 seconds.
cleanup_interval_seconds = 300
| Key | Type | Required | Default |
|---|---|---|---|
cleanup_interval_seconds | u64 | No | 60 |
Forward Proxy
When the Authentication Verifier needs to fetch JWKs from an external Identity Provider through an HTTP proxy:
[proxy_params]
# Proxy URL — scheme, host, and port are required.
url = "http://proxy.corp.example.com:3128"
# Optional Basic-Auth credentials for the proxy.
basic_auth_username = "proxy_user"
# WARNING: plain-text passwords in config files are a security risk.
# Consider using environment variable substitution or a secrets manager.
basic_auth_password = "proxy_password"
# Optional: replace the entire Proxy-Authorization header with a custom value.
# custom_auth_header = "Bearer <token>"
# Hosts that bypass the proxy.
exclusion_list = ["localhost", "127.0.0.1", "10.0.0.0/8", "192.168.0.0/16"]
| Key | Type | Required | Default |
|---|---|---|---|
url | URL string | Yes (if section present) | — |
basic_auth_username | String | No | null |
basic_auth_password | String | No | null |
custom_auth_header | String | No | null |
exclusion_list | Vec<String> | No | [] |
API Documentation (Swagger UI)
Two unauthenticated public routes expose the API schema. Both are served under /public and require no credentials.
| Route | Description |
|---|---|
GET /public/swagger-ui | Interactive Swagger UI (assets loaded from unpkg CDN) |
GET /public/openapi.yaml | Raw OpenAPI 3.1 schema (YAML, embedded in the binary) |
# Open in browser
https://<host_name>:<host_port>/public/swagger-ui
# Download the schema
curl -k https://<host_name>:<host_port>/public/openapi.yaml
The YAML schema is embedded at compile time from server/documentation/openapi.yaml. Any change to that file takes effect after the next build.
Note: The Swagger UI page loads JavaScript and CSS from
unpkg.com. In air-gapped environments the page will load but the UI assets will be missing. Serve the raw YAML instead and use a local Swagger UI deployment or editor.swagger.io.
Bootstrap Environment Variables
These environment variables are read once on first startup to create the initial super admin. They are ignored if the admin already exists.
| Variable | Description |
|---|---|
APP_REALM_ADMIN_USERNAME | Username for the initial super admin |
APP_REALM_ADMIN_INITIAL_PASSWORD | Plaintext password (hashed with Argon2id at boot) |
export APP_REALM_ADMIN_USERNAME="admin"
export APP_REALM_ADMIN_INITIAL_PASSWORD="$(openssl rand -base64 32)"
./auth_verifier auth_verifier.toml
Security: Unset these variables after the first run. Never store them in the TOML file itself.
Complete Example — Production (PostgreSQL + Redis)
# auth_verifier.toml — production example
host_name = "0.0.0.0"
host_port = 8443
[tls_params]
server_private_key = "/etc/auth/tls/server.key.pem"
server_certificate = "/etc/auth/tls/server.cert.pem"
server_ca_chain = "/etc/auth/tls/ca.chain.pem"
client_ca_cert_chain = "/etc/auth/tls/client-ca.chain.pem"
tls_cipher_suites = "TLS_AES_256_GCM_SHA384:TLS_AES_128_GCM_SHA256"
[session_jwt_params]
jwt_ec_private_key = "/etc/auth/jwt/jwt.key.pem"
jwt_ec_public_key = "/etc/auth/jwt/jwt.pub.pem"
[database_params]
backend = "postgresql"
connection_url = "postgresql://auth_auth:s3cr3t@postgres:5432/auth_auth"
max_connections = 20
min_connections = 2
connect_timeout_secs = 10
idle_timeout_secs = 300
auto_init_schema = true
[sessions_store_params]
backend = "redis"
connection_url = "redis://redis:6379/0"
max_connections = 100
[stale_session_collector_config]
cleanup_interval_seconds = 600
[proxy_params]
url = "http://proxy.corp.example.com:3128"
exclusion_list = ["localhost", "127.0.0.1", "10.0.0.0/8"]
Complete Example — Development (SQLite in-memory)
# auth_verifier.toml — development example
host_name = "127.0.0.1"
host_port = 8443
default_username = "dev_admin"
[tls_params]
server_private_key = "src/tests/certificates/ec/auth.server.key.pem"
server_certificate = "src/tests/certificates/ec/auth.server.cert.pem"
server_ca_chain = "src/tests/certificates/ec/auth.ca.pem"
# In-memory SQLite — fast startup, all data lost on restart
[database_params]
backend = "sqlite"
connection_url = "sqlite::memory:"
Realm Authentication Parameters
Realm configuration is managed at runtime via the API, not through the TOML file. These parameters are stored in the database and modified through POST /admins/realms and PUT /admins/realms/{realm_id}.
For each realm you can configure:
{
"id": "my-service",
"auth_params": {
"username_password_params": {
"allow_expired_passwords": false
},
"jwt_params": {
"idp_params": [
{
"jwt_issuer_uri": "https://accounts.google.com",
"jwks_uri": "https://www.googleapis.com/oauth2/v3/certs",
"jwt_audience": "my-client-id.apps.googleusercontent.com"
}
],
"smallest_refresh_interval_seconds": 300
},
"totp_params": {
"algorithm": "SHA1",
"step": 30
}
},
"session_max_age_seconds": 3600,
"session_max_stale_age_seconds": 1800
}
| Field | Type | Description |
|---|---|---|
session_max_age_seconds | i64 | Maximum absolute session lifetime (seconds) |
session_max_stale_age_seconds | i64 | Maximum idle time before a session expires (seconds) |
auth_params.username_password_params | Object | Enable username/password auth |
auth_params.username_password_params.allow_expired_passwords | bool | Allow login with an expired password (forces ChangePassword next step) |
auth_params.jwt_params | Object | Enable JWT/OIDC authentication |
auth_params.jwt_params.idp_params | Array | One entry per trusted Identity Provider |
auth_params.jwt_params.idp_params[].jwt_issuer_uri | String | Expected iss claim value |
auth_params.jwt_params.idp_params[].jwks_uri | String | URL to fetch the JWKS from |
auth_params.jwt_params.idp_params[].jwt_audience | String | Expected aud claim value (optional) |
auth_params.jwt_params.smallest_refresh_interval_seconds | i64 | Minimum JWKS refresh interval (optional) |
auth_params.totp_params | Object | TOTP algorithm settings for per-realm config |
auth_params.totp_params.algorithm | "SHA1" | "SHA256" | "SHA512" | HMAC algorithm for TOTP codes |
auth_params.totp_params.step | u64 | Time step in seconds (default: 30) |
auth_params.saml_params | Object | Enable SAML 2.0 single sign-on; see SAML 2.0 single sign-on for its fields |
Authentication Flows
This document describes every authentication flow supported by the Authentication Verifier:
| # | Flow | Credential | Output |
|---|---|---|---|
| 1 | Username / Password | HTTP Basic / JSON body | _ea_ session cookie |
| 2 | Username / Password + TOTP | Credentials + TOTP code | _ea_ session cookie |
| 3 | JWT Bearer | Signed JWT | _ea_ session cookie |
| 4 | Client Certificate (mTLS) | TLS client certificate | _ea_ session cookie |
| 5 | AppRole | role_id + secret_id | X-Vault-Token app token |
| 6 | Kubernetes service-account | Kubernetes SA JWT | X-Vault-Token app token |
| 7 | Token self-service | Existing app token | Metadata / renewed token |
| 8 | SAML 2.0 single sign-on | Signed SAML assertion from the realm's IdP | _ea_ session cookie |
Flows 1–4 and 8 produce a session cookie (_ea_) used by human and administrator clients. Flows 5–6 produce an opaque app token (X-Vault-Token) for machine-to-machine workloads. Flow 7 is the self-service lifecycle for app tokens produced by flows 5 and 6.
Overview
The Authentication Verifier sits in front of your application. Every client must prove its identity to the Authentication Verifier before it can access any protected resource. Once authenticated, the server issues a session cookie (_ea_) that the client presents on subsequent API requests.
Client ──► Authentication Verifier ──► Session Cookie ──► Your API ──► Services
Terminology note: Throughout this documentation, client means any entity that authenticates against the
/loginendpoint — a human via browser, the Auth CLI, or a machine/service account. An Admin (capitalised) is a database record representing an administrator account (super admin or realm admin). See index.md for the full glossary.
All communication uses HTTPS (TLS). Session cookies carry a plain-text cookie_string that is the session identifier stored in the server-side session store.
Realms
Every authentication operation is scoped to a realm. A realm is an isolated authentication domain with its own:
- Session lifetime settings
- Authentication parameters (which methods are allowed, TOTP requirements, etc.)
The special _ realm (called ADMIN_REALM) is the administrative realm. All administrator clients authenticate through this realm.
Flow 1 — Username / Password (Cookie Session)
This is the most common flow for clients (human or automated) such as web browsers or the Auth CLI.
Happy-path sequence
sequenceDiagram
autonumber
participant U as Client / Browser
participant EA as Authentication Verifier
participant SS as Session Store
participant API as Your API
U->>EA: POST /login?realm={realm}<br/>{"username":"alice","password":"secret"}
note over EA: EnsureAuth middleware validates credentials<br/>against the userpass table (Argon2id)
EA->>SS: upsert_session(session_id, realm, claims, cookie_string)
SS-->>EA: OK
EA-->>U: 200 OK<br/>Set-Cookie: _ea_=<cookie_string><br/>{"session_id":"…", "next_step":"Authenticated"}
U->>API: GET /api/resource<br/>Cookie: _ea_=<cookie_string>
note over API: CookieAuthSameServer middleware<br/>1. Extracts cookie_string from _ea_ cookie<br/>2. Looks up session in store by cookie_string<br/>3. Returns SessionData claims to handler
API->>EA: (internal) find_admins_by_auth_scheme
EA-->>API: Admin{id, realms, …}
API-->>U: 200 OK {"data": …}
What the session cookie contains
The _ea_ cookie value is a plain-text cookie_string. All session state is kept server-side in the session store. The cookie_string is used as a lookup key to retrieve the full SessionData record:
| Field | Type | Description |
|---|---|---|
session_id | String | Unique session identifier (UUID) |
realm_id | String | Realm the session belongs to |
username | String | Authenticated client username |
auth_scheme | String | Authentication method used (userpass, jwt, cert) |
cookie_string | String | The opaque value stored in the _ea_ cookie |
max_age_seconds | i64 | Maximum absolute session lifetime |
max_stale_age_seconds | i64 | Maximum idle time before the session is considered stale |
created_at | i64 | Unix timestamp when the session was created |
Credential validation
Passwords are hashed with Argon2id using a per-user salt:
salt = SHA-256(lowercase(username)) → base64url
hash = Argon2id(password, salt, memory=19456, iterations=2, parallelism=1)
The hash is stored in the userpass table. On login, the server recomputes the hash and compares it in constant time.
Flow 2 — Username / Password with 2FA (TOTP)
When a client's account has TOTP enabled, the login sequence requires a second step.
Sequence with TOTP
sequenceDiagram
autonumber
participant U as Client / Browser
participant App as Authenticator App
participant EA as Authentication Verifier
participant SS as Session Store
U->>EA: POST /login?realm={realm}<br/>{"username":"alice","password":"secret"}
note over EA: Primary credentials valid
EA->>EA: is_totp_enabled(realm, alice) → true
EA-->>U: 200 OK<br/>{"next_step":"TotpRequired", "session_id":null}
U->>App: Read current TOTP code
App-->>U: "482913"
U->>EA: POST /login?realm={realm}<br/>{"username":"alice","password":"secret","totp_code":"482913"}
note over EA: TOTP token validated against stored secret
EA->>SS: upsert_session(…)
SS-->>EA: OK
EA-->>U: 200 OK<br/>Set-Cookie: _ea_=<cookie_string><br/>{"next_step":"Authenticated"}
Note: The
next_stepfield in the response tells the client what to do next:
"Authenticated"— login complete, cookie issued"TotpRequired"— provide a TOTP code to proceed
See two_factor_authentication.md for the full TOTP enrollment and management flows.
Flow 3 — JWT Bearer Token
Machine-to-machine scenarios (service accounts, CI pipelines, SDKs) use RS256 or ES256 JWT tokens instead of cookies.
JWT Bearer Token sequence
sequenceDiagram
autonumber
participant C as Client (Service)
participant IDP as External Identity Provider
participant EA as Authentication Verifier
participant API as Your API
participant SS as Session Store
C->>IDP: Request JWT (RS256/ES256)
note over IDP: Signs JWT with private key<br/>sub=client_id, aud=api_audience
IDP-->>C: Bearer eyJhbG…
C->>API: GET /api/resource<br/>Authorization: Bearer eyJhbG…
note over API: JwtAuth middleware
API->>EA: GET /.well-known/jwks.json (key discovery)
EA-->>API: JWKS (public keys)
note over API: Validates JWT signature + exp + aud
API->>SS: upsert_session(jwt_claims)
SS-->>API: session_id
API-->>C: 200 OK {"data": …}
Key discovery
The server exposes a JWKS endpoint at GET /.well-known/jwks.json which returns the RSA/EC public keys used to verify tokens. The JWT middleware caches this document and refreshes it on a configurable interval.
JWT requirements
| Claim | Required | Description |
|---|---|---|
sub | Yes | Subject (user or service identifier) |
aud | Yes | Must match the configured audience |
exp | Yes | Expiration time (Unix seconds) |
iss | Yes | Issuer URL matching JWKS discovery URL |
Flow 4 — Client Certificate (mTLS)
For high-assurance scenarios, clients authenticate using an EC P-256 client certificate over mutual TLS.
Client Certificate sequence
sequenceDiagram
autonumber
participant C as Client
participant EA as Authentication Verifier (TLS)
participant SS as Session Store
participant API as Your API
note over C,EA: TLS handshake — client presents certificate
C->>EA: POST /login?realm={realm} (+ client cert in TLS layer)
note over EA: extract_peer_certificate middleware<br/>extracts DN from certificate
EA->>EA: Validate certificate chain against CA
EA->>SS: upsert_session(cert_subject_claims)
SS-->>EA: OK
EA-->>C: 200 OK<br/>Set-Cookie: _ea_=<cookie_string>
C->>API: GET /api/resource<br/>Cookie: _ea_=<cookie_string>
API-->>C: 200 OK {"data": …}
Flow 5 — AppRole (Machine Credentials)
AppRole is the recommended flow for server-to-server and SPIRE workloads. An operator provisions a role out-of-band; the service uses its role_id + secret_id pair to obtain an opaque app token (X-Vault-Token).
AppRole sequence
sequenceDiagram
autonumber
participant O as Operator (Admin)
participant S as Service / SPIRE
participant EA as Authentication Verifier
participant DB as Database
O->>EA: POST /auth/approle/role/{name}<br/>Cookie: _ea_=<admin session><br/>{ token_ttl: 3600, bind_secret_id: true }
EA-->>O: 204 No Content
O->>EA: GET /auth/approle/role/{name}/role-id<br/>Cookie: _ea_=<admin session>
EA-->>O: { data: { role_id: "a5d7…" } }
O->>EA: POST /auth/approle/role/{name}/secret-id<br/>Cookie: _ea_=<admin session>
EA-->>O: { data: { secret_id: "b7c4…", secret_id_accessor: "9f8e…" } }
O->>S: Provision role_id + secret_id (out-of-band)
S->>EA: POST /auth/approle/login<br/>{ role_id: "a5d7…", secret_id: "b7c4…" }
note over EA: 1. Resolve role by role_id<br/>2. Verify SHA-256(secret_id) hash<br/>3. Decrement num_uses_remaining<br/>4. Issue token (SHA-256 hash stored)
EA->>DB: Insert app_tokens row (hash only)
DB-->>EA: OK
EA-->>S: { auth: { client_token: "hvs.…", renewable: true, lease_duration: 3600 } }
S->>EA: GET /auth/token/lookup-self<br/>X-Vault-Token: hvs.…
EA-->>S: { data: { id: "hvs.…", ttl: 3541, renewable: true, … } }
Each successful login consumes one use of the secret_id. With num_uses = 1 (the SPIRE default), the secret ID is permanently invalidated after the first login. Generate a new one before the service restarts.
For the full endpoint reference, field descriptions, and management operations, see app_auth_api.md.
Flow 6 — Kubernetes Service-Account
Kubernetes workloads authenticate by presenting their pod-mounted service-account JWT. No operator-provisioned secret is required — the JWT is the credential.
Kubernetes sequence
sequenceDiagram
autonumber
participant O as Operator (Admin)
participant P as Pod (workload)
participant K8s as Kubernetes API Server
participant EA as Authentication Verifier
O->>EA: POST /auth/kubernetes/role/{name}<br/>Cookie: _ea_=<admin session><br/>{ jwks_url, bound_sa_names, bound_sa_namespaces, token_ttl }
EA-->>O: 204 No Content
P->>K8s: Read projected token<br/>/var/run/secrets/kubernetes.io/serviceaccount/token
K8s-->>P: Service-account JWT (signed by Kubernetes)
P->>EA: POST /auth/kubernetes/login<br/>{ role: "my-k8s-role", jwt: "<SA JWT>" }
note over EA: 1. Fetch JWKS from role's jwks_url<br/>2. Select key by kid from JWT header<br/>3. Validate signature, exp, nbf<br/>4. Parse sub: system:serviceaccount:<ns>:<name><br/>5. Check sa_name against bound_sa_names<br/>6. Check namespace against bound_sa_namespaces
EA-->>P: { auth: { client_token: "hvs.…", lease_duration: 3600 } }
A JWKS endpoint outage blocks new Kubernetes logins for the duration of the outage. Existing tokens remain valid until their TTL expires.
For the full endpoint reference and field descriptions, see app_auth_api.md.
Flow 7 — Token Self-Service
All app tokens — regardless of which method produced them (AppRole or Kubernetes) — expose three self-service endpoints. These require a valid X-Vault-Token header.
Token self-service sequence
sequenceDiagram
autonumber
participant S as Service
participant EA as Authentication Verifier
note over S: Service holds a token from AppRole or Kubernetes login
S->>EA: GET /auth/token/lookup-self<br/>X-Vault-Token: hvs.…
EA-->>S: { data: { id: "hvs.…", entity_id: "spire-server",<br/> renewable: true, ttl: 3541, … } }
note over S: Token nearing expiry — renew it
S->>EA: POST /auth/token/renew-self<br/>X-Vault-Token: hvs.…
EA-->>S: { auth: { client_token: "hvs.…",<br/> lease_duration: 3600, renewable: true } }
note over S: Service is shutting down — revoke token
S->>EA: POST /auth/token/revoke-self<br/>X-Vault-Token: hvs.…
EA-->>S: 204 No Content
App token lifecycle
stateDiagram-v2
[*] --> Active : POST /auth/approle/login or<br/>POST /auth/kubernetes/login
Active --> Active : POST /auth/token/renew-self<br/>(resets TTL to lease_duration)
Active --> Expired : token_ttl elapsed
Active --> Revoked : POST /auth/token/revoke-self
Expired --> [*] : Rejected with 403 on next lookup-self
Revoked --> [*] : Rejected with 403 immediately
For the full endpoint reference, see app_auth_api.md.
Flow 8 — SAML 2.0 Single Sign-On
Browser users of a SAML realm sign in at the organisation's identity provider. The server is
the SAML Service Provider: it sends a signed AuthnRequest, validates the IdP's signed
response and issues the usual _ea_ session, with as_as set to "sa". Requires a server
built with the saml feature and a [saml_sp_params] signing key.
SAML sequence
sequenceDiagram
autonumber
participant B as Browser
participant EA as Authentication Verifier
participant IdP as Identity Provider
B->>EA: GET /saml/{realm}/login?return_to=https://app.example.com/…
EA-->>B: 302 to IdP (signed AuthnRequest)<br/>Set-Cookie: _ea_saml = request ID
B->>IdP: sign in
IdP-->>B: form posting the signed SAML response
B->>EA: POST /saml/{realm}/acs (SAMLResponse, RelayState)<br/>Cookie: _ea_saml
note over EA: browser binding, single-use request,<br/>signature, audience, recipient, time, replay
EA-->>B: 200 page continuing to return_to<br/>Set-Cookie: _ea_ session
Setup, identity mapping, the full list of checks and troubleshooting are in SAML 2.0 single sign-on.
Session Lifecycle
stateDiagram-v2
[*] --> Active : POST /login (credentials valid)
Active --> Active : Any authenticated request<br/>(resets stale timer)
Active --> Expired : session_max_age_seconds elapsed
Active --> Revoked : DELETE /sessions (explicit logout)
Expired --> [*] : Stale-session collector removes it
Revoked --> [*] : Immediately rejected by CookieAuthSameServer
Session parameters (per realm)
| Parameter | Default | Description |
|---|---|---|
session_max_age_seconds | 3600 | Maximum absolute lifetime of a session |
session_max_stale_age_seconds | 3600 | Maximum idle time before a session is considered stale |
Sessions are stored in the configured session backend (SQLite / PostgreSQL / MySQL / Redis).
Explicit logout
To invalidate a session:
DELETE /sessions
Content-Type: application/json
{"session_ids": ["<session_id>"]}
Administratively, a super admin can revoke all sessions for a realm:
DELETE /sessions/realms/{realm_id}
API Endpoint Reference
Human / session authentication endpoints
| Method | Path | Description | Auth required |
|---|---|---|---|
POST | /login?realm={realm} | Authenticate and issue a session cookie | No (credentials in body) |
GET | /whoami?realm={realm} | Return the current session's claims as a signed JWT | Session cookie |
GET | /public/version | Server version string | No |
GET | /.well-known/jwks.json | JSON Web Key Set for JWT verification | No |
SAML endpoints (browser, saml feature with [saml_sp_params])
| Method | Path | Description | Auth required |
|---|---|---|---|
GET | /saml/{realm}/login | Start a login: redirect to the realm's IdP | No |
POST | /saml/{realm}/acs | Assertion Consumer Service: validate the response, set _ea_ | _ea_saml cookie from login |
GET | /saml/{realm}/metadata | This server's SP metadata for the realm, for the IdP | No |
Machine authentication endpoints
These endpoints produce or manage app tokens (X-Vault-Token). See app_auth_api.md for full request/response detail.
AppRole — login
| Method | Path | Description | Auth required |
|---|---|---|---|
POST/PUT | /auth/approle/login | Exchange role_id + secret_id for an app token | No (credential is body) |
AppRole — role management (requires admin session cookie)
| Method | Path | Description |
|---|---|---|
POST | /auth/approle/role/{name} | Create or update a role |
GET | /auth/approle/role/{name}/role-id | Read the stable role_id |
POST | /auth/approle/role/{name}/secret-id | Generate a new secret_id |
POST | /auth/approle/role/{name}/secret-id/destroy | Invalidate a secret_id by accessor |
DELETE | /auth/approle/role/{name} | Delete a role |
GET | /auth/approle/role?list=true | List all role names |
Kubernetes — login
| Method | Path | Description | Auth required |
|---|---|---|---|
POST | /auth/kubernetes/login | Exchange a K8s service-account JWT for an app token | No (credential is body) |
Kubernetes — role management (requires admin session cookie)
| Method | Path | Description |
|---|---|---|
POST | /auth/kubernetes/role/{name} | Create or update a Kubernetes role |
DELETE | /auth/kubernetes/role/{name} | Delete a Kubernetes role |
Token self-service (requires X-Vault-Token header)
| Method | Path | Description |
|---|---|---|
GET | /auth/token/lookup-self | Validate token and return its metadata |
POST | /auth/token/renew-self | Extend a renewable token's TTL |
POST | /auth/token/revoke-self | Immediately invalidate the current token |
Session JWT — /whoami response
GET /whoami?realm={realm} returns a signed JWT (ClientClaims) whose payload is a
flat JSON object containing three groups of claims:
| Claim | Group | Description |
|---|---|---|
sub | Registered (RFC 7519 §4.1.2) | Username of the authenticated client |
exp | Registered | Expiry time (Unix seconds) |
iat | Registered | Issued-at time (Unix seconds) |
roles | Authorization (RFC 9068 §2.2.3.1) | RBAC roles assigned to the user — omitted when empty |
as_as | Private | Auth scheme: "up" / "jwt" / "cc" / "f2" / "dc" / "sa" |
as_rid | Private | Realm ID (also used as the OPA domain scope) |
as_pk | Private | Client public key PEM — only present for mTLS sessions |
The roles claim follows RFC 9068 §2.2.3.1
and RFC 7643 §4.1.2. It is
a flat Vec<String> of role names (e.g. ["CryptoOfficer"]). Absence means no
roles — downstream OPA policies should treat absence as fail-closed.
Roles are set per credential via the admin API. See the
Credential Management section of the
client library guide for the UserPass.roles field, and the
ClientClaims type reference for the full
struct layout and a wire-format example.
Session management endpoints
| Method | Path | Description | Auth required |
|---|---|---|---|
GET | /sessions/{id} | Retrieve SessionData by session ID (null when not found) | — |
POST | /sessions/{id} | Retrieve SessionData and optionally apply a SessionsAction | — |
POST | /sessions/realms/{realm}/clients | Get session IDs for a set of clients | — |
DELETE | /sessions | Delete sessions by ID list (logout) | — |
DELETE | /sessions/expired | Purge all expired sessions | — |
DELETE | /sessions/realms/{realm} | Revoke all sessions for a realm | — |
Session Actions on POST /sessions/{id}
When fetching a session you can pass an optional sessions_action in the request body to perform a bulk logout as part of the same call. This is the recommended way to implement "log out everywhere else" and "log out everywhere" features.
Request body
{
"authenticated_clients": [
{ "username": "alice", "auth_scheme": "UsernamePassword" }
],
"sessions_action": "LogoutOtherSessions"
}
| Field | Type | Description |
|---|---|---|
authenticated_clients | Vec<AuthenticatedClientScheme> | Users whose sessions should be affected by the action |
sessions_action | SessionsAction (optional) | Action to perform; omit for a plain session lookup |
SessionsAction variants
| Variant | Behaviour |
|---|---|
LogoutOtherSessions | Deletes all active sessions for the given clients except the session being queried. Use this to implement "keep this session, log out everywhere else". |
LogoutAllSessions | Deletes all active sessions for the given clients, including the queried session. The session data is returned before deletion. Use this to implement "log out everywhere". |
Sequence — LogoutOtherSessions
sequenceDiagram
autonumber
participant U as Client
participant EA as Authentication Verifier
participant SS as Session Store
U->>EA: POST /sessions/{session_a}<br/>{sessions_action: "LogoutOtherSessions", authenticated_clients: [...]}
EA->>SS: get_session(session_a)
SS-->>EA: SessionData for session_a
EA->>SS: get_sessions_for_clients(authenticated_clients)
SS-->>EA: [session_a, session_b, session_c]
EA->>SS: delete_sessions([session_b, session_c])
SS-->>EA: OK
EA-->>U: 200 OK SessionData for session_a
note over U: session_a still valid<br/>session_b, session_c invalidated
Sequence — LogoutAllSessions
sequenceDiagram
autonumber
participant U as Client
participant EA as Authentication Verifier
participant SS as Session Store
U->>EA: POST /sessions/{session_a}<br/>{sessions_action: "LogoutAllSessions", authenticated_clients: [...]}
EA->>SS: get_session(session_a)
SS-->>EA: SessionData for session_a
EA->>SS: get_sessions_for_clients(authenticated_clients)
SS-->>EA: [session_a, session_b, session_c]
EA->>SS: delete_sessions([session_a, session_b, session_c])
SS-->>EA: OK
EA-->>U: 200 OK SessionData for session_a (returned before deletion)
note over U: all sessions invalidated
Request Authentication Decision Diagram
The following shows how the middleware stack decides whether to admit or reject an incoming request:
flowchart TD
A[Incoming request] --> B{Has _ea_ cookie?}
B -- No --> C{Has Bearer token?}
B -- Yes --> D[CookieAuthSameServer]
D --> G{Session found
in store?}
G -- No --> F[401 Unauthorized]
G -- Yes --> H[SessionData → ClientClaims injected]
H --> I{AdminAuth required?}
I -- Yes --> J[DB: find_admins_by_auth_scheme]
J --> K{Admin record exists?}
K -- No --> F
K -- Yes --> L[Admin injected → handler runs]
I -- No --> M[Handler runs with claims only]
C -- No --> N{Has Basic Auth header?}
C -- Yes --> O[JwtAuth middleware]
O --> P{JWT sig + exp + aud valid?}
P -- No --> F
P -- Yes --> H
N -- No --> S{Has X-Vault-Token header?}
N -- Yes --> Q[UsernamePasswordAuth]
Q --> R{Argon2id hash matches?}
R -- No --> F
R -- Yes --> H
S -- No --> F
S -- Yes --> T[AppTokenExtract middleware]
T --> U{Token hash found
in DB, not expired?}
U -- No --> F403[403 Forbidden]
U -- Yes --> V[AppTokenClaims injected
→ self-service handler]
Note: AppRole login (
POST /auth/approle/login) and Kubernetes login (POST /auth/kubernetes/login) are unauthenticated — the credential is the request body. They are not represented above.
Two-Factor Authentication (TOTP)
This document explains how Time-based One-Time Passwords (TOTP) are used as a second authentication factor, how to enroll a client account for 2FA, how the login flow changes when 2FA is active, and how to disable 2FA.
Terminology: A client is the entity that authenticates against
/login(a human, a service, the CLI). An Admin record is the administrator account stored in the database — TOTP state (totp_enabled,totp_secret) is stored on theAdminrecord, but it is the client that presents TOTP codes at login time. See index.md for the full glossary.
What is TOTP?
TOTP (RFC 6238) generates a 6-digit code that changes every 30 seconds. The user's authenticator app (Google Authenticator, Authy, 1Password, Apple Passwords, etc.) and the server share a secret. Both independently compute the current code using the same algorithm — there is no network communication between the app and the server to verify. If the codes match, the user has proven they possess the shared secret.
shared_secret + current_time_window ──► HMAC-{algorithm} ──► 6-digit code
(default: SHA1; configurable per realm)
| Parameter | Default | Notes |
|---|---|---|
| Algorithm | HMAC-SHA1 | Configurable per realm: SHA1, SHA256, SHA512 |
| Code length | 6 digits | Fixed |
| Time step | 30 seconds | Configurable per realm |
| Tolerance (skew) | ±1 step (accepts previous, current, next window) | Fixed |
| Secret size | 160 bits (CSPRNG) | Fixed |
Architecture
Module structure
| Module | Source path | Responsibility |
|---|---|---|
totp | src/totp/mod.rs | Core TOTP primitives: secret generation, token validation, otpauth:// URL construction |
middleware::totp | src/middleware/totp.rs | TotpMiddleware — orchestrates enrollment (with realm-config lookup), verify-and-enable, disable, status check |
database::trait | src/database/trait.rs | Database trait with TOTP persistence method signatures |
database::impls | src/database/impls/{sqlite,postgres,mysql}.rs | TOTP persistence: secret storage, enabled flag, otpauth:// URL |
models::base | src/models/base.rs | Admin struct carrying the TOTP fields |
Data model
TOTP state is stored on the Admin record:
#![allow(unused)] fn main() { pub struct Admin { pub totp_enabled: Option<bool>, // Is 2FA currently active? pub totp_secret: Option<String>, // Base32-encoded shared secret pub totp_auth_url: Option<String>, // otpauth:// URL stored at enable time // … } }
TotpMiddleware and Database persistence methods
TotpMiddleware is a programmatic service component. Its methods are called by other server code (e.g., by the TOTP HTTP endpoints). The HTTP endpoints are registered under the /realms scope.
The Database trait provides the following TOTP persistence methods:
| Method | Description |
|---|---|
generate_totp_secret(realm, username) | Generates a random TOTP secret using default params (Totps::new()); returns only the Base32 string. Does not use realm TOTP config; does not persist anything. Lower-level helper — prefer TotpMiddleware::handle_totp_generate for enrollment. |
enable_totp(realm, username, secret, issuer) | Stores the verified secret, sets totp_enabled = 1, regenerates and stores totp_auth_url (using default SHA1/30 s params — see per-realm note). Targets WHERE id = username AND (userpass IS NOT NULL OR jwt IS NOT NULL). |
disable_totp(realm, username) | Clears secret and auth URL, sets totp_enabled = 0. Same WHERE condition as enable_totp. |
get_totp_secret(realm, username) | Returns the stored Base32 secret, or None if not set. |
is_totp_enabled(realm, username) | Returns Some(true/false) for the user's TOTP state, or None if the user is not found. |
Enrollment Flow
Before a client can use 2FA their account must be enrolled: generate a secret, scan it into their authenticator app, and verify one code to confirm they can produce valid tokens.
The enrollment flow is exposed via two HTTP endpoints under the /realms scope:
| Endpoint | Description |
|---|---|
POST /realms/{realm}/totp/generate?realm={realm} | Generate a new TOTP secret for a user. Returns secret_base32 and otpauth_url. The secret is not stored yet. |
POST /realms/{realm}/totp/verify?realm={realm} | Validate a one-time code against the generated secret. On success, the secret is stored and TOTP is activated for the user. |
Both endpoints require a valid session cookie from a realm administrator.
sequenceDiagram
autonumber
participant U as Client
participant App as Authenticator App
participant EA as Authentication Verifier
participant DB as Database
U->>EA: POST /realms/{realm}/totp/generate?realm={realm}<br/>{"username":"alice"}
note over EA: totp_generate handler<br/>get_realm(realm) → auth_params.totp_params<br/>create_totp_secret(issuer, alice, realm_params)
EA->>EA: Generate 160-bit CSPRNG secret
EA->>EA: Build otpauth:// URL (with realm algorithm/step)
EA-->>U: 200 OK<br/>{"secret_base32":"JBSWY3DPEHPK3PXP",<br/> "otpauth_url":"otpauth://totp/Auth:alice?…"}
U->>App: Scan QR code (rendered from otpauth_url)
note over App: Stores secret, starts generating codes
App-->>U: "482913" (current code)
U->>EA: POST /realms/{realm}/totp/verify?realm={realm}<br/>{"username":"alice","token":"482913","secret":"JBSWY3DPEHPK3PXP"}
note over EA: totp_verify handler<br/>get_realm(realm) → auth_params.totp_params<br/>Totps::from_secret(secret, issuer, alice, realm_params)<br/>totps.validate_token("482913")
alt Token valid
EA->>DB: enable_totp(realm, alice, secret, issuer)
DB-->>EA: OK
EA-->>U: 200 OK — 2FA enabled
else Token invalid (wrong code or expired)
EA-->>U: 403 Forbidden — invalid TOTP token
end
otpauth:// URL format
The URL encodes everything the authenticator app needs:
otpauth://totp/{issuer}:{username}?secret={base32}&issuer={issuer}&algorithm={algorithm}&digits=6&period={step}
The algorithm and period values come from the realm's TOTP configuration (auth_params.totp_params). Example for a realm using the defaults (SHA1, 30-second step):
otpauth://totp/Auth:alice?secret=JBSWY3DPEHPK3PXP&issuer=Auth&algorithm=SHA1&digits=6&period=30
Render this as a QR code and display it to the client exactly once during enrollment. After enrollment, the raw secret must never be shown again.
Login Flow with TOTP
When TOTP is enabled for a user, the POST /login endpoint enforces a two-step login:
- The client sends credentials as usual. If they are valid and TOTP is enabled, the server returns
TotpRequiredinstead of issuing a session cookie. - The client sends the same credentials again, this time including a
totp_code. The server validates the code and, if correct, issues the session cookie.
If TOTP is not enabled for the user, step 1 returns Authenticated directly (no change from the regular flow).
Authentication Sequence
sequenceDiagram
autonumber
participant U as Client
participant App as Authenticator App
participant EA as Authentication Verifier
participant DB as Database
U->>EA: POST /login?realm={realm}<br/>{"public_key_pem": null}
note over EA: EnsureAuth / UsernamePasswordAuth middleware<br/>validates primary credentials
EA->>DB: is_totp_enabled(realm, username)
DB-->>EA: true
alt TOTP enabled — no code provided
EA-->>U: 200 OK<br/>{"next_step":"TotpRequired","session_id":null}
U->>App: Read current TOTP code
App-->>U: "482913"
U->>EA: POST /login?realm={realm}<br/>{"totp_code":"482913"}
EA->>DB: get_totp_secret(realm, username)
DB-->>EA: "JBSWY3DPEHPK3PXP"
EA->>EA: Totps::from_secret(secret, …)<br/>totps.validate_token("482913")
alt Token valid
EA-->>U: 200 OK + Set-Cookie<br/>{"next_step":"Authenticated","session_id":"…"}
else Token invalid
EA-->>U: 401 Unauthorized — Invalid TOTP code
end
else TOTP not enabled
EA-->>U: 200 OK + Set-Cookie<br/>{"next_step":"Authenticated","session_id":"…"}
end
LoginRequest and AuthenticationNextStep
#![allow(unused)] fn main() { pub struct LoginRequest { pub public_key_pem: Option<String>, pub totp_code: Option<String>, // Omit on first attempt; send on second } pub enum AuthenticationNextStep { ChangePassword, TotpRequired, // Credentials valid, TOTP code still needed Authenticated, } }
Disabling 2FA
An administrator can disable TOTP on a client's account via:
DELETE /realms/{realm}/totp/{username}?realm={realm}
This clears the stored secret and totp_enabled flag on the Admin record. Requires a valid session cookie from a realm administrator.
sequenceDiagram
autonumber
participant Admin as Admin
participant EA as Authentication Verifier
participant DB as Database
Admin->>EA: DELETE /realms/{realm}/totp/{username}?realm={realm}
note over EA: totp_disable handler
EA->>DB: disable_totp(realm, username)
note over DB: UPDATE admin<br/>SET totp_enabled = 0,<br/> totp_secret = NULL,<br/> totp_auth_url = NULL<br/>WHERE id = username<br/>AND (userpass IS NOT NULL OR jwt IS NOT NULL)
DB-->>EA: OK
EA-->>Admin: 204 No Content
After this, the client logs in via primary credentials only, with no TOTP code required.
Code Path Reference
── TOTP enrollment ──
POST /realms/{realm}/totp/generate?realm={realm}
→ totp_generate handler (src/server/endpoints/totp_endpoints.rs)
└── database.get_realm(realm) → auth_params.totp_params (or defaults)
└── totp::create_totp_secret(issuer, username, totp_params)
├── Secret::generate_secret() // 160-bit CSPRNG
├── TOTP::new(algorithm, 6, 1, step, secret_bytes, issuer, username)
└── Returns (Totps { totp }, secret_base32)
└── 200 OK: { secret_base32, otpauth_url } (secret NOT yet stored)
POST /realms/{realm}/totp/verify?realm={realm}
→ totp_verify handler
└── database.get_realm(realm) → auth_params.totp_params (or defaults)
└── Totps::from_secret(secret_base32, issuer, username, totp_params)
└── totps.validate_token(token)
└── TOTP::check_current(token) // ±1 step tolerance
└── (on success) database.enable_totp(realm, username, secret_base32, issuer)
└── UPDATE admin SET totp_enabled=1, totp_secret=?, totp_auth_url=?
WHERE id=? AND (userpass IS NOT NULL OR jwt IS NOT NULL)
└── 200 OK: {"status":"ok"}
── TOTP disable ──
DELETE /realms/{realm}/totp/{username}?realm={realm}
→ totp_disable handler
└── database.disable_totp(realm, username)
└── UPDATE admin SET totp_enabled=0, totp_secret=NULL, totp_auth_url=NULL
WHERE id=? AND (userpass IS NOT NULL OR jwt IS NOT NULL)
└── 204 No Content
── Login flow with TOTP ──
POST /login?realm={realm}
→ EnsureAuth / UsernamePasswordAuth middleware
└── Validates credentials → sets AuthenticatedClient in request extensions
→ login() handler (src/server/endpoints/client_endpoints.rs)
└── database.is_totp_enabled(realm, username)
if not enabled:
└── issue_token + build_cookie + upsert_session
└── 200 OK + Set-Cookie: { "next_step": "Authenticated", "session_id": "…" }
if enabled and no totp_code in request:
└── 200 OK: { "next_step": "TotpRequired", "session_id": null }
if enabled and totp_code present:
└── database.get_totp_secret(realm, username) → stored secret
└── Totps::from_secret(secret, None, username, realm_totp_params)
└── totps.validate_token(totp_code)
if valid:
└── issue_token + build_cookie + upsert_session
└── 200 OK + Set-Cookie: { "next_step": "Authenticated", "session_id": "…" }
if invalid:
└── 401 Unauthorized
Per-Realm TOTP Configuration
The HMAC algorithm and time step are configurable per realm. They are stored in the realm's auth_params JSON column under the totp_params key. Realms that do not set totp_params use the defaults.
auth_params.totp_params field | Type | Default | Accepted values |
|---|---|---|---|
algorithm | string | "SHA1" | "SHA1", "SHA256", "SHA512" |
step | integer (seconds) | 30 | any positive integer |
Example realm auth_params JSON with custom TOTP config
{
"jwt_params": { … },
"username_password_params": { … },
"totp_params": {
"algorithm": "SHA256",
"step": 60
}
}
When a realm sets custom TOTP params:
POST /realms/{realm}/totp/generateuses those params to build theotpauth://URL — the authenticator app will therefore use the correct algorithm and period.POST /realms/{realm}/totp/verifylooks up the same params to reconstruct theTotpsverifier, so the token is checked with the same algorithm and time window.- The stored
totp_auth_urlin theAdminrecord is regenerated byenable_totpusing default params (SHA1, 30 s) regardless of the realm's TOTP config — this is a known limitation of the currentenable_totpimplementation. The canonical, authoritative URL (reflecting the realm's actual algorithm and step) is the one returned byTotpMiddleware::handle_totp_generateat enrollment time. Callers should use that returned URL for QR-code generation, notAdmin.totp_auth_url.
Important: If you change a realm's TOTP params after users have already enrolled, their authenticator apps will continue using the old algorithm/period. All affected users must re-enroll.
Security Considerations
Protect the secret during enrollment
The otpauth:// URL and the raw Base32 secret must:
- Only be transmitted over HTTPS
- Be displayed to the client exactly once (during enrollment QR-code display)
- Never appear in server logs — TOTP-related log lines use
trace!/debug!macros and are filtered out of production output
Secret storage
TOTP secrets are stored as plain Base32 strings in the database. In high-security deployments, consider encrypting the totp_secret column at rest using a KMS-managed key.
Brute-force protection
A 6-digit TOTP code has 1 000 000 possible values. With a 30-second window and ±1 skew tolerance (3 valid windows), the effective attack window is short but non-zero. Rate-limit the login endpoint to prevent automated guessing. Common threshold: 5 failed attempts per 5-minute window per username.
Clock synchronisation
TOTP is time-based. The skew of ±1 (accepting the previous/current/next 30-second window) tolerates up to 60 seconds of clock drift between the server and the user's device. Ensure the server clock is synchronised via NTP.
TOTP fallback / recovery codes
The current implementation does not generate single-use recovery codes. In a production deployment, generate and store a set of hashed recovery codes at enrollment time so users can regain access if they lose their authenticator device.
Example: Enrolling an Admin via the Rust Client
#![allow(unused)] fn main() { use auth_authentication::{AuthClient, AuthClientScheme}; // 1. Authenticate as an administrator let admin = AuthClient::new("https://auth.example.com", AuthClientScheme::UsernamePassword { username: "admin".to_string(), password: "admin_password".to_string(), })?; admin.login("_", None, None).await?; // 2. Generate a TOTP secret for the target user let resp = admin.generate_totp("_", "alice", None).await?; // resp.secret_base32: Base32 secret // resp.otpauth_url: otpauth:// URL — render this as a QR code for alice // 3. Alice scans the QR code and provides a code from her authenticator let token = "482913"; admin.verify_and_enable_totp("_", "alice", &resp.secret_base32, token, None).await?; // TOTP is now enabled for alice. // 4. To disable TOTP later: admin.disable_totp("_", "alice").await?; }
SAML 2.0 Single Sign-On
The Authentication Verifier can act as a SAML 2.0 Service Provider (SP): users of a realm
sign in at the organisation's identity provider (IdP) — Microsoft Entra ID, Okta, ADFS,
Keycloak, Shibboleth, … — and come back with the usual _ea_ session cookie. Nothing changes
for the API servers that validate sessions: a SAML session is a session like any other, with
as_as (auth scheme) set to "sa".
Table of Contents
- What is supported
- Architecture
- Prerequisites
- Step 1 — Create the SP signing key
- Step 2 — Configure the realm
- Step 3 — Register the realm at the IdP
- Step 4 — Sign users in from your application
- Login flow
- Identity mapping
- Security checks
- Certificate and key rotation
- Troubleshooting
What is supported
| Supported | Not supported |
|---|---|
| SP-initiated Web Browser SSO (SAML Profiles §4.1) | IdP-initiated (unsolicited) responses |
AuthnRequest over HTTP-Redirect, signed with RSA-SHA256 | HTTP-POST or Artifact binding for requests |
Response over HTTP-POST | Artifact binding for responses |
| Signed assertion, signed response, or both | Encrypted assertions |
| RSA or ECDSA signatures with SHA-256/384/512 | SHA-1 signatures or digests |
| IdP metadata pasted by an administrator | Fetching metadata from a URL |
| One IdP per realm | Federations / multi-IdP discovery |
Local logout (DELETE /sessions) | SAML Single Logout |
SAML is a login method for the users of a realm. It is never an administrator credential:
admins keep signing in with the methods of the _ realm, which refuses SAML settings.
Architecture
flowchart LR
subgraph user["End user"]
B["Web browser"]
end
subgraph app["Your application"]
APP["Web application<br/>(origin listed in allowed_return_origins)"]
API["API server"]
end
subgraph idp["Identity provider"]
IDP["SAML 2.0 IdP<br/>Entra ID, Okta, ADFS, Keycloak, Shibboleth"]
DIR[("User directory<br/>AD, LDAP")]
MFA["MFA factors"]
end
subgraph verifier["Authentication Verifier deployment"]
EA["Authentication Verifier<br/>SAML 2.0 Service Provider<br/>/saml/{realm_id}/login, /acs, /metadata"]
KEY["SP signing key and certificate<br/>(PEM files of saml_sp_params)"]
DB[("Auth database<br/>SQLite, PostgreSQL, MySQL<br/>realms and saml_params")]
SS[("Session store<br/>SQLite, PostgreSQL, MySQL, Redis<br/>sessions, pending SAML requests, replay cache")]
end
ADM["Realm administrator<br/>admin UI or admin API"]
IDPADM["IdP administrator"]
B -- "1. opens the application" --> APP
B -- "2. login redirect and ACS form post" --> EA
B -- "3. signs in" --> IDP
IDP --> DIR
IDP --> MFA
B -- "4. API calls with the _ea_ cookie" --> API
API -- "5. validates the session (/sessions)" --> EA
EA --> DB
EA --> SS
KEY -.-> EA
ADM -. "pastes IdP metadata, sets SAML realm settings" .-> EA
EA -. "SP metadata" .-> IDPADM
IDPADM -. "registers the SP" .-> IDP
The Authentication Verifier and the IdP never talk to each other directly: every SAML message
travels through the browser (front channel), and trust is set up once, out of band, by
exchanging metadata. The application and the API server only ever see the _ea_ session.
Prerequisites
-
A server built with the
samlfeature. SAML statically links the xmlsec and libxml2 C libraries, so it is off by default. Either use a prebuilt SAML build or build it yourself:- Prebuilt: the release publishes a SAML variant next to the standard one — packages
whose file name ends in
-saml(for exampleauth-verifier_<version>-1_amd64-saml.deb) and the Docker imageghcr.io/cosmian/auth-verifier-saml:<version>, a separate package from the standardghcr.io/cosmian/auth-verifier. It is a static build only and installs under the same package name as the standard server, so install one or the other. - From source with Nix:
nix-build -A auth-verifier-static-saml - From source with cargo, inside the Nix shell:
nix-shell --run "cargo build --release --features auth_verifier/saml"A server built without the feature refuses realms carrying SAML settings (HTTP 400) and refuses to start if
[saml_sp_params]is configured. - Prebuilt: the release publishes a SAML variant next to the standard one — packages
whose file name ends in
-
HTTPS. The ACS URL must be
https://, and the login cookie that protects against login CSRF isSecure. -
An SP signing key in the server configuration — Step 1. Without it the
/samlroutes don't exist and realms can't enable SAML.
Step 1 — Create the SP signing key
One RSA key signs the AuthnRequests of every SAML realm, and its certificate is published in
the SP metadata that IdPs import. It is server configuration: it never goes through the
database or the admin API.
openssl req -x509 -newkey rsa:3072 -sha256 -days 1095 -nodes \
-subj "/CN=auth.example.com SAML SP" \
-keyout saml-sp.key.pem -out saml-sp.cert.pem
chmod 600 saml-sp.key.pem
[saml_sp_params]
saml_rsa_private_key = "/etc/cosmian/saml-sp.key.pem"
saml_certificate = "/etc/cosmian/saml-sp.cert.pem"
The server checks the pair at startup and stops if a file is unreadable, the key isn't RSA or is shorter than 2048 bits, or the certificate doesn't match the key. A self-signed certificate is fine: IdPs pin the certificate from the metadata rather than validating a chain. See Server configuration.
Step 2 — Configure the realm
In the admin UI, open the realm (Realms → Edit) and tick SAML 2.0 (single sign-on).
The same settings can be sent through the API as auth_params.saml_params on
POST /admins/realms or PUT /admins/realms/{realm_id}:
{
"saml_params": {
"metadata_xml": "<md:EntityDescriptor entityID=\"https://idp.example.com/…\">…</md:EntityDescriptor>",
"sp_entity_id": "https://auth.example.com/saml/my-service",
"sp_acs_url": "https://auth.example.com/saml/my-service/acs",
"subject_attribute": "email",
"normalize_subject_case": true,
"role_attribute": "groups",
"attribute_claim_map": { "department": "dept" },
"allowed_return_origins": ["https://app.example.com"],
"default_return_url": "https://app.example.com/"
}
}
| Field | Required | Description |
|---|---|---|
metadata_xml | Yes | The IdP's SAML 2.0 metadata (one EntityDescriptor, at most 256 KiB). |
sp_entity_id | Yes | This server's entity ID for the realm, given to the IdP. Conventionally https://<server>/saml/<realm_id>. |
sp_acs_url | Yes | https://<server>/saml/<realm_id>/acs — the public URL browsers post the IdP's response to. |
subject_attribute | No | Attribute whose single value becomes the user name. Unset: the NameID is used. Required when the IdP issues transient NameIDs. |
normalize_subject_case | No | Lowercase the user name (default false). |
role_attribute | No | Attribute whose values become the session roles. |
attribute_claim_map | No | Attribute name → extra-claim name. Only listed attributes reach the session. |
allowed_return_origins | Yes | https://host[:port] origins a login may return to. |
default_return_url | Yes | Where a login returns when no return_to is given; must be under an allowed origin. |
The IdP fields (idp_entity_id, idp_sso_url, idp_signing_certificates,
idp_nameid_format) are derived by the server from metadata_xml on every save, and any
values sent for them are ignored. The metadata is refused if it isn't a single SAML 2.0
EntityDescriptor, has expired (validUntil), has no HTTPS HTTP-Redirect
SingleSignOnService, or has no signing certificate. Every refusal is an HTTP 400 naming the
field (saml_params.<field>: <reason>); the admin UI shows it next to that field.
The admin UI previews the parsed metadata — IdP entity ID, sign-in URL, signing certificates with their expiry — before you save.
Step 3 — Register the realm at the IdP
The IdP administrator needs this server's SP details. Either give them the SP metadata:
https://auth.example.com/saml/my-service/metadata
(also available from the realm drawer's Download SP metadata button, or
AuthClient::get_saml_metadata), or enter by hand:
| IdP setting | Value |
|---|---|
| Entity ID / Identifier / Audience | sp_entity_id |
| ACS URL / Reply URL (HTTP-POST) | sp_acs_url |
| Request signing certificate | The [saml_sp_params] certificate |
| Sign | Assertion, response, or both |
| Attributes to release | Those named in subject_attribute, role_attribute and attribute_claim_map |
Then paste the IdP's metadata into the realm (Step 2).
Step 4 — Sign users in from your application
Send the browser to the realm's login endpoint, with the page to come back to:
https://auth.example.com/saml/my-service/login?return_to=https://app.example.com/dashboard
After signing in at the IdP, the browser returns to return_to (or default_return_url)
holding the _ea_ session cookie. return_to must be an https URL under one of
allowed_return_origins; anything else is refused with HTTP 400 rather than silently
replaced, so a misconfigured link is noticed.
Your API validates the session exactly as for any other method — see Session management.
Login flow
sequenceDiagram
autonumber
participant B as Browser
participant EA as Authentication Verifier
participant DB as Auth database
participant RS as SAML request store
participant SS as Session store
participant IdP as Identity Provider
participant APP as Application and API
B->>EA: GET /saml/{realm_id}/login?return_to=URL
note over EA: per-IP rate limit (same as /login)
EA->>DB: get realm
DB-->>EA: realm and saml_params
note over EA: 400 if the realm does not use SAML<br/>return_to must be https under allowed_return_origins (else 400)<br/>absent return_to uses default_return_url
EA->>RS: store pending request (request ID, realm, return URL, expires in 10 min)
note over EA: AuthnRequest ID = request ID<br/>signed RSA-SHA256 with the SP key (HTTP-Redirect)
EA-->>B: 302 Location: IdP SSO URL with SAMLRequest, RelayState = request ID, SigAlg, Signature<br/>Set-Cookie: _ea_saml = request ID (Secure, HttpOnly, SameSite=None, Path=/)
rect rgba(128, 128, 128, 0.1)
note over B,IdP: at the IdP, outside the Authentication Verifier
B->>IdP: GET SSO URL
note over IdP: checks the AuthnRequest signature<br/>authenticates the user (password, MFA)
IdP-->>B: auto-submitting HTML form
end
B->>EA: POST /saml/{realm_id}/acs with SAMLResponse and RelayState<br/>Cookie: _ea_saml = request ID
note over EA: _ea_saml cookie must equal RelayState (else 401)
EA->>DB: get realm
DB-->>EA: realm and saml_params
EA->>RS: take pending request (RelayState, realm), single use
RS-->>EA: pending request with return URL (none: 401)
note over EA: base64-decode SAMLResponse<br/>verify signature against the IdP certificates (xmlsec)<br/>check algorithms, Issuer, InResponseTo, Audience,<br/>Recipient, Destination, validity window, AuthnStatement, Status
EA->>RS: record assertion ID in this realm (replay cache)
RS-->>EA: new (already seen: 401)
note over EA: map identity: subject, roles, extra claims<br/>issue session token (as_as = sa, as_rid = realm)
EA->>SS: upsert session
EA-->>B: 200 HTML page continuing to the return URL<br/>Set-Cookie: _ea_ session (SameSite=Strict), _ea_saml cleared
B->>APP: GET return URL with the _ea_ cookie
APP->>EA: validate the session (/sessions)
EA-->>APP: session data
The pending requests and the replay cache live in the session store's database (SQLite,
PostgreSQL, MySQL or Redis) and are purged on the stale-session collector's interval. The
/saml routes share the per-IP rate limit of /login.
On the SQL backends SAML opens its own connection pool with the session store's
max_connections / min_connections, so plan for twice that many connections to that
database. With auto_init_schema = false, create the two SAML tables yourself:
saml_pending_request (request_id primary key, realm_id, return_url, created_at,
expires_at) and saml_seen_assertion (primary key realm_id + assertion_id, or
assertion_id_sha256 BINARY(32) on MySQL, and expires_at), each indexed on
expires_at. The CREATE TABLE statements in server/src/saml/impls/ are the reference.
Until they exist, SAML logins fail and the periodic cleanup logs errors.
The ACS answers with a small page instead of a redirect: the SameSite=Strict session cookie
may be withheld on a navigation that directly follows the IdP's cross-site POST, and
continuing from a page of this server makes it a same-site navigation.
SAML sessions don't go through this server's TOTP step: multi-factor authentication is the IdP's responsibility.
Identity mapping
| Session field | Source |
|---|---|
sub (user name) | subject_attribute's value — exactly one non-empty value is required — or else the <NameID>. A transient NameID is refused unless subject_attribute is set, as it changes on every login. Lowercased when normalize_subject_case is set. |
roles | The deduplicated values of role_attribute. None when it is unset or not sent, which policies treat as no access. |
| extra claims | For each attribute_claim_map entry the IdP sent: a string, or an array for several values. At most 4 KiB in total; claim names this server sets itself (sub, roles, as_rid, …) are refused when saving. |
as_as | "sa" |
as_rid | The realm ID |
Roles come straight from the IdP: this server does not filter them against its role list.
A SAML user is a different identity from a user of another scheme with the same name: a
session's identity is the realm, the scheme (as_as) and sub together. Applications must
key users on all three, never on sub alone.
Security checks
A response is accepted only if all of these hold; otherwise the ACS answers
401 SAML error: <reason> and logs an auth.login.failure event.
| Check | Rule |
|---|---|
| Browser binding | The _ea_saml cookie set by /login equals RelayState (prevents login CSRF: a response obtained elsewhere can't be posted into someone else's browser). |
| Solicited | InResponseTo names a pending request of this realm, which is consumed (single use, 10-minute lifetime). |
| Signature | The assertion, or the response containing it, is signed by one of the IdP certificates from the metadata. Unsigned content is ignored (XML signature-wrapping defence). |
| Algorithms | RSA or ECDSA with SHA-256/384/512 only, for both signature and digest. |
| Issuer | Equals the IdP entity ID. |
| Audience | An AudienceRestriction is present and every one of them names sp_entity_id. |
| Recipient / Destination | Equal sp_acs_url. |
| Time | NotBefore / NotOnOrAfter hold with 3 minutes of clock skew, and the assertion was issued at most 5 minutes ago. |
| Authentication | The assertion has an AuthnStatement and a bearer SubjectConfirmation. |
| Status | The response status is Success. |
| Replay | The assertion ID hasn't been used before (remembered for as long as it could be accepted). |
Certificate and key rotation
IdP signing certificate. When the IdP rolls its certificate, paste its new metadata into the realm. During a planned rollover, metadata listing both certificates keeps logins working across the switch. The admin UI shows each certificate's expiry in the preview and flags a realm card when a certificate expires within 30 days.
SP signing key. Replace the files named in [saml_sp_params] and restart the server, then
have every IdP import the new metadata. IdPs that verify request signatures reject requests
signed with the new key until they do.
Troubleshooting
Rejections are logged with the reason:
WARN event="auth.login.failure" realm=my-service auth_scheme="saml" SAML login rejected: …
| Symptom | Likely cause |
|---|---|
404 on /saml/… | The server was built without saml, or [saml_sp_params] isn't set. |
400 realm '…' does not exist or does not use SAML | Wrong realm in the URL, or SAML isn't enabled for it. |
400 return_to is not under an allowed return origin | Add the origin to allowed_return_origins. |
401 this sign-in was not started from this browser | The browser didn't send back the _ea_saml cookie: the login was started in another browser or profile, a newer sign-in was started in another tab of the same browser (only the latest one can complete), or the server isn't reached over HTTPS. Start again from /saml/{realm}/login. |
401 unknown or expired sign-in request | More than 10 minutes at the IdP, the response was already used, or it answers another realm. |
401 … must be signed / signature errors | The IdP signs with a certificate missing from the pasted metadata, or signs neither the assertion nor the response. Refresh the metadata. |
401 … AudienceRequirement / not addressed to this service provider | The IdP's entity ID / audience setting differs from sp_entity_id. |
401 … Recipient / destination | The IdP's ACS / reply URL differs from sp_acs_url (watch for http vs https and trailing slashes). |
401 … expired / not valid until | Clock drift above 3 minutes between the IdP and this server — check NTP. |
401 the NameID is transient … | Set subject_attribute, or configure a persistent NameID at the IdP. |
401 subject attribute '…' is missing | The IdP doesn't release that attribute to this SP. |
AppRole, Kubernetes & Token Authentication
The Authentication Verifier exposes an HTTP authentication API compatible with SPIRE's UpstreamAuthority and KeyManager plugins, under the /auth/ prefix. This lets SPIRE — and any other tool that speaks the same protocol — authenticate against the Authentication Verifier without requiring a separate secrets cluster.
This page covers the Authentication Verifier side only: AppRole login, Kubernetes service-account login, and token self-service. For the KMS-side crypto engines (/v1/transit/*, /v1/{pki_mount}/*) and the full end-to-end SPIRE flow, see the KMS SPIRE/SPIFFE integration guide.
Contents
- Standards and Protocol References
- Endpoint overview
- Token format and storage
- AppRole auth method — server-to-server and SPIRE workloads
- Kubernetes auth method — Kubernetes pod workloads
- Token self-service — lookup, renew, revoke (all auth methods)
- Database schema
- Integration with the Cosmian KMS
- Security notes
Standards and Protocol References
AppRole auth method
AppRole is not an IETF/W3C standard; it is an HTTP authentication protocol that has become a de-facto standard for machine-to-machine and SPIRE workloads.
| Reference | Description |
|---|---|
| AppRole Auth API specification | Authoritative wire protocol definition for /auth/approle/* request and response shapes. |
SPIRE UpstreamAuthority plugin source | SPIRE-side Go plugin implementation that consumes this protocol. |
| RFC 4648 §5 — Base64url encoding | Token body format: hvs.<base64url(32 random bytes)>. |
| RFC 4086 — Randomness Requirements for Security | Entropy requirements for token and secret-ID generation. |
| FIPS 180-4 — Secure Hash Standard (SHA-256) | Token values and secret IDs are stored only as their SHA-256 hashes. |
Kubernetes auth method
The Kubernetes auth method validates service-account JWTs per the following standards:
| Reference | Description |
|---|---|
| RFC 7519 — JSON Web Token (JWT) | JWT format; exp (§4.1.4) and nbf (§4.1.5) are validated; iss (§4.1.1) and aud (§4.1.3) are validated when configured. |
| RFC 7517 — JSON Web Key (JWK) | JWKS format for the Kubernetes API server's signing keys; kid (§4.5) used for key selection. |
| RFC 7518 — JSON Web Algorithms (JWA) | Only asymmetric algorithms (RS256/RS384/RS512/ES256/ES384) are accepted. |
| Kubernetes Bound Service Account Tokens | Service-account JWT format, sub claim shape (system:serviceaccount:<ns>:<name>), and projected volume usage. |
| OpenID Connect Discovery 1.0 | Kubernetes ≥1.21 exposes an OIDC-compliant JWKS at /.well-known/openid-configuration. |
Token self-service
Token self-service follows a simple HTTP self-service protocol for token introspection and lifecycle management:
| Reference | Description |
|---|---|
| Token self-service endpoint specification | lookup-self, renew-self, revoke-self endpoint shapes. |
Endpoint overview
| Method | Path | Auth | Purpose |
|---|---|---|---|
POST/PUT | /auth/approle/login | none | Exchange role_id + secret_id for an app token |
POST | /auth/approle/role/{name} | admin session | Create or update an AppRole role |
GET | /auth/approle/role/{name}/role-id | admin session | Read the stable role_id |
POST | /auth/approle/role/{name}/secret-id | admin session | Generate a new secret_id |
POST | /auth/approle/role/{name}/secret-id/destroy | admin session | Invalidate a secret_id by accessor |
DELETE | /auth/approle/role/{name} | admin session | Delete a role |
GET | /auth/approle/role?list=true | admin session | List all roles |
POST | /auth/kubernetes/login | none | Exchange a Kubernetes service-account JWT for an app token |
POST | /auth/kubernetes/role/{name} | admin session | Create or update a Kubernetes role |
DELETE | /auth/kubernetes/role/{name} | admin session | Delete a Kubernetes role |
GET | /auth/token/lookup-self | X-Vault-Token | Validate a token and return its metadata |
POST | /auth/token/renew-self | X-Vault-Token | Extend a renewable token's TTL |
POST | /auth/token/revoke-self | X-Vault-Token | Immediately invalidate a token |
Admin session means an active _ea_ cookie issued by POST /login?realm=_ (the _ admin realm). See Authorization and Administration for details.
Token format and storage
Issued tokens use the hvs.<base64url(32 random bytes)> format, mirroring the SPIRE-compatible token prefix expected on the wire. The raw token is never stored — only its SHA-256 hash is persisted. Clients receive the token once at login time; there is no way to retrieve it again.
AppRole auth method
AppRole is the recommended method for server-to-server and SPIRE workloads. An operator provisions a role out-of-band and hands the resulting role_id + secret_id to the service.
Step 1 — Create a role (admin)
POST /auth/approle/role/{name}
Content-Type: application/json
Cookie: _ea_=<admin session cookie>
{
"token_ttl": 3600,
"secret_id_ttl": 86400,
"token_policies": ["default"],
"bind_secret_id": true
}
| Field | Type | Default | Description |
|---|---|---|---|
token_ttl | integer | 3600 | Lifetime of issued tokens in seconds. |
secret_id_ttl | integer | 0 | Lifetime of generated secret IDs in seconds. 0 means no expiry. |
token_policies | array of strings | [] | Policies attached to every token issued by this role. |
bind_secret_id | boolean | true | When true, a valid secret_id is required for login. |
Response: 204 No Content
Step 2 — Read the role_id (admin)
The role_id is a stable UUID generated when the role is created. Hand this to the service that will log in.
GET /auth/approle/role/{name}/role-id
Cookie: _ea_=<admin session cookie>
Response:
{
"data": {
"role_id": "a5d7e2f1-0c3b-4a8d-9e6f-1234567890ab"
}
}
Step 3 — Generate a secret_id (admin)
Secret IDs are single-use or limited-use credentials bound to a role.
POST /auth/approle/role/{name}/secret-id
Content-Type: application/json
Cookie: _ea_=<admin session cookie>
{
"ttl": 0,
"num_uses": 1
}
| Field | Type | Default | Description |
|---|---|---|---|
ttl | integer | 0 | Per-secret-ID TTL override in seconds. 0 uses the role default. |
num_uses | integer | 0 | Maximum number of login uses. 0 means unlimited. |
Response:
{
"data": {
"secret_id": "b7c4e9d2-1a2b-4c3d-8e5f-fedcba987654",
"secret_id_accessor": "9f8e7d6c-5b4a-3c2d-1e0f-abcdef012345"
}
}
Save the secret_id securely — it cannot be retrieved again. The secret_id_accessor can be used later to invalidate the secret ID without knowing the secret itself.
Step 4 — Login (client)
The service exchanges its role_id + secret_id for an app token. Both POST and PUT are accepted (SPIRE's Go SDK may issue either).
POST /auth/approle/login
Content-Type: application/json
{
"role_id": "a5d7e2f1-0c3b-4a8d-9e6f-1234567890ab",
"secret_id": "b7c4e9d2-1a2b-4c3d-8e5f-fedcba987654"
}
Response:
{
"auth": {
"client_token": "hvs.AAAAAQIDBAUGBwgJCgsMDQ4PEBESExQVFhcYGRob",
"renewable": true,
"lease_duration": 3600,
"policies": ["default"],
"metadata": {
"role_name": "spire-server"
}
}
}
The client_token must be passed as X-Vault-Token on all subsequent requests to the KMS's /v1/transit/* and /v1/<pki_mount>/* scopes.
Each login call consumes one use of the secret_id. When num_uses is 1 (the SPIRE demo default), the secret ID is invalidated after the first successful login. Generate a new one before SPIRE restarts.
Managing roles
Destroy a secret_id (admin, by accessor):
POST /auth/approle/role/{name}/secret-id/destroy
Content-Type: application/json
Cookie: _ea_=<admin session cookie>
{
"secret_id_accessor": "9f8e7d6c-5b4a-3c2d-1e0f-abcdef012345"
}
Response: 204 No Content
List all roles (admin):
GET /auth/approle/role?list=true
Cookie: _ea_=<admin session cookie>
Response:
{
"data": {
"keys": ["spire-server", "mistral-agents"]
}
}
Delete a role (admin):
DELETE /auth/approle/role/{name}
Cookie: _ea_=<admin session cookie>
Response: 204 No Content. All secret IDs for that role are deleted automatically (cascade).
Kubernetes auth method
The Kubernetes auth method lets workloads running as Kubernetes service accounts authenticate by presenting their pod-mounted service-account JWT. No operator-provisioned secret is required — the JWT itself is the credential.
Step 1 — Create a Kubernetes role (admin)
POST /auth/kubernetes/role/{name}
Content-Type: application/json
Cookie: _ea_=<admin session cookie>
{
"jwks_url": "https://kubernetes.default.svc/.well-known/jwks.json",
"bound_service_account_names": ["my-app"],
"bound_service_account_namespaces": ["production"],
"token_ttl": 3600
}
| Field | Type | Description |
|---|---|---|
jwks_url | string | URL of the Kubernetes JWKS endpoint. Used to verify the service-account JWT's signature. |
bound_service_account_names | array | Allowed service-account names. Use ["*"] to allow any name. |
bound_service_account_namespaces | array | Allowed namespaces. Use ["*"] to allow any namespace. |
token_ttl | integer | Lifetime of issued tokens in seconds. |
Response: 204 No Content
Step 2 — Login (client)
POST /auth/kubernetes/login
Content-Type: application/json
{
"role": "my-k8s-role",
"jwt": "<service account JWT from /var/run/secrets/kubernetes.io/serviceaccount/token>"
}
Response:
{
"auth": {
"client_token": "hvs.AAAAAQIDBAUGBwgJCgsMDQ4PEBESExQVFhcYGRob",
"renewable": true,
"lease_duration": 3600,
"policies": [],
"metadata": {}
}
}
The server:
- Fetches the JWKS from the role's
jwks_url. - Selects the correct key by
kidfrom the JWT header. - Validates the JWT signature and expiry.
- Checks
sub(system:serviceaccount:<namespace>:<name>) against the role's allow-lists. - Issues a app token on success.
A JWKS endpoint outage blocks new Kubernetes logins for the duration of the outage. Existing tokens remain valid until their TTL expires.
Delete a Kubernetes role (admin)
DELETE /auth/kubernetes/role/{name}
Cookie: _ea_=<admin session cookie>
Response: 204 No Content
Token self-service
All app tokens — regardless of which auth method produced them — support the same self-service endpoints. These require a valid X-Vault-Token header.
GET /auth/token/lookup-self
Validate a token and return its current metadata. This endpoint is called by the KMS middleware on every request to the /v1/transit/* and /v1/<pki_mount>/* scopes (with a 30-second cache).
GET /auth/token/lookup-self
X-Vault-Token: hvs.AAAAAQIDBAUGBwgJCgsMDQ4PEBESExQVFhcYGRob
Response:
{
"data": {
"id": "hvs.AAAAAQIDBAUGBwgJCgsMDQ4PEBESExQVFhcYGRob",
"entity_id": "spire-server",
"policies": ["default"],
"renewable": true,
"ttl": 3541,
"creation_time": 1753670400
}
}
id is the token itself (echoed from the X-Vault-Token request header). SPIRE reads this field to warm its internal token state.
Returns 403 Forbidden if the token is missing, invalid, expired, or has been revoked.
POST /auth/token/renew-self
Extend a renewable token's TTL back to its configured lease_duration.
POST /auth/token/renew-self
X-Vault-Token: hvs.AAAAAQIDBAUGBwgJCgsMDQ4PEBESExQVFhcYGRob
Response:
{
"auth": {
"client_token": "hvs.AAAAAQIDBAUGBwgJCgsMDQ4PEBESExQVFhcYGRob",
"renewable": true,
"lease_duration": 3600,
"policies": ["default"],
"metadata": {}
}
}
client_token is the token echoed from the X-Vault-Token request header. SPIRE uses this to refresh its in-memory token state.
POST /auth/token/revoke-self
Immediately invalidate the current token.
POST /auth/token/revoke-self
X-Vault-Token: hvs.AAAAAQIDBAUGBwgJCgsMDQ4PEBESExQVFhcYGRob
Response: 204 No Content
Once a token is revoked, subsequent lookup-self calls return 403 immediately. If the KMS's token-validation cache has a live entry for that token, requests to the KMS may still succeed for up to app_token_cache_ttl_secs seconds (default: 30). Reduce or disable caching on the KMS side if your threat model requires faster revocation propagation.
Database schema
The SPIRE auth API stores its state in four tables, added alongside the existing Authentication Verifier schema on all three database backends (SQLite, PostgreSQL, MySQL):
-- Issued tokens (all auth methods)
CREATE TABLE app_tokens (
token_hash BLOB PRIMARY KEY, -- SHA-256(raw "hvs.<base64>" token)
entity TEXT NOT NULL, -- AppRole role name or K8s service-account name
policies TEXT NOT NULL, -- comma-separated
expiry INTEGER NOT NULL, -- Unix timestamp; 0 = never
renewable BOOLEAN NOT NULL,
lease_duration_secs INTEGER NOT NULL,
created_at INTEGER NOT NULL
);
-- AppRole roles
CREATE TABLE approle_roles (
name TEXT PRIMARY KEY,
role_id TEXT UNIQUE NOT NULL,
secret_id_ttl_secs INTEGER NOT NULL,
token_ttl_secs INTEGER NOT NULL,
bind_secret_id BOOLEAN NOT NULL,
token_policies TEXT NOT NULL -- comma-separated
);
-- AppRole secret IDs (hashed, limited-use)
CREATE TABLE app_secret_ids (
accessor TEXT PRIMARY KEY, -- UUID returned to the admin
secret_id_hash BLOB NOT NULL, -- SHA-256(raw secret_id)
role_name TEXT NOT NULL REFERENCES approle_roles(name) ON DELETE CASCADE,
expiry INTEGER NOT NULL, -- 0 = no expiry
num_uses_remaining INTEGER NOT NULL -- -1 = unlimited
);
-- Kubernetes roles
CREATE TABLE k8s_roles (
name TEXT PRIMARY KEY,
jwks_url TEXT NOT NULL,
bound_sa_names TEXT NOT NULL, -- JSON array
bound_sa_namespaces TEXT NOT NULL, -- JSON array
token_ttl_secs INTEGER NOT NULL
);
Raw token values and raw secret IDs are never written to the database — only their SHA-256 hashes.
Integration with the Cosmian KMS
The Authentication Verifier's /auth/token/lookup-self endpoint is the only point of contact between the Authentication Verifier and the KMS. The KMS calls it to validate every X-Vault-Token presented to its /v1/transit/* and /v1/<pki_mount>/* scopes.
Configure the KMS to point at the Authentication Verifier with these parameters (see KMS SPIRE/SPIFFE integration guide):
[vault]
vault_api_enabled = true
vault_auth_verifier_url = "https://auth.example.com"
vault_auth_verifier_ca_cert = "/path/to/ca.pem" # omit if using a public CA
vault_token_cache_ttl_secs = 30
The KMS exposes a single HTTPS entry point for SPIRE. The /auth/* endpoints
(login, token renew, etc.) are proxied transparently by the KMS to the
Authentication Verifier. SPIRE only needs to know the KMS address — it never contacts the
Authentication Verifier directly. No external reverse proxy (e.g. nginx) is required.
Security notes
- Login endpoints are unauthenticated —
POST /auth/approle/loginandPOST /auth/kubernetes/loginare intentionally open; the credential is the request body. Apply rate limiting at the reverse-proxy level in production. - No admin token-revocation endpoint — a leaked, not-yet-expired token can only be revoked via
revoke-self(self-service) or direct database deletion. There is no admin endpoint to revoke all tokens for a given role yet. - Secret ID consumption —
consume_secret_idatomically decrementsnum_uses_remainingin a single database transaction, preventing replay. A secret ID withnum_uses = 1is permanently invalidated after the first login. - Raw values never stored — token values and secret IDs follow the same hashing convention as passwords: only SHA-256 hashes are persisted. A database compromise does not expose any usable credential.
See also
- KMS SPIRE/SPIFFE integration guide — full end-to-end flow, KMS configuration, CLI reference, and troubleshooting.
- Authorization and Administration — the
AdminAuthmiddleware reused for AppRole/Kubernetes role administration. ckmsAppRole provisioning commands — CLI wrapper for AppRole provisioning against this API.
Session Management
This document covers the session lifecycle, the three strategies for validating sessions in your API server, the session cookie format, session actions (bulk logout), and the stale-session cleanup background task.
Table of Contents
- Session Management
The Session Cookie
On successful authentication, the server sets an _ea_ cookie:
Set-Cookie: _ea_=<cookie_string>; HttpOnly; Secure; SameSite=Strict
The cookie_string is an opaque token — a lookup key into the server-side session store. It is not a JWT and contains no embedded session data. All session state is stored server-side.
The server also returns a session_id (UUID) in the JSON response body:
{
"next_step": "Authenticated",
"session_id": "550e8400-e29b-41d4-a716-446655440000"
}
The session_id can be used to look up or invalidate the session via the API. The cookie_string (from the cookie) or the session_id (from the response body) can both be used to retrieve SessionData.
Session Lifecycle
stateDiagram-v2
[*] --> Active : POST /login\n(credentials valid)
Active --> Active : Any authenticated request\n(resets stale timer)
Active --> Stale : No request for\nsession_max_stale_age_seconds\n(idle timeout)
Stale --> [*] : Stale-session collector\nremoves it
Active --> Expired : session_max_age_seconds\nelapsed since creation\n(absolute lifetime)
Expired --> [*] : Stale-session collector\nremoves it
Active --> Invalidated : DELETE /sessions\n(explicit logout)
Invalidated --> [*] : Immediately rejected\non next request
Sessions are validated on every request. A session is considered expired when:
created_at + max_age_seconds < now(absolute lifetime exceeded), ORlast_access + max_stale_age_seconds < now(idle timeout exceeded).
The stale-session collector (a background task) periodically purges expired sessions from the store. With Redis, sessions are purged automatically via TTL.
Session Validation Strategies
Your API server can validate incoming sessions using three strategies. Choose based on your deployment's security requirements and performance constraints.
Client ──► Your API ──► Validate Session ──► Authentication Verifier
Strategy 1 — Auth Verifier Session Endpoint (recommended)
Call GET /sessions/{session_id} on the auth-verifier for every request. This is the most secure strategy: session revocations take effect immediately.
Pros: Immediate invalidation. No local state. Simple implementation. Cons: One additional HTTPS round-trip per request.
#![allow(unused)] fn main() { use auth_client::{AuthClient, AuthClientScheme}; let auth = AuthClient::new("https://auth.example.com", &ca_pem, AuthClientScheme::None)?; // Extract session_id from the _ea_ cookie value let session_id = req.cookie("_ea_").map(|c| c.value().to_string()); let session = auth.get_session(&session_id).await?; match session { None => return Err(HttpError::Unauthorized), Some(s) => { // s.username, s.realm_id, s.auth_scheme are guaranteed valid } } }
Latency mitigation: Run the auth-verifier on the same private network as your API server (or on the same host). A Redis session store further reduces lookup latency to sub-millisecond.
Strategy 2 — Direct Session Store Query
Bypass the auth-verifier HTTP API and query the session store directly. Requires your API server to have access to the session store database (PostgreSQL, Redis, etc.).
This strategy reduces latency but requires shared database access and couples the API server to the session store schema.
Pros: Lower latency (no auth-verifier round-trip). Immediate invalidation still possible. Cons: Requires database access from the API server. Schema coupling.
Strategy 3 — Offline JWT Validation
The _ea_ cookie value is a plain-text cookie_string; it is not a JWT. However, the GET /whoami?realm={realm} endpoint returns a signed JWT containing the session claims. Your API server can cache this JWT and validate it offline for a short window.
Warning: This approach delays session revocation visibility by the JWT's caching window. Use only when latency requirements preclude round-trips to the auth-verifier and you accept the security trade-off.
In practice, for most deployments Strategy 1 with a Redis session store provides sufficient performance.
Session Actions — Bulk Logout
When validating a session, you can simultaneously revoke other sessions for the same user. This is the recommended implementation for "log out everywhere else" and "log out from every device" features.
Log out everywhere else (keep current session)
#![allow(unused)] fn main() { use auth_client::{ AuthClient, AuthClientScheme, AuthenticatedClientScheme, AuthScheme, SessionsAction, }; let session = auth.get_session_with_action( ¤t_session_id, vec![ AuthenticatedClientScheme { username: "alice".to_string(), auth_scheme: AuthScheme::UsernamePassword, }, ], SessionsAction::LogoutOtherSessions, ).await?; // All of alice's other sessions are now revoked. // The current session remains active and its SessionData is returned. }
Log out from every device
#![allow(unused)] fn main() { let session = auth.get_session_with_action( ¤t_session_id, vec![ AuthenticatedClientScheme { username: "alice".to_string(), auth_scheme: AuthScheme::UsernamePassword, }, ], SessionsAction::LogoutAllSessions, ).await?; // ALL sessions for alice (including the current one) are revoked. // SessionData is returned before deletion. }
Cross-scheme bulk logout
If a user can authenticate through multiple schemes (e.g., username/password for a web app and JWT for the CLI), you can revoke sessions across all schemes:
#![allow(unused)] fn main() { let session_ids = auth.get_sessions_for_clients( "my-service", &[ AuthenticatedClientScheme { username: "alice".to_string(), auth_scheme: AuthScheme::UsernamePassword }, AuthenticatedClientScheme { username: "alice".to_string(), auth_scheme: AuthScheme::Jwt }, AuthenticatedClientScheme { username: "alice".to_string(), auth_scheme: AuthScheme::ClientCertificate }, ], ).await?; auth.delete_sessions(&session_ids).await?; }
Stale Session Cleanup
For SQL-backed session stores, a background task periodically purges sessions that have exceeded their max_age_seconds or max_stale_age_seconds.
Configure the cleanup interval in auth_verifier.toml:
[stale_session_collector_config]
# Cleanup interval in seconds. Default: 60.
cleanup_interval_seconds = 300
For Redis-backed session stores, cleanup is automatic via TTL — the collector is not needed.
You can also trigger an immediate purge of all expired sessions:
#![allow(unused)] fn main() { auth.delete_expired_sessions().await?; }
Session Parameters (per realm)
Session lifetime is configured per realm and managed via the Realm API at runtime.
| Parameter | Type | Description |
|---|---|---|
session_max_age_seconds | i64 | Maximum absolute session lifetime. The session expires this many seconds after creation regardless of activity. |
session_max_stale_age_seconds | i64 | Idle timeout. The session expires if no request has been made for this many seconds. Any authenticated request resets this timer. |
Example — short-lived sessions with a 30-minute idle timeout:
{
"id": "my-service",
"auth_params": { ... },
"session_max_age_seconds": 86400,
"session_max_stale_age_seconds": 1800
}
Example — long-lived sessions for a CLI tool:
{
"id": "cli",
"auth_params": { ... },
"session_max_age_seconds": 2592000,
"session_max_stale_age_seconds": 604800
}
Authorization and Administration
This document explains Auth's two-tier authorization model, how super admins and realm admins differ, how to bootstrap the first administrator, and how to delegate administration of individual realms.
Overview
Every Admin record in the database represents an administrator — either a super admin or a realm admin. There are no purely client-facing account types: if a Admin record exists it has administrative authority over at least one realm. Clients authenticate against /login and receive a session cookie, but the associated Admin record determines what administrative operations they may perform.
The two tiers are:
| Tier | Sentinel | Condition |
|---|---|---|
| Super Admin | Admin.realms contains "_" | Can administer any realm that has no admin of its own yet (plus always retains GET/DELETE on any realm — see below) |
| Realm Admin | Admin.realms contains one or more realm IDs | Can administer only the listed realms (and their admins) |
graph TD
SA["Super Admin<br/>realms: [#quot;_#quot;]"]
RA1["Realm Admin A<br/>realms: [#quot;finance#quot;]"]
RA2["Realm Admin B<br/>realms: [#quot;hr#quot;, #quot;payroll#quot;]"]
NEW["Realm: new-service<br/>(just created, unclaimed)"]
SA -->|direct member| ADMIN_REALM["Realm: _"]
SA -->|"bootstrap: unclaimed"| NEW
SA -.->|"GET / DELETE only\n(permanent exemption)"| FINANCE["Realm: finance"]
SA -.->|"GET / DELETE only\n(permanent exemption)"| HR["Realm: hr"]
SA -.->|"GET / DELETE only\n(permanent exemption)"| PAYROLL["Realm: payroll"]
RA1 -->|direct member| FINANCE
RA2 -->|direct member| HR
RA2 -->|direct member| PAYROLL
Once new-service gets its first admin, it moves from the super admin's solid-line bootstrap access to the same dashed, GET/DELETE-only relationship shown for finance, hr, and payroll — see Realm-Claim Lifecycle.
The _ (Admin) Realm
The string "_" is the ADMIN_REALM constant. It is a real realm stored in the database and has two purposes:
- Authentication domain — all administrator clients log in via
POST /login?realm=_. The resulting_ea_session cookie is scoped to_and authorises all admin API calls. - Super-admin sentinel — a
Adminrecord whoserealmsfield contains"_"is recognised as a super admin.
Realm-Claim Lifecycle
A realm is unclaimed from the moment it is created until it gets its first admin, and claimed from that point on. This is not a stored flag — it is recomputed on every request by checking whether any Admin record's realms list already contains the realm.
| State | Who may manage its admins, credentials, and config (PUT on the realm) |
|---|---|
| Unclaimed | The super admin (bootstrap access) — this is how the very first admin of a new realm gets created |
| Claimed | Only that realm's own admin(s). The super admin loses access, including read access, to its admins and credentials |
Two operations are exempt from this rule and stay available to the super admin permanently, regardless of claim status:
GET /admins/realms/{id}andGET /admins/realms— visibility is never revoked, so an operator can always see that a realm exists.DELETE /admins/realms/{id}— a safety net so an abandoned realm (its admins gone, or nobody ever cleaning it up) can always be removed, even though the super admin can no longer configure or administer it day to day.
The claim is re-evaluated on every request rather than recorded once: if a realm's last admin is removed, the realm reverts to unclaimed and the super admin regains bootstrap access automatically — no manual reset needed.
stateDiagram-v2
[*] --> Unclaimed: POST /admins/realms
Unclaimed --> Claimed: first admin added
Claimed --> Unclaimed: last admin removed
Claimed --> [*]: DELETE (always available\nto the super admin)
Unclaimed --> [*]: DELETE
Authorization Helper Methods
The Admin struct provides two static, database-less methods:
#![allow(unused)] fn main() { /// Returns true if this Admin record represents a super admin. pub fn is_super_admin(&self) -> bool { self.realms.contains(&ADMIN_REALM.to_string()) // "_" } /// Returns true if this Admin record directly belongs to the given realm /// (or is a super admin). A static check only — see below. pub fn can_administer_realm(&self, realm: &str) -> bool { self.realms.contains(&ADMIN_REALM.to_string()) || self.realms.contains(&realm.to_string()) } }
can_administer_realm alone only answers "does this admin directly belong to this realm?" — it has no way to know whether the realm has since been claimed by someone else, so it is not sufficient on its own for most endpoints. It remains exactly right for the two permanently-exempt operations above (GET/DELETE on a single realm), and it stays in the public client SDK as a lightweight, database-less hint (e.g. "should the UI show this button?").
Everywhere else, the server pairs it with two async, database-backed helpers that implement the realm-claim rule:
#![allow(unused)] fn main() { /// Whether `requester` may administer `realm_id` right now. Direct /// membership always grants access; a super admin who is not a direct /// member gets access only while the realm has no admin of its own yet. pub async fn can_manage_realm(requester: &Admin, realm_id: &str, database: &Data<Arc<dyn Database>>) -> Result<bool, AuthError>; /// Same, but for every realm an `Admin` record (or a create/update request /// body) lists — the claim-aware form of the exclusive-ownership rule below. pub async fn can_manage_admin_realms(requester: &Admin, realms: &[String], database: &Data<Arc<dyn Database>>) -> Result<bool, AuthError>; }
Authorization Decision Flow
flowchart TD
A[Incoming request] --> B{Authenticated?\nUserAuth middleware}
B -- No --> Z[HTTP 401 Unauthorized]
B -- Yes --> C{Endpoint category}
C -- "Realm creation\nPOST /admins/realms" --> D{is_super_admin?}
D -- No --> E[HTTP 403 Forbidden]
D -- Yes --> F[Proceed]
C -- "Permanently exempt\nGET /admins/realms{,/{id}}\nDELETE /admins/realms/{id}" --> G{"can_administer_realm(realm)?\n(static — super admin always true)"}
G -- No --> E
G -- Yes --> F
C -- "Everything else scoped to a realm\nPUT /admins/realms/{id}\n/realms/{realm}/…, TOTP, /sessions/…\nPUT|DELETE /admins/{id}/realms/{realm_id}" --> H{"Direct member\nof realm?"}
H -- Yes --> F
H -- No --> I{"is_super_admin AND\nrealm has no admin yet?"}
I -- No --> E
I -- Yes --> F
C -- "Admin CRUD\nPOST /admins,\nGET|PUT|DELETE /admins/{id}" --> OWN{"target.realms empty?\n(unaffiliated admin)"}
OWN -- Yes --> SAONLY{is_super_admin?}
SAONLY -- No --> E
SAONLY -- Yes --> F
OWN -- No --> CLAIM{"every realm in target.realms\npasses the check above?"}
CLAIM -- No --> E
CLAIM -- Yes --> PUTCHECK{"PUT only: every realm in\nthe new body also passes it?"}
PUTCHECK -- No --> E
PUTCHECK -- Yes --> F
C -- "GET /admins/realms\n(list)" --> LH{is_super_admin?}
LH -- Yes --> LI[Return all realms]
LH -- No --> LJ["Return only realms\nrequester administers"]
GET /admins and GET /admins/userpass follow the same "Admin CRUD" / "target.realms" branch as above, applied per item, to decide what the returned list includes.
Endpoint Authorization Matrix
Realm Management
| Method | Endpoint | Super Admin | Realm Admin |
|---|---|---|---|
POST | /admins/realms | ✅ | ❌ |
GET | /admins/realms/{id} | ✅ always ¹ | ✅ if can_administer_realm(id) |
PUT | /admins/realms/{id} | ✅ if unclaimed | ✅ if administers realm (once claimed) |
DELETE | /admins/realms/{id} | ✅ always ¹ | ✅ if administers realm |
GET | /admins/realms | ✅ all ¹ | ✅ filtered |
¹ GET and DELETE on a single realm, and GET on the list, are the operations permanently exempt from the realm-claim rule — see Realm-Claim Lifecycle. They still use the static can_administer_realm, not the claim-aware checks below.
Admin Management
| Method | Endpoint | Super Admin | Realm Admin |
|---|---|---|---|
POST | /admins | ✅ ² | ✅ ² |
GET | /admins/{id} | ✅ ² | ✅ ² |
PUT | /admins/{id} | ✅ ² (current AND new) | ✅ ² (current AND new) |
DELETE | /admins/{id} | ✅ ² | ✅ ² |
GET | /admins | ✅ (results filtered) | ❌ |
PUT | /admins/{id}/realms/{realm_id} | ✅ if realm unclaimed | ✅ if administers realm_id, and owns target ³ |
DELETE | /admins/{id}/realms/{realm_id} | ✅ if realm unclaimed | ✅ if administers realm_id, and owns target ³ |
² Subject to the claim-aware exclusive-ownership rule — see below. Super admins and realm admins are now treated symmetrically here: a super admin qualifies for a non-empty realm list only while every realm in it is unclaimed, exactly like a realm admin needs to already administer it. ³ Additionally requires the requester to already exclusively own every realm the target admin currently belongs to (skipped only if the target is unaffiliated) — see below.
Credential Management
All /realms/{realm}/userpass and /realms/{realm}/totp/* endpoints require can_manage_realm(realm) — the claim-aware check: a super admin qualifies only while the realm has no admin of its own yet.
| Method | Endpoint | Super Admin | Realm Admin |
|---|---|---|---|
POST | /realms/{realm}/userpass | ✅ if unclaimed | ✅ if can_manage_realm(realm) |
GET | /realms/{realm}/userpass/{username} | ✅ if unclaimed | ✅ if can_manage_realm(realm) |
PUT | /realms/{realm}/userpass/{username} | ✅ if unclaimed | ✅ if can_manage_realm(realm) |
DELETE | /realms/{realm}/userpass/{username} | ✅ if unclaimed | ✅ if can_manage_realm(realm) |
GET | /realms/{realm}/userpass | ✅ if unclaimed | ✅ if can_manage_realm(realm) |
GET | /admins/userpass | ✅ (results filtered) | ❌ |
Session Management
| Method | Endpoint | Super Admin | Realm Admin |
|---|---|---|---|
GET | /sessions/{session_id} | ✅ | ✅ if session is in an administered realm |
DELETE | /sessions/{session_id} | ✅ | ✅ if session is in an administered realm |
GET | /sessions | ✅ | ✅ filtered to administered realms |
Public / unauthenticated
| Method | Endpoint | Anyone |
|---|---|---|
GET | /public/version | ✅ |
GET | /.well-known/jwks.json | ✅ |
POST | /login | ✅ |
GET | /whoami | ✅ (no AdminAuth) |
The Exclusive-Ownership Rule
The most important protection on Admin records is the exclusive-ownership rule: nobody may CRUD an Admin record unless every realm in that record's realms list is one they administer. "Administer" here is the claim-aware check (Realm-Claim Lifecycle), not the static can_administer_realm — this applies symmetrically to realm admins and super admins. A super admin only qualifies for a non-empty realm list while every realm in it is still unclaimed.
allowed iff:
target.realms.is_empty() // unaffiliated: super admin only
|| target.realms.iter().all(|r| requester_can_manage(r)) // claim-aware, see can_manage_admin_realms
The intent is:
- Nobody can view or modify an
Adminrecord that spans multiple realms unless they administer all of them — including a super admin, once any of those realms has been claimed. - A realm admin cannot delete a super admin (
Adminrecords for super admins have"_"in theirrealmslist, and a realm admin never administers"_"). - An
Adminrecord with an emptyrealmslist is unaffiliated — not yet claimed by anyone — and only a super admin may create or manage it, regardless of what's claimed elsewhere.
PUT /admins/{id} runs the rule twice
Check 1 (current state): requester can own the user as it is now.
Check 2 (incoming body): requester can own the user as it would become.
This prevents privilege escalation: a realm admin cannot silently add "_" or a foreign/claimed realm to a user's realms list by providing it in the update body.
PUT/DELETE /admins/{id}/realms/{realm_id} also run it against the target
Granting or revoking realm membership (add_admin_to_realm / remove_admin_from_realm) additionally requires the requester to already exclusively own every realm the target admin currently belongs to — skipped only when the target is still unaffiliated. Without this, a realm admin could unilaterally extend their realm onto an admin who also serves a foreign realm they don't control — which, per the rule above, would then lock that foreign realm's own admin out of managing their own colleague.
Cookie-Realm Constraint
Session cookies are scoped to the realm through which the user logged in. A cookie issued by POST /login?realm=_ can only authenticate requests that require the _ realm's session.
The /realms/{realm}/userpass endpoints read the session cookie and check that the cookie's realm matches (or the caller is a super admin). Practically this means:
- A realm admin for
financewho logs into_cannot manage/realms/finance/userpassentries — their cookie is for_, not forfinance. They would need to authenticate as a client against thefinancerealm separately. - A super admin who logs into
_can manage/realms/_/userpassentries directly.
Bootstrapping the First Super Admin
The first super admin is seeded at server startup from two environment variables:
| Variable | Description |
|---|---|
APP_REALM_ADMIN_USERNAME | Username for the initial super admin |
APP_REALM_ADMIN_INITIAL_PASSWORD | Plaintext password (hashed with Argon2id at boot) |
At startup the server:
- Creates the
_realm if it does not exist. - Creates a
UserPassentry forAPP_REALM_ADMIN_USERNAMEin realm_. - Creates a
Adminrecord withrealms: ["_"]anduserpass: APP_REALM_ADMIN_USERNAME.
After bootstrapping, rotate or remove APP_REALM_ADMIN_INITIAL_PASSWORD from the environment.
Creating a Realm Admin
Below is the step-by-step process for creating a realm admin for a realm named my_realm.
sequenceDiagram
autonumber
participant SA as Super Admin
participant EA as Authentication Verifier
SA->>EA: POST /admins/realms<br/>{"id":"my_realm","name":"My Realm",…}
EA-->>SA: 201 Created
SA->>EA: POST /realms/_/userpass<br/>{"realm":"_","username":"alice","password":"<hashed>","change_password":false}
note over EA: Stores Argon2id hash of alice's password in realm _
EA-->>SA: 201 Created
SA->>EA: POST /admins<br/>{"id":"alice_user","realms":["my_realm"],"userpass":"alice"}
note over EA: Creates Admin record\nuserpass → foreign key into userpass table
EA-->>SA: 201 Created
note over SA: Realm admin alice is ready.
SA->>EA: POST /login?realm=_<br/>{"username":"alice","password":"<plain>"}
EA-->>SA: 200 OK + Set-Cookie: _ea_=…<br/>{"next_step":"Authenticated","session_id":"…"}
SA->>EA: GET /admins/realms/my_realm<br/>Cookie: _ea_=…
EA-->>SA: 200 OK — realm details
What alice can now do
Alice's cookie (from POST /login?realm=_) authorises:
GET/POST/PUT/DELETE /realms/_/userpass/*(credential management in_)GET /admins/realms/my_realmPOST /adminswithrealms: ["my_realm"]- CRUD on any user whose
realmsis a subset of["my_realm"]
Alice cannot:
- Create realms, or delete a realm she doesn't administer
- Access
/admins(list all users) or/admins/userpass(list all credentials) - Manage any other realm
- Manage users whose
realmsincludes something other thanmy_realm
Note:
my_realmis now claimed. From this point on, the super admin who set Alice up also loses the ability to create further admins, manage credentials, or update the config inmy_realm— only Alice (and any admin she adds) can. The super admin permanently retainsGET/DELETEonmy_realmitself (see Realm-Claim Lifecycle).
Promoting an Admin to Super Admin
Only a super admin can promote another admin to super admin, and only while that admin is still unaffiliated (empty realms) — assign "_" to its realms list:
PUT /admins/{new_admin_id}
Content-Type: application/json
Cookie: _ea_=<super_admin_cookie>
{
"id": "new_admin_id",
"realms": ["_"],
"userpass": "new_admin_login"
}
Warning: This grants full administrative access to every realm and every user. Only perform this operation when necessary, and audit the super admin list regularly.
Limitation: this does not work for an admin that already exclusively belongs to a claimed realm (e.g. Alice above, once
my_realmhas been claimed) — see Limitations and Known Caveats.
Credentials and the userpass Foreign Key
The Admin.userpass field is a username (not a password) that acts as a foreign key into the userpass table. There can be multiple UserPass rows with the same username if the same person authenticates in multiple realms.
When a Admin record is deleted, all associated UserPass credentials are cascade-deleted automatically (any orphaned credentials with the same username as admin.userpass are removed from all realms).
Limitations and Known Caveats
GET /whoami has no AdminAuth
GET /whoami returns the caller's identity from the session cookie but does not use the AdminAuth middleware. It cannot return a full Admin record — only the session claims (realm, username, and any custom claims) belonging to the authenticated client are available. It is not subject to realm-admin authorization checks.
No non-admin client accounts
There is no built-in concept of a client whose presence in the database does not confer administrative rights. Any Admin record that exists with at least one realm in its realms list is a realm admin for that realm. Applications that need non-admin client accounts should model that distinction at the application level, outside the Authentication Verifier.
Concurrent realm admin creation
Creating two realm admin users simultaneously for the same username is not prevented at the application level. The database unique constraint on userpass(username) is the only safeguard. Ensure the caller serializes user creation at the client side.
Realm-claim check is not transactional
can_manage_realm and can_manage_admin_realms read the current admin list, decide, and only then let the caller's write proceed — there is no database transaction or lock tying the two together. Two concurrent super-admin requests can both observe an unclaimed realm and both act on it (e.g. both create an admin, or both mutate its credentials) before either one's write has made the realm visibly claimed to the other. The "only that realm's own admin(s) may act on a claimed realm" rule is therefore not strictly enforced under concurrent bootstrap. This matters only during the narrow window before a realm gets its first admin; mitigate by having a single operator bootstrap each realm rather than racing two super-admin sessions against the same new realm.
Promoting an existing realm-scoped admin to super admin is not possible via the API
PUT /admins/{id} with realms: ["_"] runs the exclusive-ownership check against both the admin's current realms and the new ones (see The Exclusive-Ownership Rule). If the target already exclusively belongs to a claimed realm (the normal state of any realm admin), the super admin no longer administers that realm and fails the first check; the target itself cannot pass the second check (administering "_") without already being a super admin. PUT/DELETE /admins/{id}/realms/{realm_id} are blocked the same way. In practice, promotion to super admin only works for an admin that is still unaffiliated (empty realms) — see Promoting an Admin to Super Admin. There is currently no supported way to promote an existing realm admin directly; create a fresh unaffiliated Admin record and promote that one instead.
Client Library Guide
The auth_client crate provides an HTTP client and shared types for interacting with the Authentication Verifier. It is used by:
- API servers that need to validate incoming session cookies and manage sessions.
- Admin tools that manage realms, users, and credentials.
- The Authentication Verifier itself (internal use).
Table of Contents
- Installation
- Building a Client
- Authentication Schemes
- Session Validation
- Session Actions — Log Out Everywhere
- Logging In
- Realm Management
- Admin Management
- Credential Management
- TOTP Management
- Machine Authentication (AppRole / Kubernetes / Token)
- Public Endpoints
- Error Handling
- Types Reference
- Actix-web Integration Example
Installation
Add to your Cargo.toml:
[dependencies]
auth_client = { path = "../authentication_client" }
No Cargo features are required for session validation. The _server feature enables additional actix-web integrations and is only needed inside the Authentication Verifier crate itself.
Building a Client
All operations go through AuthClient. Create one at startup and share it as application state (it is Clone-able).
#![allow(unused)] fn main() { use auth_client::{AuthClient, AuthClientScheme}; use std::fs; // Client for session validation — no authentication needed for this role let client = AuthClient::new( "https://auth.example.com", // base URL &fs::read_to_string("ca.cert.pem")?, // PEM of the server CA certificate AuthClientScheme::None, )?; println!("Base URL: {}", client.base_url()); }
AuthClient::new returns AuthResult<AuthClient>. It fails if the CA certificate is malformed or the authentication scheme configuration is invalid (e.g., unparsable PKCS#12 archive).
Authentication Schemes
AuthClientScheme controls how the client authenticates to the Authentication Verifier crate itself. For simple session validation no authentication is needed; admin operations require a logged-in session.
#![allow(unused)] fn main() { use auth_client::AuthClientScheme; // No authentication — use for session validation and public endpoints AuthClientScheme::None // Username/password — use to log in as admin before calling management APIs AuthClientScheme::UsernamePassword { username: "admin".to_string(), password: "s3cret".to_string(), } // JWT Bearer token — use for machine-to-machine admin access AuthClientScheme::Jwt { token: jwt_string, } // Client Certificate (mTLS) — PKCS#12 DER archive + password AuthClientScheme::ClientCertificate { pkcs12_der: fs::read("client.p12")?, password: "pkcs12_password".to_string(), } }
Session cookie management: After a successful
login()call the session cookie is stored automatically in the client's built-in cookie jar and sent with all subsequent requests. You do not need to manage cookies manually.
Session Validation
The most common operation: your API server receives a request with an _ea_ cookie and needs to check whether the session is valid.
#![allow(unused)] fn main() { use auth_client::{AuthClient, AuthClientScheme, SessionData}; // Build a shared client at application startup let auth = AuthClient::new( "https://auth.example.com", &fs::read_to_string("ca.cert.pem")?, AuthClientScheme::None, )?; // Later, in a request handler — extract session_id from the _ea_ cookie let session_id = extract_session_id_from_cookie(&request); let session: Option<SessionData> = auth.get_session(&session_id).await?; match session { None => { // Session not found or expired — return 401 } Some(data) => { println!("Authenticated: {} in realm {}", data.username, data.realm_id); // data.auth_scheme — "up" | "jwt" | "cc" | "f2" | "dc" | "sa" // data.created_at — Unix timestamp } } }
get_session maps to GET /sessions/{session_id}. It returns None — not an error — when the session is not found.
SessionData fields
| Field | Type | Description |
|---|---|---|
session_id | String | Unique session identifier (UUID) |
realm_id | String | Realm the session belongs to |
username | String | Authenticated client identity |
auth_scheme | String | "up" / "jwt" / "cc" / "f2" / "dc" / "sa" |
cookie_string | String | Opaque value from the _ea_ cookie |
max_age_seconds | i64 | Maximum absolute session lifetime |
max_stale_age_seconds | i64 | Idle timeout; any access resets this timer |
created_at | i64 | Unix timestamp of session creation |
Session Actions — Log Out Everywhere
You can validate a session and perform a bulk logout in a single round-trip. This implements "keep this session, revoke all others" and "log out from every device" patterns.
#![allow(unused)] fn main() { use auth_client::{ AuthClient, AuthClientScheme, AuthenticatedClientScheme, AuthScheme, SessionsAction, }; let auth = AuthClient::new("https://auth.example.com", &ca_pem, AuthClientScheme::None)?; let current_session_id = "550e8400-e29b-41d4-a716-446655440000"; // Validate the session AND revoke all other sessions for alice in one call let session = auth.get_session_with_action( current_session_id, vec![AuthenticatedClientScheme { username: "alice".to_string(), auth_scheme: AuthScheme::UsernamePassword, }], SessionsAction::LogoutOtherSessions, ).await?; }
SessionsAction | Effect |
|---|---|
LogoutOtherSessions | Deletes all sessions for the given clients except the current one. |
LogoutAllSessions | Deletes all sessions for the given clients including the current one. Session data is returned before deletion. |
Look up session IDs across authentication schemes
#![allow(unused)] fn main() { use auth_client::{AuthenticatedClientScheme, AuthScheme}; let session_ids = auth.get_sessions_for_clients( "my-service", &[ AuthenticatedClientScheme { username: "alice".to_string(), auth_scheme: AuthScheme::UsernamePassword }, AuthenticatedClientScheme { username: "alice".to_string(), auth_scheme: AuthScheme::Jwt }, AuthenticatedClientScheme { username: "alice".to_string(), auth_scheme: AuthScheme::ClientCertificate }, ], ).await?; // Revoke all found sessions auth.delete_sessions(&session_ids).await?; }
Explicit logout
#![allow(unused)] fn main() { // Delete specific sessions auth.delete_sessions(&[session_id.to_string()]).await?; // Delete all sessions in a realm auth.delete_sessions_for_realm("my-service").await?; // Purge all globally expired sessions (maintenance) auth.delete_expired_sessions().await?; }
Logging In
Admin operations require a logged-in session. The login() method stores the session cookie automatically.
#![allow(unused)] fn main() { use auth_client::{AuthClient, AuthClientScheme, AuthenticationNextStep}; let admin = AuthClient::new( "https://auth.example.com", &fs::read_to_string("ca.cert.pem")?, AuthClientScheme::UsernamePassword { username: "admin".to_string(), password: "s3cret".to_string(), }, )?; let (result, _cookie) = admin.login("_", None).await?; match result.next_step { AuthenticationNextStep::Authenticated => { println!("Logged in. Session: {}", result.session_id.unwrap()); } AuthenticationNextStep::TotpRequired => { // Prompt for TOTP code then re-login: let code = prompt_for_totp_code(); let (result2, _) = admin.login("_", Some(code)).await?; assert!(matches!(result2.next_step, AuthenticationNextStep::Authenticated)); } AuthenticationNextStep::ChangePassword => { // Handle forced password change } } }
Realm Management
Realm management requires super admin authentication.
#![allow(unused)] fn main() { use auth_client::{Realm, RealmAuthParams}; // List all realms let realms: Vec<Realm> = admin.list_realms_as_super_admin().await?; // Create a new realm with username/password authentication let realm = Realm { id: "my-service".to_string(), auth_params: serde_json::from_str(r#"{ "username_password_params": { "allow_expired_passwords": false } }"#)?, session_max_age_seconds: 3600, session_max_stale_age_seconds: 1800, }; admin.create_realm_as_super_admin(&realm).await?; // Create a realm with JWT/OIDC authentication (e.g., Google Sign-In) let jwt_realm = Realm { id: "google-login".to_string(), auth_params: serde_json::from_str(r#"{ "jwt_params": { "idp_params": [{ "jwt_issuer_uri": "https://accounts.google.com", "jwks_uri": "https://www.googleapis.com/oauth2/v3/certs", "jwt_audience": "my-client-id.apps.googleusercontent.com" }] } }"#)?, session_max_age_seconds: 28800, session_max_stale_age_seconds: 3600, }; admin.create_realm_as_super_admin(&jwt_realm).await?; // Retrieve a realm let r: Realm = admin.get_realm_as_super_admin("my-service").await?; // Update a realm admin.update_realm_as_super_admin("my-service", &r).await?; // Delete a realm admin.delete_realm_as_super_admin("my-service").await?; }
Admin Management
#![allow(unused)] fn main() { use auth_client::Admin; // Create a realm admin (can manage "my-service" and "other-service") let user = Admin { id: "bob".to_string(), realms: vec!["my-service".to_string(), "other-service".to_string()], userpass: Some("bob".to_string()), jwt: None, fido2: None, digital_credentials: None, client_certificate: None, totp_enabled: Some(false), totp_secret: None, totp_auth_url: None, }; let created: Admin = admin.create_admin_as_super_admin(&user).await?; // Check admin roles assert!(created.can_administer_realm("my-service")); assert!(!created.is_super_admin()); // List all users let all: Vec<Admin> = admin.list_admins_as_super_admin().await?; // Add / remove realm from user admin.add_admin_to_realm("bob", "another-realm").await?; admin.remove_admin_from_realm("bob", "another-realm").await?; // Delete admin.delete_admin_as_super_admin("bob").await?; }
Credential Management
Passwords are hashed with Argon2id server-side. Pass the plaintext password via
password_input: Some(PasswordInput::Plaintext(...)). The server stores only the hash in
password_hash, which is server-computed and always empty in responses and ignored on input.
#![allow(unused)] fn main() { use auth_client::{PasswordInput, UserPass}; // Create credentials admin.create_admin_credentials_in_realm( "my-service", &UserPass { realm: "my-service".to_string(), username: "alice".to_string(), password_hash: String::new(), password_input: Some(PasswordInput::Plaintext("hunter2".to_string())), change_password: false, roles: vec!["CryptoOfficer".to_string()], extra_claims: None, }, ).await?; // Read back — password_hash is always empty let stored: UserPass = admin.get_admin_credentials_in_realm("my-service", "alice").await?; assert!(stored.password_hash.is_empty()); // Force password change on next login admin.update_admin_credentials_in_realm( "my-service", "alice", &UserPass { realm: "my-service".to_string(), username: "alice".to_string(), password_hash: String::new(), password_input: Some(PasswordInput::Plaintext("new-password".to_string())), change_password: true, roles: vec!["CryptoOfficer".to_string()], extra_claims: None, }, ).await?; // List all credentials in a realm let all: Vec<UserPass> = admin.list_admin_credentials_in_realm("my-service").await?; // Delete admin.delete_admin_credentials_in_realm("my-service", "alice").await?; }
Provisioning a pre-computed password hash
password_input is required on create — either PasswordInput::Plaintext(String) or
PasswordInput::Hashed(String), mutually exclusive by construction. Use Hashed to
provision a credential without ever sending its plaintext to this server — e.g. a script
that hashes locally before calling this API. The value must be a PHC string using
exactly this server's own Argon2id cost parameters (m=65536,t=3,p=4, RFC 9106 §4's
recommended option for deployments without a secret pepper key); the server rejects it with
400 if it doesn't parse as PHC, isn't argon2id, or its cost parameters don't match
exactly. The blanket PasswordVerifier derives its cost parameters from the stored
string, so an unbounded m would let an unauthenticated login attempt allocate arbitrary
memory before the password comparison even runs — pinning to one known-safe preset closes
that off.
#![allow(unused)] fn main() { admin.create_admin_credentials_in_realm( "my-service", &UserPass { realm: "my-service".to_string(), username: "bob".to_string(), password_hash: String::new(), password_input: Some(PasswordInput::Hashed( "$argon2id$v=19$m=65536,t=3,p=4$<salt>$<hash>".to_string(), )), change_password: false, roles: vec![], extra_claims: None, }, ).await?; }
The same rule applies on update: leave password_input as None to keep the existing
password unchanged while only updating roles/change_password.
Extra claims
extra_claims are set by the realm admin at enrollment and merged into the session JWT's
top-level claims on username/password login (see
authentication_flows.md for which auth schemes this applies
to). They can be selectively copied into a POST /certify certificate by name — see
api_reference.md.
#![allow(unused)] fn main() { use serde_json::json; use std::collections::HashMap; admin.create_admin_credentials_in_realm( "my-service", &UserPass { realm: "my-service".to_string(), username: "alice".to_string(), password_hash: String::new(), password_input: Some(PasswordInput::Plaintext("hunter2".to_string())), change_password: false, roles: vec!["CryptoOfficer".to_string()], extra_claims: Some(HashMap::from([ ("as_registrant".to_string(), json!("acme-corp")), ])), }, ).await?; }
TOTP Management
TOTP enrollment is a two-step process: generate a secret, show the QR code to the user, then verify one code to confirm enrollment.
#![allow(unused)] fn main() { use auth_client::TotpGenerateResponse; // Step 1 — generate a TOTP secret (not stored yet) let resp: TotpGenerateResponse = admin .generate_totp("my-service", "alice", Some("My App".to_string())) .await?; println!("Secret: {}", resp.secret_base32); println!("QR code URL: {}", resp.otpauth_url); // Render resp.otpauth_url as a QR code and show it to the user // Step 2 — user scans the QR code and provides the current code let totp_code = prompt_user_for_code(); // e.g., "482913" admin.verify_and_enable_totp( "my-service", "alice", &resp.secret_base32, &totp_code, Some("My App".to_string()), ).await?; // TOTP is now active. Alice's next login will return `TotpRequired`. // Disable TOTP admin.disable_totp("my-service", "alice").await?; }
Machine Authentication (AppRole / Kubernetes / Token)
These methods are used by machine clients (SPIRE, CI pipelines, Kubernetes workloads). They do not use session cookies — they produce opaque app tokens (X-Vault-Token).
AppRole provisioning (admin operations)
#![allow(unused)] fn main() { use auth_client::{AppRoleRequest, AppRoleSecretIdRequest}; // Create or update a role (requires admin session) client.approle_create_role("spire-server", &AppRoleRequest { token_ttl: 3600, secret_id_ttl: 86400, token_policies: vec!["default".to_string()], bind_secret_id: true, }).await?; // Read the stable role_id to hand to the service let role_id_resp = client.approle_get_role_id("spire-server").await?; let role_id = role_id_resp.data.role_id; println!("role_id: {role_id}"); // Generate a secret_id (single-use by default) let secret_resp = client.approle_generate_secret_id("spire-server", &AppRoleSecretIdRequest { ttl: 0, num_uses: 1, }).await?; let secret_id = secret_resp.data.secret_id; let accessor = secret_resp.data.secret_id_accessor; println!("secret_id: {secret_id} accessor: {accessor}"); // Destroy a secret_id by accessor (without knowing its value) client.approle_destroy_secret_id("spire-server", &accessor).await?; // List all role names let roles = client.approle_list_roles().await?; println!("roles: {:?}", roles.data.keys); // Delete a role (cascades to all its secret IDs) client.approle_delete_role("spire-server").await?; }
AppRole login (client operation)
#![allow(unused)] fn main() { use auth_client::AppAuthResponse; // Exchange role_id + secret_id for an app token let auth: AppAuthResponse = client .approle_login(&role_id, Some(&secret_id)) .await?; let token = auth.auth.client_token; println!("app token: {token}"); println!("renewable: {}, ttl: {}s", auth.auth.renewable, auth.auth.lease_duration); }
Kubernetes role provisioning (admin operations)
#![allow(unused)] fn main() { use auth_client::K8sRoleRequest; // Create or update a Kubernetes role (requires admin session) client.k8s_create_role("my-k8s-role", &K8sRoleRequest { jwks_url: "https://kubernetes.default.svc/.well-known/jwks.json".to_string(), bound_service_account_names: vec!["my-app".to_string()], bound_service_account_namespaces: vec!["production".to_string()], token_ttl: 3600, expected_issuer: None, bound_audiences: None, }).await?; // Delete a Kubernetes role client.k8s_delete_role("my-k8s-role").await?; }
Kubernetes login (client operation)
#![allow(unused)] fn main() { // Read the projected service-account JWT from the pod filesystem let jwt = std::fs::read_to_string( "/var/run/secrets/kubernetes.io/serviceaccount/token" )?; let auth = client.k8s_login("my-k8s-role", &jwt).await?; let token = auth.auth.client_token; }
Token self-service
#![allow(unused)] fn main() { use auth_client::APP_TOKEN_HEADER; // Validate a token and read its metadata let lookup = client.token_lookup_self(&token).await?; println!("entity: {}, ttl: {}s", lookup.data.entity_id, lookup.data.ttl); // Renew a token (resets TTL to lease_duration) let renewed = client.token_renew_self(&token).await?; println!("new lease_duration: {}s", renewed.auth.lease_duration); // Revoke a token immediately client.token_revoke_self(&token).await?; // The header constant, if you need to set it manually: println!("Header name: {APP_TOKEN_HEADER}"); // "X-Vault-Token" }
Public Endpoints
#![allow(unused)] fn main() { // Server version — no authentication required let version: String = client.get_version().await?; println!("Auth server version: {}", version); // Current session claims — requires a valid session cookie in the jar use auth_client::ClientClaims; let claims: ClientClaims = client.whoami("_").await?; println!("Logged in as: {}", claims.registered.sub.as_deref().unwrap_or("unknown")); }
Error Handling
All methods return AuthResult<T>, which is Result<T, AuthError>.
#![allow(unused)] fn main() { use auth_client::AuthError; match client.get_session("bad-id").await { Ok(None) => { /* session not found — normal path */ } Ok(Some(s)) => { /* valid session */ } Err(AuthError::FailedHttpStatus(msg)) => eprintln!("Auth server error: {}", msg), Err(AuthError::SessionNotFound) => eprintln!("Session not found"), Err(AuthError::Config(msg)) => eprintln!("Client config error: {}", msg), Err(AuthError::JWT(msg)) => eprintln!("JWT error: {}", msg), Err(e) => eprintln!("Unexpected error: {}", e), } }
| Variant | Meaning |
|---|---|
AuthError::FailedHttpStatus(msg) | Non-2xx response; msg contains status code and body |
AuthError::SessionNotFound | GET /sessions/{id} returned 404 |
AuthError::Config(msg) | Client misconfiguration (bad URL, certificate parse error, etc.) |
AuthError::JWT(msg) | JWT signing or validation failure |
AuthError::Generic(msg) | Network or serialization error |
Types Reference
AuthClientScheme
#![allow(unused)] fn main() { pub enum AuthClientScheme { None, Jwt { token: String }, ClientCertificate { pkcs12_der: Vec<u8>, password: String }, UsernamePassword { username: String, password: String }, } }
AuthScheme (wire format in AuthenticatedClientScheme)
| Rust Variant | JSON value |
|---|---|
UsernamePassword | "up" |
Jwt | "jwt" |
ClientCertificate | "cc" |
Fido2 | "f2" |
DigitalCredentials | "dc" |
Saml | "sa" |
AuthenticationNextStep
| Variant | Meaning |
|---|---|
Authenticated | Login complete; session cookie issued |
TotpRequired | Primary credentials accepted; re-submit with totp_code |
ChangePassword | Password has expired; must be changed |
ClientClaims
Returned by whoami(). The struct has three flattened sub-structs — the JWT is a
flat JSON object on the wire; the sub-struct boundaries exist only in Rust:
#![allow(unused)] fn main() { pub struct ClientClaims { pub registered: RegisteredClaims, // RFC 7519 §4.1 pub authorization: AuthorizationClaims, // RFC 9068 §2.2.3.1 pub private: AuthPrivateClaims, // Auth-specific pub extra: HashMap<String, Value>, } pub struct RegisteredClaims { pub iss: Option<String>, // Issuer pub sub: Option<String>, // Subject (username) pub aud: Option<Vec<String>>, // Audience pub exp: Option<i64>, // Expiry (Unix secs) pub nbf: Option<i64>, // Not-before (Unix secs) pub iat: Option<i64>, // Issued-at (Unix secs) pub jti: Option<String>, // JWT ID } /// Authorization claims (RFC 9068 §2.2.3.1 / RFC 7643 §4.1.2). pub struct AuthorizationClaims { // "roles" — RBAC roles assigned to the user at credential level. // Omitted when empty (fail-closed in OPA and downstream consumers). pub roles: Option<Vec<String>>, } pub struct AuthPrivateClaims { // "as_as" — auth scheme: "up" | "jwt" | "cc" | "f2" | "dc" | "sa" pub auth_scheme: Option<AuthScheme>, // "as_rid" — realm ID (also used as the OPA domain scope) pub realm_id: Option<String>, } }
Reading roles from a validated session
#![allow(unused)] fn main() { let claims: ClientClaims = client.whoami("my-service").await?; let roles = claims.authorization.roles.as_deref().unwrap_or(&[]); if roles.contains(&"CryptoOfficer".to_string()) { // grant access to crypto operations } }
Wire format example
A token issued for a user with the CryptoOfficer role in realm acme looks like:
{
"sub": "alice",
"exp": 1893456000,
"iat": 1893452400,
"roles": ["CryptoOfficer"],
"as_as": "up",
"as_rid": "acme"
}
The roles claim is absent (not []) when the credential has no roles assigned,
so downstream OPA policies can treat absence as fail-closed without an explicit
empty-array check.
Actix-web Integration Example
A complete pattern for an Actix-web API server that validates sessions via the Authentication Verifier.
use std::sync::Arc; use actix_web::{web, HttpRequest, HttpResponse, middleware}; use auth_client::{AuthClient, AuthClientScheme, AuthError, SessionData}; /// Shared application state containing the auth client. pub struct AppState { pub auth: Arc<AuthClient>, } /// Extract and validate the _ea_ session cookie. async fn validate_session( state: &AppState, req: &HttpRequest, ) -> Result<SessionData, HttpResponse> { let cookie = req .cookie("_ea_") .ok_or_else(|| HttpResponse::Unauthorized().body("Missing _ea_ cookie"))?; state .auth .get_session(cookie.value()) .await .map_err(|e| HttpResponse::InternalServerError().body(e.to_string()))? .ok_or_else(|| HttpResponse::Unauthorized().body("Session not found or expired")) } /// A protected endpoint. async fn protected_handler( state: web::Data<AppState>, req: HttpRequest, ) -> HttpResponse { let session = match validate_session(&state, &req).await { Ok(s) => s, Err(resp) => return resp, }; HttpResponse::Ok().json(serde_json::json!({ "message": format!("Hello, {}!", session.username), "realm": session.realm_id, })) } /// Build the shared auth client at application startup. pub fn build_auth_client( auth_verifier_url: &str, ca_cert_pem: &str, ) -> Arc<AuthClient> { Arc::new( AuthClient::new(auth_verifier_url, ca_cert_pem, AuthClientScheme::None) .expect("Failed to build auth client"), ) } #[actix_web::main] async fn main() -> std::io::Result<()> { use actix_web::{App, HttpServer}; let ca_pem = std::fs::read_to_string("ca.cert.pem").unwrap(); let auth = build_auth_client("https://auth.example.com", &ca_pem); HttpServer::new(move || { App::new() .app_data(web::Data::new(AppState { auth: auth.clone() })) .route("/api/resource", web::get().to(protected_handler)) }) .bind("0.0.0.0:8080")? .run() .await }
API Reference
Complete reference for all HTTP endpoints exposed by the Authentication Verifier.
All endpoints are served over HTTPS only. The base URL is https://{host}:{port}.
Table of Contents
- Public Endpoints
- Authentication — Login and Session Claims
- SAML 2.0 Single Sign-On
- Session Management
- Machine Authentication (AppRole / Kubernetes / Token)
- Realm Administration
- Admin Administration
- Credential Management
- TOTP Management
- Common Response Codes
- Authentication for Admin Endpoints
- Data Types
Public Endpoints
No authentication required.
GET /public/version
Returns the server version string.
Response
HTTP/1.1 200 OK
Content-Type: text/plain
"0.1.2"
GET /.well-known/jwks.json
Returns the JSON Web Key Set containing the server's public key(s) for JWT signature verification.
Note: Only available in test builds. Production deployments expose JWKS through the Identity Provider's own JWKS endpoint.
Response
{
"keys": [
{
"kty": "EC",
"crv": "P-256",
"x": "...",
"y": "...",
"use": "sig"
}
]
}
GET /.well-known/certificate-jwks.json
Returns the JSON Web Key Set for the certificate signing key used by POST /certify —
deliberately a separate document from /.well-known/jwks.json, since certificates are
signed with a key distinct from the session JWT key. Same response shape as above.
Response — 404 Not Found — certificate signing is not configured on this server.
Authentication — Login and Session Claims
POST /login?realm={realm_id}
Authenticate a client and issue a session cookie. The authentication method is determined by the Authorization header or the request body.
Authentication methods:
| Method | How to supply credentials |
|---|---|
| Username/Password | Authorization: Basic <base64(username:password)> |
| JWT Bearer | Authorization: Bearer <jwt_token> |
| Client Certificate | Client certificate in TLS handshake |
Request body (optional — for the TOTP code)
{
"totp_code": "482913"
}
| Field | Type | Description |
|---|---|---|
totp_code | String | null | TOTP verification code for 2FA step |
Response — 200 OK
{
"next_step": "Authenticated",
"session_id": "550e8400-e29b-41d4-a716-446655440000"
}
Set-Cookie header: _ea_=<cookie_string>; HttpOnly; Secure; SameSite=Strict
| Field | Type | Description |
|---|---|---|
next_step | "Authenticated" | "TotpRequired" | "ChangePassword" | What the client should do next |
session_id | String | null | UUID of the new session (only present when Authenticated) |
Response — 401 Unauthorized — credentials invalid or missing.
Response — 200 OK with "next_step": "TotpRequired" — primary credentials valid but TOTP code is required. Re-submit the request with totp_code.
GET /whoami?realm={realm_id}
Returns the JWT claims for the currently authenticated session.
Authentication: Session cookie (_ea_ cookie).
Response — 200 OK
{
"iss": "auth-auth",
"sub": "alice",
"aud": ["my-service"],
"exp": 1745000000,
"iat": 1744996400,
"as_as": "up",
"as_rid": "my-service"
}
See Data Types — ClientClaims for the full field reference.
Response — 401 Unauthorized — no valid session cookie.
POST /certify?realm={realm_id}
Certify a verification (public) key under the identity of the currently authenticated
session. Returns a long-lived, ES256-signed certificate binding the caller's realm_id,
sub and auth_scheme to the supplied key — signed with a dedicated certificate signing
key, entirely separate from the session JWT key, so the certificate can never be presented
back as a session cookie/token.
Authentication: Session cookie (_ea_ cookie).
Request body:
{
"verification_key": "-----BEGIN PUBLIC KEY-----\n...\n-----END PUBLIC KEY-----",
"claims": ["as_registrant"],
"exclude_sub": false
}
| Field | Type | Description |
|---|---|---|
verification_key | String | PEM-encoded public key to certify |
claims | String[] | Optional, default []. Names of the session's extra claims to copy into the certificate. Only names both listed here and present in the session are included — nothing is copied by default. |
exclude_sub | bool | Optional, default false. Omit sub from the certificate. Only allowed when claims yields at least one claim actually present in the session — a certificate can't identify nobody. |
Response — 200 OK
{
"certificate": "eyJhbGciOiJFUzI1NiJ9..."
}
certificate is a compact JWS (alg: ES256) whose payload is a
CertificateClaims object.
Response — 400 Bad Request — verification_key missing, empty, not PEM-shaped
(-----BEGIN .../-----END ...), or longer than 8192 bytes; or exclude_sub: true while
the requested/present intersection of claims is empty.
Response — 401 Unauthorized — no valid session cookie.
Response — 500 Internal Server Error — certificate signing is not configured on this
server (no certificate_jwt_params).
SAML 2.0 Single Sign-On
Browser endpoints of the SAML Service Provider. They exist only on servers built with the
saml feature and configured with [saml_sp_params]; otherwise they return 404. See
SAML 2.0 single sign-on for setup and the validation rules.
GET /saml/{realm_id}/login
Start a login at the realm's IdP. Meant to be opened by the browser, not called by API clients.
| Query parameter | Required | Description |
|---|---|---|
return_to | No | Where the browser goes after login: an https URL under one of the realm's allowed_return_origins. Defaults to default_return_url. |
Response — 302 Found — Location is the IdP sign-in URL carrying a signed AuthnRequest
(HTTP-Redirect binding) whose RelayState is the request ID. Also sets
_ea_saml=<request ID>; Secure; HttpOnly; SameSite=None; Path=/; Max-Age=600.
Response — 400 Bad Request — unknown realm, realm without SAML, or return_to not allowed.
POST /saml/{realm_id}/acs
Assertion Consumer Service: the IdP's response arrives here through the browser (HTTP-POST
binding, application/x-www-form-urlencoded).
| Form field | Description |
|---|---|
SAMLResponse | Base64-encoded SAML <Response> |
RelayState | The request ID from the login redirect; must equal the _ea_saml cookie |
Response — 200 OK — an HTML page sending the browser on to the login's return URL, with
Set-Cookie: _ea_=<cookie_string>; HttpOnly; Secure; SameSite=Strict (auth scheme sa) and
the _ea_saml cookie cleared.
Response — 400 Bad Request — unknown realm or realm without SAML.
Response — 401 Unauthorized — "SAML error: <reason>": the login wasn't started from
this browser, the request is unknown, expired or already used, or the response fails
validation.
GET /saml/{realm_id}/metadata
This server's SAML 2.0 SP metadata for the realm (entity ID, ACS URL, NameID format, signing
certificate, AuthnRequestsSigned="true"), to import into the IdP.
Response — 200 OK — Content-Type: application/samlmetadata+xml.
Response — 400 Bad Request — unknown realm or realm without SAML.
Session Management
GET /sessions/{session_id}
Retrieve session data by session ID. Returns null (not an error) when the session does not exist or has expired.
Response — 200 OK (session found)
{
"session_id": "550e8400-e29b-41d4-a716-446655440000",
"realm_id": "my-service",
"username": "alice",
"auth_scheme": "up",
"cookie_string": "eyJ…",
"max_age_seconds": 3600,
"max_stale_age_seconds": 1800,
"created_at": 1744996400
}
Response — 200 OK (session not found)
null
POST /sessions/{session_id}
Retrieve session data and optionally apply a bulk logout action in the same request.
Request body
{
"authenticated_clients": [
{ "username": "alice", "auth_scheme": "UsernamePassword" }
],
"sessions_action": "LogoutOtherSessions"
}
| Field | Type | Description |
|---|---|---|
authenticated_clients | AuthenticatedClientScheme[] | Clients whose sessions may be affected |
sessions_action | "LogoutOtherSessions" | "LogoutAllSessions" | null | Action to perform alongside the lookup |
sessions_action values:
| Value | Effect |
|---|---|
"LogoutOtherSessions" | Delete all sessions for the given clients except the queried one |
"LogoutAllSessions" | Delete all sessions for the given clients (including the queried one); session data is returned before deletion |
Response — 200 OK — same shape as GET /sessions/{id}.
POST /sessions/realms/{realm_id}/clients
Return all session IDs for a set of authenticated clients in a realm.
Request body
[
{ "username": "alice", "auth_scheme": "UsernamePassword" },
{ "username": "alice", "auth_scheme": "Jwt" }
]
Response — 200 OK
{
"session_ids": [
"550e8400-e29b-41d4-a716-446655440000",
"660f9511-f3ac-52e5-c827-557766551111"
]
}
DELETE /sessions
Delete sessions by ID.
Request body
{
"session_ids": [
"550e8400-e29b-41d4-a716-446655440000"
]
}
Response — 204 No Content — empty body.
DELETE /sessions/expired
Delete all expired sessions from the session store.
Response — 204 No Content — empty body.
DELETE /sessions/realms/{realm_id}
Delete all sessions for a given realm (administrative bulk logout).
Response — 204 No Content — empty body.
Machine Authentication (AppRole / Kubernetes / Token)
Endpoints for machine-to-machine authentication. These sit under the /auth/ prefix. Login endpoints are unauthenticated (the credential is the request body). Role management endpoints require an active admin session cookie. Token self-service endpoints require a valid X-Vault-Token header.
For complete request/response examples and field descriptions see app_auth_api.md.
POST /auth/approle/login
Exchange a role_id + secret_id pair for an opaque app token. Also accepts PUT (SPIRE compatibility).
Request body
{
"role_id": "a5d7e2f1-0c3b-4a8d-9e6f-1234567890ab",
"secret_id": "b7c4e9d2-1a2b-4c3d-8e5f-fedcba987654"
}
secret_id is optional when the role has bind_secret_id: false.
Response — 200 OK
{
"auth": {
"client_token": "hvs.AAAAAQIDBAUGBwgJCgsMDQ4PEBESExQVFhcYGRob",
"renewable": true,
"lease_duration": 3600,
"policies": ["default"],
"metadata": { "role_name": "spire-server" }
}
}
Error responses: 400 Bad Request (invalid role_id or secret_id), 403 Forbidden (secret_id exhausted).
POST /auth/approle/role/{name}
Create or update an AppRole role. Requires admin session cookie.
Path parameter
name — role name (unique identifier for this role)
Request body
{
"token_ttl": 3600,
"secret_id_ttl": 86400,
"token_policies": ["default"],
"bind_secret_id": true
}
| Field | Type | Default | Description |
|---|---|---|---|
token_ttl | integer | 3600 | Token lifetime in seconds |
secret_id_ttl | integer | 0 | Secret ID lifetime in seconds; 0 = no expiry |
token_policies | array | [] | Policies attached to every issued token |
bind_secret_id | boolean | true | If false, login succeeds with role_id alone |
Response — 204 No Content
GET /auth/approle/role/{name}/role-id
Read the stable role_id for a role. Requires admin session cookie.
Response — 200 OK
{ "data": { "role_id": "a5d7e2f1-0c3b-4a8d-9e6f-1234567890ab" } }
POST /auth/approle/role/{name}/secret-id
Generate a new secret_id for a role. Requires admin session cookie.
Request body
{ "ttl": 0, "num_uses": 1 }
| Field | Type | Default | Description |
|---|---|---|---|
ttl | integer | 0 | Per-secret-ID TTL override in seconds; 0 = use role default |
num_uses | integer | 0 | Max login uses; 0 = unlimited |
Response — 200 OK
{
"data": {
"secret_id": "b7c4e9d2-1a2b-4c3d-8e5f-fedcba987654",
"secret_id_accessor": "9f8e7d6c-5b4a-3c2d-1e0f-abcdef012345"
}
}
Save the secret_id — it cannot be retrieved again. Use the secret_id_accessor to destroy it without knowing the value.
POST /auth/approle/role/{name}/secret-id/destroy
Invalidate a secret_id by its accessor. Requires admin session cookie.
Request body
{ "secret_id_accessor": "9f8e7d6c-5b4a-3c2d-1e0f-abcdef012345" }
Response — 204 No Content
DELETE /auth/approle/role/{name}
Delete a role and all its secret IDs (cascade). Requires admin session cookie.
Response — 204 No Content
GET /auth/approle/role?list=true
List all AppRole role names. Requires admin session cookie.
Response — 200 OK
{ "data": { "keys": ["spire-server", "mistral-agents"] } }
POST /auth/kubernetes/login
Exchange a Kubernetes service-account JWT for an app token.
Request body
{
"role": "my-k8s-role",
"jwt": "<service-account JWT from /var/run/secrets/kubernetes.io/serviceaccount/token>"
}
Response — 200 OK
{
"auth": {
"client_token": "hvs.AAAAAQIDBAUGBwgJCgsMDQ4PEBESExQVFhcYGRob",
"renewable": true,
"lease_duration": 3600,
"policies": [],
"metadata": {}
}
}
Error responses: 400 Bad Request (invalid JWT or role), 403 Forbidden (SA name / namespace not in allow-list).
POST /auth/kubernetes/role/{name}
Create or update a Kubernetes auth role. Requires admin session cookie.
Request body
{
"jwks_url": "https://kubernetes.default.svc/.well-known/jwks.json",
"bound_service_account_names": ["my-app"],
"bound_service_account_namespaces": ["production"],
"token_ttl": 3600
}
| Field | Type | Description |
|---|---|---|
jwks_url | string | URL of the Kubernetes JWKS endpoint |
bound_service_account_names | array | Allowed SA names; ["*"] = any |
bound_service_account_namespaces | array | Allowed namespaces; ["*"] = any |
token_ttl | integer | Token lifetime in seconds |
expected_issuer | string (optional) | If set, validates JWT iss claim |
bound_audiences | array (optional) | If set, validates JWT aud claim |
Response — 204 No Content
DELETE /auth/kubernetes/role/{name}
Delete a Kubernetes role. Requires admin session cookie.
Response — 204 No Content
GET /auth/token/lookup-self
Validate an app token and return its metadata.
Request header
X-Vault-Token: hvs.AAAAAQIDBAUGBwgJCgsMDQ4PEBESExQVFhcYGRob
Response — 200 OK
{
"data": {
"id": "hvs.AAAAAQIDBAUGBwgJCgsMDQ4PEBESExQVFhcYGRob",
"entity_id": "spire-server",
"policies": ["default"],
"renewable": true,
"ttl": 3541,
"creation_time": 1753670400
}
}
Error response: 403 Forbidden — token missing, invalid, expired, or revoked.
POST /auth/token/renew-self
Extend a renewable token's TTL back to its configured lease_duration.
Request header
X-Vault-Token: hvs.AAAAAQIDBAUGBwgJCgsMDQ4PEBESExQVFhcYGRob
Response — 200 OK
{
"auth": {
"client_token": "hvs.AAAAAQIDBAUGBwgJCgsMDQ4PEBESExQVFhcYGRob",
"renewable": true,
"lease_duration": 3600,
"policies": ["default"],
"metadata": {}
}
}
Error response: 403 Forbidden — token not found, expired, or not renewable.
POST /auth/token/revoke-self
Immediately invalidate the current token.
Request header
X-Vault-Token: hvs.AAAAAQIDBAUGBwgJCgsMDQ4PEBESExQVFhcYGRob
Response — 204 No Content
Realm Administration
Realm CRUD endpoints live under /admins/realms. Creating, updating, and deleting realms requires super admin privileges. Listing and getting a single realm is accessible to any authenticated admin (filtered to their administered realms).
POST /admins/realms
Create a new realm. Super admin only.
Request body
{
"id": "my-service",
"auth_params": {
"username_password_params": {
"allow_expired_passwords": false
}
},
"session_max_age_seconds": 3600,
"session_max_stale_age_seconds": 1800
}
Response — 201 Created — created Realm object.
Response — 409 Conflict — realm ID already exists.
GET /admins/realms/{realm_id}
Retrieve a realm by ID. Realm admins may only retrieve realms they administer.
Response — 200 OK
{
"id": "my-service",
"auth_params": { "username_password_params": { "allow_expired_passwords": false } },
"session_max_age_seconds": 3600,
"session_max_stale_age_seconds": 1800
}
Response — 404 Not Found — realm does not exist.
PUT /admins/realms/{realm_id}
Replace a realm's configuration. Super admin only. Returns the updated realm.
Request body — same shape as POST /admins/realms
Response — 200 OK — updated Realm object.
DELETE /admins/realms/{realm_id}
Delete a realm and all associated data. Super admin only.
Response — 204 No Content — empty body.
GET /admins/realms
List all realms. Super admins see all realms; realm admins see only their administered realms.
Response — 200 OK
[
{
"id": "_",
"auth_params": {},
"session_max_age_seconds": 3600,
"session_max_stale_age_seconds": 3600
},
{
"id": "my-service",
...
}
]
GET /admins/userpass
List all username/password credentials across every realm. Super admin only.
Response — 200 OK — array of UserPass objects. The password_hash field is always returned as an empty string.
Admin Administration
POST /admins
Create a new Admin record. Super admins may create any admin. Realm admins may create an admin only if every realm in the new admin's realms list is one they administer.
Request body
{
"id": "bob",
"realms": ["my-service"],
"userpass": "bob",
"jwt": null,
"fido2": null,
"digital_credentials": null,
"client_certificate": null,
"totp_enabled": false,
"totp_secret": null,
"totp_auth_url": null
}
| Field | Type | Description |
|---|---|---|
id | String | Unique user identifier |
realms | String[] | Realms this user administers. Use ["_"] for super admin. |
userpass | String | null | Username key referencing the userpass credential table |
jwt | String | null | JWT subject identifier |
fido2 | String | null | FIDO2 identifier (future) |
digital_credentials | Object | null | Key-value map of digital credential identifiers (future) |
client_certificate | String | null | Client certificate identifier |
totp_enabled | bool | null | Whether TOTP is active for this user |
totp_secret | String | null | Base32-encoded TOTP secret (read-only via API) |
totp_auth_url | String | null | otpauth:// URL for QR code enrollment (read-only) |
Response — 201 Created — created Admin object.
GET /admins/{admin_id}
Retrieve an admin by ID.
Response — 200 OK — Admin object.
Response — 404 Not Found — admin does not exist.
PUT /admins/{admin_id}
Replace an admin record. Returns the updated admin.
Request body — same shape as POST /admins
Response — 200 OK — updated Admin object.
DELETE /admins/{admin_id}
Delete an admin record.
Response — 204 No Content — empty body.
GET /admins
List all admins. Super admin only.
Response — 200 OK — array of Admin objects.
PUT /admins/{admin_id}/realms/{realm_id}
Add a realm to an admin's realms list.
Response — 200 OK — updated Admin object.
DELETE /admins/{admin_id}/realms/{realm_id}
Remove a realm from an admin's realms list.
Response — 200 OK — updated Admin object.
Credential Management
All /realms/{realm} endpoints require a valid session from a user who administers the given realm (see authorization_and_administration.md).
POST /realms/{realm_id}/userpass
Create a username/password credential in a realm.
Request body
{
"realm": "my-service",
"username": "alice",
"password_hash": "",
"password_input": { "plaintext": "secret" },
"change_password": false,
"roles": ["CryptoOfficer"],
"extra_claims": { "as_registrant": "acme-corp" }
}
| Field | Type | Description |
|---|---|---|
realm | String | Realm ID (must match path parameter) |
username | String | Credential username |
password_hash | String | Server-computed stored password hash (a PHC string). Ignored on input — use password_input instead. Always empty in responses. |
password_input | object | absent | How to set the password: { "plaintext": "<password>" }, hashed with Argon2id by the server before storage; or { "hashed": "<PHC string>" }, stored as-is — for provisioning a credential without ever sending its plaintext to this server, and must use exactly this server's own Argon2id cost parameters (m=65536,t=3,p=4). Rejected with 400 if it doesn't parse as PHC, isn't argon2id, or its cost parameters don't match exactly. Required on create. |
change_password | bool | When true, the next login returns "ChangePassword" next step |
roles | String[] | Optional, default []. RBAC roles assigned to this user, emitted in the session JWT's roles claim. |
extra_claims | object | null | Optional. Arbitrary extra claims merged into the session JWT on username/password login, and selectively exposed via POST /certify's claims field. Rejected with 400 if it also uses a reserved claim name, or if its serialized size exceeds 4 KiB. |
Response — 201 Created — created UserPass object.
Response — 409 Conflict — a credential for this (realm, username) already exists,
including on a byte-for-byte resubmission of the same data: telling the two cases apart
would require verifying the submitted password against the stored hash on this
unrate-limited, admin-authenticated endpoint, turning it into a password-guessing oracle.
Use PUT /realms/{realm_id}/userpass/{username} to update an existing credential.
GET /realms/{realm_id}/userpass
List all credentials in a realm.
Response — 200 OK — array of UserPass objects. The password_hash field is always empty.
GET /realms/{realm_id}/userpass/{username}
Retrieve a single credential.
Response — 200 OK — UserPass object. The password_hash field is always empty.
Response — 404 Not Found — credential does not exist.
PUT /realms/{realm_id}/userpass/{username}
Update a credential (typically to change the password or set change_password/roles).
Request body — same shape as POST /realms/{realm}/userpass
Omit password_input to keep the existing password unchanged and only apply
roles/change_password.
Response — 200 OK — updated UserPass object.
DELETE /realms/{realm_id}/userpass/{username}
Delete a credential.
Response — 204 No Content — empty body.
TOTP Management
See two_factor_authentication.md for the full enrollment flow.
POST /realms/{realm_id}/totp/generate
Generate a TOTP secret for a user. The secret is not stored at this point — it is only persisted after a successful verification call.
Query parameters: realm={realm_id}
Request body
{
"username": "alice",
"issuer": "My Application"
}
Response — 200 OK
{
"secret_base32": "JBSWY3DPEHPK3PXP",
"otpauth_url": "otpauth://totp/My%20Application:alice?secret=JBSWY3DPEHPK3PXP&issuer=My%20Application&algorithm=SHA1&digits=6&period=30"
}
POST /realms/{realm_id}/totp/verify
Verify a TOTP code and enable TOTP for the user. Call this after generate to confirm the user has enrolled their authenticator app.
Query parameters: realm={realm_id}
Request body
{
"username": "alice",
"token": "482913",
"secret": "JBSWY3DPEHPK3PXP",
"issuer": "My Application"
}
Response — 200 OK — empty body. TOTP is now active for the user.
Response — 400 Bad Request — TOTP token is invalid.
DELETE /realms/{realm_id}/totp/{username}
Disable TOTP for a user.
Query parameters: realm={realm_id}
Response — 200 OK — empty body.
Common Response Codes
| Code | Meaning |
|---|---|
200 OK | Success |
400 Bad Request | Malformed request body or invalid parameter |
401 Unauthorized | Missing or invalid credentials |
403 Forbidden | Authenticated but not authorised (e.g., realm admin trying to modify another realm) |
404 Not Found | Resource does not exist |
409 Conflict | Resource already exists (duplicate ID) |
500 Internal Server Error | Unexpected server error |
Authentication for Admin Endpoints
Admin endpoints (/admins, /admins/realms, /realms) require a valid session cookie obtained by logging into the _ realm (super admin) or the target realm (realm admin).
# Log in as super admin
curl --cacert ca.cert.pem \
-X POST "https://localhost:8443/login?realm=_" \
-u "admin:password" \
-c cookies.txt
# Use the session cookie for admin calls
curl --cacert ca.cert.pem \
-b cookies.txt \
https://localhost:8443/admins/realms
See authorization_and_administration.md for the full authorization matrix.
Data Types
Realm
{
"id": "my-service",
"auth_params": {
"username_password_params": { "allow_expired_passwords": false },
"jwt_params": {
"idp_params": [
{
"jwt_issuer_uri": "https://accounts.google.com",
"jwks_uri": "https://www.googleapis.com/oauth2/v3/certs",
"jwt_audience": "my-client-id.apps.googleusercontent.com"
}
],
"smallest_refresh_interval_seconds": 300
},
"totp_params": { "algorithm": "SHA1", "step": 30 }
},
"session_max_age_seconds": 3600,
"session_max_stale_age_seconds": 1800
}
auth_params.saml_params (omitted when unset) enables SAML single sign-on; its fields are
described in SAML 2.0 single sign-on.
Admin
{
"id": "alice",
"realms": ["my-service"],
"userpass": "alice",
"jwt": null,
"fido2": null,
"digital_credentials": null,
"client_certificate": null,
"totp_enabled": false,
"totp_secret": null,
"totp_auth_url": null
}
UserPass
{
"realm": "my-service",
"username": "alice",
"password_hash": "",
"change_password": false,
"roles": ["CryptoOfficer"],
"extra_claims": { "as_registrant": "acme-corp" }
}
The
password_hashfield is always returned as an empty string from GET endpoints, andpassword_inputis never returned. Send{ "plaintext": "<password>" }or{ "hashed": "<PHC string>" }inpassword_inputon create/update — seePOST /realms/{realm_id}/userpass.
SessionData
{
"session_id": "550e8400-e29b-41d4-a716-446655440000",
"realm_id": "my-service",
"username": "alice",
"auth_scheme": "up",
"cookie_string": "eyJ…",
"max_age_seconds": 3600,
"max_stale_age_seconds": 1800,
"created_at": 1744996400
}
| Field | Description |
|---|---|
auth_scheme | "up" username/password · "jwt" JWT · "cc" client cert · "f2" FIDO2 · "dc" digital credentials · "sa" SAML |
AuthenticatedClientScheme
{ "username": "alice", "auth_scheme": "UsernamePassword" }
auth_scheme values: "UsernamePassword", "Jwt", "ClientCertificate", "Fido2", "DigitalCredentials", "Saml"
ClientClaims
The JWT payload returned by GET /whoami:
| Claim | Type | Description |
|---|---|---|
iss | String | Issuer |
sub | String | Subject (authenticated username) |
aud | String[] | Audience list |
exp | i64 | Expiration (Unix seconds) |
nbf | i64 | Not-before (Unix seconds) |
iat | i64 | Issued-at (Unix seconds) |
jti | String | JWT ID |
roles | String[] | RBAC roles (e.g. ["CryptoOfficer"]), sourced from UserPass.roles for username/password sessions and from the realm's role_attribute for SAML sessions. Absent/empty means no roles (fail-closed in OPA). Empty for all other auth schemes. |
as_as | String | Auth scheme used (up/jwt/cc/f2/dc/sa) |
as_rid | String | Realm ID |
Any keys from UserPass.extra_claims are also present as top-level claims for
username/password sessions, and the attributes mapped by the realm's attribute_claim_map
for SAML sessions.
CertificateClaims
The JWT payload returned (base64url-encoded, inside the certificate field) by
POST /certify. Deliberately a different shape from ClientClaims — no roles, no
as_*-prefixed names — and signed with a different key, so it cannot be confused with, or
substituted for, a session token.
| Claim | Type | Description |
|---|---|---|
realm_id | String | Realm the caller authenticated to |
sub | String | absent | Subject (authenticated username). Absent when the request set exclude_sub: true. |
auth_scheme | String | Auth scheme used to establish the session (up/jwt/cc/f2/dc/sa) |
verification_key | String | The certified PEM public key |
iat | i64 | Issued-at (Unix seconds) |
exp | i64 | Expiration (Unix seconds) — realm's certificate_max_age_seconds |
Any names listed in the /certify request's claims field are also present as top-level
claims, copied from the session's own extra claims.